Do you want to create an HTML table from an Excel file in Power Automate? Check out this step-by-step tutorial on, how to create an HTML Table from Excel in Power Automate flow with an example.
I will also show you, how to add some custom CSS to the HTML table to give it a rich look.
How to Create HTML Table from Excel in Power Automate
Here we will see how to extract values from Excel tables and create an HTML table using Power Automate flow.
In this example, we are going to use the below Customer Sales details Excel sheet to extract values from the Excel sheet and to create an HTML table using Power Automate flow.

Follow the below Points, To achieve it.
Make sure, the Excel sheet has been uploaded to a SharePoint document Library. Now we will create a flow to extract values from the Excel sheet and create an HTML table.
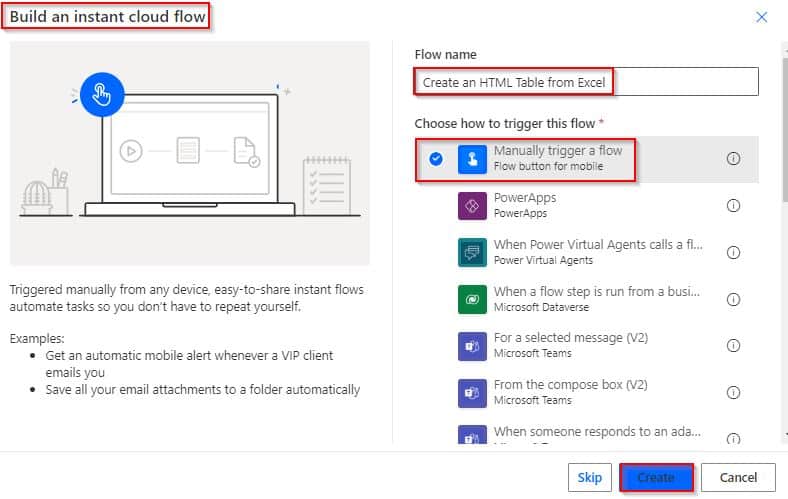
Here we will create a flow that will trigger manually that you can start by using a button click.
- Select an instant cloud flow to trigger the flow manually, Enter the flow name, and click on the create option.
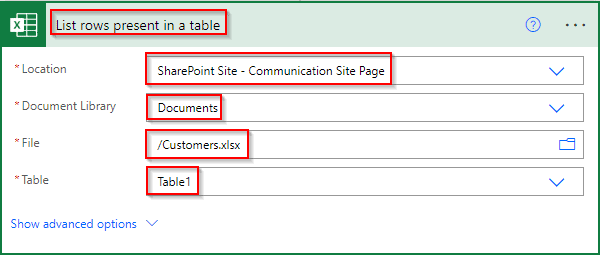
- Click on the Next step and choose List rows present in a table action from action triggers.
- Configure the required fields like Location, Document Library, file, and table as shown below:
- Location – Select the SharePoint site address
- Document Library – Choose the document library
- File – In the file section, select the Excel file
- Table – choose the Excel table value.
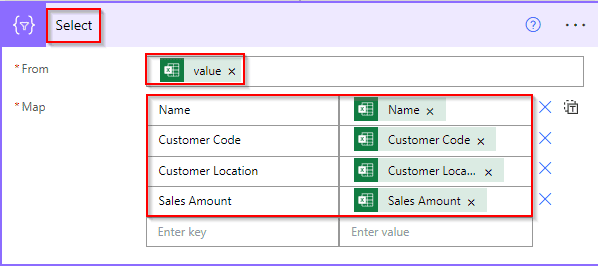
- Now click on the next step, and choose the ‘Select‘ data operation to map the key-value pair. Then in the ‘From box’ add the values from dynamic content.
- Next, we will dynamically map values by adding the key-value pair in the Map box.
- Enter the key name in the key text box and then in the value box add the dynamic content values, like below:
- In this next step, we will create an Html table and then select the ‘Create HTML table action.
- Next in the From box, select the ‘output’ from the dynamic content, and in the Columns box select Automatic.

- Add a compose action to use the style for the table and add the below CSS code.
<style>
table {
  border: 1px solid #1C6EA4;
  background-color: #EEEEEE;
  width: 100%;
  text-align: left;
  border-collapse: collapse;
}
table td, table th {
  border: 1px solid #AAAAAA;
  padding: 3px 2px;
}
table tbody td {
  font-size: 13px;
}
table thead {
  background: #34ebc0;
  border-bottom: 2px solid #444444;
}
table thead th {
  font-size: 15px;
  font-weight: bold;
  color: #FFFFFF;
  border-left: 2px solid #D0E4F5;
}
table thead th:first-child {
  border-left: none;
}
</style>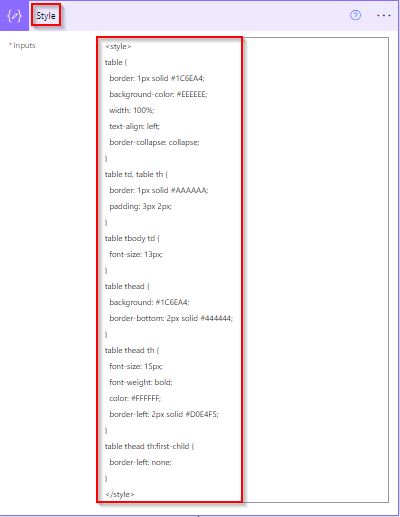
- To send an email, select Send an Email (V2) (outlook) action. In The To address pass the dynamic content user email address.
- Then in the body add outputs of the style-composed action and HTML action from dynamic content.
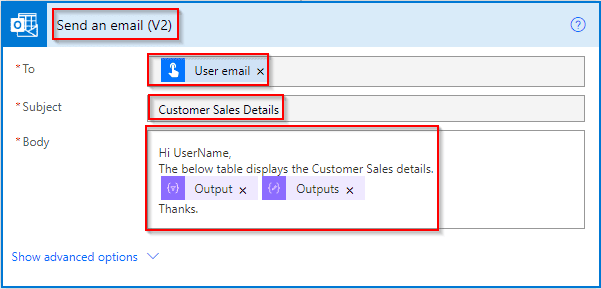
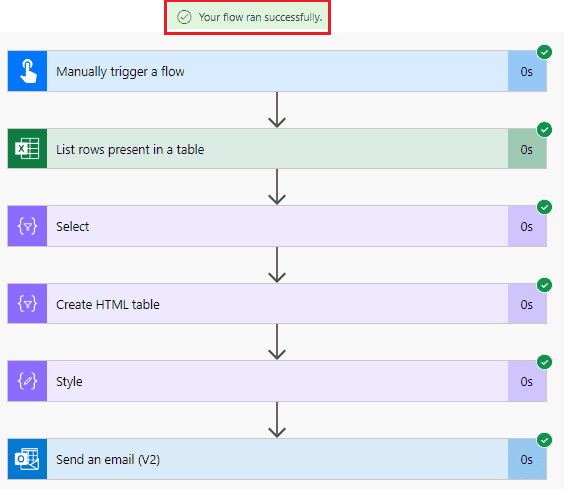
Save and test the flow, and run the flow by selecting the flow run option. Once the flow runs successfully like below:
In the Outlook email, we can see that the values have been extracted from the Excel sheet and the HTML table has been generated and displayed the Customer’s Sales information.
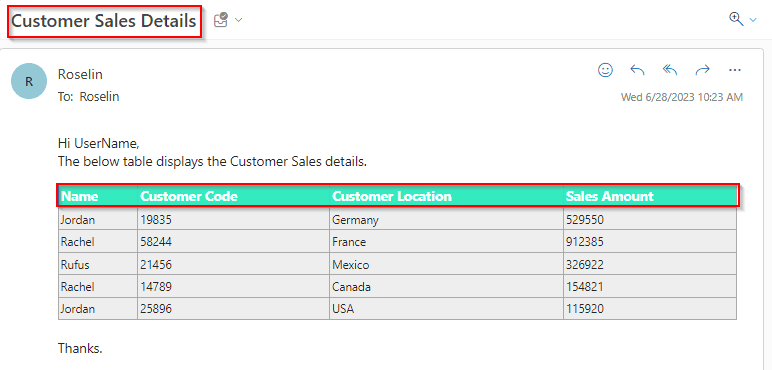
This is how to extract values from Excel tables and create an HTML table using Power Automate flow.
Conclusion
In this Microsoft Power Automate article, we saw how to Create an HTML Table from Excel using Power Automate. Also, I have explained how to use CSS in the HTML table in Power Automate to give a rich look.
You may like the following Power Automate tutorials:
- Create an HTML Table from an Array in Power Automate
- merge pdf files in Power Automate
- Create an HTML Table in Power Automate
- How to check if a file exists in the SharePoint document library in Power Automate?
- Send Email Reminders from a SharePoint List using Power Automate
I am Bijay a Microsoft MVP (10 times – My MVP Profile) in SharePoint and have more than 17 years of expertise in SharePoint Online Office 365, SharePoint subscription edition, and SharePoint 2019/2016/2013. Currently working in my own venture TSInfo Technologies a SharePoint development, consulting, and training company. I also run the popular SharePoint website EnjoySharePoint.com