Power Apps offers a variety of input controls, including Text, Label, Gallery, Data Table, and more. Out of all these controls, Import and Export are the two most important for importing and exporting data in Power Apps.
This article assists you in learning what PowerApps import control is and how to work with PowerApps export data in detail.
Also, we will see the various properties of Power Apps export import control and how to work with Power Apps import data button with various examples.
Later, we will discuss the limitations of Power Apps Export import control.
Power Apps Export Import Control
Apart from the Power Apps Export Import Package, in the app, there are two types of controls available that you can use inside your app: PowerApps Export Control and PowerApps Import Control.
Data can be exported to a local file using Power Apps Export Control and imported into another PowerApps app with Power Apps Import Control.
The most important thing you should know is that when you export data, you will create a compressed file that you can copy to another machine but cannot read in any program other than Power Apps.
Let’s say you would like to create multiple apps that share the same data but don’t want to share it with anyone outside those apps. You can use the PowerApps Export and Import controls to import and export the data.
Power Apps Export Import Control Properties
Here, we will see the key properties of the Power Apps Export and Import control.
| Property | Description |
| Align | The horizontal positioning of text for the control’s center position. |
| Color | It provides the color of text in a control. |
| DisplayMode | This control has three possible states: Edit, View, or Disabled. The Edit state permits user input, the View state displays data, and the Disabled state renders the control unusable. |
| Fill | It represents the background color of a control. |
| HoverFill | The color of a control’s background when the user hovers the mouse pointer over it. |
| Size | It specifies the font size of the text that appears on a control. |
| strikethrough | Whether a line appears through the text that appears on a control |
| Text | The keyboard navigation order regarding other controls needs to be determined. |
| Visible | It defines whether a control appears or is hidden. |
These are the key properties of the Power Apps Export and Import control.
How to Use Power Apps Export and Import Control
Let’s see how to add and use the export and import control in Power Apps. To do so, follow the below-mentioned steps. Such as:
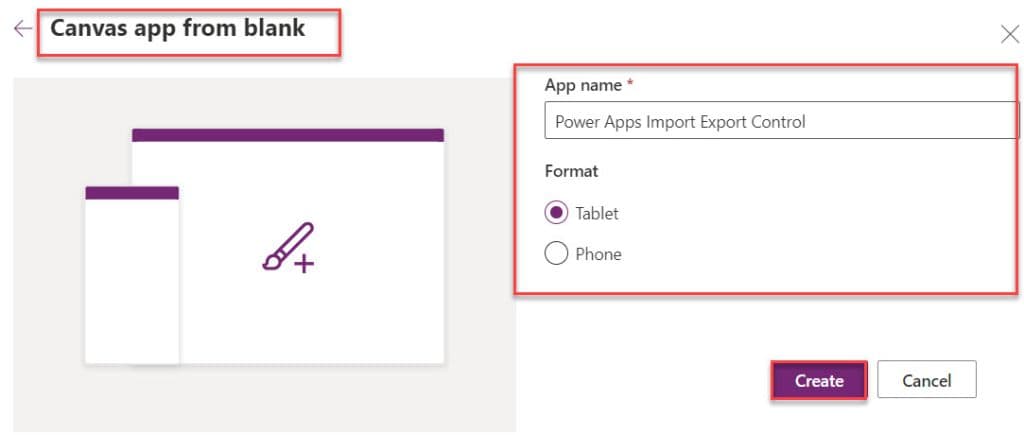
1. Open Power Apps with your respective Microsoft credentials -> Create a Blank canvas app as in the screenshot below.
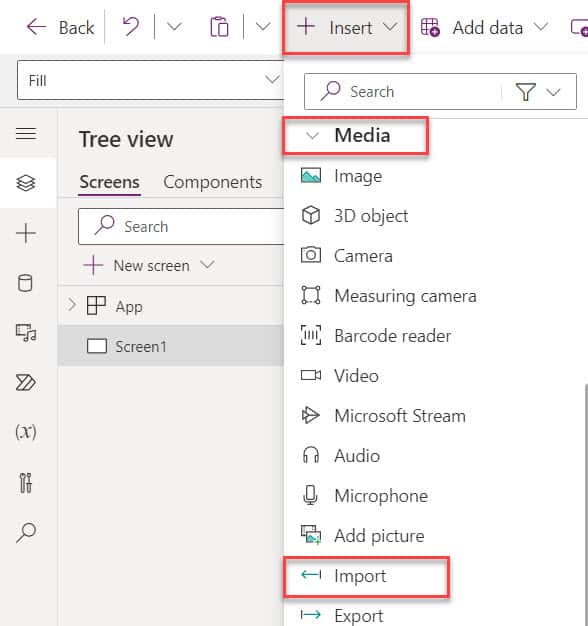
2. On the Power Apps Screen, expand the + Insert tab -> Expand Media -> Select Import as shown below.
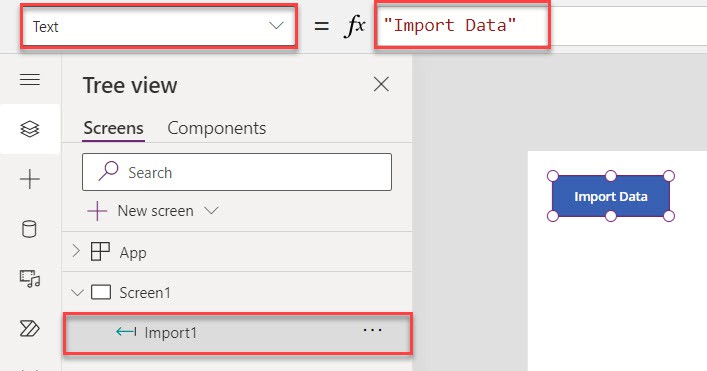
3. Once the Import control is added by default, the Text property of the Import control is “Import Data,” and the name of the control is “Import1,” as in the screenshot below.
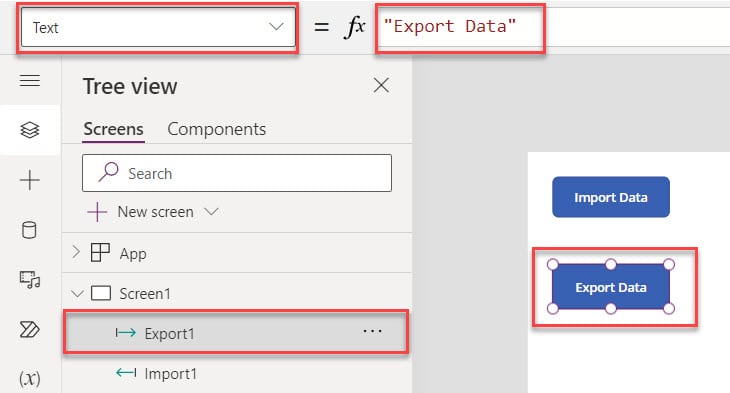
4. Similarly, insert an Export control under the Media dropdown. By default, the Text property of the Export control is “Export Data,” and the name of the control is “Export1,” like below.
Next, we will use the Power Apps export-import control with a simple example.
Example:
I have created a manual Power Apps collection named “colTravel” using different headers/columns, as shown below.
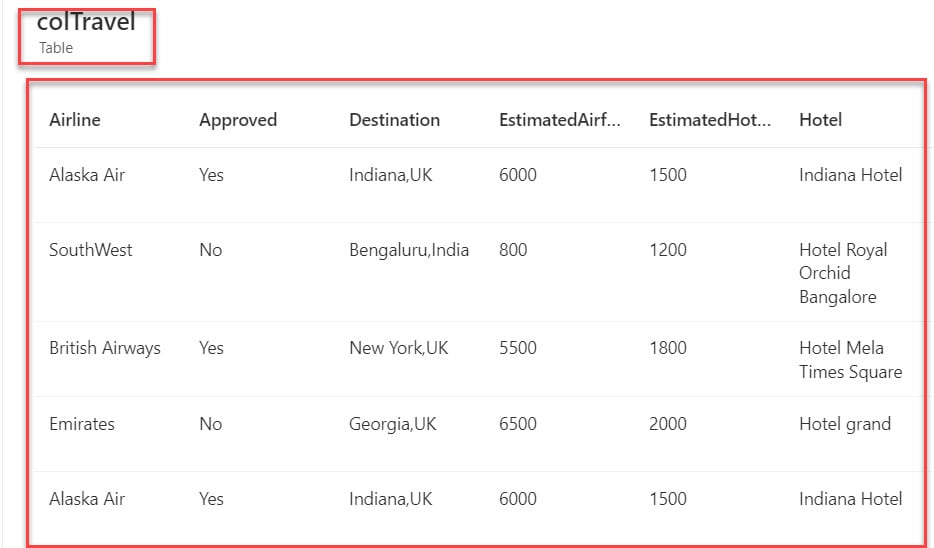
Now, I would like to export this collection to the local device and import it from the local device to the Power Apps Canvas app.
Refer to the below image:
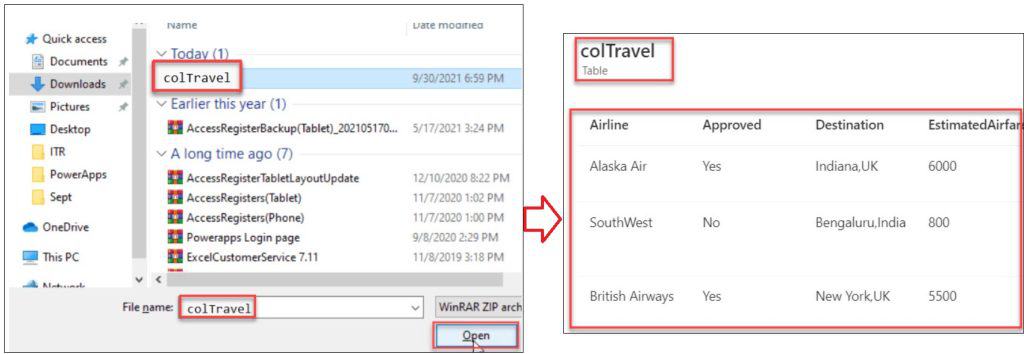
To work around this example, follow the below-mentioned steps. Such as:
1. Create the Power Apps Collection on the App’s OnStart property as:
OnStart = ClearCollect(
    colTravel,
    {
        TripTitle: "Company anniversary trip",
        Destination: "Indiana,UK",
        TravelStartDate: "9/25/2023",
        TravelEndDate: "9/31/2023",
        Airline: "Alaska Air",
        EstimatedAirfare: 6000,
        Hotel: "Indiana Hotel",
        EstimatedHotelCost: 1500,
        Requestor: "Lidia Holloway",
        Approved: "Yes"
    },
    {
        TripTitle: "Research interviews",
        Destination: "Bengaluru,India",
        TravelStartDate: "10/15/2023",
        TravelEndDate: "10/20/2023",
        Airline: "SouthWest",
        EstimatedAirfare: 800,
        Hotel: "Hotel Royal Orchid Bangalore",
        EstimatedHotelCost: 1200,
        Requestor: "Lynne Robbins",
        Approved: "No"
    },
    {
        TripTitle: "Design sprint",
        Destination: "New York,UK",
        TravelStartDate: "11/22/2023",
        TravelEndDate: "11/28/2023",
        Airline: "British Airways",
        EstimatedAirfare: 5500,
        Hotel: "Hotel Mela Times Square",
        EstimatedHotelCost: 1800,
        Requestor: "Joni Sherman",
        Approved: "Yes"
    },
    {
        TripTitle: "Sales team conference",
        Destination: "Georgia,UK",
        TravelStartDate: "12/20/2023",
        TravelEndDate: "12/25/2023",
        Airline: "Emirates",
        EstimatedAirfare: 6500,
        Hotel: "Hotel grand",
        EstimatedHotelCost: 2000,
        Requestor: "Johanna Lorenz",
        Approved: "No"
    },
    {
        TripTitle: "Event and conference travel",
        Destination: "Indiana,UK",
        TravelStartDate: "12/15/2023",
        TravelEndDate: "12/18/2023",
        Airline: "Alaska Air",
        EstimatedAirfare: 6000,
        Hotel: "Indiana Hotel",
        EstimatedHotelCost: 1500,
        Requestor: "Lidia Holloway",
        Approved: "Yes"
    },
    {
        TripTitle: "Internal meetings and visiting offices",
        Destination: "Georgia,UK",
        TravelStartDate: "12/27/2023",
        TravelEndDate: "12/30/2023",
        Airline: "Emirates",
        EstimatedAirfare: 6500,
        Hotel: "Hotel grand",
        EstimatedHotelCost: 2000,
        Requestor: "Johanna Lorenz",
        Approved: "No"
    },
    {
        TripTitle: "Company retreats",
        Destination: "Bengaluru,India",
        TravelStartDate: "1/5/2024",
        TravelEndDate: "1/11/2024",
        Airline: "SouthWest",
        EstimatedAirfare: 800,
        Hotel: "Hotel Royal Orchid Bangalore",
        EstimatedHotelCost: 1200,
        Requestor: "Lynne Robbins",
        Approved: "No"
    },
    {
        TripTitle: "Client meetings",
        Destination: "Austria,UK",
        TravelStartDate: "1/20/2024",
        TravelEndDate: "1/27/2024",
        Airline: "Japan Airlines",
        EstimatedAirfare: 7500,
        Hotel: "Hotel Rand",
        EstimatedHotelCost: 1500,
        Requestor: "Johanna Lorenz",
        Approved: "No"
    }
)
Where,
- colTravel = Power Apps Collection Name
- TripTitle, Destination, etc… = Collection Headers/Columns
- “Company anniversary trip”, “Indiana,UK”, etc… = Collection Records/Rows
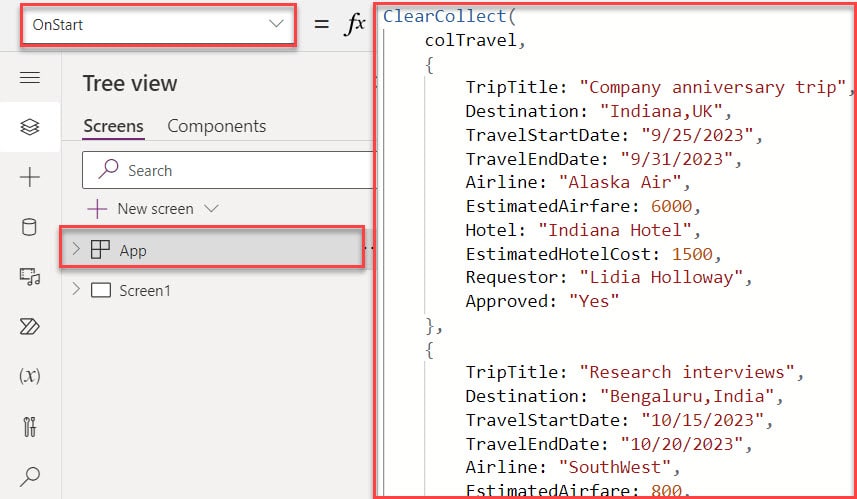
2. On the Power Apps Screen, select the Export control and set its Data property as:
Data = colTravel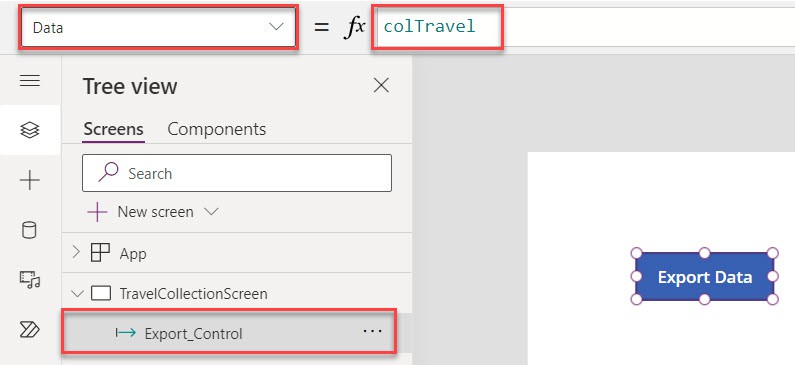
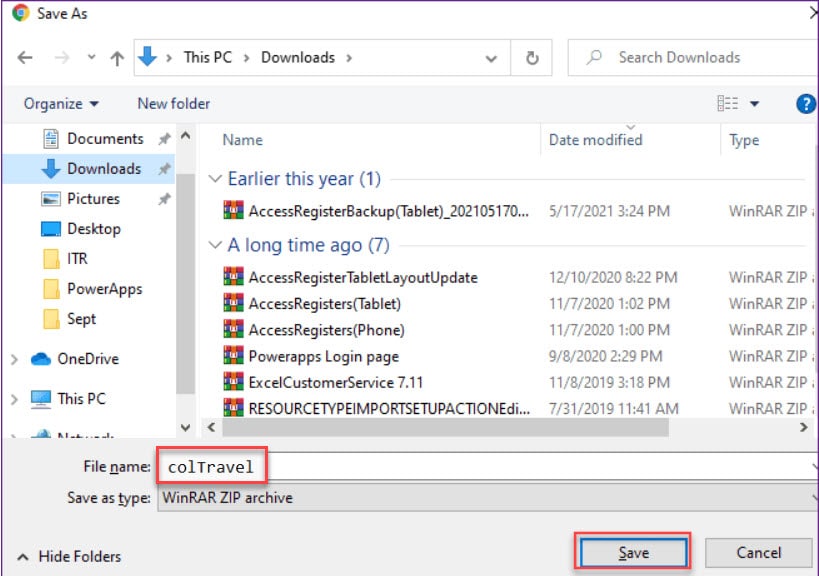
3. Once your app is ready, Save, Publish, and Preview the app. Whenever the user taps or clicks on the Export Data control, it will ask to download the file as “colTravel.Zip.“
4. Save the Zip file in your local system and press Esc to return to the default workspace.
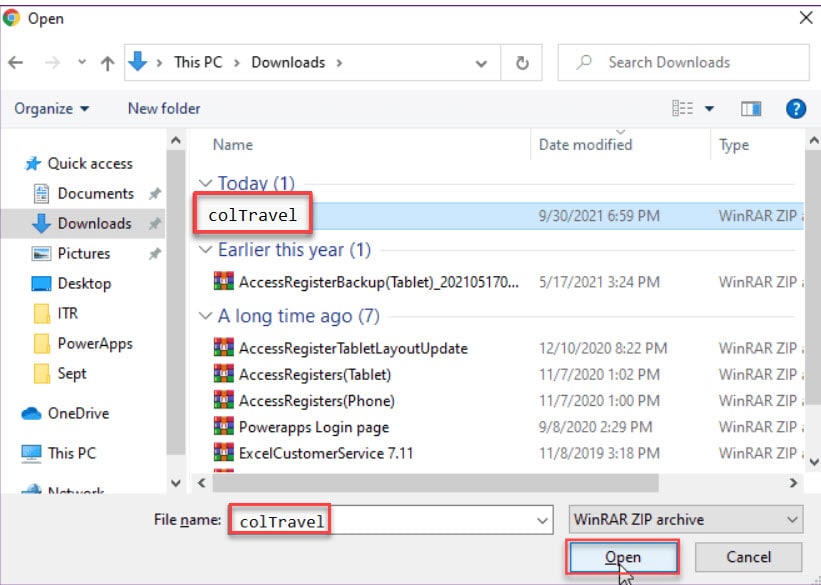
5. Next, insert an Import control on the Power Apps screen. By selecting this control, it will navigate to your local device, and you can choose the file as per your needs [I have selected my exported collection].
Refer to the below screenshot:
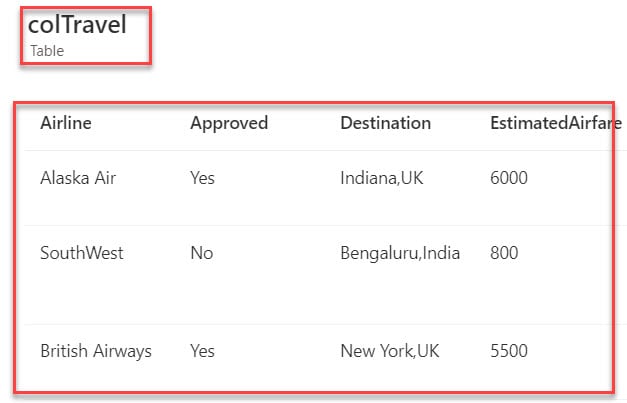
6. Once you import the file, it will be added to the Power Apps collection, as shown below.
This is how to use the Power Apps Export and Import control.
Power Apps Export Import Control Limitations
NOTE:
There is only one limitation of the PowerApps Export Import Control i.e. The export functionality can not support in web browsers.
I trust this Power Apps tutorial taught in detail information about the Power Apps Export and Import control. Also, we discussed how to powerapps export and powerapps import data with a simple example.
Moreover, you may like some more Power Apps examples:
- Migrate Power Apps from One Tenant to Another
- Power Apps Dropdown Control
- Gallery Control in Power Apps
I am Bijay a Microsoft MVP (10 times – My MVP Profile) in SharePoint and have more than 17 years of expertise in SharePoint Online Office 365, SharePoint subscription edition, and SharePoint 2019/2016/2013. Currently working in my own venture TSInfo Technologies a SharePoint development, consulting, and training company. I also run the popular SharePoint website EnjoySharePoint.com