When working with Power Apps, we usually need to create a collection to store and manipulate data within the app temporarily.
In this Power Apps tutorial, I will explain everything about the Power Apps Collection, like what is a collection in Power Apps and its syntaxes. Including:
- How to create collection in Power Apps
- Power Apps create collection from table
Collection in Power Apps
A Collection is a group of items or an Array. A PowerApps Collection is an array that helps store data in PowerApps memory. Later, you can use this stored data in many ways.
Additionally, data from any data source—such as an Excel spreadsheet or a SharePoint Online list—can be saved in a Power Apps Collection.
By default, 500 rows are the maximum number that can be imported into a collection simultaneously. You can increase the delegation limit to 2,000 by increasing the delegation limit.
You can create a PowerApps Collection on the App’s OnStart property so that the code will run each time the app loads. You can also use a PowerApps Button control (on the Button’s OnSelect property).
Collection Syntax in Power Apps
To create a Power Apps Collection, follow the syntaxes below:
Collect Function in Power Apps
The Power Apps Collect function creates new records in the collection or updates existing collection records repeatedly with the same names.
Collect(CollectionName, record(s))Where,
- Collect = Power Apps Collect function helps add records to a data source
- CollectionName = You need to specify a collection name while creating the Powerapps Collection
- record(s) = The Record we can take as a single value, an item, or a table.
ClearCollect Function in Power Apps
The Power Apps ClearCollect function creates a new collection, adds data from the Data Source or other collections, and clears the existing data from the collection.
ClearCollect(CollectionName, record(s))Where,
- ClearCollect = The Power Apps ClearCollect function deletes all the records from a collection and then adds a different set of records to the same collection.
Create Collection Power Apps [Manually]
Suppose you want to store the list of book records in the Power Apps collection; create this collection on the App’s OnStart property using the Collect function.
To create a collection in Power Apps, follow the instructions below:
1. On the Power Apps Screen -> Select the App object [From the left navigation] and set its OnStart property to the code below.
OnStart = Collect(
    BookCollection,
    {
        BookName: "The Testaments",
        Author: "Margaret Atwood"
    },
    {
        BookName: "Cheque book",
        Author: "Vasdev Mohi"
    },
    {
        BookName: "The Overstory",
        Author: "Richard Powers"
    },
    {
        BookName: "Come! Let's Run",
        Author: "Ma. Subramanian"
    },
    {
        BookName: "Spare",
        Author: "J. R. Moehringer"
    }
)
Where,
- BookCollection = Collection Name
- BookName, Author = Collection Headers/Columns
- “The Testaments”, “Margaret Atwood” and so on = Collection Items/Records
NOTE:
Also, you can use the ClearCollect function instead of the Collect function. All that needs to be changed in the code above is to use the ClearCollect function instead of the Collect function.
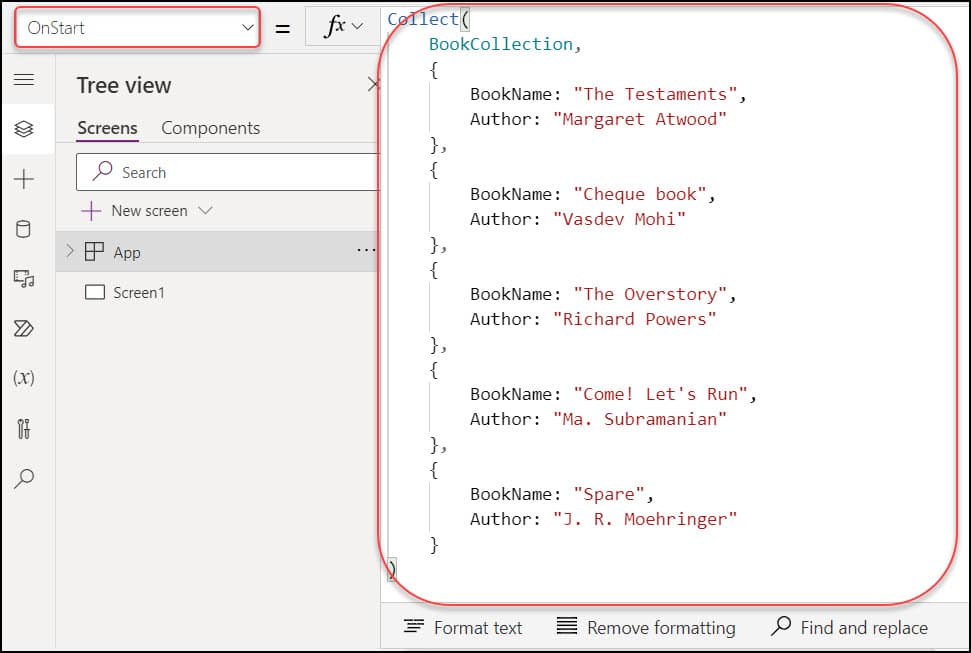
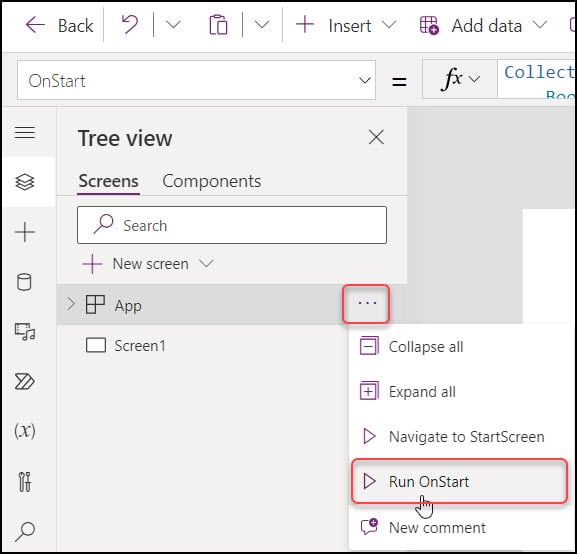
2. Save and Publish the app. Also, click on the Run OnStart button to get the created collection [App -> Ellipses … -> Run OnStart] as shown below.
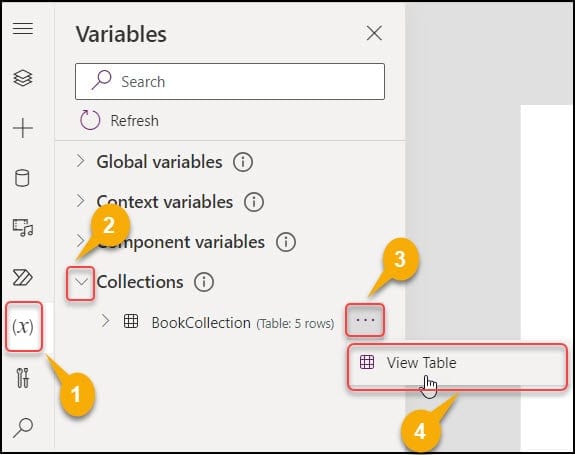
3. Now, the collection has been created. To view the result, go to Variables [x] -> Expand Collections -> Select ellipses of specific collection [BookCollection] -> View Table.
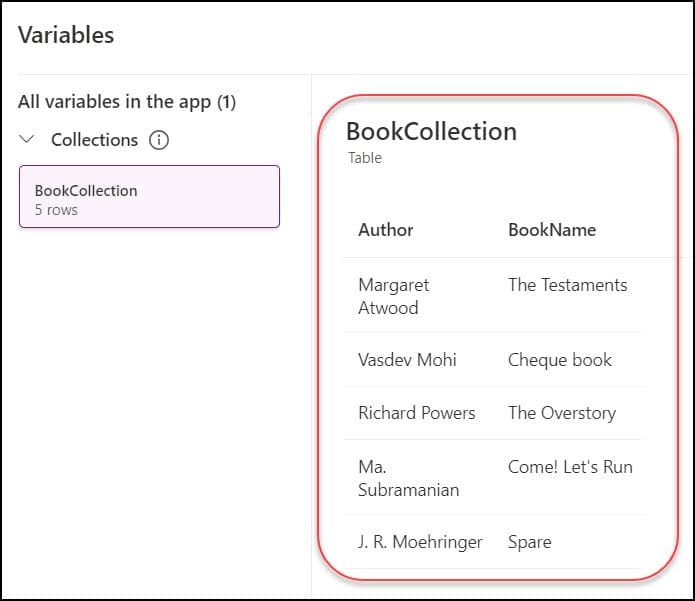
4. The specific collection will appear with all the records, like the image below.
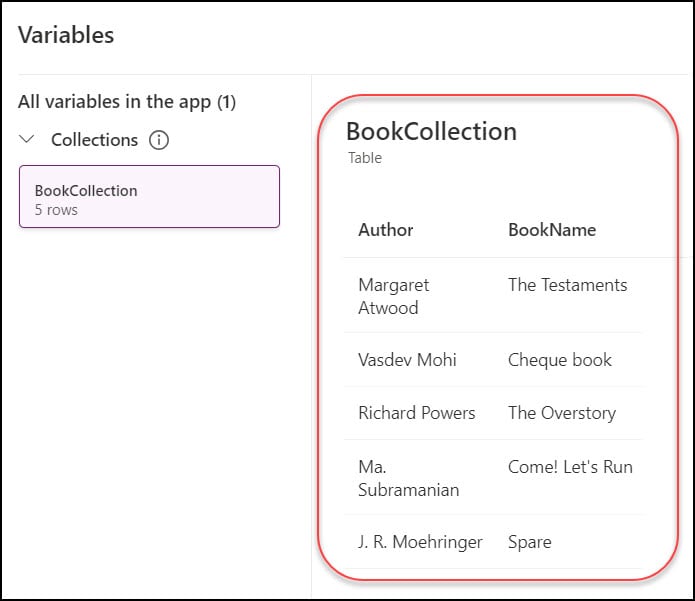
This is how to create a collection in Power Apps manually.
Power Apps Create Collection Using Button Control
Next, we will explore creating a Power Apps collection using Button control with the ClearCollect function.
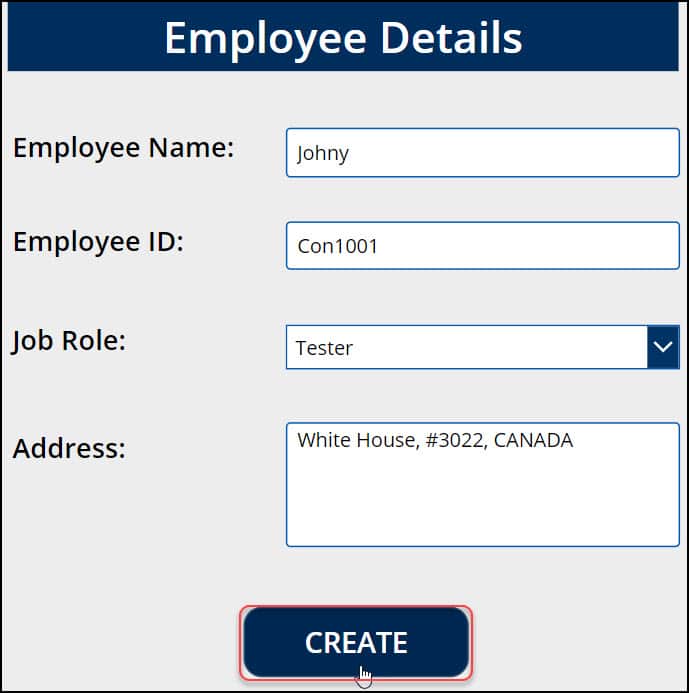
The screenshot below represents custom controls and a Button. A user will fill in the fields and click on the CREATE button.
Once he/she taps the button, the collection will be created and saved in the Power Apps Variables section.
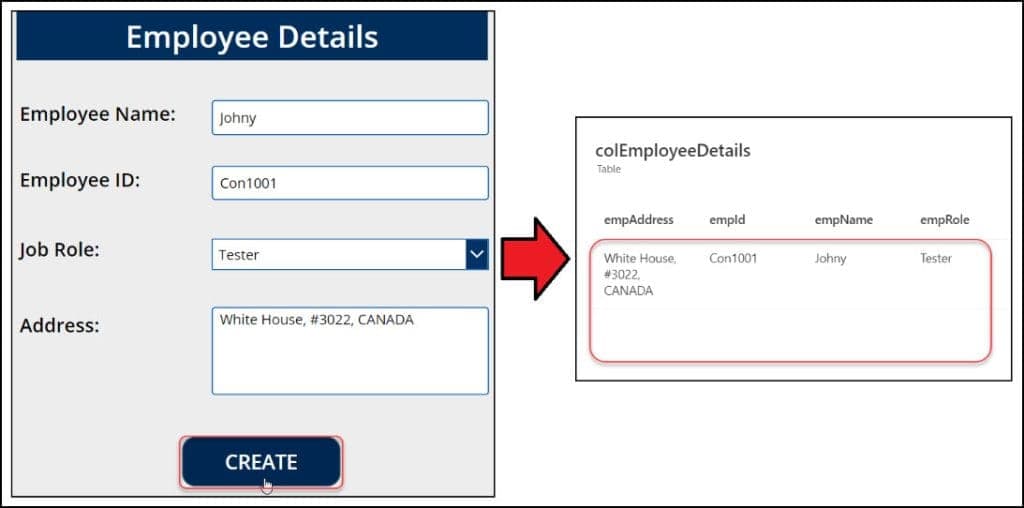
To achieve this, follow the instructions below:
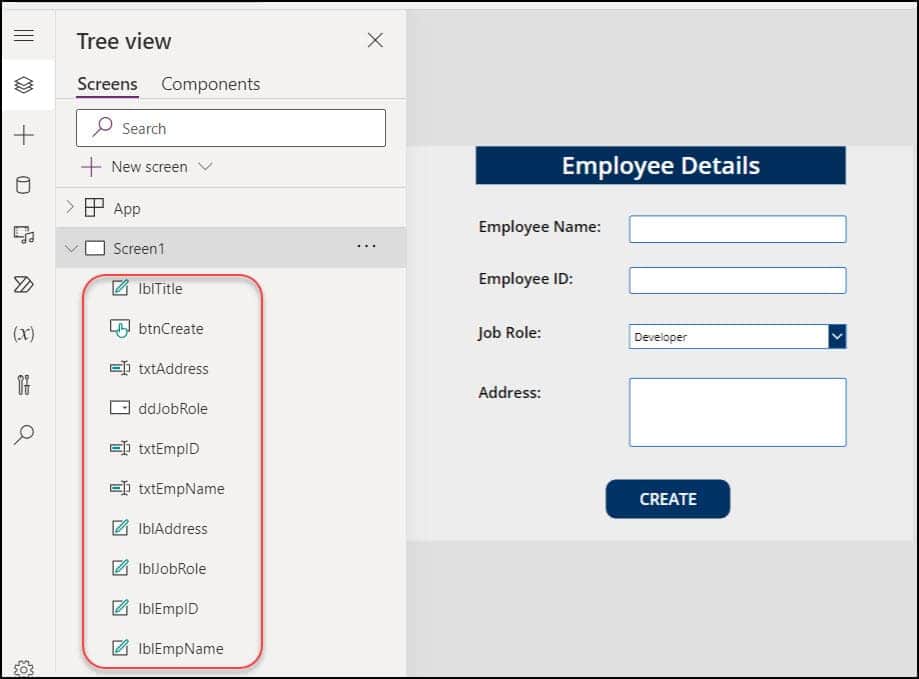
1. On the Power Apps screen, add some controls like Text labels, Text inputs, a Dropdown, and a Button. Just rename all the controls from the Tree view.
2. Rename the button as CREATE [by double tapping].
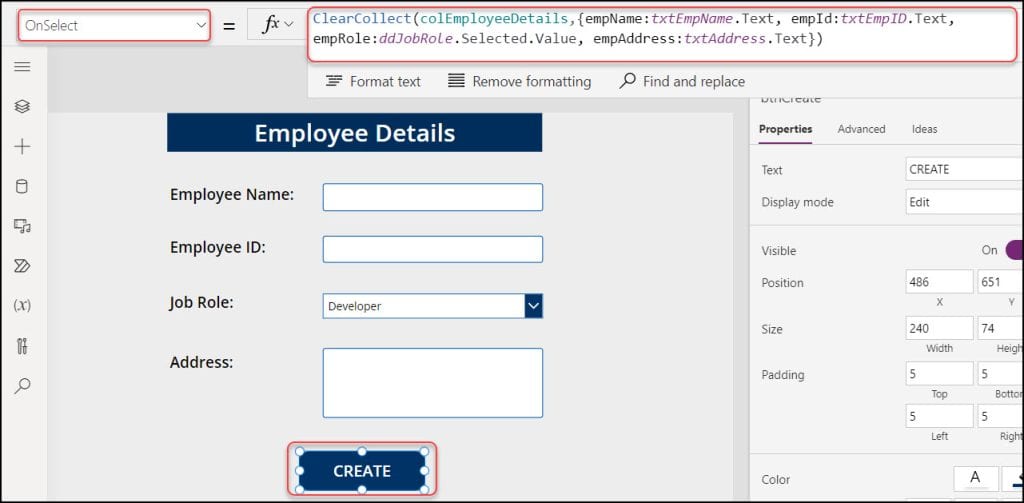
3. Select the Button input and set its OnSelect property to the code below:
OnSelect = ClearCollect(
    colEmployeeDetails,
    {
        empName: txtEmpName.Text,
        empId: txtEmpID.Text,
        empRole: ddJobRole.Selected.Value,
        empAddress: txtAddress.Text
    }
)
Where,
- colEmployeeDetails = Collection Name
- empName, empID, empRole, empAddress = Collection Headers/Columns
- tctEmpName, txtEmpID = Text input control names
- ddJobRole = Dropdown control name
- txtAddress = Text input control name [Multi-text]
Refer to the image below.
4. Save, Publish, and Preview the app. Enter all the employee details and click on the CREATE button.
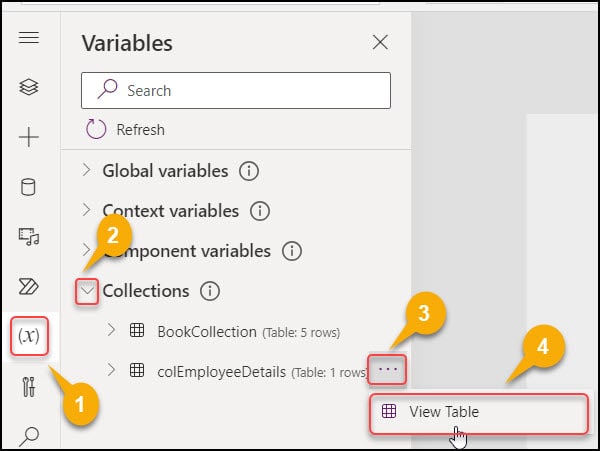
5. Now, the new employee collection has been created. To view the result, go back to the Power Apps screen -> Select Variables [x] -> Expand Collections -> Select ellipses of the specific collection [colEmployeeDetails] -> View Table.
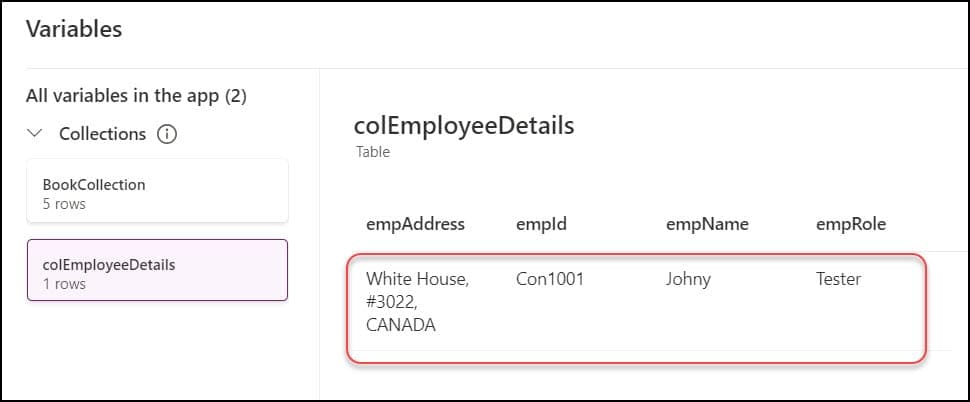
6. The new item has been displayed in the collection, like the image below.
Power Apps Create Collection from Table
Finally, you can also create a collection from the table. That means you can connect the data source [SharePoint list, Excel table, SQL Server table, etc.] to the collection using the ClearCollect function.
For more information, you can follow this Post-> Create a Collection in Power Apps from a SharePoint List.
I hope you got the details about the Power Apps Collection, like what it means by Power Apps Collection and its syntaxes.
Then, we learned how to create a collection in Power Apps with different examples and how to create a Power Apps collection from the table.
Moreover, you may like:
- Power Apps Collection Distinct Filter
- Add Image to a Power Apps Collection
- Create Empty Collection in Power Apps
- Add Gallery Data to a Collection in Power Apps
I am Bijay a Microsoft MVP (10 times – My MVP Profile) in SharePoint and have more than 17 years of expertise in SharePoint Online Office 365, SharePoint subscription edition, and SharePoint 2019/2016/2013. Currently working in my own venture TSInfo Technologies a SharePoint development, consulting, and training company. I also run the popular SharePoint website EnjoySharePoint.com
Thank you Bijay for the detailed explanation.
I couldn’t find why we need a button with “OnSelect” instead of a screen with “OnVisible=”
Hello,
i have a sharepoint list wherein a column has repetitive value in string datatype
i need a collection using group by count and raw of that particular column
for example-
SAPnumber Status
234 Open
345 Close
234 Open
435 Close
654 Open
756 on-going
457 open
output in collect-
status value
open 4
close 2
ongoing 1
Please help in this request