In this Power Apps Tutorial, we will discuss how to create a PowerApps Collection from a SharePoint List.
Also, we will cover these below topics that are related to PowerApps Collection to SharePoint List:
- PowerApps create collection from SharePoint List
- PowerApps SharePoint list to collection
- PowerApps create collection from datasource
- PowerApps create collection from SharePoint list column
- PowerApps collection SharePoint list filter
- PowerApps collect SharePoint list attachments
- PowerApps collect SharePoint choice column
- PowerApps collect SharePoint list column
- PowerApps collect SharePoint list person field
- PowerApps collection SharePoint list limit
- PowerApps collect large SharePoint list
- PowerApps collection update SharePoint list
If you want to create a collection from an excel in Power Apps, check out how to create PowerApps Collection from Excel.
Create Collection from SharePoint list PowerApps
- As from my previous post i.e. PowerApps Collection create and use, you must be learned that what is a PowerApps Collection and how to create a collection in PowerApps.
- Now we will see how we can create a PowerApps Collection from SharePoint list. To achieve this, we need to follow these below basic steps:
- Create a SharePoint List and insert some records into it
- Create a new blank canvas app in PowerApps
- Connect a new or existing Sharepoint Data source and add the SharePoint list
- Insert a PowerApps Button input and apply the List Collections code
- Save and Preview the app and then tap the button
- View the SharePoint List items i.e. added into the PowerApps Collections
Syntax: Create PowerApps Collection from SharePoint List
You can refer to the below syntax to create a PowerApps collection from the SharePoint list.
Collect(CollectionName, YourListName)Where,
- Collect = This is the collection function Name that is used to create Powerapps Collections
- CollectionName = Specify a collection name
- YourListName = Provide the SharePoint List Name that contains the records that you wants to display in the Powerapps Collections
Now we will start the step by step process:
- Create a SharePoint List and insert some records into it
- At first, you need to create a SharePoint list on your SharePoint site. And also, you have to insert some new records into it.
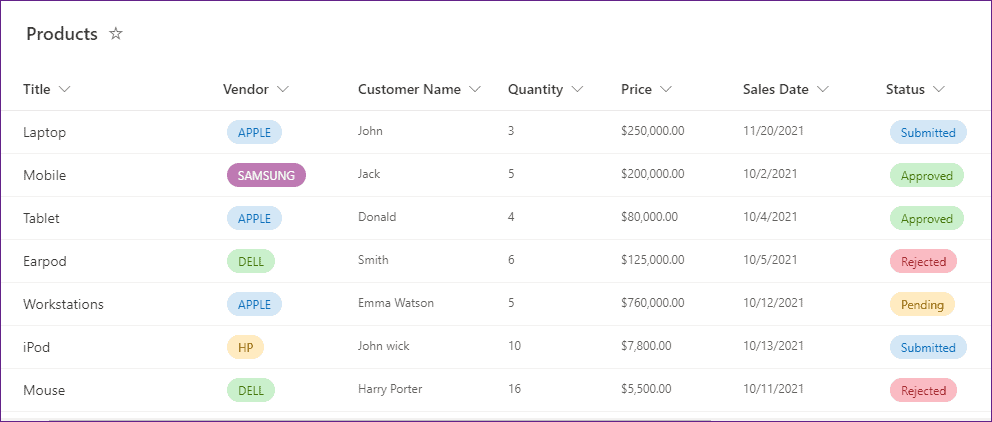
- The below screenshot represents a SharePoint List named Products. This list has some different data types of fields and as well as some records as shown below.
2. Create a new blank canvas app in PowerApps
- Sign in to the PowerApps app with your credentials.
- Go to the Apps section from the left navigation.
- Select Canvas under the + New app tab from the top of the page.
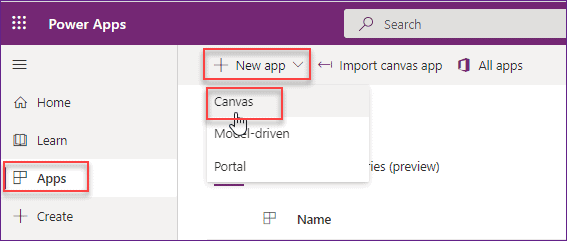
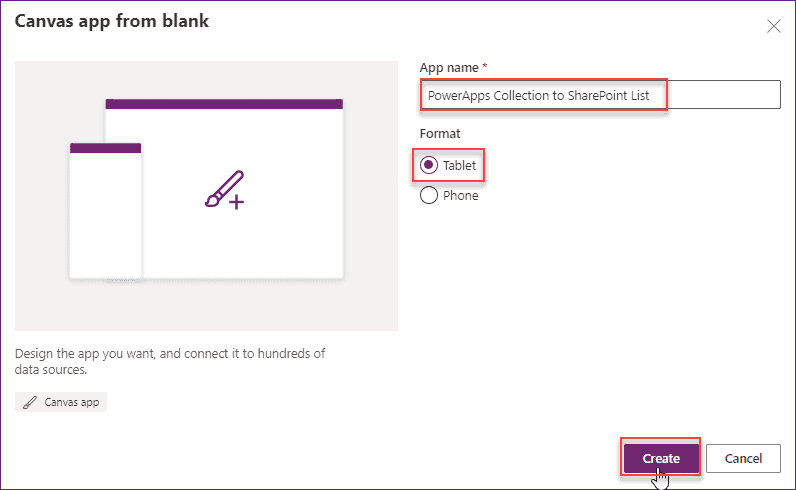
- Enter the name of the app and select the Tablet layout under the Format section. Then hit on the Create button as like the below screenshot.
3. Connect a new or existing Sharepoint Data source and add the SharePoint list
- Next, you need to connect the SharePoint List data source and then add the created SharePoint List to PowerApps.
- Go to the Data tab (from the left navigation pane) -> click on +Add data -> Search SharePoint in the search box as shown below.
- If there is an existing SharePoint connection, then you can use it directly otherwise you will create a new SharePoint connection by using the “+ Add a connection” option.
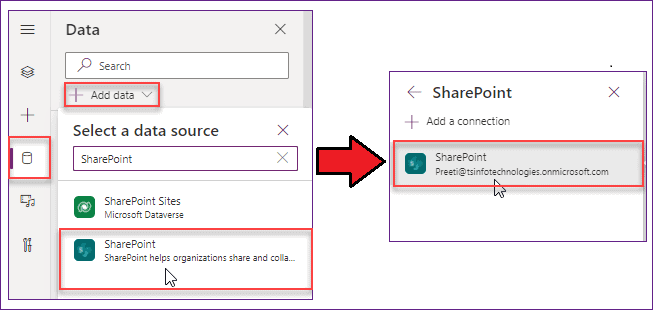
- Then, select the SharePoint site and as well as choose the SharePoint list (Products). At last click on the Connect button.
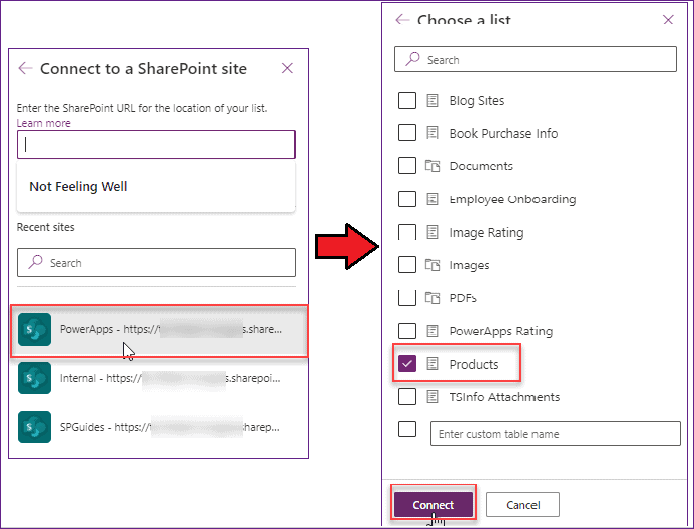
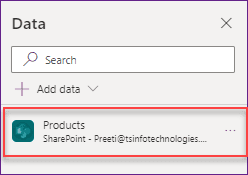
- Now the SharePoint list (Products) is ready to use in the app as shown below.
4. Insert a PowerApps Button input and apply the List Collections code
- On the PowerApps screen, insert a Button control and rename it to Add SP List Items to Collection. Also, you can provide some properties to the button like Background color, Font size, Font text etc.
- Select the button and apply the below formula on its OnSelect property as:
OnSelect = Collect(colSPListItems, Products)Where,
- colSPListItems = Name of the collection
- Products = SharePoint list name

5. Save and Preview the app and then tap the button
- Now save, publish, and preview (F5) the app. Just tap on the button. When you will press on to it, then the collection will create and add all the SharePoint list records into it.
6. View the SharePoint List items i.e. added into the PowerApps Collections
- To view the SharePoint List collection, go to the View tab -> click on Collections as like below.

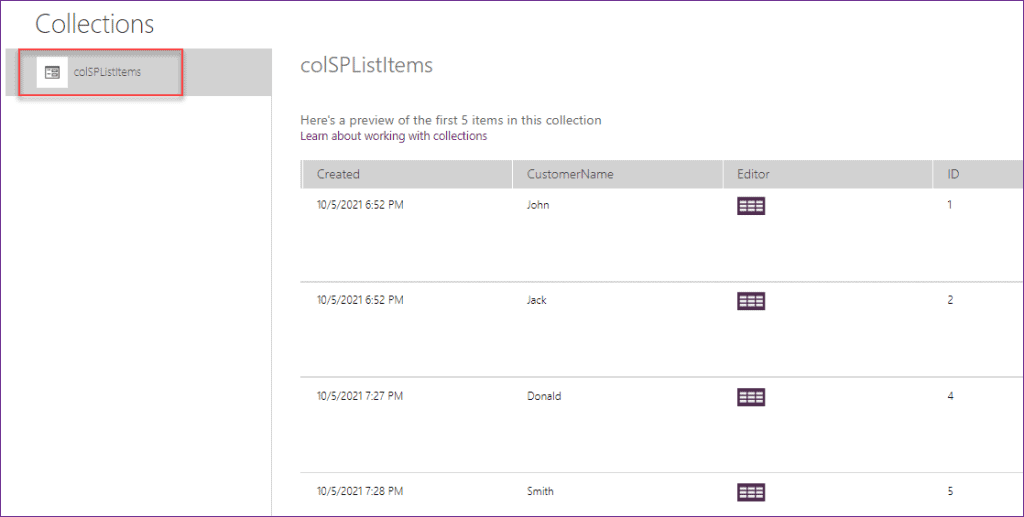
- Once you will click on the collection name (colSPListItems), you can see all the SharePoint list records inside the created collection as shown in the below screenshot.
That’s how you can create a collection from SharePoint List in PowerApps.
PowerApps create collection from datasource
To work around with the PowerApps create a collection from the data source, you can check out PowerApps create collection from datasource to get some ideas.
PowerApps create collection from SharePoint list column
Here we will see how PowerApps create a collection from the SharePoint list column.
- Suppose there is a SharePoint List and it has some various columns. Next, you would like to display some of the SharePoint List columns in a PowerApps collections. So check out the below formula to achieve it.
- Here, I have taken the same above SharePoint List (Products). Now I would like to display only the Vendor (Choice Data type) and CustomerName (Single line of text Data type) column in the PowerApps Collections.
- Add a Button control and rename it to View Column from Collections. Select the button and apply the below code on its OnSelect property as:
OnSelect = ClearCollect(
    colProducts,
    ShowColumns(
        Products,
        "Vendor",
        "CustomerName"
    )
)
Where,
- colProducts = Specify the Collection name
- ShowColumns = PowerApps ShowColumns function includes columns of a table and drops all other columns
- Products = SharePoint List Name
- “Vendor” = SharePoint List Choice column name
- “CustomerName” = SharePoint List Singe line of text column name

- Please note that the column names must be enclosed in double-quotes. Also please be aware that these functions are not delegatable, so if your list is >2000 items, you will run into problems with them when you create the collection unless you filter the list down to <2000 items.
- Now save and preview the app. Once you will open the collections (View -> Collections), then you can view the result as shown like the below screenshot.
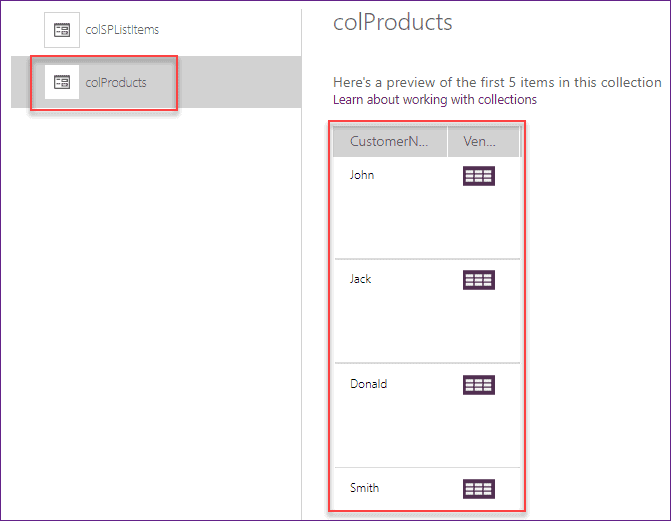
This is how we can work with PowerApps to create a collection from the SharePoint list column.
PowerApps collection SharePoint list filter
In this scenario, We will discuss how to filter a PowerApps collection from the Sharepoint List. Let’s take some different scenarios.
Scenario – 1:
- I have a SharePoint list named Blog Sites. This list has six columns with different data types:
- Title = By default this is a single line of text data type
- Site URL = This is also a Single line of text data type field
- Site Rank = Single line of text data type column
- Active Or Inactive = This is yes/no field
- Site Work = Single line of text data type column
- Created By = By default, This is a person field
Refer to the below screenshot.
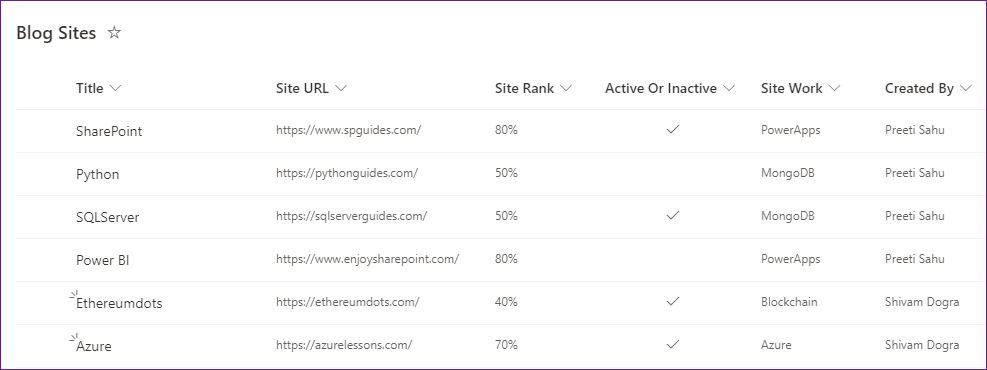
- Now I would like to create a PowerApps collection from the SharePoint List where it will filter only the records of the current logged in user. That means, suppose I am the current logged in user, then my records only visible to me. I can not see others records in the app.
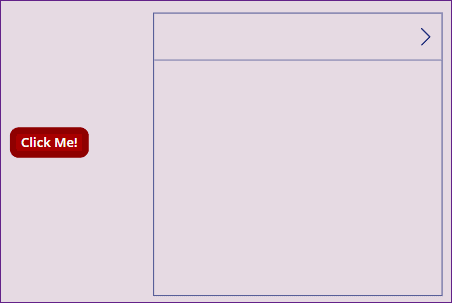
- To workaround with this, insert a Button control and as well as a Gallery control to the screen. Rename the button control to Click Me! as shown below.
- Next, select the button and set its OnSelect property to the below code:
OnSelect = ClearCollect(
    AllMyData,
    Filter(
        'Blog Sites',
        Lower('Created By'.Email) = Lower(User().Email)
    )
)
Where,
- AllMyData = Specify a Collection name
- ‘Blog Sites’ = SharePoint List name
- Lower = This function helps to convert a string of text from uppercase to lowercase. To know more details about this function, refer to this article PowerApps Lower, Upper, and Proper function
- ‘Created By’ = SharePoint list person field name. Here you need to specify .Email parameter.

- Now select the gallery control and set its Items property to the collection name i.e.
Items = AllMyData
- Save and preview the app. When you will click on the button, in the gallery, you will see all the records that have been created by you only (current logged in user) as in the below screenshot.
- Also, you can view the filter records in the created collections section as well named AllMyData.
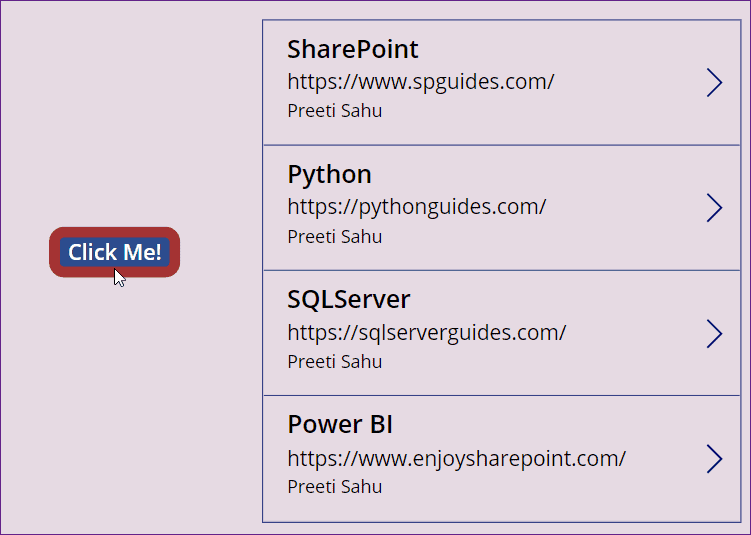
This is how to work with the PowerApps collection SharePoint list filter.
Scenario – 2:
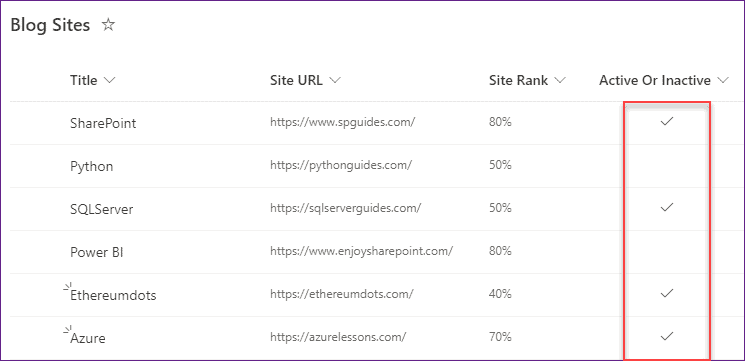
- In this scenario, I would like to filter the SharePoint list Yes/No field and the filtered records will display in a PowerApps Collections.
- In the below screenshot, When you will press the button (Hit Me), then it will filter the SharePoint boolean field records that contain only the Yes values.

- The below screenshot represents the same SharePoint List (Blog Sites) that I have used in the above scenario. Among all the fields, it also has a boolean field named Active Or Inactive. In the collection, the SharePoint list will filter and it will only display the True values.
- To do this, apply the below code on Button’s OnSelect property as:
OnSelect = Collect(
    colBoolData,
    Filter(
        'Blog Sites',
        'Active Or Inactive' = 1
    )
)
Where,
- colBoolData = Specify a collection name
- ‘Blog Sites’ = Specify the SharePoint List name
- ‘Active Or Inactive’ = SharePoint List Yes/No field name. You need to specify the numeric number as 1 to get all the true values from the SharePoint List.

- Next, insert a Data table and set the collection name on its Items property as:
Items = colBoolData
- Save and preview the app. When you will click on the button, you can see all the true values in the data table control.
To work with Power Apps Filter from SharePoint List, you can check out the tutorial on PowerApps Filter SharePoint List
PowerApps collect SharePoint list attachments
- Sometimes you may think that can PowerApps Collections have attachments? Or is there any way to view an attachment in a PowerApps Collections? Overall, Do you want to pull the SharePoint List attachments into a collection using the ClearCollect function?
- Coming to its answer is if you want to pull the SharePoint List attachments into a collection using the ClearCollect function, I afraid that there is no way to achieve your needs within PowerApps currently.
- Alternatively, We could only access the SharePoint List item attachments within the Attachments control of an Edit form. For more details about the attachment control, you can check out the PowerApps tutorial on PowerApps Email Attachment Control – How to Use
PowerApps collect SharePoint choice column
Do you want to work with the SharePoint Choice column in PowerApps Collection? Check out the below scenarios to get details.
Scenario – 1:
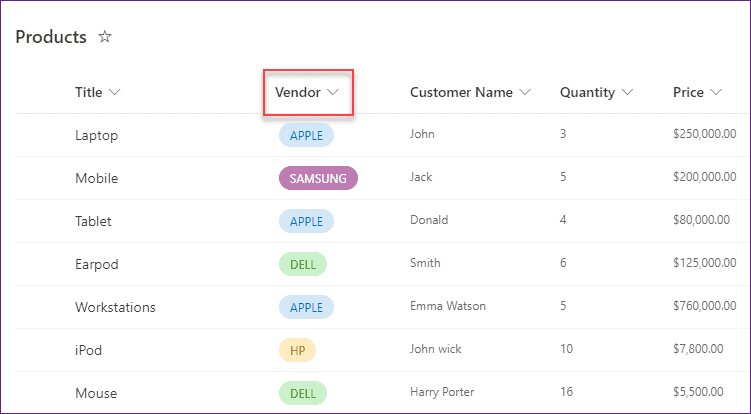
- In this scenario, I have a SharePoint list named Products. Among all the various fields, there is a Choice column called Vendor.
- This Vendor column has some choice values like APPLE, DELL, HP, SAMSUNG, etc. Now I would like to create one collection that will display only the SharePoint choice values.
- To do this, insert a button control and rename it to Get SharePoint Choices. Then, apply the below formula on its OnSelect property as:
OnSelect = ClearCollect(
    colChoices,
    Choices(Products.Vendor)
)
Where,
- colChoices = Collection Name
- Products = SharePoint List Name
- Vendor = SharePoint Choice column name

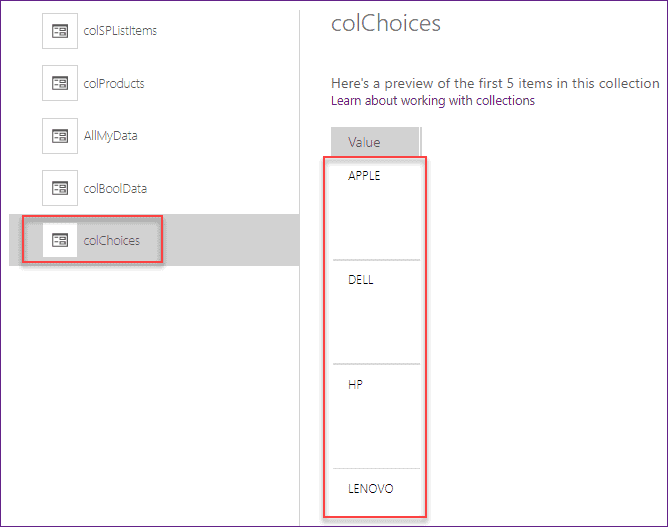
- Save and Preview (F5) the app. Tap on the button (Get SharePoint Choices) and then go to the Collections (View -> Collections). When you will open the specific collection, you can see all the SharePoint Choice values as shown below.
Scenario – 2:
- For this scenario also, I will take the same above SharePoint List (Products) and the same Choice field named Vendor.
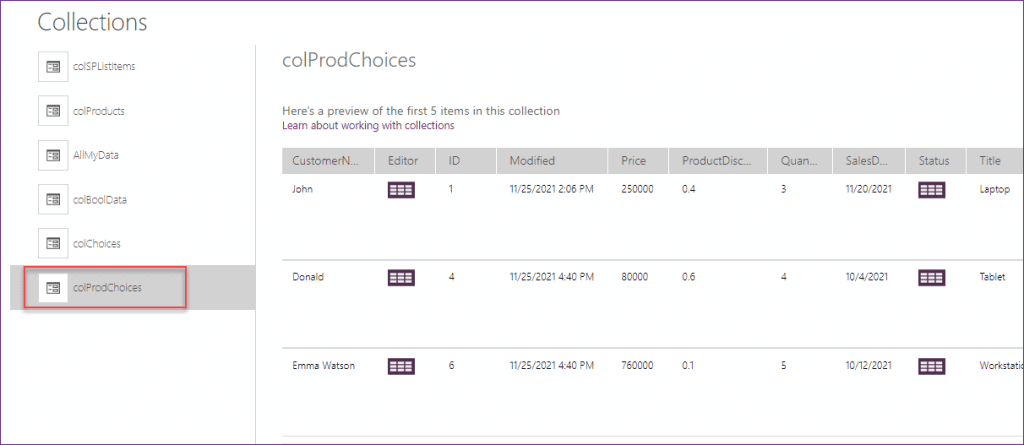
- Here I would like to filter the SharePoint choice column and display the vendor value that contains only APPLE values. All the filtered records will store in a PowerApps Collections.
- To work around with this, add a Button control and rename it to Click and Get SP Choices. Set the below code on Button’s OnSelect property as:
OnSelect = ClearCollect(
    colProdChoices,
    Filter(
        Products,
        "APPLE" in Vendor.Value
    )
)
Where,
- colProdChoices = Specify the collection name
- Products = SharePoint List name
- “APPLE” = Specify the choice value that you want to filter
- Vendor = SharePoint Choice column name. Here you need to specify .Value parameter.

- Save and Preview (F5) the app. Click on the button. Now go to created collections (colProdChoices). Here you will get all the APPLE value details as like the below screenshot.
NOTE:
If the SharePoint Choice column is not multiple-choice, then, in that case, you can try these below formulas:
- Insert a Gallery control and set its Items property to the below code:
Items = AddColumns(Products, "NewValues", Vendor.Value)- Then, create a button and set its OnSelect property to the below code:
OnSelect = ClearCollect(colProducts,Filter(Gallery1.AllItems, NewValues= "APPLE")This is how we can work with PowerApps collect SharePoint choice column.
PowerApps collect SharePoint list column
Here we will see how to work with the PowerApps collect SharePoint list column. Let us discuss a simple scenario.
- Suppose there is a SharePoint List with various types of fields. Among them, you want to view some of the fields (may be two or three) in the PowerApps Collections. That means except some fields, you do not want to view all the SharePoint List fields in the collections.
- From the below SharePoint list named TSInfo Attachments, I want only two column values i.e. Title and Attachment Types. Title is a Single line of text data type and Attachment Types is a Choice column.
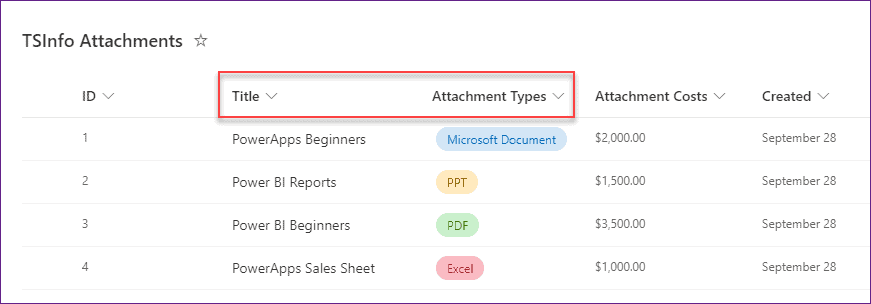
- To workaround with this, add a Button control (Click me) and set its OnSelect property to the below code:
OnSelect = ClearCollect(
    colSPValues,
    ShowColumns(
        'TSInfo Attachments',
        "Title",
        "AttachmentTypes"
    )
)
Where,
- colSPValues = Name of the collection
- TSInfo Attachments = SharePoint List name
- “Title“, “AttachmentTypes” = These are the column names that I want to view in the collections

- Now, insert a Data Table control and set its Items property to the created collection:
Items = colSPValues
- In the data table control, you need to add these both fields by using the Edit fields section. Once you added those two fields, you may face error in one field due to the SharePoint Choice field.
- For the SharePoint Choice field, you need to specify its Text property as:
Text = ThisItem.AttachmentTypes.ValueRefer to the below screenshot.

- At last, save and preview the app. When you will click on the button (Click me), then all the records will display in the data table as like the below screenshot.
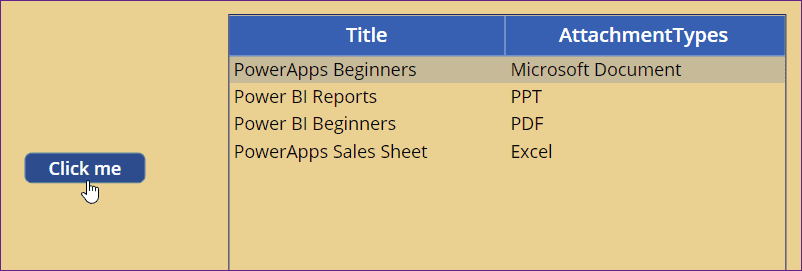
PowerApps collect SharePoint list person field
Do you ever want to collect email addresses from the Person column in Sharepoint List? It’s very simple. Check out the below scenarios.
Scenario – 1:
- There is a SharePoint List named Book Purchase Info. This list has a People picker or Person field called Book Seller. Now I would like to collect all the email address from the Sharepoint List Person field. The list has some records as shown below.
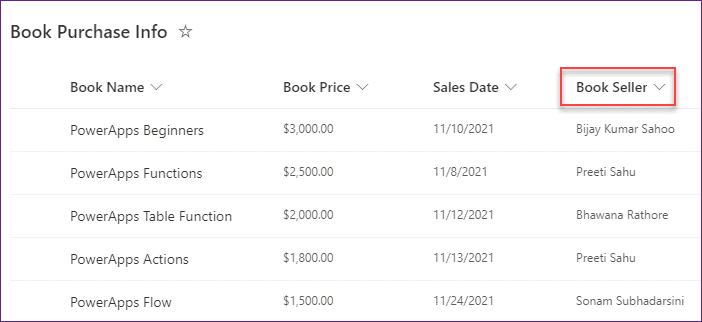
- To do this, take a Button control (Hit Me!!) and set the below code to its OnSelect property as:
OnSelect = ClearCollect(
    colEmail,
    ShowColumns(
        AddColumns(
            'Book Purchase Info',
            "Email",
            BookSeller.Email
        ),
        "Title",
        "BookPrice",
        "Email"
    )
)
Where,
- colEmail = Collection name where all the Email will store
- AddColumns = PowerApps AddColumns function helps to add a column to a table. To know more details about AddColumns function, refer to the article: PowerApps AddColumns Function with Examples
- ‘Book Purchase Info’ = SharePoint List name
- “Email” = Enter new column name where the email will store
- BookSeller = SharePoint Person field name
- “Title“, “BookPrice“, “Email” = SharePoint field names

- Save and Preview the app. Click on the button and then go to the Collections that you have created (colEmail). There you can able to view all the person emails in the Email field as like the below screenshot.
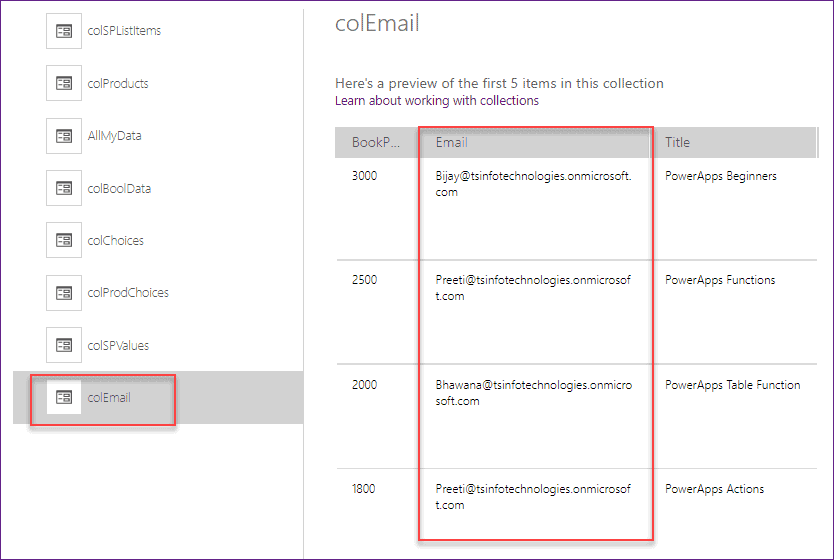
Scenario – 2:
- In the below screenshot, you can see there are multiple people present in a single SharePoint List item. Now I would like to view all the email addresses individually within a PowerApps Collection.
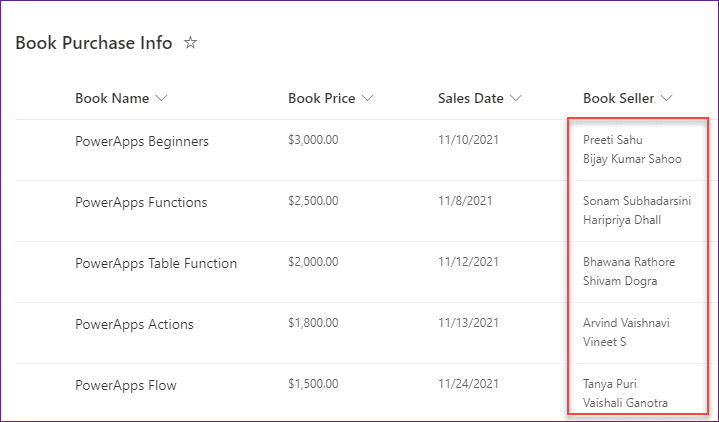
- To achieve this, insert a Button control (Click to collect SP People) and apply the below formula on its OnSelect property as:
OnSelect = ClearCollect(
    colSPPeople,
    Ungroup(
        'Book Purchase Info',
        "BookSeller"
    )
)
Where,
- colSPPeople = Specify the collection name
- Ungroup = PowerApps Ungroup function helps to break into separate records that were grouped together
- ‘Book Purchase Info’ = SharePoint list name
- “BookSeller” = SharePoint Person Field name

- Save and Preview the app. Click on the button i.e. Click to collect SP People and then go to the Collections (colSPPeople). Here, you can able to view all the email addresses separately as shown below.
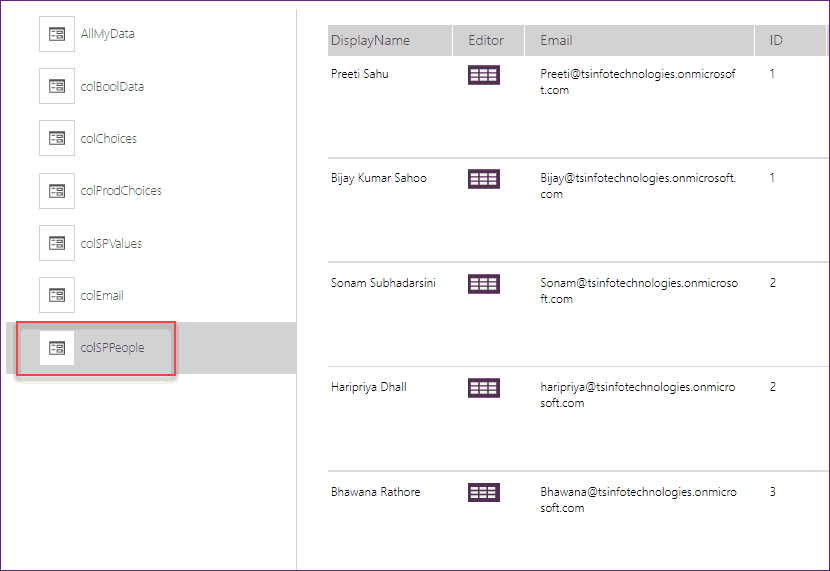
This is how to work with PowerApps collect SharePoint list person field.
PowerApps collection SharePoint list limit
- As you know, everything has a certain limit in PowerApps. Similarly, PowerApps Collection items have certain limits. If the item crosses beyond its limit, then you will see a warning issue. This issue is known as the PowerApps Delegation issue.
- Do you worry about Delegations issues in PowerApps Collection? Also, if you want to know how to overcome this issue, then follow the below link to get all the details on PowerApps Collection SharePoint list limit
PowerApps collect large SharePoint list
Suppose in case, your SharePoint list is having more than 3000 records. But unfortunately, the PowerApps collection limit is only 2000 records. Then in that case what you will do to resolve the issue? You can check out PowerApps collect a large SharePoint list to overcome this type of issue.
PowerApps collection update SharePoint list
Do you want to update the SharePoint list from the collection itself? If so, then you can refer to the article on PowerApps collection update SharePoint list
Also, if you want to update the items in the PowerApps collection, then check out a tutorial on How to Update collection item in PowerApps
Also, you may like these below PowerApps Tutorials:
- PowerApps Find Function
- PowerApps Mod Function
- PowerApps Trim Function
- Upload PowerApps Attachments to SharePoint Library Folder
- Power BI integration with PowerApps Portals
- Power Apps Azure AD Group
- Power Apps RSS Feed
- PowerApps Weather
- PowerApps Twitter Connector
- Power Apps Calculate + 13 Examples
- Build a Calculator in Power Apps
- Power Apps Slider Control
- Power Apps Rating Control – How to use
- Power Apps Gallery Pagination
- PowerApps Functions Tutorial
- Power Apps Export Import Control – How to use
- Migrate PowerApps from one tenant to another
- Power Apps PDF Viewer – Complete tutorial
In this Power Apps Tutorial, we discussed how to create a PowerApps Collection from the SharePoint List.
Also, we covered these below topics that are related to PowerApps Collection to SharePoint List:
- PowerApps create collection from SharePoint List
- PowerApps SharePoint list to collection
- PowerApps create collection from datasource
- PowerApps create collection from SharePoint list column
- PowerApps collection SharePoint list filter
- PowerApps collect SharePoint list attachments
- PowerApps collect SharePoint choice column
- PowerApps collect SharePoint list column
- PowerApps collect SharePoint list person field
- PowerApps collection SharePoint list limit
- PowerApps collect large SharePoint list
- PowerApps collection update SharePoint list
I am Bijay a Microsoft MVP (10 times – My MVP Profile) in SharePoint and have more than 17 years of expertise in SharePoint Online Office 365, SharePoint subscription edition, and SharePoint 2019/2016/2013. Currently working in my own venture TSInfo Technologies a SharePoint development, consulting, and training company. I also run the popular SharePoint website EnjoySharePoint.com
Hello, i would like to know how to make an item deleted automatically from a sharpoint list when it is removed from a collection ?
Thank you for the walkthrough. When I do this though it renames all of my columns to Field_1, Field_2, … I can’t seem to retain the column names.