One of my clients provided a requirement to create a pagination in the Power Apps application. Additionally, they want to use the Gallery control and a Dropdown control to make pagination more attractive and responsive.
This Power Apps article explains how to create pagination in PowerApps, pagination in PowerApps gallery, and pagination in Power Apps using Dropdown control with various examples.
Pagination in Power Apps
Power Apps Pagination divides content from a large data source and represents it in a limited manner. In this case, we can use the Gallery control to make pagination in Power Apps.
As we know, the Power Apps gallery control contains only up and down scrollbar navigation. So, using this pagination trick, we can resize the gallery according to our choice.
Suppose you want to view the previous or next page of records in the gallery. You can do this by using the Previous or Next control navigation. When a user clicks on the Previous or Next button, they can see their desired records. Have a look at the image below.
Pagination in Power Apps Gallery
To create the PowerApps gallery pagination, follow the simple example below.
Example:
I have a SharePoint list named “Vacation Budget” and this list contains the below fields.
| Column Name | Data Type |
| Destination | It is a default single line of text |
| Expense Name | A Single line of text |
| Category | Choice |
| Estimated Cost | Currency |
| Start Date | Date and time |
| End Date | Date and time |
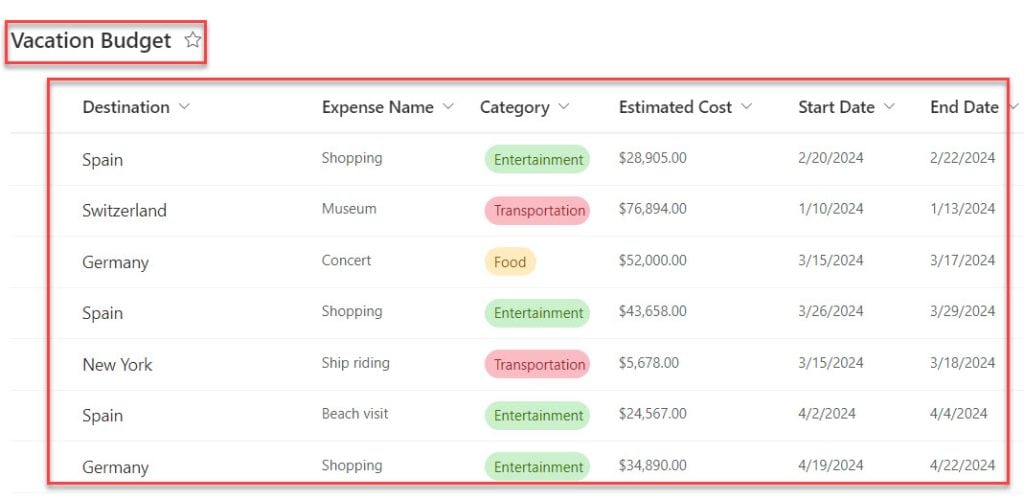
Now, I would like to display these SharePoint list records on the Power Apps gallery control with pagination. Have a look at the below screenshot for the output.
Output:
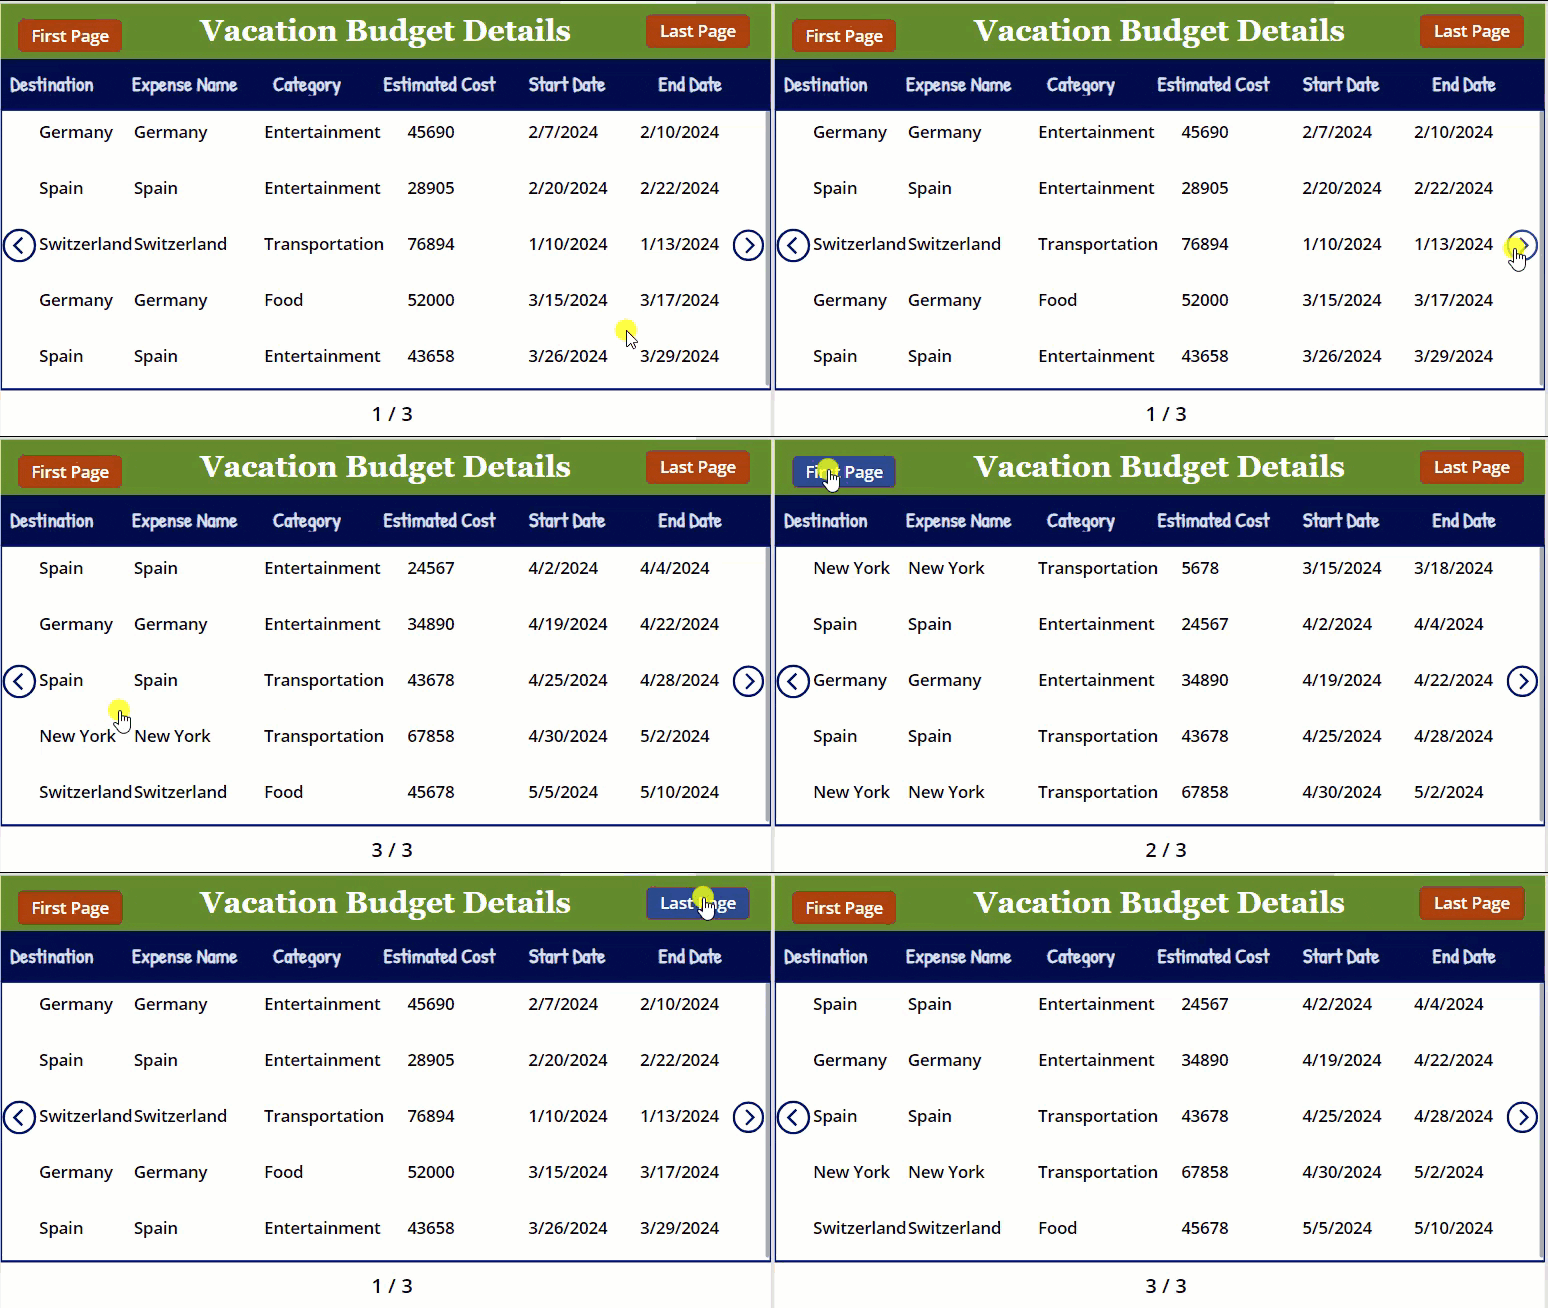
To work around this example, follow the below-mentioned steps. Such as:
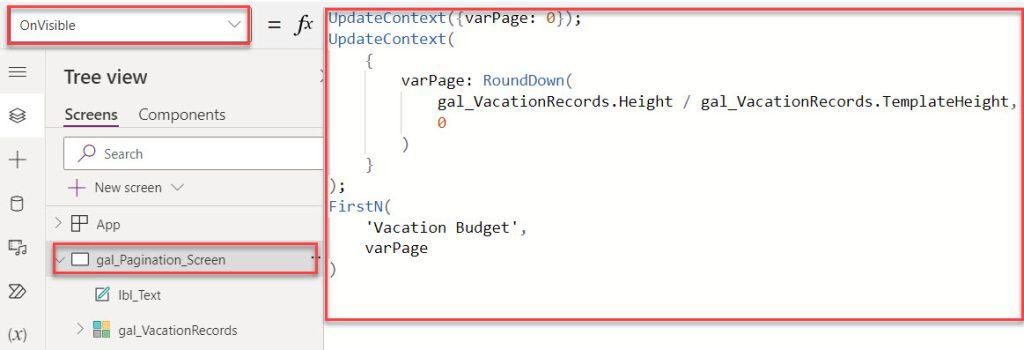
1. Open the Power Apps app, select the respective screen where you want to add pagination, and set its OnVisible property to the code below.
OnVisible = UpdateContext({varPage: 0});
UpdateContext(
    {
        varPage: RoundDown(
            gal_VacationRecords.Height / gal_VacationRecords.TemplateHeight,
            0
        )
    }
);
FirstN(
    'Vacation Budget',
    varPage
)
Where,
- varPage = Power Apps context variable name
- gal_VacationRecords = Gallery control name
- ‘Vacation Budget’ = SharePoint Online list
2. Next, select the Gallery control and set its Items property as:
Items = LastN(
    FirstN(
        'Vacation Budget',
        varPage
    ),
    RoundDown(
        gal_VacationRecords.Height / gal_VacationRecords.TemplateHeight,
        0
    )
)
3. Next comes to count the page number out of the total number of pages. For that, insert a Text label control under the gallery and set its Text property as:
Text = RoundUp(
    varPage / RoundDown(
        gal_VacationRecords.Height / gal_VacationRecords.TemplateHeight,
        0
    ),
    0
) & " / " & RoundUp(
    CountRows('Vacation Budget') / RoundDown(
        gal_VacationRecords.Height / gal_VacationRecords.TemplateHeight,
        0
    ),
    0
)
Note:
Whenever the user uses the CountRows function to get the SharePoint list records count, it will give the Delegation waring [Delegation warning. The highlighted part of this formula might not work correctly on large data sets. The “CountRows” operation is not supported by this connector.]
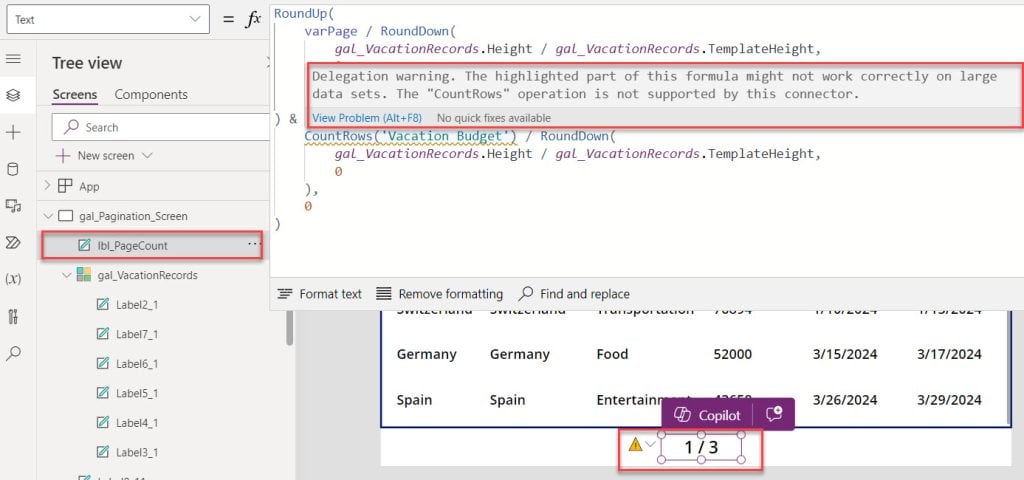
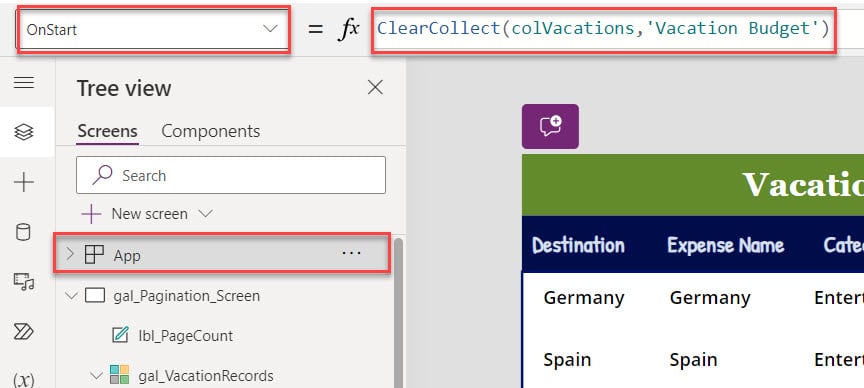
4. To resolve this issue, you can create a collection [App -> OnStart] using a SharePoint Online list, as shown below.
OnStart = ClearCollect(
    colVacations,
    'Vacation Budget'
)
Where,
- colVacations = Power Apps collection name
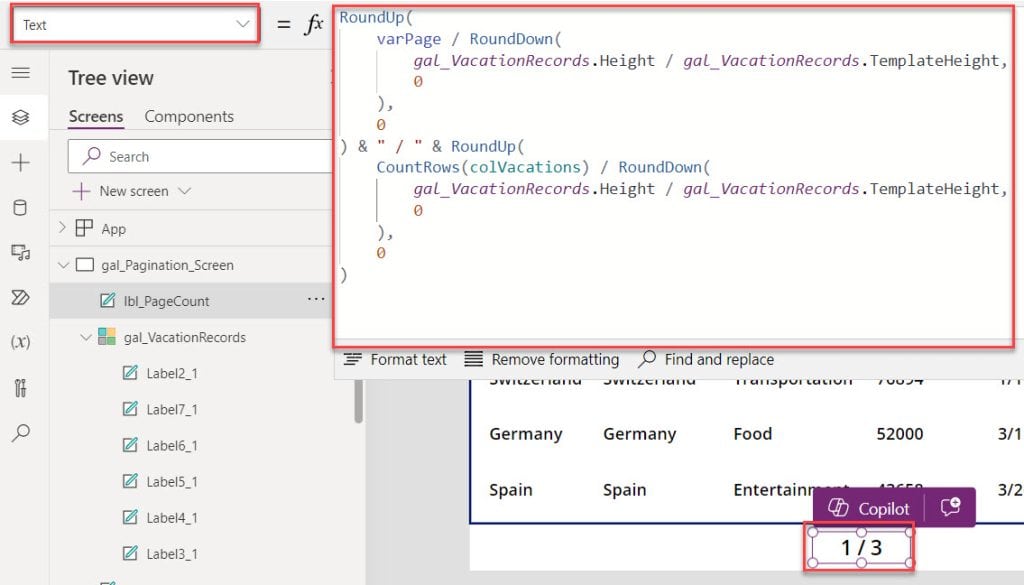
5. Now, select the Text label control and set its Text property to the code below.
Text = RoundUp(
    varPage / RoundDown(
        gal_VacationRecords.Height / gal_VacationRecords.TemplateHeight,
        0
    ),
    0
) & " / " & RoundUp(
    CountRows(colVacations) / RoundDown(
        gal_VacationRecords.Height / gal_VacationRecords.TemplateHeight,
        0
    ),
    0
)
6. Then insert a Button control [First Page] and set its OnSelect property as:
OnSelect = UpdateContext(
    {
        varPage: RoundDown(
            gal_VacationRecords.Height / gal_VacationRecords.TemplateHeight,
            0
        )
    }
);
FirstN(
    colVacations,
    varPage
)
7. In the same way, insert another Button control [Last Page] and set its OnSelect property to the code below.
OnSelect = UpdateContext({varPage: CountRows(colVacations)});
LastN(
    colVacations,
    varPage
)
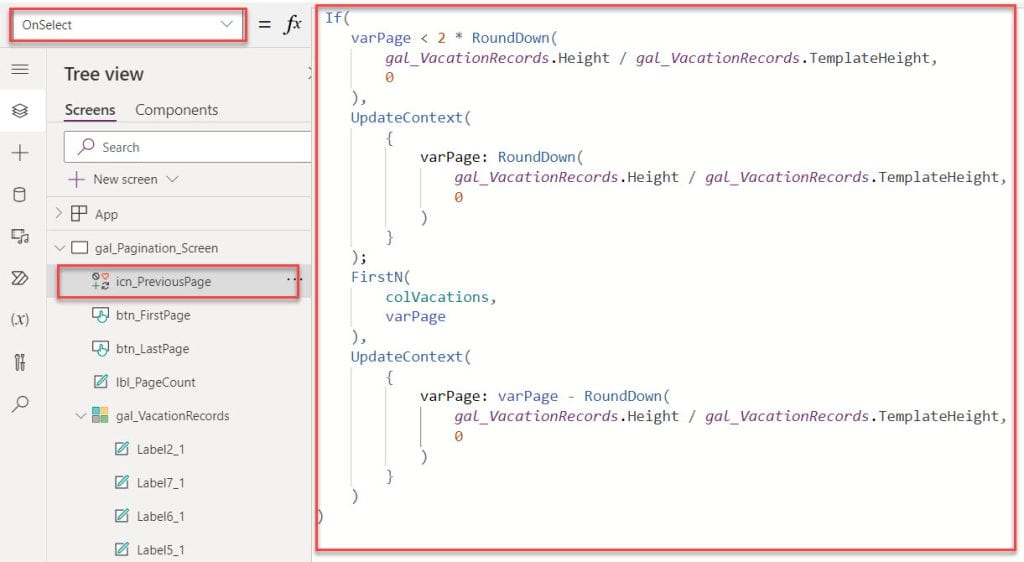
8. In the last, add the Back arrow icon(<) and set its OnSelect property to the code below.
OnSelect = If(
    varPage < 2 * RoundDown(
        gal_VacationRecords.Height / gal_VacationRecords.TemplateHeight,
        0
    ),
    UpdateContext(
        {
            varPage: RoundDown(
                gal_VacationRecords.Height / gal_VacationRecords.TemplateHeight,
                0
            )
        }
    );
    FirstN(
        colVacations,
        varPage
    ),
    UpdateContext(
        {
            varPage: varPage - RoundDown(
                gal_VacationRecords.Height / gal_VacationRecords.TemplateHeight,
                0
            )
        }
    )
)
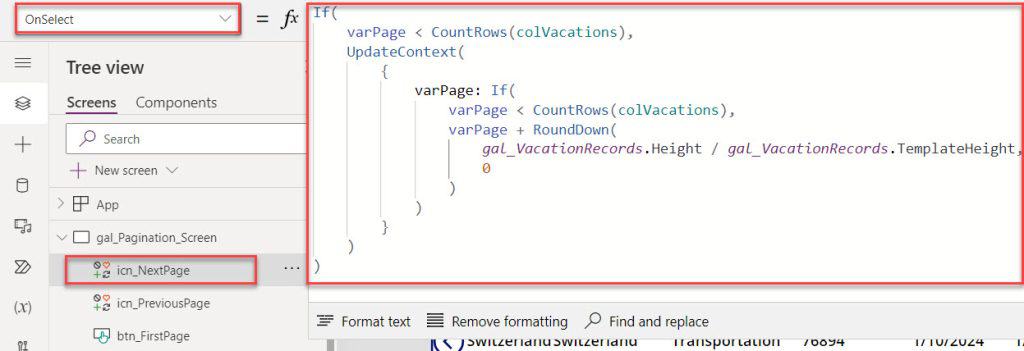
9. Likewise, insert a Next arrow icon(>) and set its OnSelect property to the code below.
OnSelect = If(
    varPage < CountRows(colVacations),
    UpdateContext(
        {
            varPage: If(
                varPage < CountRows(colVacations),
                varPage + RoundDown(
                    gal_VacationRecords.Height / gal_VacationRecords.TemplateHeight,
                    0
                )
            )
        }
    )
)
10. Once your app is ready, Save, Publish, Reload, and Preview it. Whenever the user selects the next arrow icon, the app will redirect to the next page. Similarly, if the user selects the back arrow icon, the app will redirect to the previous page.

11. In the same way, when the user selects the First Page button, it will redirect to the first page, or if the user selects the Last Page button, it will redirect to the last page, as shown below.

This way, you can work with the Power Apps gallery pagination.
Power Apps Gallery Pagination Using Dropdown
In this example, I will show you how to work with the Power Apps gallery pagination using dropdown control. To do so, follow the below steps. Such as:
1. Select the Power Apps Screen and set its OnVisible property as:
OnVisible = UpdateContext({varPageNumber:1})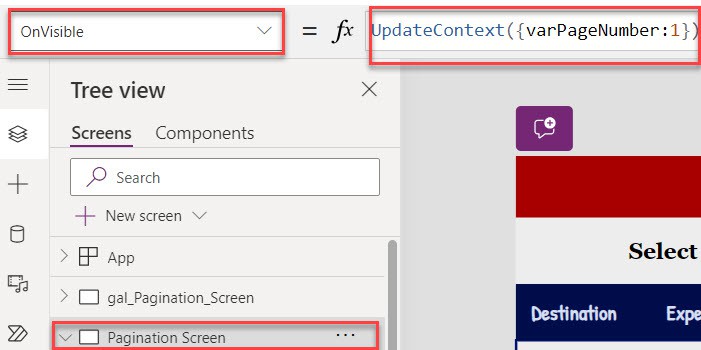
2. Next, insert a Dropdown control and set its Items property to make page size [Number of records]
Items = ["3","4","5"]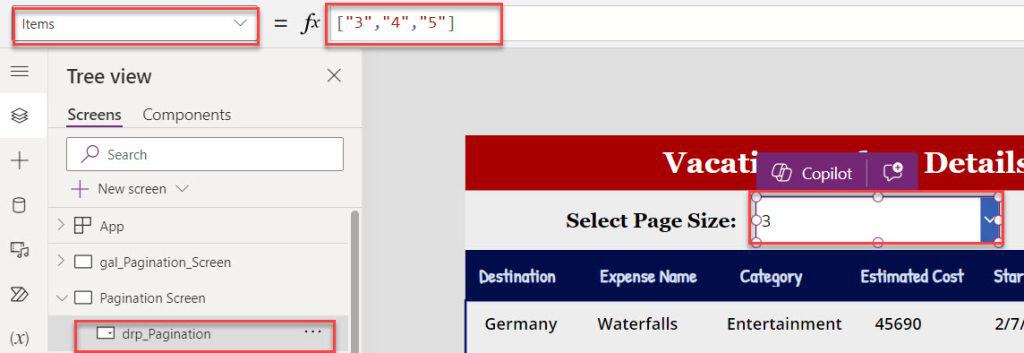
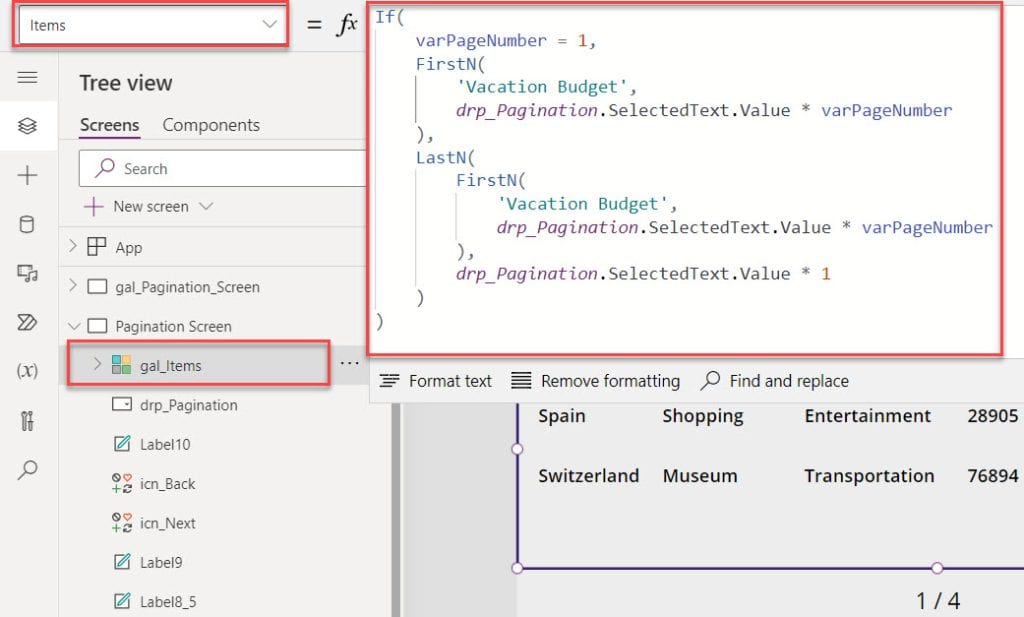
3. Now, insert a Gallery control and set its Items property to the code below.
Items = If(
    varPageNumber = 1,
    FirstN(
        'Vacation Budget',
        drp_Pagination.SelectedText.Value * varPageNumber
    ),
    LastN(
        FirstN(
            'Vacation Budget',
            drp_Pagination.SelectedText.Value * varPageNumber
        ),
        drp_Pagination.SelectedText.Value * 1
    )
)
Where,
- drp_Pagination = Power Apps dropdown control name
- ‘Vacation Budget’ = SharePoint Online list
4. Next, insert a Back arrow icon[<] and set its OnSelect property using the below code.
OnSelect = UpdateContext({varPageNumber:varPageNumber-1})
5. Similarly, select the Back arrow icon and set its DisplayMode property to the code below.
DisplayMode = If(
    varPageNumber = 1,
    DisplayMode.Disabled,
    DisplayMode.Edit
)
6. Then, insert a Next arrow icon[>] and set its OnSelect property as:
OnSelect = UpdateContext({varPageNumber: varPageNumber + 1})
7. Likewise, select the Next arrow icon and set its DisplayMode property to the code below.
DisplayMode = If(
    drp_Pagination.SelectedText.Value * varPageNumber < CountRows(colVacations),
    DisplayMode.Edit,
    DisplayMode.Disabled
)
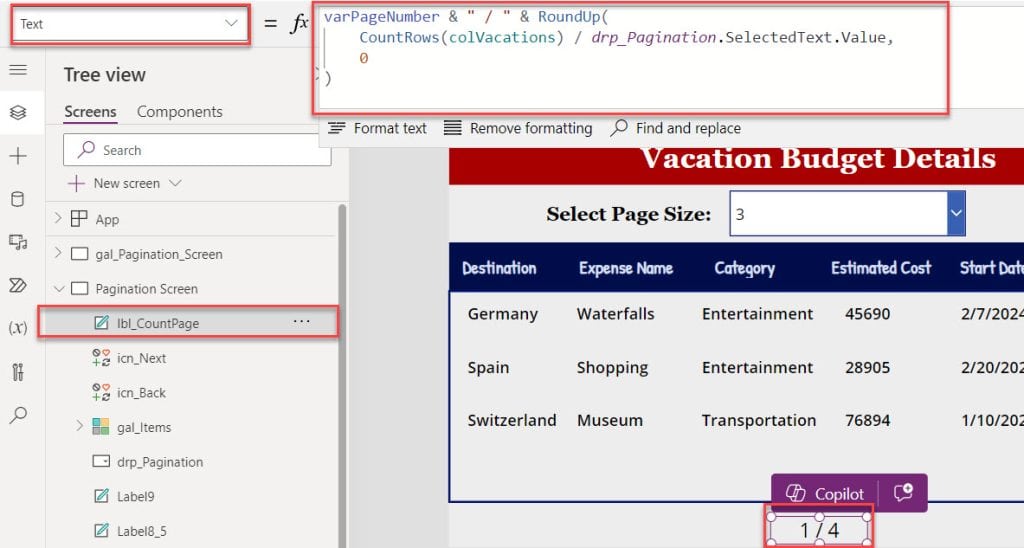
8. Finally, insert a Text label control and set its Text property to the code below.
Text = varPageNumber & " / " & RoundUp(
    CountRows(colVacations) / drp_Pagination.SelectedText.Value,
    0
)
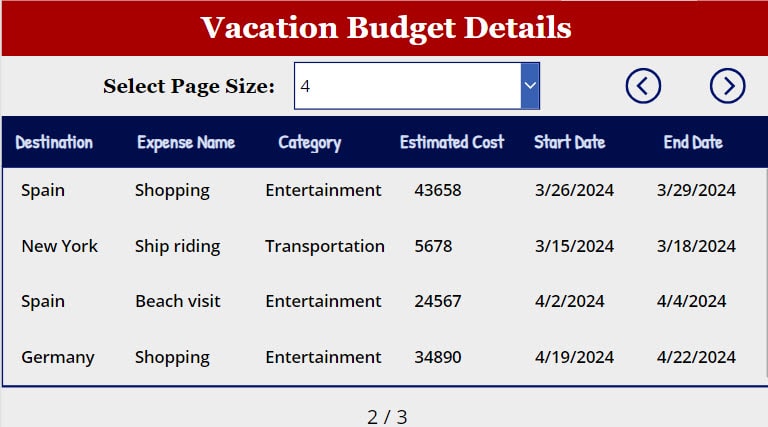
9. Once all the updates are done, Save, Publish, and Preview the app. Whenever the user selects page size from the dropdown control, the gallery will display respective records based on the selected number.
10. Also, if the user selects the next arrow icon, it will redirect to the next page. On the other hand, when the user selects the back arrow icon [On the first page, it will be in disable mode], it will redirect to the previous screen.
Have a look at the below output.
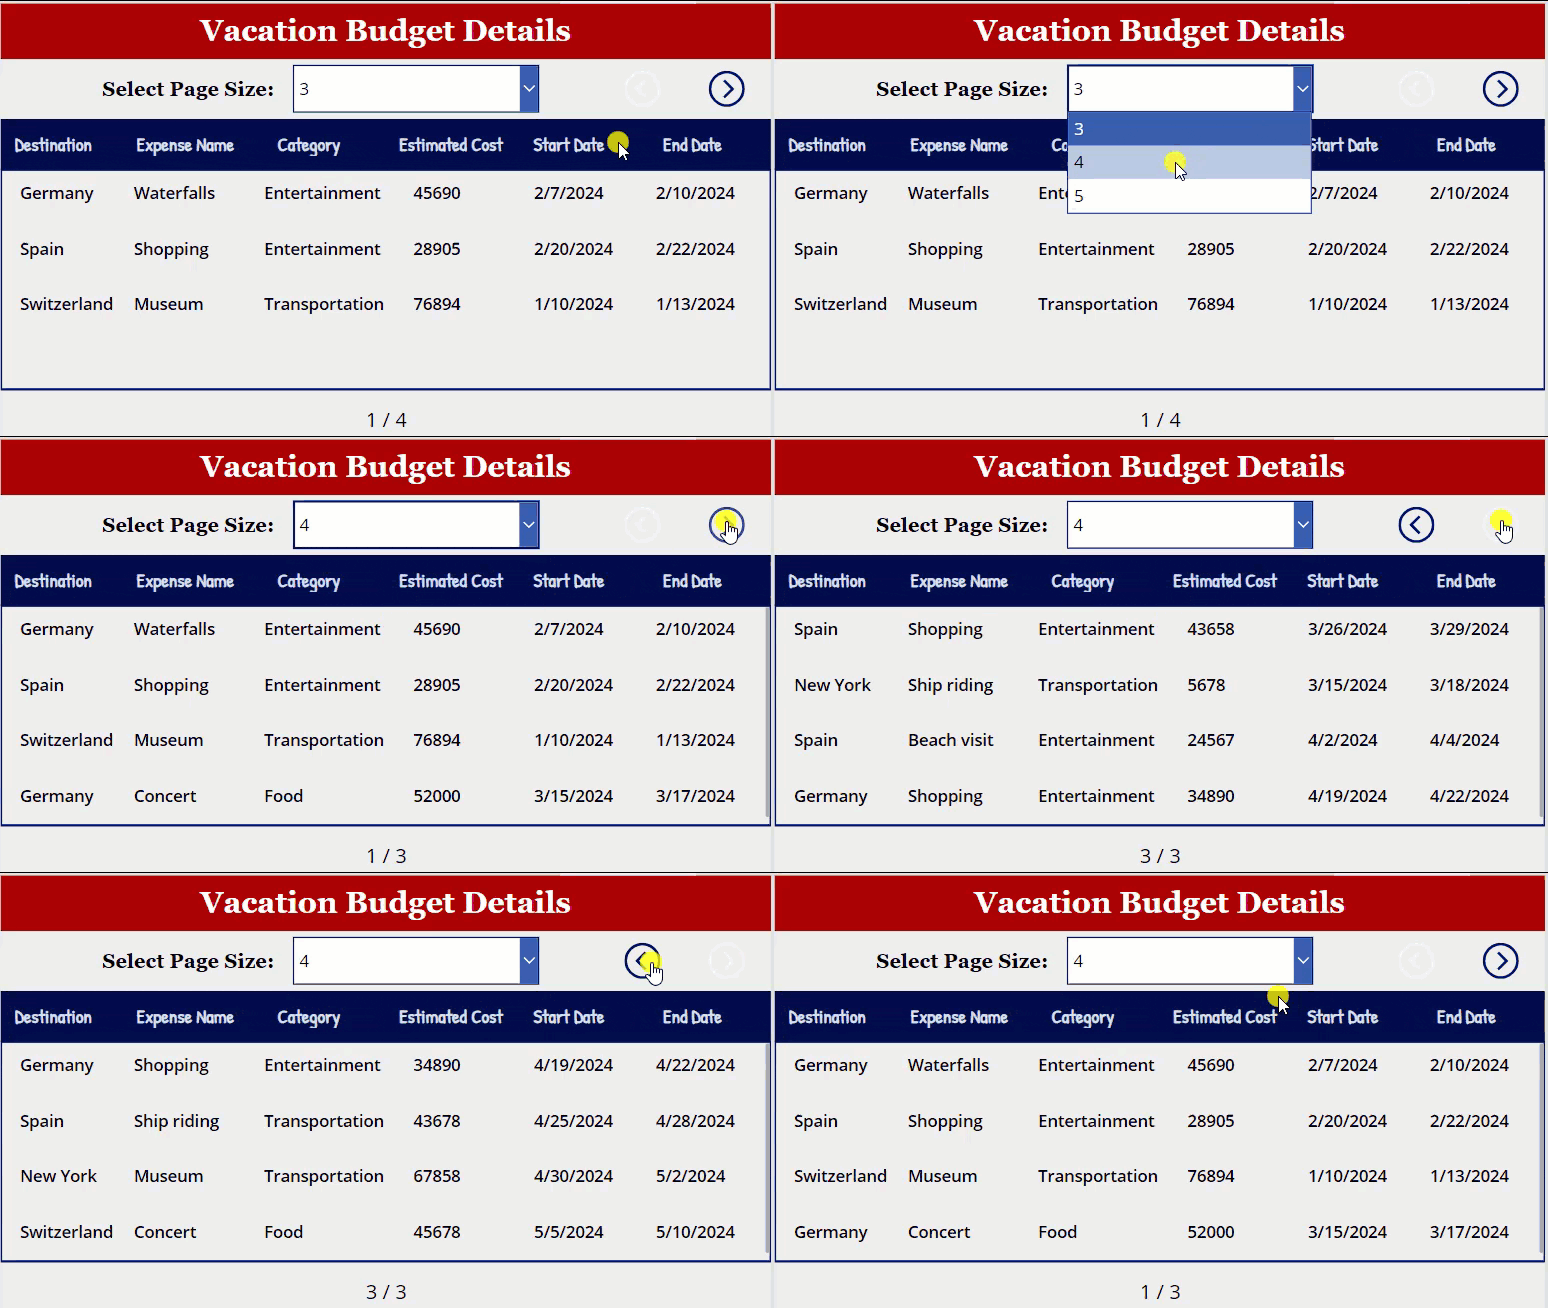
This is how we can work with the Power Apps pagination gallery using dropdown control.
From this Power Apps tutorial, we learned how to create pagination in Power Apps using two different examples. Such as:
- Pagination in Power Apps Gallery
- Power Apps Gallery Pagination using Dropdown
Also, you may like some more articles:
- Power Apps PDF Viewer Control
- PowerApps Date and Time Picker
- Power Apps Remove First Character from String
- Power Apps Today Date Without Time
- Power Apps Rating Control
- Display SharePoint List in Power Apps
I am Bijay a Microsoft MVP (10 times – My MVP Profile) in SharePoint and have more than 17 years of expertise in SharePoint Online Office 365, SharePoint subscription edition, and SharePoint 2019/2016/2013. Currently working in my own venture TSInfo Technologies a SharePoint development, consulting, and training company. I also run the popular SharePoint website EnjoySharePoint.com
Very good
Biijay, that’s amazing!!!! Thanks for sharing. Is this documented? How’d you learn this?
the above steps are working in large data set of about 10,000
getting an error in varPage variable that we used in the items property of the gallery!! how to resolve it??
why data not show
is myCode
LastN(
FirstN(
Users,
varPage
),
RoundDown(
Gallery3.Height / Gallery3.TemplateHeight,
0
)
)
Hi Bijay, Thank you for this article. I am new to PowerApps and I would like to know how I can combine this with a Search Bar and DropDown that is tied to the gallery. Looking forward to hearing from you
did you found any solution?
How to filter the gallery along with search and dropdowns .
Please help!!!!
Hi Mutafa,
You can refer to this article: https://www.spguides.com/powerapps-gallery-control-filter/
Hello Sir ! I am Facing Delegation Warnings On Last Page Button And Next Arrow And 1/2 Page Label How Should i Solve Help Me Sir.
Great! How can we add for example, the filter or search function to the Power Apps Gallery Pagination Using Dropdown? I have no idea where to add.
This article is brilliant and just what I needed to progress my app. However I noticed that as I cycle through the pages, the last page contains data from the last but one page (i.e. if there were 10 records and each page shows 8 then page 1 will show records 1-8 and page 2 will show records 3-10 so there is an overlap. Is it possible to only show the remaining 2 items on page 2?