The Navigate function in Power Apps helps you change which screen to display. It allows you to transition from one screen to another, either within the same app or to a different app.
In this tutorial, I will explain in detail the Power Apps navigate function, Power Apps screen transitions, and how to work with Power Apps navigate to another screen with various examples.
Also, we will cover:
- What is Back function in PowerApps
- Power Apps navigate to previous screen
- How to use Power Apps button to next screen
- Power Apps navigate to another screen with parameter
- Working with Power Apps navigate to url
- PowerApps switch screens
- Navigate between the Power Apps screen based on condition
Navigate Function in Power Apps
The Power Apps Navigate function helps you change which screen you want to display. To see the screen change, you can specify a visual transition such as Fade, Cover, UnCover, etc.
Suppose there are two screens, Screen1 and Screen2. You want to change the screen from Screen1 to Screen2 when a user selects a button. In this case, you need to specify the formula (on Button’s OnSelect property) that includes a Navigate function.
Note:
You can use the Navigate function to set one or more context variables for the screen; that is the only way to set a context variable from outside the screen.
Syntax:
Navigate( Screen [, Transition [, UpdateContextRecord ] ] )Where,
- Screen = Specify the screen that you want to display
- Transition = This is optional. You can set a visual transition between the current screen and the next screen. Here, the default value is None.
- UpdateContextRecord = This is also optional. A record that contains the name of at least one column and a value for each column. This record updates the context variables of the new screen as if passed to the UpdateContext function.
Power Apps Screen Transitions
There are some Power Apps Navigate transition arguments. The first argument specifies the name of the screen to display. Similarly, the second argument specifies how the old screen changes to the new screen.
The table below represents some Navigate transition arguments and their descriptions:
| Transition Argument | Description |
| ScreenTransition.Cover | The new screen slides into view, moving right to left, to cover the current screen. |
| ScreenTransition.CoverRight | The new screen slides into view, moving left to right, to cover the current screen. |
| ScreenTransition.Fade | The current screen fades away to reveal the new screen. |
| ScreenTransition.None (Default) | The new screen quickly replaces the current screen. |
| ScreenTransition.UnCover | The current screen slides out of view, moving right to left, to uncover the new screen. |
| ScreenTransition.UnCoverRight | The current screen slides out of view, moving left to right, to uncover the new screen. |
Back function in PowerApps
- PowerApps Back function helps to return the screen that was recently displayed. You can use the successive Back calls to return all the way to the screen that appeared when the user started the app.
- The inverse transition is used by default when the Back function runs. Fade and None are their own inverses.
- PowerApps Back function always returns true, but it may return false if the user has not navigated to another screen.
Syntax:
Back( [ Transition ] )Where,
Transition = This is optional. The visual transition is used between the current screen and the previous screen.
Power Apps Navigate to Another Screen
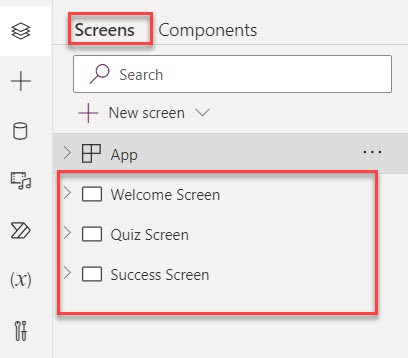
In the Power Apps app, there are three different screens [Welcome Screen, Quiz Screen, and Success Screen], as shown below.
Now, I would like to navigate or move one screen to another to make the application responsive and attractive. In this case, we can use the Navigate() function to achieve this. Follow the code below.
OnSelect = Navigate(
    'Quiz Screen',
    ScreenTransition.None
)- ‘Quiz Screen’ = Power Apps second screen name
- ScreenTransition.None = We can use this transition to quickly replace the current screen with new screen
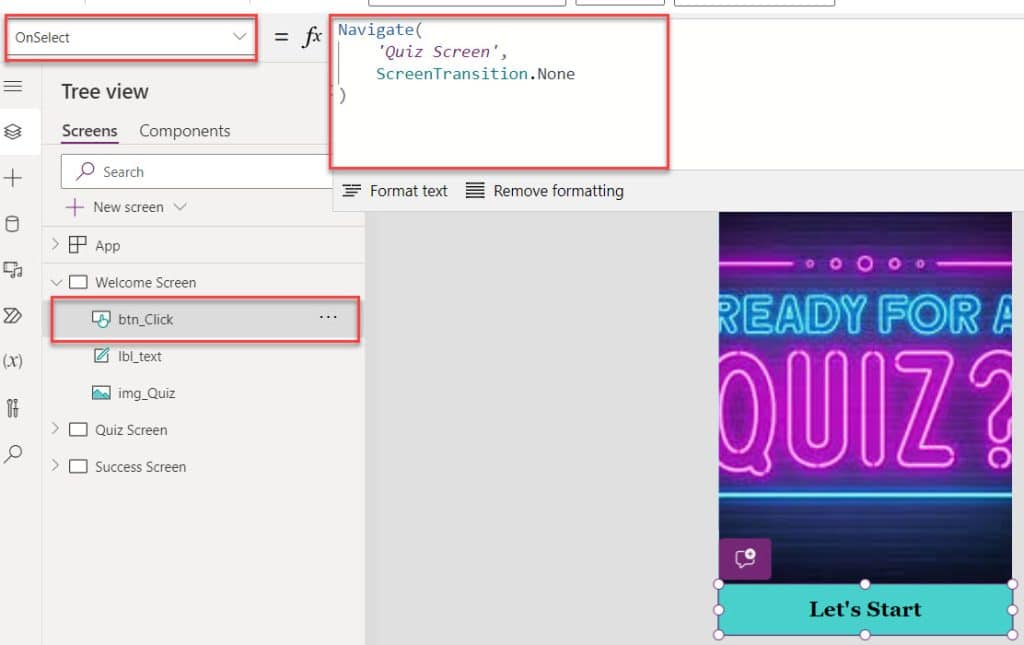
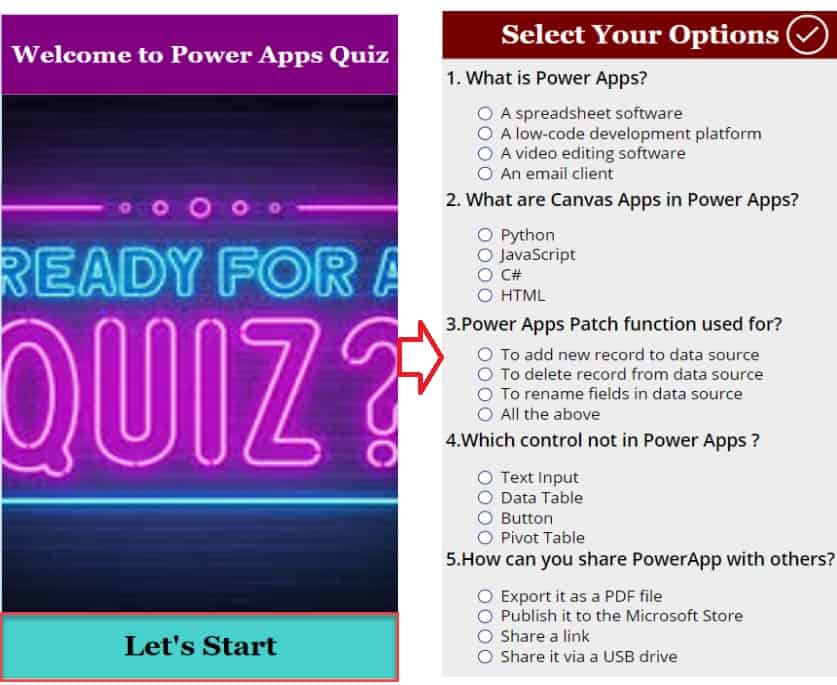
Once it is done, Save, Publish, and Preview the app. When the user selects the button control [Let’s Start], it will navigate to the second screen, as in the screenshot below.
This way, you can with the Power Apps navigate to another screen.
Power Apps Navigate to Previous Screen
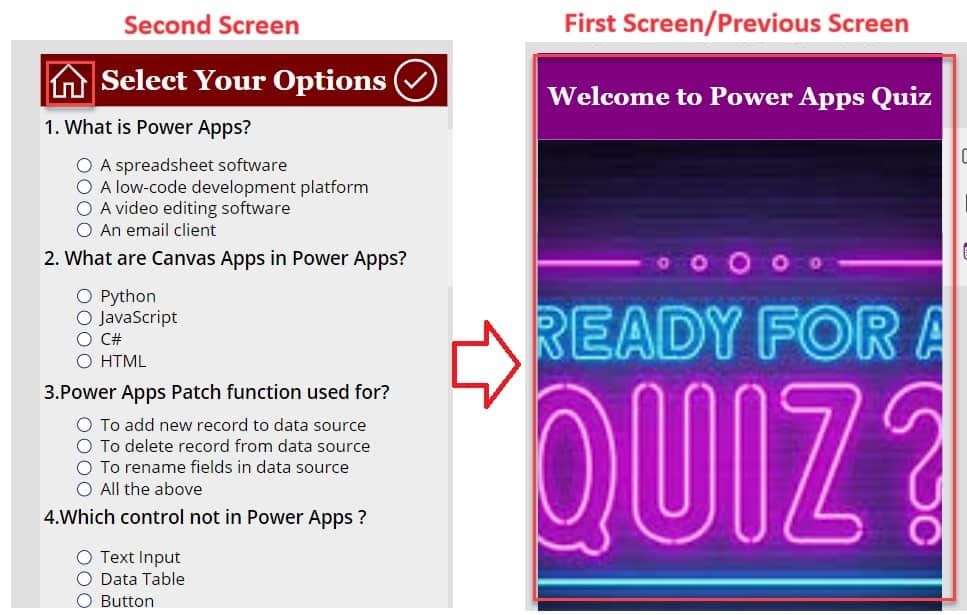
Suppose you are working with the different screens in the Power Apps app, and you want to navigate to the previous screen. In this case, you can use the Back() function.
OnSelect = Back()

                   OR

OnSelect = Back(ScreenTransition.Cover)
Have a look at the below screenshot for the output.
Power Apps Button to Next Screen
Next, I will show you how to navigate or redirect to the next or another screen in Power Apps with a simple scenario.
Scenario:
I have created a Power Apps collection to store the user details [Username and Password]. For that, on the Power Apps screen, I have inserted two text input controls and a button control.
Whenver the user provides the details and clicks on the button control, it will store the collection as well as navigate to the Welcome Screen.
To do so, select the Button control and set its OnSelect property to the code below.
OnSelect = Collect(
    colUserLogin,
    {
        UserName: txt_Username.Text,
        Password: txt_Password.Text
    }
);
Navigate(
    'Welcome Screen',
    ScreenTransition.None
)
Where,
- ‘Welcome Screen’ = Power Apps second screen name
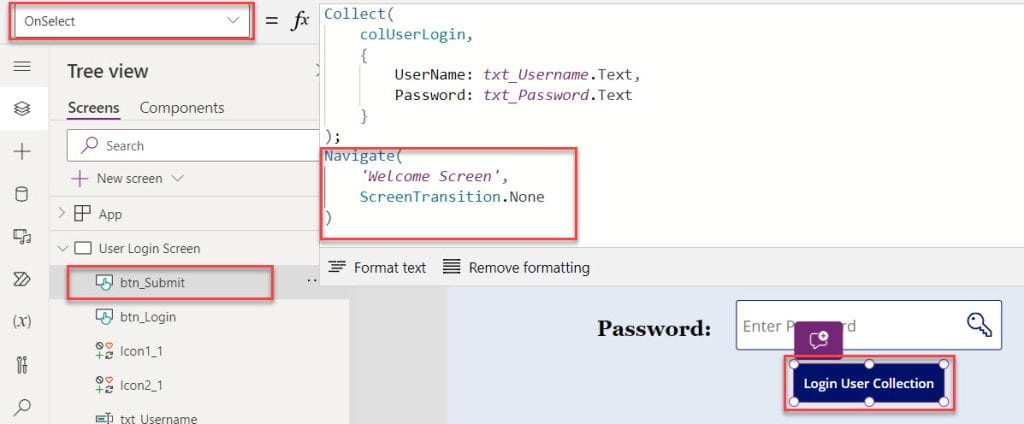
Preview the app. Once the user provides the details and clicks on the button control, the app will store the collection and navigate to the Welcome Screen, as shown below.
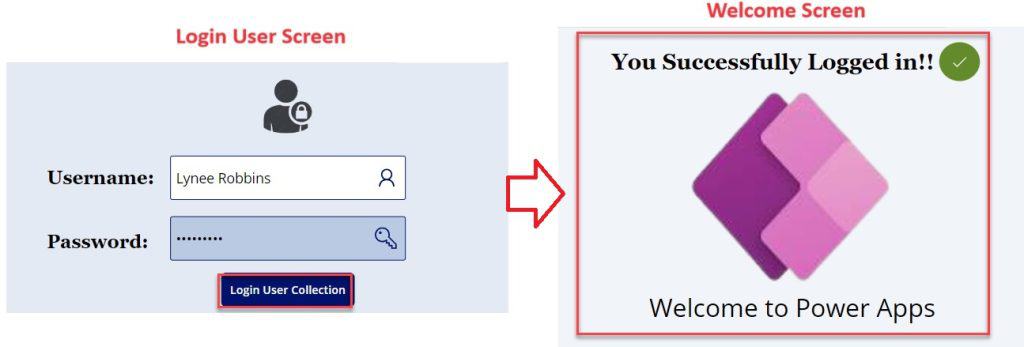
This is how to navigate or redirect to the next or another screen in Power Apps.
Power Apps Navigate to Another Screen with Parameter
Let’s see how to navigate to another screen with parameters in Power Apps with a simple example.
Example:
In Power Apps, there are two screens [First Screen and Second Screen]. On the First screen, I have added a Text input control that contains a Global Variable and a Button control to navigate to the second screen.
On the second screen, I have added a Text label control to display the text along with the parameter value.
Whenver the user adds a value on the text input control and clicks on the button control, it will navigate to the second screen and add that parameter value to the text label string.
Output:

To achieve it, follow the below steps.
1. On the Power Apps Screen [First Screen], insert a Text input control, set its Default property to blank, and set its OnChange property to the code below.
OnChange = Set(
    varParameter,
    txt_InputValue
)
Where,
- varParameter = Power Apps global variable name
- txt_InputValue = Text input parameter value
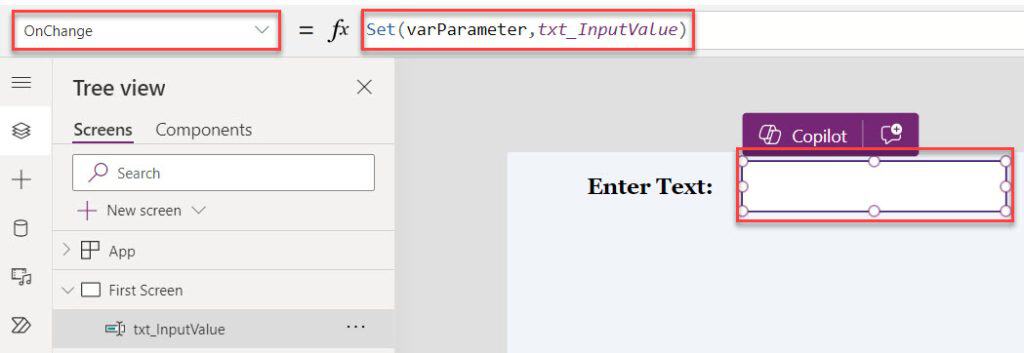
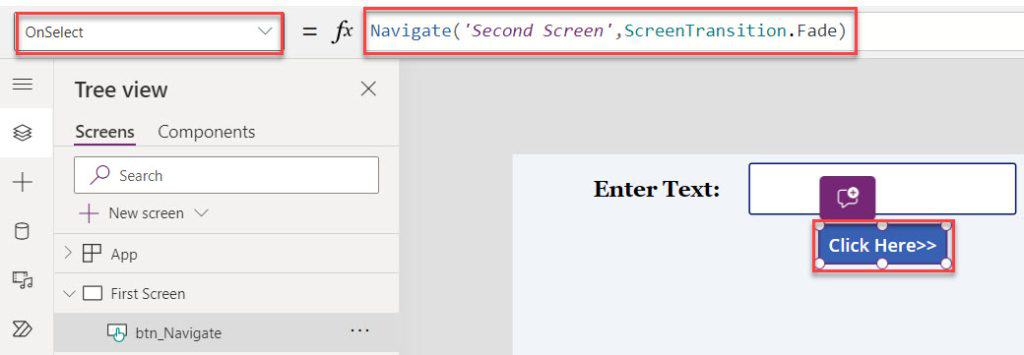
2. Then, insert a Button control and set its OnSelect property to the code below.
OnSelect = Navigate(
    'Second Screen',
    ScreenTransition.Fade
)
3. Now, on the Power Apps Second Screen, insert a Text label and set its Text property as:
Text = "Microsoft"&" "&varParameter.TextWhere,
- “Microsoft” = Power Apps string value
- varParameter = Parameter value
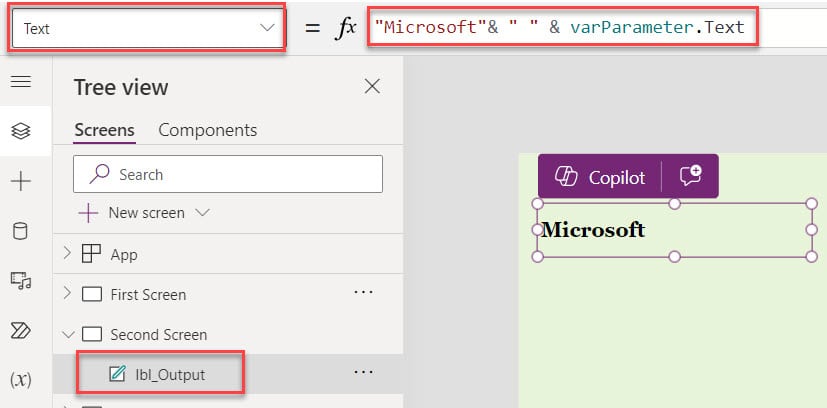
4. Finally, go to the Preview section. Once the user adds a value in the text input control and clicks on the button control, it will navigate to the second screen and add that parameter value to the text label string, as shown below.
This is how we can work with the Power Apps navigate to another screen with parameter.

Power Apps Navigate to URL
In this section, I will explain how to work with the Power Apps navigate the URL using button control with a simple scenario.
Scenario:
There is a Button control in Power Apps. Now, I would like to add a URL to the button control so that when the user clicks or taps it, it will navigate to or redirect to the appropriate website.
Have a look at the below screenshot for the output.

To do so, follow the below steps. Such as:
1. On the Power Apps Screen, insert a Button control and set its Text and OnSelect properties using the following codes.
Text = SpGuides.com

OnSelect =  Launch("https://www.spguides.com/")
Where,
- Launch() = The PowerApps Launch() function works the same way as hyperlinks. It allows you to launch web pages, apps, and other services on your device
- “https://www.spguides.com/” = Respective Website URL
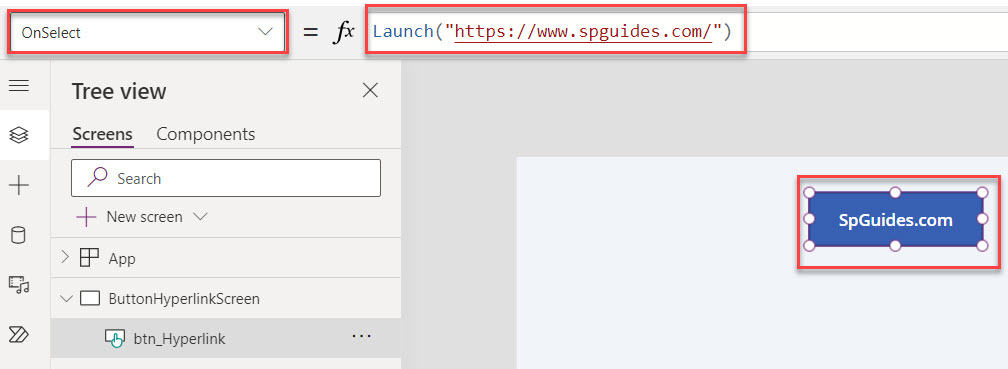
2. Once your app is ready, Save, Publish, and Preview the app. Whenever the user clicks on the button control, it will navigate or redirect to the specific website based on the URL address.
This is a way you can work with the Power Apps navigate URL.

Power Apps Switch Screens
Let’s see how to work with the Power Apps switch screens. To do so, follow the below steps. Such as:
1. In Power Apps, I have added three different screens [Welcome Screen, Quiz Screen, and Success Screen]. Now, I want to switch between them based on a variable and using the navigate function.
2. For that, select the App object and set its OnStart property to the code below.
OnStart = Set(
    ScreenSelection,
    "Success Screen"                                     //You can also change screen name
)
Where,
- ScreenSelection = Power Apps variable name
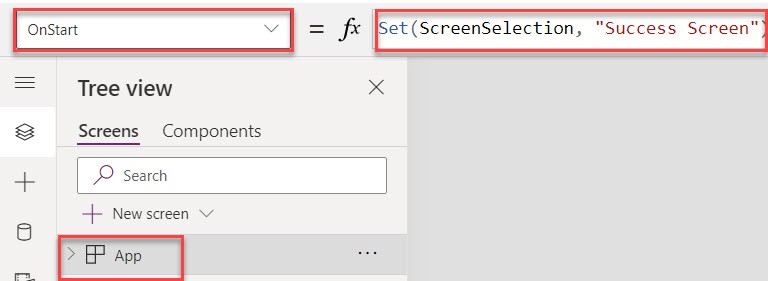
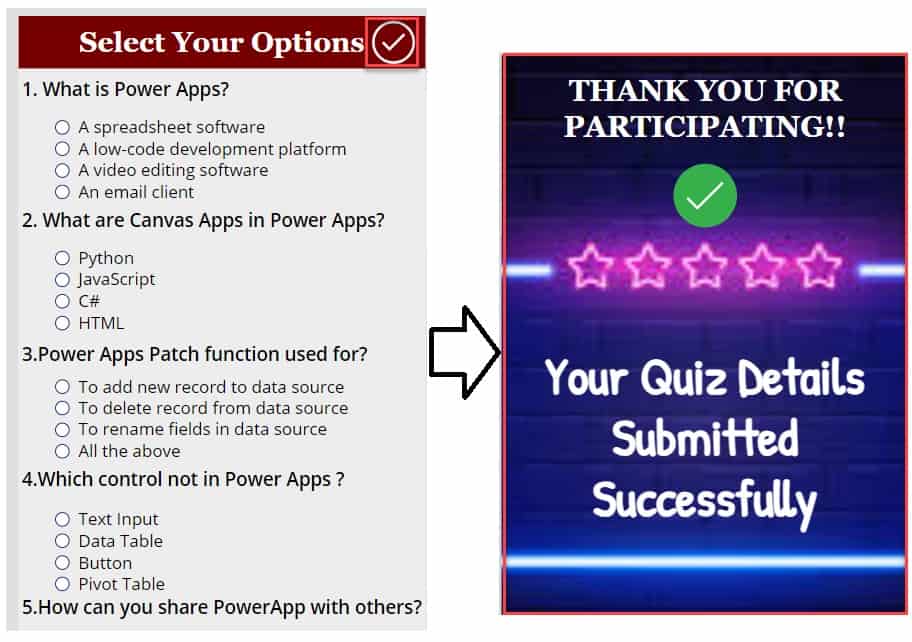
3. Now, go to the respective screen where you want to use the switch function to navigate to another screen. Click on the Select icon, and set its OnSelect property as:
OnSelect = Switch(
    ScreenSelection,
    "Welcome Screen",
    Navigate(
        'Welcome Screen',
        ScreenTransition.None
    ),
    "Success Screen",
    Navigate(
        'Success Screen',
        ScreenTransition.None
    )
)
Where,
- “Welcome Screen” = Power Apps 1st screen name
- ‘Success Screen’ = Power Apps 3rd screen name

4. Once it is done, go to the Preview selection. When you click the select icon, it will switch between the screens based on the value of the variable [“ScreenSelection”] and navigate to the respective screen, as shown below.
Navigate Between Screens in Power Apps based on Condition
Here is the scenario: I have three screens for the User Registration application.
- Screen 1: Dashboard screen – it has a View My Profile button.
- Screen 2: Gallery screen – it has a view button.
- Screen 3: Registration form screen- it has a form for registrations and a Cancel button to return.
When I click on the View My Profile button in the dashboard screen, it navigates to screen 3. There, I have the Cancel button to return.
Now, when I click on the View button in the gallery on screen 2, it also navigates to screen 3 to display the details of the selected item. To return, I have the same Cancel button.
The same cancel button needs to work for both screen 1 and screen 2. This means that when I come from the dashboard screen to screen 3, the cancel button must navigate back to the dashboard screen. If it comes from the gallery screen to screen 3, that time the cancel button navigates back to the gallery screen.
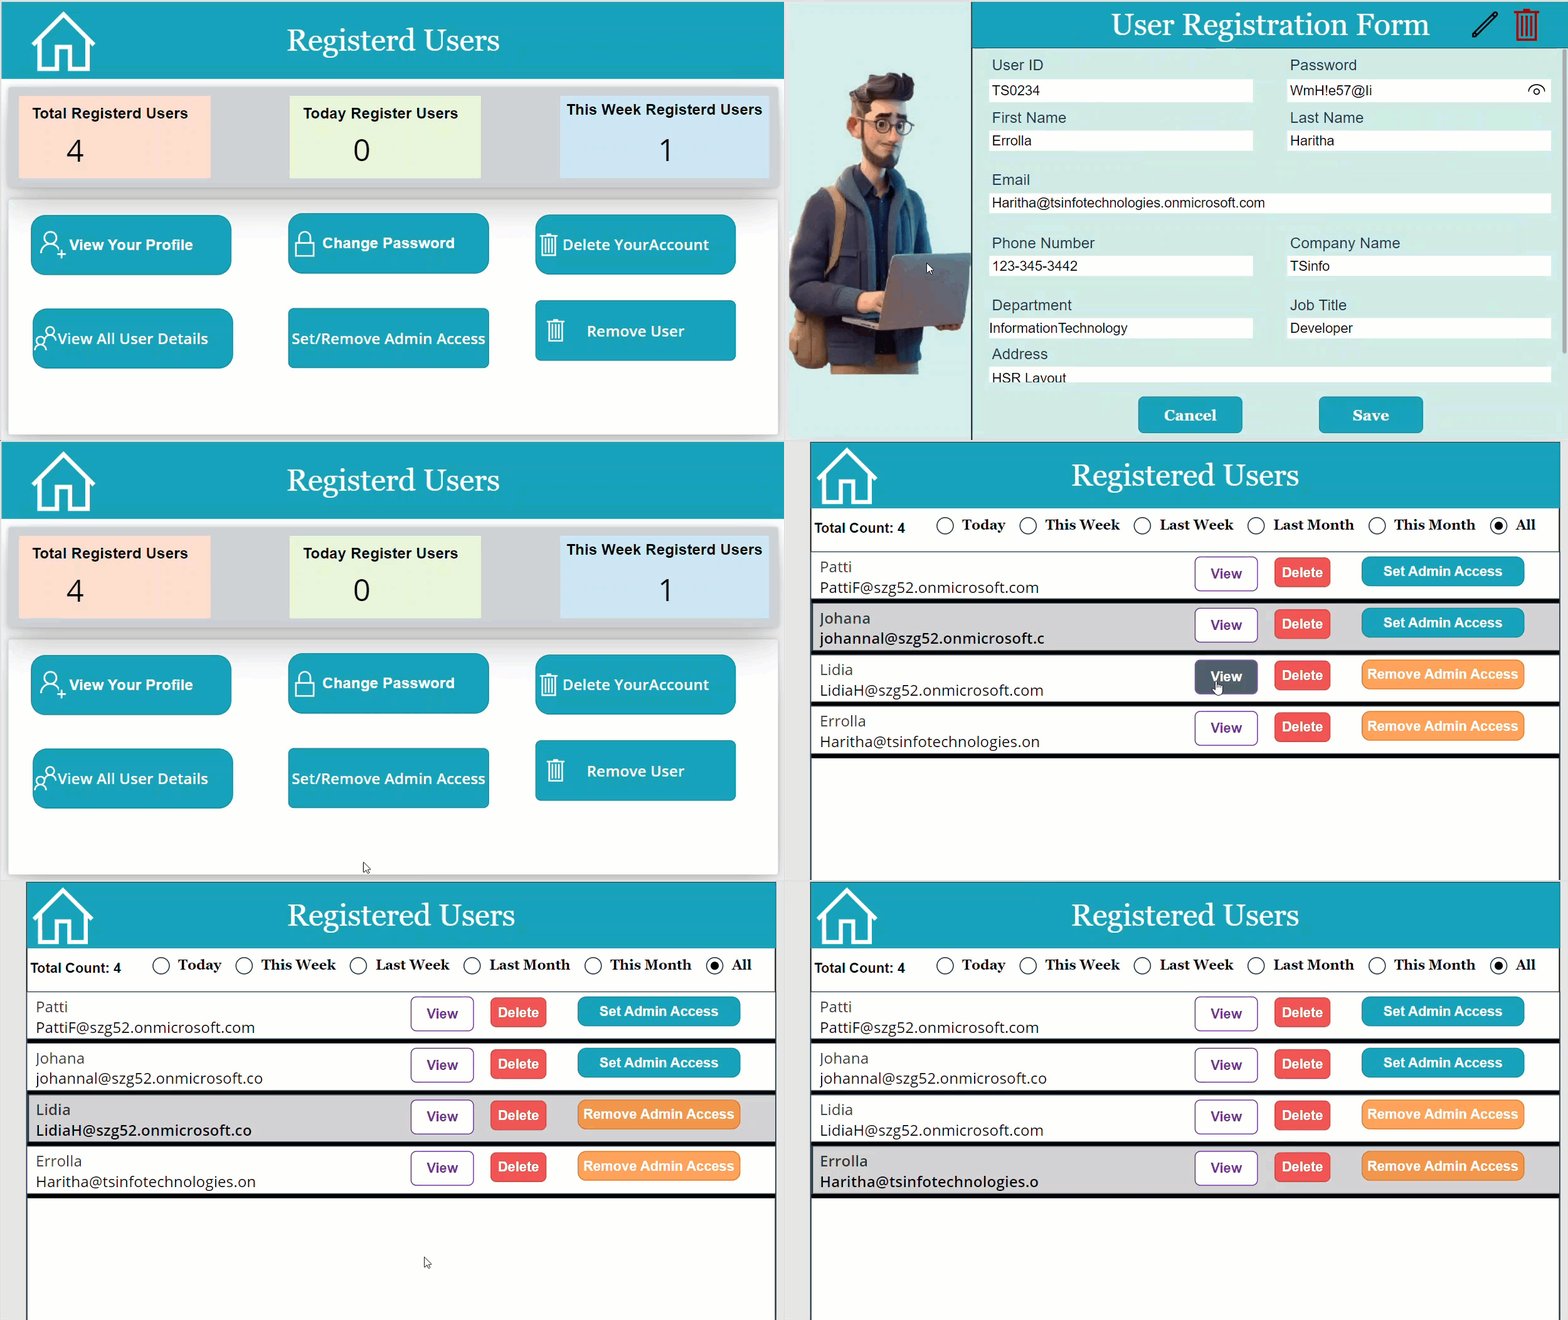
Follow the steps below to achieve this,
1. Provide the formula below in the OnSelect property of the View My Profile button on the dashboard screen.
Navigate(RegistrationForm_screen,ScreenTransition.Fade,{SelectedUserID:LoggedinUserID,SourceScreen: "Dashboard"});In the above formula, the SourceScreen is the variable name that contains the screen name. I used this SelectedUserID variable to display my details in the form.

2. Provide the below formula in the OnSelect property of the View button on the gallery screen.
Navigate(RegistrationForm_screen,ScreenTransition.Fade,{SelectedUserID:ThisItem.ID,SourceScreen: "Gallery"});In the above formula, the SourceScreen variable contains the current screen name.

3. Now, provide the formula below in the OnSelect property of the Cancel button on the registration form screen.
If(SourceScreen = "Dashboard",Navigate(DashBoard_screen,ScreenTransition.Fade),SourceScreen = "Gallery",Navigate(RegisterdUsers_screen,ScreenTransition.Fade))Based on the SourceScreen value, the navigation will be done when we click this Cancel button.

Now, save the changes and preview it once. The cancel button will work for both the screens to return. In this way, we can navigate between the screens based on condition.
Also, you may like the following:
- Power Apps Length Of String
- Power Apps Start Timer On Button Click
- PowerApps Replace Character in String
- How to Update Collection in Power Apps
- 6 Easiest Ways to Filter Gallery in Power Apps
- Create CSV File in SharePoint Using Power Apps
This Power Apps article explained how to navigate in PowerApps, Power Apps screen transitions, and Power Apps button to next screen.
Also, we saw how to work with PowerApps navigate to another screen, Power Apps change screen with various examples and navigate between the Power Apps screen based on condition.
I am Bijay a Microsoft MVP (10 times – My MVP Profile) in SharePoint and have more than 17 years of expertise in SharePoint Online Office 365, SharePoint subscription edition, and SharePoint 2019/2016/2013. Currently working in my own venture TSInfo Technologies a SharePoint development, consulting, and training company. I also run the popular SharePoint website EnjoySharePoint.com
Google
Although internet sites we backlink to below are considerably not connected to ours, we really feel they are essentially really worth a go through, so have a look.
Nice
hi bijay, how to i navigate to another screen which is referring to different sharepoint list (whilst maintaining the same ref id)?