Recently, I got an opportunity to work on creating a CSV file in SharePoint using Power Apps.
In this Power Apps tutorial, I will explain in detail information about how to create CSV file in SharePoint using Power Apps with a real-time scenario.
Also, we will see how to export gallery data to excel in Power Apps using Power Automate.
Create CSV File in SharePoint Using Power Apps
Creating a CSV file in SharePoint using Power Apps can be a useful way to export data from your Power Apps application and store it in the SharePoint document library.
Note:
Whenever you want to create a CSV file in SharePoint, you must use the Power Automate flow [Instant clould flow] including with Power Apps.
Now, I will show you how to create a CSV file in SharePoint using Power Apps with a simple scenario.
Scenario:
I have a SharePoint Online list named “Vacation Budget” and this list contains the below fields.
| Column Name | Data Type |
| Destination | It is a default single line of text |
| Expense Name | A single line of text |
| Category | Choice |
| Estimated Cost | Currency |
| Start Date | Date and time |
| End Date | Date and time |
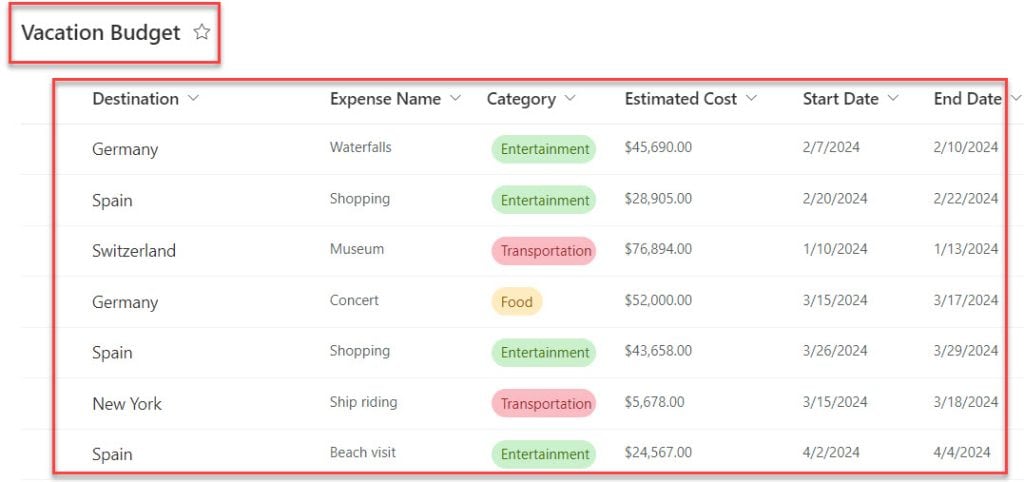
Now, I would like to display these SharePoint list records on the Power Apps Gallery control and create a CSV table using the Power Automate flow. Finally, I would save the CSV file to the SharePoint document library.
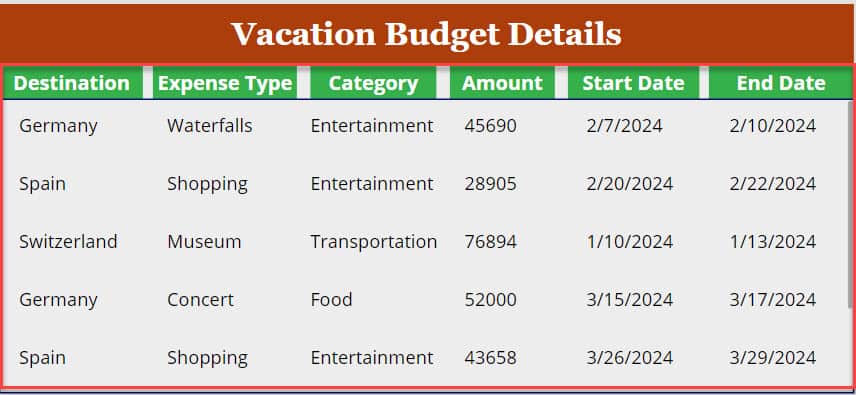
Have a look at the below screenshot for the output.

To work around this, follow the below-mentioned steps. Such as:
1. On the Power Apps Screen -> Insert a Gallery control [+ Insert -> Blank vertical gallery] and set its Items property as:
Items = 'Vacation Budget'Where,
- ‘Vacation Budget’ = SharePoint Online list

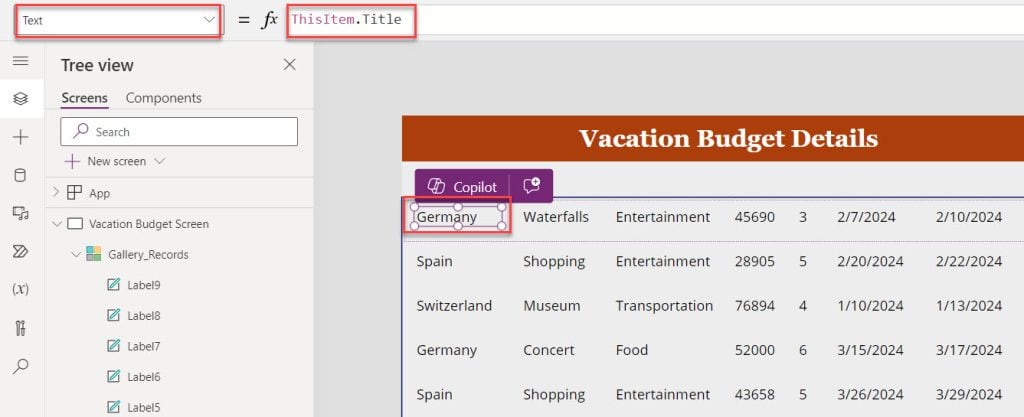
2. To display the SharePoint list records on the gallery control, you can add respective Text label controls [Whenver you add text labels inside the gallery by default, the labels display each record from the SharePoint list], as shown below.
3. You can also add respective headers for the Power Apps gallery records, like below.
4. Now, you can create the Power Automate flow to create the CSV table and add it to the SharePoint document library with a single Power Apps button click.
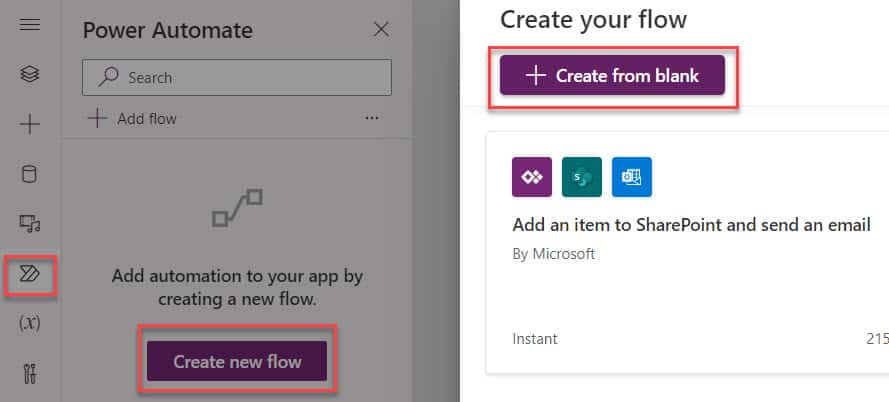
5. For that, go to the Power Automate section, click on the “Create new flow” button, and Select + Create from blank button.
6. Once you click on the Create from the blank button by default, it will create the flow with the Power Apps (V2) trigger condition where you can add Text input [Power Apps_Inputs],
7. Next, add Compose action and select Inputs from Dynamic content [PowerApps_Inputs]
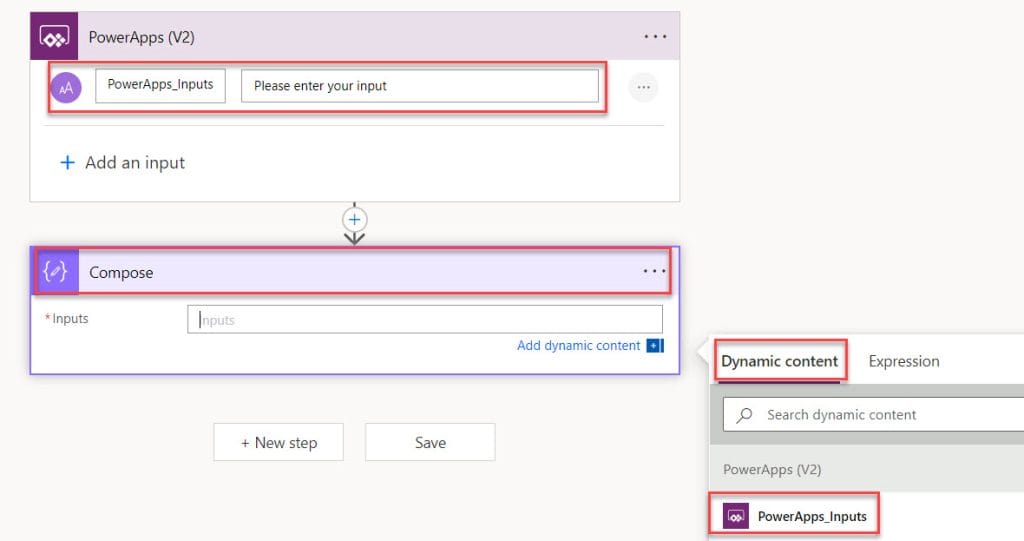
8. Once it is done, Provide the flow name [PowerAppsCreateCSV] and click on the Save button. Then go to the Power Apps Power Automate section, where you will get the created flow.
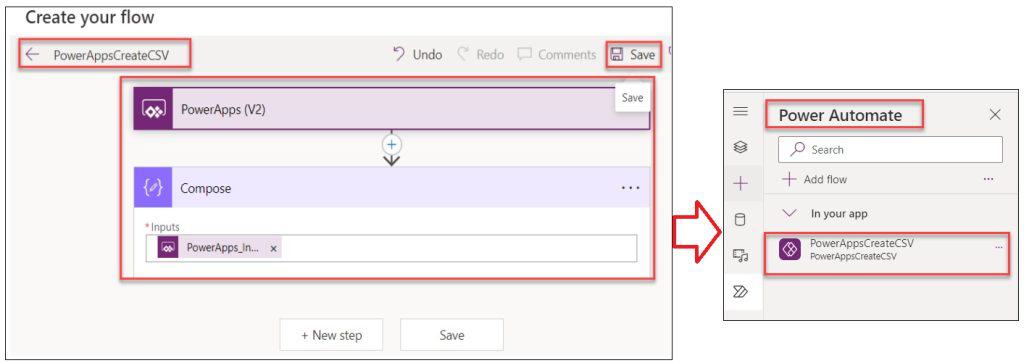
9. Now, insert a Button control under the gallery and set its OnSelct property to the code below.
OnSelect = Set(
    varExportCSV,
    JSON(
        ShowColumns(
            Gallery_Records.AllItems,
            "Title",
            "ExpenseType",
            "Category",
            "TotalEstimatedCost",
            "StartDate",
            "EndDate"
        ),
        JSONFormat.IndentFour
    )
);
Set(
    varCSVFile,
    PowerAppsCreateCSV.Run(varExportCSV)
)
Where,
- varExportCSV = Power Apps variable name
- Gallery_Records = Power Apps gallery control name
- “Title”, “ExpenseType”, “Category”, etc. = SharePoint list fields
- PowerAppsCreateCSV = Power Automate flow name
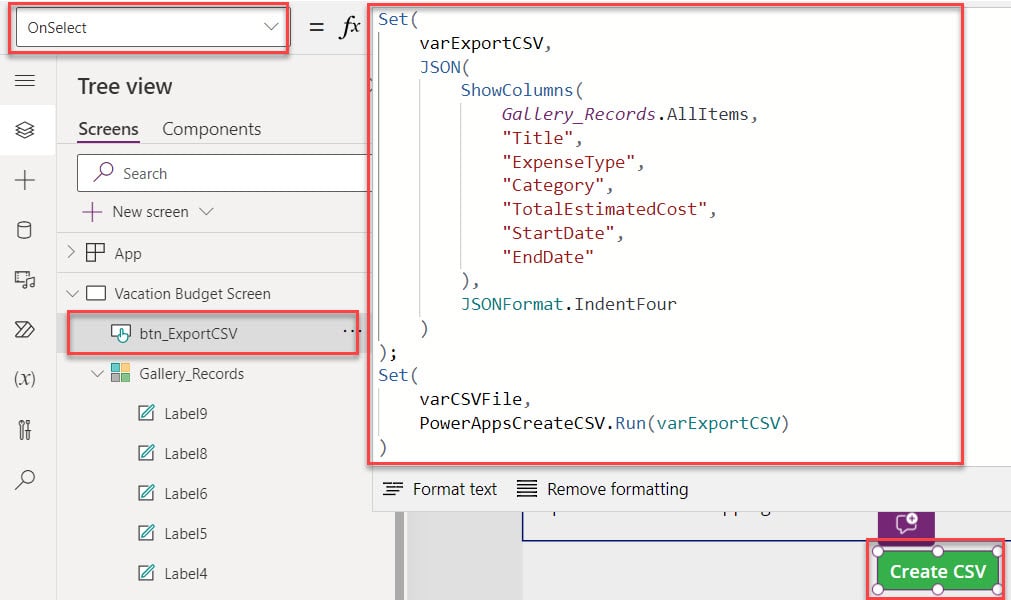
10. Once your app is ready, Save, Publish, and Preview it. When the user clicks on the button control, the flow will be triggered successfully, as shown below.
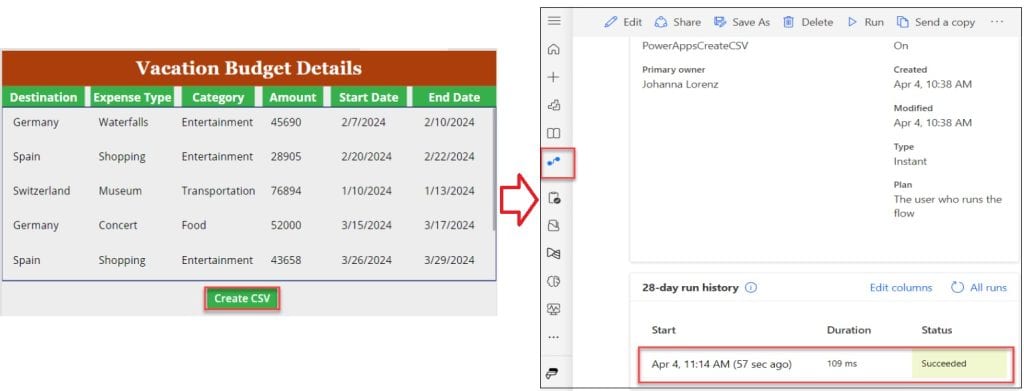
11. Now, open the flow, Copy the whole thing from the OUTPUTS section, and paste it into a notepad. We will use this code in the next action.
12. Next, Edit the flow and add a new step below the Compose section. Insert Parse JSON action and enter the below input fields:
- Content = Go to Dynamic content -> Select Outputs option under the Compose section
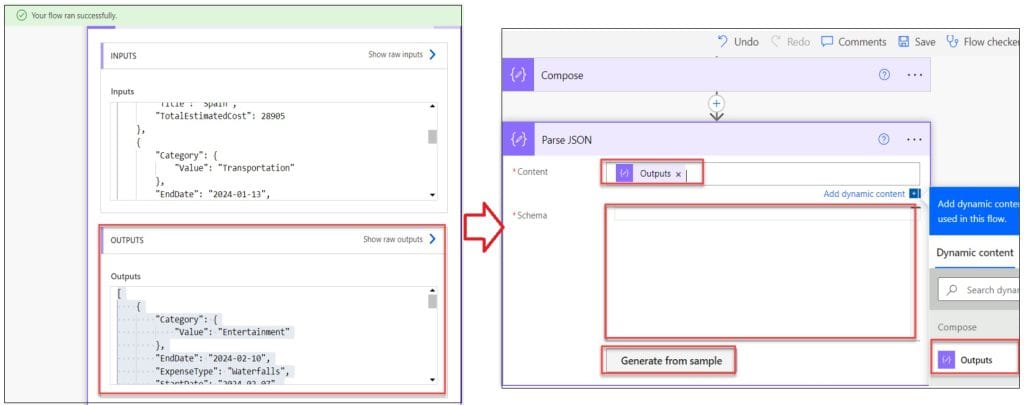
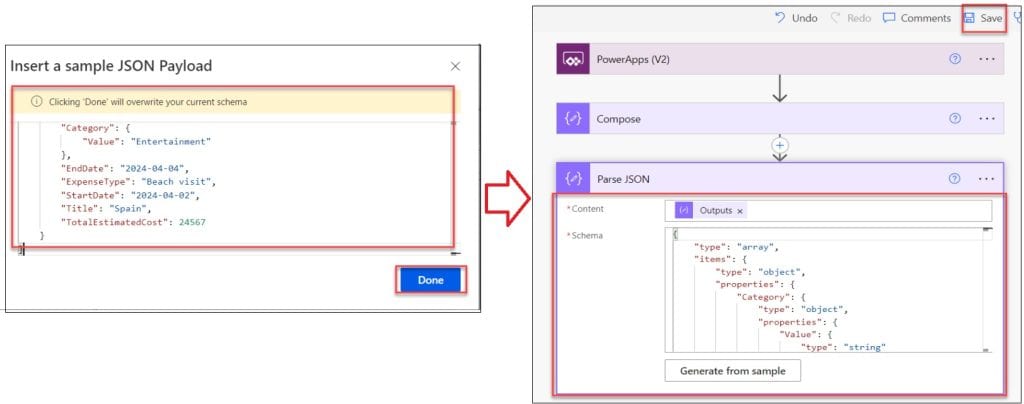
- Schema = Click on the Generate from sample option and paste the code that you have copied in Notepad. Next, click on the Done button
13. Once you add or paste the code, then the JSON schema will look like the screenshot below.
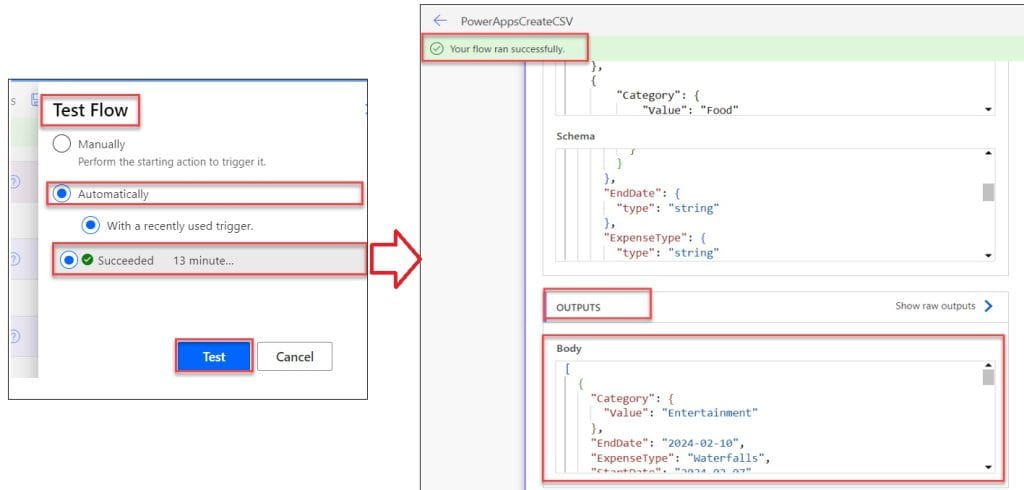
14. Now, again save and test the flow from the previous successful run. Then, the flow will succeed. Once you expand the Parse JSON, you can see the correct JSON schema format in its OUTPUTS section, as shown below.
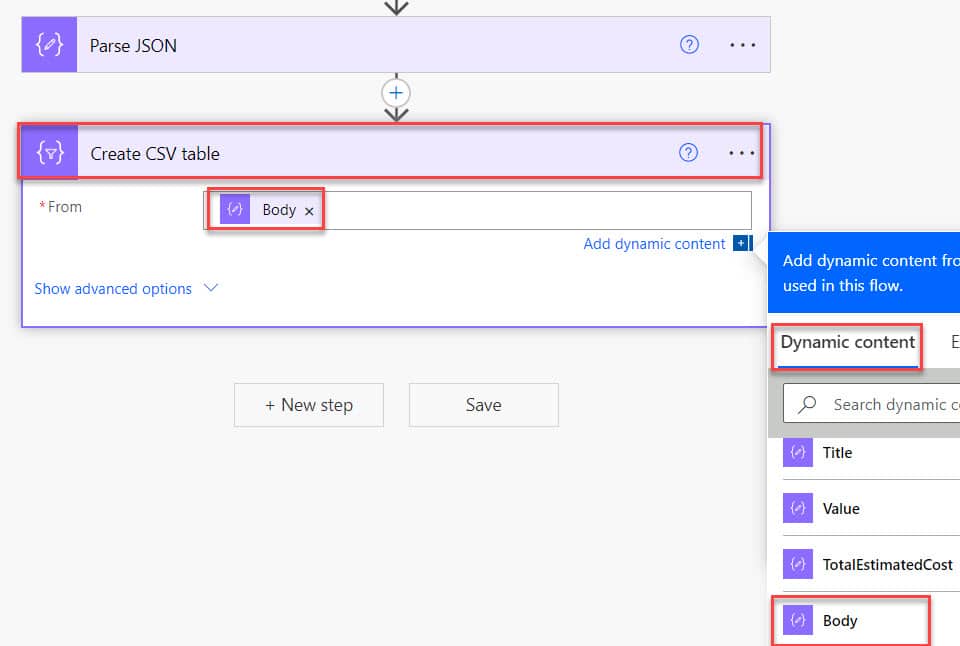
15. Edit the flow and then add a new step under the Parse JSON action. Insert Create CSV table action and enter the value of this below field as:
- From = Select Dynamic content -> Select Body under the Parse JSON section
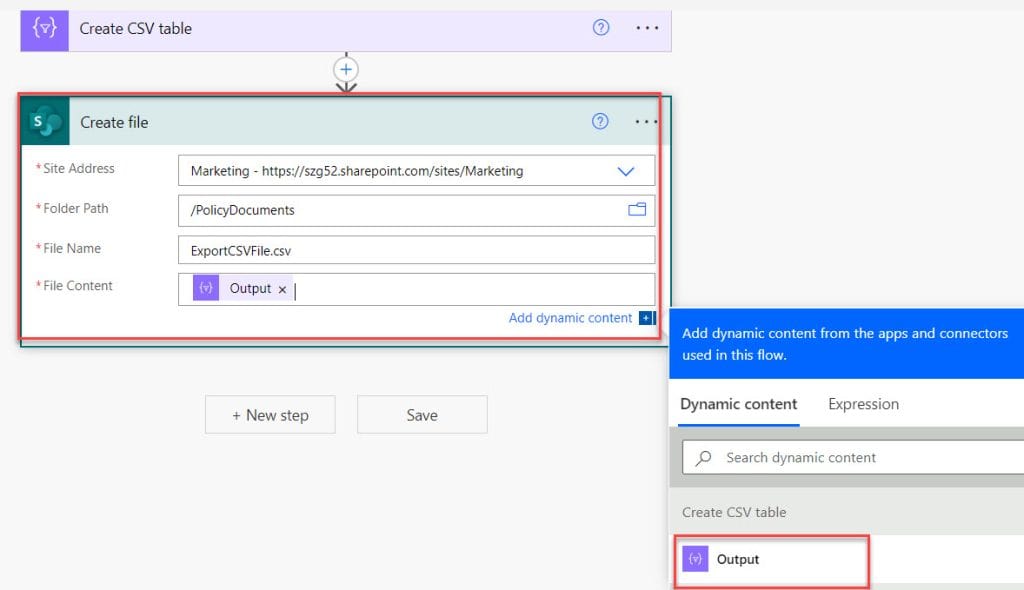
16. Finally, add a new step and add the Create file (SharePoint) action [As we need to create the CSV file in the SharePoint Document Library]. Enter the below fields:
- Site Address = Select the SharePoint Online Site address URL. Also, if the Site address is not there, then you need to enter the SharePoint Site address URL using the custom value
- Folder Path = Select the folder path where you want to create the PowerApps CSV file. I chose Shared Documents from the show picker icon because I want to create it in the SharePoint Document Library.
- File Name: Provide a name for the CSV file with an extension as“.csv“
- File Content: Select the Dynamic content -> Select Output under the Create CSV table action
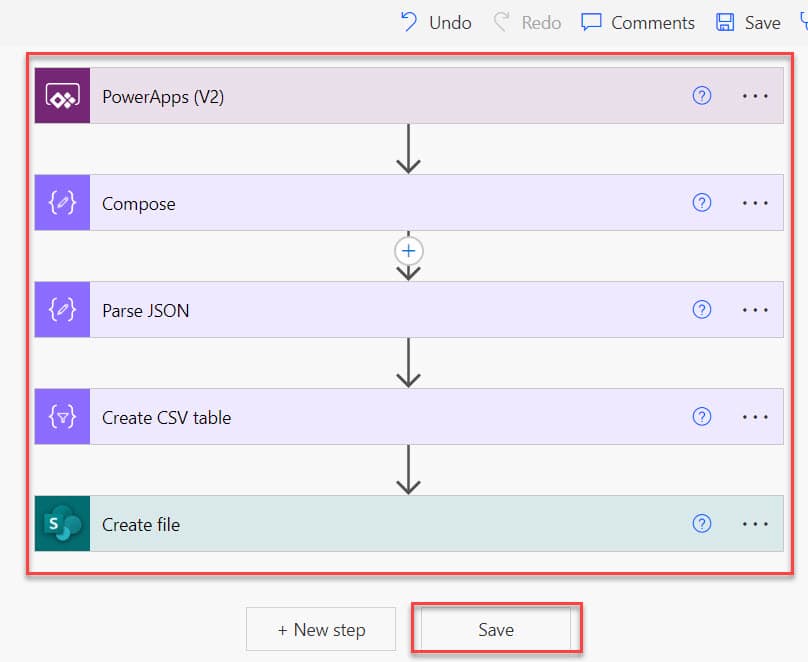
17. Have a look at the whole structure of the flow; Save the flow and go back to the Power Apps Canvas app.
18. Also, remember to refresh the created flow and go to the Preview section. Whenever the user clicks on the button control [Create CSV], the CSV file will be saved in the SharePoint Online document library, as in the screenshot below.

19. Once you click on the CSV file, then you can see all the SharePoint Online list records from the Power Apps gallery control, as shown below.
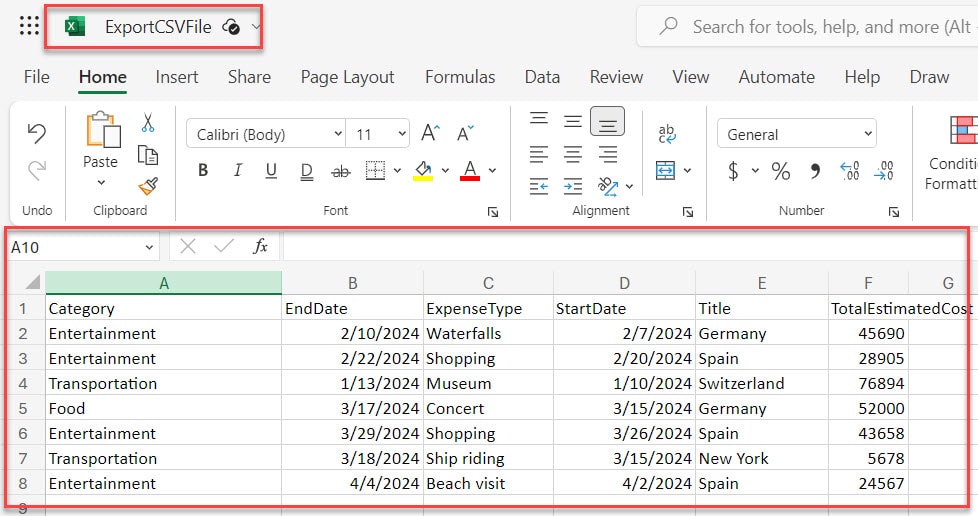
This is how we can create a CSV file in SharePoint using Power Apps [Including Power Automate flow].
Also, you may like:
- Cascading Dropdown in Power Apps
- Create Power Apps Login Page
- 6 Easiest Ways to Filter Gallery in Power Apps
- Power Apps Upload File to SharePoint Document Library
- Power Apps Attachment Control
This Power Apps tutorial taught in detail information about how to create a CSV file in sharePoint using Power Apps with a simple scenario. If you have any requirements related to creating CSV files using Power Apps and Power Automate, you can follow the above steps to do it.
I am Bijay a Microsoft MVP (10 times – My MVP Profile) in SharePoint and have more than 17 years of expertise in SharePoint Online Office 365, SharePoint subscription edition, and SharePoint 2019/2016/2013. Currently working in my own venture TSInfo Technologies a SharePoint development, consulting, and training company. I also run the popular SharePoint website EnjoySharePoint.com
How to change order from alphabetical to our custom order in csv file?
How to import csv when we have multiple choice column or dropdown