In this Power Apps tutorial, I will explore how to create a cascading dropdown in Power Apps using different ways. Such as:
- Manually create a cascading dropdown in Power Apps
- Cascading dropdown in Power Apps from SharePoint list
- Power Apps cascading dropdown lookup
- Add a blank option to each cascading dropdown in Power Apps
Cascading Dropdown in Power Apps [Manually]
Power Apps cascading dropdown is mostly useful when you have data that is related hierarchically. To create a cascading dropdown in Power Apps manually, we will use the Power Apps collection.
For that, I have created a Collection named “colBooks,” which contains the fields below.
| Column Name | Data Type |
| BookName | Text field |
| Author | Text field |
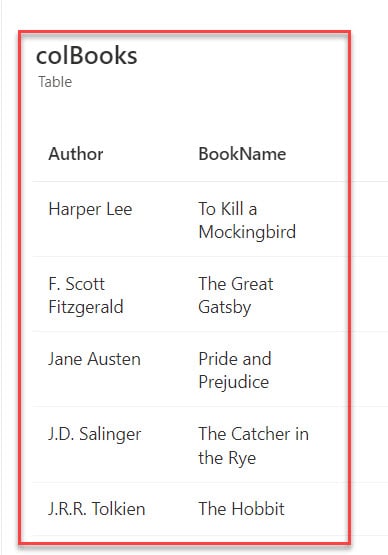
In Power Apps, there are two Dropdown controls [drp_BookName and drp_Author]. Whenever the user selects any book name in the first dropdown, the second dropdown will filter and display the respective author name based on the first dropdown selected value.
Output:
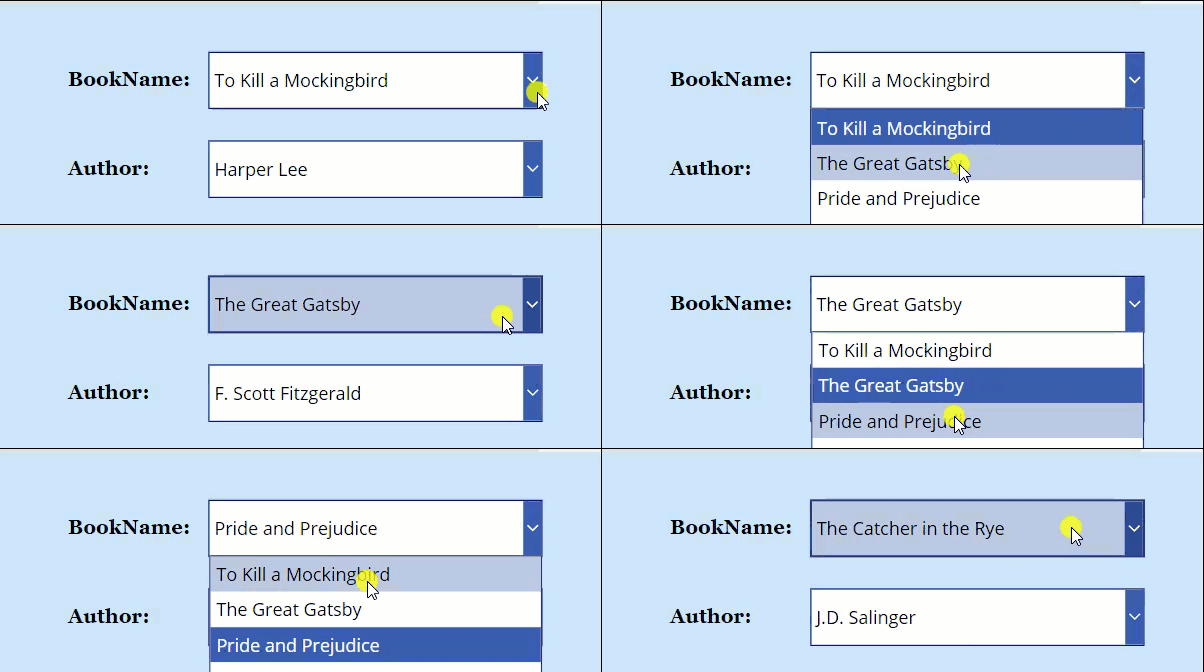
To do so, follow the below steps. Such as:
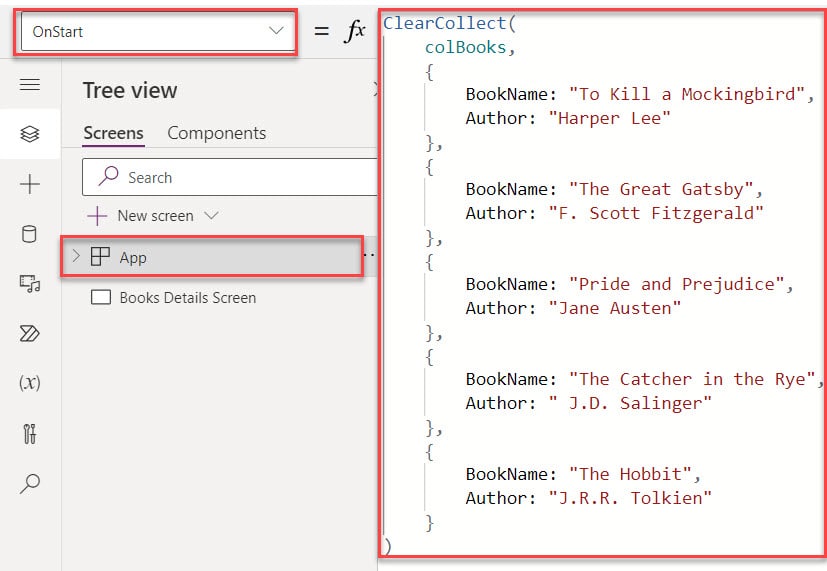
1. Open your Power Apps app -> Select the App object from the left navigation and set its OnStart property to the code below.
OnStart = ClearCollect(
    colBooks,
    {
        BookName: "To Kill a Mockingbird",
        Author: "Harper Lee"
    },
    {
        BookName: "The Great Gatsby",
        Author: "F. Scott Fitzgerald"
    },
    {
        BookName: "Pride and Prejudice",
        Author: "Jane Austen"
    },
    {
        BookName: "The Catcher in the Rye",
        Author: " J.D. Salinger"
    },
    {
        BookName: "The Hobbit",
        Author: "J.R.R. Tolkien"
    }
)
Where,
- colBooks = Power Apps collection name
- BookName, Author = Collection fields
2. On the Power Apps Screen -> Insert a Dropdown control and set its Items and Value properties, as shown below.
Items = colBooks

Value = BookName
3. Then, insert another Dropdown control and set its Items and Value properties.
Items = Filter(
    colBooks,
    BookName = drp_BookNames.Selected.BookName
)

Value = Author
Where,
- drp_BookNames = Power Apps 1st dropdown control name

4. Once your app is ready, Save, Publish, and Preview the app. Once you select any book name in the first dropdown, the second dropdown will filter and display the respective author name based on the first dropdown selected value.
This way, you can work with the cascading dropdown in Power Apps manually.

Cascading dropdown in Power Apps from SharePoint list
Next, I will show you how to create cascading dropdowns in Power Apps from the SharePoint Online list with a simple scenario.
Scenario:
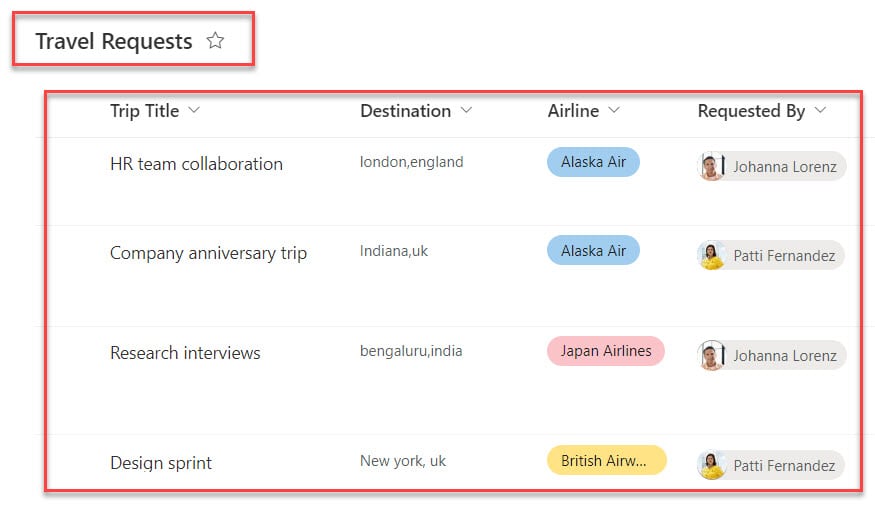
I have a SharePoint Online list [Travel Requests] and this list contains the below fields.
| Column Name | Data Type |
| Trip Title | It is a default single line of text |
| Destination | Location |
| Airline | Choice |
| Requested By | Person or Group |
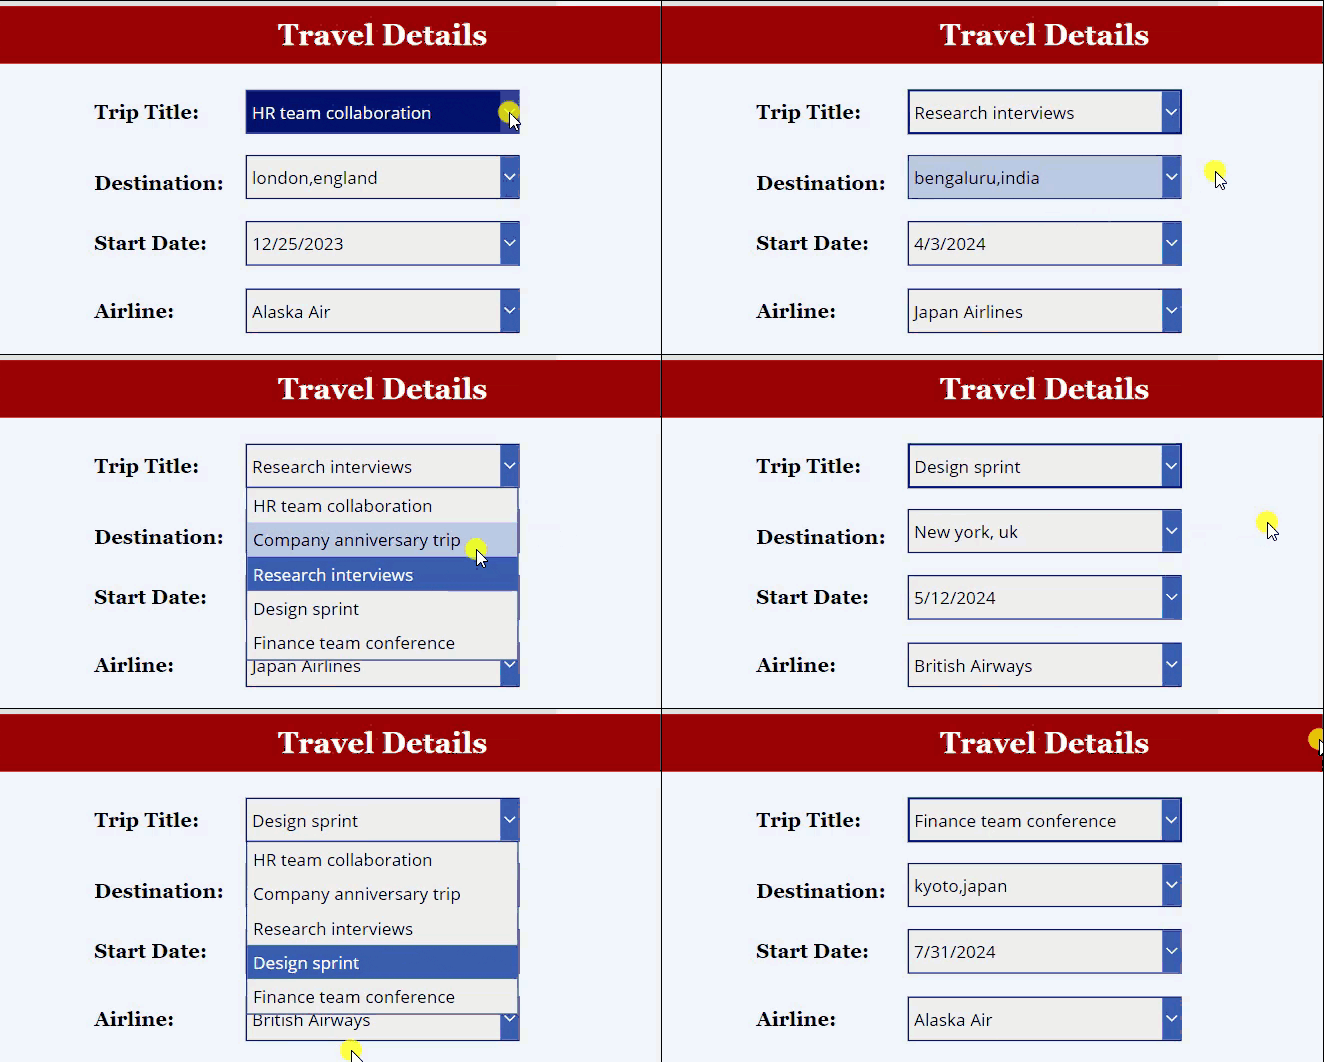
In Power Apps, there are four Dropdown controls [drp_TripTile, drp_Destination, drp_StartDate, and drp_Airline]. When the user selects the trip tile from the first dropdown, the remaining dropdowns filter and display all the trip details based on the selected trip name.
Output:
To achieve it, follow the below steps.
1. On the Power Apps Screen -> Insert a Dropdown control and set its Items property as:
Items = 'Travel Requests'.TitleWhere,
- ‘Travel Requests’ = SharePoint Online list
- Title = SharePoint list text field
2. Next, insert another dropdown control and set its Items and Value property to the code below.
Items = Filter('Travel Requests',Title=drp_TripTitle.Selected.Title)

Value = Destination: Name
Where,
- drp_TripTitle = Power Apps 1st dropdown control name

3. Similarly, insert another dropdown control and set its Items and Value property to the code below.
Items = Filter('Travel Requests',Title=drp_TripTitle.Selected.Title)

Value = Travel Start Date
4. However, when I use the filter condition on the SharePoint list choice field, it does not receive the value, as shown below.

5. To fix this issue, I used the LookUp function instead of the Filter function using the code below.
Items = LookUp('Travel Requests',Title=drp_TripTitle.Selected.Title).Airline
6. Now, preview the app. Whenever the user selects the trip tile from the first dropdown, the remaining dropdowns filter and display selected trip details.

This is how we can work with cascading dropdowns in Power Apps from the SharePoint Online list.
Power Apps Cascading Dropdown Lookup
To create a cascading dropdown lookup, I have created two simple SharePoint Online lists. Such as:
- Employee Country [Source List]
- Employee State [Destination List]
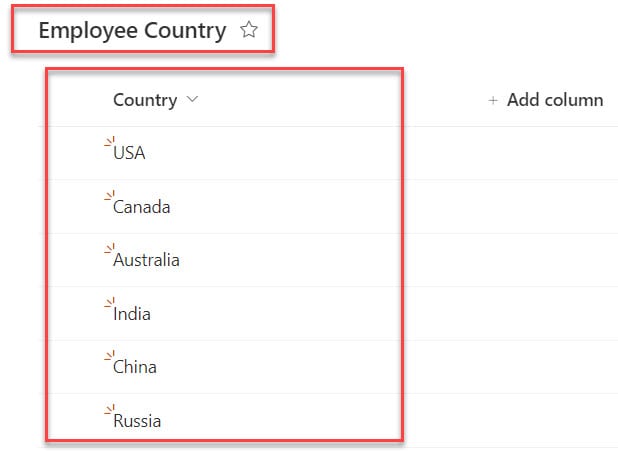
The Employee Country list has only one Title column, and I just renamed it “Country,” as shown below.
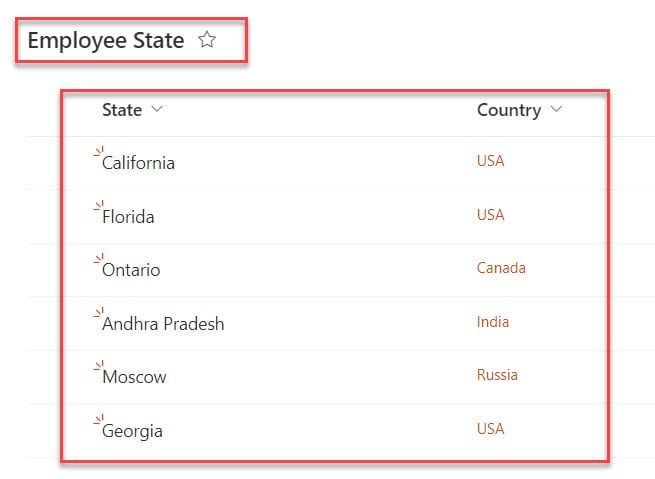
The Employee State list has two columns:
- State = It is a default single line of text
- Country = it is a lookup column [I have added from the Employee Country list]
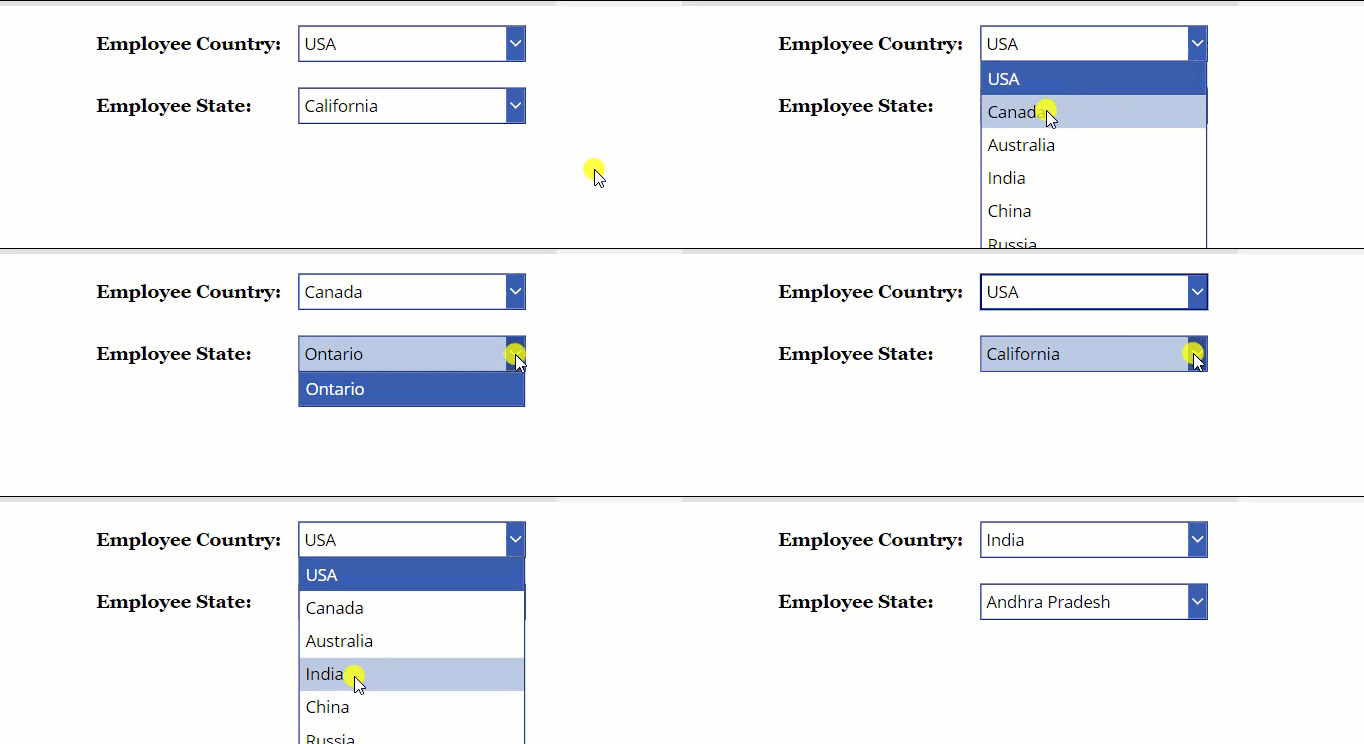
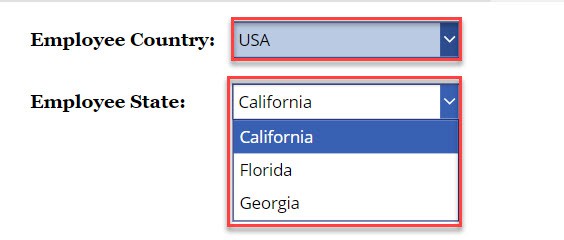
In Power Apps, there are two dropdown controls [drp_Country and drp_State]. Whenever the user selects the country value in the first dropdown, the second dropdown filters and displays the selected country state records.
Output:
To work around this, follow the below-mentioned steps. Such as:
1. On the Power Apps Screen -> Insert a Dropdown control and set its Items property to the code below.
Items = 'Employee Country'.TitleWhere,
- ‘Employee Country’ = SharePoint source list

2. Then, insert another Dropdown control and set its Items and Value property to the code.
Items = Filter(
    'Employee State',
    Country.Value = drp_Country.Selected.Title
)

Value = Title
Where,
- drp_Country = Power Apps 1st dropdown name

3. Save, Publish, and Preview the app. When the user selects the country value in the first dropdown, the second dropdown filters and displays the selected country state records, as shown below.
This way, you can work with the Power Apps cascading dropdown lookup.
Add a blank option to each cascading dropdown in Power Apps
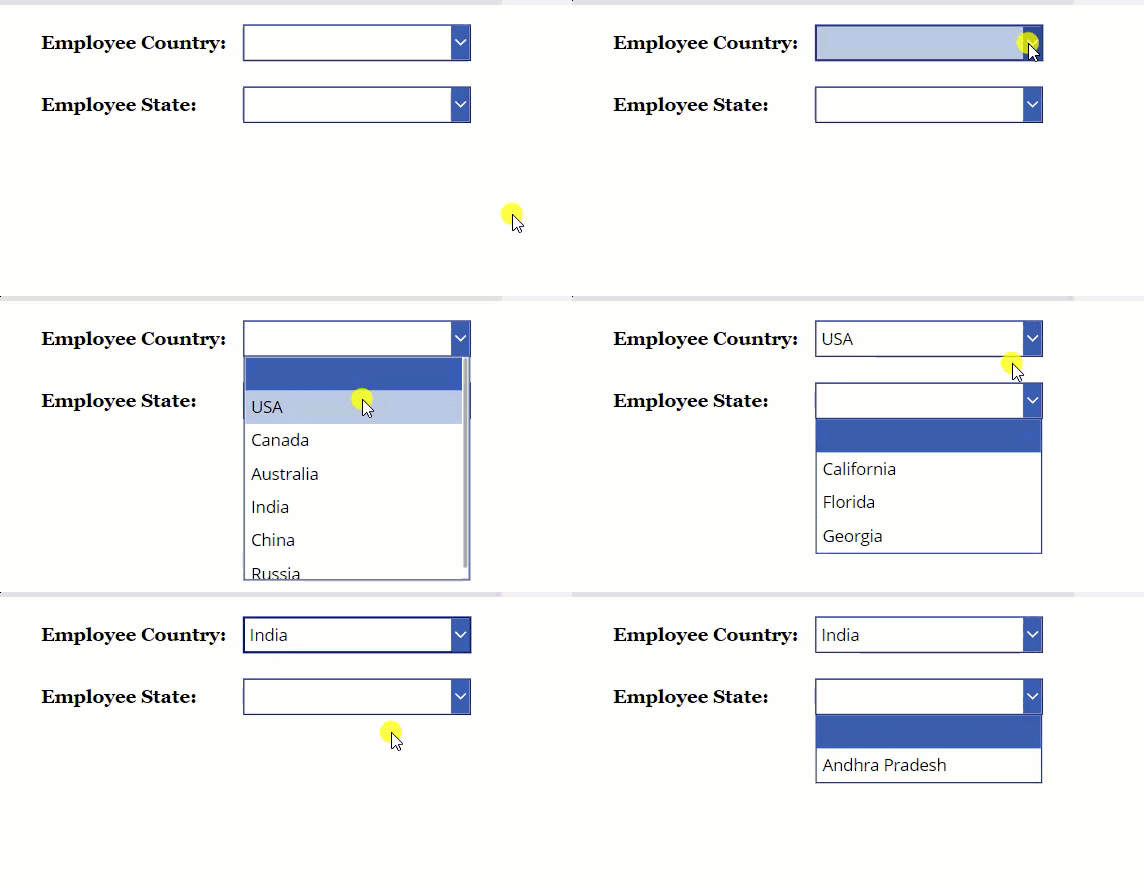
Suppose you want to add a blank value to the Power Apps cascading dropdown to make a better user experience [Whenever the user opens or runs the app, the cascading dropdown’s selected value is blank].
Also, when the user selects any value from the dropdown, the remaining dropdowns will filter and display respective records based on the dropdown selected value.
Have a look at the below output.
1. On the Power Apps Screen -> Select the Country Dropdown and set its Items property to the code below.
Items = Ungroup(
     Table(
         {Value: Blank()},
         {Value: 'Employee Country'.Title}
     ),
     "Value"
 )
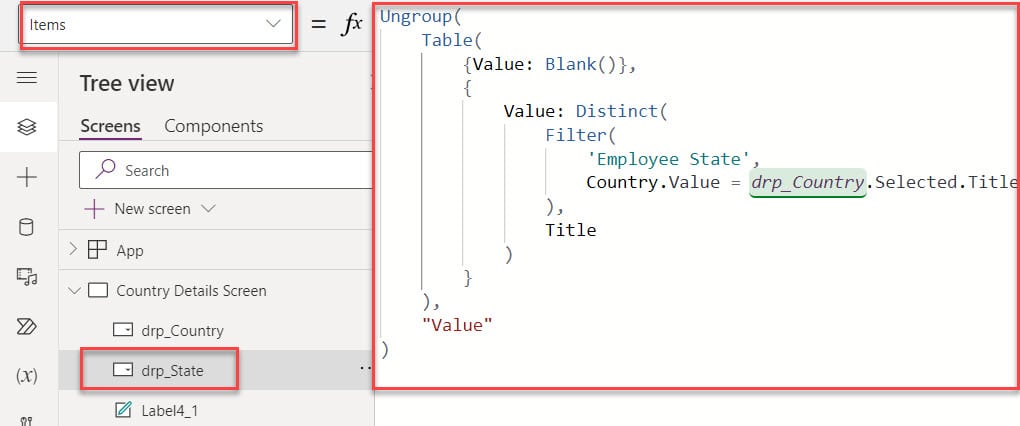
2. Likewise, select State dropdown and set its Items property as:
Items = Ungroup(
    Table(
        {Value: Blank()},
        {
            Value: Distinct(
                Filter(
                    'Employee State',
                    Country.Value = drp_Country.Selected.Title
                ),
                Title
            )
        }
    ),
    "Value"
)
3. Save, publish, and Preview the app. Whenver the user selects any country value from the first dropdown, the second dropdown will filter and display state records based on the selected dropdown country value.
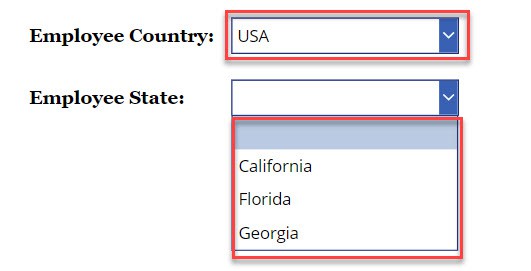
This is how we can add a blank option to each cascading dropdown in PowerApps.
Some more articles you may also like:
- Create Collection in Power Apps
- Power Apps Len Function
- Power Apps Filter Gallery by Dropdown
- Add a Blank Value to a Dropdown List in Power Apps
- Create CSV File in SharePoint Using Power Apps
- Filter Gallery in Power Apps
I trust you find this tutorial useful. Here, we learned how to create a cascading dropdown in Power Apps manually and how to work with the cascading dropdown in Power Apps from the SharePoint list.
Additionally, we also covered the Power Apps cascading dropdown lookup and how to add a blank option to each cascading dropdown in Power Apps.
I am Bijay a Microsoft MVP (10 times – My MVP Profile) in SharePoint and have more than 17 years of expertise in SharePoint Online Office 365, SharePoint subscription edition, and SharePoint 2019/2016/2013. Currently working in my own venture TSInfo Technologies a SharePoint development, consulting, and training company. I also run the popular SharePoint website EnjoySharePoint.com
Fabulous. Very well explained and very usefull. Thank you.