While working with the SharePoint Online document library, we sometimes need to upload a file or multiple files from Power Apps to the SharePoint document library.
In this Power Apps tutorial, I will explore in detail information about upload files from Power Apps to the SharePoint document library including:
- Power Apps upload file to SharePoint document library using flow
- Power Apps upload multiple files to SharePoint
- Power Apps upload file to SharePoint document library without flow
Power Apps Upload File to SharePoint Document Library
Recently, I got the opportunity to work with Power Apps upload files to the SharePoint document library using different real-time scenarios.
I have created a SharePoint document library named “Policy Documents,” which has the fields below.
| Column Name | Data Type |
| Name | It is a default single line of text |
| Modified | Date and time |
| Modified By | Person or Group |
| Review Date | Date and time |
| Is Approved | Yes/NO |

Now, I would like to upload or add a file from Power Apps to the SharePoint document library. Unfortunately, there is no direct way to upload a file or files to the document library from Power Apps.
But there is a way to overcome this issue, like connecting the Power Automate Instant flow to the Power Apps and uploading files using a single button click from Power Apps to the SharePoint document library.
NOTE:
As of the last update in January 2022, uploading files to a SharePoint document library directly from Power Apps without using Power Automate is not directly supported.
However, we can directly upload the files from Power Apps to the SharePoint list without using any flows.
Have a look at the below screenshot for the output.

To achieve it, follow the below steps. Such as:
1. On the Power Apps Screen, insert an Edit form control and set its DataSource to any existing SharePoint list for the “Attachment control.”
DataSource = 'Company Attachments'Where,
- ‘Company Attachments’ = SharePoint Online list
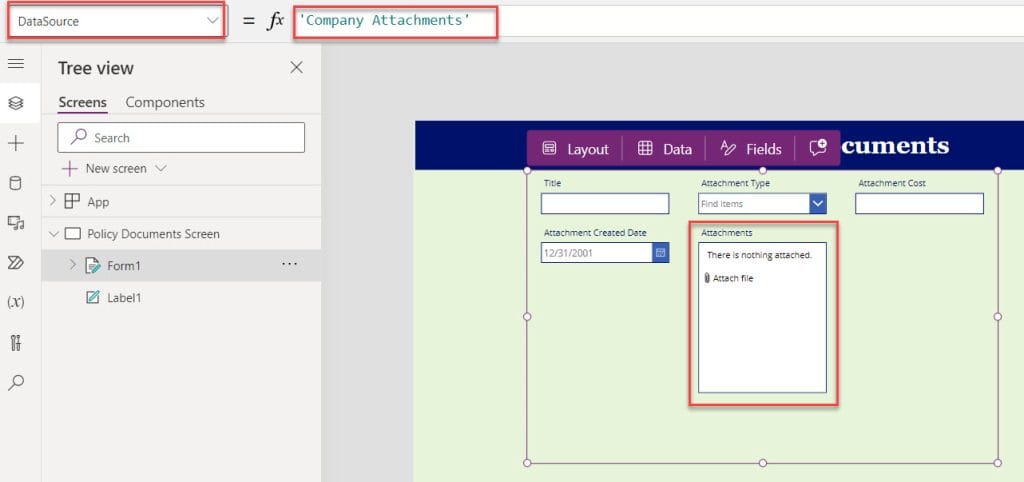
2. Now cut the Attachment control, paste it outside the form, and delete the form. You can see some errors will appear in the Attachment control. To resolve those errors, follow the below properties.
DisplayMode = DisplayMode.Edit
Items = Blank()
Max attachments = 1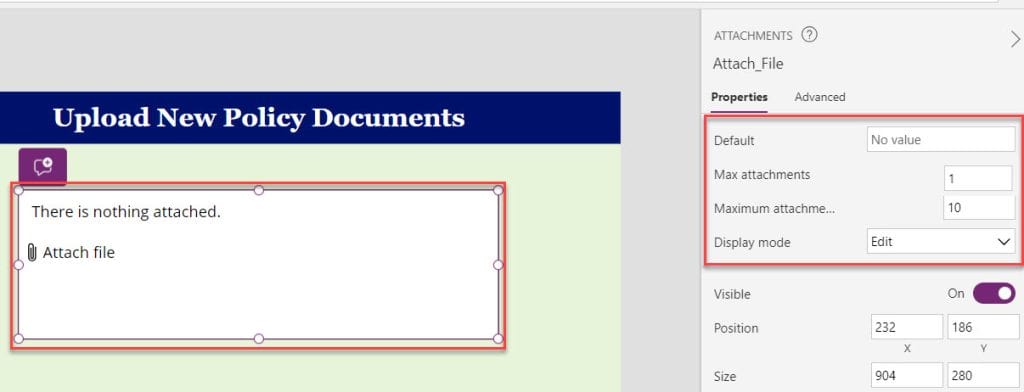
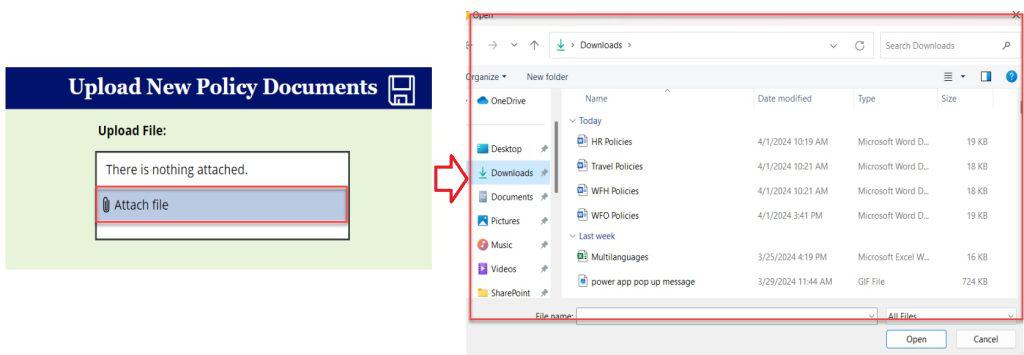
3. Now, the Attachment control is ready to attach any file. Once you click on the Attach file link from the attachment control, it will redirect you to your local system to select the files.
4. Documents or files cannot be uploaded directly to a SharePoint document library from Power Apps; instead, a Power Automate flow must be created for this purpose.
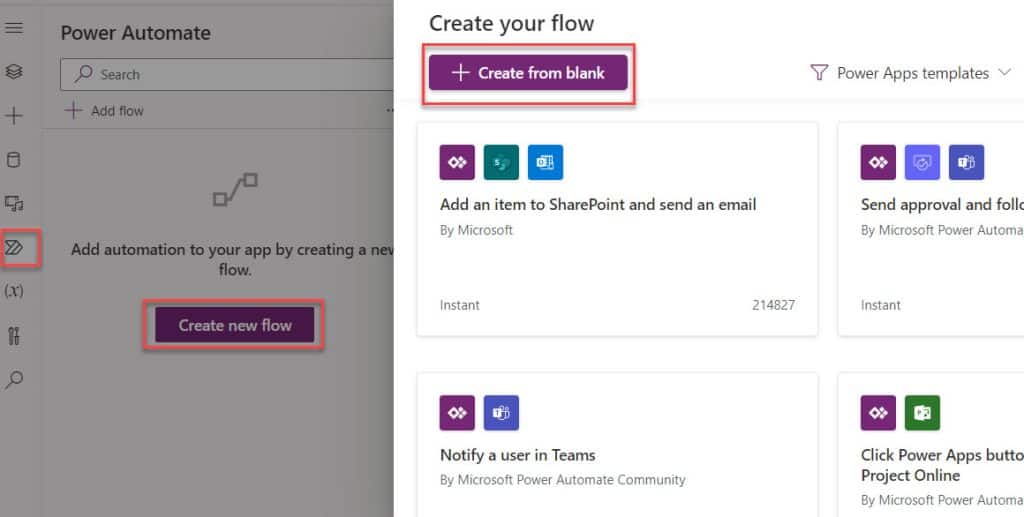
5. For that, go to the Power Automate section, select the Create new flow button, and click on the + Create from blank button, as shown below.
6. Once you click on the “Create from blank” button, the trigger will be created as PowerApps (V2) by default. Then, you can choose the user input as a File.

7. Next, click on the + New step to add an action [Create a file] and provide the below information. Such as:
- Site Address = Provide the specific SharePoint site address URL
- Folder Path = Select the SharePoint document library where you are going to upload the Power Apps files
- File Name = The File Name field requires a Expression -> [triggerBody()[‘file’][‘name’]
- File Content = The File Content field should reference the file located within our flow trigger

8. Once it is done, Rename and Save the flow. You will now find the created flow under the Power Automate section, as shown below.

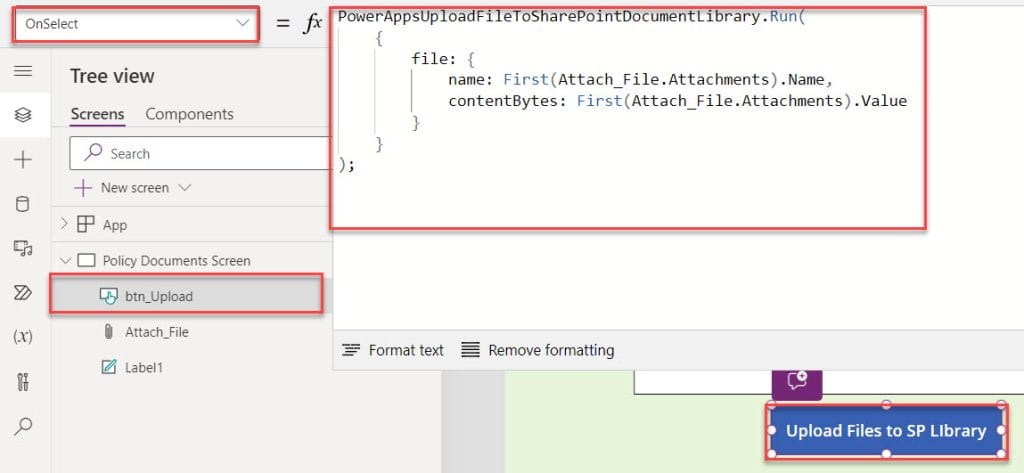
9. Finally, insert a Button control and set its OnSelect property to the code below.
OnSelect = PowerAppsUploadFileToSharePointDocumentLibrary.Run(
    {
        File: {
            name: First(Attach_File.Attachments).Name,
            contentBytes: First(Attach_File.Attachments).Value
        }
    }
);
Where,
- PowerAppsUploadFileToSharePointDocumentLibrary = Power Automate flow name
- name = It stores the filename and extension
- Attach_File = Power Apps Attachment control
- contentBytes = This contentBytes field holds a reference to the attachment file
10. Once your app is ready, Save, publish, and Preview the app. When the user uploads any file or document from the local device and clicks on the button control, the flow will trigger successfully, as shown below.
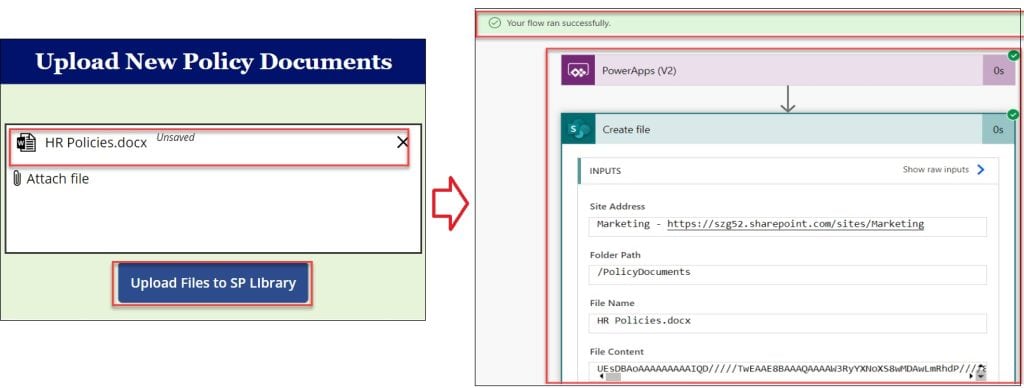
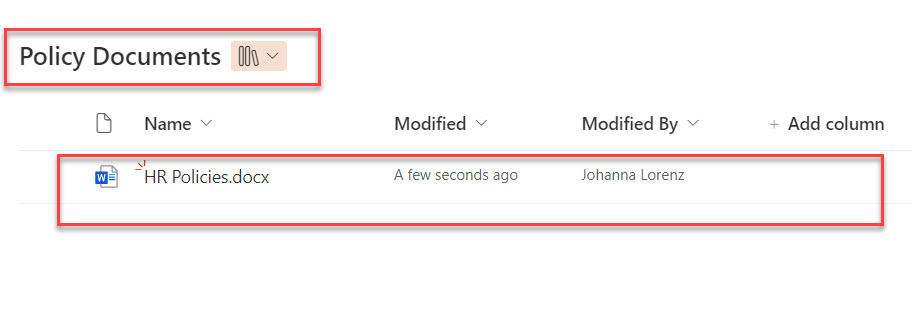
11. Also, the file will stored in the SharePoint Online document library as well.
This way, you can upload a single file from Power Apps to the SharePoint document library.
Power Apps Upload Multiple Files to SharePoint
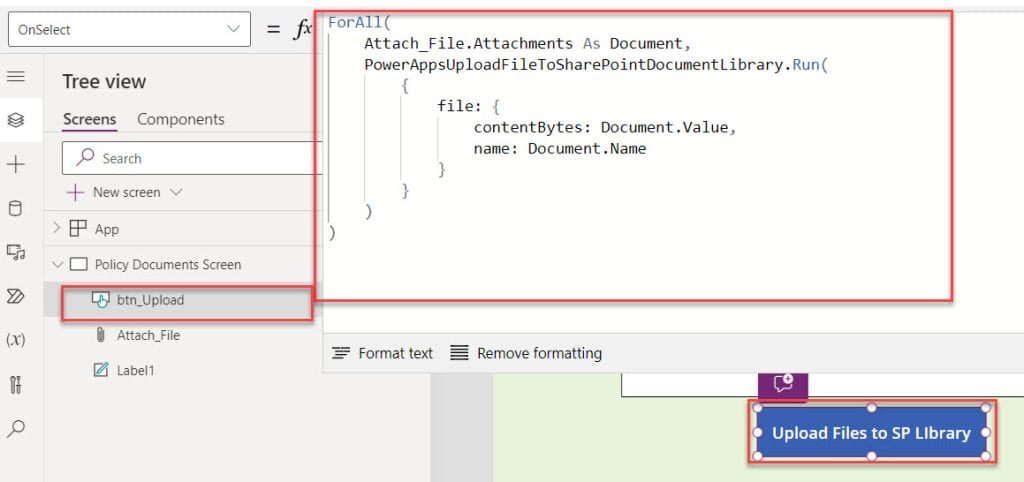
Similarly, if you want to upload multiple files from Power Apps to the SharePoint document library, you can follow the code below to set the button control’s OnSelect property.
OnSelect = ForAll(
    Attach_File.Attachments As Document,
    PowerAppsUploadFileToSharePointDocumentLibrary.Run(
        {
            File: {
                contentBytes: First(Attach_File.Attachments).Value,
                name: First(Attach_File.Attachments).Name
            }
        }
    )
)
Note:
If you want to upload multiple files from Power Apps to SharePoint library, you should increase the Max attachments from 1 to another value.
Save, Publish, and Preview the app. Whenever the user selects multiple files from a local device and clicks on the button control, the flow will trigger successfully, and files will be stored in the document library.

This is how we can work with Power Apps upload multiple files to the SharePoint library.
How to Add Metadata to the SharePoint Document Library
Suppose you want to upload the file, including the metadata from Power Apps, to the SharePoint document library; follow the below steps. Such as:
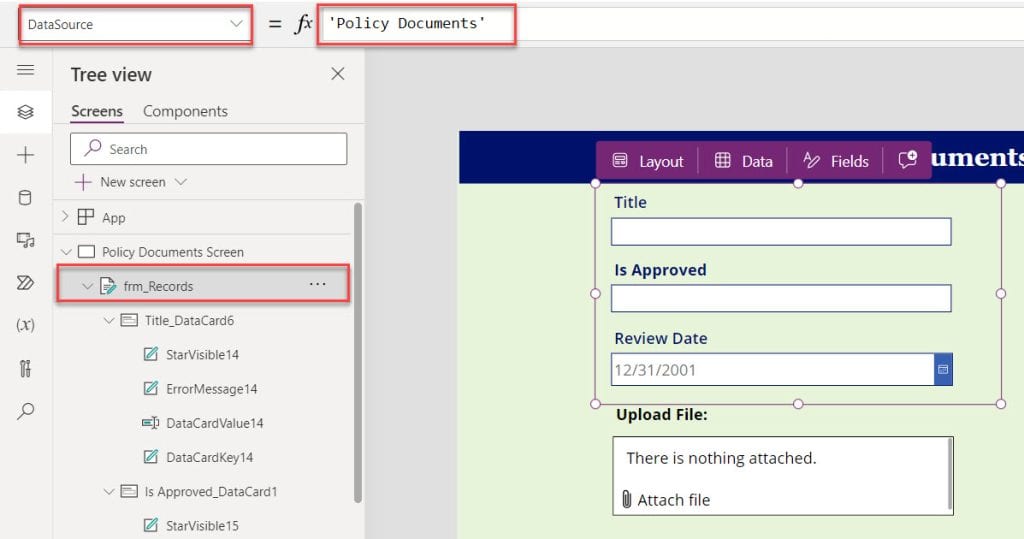
1. On the Power Apps Screen -> Insert an Edit form above the Attachment control and set its DataSource as:
DataSource = 'Policy Documents'Where,
- ‘Policy Documents’ = SharePoint document library
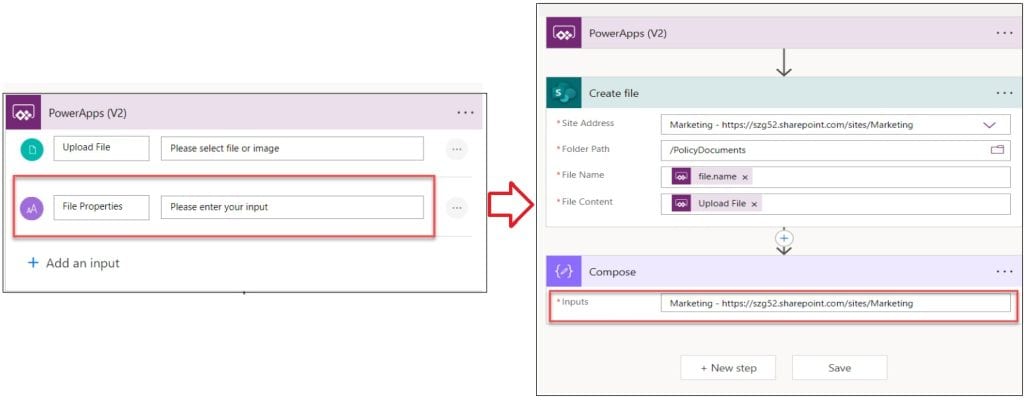
2. Now, edit the current flow, like adding Text input for File Properties -> Add Compose action and setting Its Inputs as a SharePoint online site, as shown below.
3. Next, add another action [Update file properties] and provide the below information. Such as:
- Site Address = Provide site address from Compose outputs
- Library Name = By default, it will take library code based on the outputs
- ID = You can Seect dynamic content of ItemID
- Item = For Item property, you can use the following expression like, (json[triggerBody()[‘text’]) using File Properties

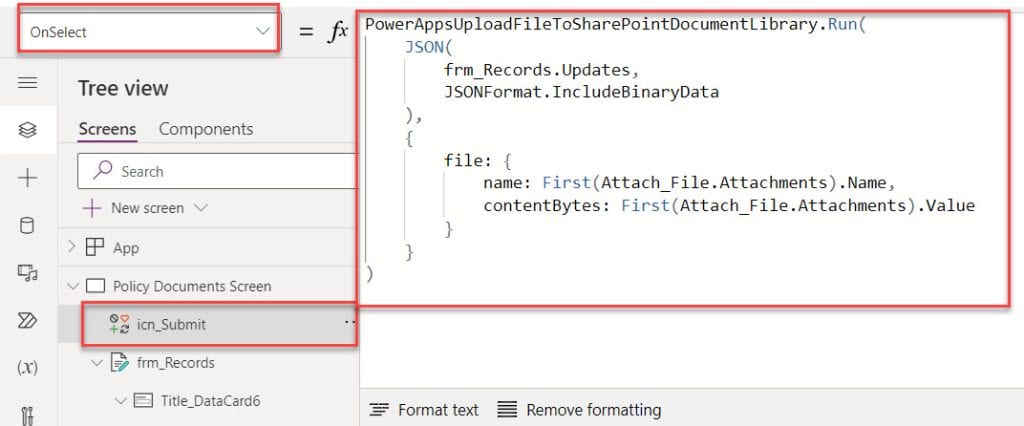
4. After saving the flow, insert a Submit icon on the Power Apps Screen and set its OnSelect property to the code below.
OnSelect = PowerAppsUploadFileToSharePointDocumentLibrary.Run(
    JSON(
        frm_Records.Updates,
        JSONFormat.IncludeBinaryData
    ),
    {
        file: {
            name: First(Attach_File.Attachments).Name,
            contentBytes: First(Attach_File.Attachments).Value
        }
    }
)
Where,
- JSON() = We can use this Power Apps JSON() function to add metadata to the SharePoint document library
5. Save, Publish, and Preview the app. Once the user adds metadata, including the attachment, and clicks on the save icon, the flow will trigger successfully, and you will get the attachment file, including metadata, on the SharePoint library.

I trust this Power Apps tutorial will be helpful. If you have any requirements related to uploading a Power Apps file to the SharePoint document library, you can follow the above examples to do it.
Also, you may like:
- Power Apps Update Data Table
- Create Power Apps Popup Message
- Power Apps Set Text input Value Based On Another Field
- Power Apps Value Function
- 6 Easiest Ways to Filter Gallery in Power Apps
I am Bijay a Microsoft MVP (10 times – My MVP Profile) in SharePoint and have more than 17 years of expertise in SharePoint Online Office 365, SharePoint subscription edition, and SharePoint 2019/2016/2013. Currently working in my own venture TSInfo Technologies a SharePoint development, consulting, and training company. I also run the popular SharePoint website EnjoySharePoint.com
Great article, thank you. However, I’m experiencing an issue with Step #8. While attempting to add the File Content parameter to the Create File action. I’ve followed your labeling and instructions so I’m using the same names, etc.
When I attempt to add this text to the File Content field:
dataUriToBinary(items(‘Apply_to_each’)[‘DataStream’])
I receive an error message stating “The expression is invalid”. What am I missing?
I ran into the same problem. I got around it by choosing Dynamic Content and then choosing the DataStream value from Parse JSON and it appeared to work, at least it copied the files. I need to do some more testing though to see if that will cause some other problem.
I’m having same issue. Were you able to resolve?
I think the problem is that you’re cutting and pasting from this website, and the ‘ character gets transformed into an incorrect character. Try manually replacing those and see if it works better for you.
I had a similar issue, turns out I had to remove some characters, following this guide: https://powerusers.microsoft.com/t5/Building-Power-Apps/Flow-to-pull-images-to-SharePoint/td-p/841999
Good article – but my flow fails at Step 10
The Automate step ‘PowerApps’ give the following error “InvokerConnectionOverrideFailed. Failed to parse invoker connections from trigger ‘manual’ outputs. Exception: Could not find any valid connection for connection reference name ‘shared_sharepointonline’ in APIM tokens header.”
And the same error is also on the buttons. Any assistance welcomed.
Problem Sorted – had to drop connection via the Action tab in Power Apps save it and add it again. Here’s the helping URL https://powerusers.microsoft.com/t5/Building-Power-Apps/PowerApps-error-when-workflow-is-run-quot/td-p/491911
Glad the issue has been resolved.
Hi, do you know maybe how to reset/clear attachments control after uploading files?
Hi,
Can you check out this article https://www.spguides.com/powerapps-email-attachment-control/
This tutorial was a life saver, thank you!
Thanks, it helps!
Brilliant! An absolute lifesaver. After days of looking around and trying to figure this out, your guide is the first one that ties everything together. I used a Logic App instead of a flow, made a few tweaks, and I have files flying into my Azure file share now. I will never understand why microsoft makes this as convoluted as possible. Thanks again!
Hello.
Thank you for a simple guide on how to upload files to a document library using flow. Unfortunately, in step 8, the flow ends with an error:
Unable to process template language expressions in action ‘Create_file’ inputs at line ‘1’ and column ‘8023’: ‘The template language function’ dataUriToBinary ‘expects its parameter to be formatted as a valid data URI. The provided value ‘appres: // blobmanager / 493b8d139c8b4c34a1c798e8f48faf7d / 3’ was not formatted correctly. Please see https://aka.ms/logicexpressions#dataUriToBinary for usage details. ‘.
I think you might have missed the step where you need to convert that blob pointer to the image data stream. An easy clue is the string should not start with “appres: // blobmanager…”, but rather something like “data:image…”
Hope that helps point you in the right direction.
This article is great, thanks for the help doing something pretty difficult
Thanks Lee!
does it allow to upload a file larger than 25MB since attachment control has size restriction?
How would you update the meta data individually for these files? I’ve created a gallery to edit the varfields for each attachment file but I don’t know how to get the update properties to update each correlated file with their new data.
After a few typos, I got my act together and this worked as you explained. I appreciated the thorough portrayal! Many thanks for your inestimable help Bijay
NIce post here, how do we delete a file from the SP library based on the file removed from the attachmentBox from powerapps then update the library with the remaining files.
Hi,
Is there any way we can see the thumbanail of the file attached and uploaded?
Hi
Do you know if its possible to upload images to a specific folder that you suggested in Powerapps, i want to put my images in a folder i select in powerapps, mainly because we will be uploading images to different folder each time.
Thanks for any help in Advance.
Just add another input field in PowerApps Trigger and add param with your path for example /Folder/OtherFolder and use dynamic content instead of Folder from Create file action
Hello, good afternoon, I get an error when opening the document uploaded to SharePoint online, why would it be?
Same issue as above. Attachment control and flow works but the file opens blank. I’ve tried jpeg and pdf files and have opened in sharepoint and tried downloading first. All open blank. I looked at the data stream, but can’t find anything wrong?
You have set the “Image” property in the Gallery to ThisItem.Value
Gracias por el articulo. Una consulta, el flujo me tira error en la acción Compose: InvalidTemplate. Unable to process template language expressions in action ‘Compose’ inputs at line ‘0’ and column ‘0’: ‘The template language function ‘json’ parameter is not valid. The provided value ‘adj’ cannot be parsed: ‘Unexpected character encountered while parsing value: a. Path ”, line 0, position 0.’. Please see https://aka.ms/logicexpressions#json for usage details.’.
Qué puede ser?
This article is great!!! I have adopted our SharePoint/PowerApps processes and I am “green” and do not have any formal training in these subjects. This has helped a lot!!
If I could ask one question. To further this process, I would like to create a button to launch the attachment. I assume using the launch command? I am having some trouble. If you have any advice, I would appreciate it!
Having some issues, I’m still getting the appress://xxx value off the Image attribute from the gallery image.
It worked!!!
Hi There, I’m not getting the attachment data card when attaching the edit form to a sharepoint library. any suggestions?
hi I tried the above flow I am getting this error. please let me know how to fix this
“Failed to parse invoker connections from trigger ‘manual’ outputs. Exception: Could not find any valid connection for connection reference name ‘shared_sharepointonline’ in APIM tokens header.”
Hello and thank you for this tutorial. It is exactly what I need for an awards app where people can submit nominations. What I’d like to do is have the nominations and supplemental documents saved to a Sharepoint list and library, but obviously I do not want anyone except the administrators of these awards to have access to this information. If I follow the steps of this tutorial, will it work if I do not share the Sharepoint site with the people submitting the form and uploading the documents? The data source about the awards in in sql and implicity shared, but the nomination data needs to be private. Any help on how to design this securely would be appreciated.
Hi, Bijay!
I have a Dataverse table as BookingTables and I have enabled Notes and Files for that table.
and I have added Attachments in the form (Which is available when you Turn on Enabled Notes and Files)
On Submit, I am submitting Form Data to Dataverse and Attachment to Notes and then Using flow to Move the Attachments from Notes to SharePoint Document Library
and I have also updated the SharePoint Library File with the Dataverse GUID to relate it.
Now, I want to show this file in my Edit form in Attachment Control (which is of Dataverse Table).
Please help
In the “PowerApps Upload File to SharePoint Library using Flow” step 3, you lay out how to update the items for a choice control. What would you need to do and update for a text control? The Choice control worked out great. I am so close to finishing this project I just need to in this section how to handle text controls, and if anything other than the variable and update file properties need to updated in the flow. Thank you so much for this tutorial. It has been really great to use.
I meant the section “PowerApps Upload Files to SharePoint Library with different types of Columns” section 3.