The OnSelect property of the button control in Power Apps allows us to perform actions like submitting data, navigating to another screen, changing background colors, etc.
In this PowerApps Tutorial, I will explain various examples of using this OnSelect property of the button control to perform some actions.
How to Use the Power Apps Button Control OnSelect Property?
In Power Apps, the Button is an input control, and its OnSelect property specifies the actions that occur when the button is clicked.
You can insert your code into the Button’s OnSelect property to trigger an action. If you do not specify any code for this property, no action will be taken at the click of the button.
Look at some properties of the Power Apps button control.
PowerApps Button Control Properties
| Property | Description |
|---|---|
| Text | We used this property to display the name on the button control. |
| OnSelect | We used this property to perform some actions while clicking the button control. |
| BorderColor | It defines the color of the control’s border |
| Color | It specifies the text control in a control. |
| DisplayMode | It specifies whether the control allows user input (Edit), View, or Disabled. |
| Fill | It defines the background color of a control. |
| Pressed | The background color will change when the user clicks the button input. |
| PressedColor | When the user clicks the button input, then the text color will change. |
| PressedFill | The background color will change when the user clicks the button control. |
| Size | Specifies the font size of the text that appears on the control |
| Visible | It specifies whether the control appears or is hidden. |
| Width | It specifies the width of the button control. |
Change the Button Color on Press in Power Apps
Power Apps provides the PressedColor property for the button’s font color and the PressedFill property for the button’s background color to change the button color when pressed.
Follow the steps below to change the color each time it’s pressed.
1. Provide the formula below in the Onselect property of the button control.
Button1.OnSelect = UpdateContext({ toggleValue: !toggleValue })2. Then, put the formula below in the button control’s Color property.
Button1.Color = If(toggleValue, Color.Black, Color.Green)3. Provide the formula below on the Fill property of the button control.
Button1.Fill = If(toggleValue, Color.Blue, Color.Orange)By following these steps, you’ll see how the button controls background color and font color changes while you press the button.
Change Button Colors based on Selections in Power Apps
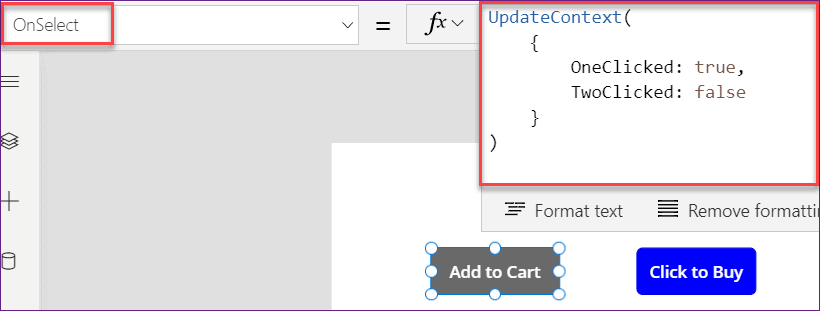
I have two button controls: Add to Cart and Click to Buy. When the user clicks the Add to Cart button, the Click to Buy button color changes to grey. The same is true for another button. However, the user can select only one button at a time.

Follow the steps below to achieve this!
1. Provide the formula below in the OnSelect property of the Add to Cart button control.
OnSelect = UpdateContext(
    {
        OneClicked: true,
        TwoClicked: false
    }
)
Here,
OneClicked, TwoClicked = These are the context variable names for which I specified the boolean values true and false. You can change the context variable names.
2. Similarly, use the formula below for the OnSelect property of the Click to Buy button control.
OnSelect = UpdateContext(
    {
        TwoClicked: true,
        OneClicked: false
    }
)
Here, I have specified the TwoClicked variable value as true and the OneClicked as false.
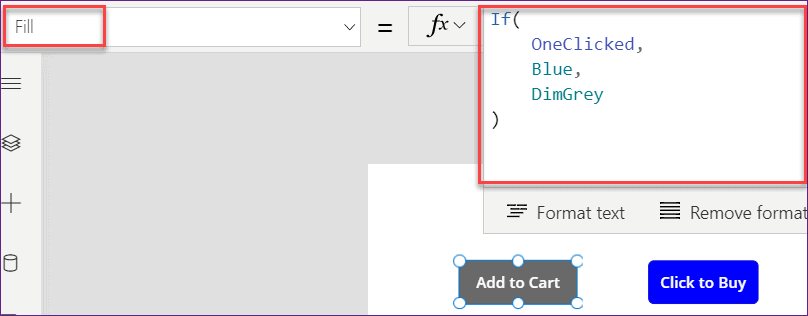
3. Next, select the Add to Cart button and set its Fill property to the below formula:
Fill = If(
    OneClicked,
    Blue,
    DimGrey
)
Where,
OneClicked = Specified Context variable name
4. Similarly, select the second button (Click to Buy) and apply the below formula on its Fill property as:
Fill = If(
    TwoClicked,
    Blue,
    DimGrey
)
5. Now, save and preview the app. When you click the first button (Add to Button), the color will change to Blue, and the second button will display a Grey color.
Similarly, when you click on the second button (Click to Buy), it will appear in Blue, and the first button will be Grey. At the same time, you can only press one button control.
Disable the Power Apps Button Control
In this section, we’ll see how to disable the button control by using its OnSelect property. Refer to the image below; after clicking this button, it is disabled.

Follow the steps below to achieve this!
1. Provide the formula below in the OnSelect property of the button control.
OnSelect = UpdateContext ({DisplayMode: DisplayMode.Disabled})Where,
- DisplayMode = Context Variable Name
- DisplayMode.Disabled = This is the button’s display mode property where I have specified it to disable mode

2. Again, go to the DisplayMode property of the button input control and set this below code:
DisplayMode = DisplayModeWhere,
- DisplayMode = Specified context variable name

Now save and publish the app. While previewing, once you press it, the button will be disabled. (Please note that this will work only once in the app. That means the user can only press the button once.)
Trigger a Power Automate Flow with Power Apps Button Control
In this example, I will discuss how we can run a PowerAutomate or flow just by clicking a PowerApps button.
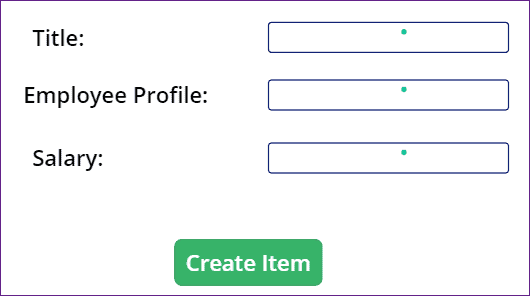
The screenshot below shows three text input controls: Title, Employee Profile, and Salary. The Create Item button control will help you to run the flow.
This flow will store the details in the SharePoint list. To achieve this, follow the steps below.
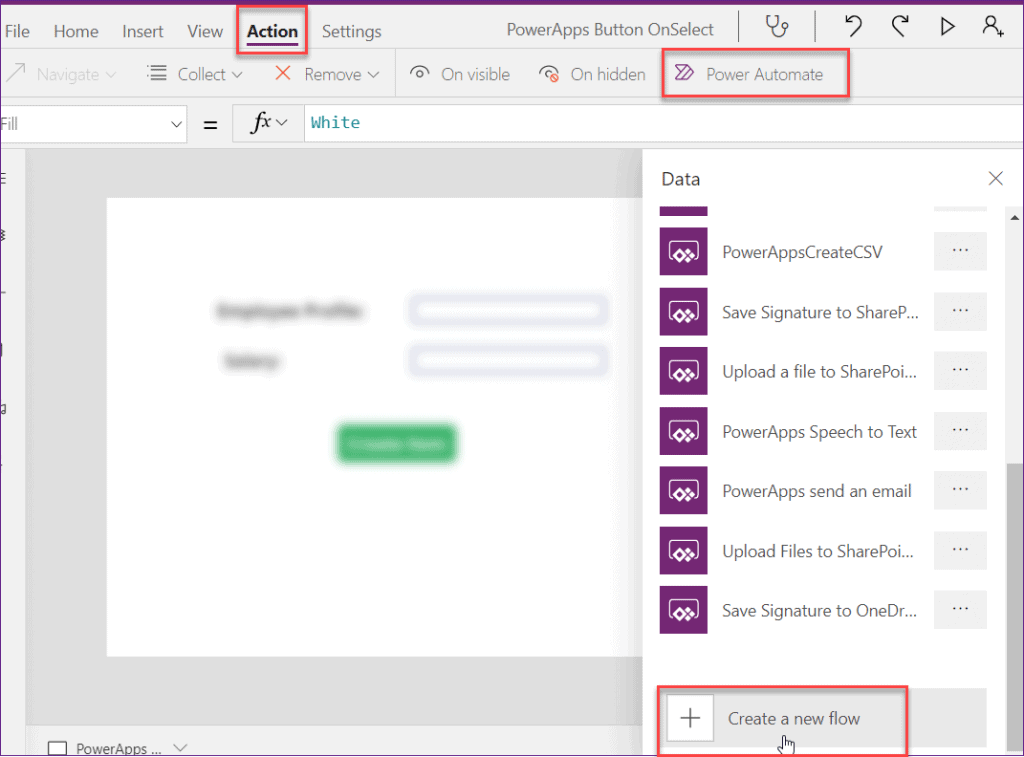
1. On the PowerApps screen, Go to the Action section -> Power Automate -> Click on + Create a new flow, as shown in the screenshot below.
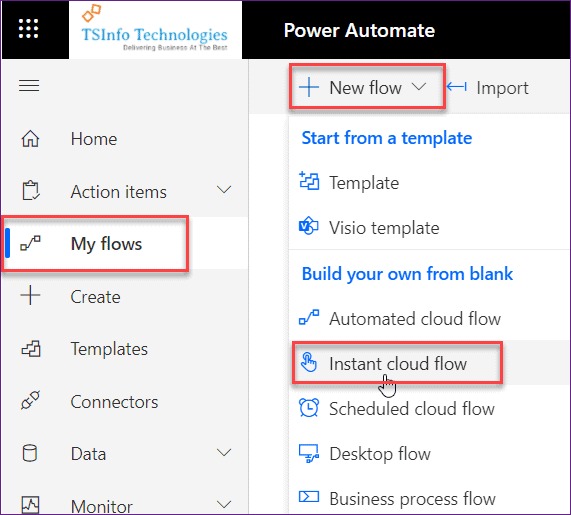
2. Now, it will open with the page below. Go to My flows -> + New flow -> Instant cloud flow.
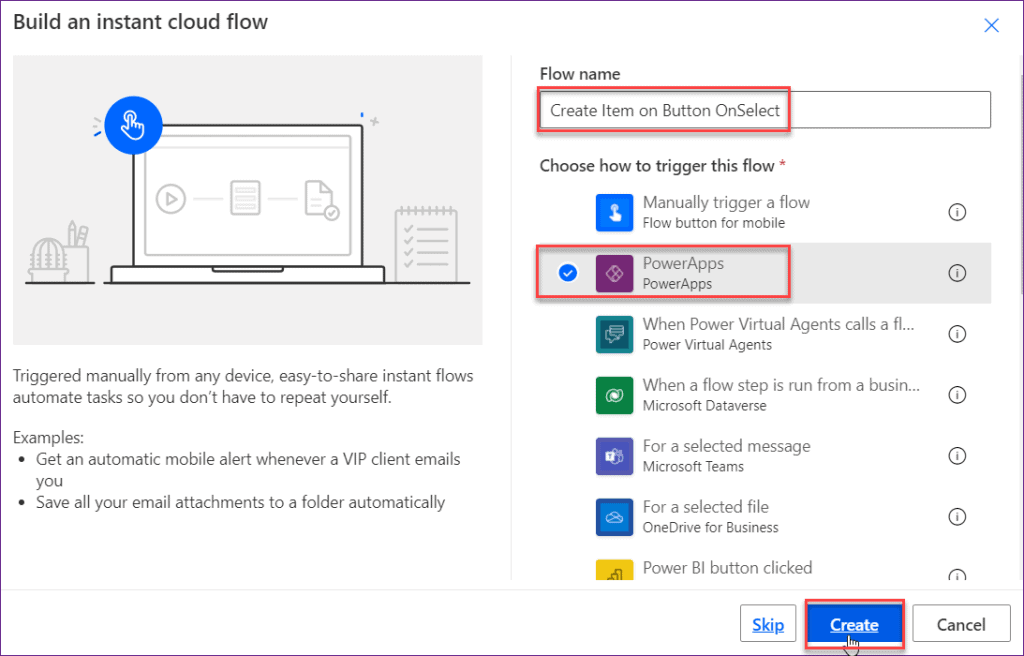
3. Enter the flow name. Then, click the Create button.
4. You can see the flow screen will appear below. Click on the + New step to add a new action.

5. Hence, we want to create a new item in the SharePoint custom list, So we need the action “Create item.” Enter the values below for the parameters of this action.
- Site Address: Enter or select the SharePoint site address.
- List Name: Specify the SharePoint list name.
- Title: Select the Title field and click “Ask in Power Apps” from the Dynamic content. The title column will then come from Power Apps.
- Employee Profile: Select the Employee Profile field and click “Ask in Power Apps” from the Dynamic content. The employee profile column will then come from Power Apps.
- Salary: Select the Salary field and click “Ask in PowerApps” from the Dynamic content. The salary column will then come from Power Apps.
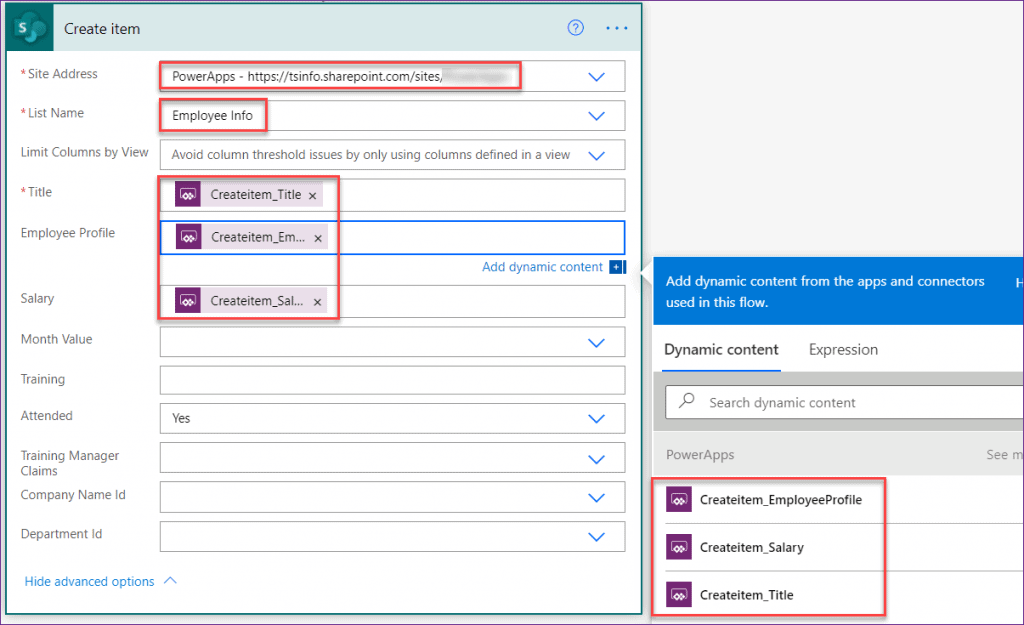
6. Next, save the flow and return to the Power Apps app. Here, the new flow will appear in the Flow data window. Click on it. Once you click the flow, the new flow name will be integrated with the button’s OnSelect property.
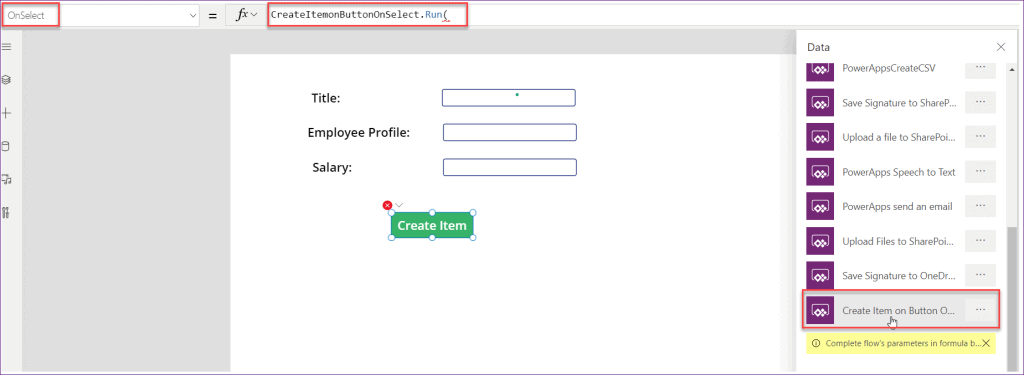
7. In the OnSelect property of the Create Item button. Provide the formula below.
OnSelect = CreateItemonButtonOnSelect.Run(txtEmpProfile,txtSalary,txtTitle)Where,
txtEmpProfile,txtSalary,txtTitle = Text input control names
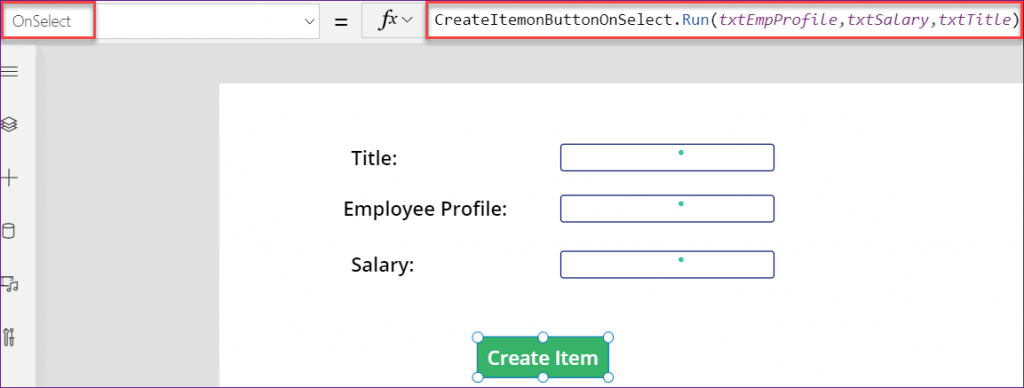
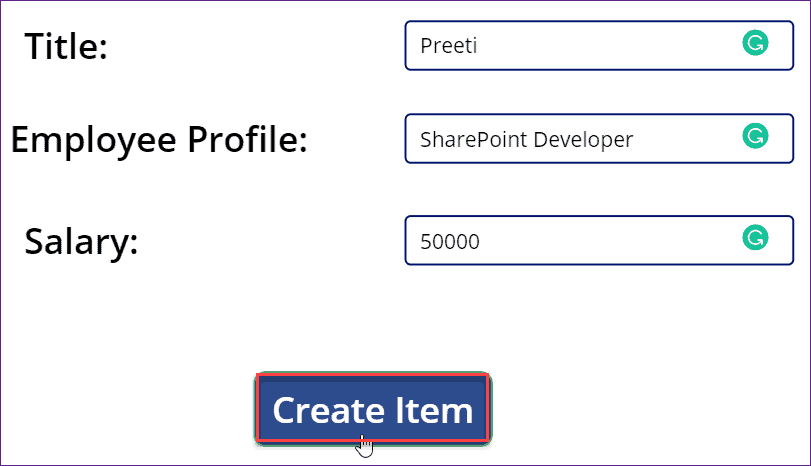
8. Now, save and publish the app. While previewing the app, provide the details and click the Create item button. It will trigger the flow and save these details into the SharePoint list.
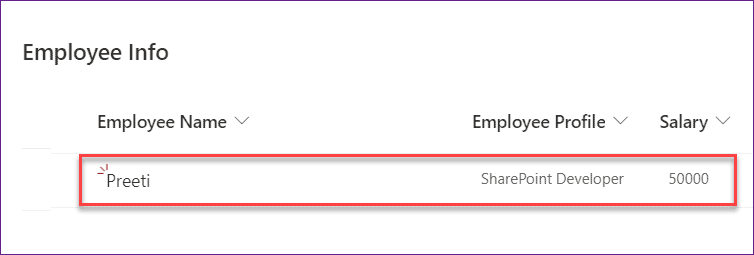
9. Finally, go to the SharePoint list (Employee Info), and the new item will be created, as shown in the screenshot below.
This is how we can trigger a Power Automate flow with the Power Apps button control.
How to Use Power Apps Button for Data Submission and Screen Navigation
In this section, we’ll see how to submit the data to the SharePoint list and navigate to another screen simultaneously with a single click of the Power Apps button.
I have an edit form in the Power Apps application that contains SharePoint list data (Travel Details). Now, I want to perform two actions when the user presses the submit button. Those actions are:
- The form data will be submitted in the SharePoint list (Travel Details).
- After submitting the data, it will navigate to another (Thank You) screen.
NOTE:
Separate multiple actions with a Semicolon (;).
Provide the formula in the OnSelect property of the Submit button.
OnSelect = SubmitForm(Form1); Navigate(Screen2);Where,
- Form1 = Edit form name
- Screen 2 = Thank you screen. After submitting the form, it will navigate to this specified screen.
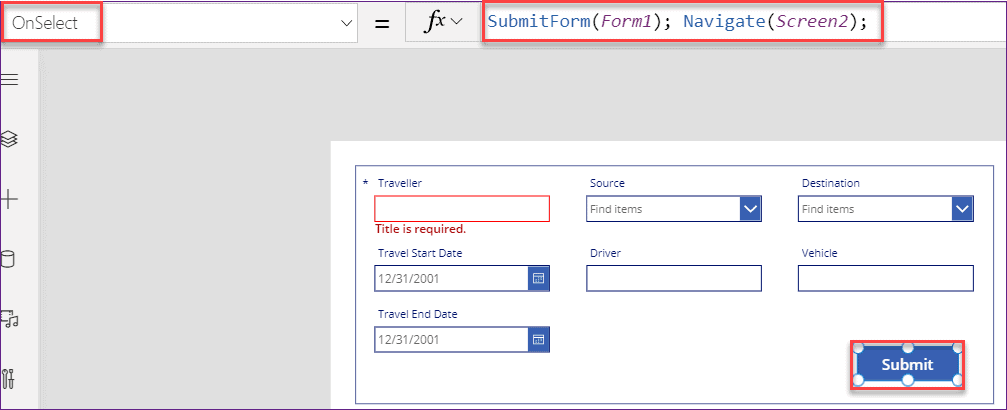
Now save and preview the app. Enter all the field values in the form and click the submit button. The data will be submitted to the existing SharePoint list (Travel Details) and, at the same time, navigate to Screen2.
To learn more about How to navigate between the screens using the Power Apps button control. Follow this article: Navigate between the screens.
Set Field Value using Power Apps Button Control
Do you ever set the field value on the Power Apps button select? If not, the scenario below represents a simple one you can easily understand.
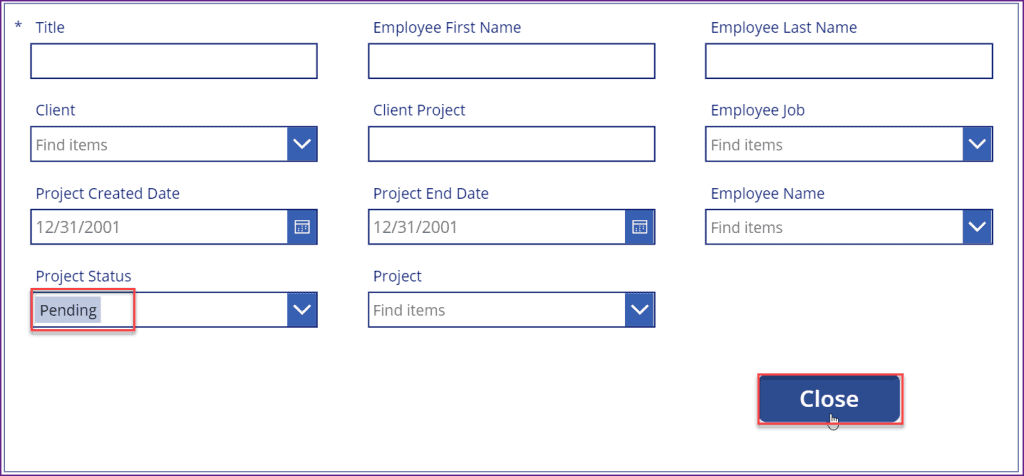
I have a SharePoint list named Project Details. This list has a Choice column named Project Status. This choice column has these many values:
- Submitted
- Approved
- Rejected
- Pending
I have an Edit form with a SharePoint list connection named Project Details in Power Apps. Also, a button control is named Closed. When I click this close button, it will set the choice field value as Pending.
To achieve this, follow the steps below!
1. Provide the formula below in the OnVisible property of the screen.
OnVisible = NewForm(Form2);Set(ChoiceVar, Blank());Where,
ChoiceVar = Variable name

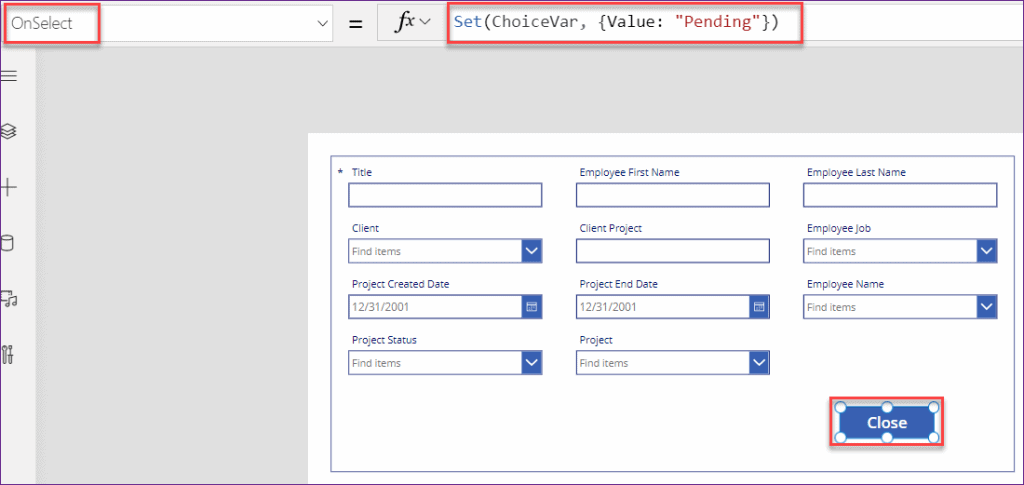
2. Now select the Close button and set this below formula on its OnSelect property as:
OnSelect = Set(ChoiceVar, {Value: "Pending"})Where,
- ChoiceVar = Specified variable name
- Value: “Pending” = Here, I have specified the value as Pending
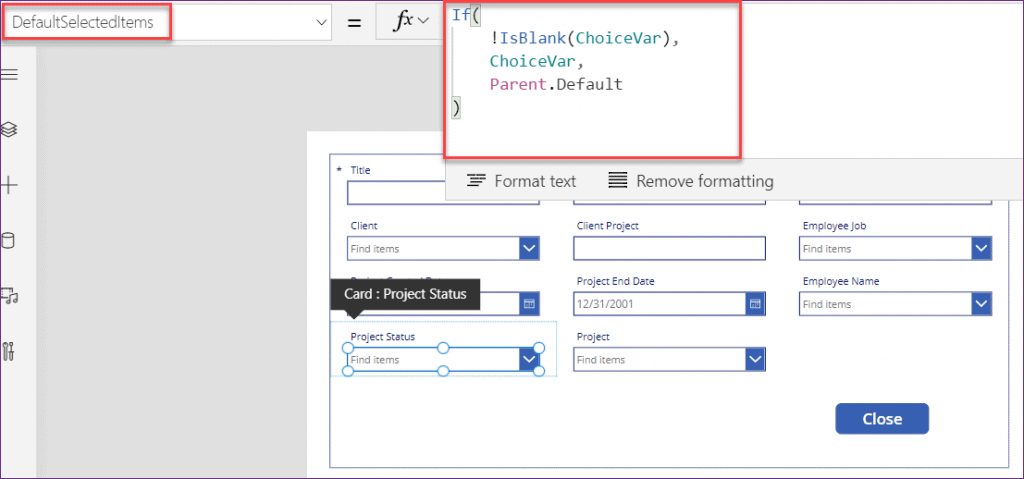
3. Next, select the project status ComboBox control and apply the below formula on its DefaultSelectedItems property.
DefaultSelectedItems = If(
    !IsBlank(ChoiceVar),
    ChoiceVar,
    Parent.Default
)
Refer to the screenshot below.
4. Save and Publish the app. While previewing, click the close button. The project status field value will update to Pending.
In this way, you can set the field value using the Power Apps button when you select it.
Open a Hyperlink using Power Apps Button Control
It’s really interesting that when a user clicks the button control, it will open a hyperlink or URL for a specific website. To achieve this, follow the steps below.
1. To open a hyperlink or URL through Power Apps. We’re using the Launch function.
Syntax: Launch( "https://bing.com" )Within the launch function, we must provide the URL with double quotations.
2. Provide the formula below in the OnSelect property of the button control.
OnSelect = Launch("https://www.tsinfotechnologies.com/")
Save and publish the app. While previewing, click the button control once, and it will navigate to a specified website that we have provided.
Change the Power Apps Button Control Text based on a Condition
This section will explain how to change the Power Apps button control text based on condition. Here, I have a button control named Show Me. When the user clicks this button, it will change to Hide Me. Again, if the user clicks this button(Hide Me), it will change to Show Me, and vice versa.

Follow the steps below to achieve this.
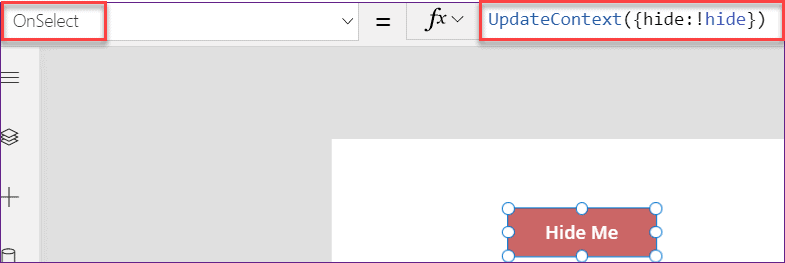
1. Provide the formula below in the OnSelect property of the button control.
OnSelect = UpdateContext({hide:!hide})Where
- hide = Context Variable name
- !hide = This is the value given to the variable
2. Next, set the below code on the button’s Text property.
Text = If(
    hide,
    "Show Me",
    "Hide Me"
)
The above code specifies if the button value is “hide,” then the text will appear with “Show Me”; otherwise, it will appear with “Hide Me.”
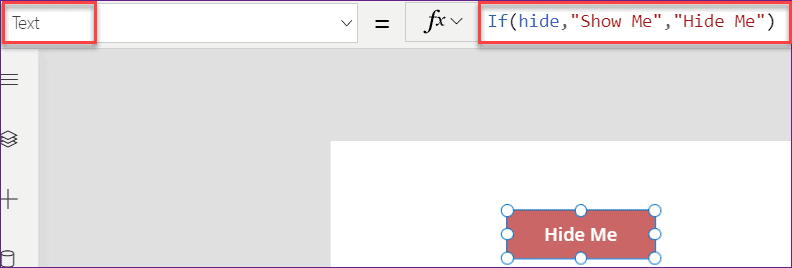
Rather than this, if you want to design more, you can use other control properties. It may be to disable the button control or to change its color.
3. To disable/enable the button control, you can set its DisplayMode property to the below formula.
DisplayMode = If(hide,DisplayMode.Edit,DisplayMode.View)4. if you want to change the color, you can easily use the Fill property to this code below.
Fill = If(hide,Color.Red,Color.Green)In this way, you can change the text, color, and display mode of the Power Apps button control based on the condition.
Navigate Between Two Screens with a Single Power Apps Button
I’ll explain navigating between two screens with a single Power Apps button control here. I have an Event Registration Form connected to the SharePoint list in my Power Apps application.
Within the form, there is Want to Submit? Yes/No field (Power Apps Toggle Control). If this field value is Yes, it navigates to the success screen after clicking this register button. If not, it navigates to the error screen.
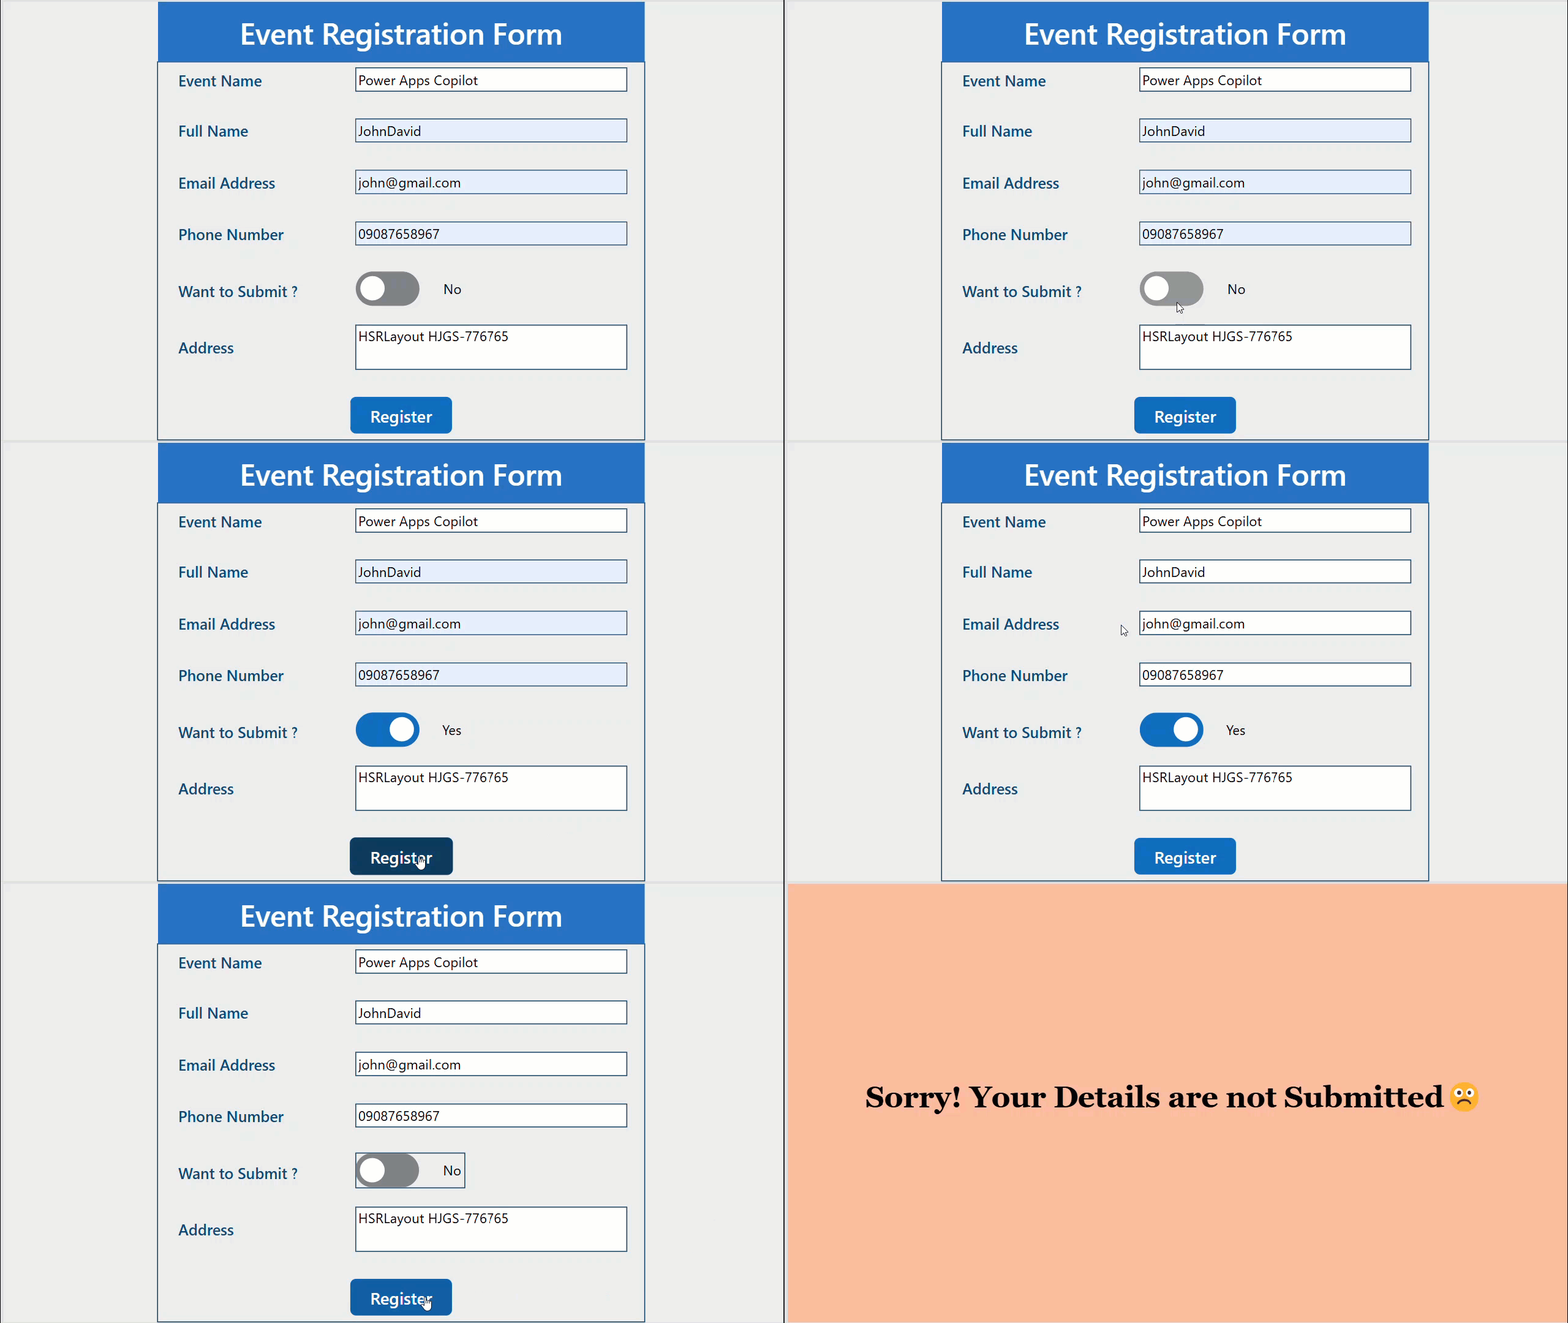
Create one SharePoint list that has the following fields:
| Column Name | Data Type |
|---|---|
| Event Name | Title(Single line of text) |
| Full Name | Single line of text |
| Email Address | Single line of text |
| Phone Number | Number |
| Want to Submit? | Yes/No |
| Address | Multiline of text |
1. Insert one Edit Form, button control to the Power Apps screen -> Connect with SharePoint list.
2. Now, Provide the formula below in the OnSelect property of the button control.
OnSelect = If(
    DataCardValue6.Value = true,
    Navigate(
        Screen3,
        ScreenTransition.Fade
    ),
    Navigate(
        Screen4,
        ScreenTransition.Fade
    )
)
Where,
- DataCardValue6 = Yes/No field value name.
- Screen 3 = Success screen name.
- Screen4 = Error screen name.
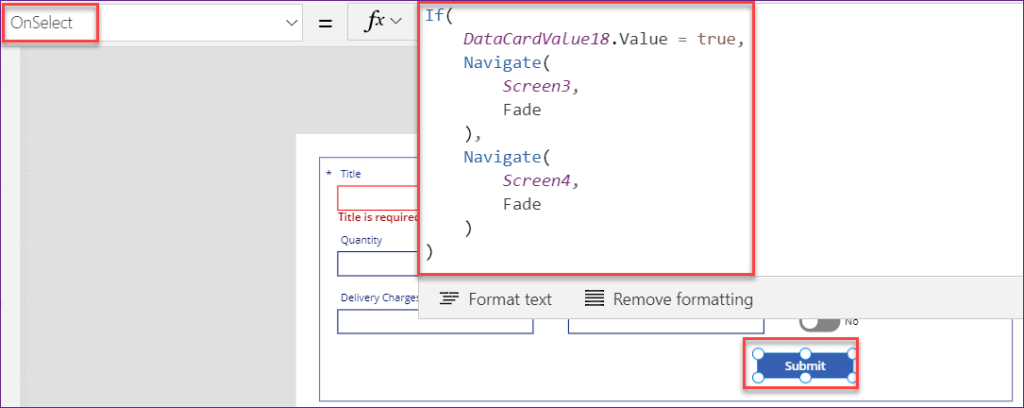
Save and publish the app once. While previewing, check it once. When we click the Register button, it will navigate between the screens based on the yes/no field value.
Create Alert Messages On Clicking the Power Apps Button
Here, I will explain how to create alert messages by clicking the Power Apps button control. We can achieve this by using the Notify function on the button control OnSelect property.
Basically, we used these alert messages during the below scenarios:
- If the end-user doesn’t provide the required field values while submitting the form, we can notify them by saying, “Please fill out the required fields.”
- Suppose we’re running the flow to send emails while clicking the button control. We’ll notify them, “Please check out the mail; we will send you the links to connect with the community.”, etc.
To achieve this, you can refer to the below two PowerApps articles:
Close an App with Power Apps Button Control
Here, I will explain how to close or exit the app with the Power Apps button control. I built an application to submit the registration details to the SharePoint list.
Once the registration is over, it navigates to the success screen, where I have the Close The App button. When the user clicks the button, the app closes automatically.
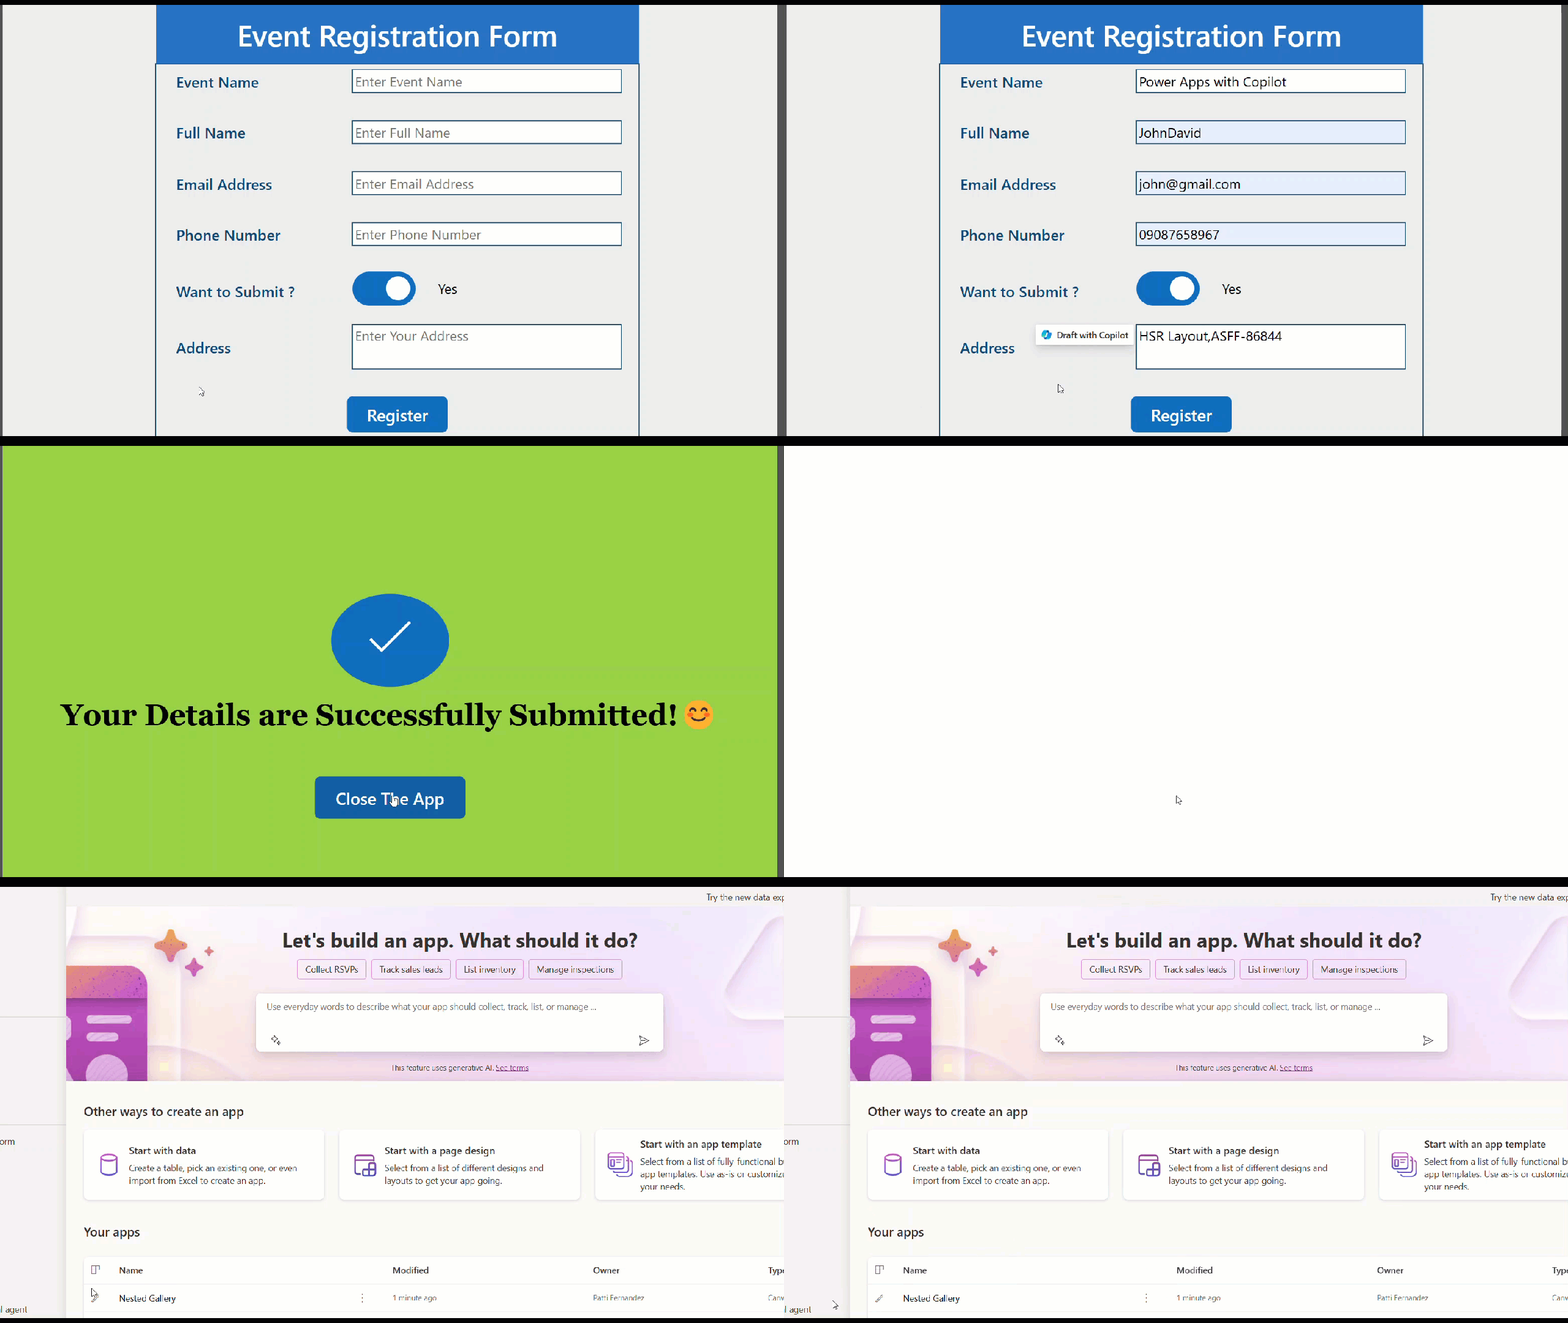
PowerApps Exit function helps exit or close the running app and signs out the current user. Then, the user can open another app.
Exit( [Signout] )- You can use the Signout argument to sign out the current user from the Power Apps app.
Refer to the table below that shows how to use the Power Apps Exit Function.
| Formula | Description |
| Exit() | This helps to exit the current app and leaves the user signed in. The user is returned to the list of apps. |
| Exit( true ) | This helps to exit the current app, and the user is signed out. The user must sign in with their credentials before running an app. |
1. Provide the formula below for the OnSelect property of the button control.
OnSelect = Exit()2. Now, save and publish the app. Then, come out of the application and run it. You’ll get out of the application after clicking the button control.
Note:
The Exit() function only works when the App is running, if you clicked the corresponding button under Edit Mode, it won’t work. for more info: follow this link
How to Use the Form Control Properties with Power Apps Button Control
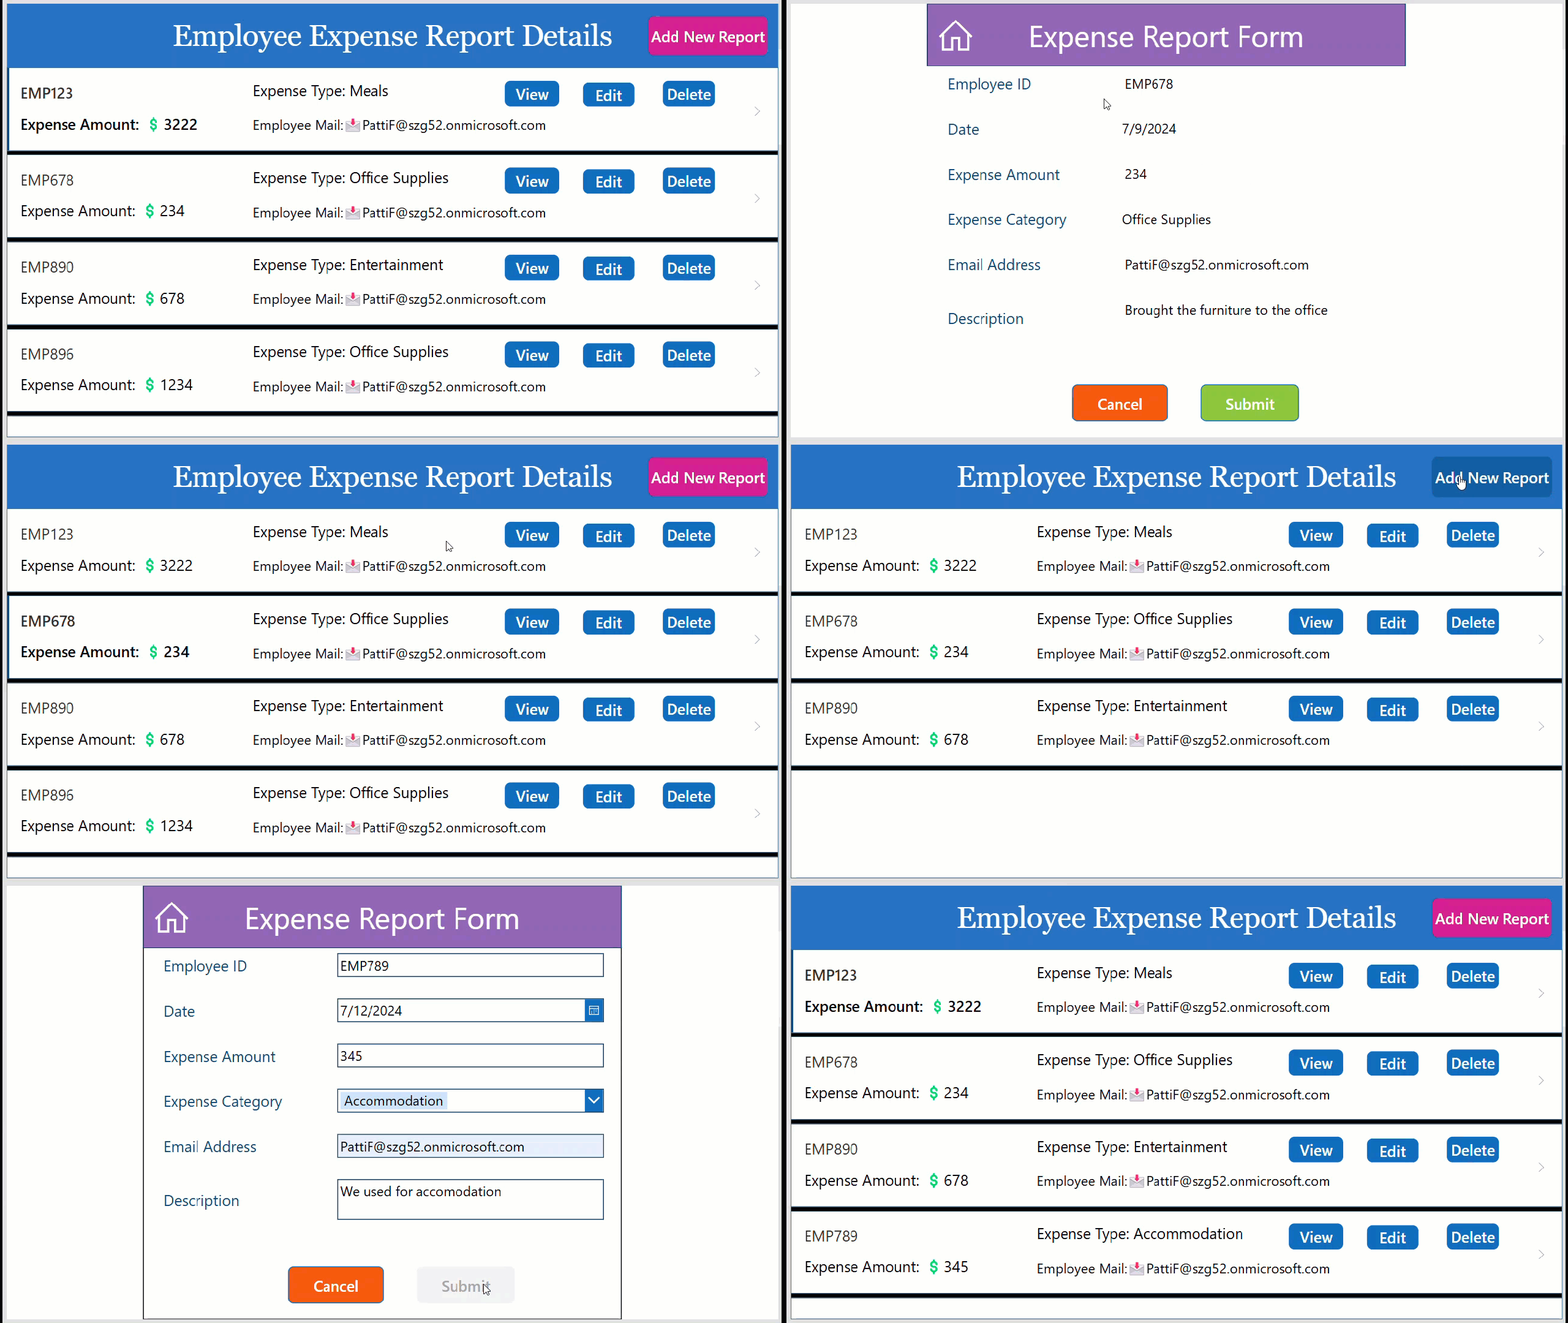
Here, I have an Expense Report Power Apps application. This app has two screens. 1st Screen contains the details of employee expense reports within the gallery. 2nd Screen contains the form to submit the expense report.
- On 1st screen, the gallery contains three button controls for each record.
- View: It navigates to the 2nd screen and displays the selected item details in the form with View mode.
- Edit: It will navigate to the 2nd screen and display the selected item details in the form with Edit mode.
- Delete: It will delete the selected item in the gallery.
- On the 1st screen, there is another button called Add New Report. We can use this button to add a new report, which will convert the form to a new form.
- On 2nd screen, there are two buttons controls for save and cancel:
- Submit: It will submit the details to a data source.
- Cancel: It will reset the form.
Refer to the example below.
To achieve this, follow the steps below!
1. In Power Apps, insert a vertical gallery -> connect it with the SharePoint list. Then add three button controls and name it as view, edit, delete.
Provide the formula below on the OnSelect property of the View button.
ViewForm(Form2);Navigate(Screen4);ViewForm() function will make form view purpose only. Here, Form2 is the expense report form name.

2. Put the below formula on the OnSelect property of the Edit button in the gallery.
EditForm(Form2);Navigate(Screen4);With the above formula, we can able to edit the selected gallery item in the expense report form.

3. Provide the below formula in the OnSelect property of the Delete button in the gallery.
Remove('Expense Report Form',ThisItem)Here, the Remove function will remove the selected item from the datasource. ThisItem represents the selected item.

4. Provide the formula below in the OnSelect property of the Add New Report button.
NewForm(Form2);Navigate(Screen4);Using this formula, the form becomes a new form, so users can fill in the details and submit it.

5. Now, on the 2nd screen. Provide the formula below in the OnSelect property of the Submit button.
SubmitForm(Form2);SubmitForm() function submits the data to datasource.
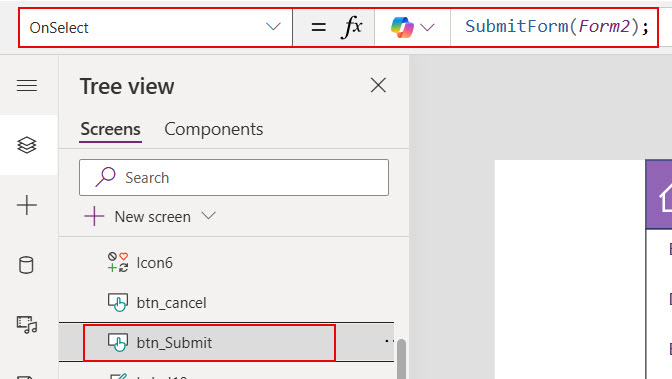
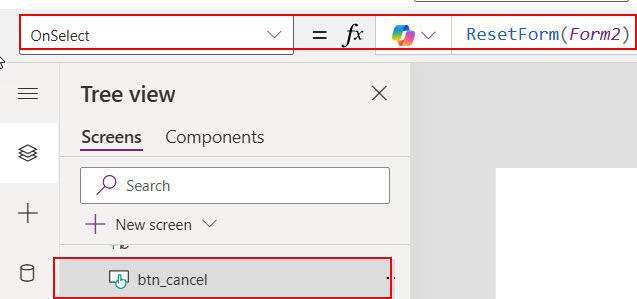
6. Provide the formula below in the OnSelect property of the Cancel button.
ResetForm(Form2)The ResetForm() function will reset the form.
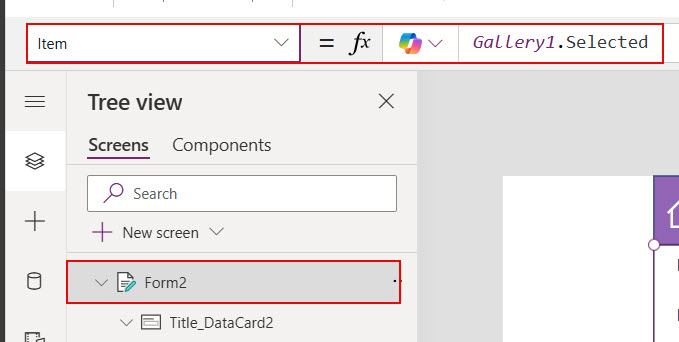
7. On the second screen, provide the formula below for the form’s Item property to display the selected user details.
Gallery1.SelectedHere, Gallery1 is the gallery name; you can rename it using Naming Conventions.
Now, save the application and run it. You’ll see each button’s functionality in the application.
Send an Email Using the Power Apps Button control
Do you ever try to send an email to a particular user by only pressing the Power Apps button control? It’s really an interesting thing to do in Power Apps.
If you have never tried this before, please refer to the article below, which describes details about sending an email with a button click in Power Apps.
Power Apps send emails with a button click.
How to Update/ Create a SharePoint List Item Through Power Apps Button Control
From Power Apps, we can create a new SharePoint list of items and update the item using the Patch()function.
Syntax: Patch( DataSource, BaseRecord, ChangeRecord1 [, ChangeRecord2, … ])To learn more about how to use the patch function on the Power Apps button control Onselect property. Refer to this article: How to use patch function in Power Apps.
Also, you may like these below PowerApps tutorials:
- How to Show/Hide the Buttons based on the Current User
- Modern Power Apps Button Control
- Power Apps Radio Button Control
- PowerApps CheckBox – How to use
In this PowerApps Tutorial, We discussed how to use Power Apps button OnSelect property for different requirements. I hope you found this article helpful.
I am Bijay a Microsoft MVP (10 times – My MVP Profile) in SharePoint and have more than 17 years of expertise in SharePoint Online Office 365, SharePoint subscription edition, and SharePoint 2019/2016/2013. Currently working in my own venture TSInfo Technologies a SharePoint development, consulting, and training company. I also run the popular SharePoint website EnjoySharePoint.com
Hi Bijay, thank you for this article, very helpful for beginners like me. However, I have a simplest question about multiple functions for one button. I find everywhere information about putting “;” sign between commands but it doesn’t work for me!
My code for OnSelect: Collect(
Requests;
{
Requestor: Orderby.Text;
Email: Email_2.Text;
Executive: Director.Text;
Priority: Dropdown1.SelectedText;
Message: TextInput1.Text
}
)
;
Navigate(ConfirmationRequestScreen;Fade);
But has to create a new item for collection (gallery) Requests and set next screen, however I see an error “Unexpected sign”.
Can you please advise what I am doing wrong?
to my previous comment: Collect works perfectly as well as Navigate but only separately
How is PowerApps button onselect change dropdown different from PowerApps button onselect update sharepoint list? I have set up buttons for the first example but my drop down values don’t update correctly. I do need to update the SharePoint list as well, but I’m unclear about whether a combo box is required for the second example or not.