Recently, I got an opportunity to work with Power Apps Send Email using Outlook. Follow this tutorial to get all the information about how to send email from Power Apps in different ways. Such as:
- Power Apps Send Email using Outlook
- Power Apps Send Email to Multiple Users
- How to Send Email from Power Apps using SharePoint
- Power Apps Send Email with CC and BBC
- Power Apps Send Email Attachments
- Power Apps Send Email with Link
- Power Apps Send Email with Importance [High/Low/Normal]
- Power Apps Send Email with HTML Table
- Power Apps Send Email V2 | Power Apps Send Email using Power Automate
Power Apps Send Email
Follow the steps below to send an email from Power Apps to Outlook. Such as:
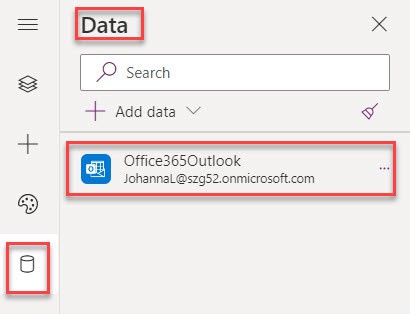
1. Open the Power Apps app and connect it to the Office356Outlook connector, as shown below.
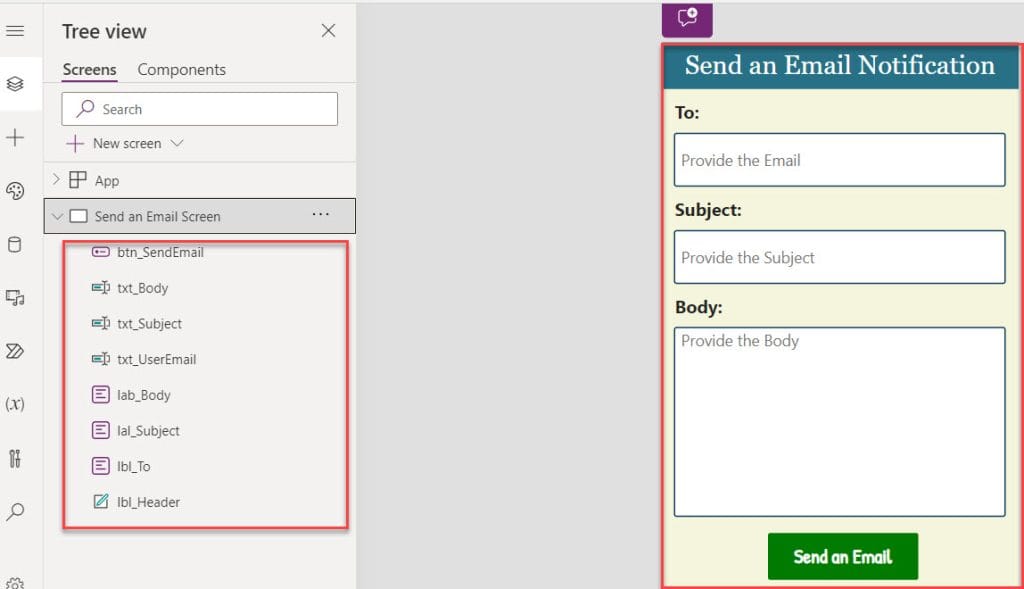
2. On the Power Apps Screen, insert three Text input controls [txt_UserName, txt_Subject, and txt_Body] and a Button control.
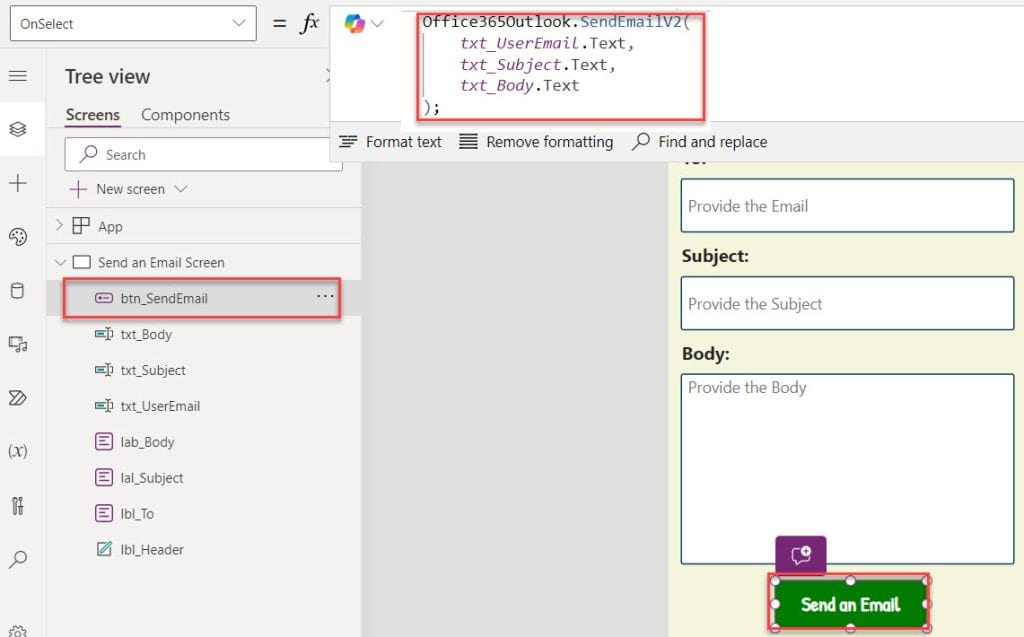
3. Next, select the Button control and set its OnSelect property to the code below.
OnSelect = Office365Outlook.SendEmailV2(
    txt_UserName.Text,
    txt_Subject.Text,
    txt_Body.Text
)
Where,
- Office365Outlook.SendEmailV2 = We can use the Office 365Outlook connector to send an email from Power Apps
- txt_UserName, txt_Subject, txt_Body = Power Apps text input control names
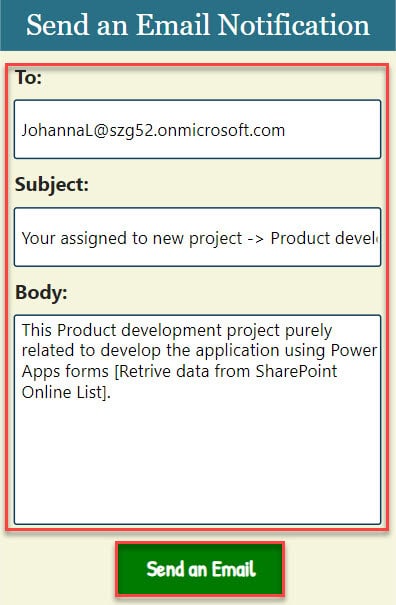
4. Finally, Save, Publish, and Preview the app. When the user provides the information and clicks on the Send an Email button to send an email to a specific user, as shown below.
5. Next, open Outlook; that specific person or user will receive a new Email in his/her mailbox.
Output:

This is how we can send an email from Power Apps to Outlook.
Power Apps Send Email to Multiple Users
In the same way, if you want to send an email to multiple users from Power Apps, follow the below steps.
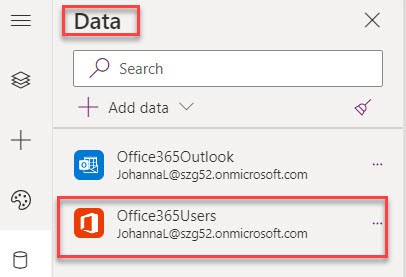
1. Whenever you need to retrieve the Office 365 users list, you shout connect the Office 365Users connector.
2. On the Power Apps Screen, insert a Combo box control and set its Items property to the code below.
Items = Office365Users.SearchUser({searchTerm:cmb_UserName.SearchText}).UserPrincipalName
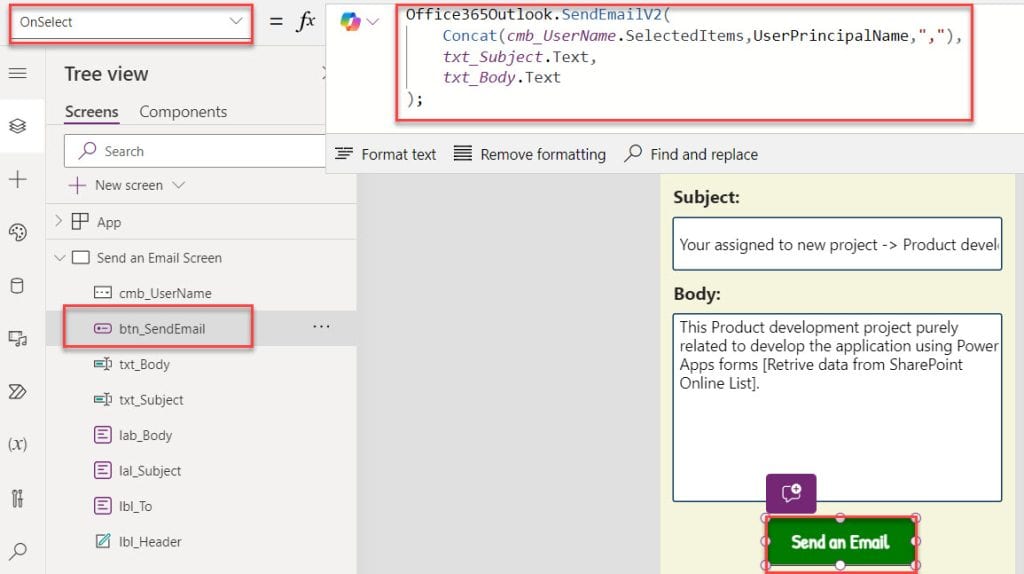
3. Now, select the Button control and set its OnSelect property as:
OnSelect = Office365Outlook.SendEmailV2(
    Concat(cmb_UserName.SelectedItems,UserPrincipalName,","),
    txt_Subject.Text,
    txt_Body.Text
);
Where,
- cmb_UserName = Power Apps combo box control
- UserPrincipalName = We can use this connector to get the user’s email
4. Now, select the multiple users from the combo box control and click on the button control, as shown below.
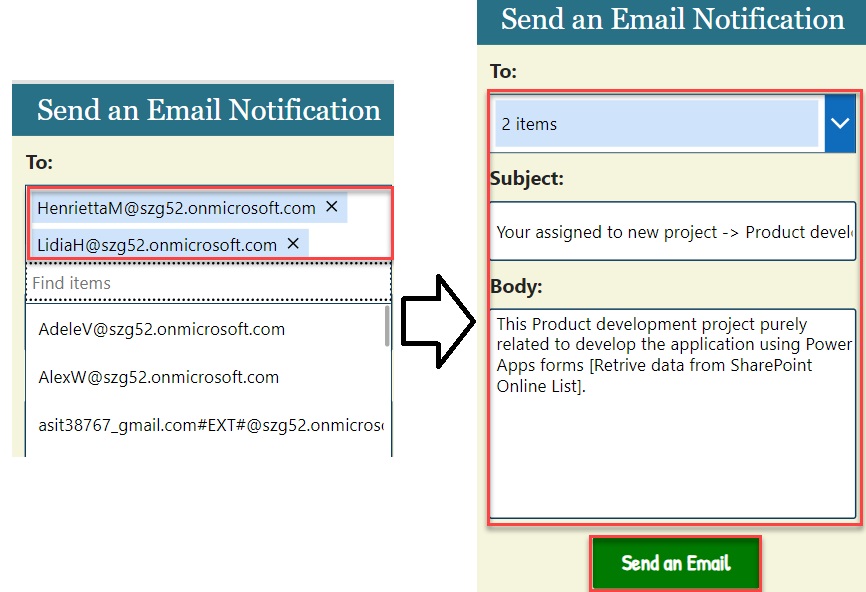
5. Finally, once you click on the button control, the respective users will get the email notification.
Output:

This is how we can work the Power Apps Send Email to Multiple Users.
How to Send Email from Power Apps using SharePoint
In this section, I will explain how to send email from Power Apps using SharePoint list. To achieve it, follow the below steps.
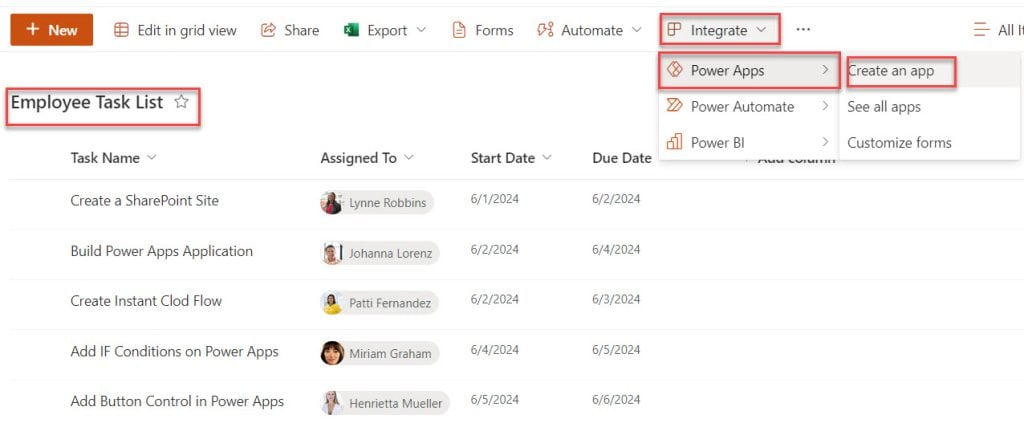
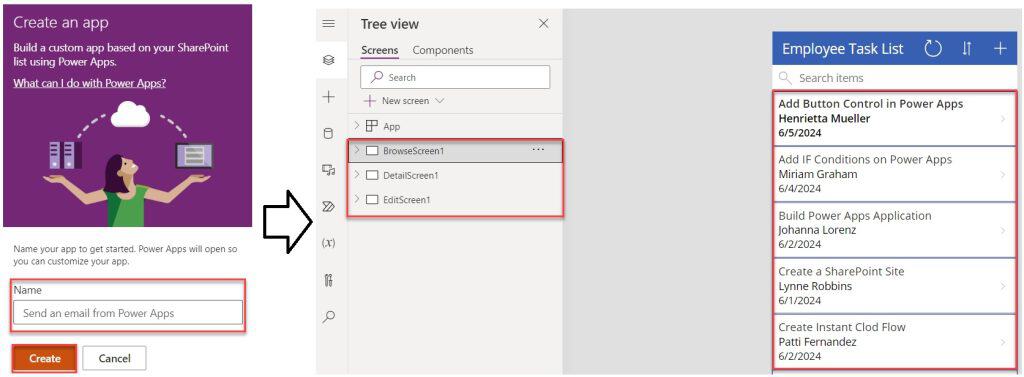
1. On the SharePoint list [Employee Task List], select the Create an app option [Integrate > Power Apps].
2. Next, provide the app’s Name and click the Create button. Once you do this, you will get three different screens by default [BrowseScreen1, DetailsScreen1, EditScreen1], as shown below.
3. Now, select the details screen and Add a custom card [Edit fields > + Add a custom care]
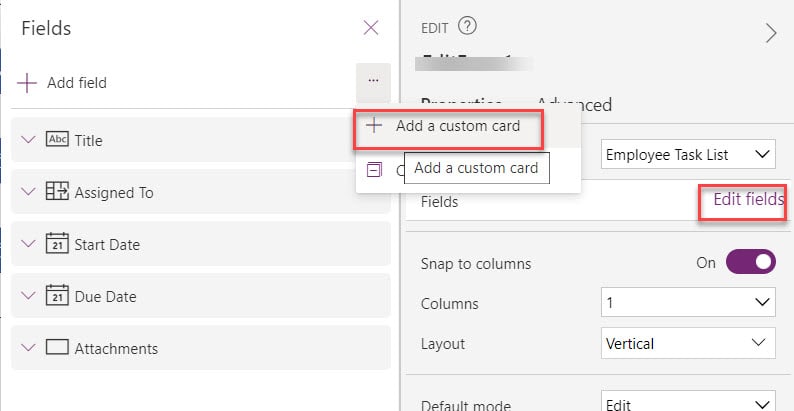
4. Then, insert a Button control inside the custom card and set its Onselect property to the code below.
OnSelect = Office365Outlook.SendEmail(
    "JohannaL@szg52.onmicrosoft.com",
    "Added New Project",
    "PowerApps Project has been added here"
) 
5. When the user clicks on the button control, the email is sent to that user, as shown below.
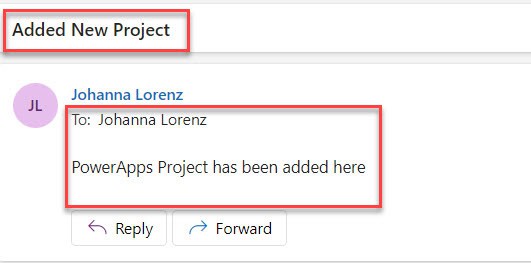
This is how we can work with the Power Apps to send an email using the SharePoint list.
Power Apps Send Email with CC and BBC
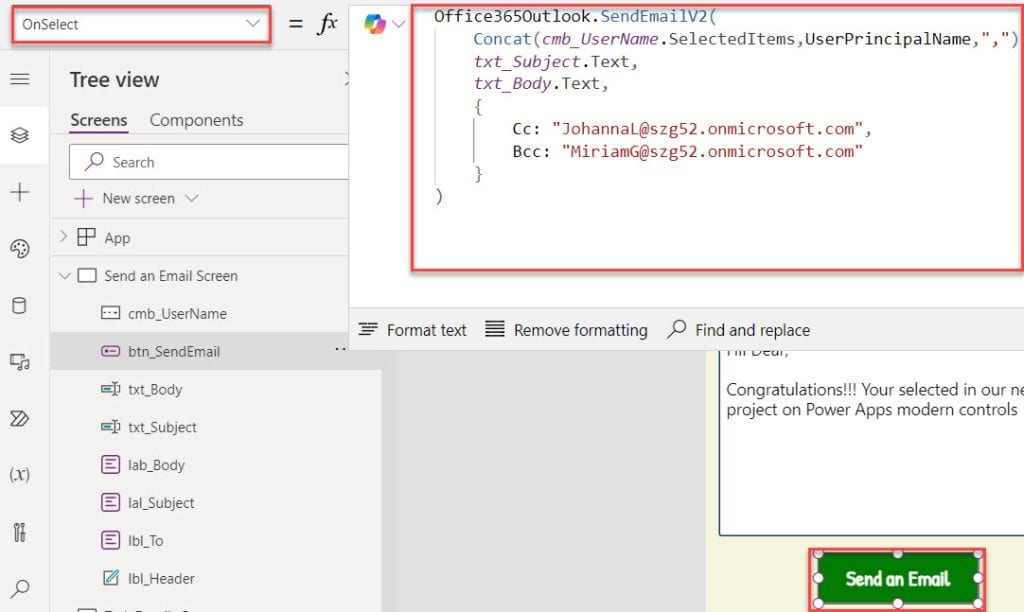
Suppose you add Cc and Bcc user email addresses to the PowerApps Email. The PowerApps Office 365 Outlook Sendmail method provides the Cc and Bcc parameters by default.
Also, you can add multiple numbers of Cc and Bcc user addresses in the PowerApps email. To do so, select the Button control and set its OnSelect property to the code below.
OnSelect = Office365Outlook.SendEmailV2(
    Concat(
        cmb_UserName.SelectedItems,
        UserPrincipalName,
        ","
    ),
    txt_Subject.Text,
    txt_Body.Text,
    {
        Cc: "JohannaL@szg52.onmicrosoft.com",
        BCC:"MiriamG@szg52.onmicrosoft.com"
    }
)
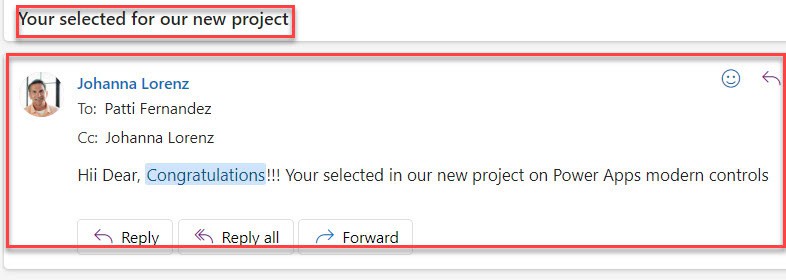
Once you check your Outlook email, you will receive a new email. Also, those users you mentioned in Cc and Bcc will receive the mail at the same time.
Power Apps Send Email Attachments
To work with Power Apps send email attachments, follow the below steps.
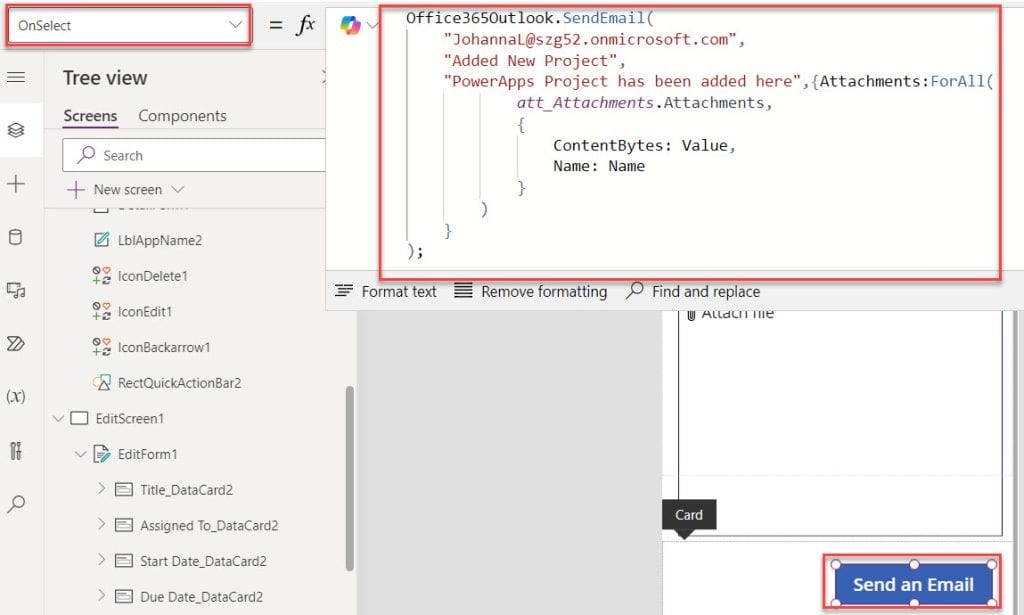
1. Select the Power Apps EditScreen1, where you will get the Attachments control by default. Then, add a custom data card, insert Button control inside the custom data card, and set its OnSelect property as:
OnSelect = Office365Outlook.SendEmail(
    "JohannaL@szg52.onmicrosoft.com",
    "Added New Project",
    "PowerApps Project has been added here",{Attachments:ForAll(
            att_Attachments.Attachments,
            {
                ContentBytes: Value,
                Name: Name
            }
        )
    }
);
Where,
- att_Attachments = Power Apps attachment control name
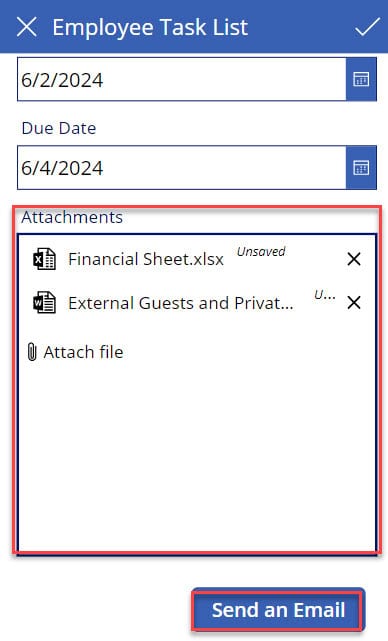
2. Add the attachments from your local device and click on the button control.
Finally, look at the screenshot below for the output [How to get email with attachments].
Output:
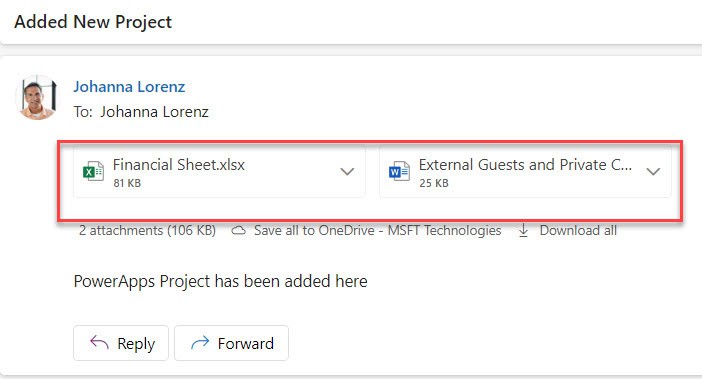
This way, we can work with Power Apps send email with attachments.
Power Apps Send Email with Link
Similarly, if you want to send an email with a link from Power Apps, you can follow the below steps. Such as:
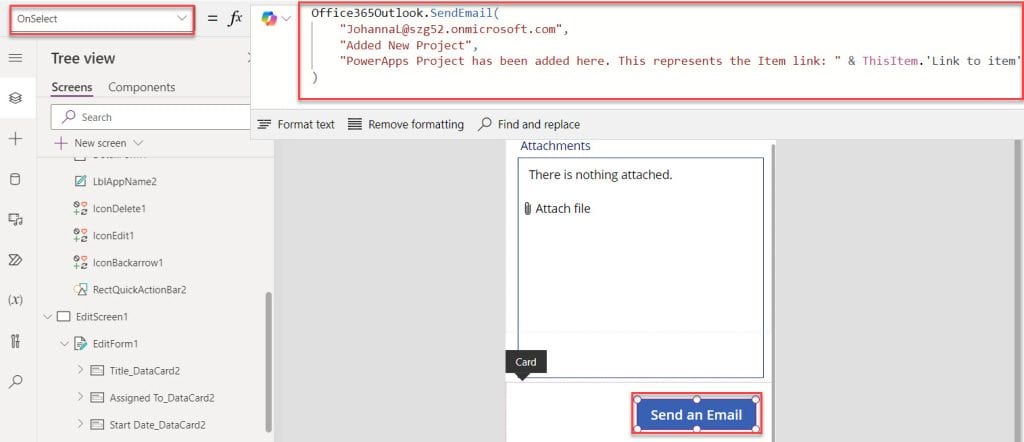
1. Select the Button control on the Power Apps EditScreen1 and set its OnSelect property to the code below.
On Select = Office365Outlook.SendEmail(
    "JohannaL@szg52.onmicrosoft.com",
    "Added New Project",
    "PowerApps Project has been added here. This represents the Item link: " & ThisItem.'Link to item'
)
2. Once your updates are done, click on the button control to send an email with a link from Power Apps, as shown below.

Power Apps Send Email with Importance [High/Low/Normal]
In this section, I will show you how to send an email with importance from Power Apps. To achieve it, follow the below steps.
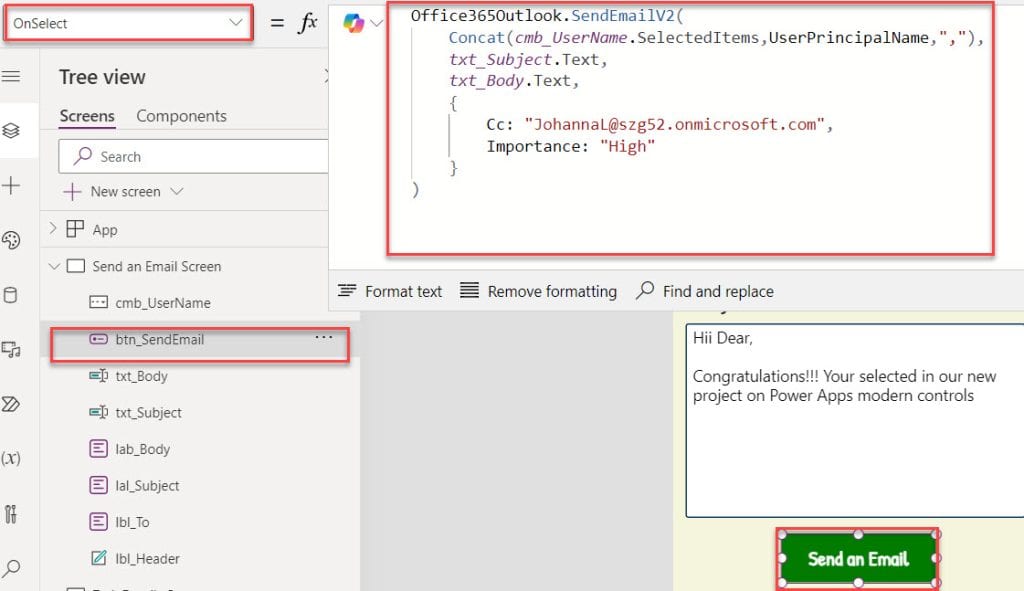
1. Select the button control on the Send am Email Screen and set its OnSelect property to the code below.
OnSelect = Office365Outlook.SendEmailV2(
    Concat(
        cmb_UserName.SelectedItems,
        UserPrincipalName,
        ","
    ),
    txt_Subject.Text,
    txt_Body.Text,
    {
        Cc: "JohannaL@szg52.onmicrosoft.com",
        Importance: "High"
    }
)
2. Finally, click on the button control to send an email with high importance from the Power Apps.
Output:
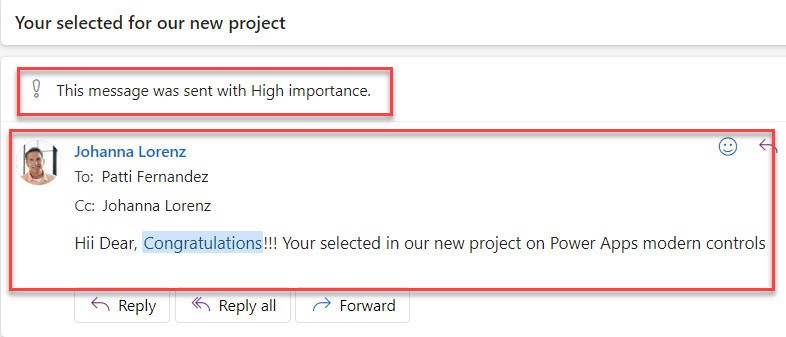
This is how we can send an important email from the Power Apps.
Power Apps Send Email with HTML Table
To work with the Power Apps, send an email with an HTML table and follow the steps below. Such as:
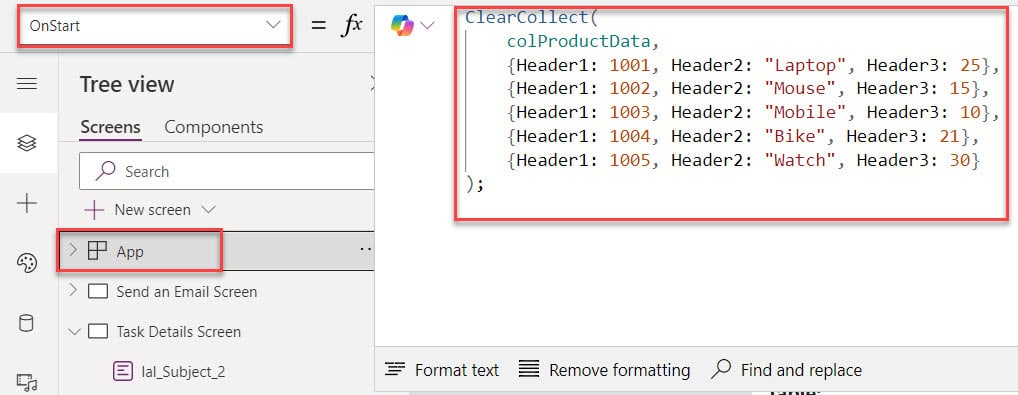
1. On the Power Apps app, select the App object from the left navigation and set its OnStart property to the code below.
OnStart = ClearCollect(
    colProductData,
    {Header1: 1001, Header2: "Laptop", Header3: 25},
    {Header1: 1002, Header2: "Mouse", Header3: 15},
    {Header1: 1003, Header2: "Mobile", Header3: 10},
    {Header1: 1004, Header2: "Bike", Header3: 21},
    {Header1: 1005, Header2: "Watch", Header3: 30}
);
Where,
- colProductData = Power Apps collection name
2. Next, on the Power Apps screen, insert a Table control and set its Items property as:
Items = colProductData3. To display the collection fields on a table control, select the Fields option, choose the respective fields, and click the Add button.

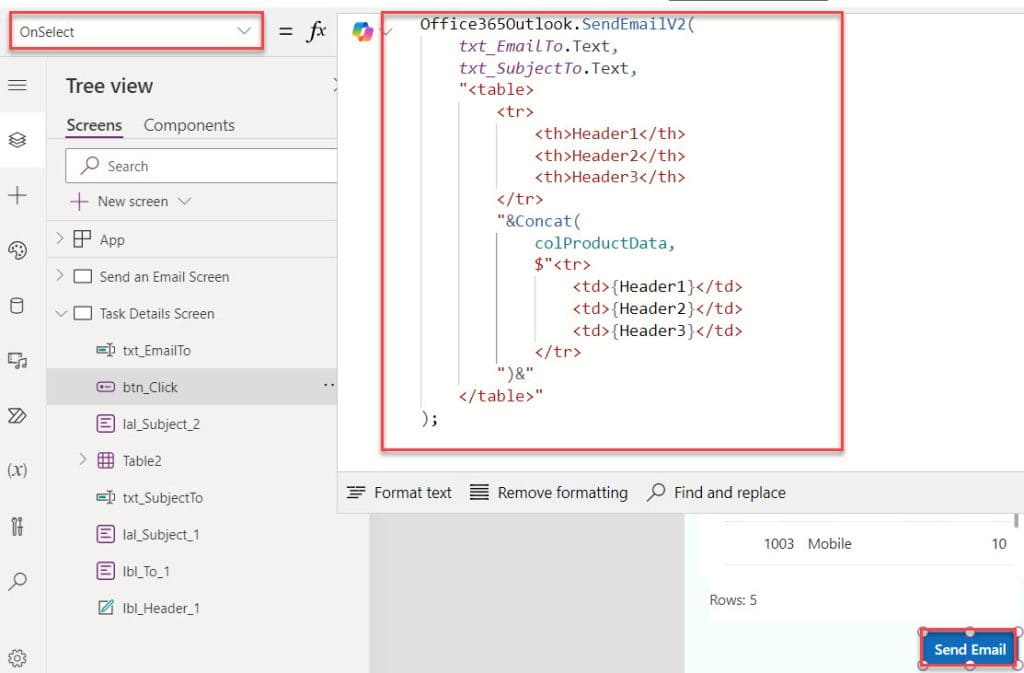
4. Next, insert a Button control under the Table control and set its OnSelect property as:
OnSelect = Office365Outlook.SendEmailV2(
    txt_EmailTo.Text,
    txt_SubjectTo.Text,
    "<table>
        <tr>
            <th>Header1</th>
            <th>Header2</th>
            <th>Header3</th>
        </tr>
        "&Concat(
            colProductData,
            $"<tr>
                <td>{Header1}</td>
                <td>{Header2}</td>
                <td>{Header3}</td>
            </tr>
        ")&"
    </table>"
);
Finally, click on the button control to send an email with an HTML table from Power Apps, as shown below.
Output
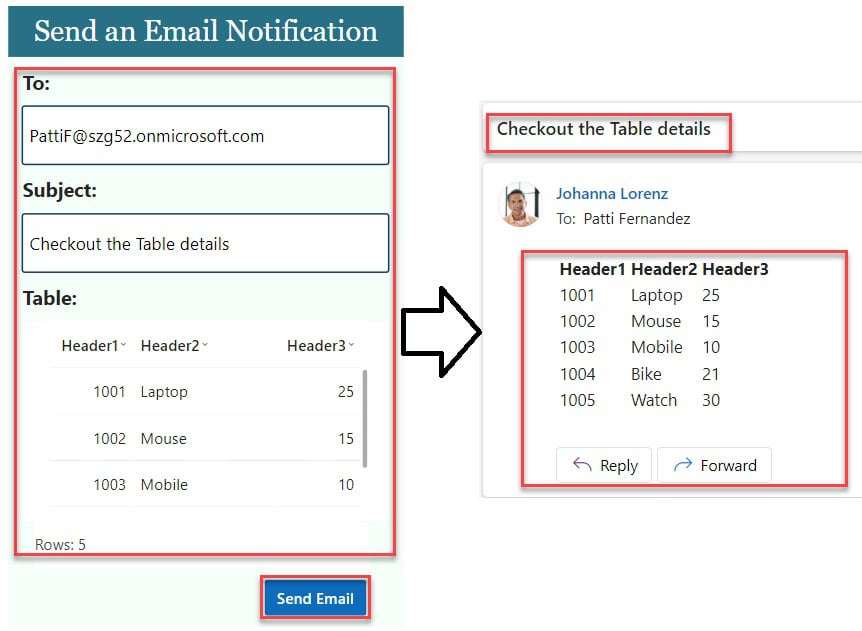
This way, we can work with the Power Apps Send an Email with HTML table.
Power Apps Send Email V2 | Power Apps Send Email using Power Automate
Lastly, I will explain how to send the Power Apps email using Power Automate, To work around this, follow the below steps.
1. On the Power Apps app, select the Power Automate section, click the Create new flow button, and Click a button in Power Apps to send an email template under the Create your flow window.
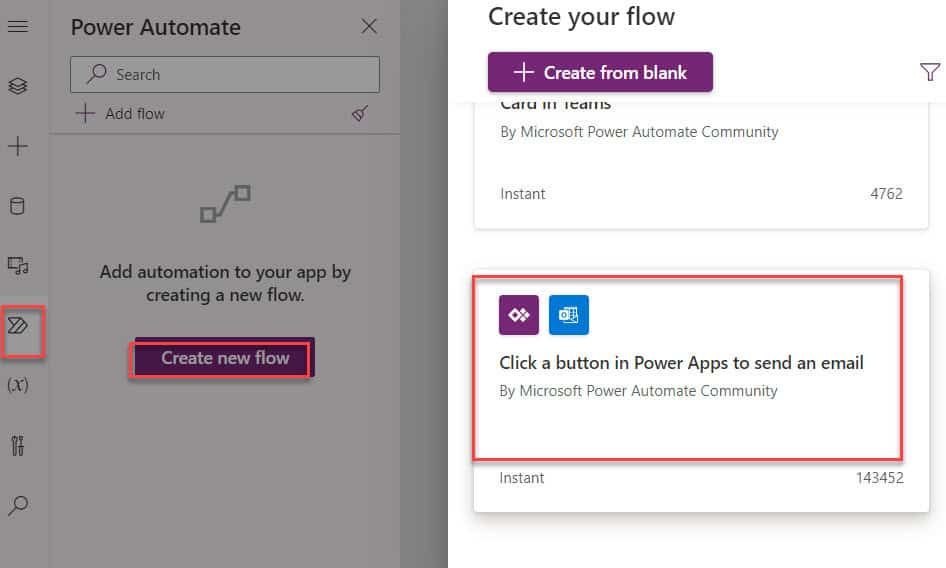
2. Then, select the Next button on the Create flow window.

3. Once you click on the create flow button, the flow [You can change flow name] will be created by default and located in the Power Automate section.
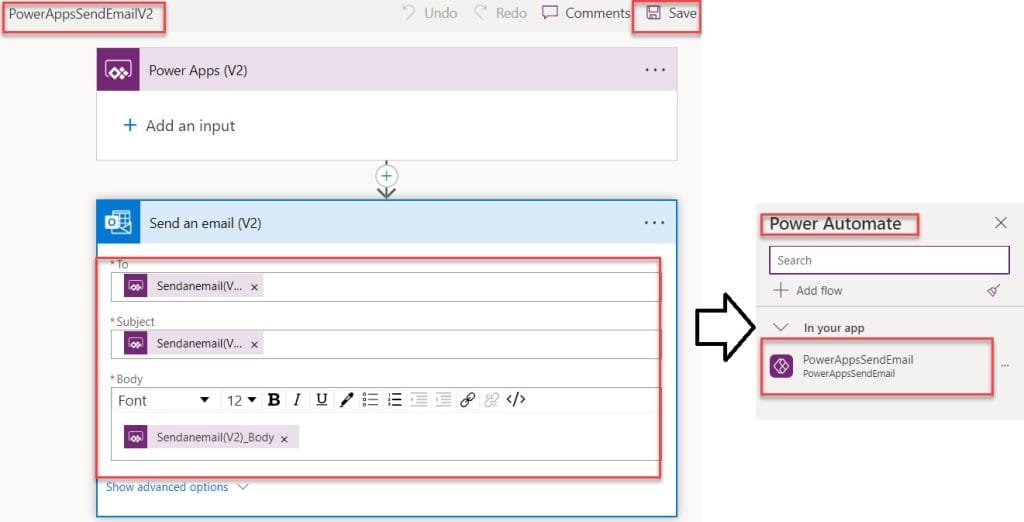
4. Finally, select the button control on the Power Apps Screen and set its OnSelect property as:
OnSelect = PowerAppsSendEmailV2.Run(
    Concat(
        cmb_UserName.SelectedItems,
        UserPrincipalName,
        ","
    ),
    txt_Subject.Text,
    txt_Body.Text
);
Notify("Email has been send")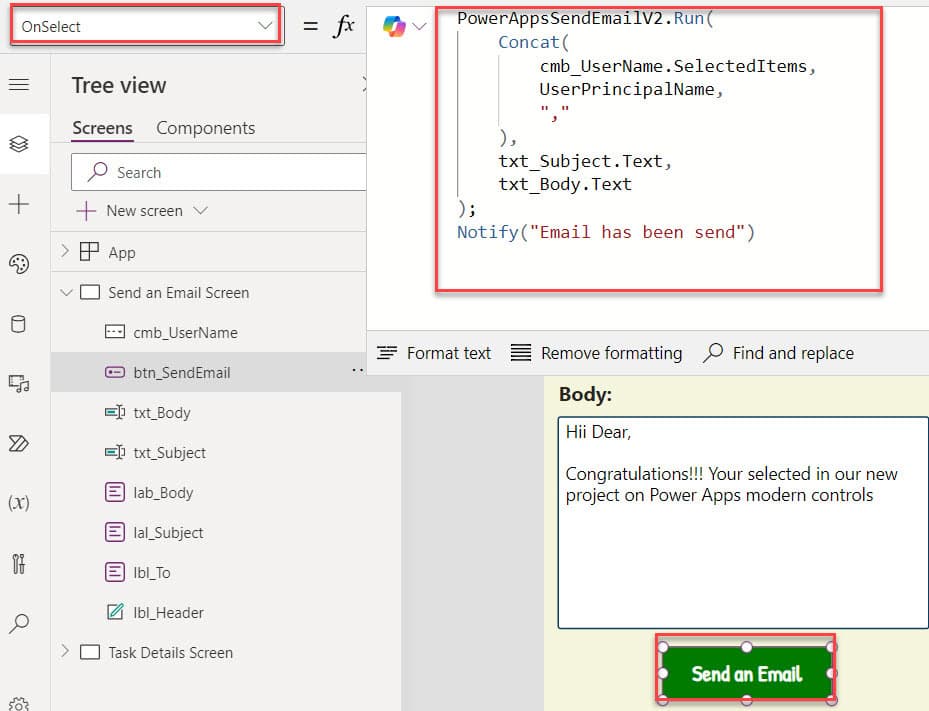
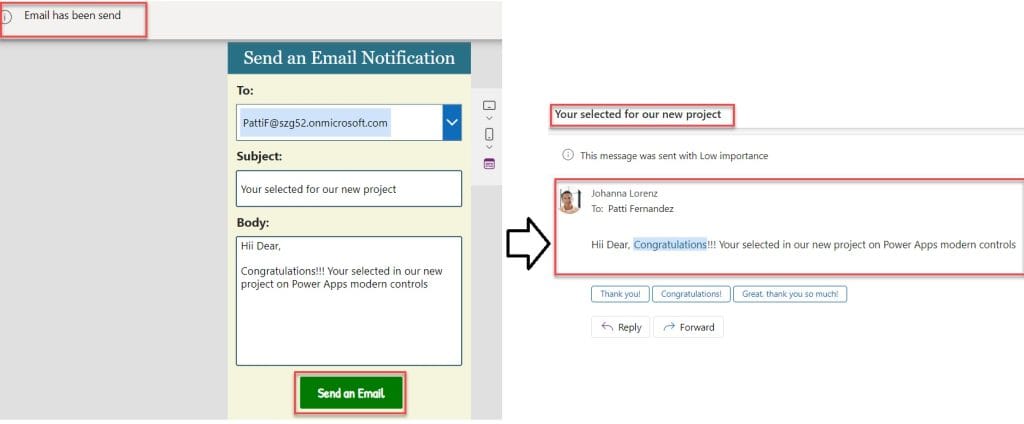
5. Once you click on the button control, it will display the notification message [Email has been send] and send an email to the specific user, as shown below.
6. Also, the flow will trigger successfully, as shown below.
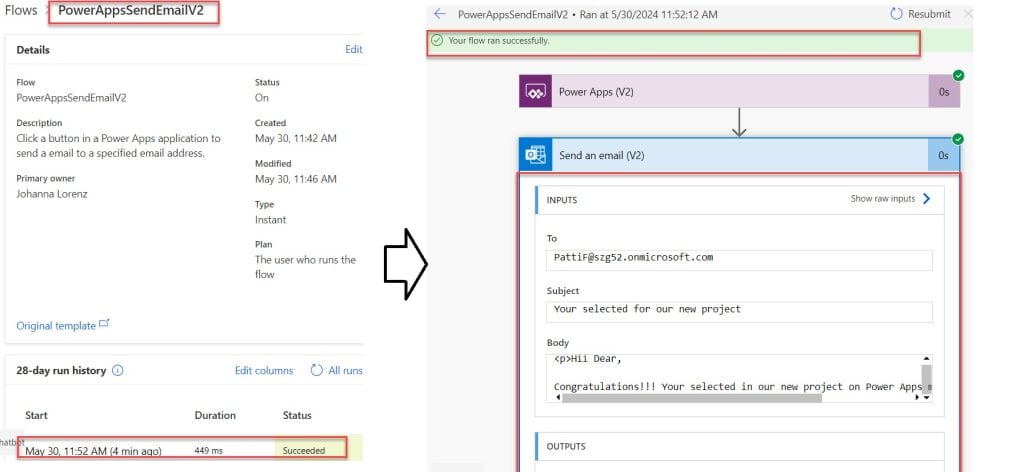
This is how we can work with the Power Apps send email v2 or Power Apps send email using Power Automate.
Additionally, you may like some more Power Apps articles:
- 6 Easiest Ways to Use Power Apps ForAll Function
- Power Apps Combo Box Control
- Power Apps Mod Function Examples
- Power Apps Naming Conventions
- Download File From SharePoint Document Library in Power Apps
I hope this Power Apps tutorial is helpful. If you have any requirements for sending an email from Power Apps, follow the above examples based on the real-time scenarios to achieve them.
I am Bijay a Microsoft MVP (10 times – My MVP Profile) in SharePoint and have more than 17 years of expertise in SharePoint Online Office 365, SharePoint subscription edition, and SharePoint 2019/2016/2013. Currently working in my own venture TSInfo Technologies a SharePoint development, consulting, and training company. I also run the popular SharePoint website EnjoySharePoint.com
How do you get powerapps or powerautomate/flow to send an email to the CURRENT user, not a user pulled from a sharepoint list? Thanks.
I am manually inputting the emails(s) I want to send. I have created a text input and the Send button picks email as input in the text box
Is we can get link of item when you creating new record . … Its only getting on edit screen …
Hey Bijay, i have used many of your posts on powerapps to improve the powerapps. Thank you for all the hard work you do.