In Power Apps, toggle control allows users to interact with an application by switching between actions, like On and Off, with a simple click.
In this article, I will explain the usage of toggle control in Power Apps using 10 different examples.
Power Apps Toggle Control
The toggle control in Power Apps is a simple switch that users can turn on or off by sliding its handle. It works like a checkbox.
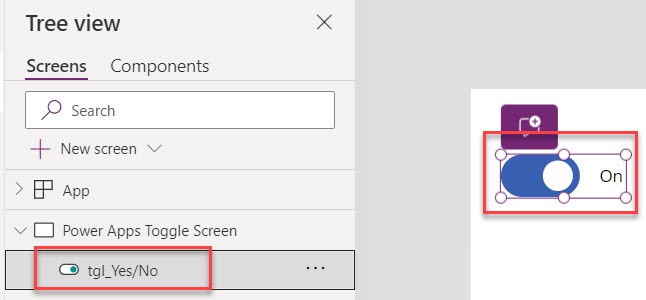
Refer to the screenshot below for toggle control. We also have Modern Toggle Control.
Power Apps Toggle Control Properties
Next, we’ll discuss the Power Apps toggle control properties. Have a look at the below table.
| Property | Description |
| Default | It is the initial value of a control before the user changes it |
| DisplayMode | It allows whether it is in Edit mode, View mode, or in Disable mode |
| FalseFill | When the Toggle switch control is off, then the toggle fills with color |
| FalseHoverFill | When the Toggle switch control is off, then the toggle hover fills with color |
| FalseText | It helps to show the text value when the toggle switch is off |
| Fill | It provides the background color of a toggle control |
| HandleFill | It provides the color to the toggle handle |
| OnChange | When the user changes the value of a control, then it specifies how the app responds |
| OnCheck | When the toggle value changes to true, then it specifies how the app responds |
| OnSelect | It specifies how the app responds when the user hits the control |
| OnUncheck | It specifies how the app responds when the user changes the control value to false |
| Reset | It helps the control back to its default value |
| TrueFill | When the toggle switch is on, then the toggle fills with color |
| TrueHoverFill | When the toggle switch is on, then the toggle hover fills with color |
| TrueText | It helps to show the text value when the toggle switch is on |
| Visible | It specifies whether the toggle switch control is displaying or hidden |
How to Add a Toggle Control in Power Apps
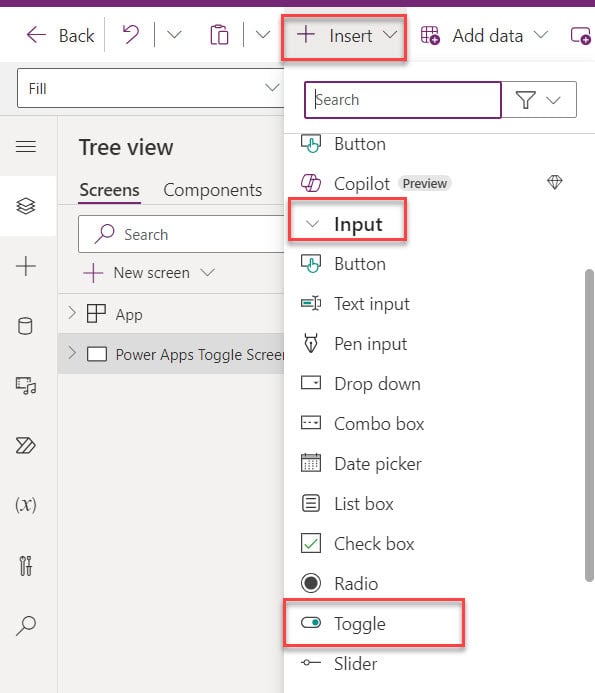
Here, I will show you how to add a toggle control in the Power Apps. Add a Toggle control [+ Insert > Inputs > Toggle] on the Power Apps screen, as shown below.
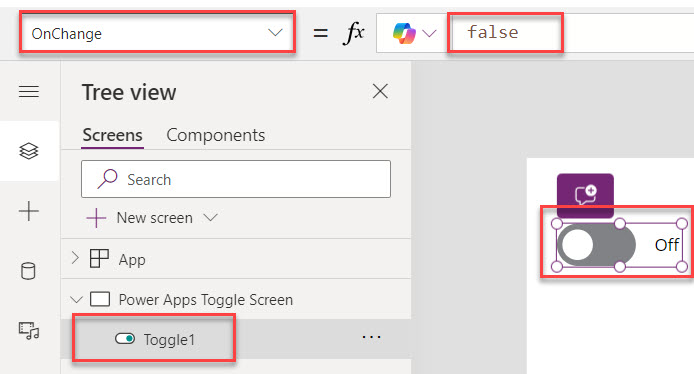
Once you add a toggle control, its OnChange property is false, and its name is Toggle1, as shown below.
How to Set Toggle Control Values for On and Off States
Now, I will show you how to set the Power Apps toggle control values with a simple example.
Example:
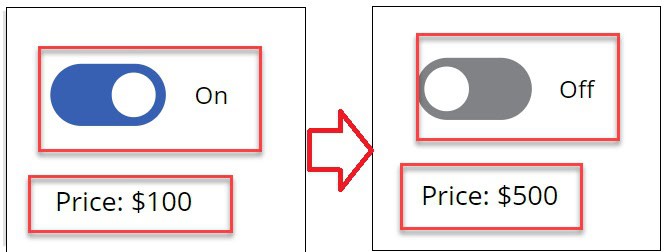
In Power Apps, there is a Toggle control and a Text label. I want the text label to display”500″ when the toggle is ON and “100” when it is OFF.
To do so, provide the formula below in the Text property of the text label.
Text = If(
    tgl_Value.Value = true,
    "Price: $100",
    "Price: $500"
)
Here,
- tgl_Value is the control name.
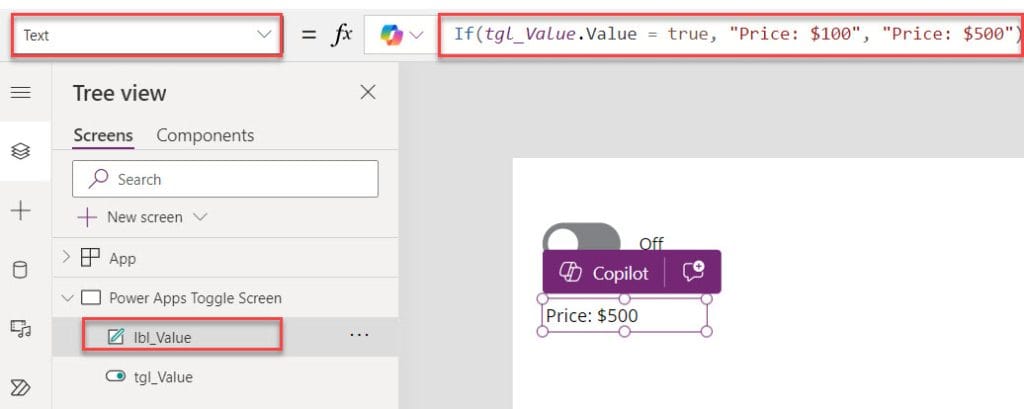
Now, save, publish, and preview the app. It displays the values based on the toggle control state. Refer to the image below.
Output:
How to Change PowerApps Toggle Control On/Off values to Yes/No
Here, we’ll see how to change the toggle control On/Off values to Yes/No with a simple example.
I have a SharePoint Online list named “Project Status List,” which contains the fields below.
| Column Name | Data Type |
| Project Name | It is a default single line of text |
| Is Approved | Yes/No |
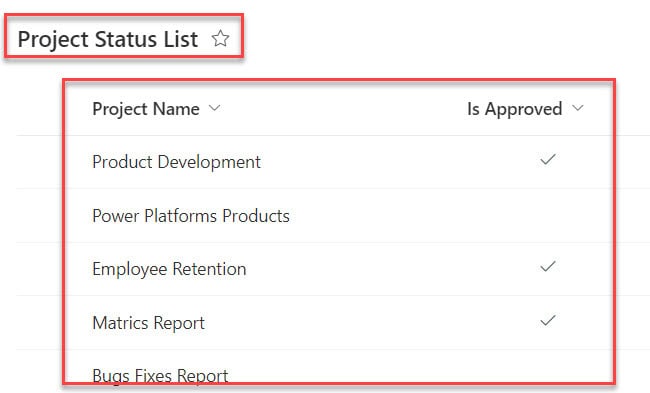
When I add this Yes/No field in the Power Apps Edit form, all the toggle text values appear with “On/Off” instead of “Yes/No,” as shown below.
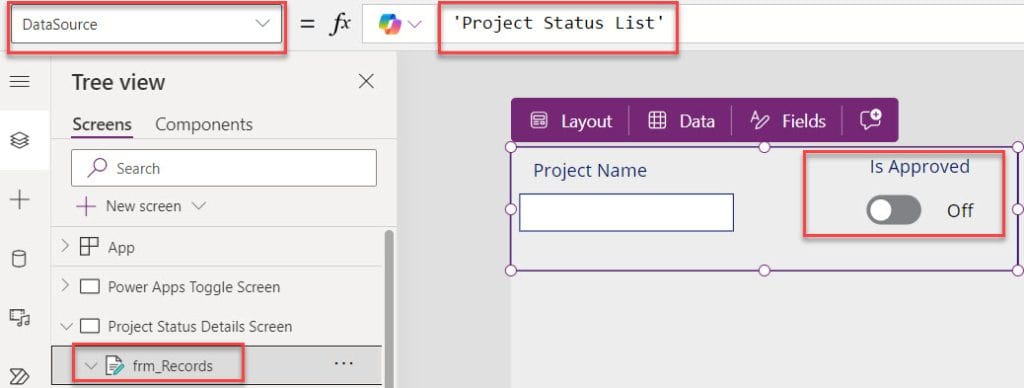
To convert this Toggle text value from On/Off to Yes/No, you need to do the following things:
In the Power Apps edit form, select the toggle data card. Apply the formula below to its TrueText and FalseText properties.
TrueText = "Yes"

FalseText = "No"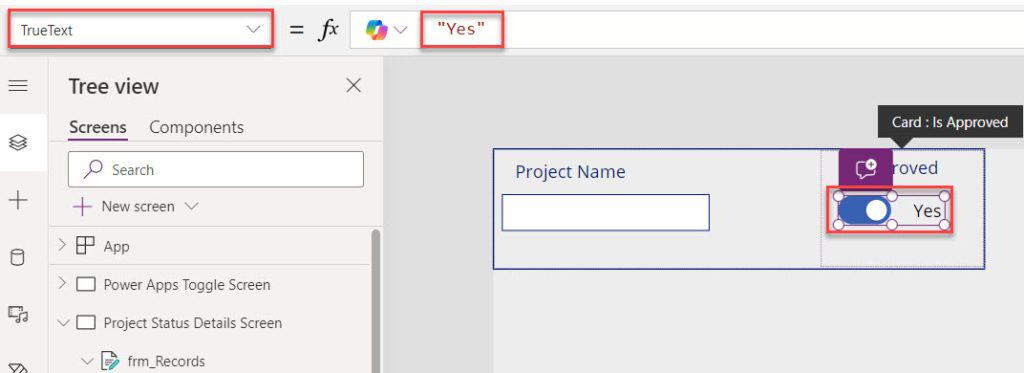
This way, you can change the Power Apps toggle control On and Off values to Yes/No.
PowerApps Toggle Control Visibility based on the Button Click
Next, I will show you the Power Apps toggle control visibility based on the button click.
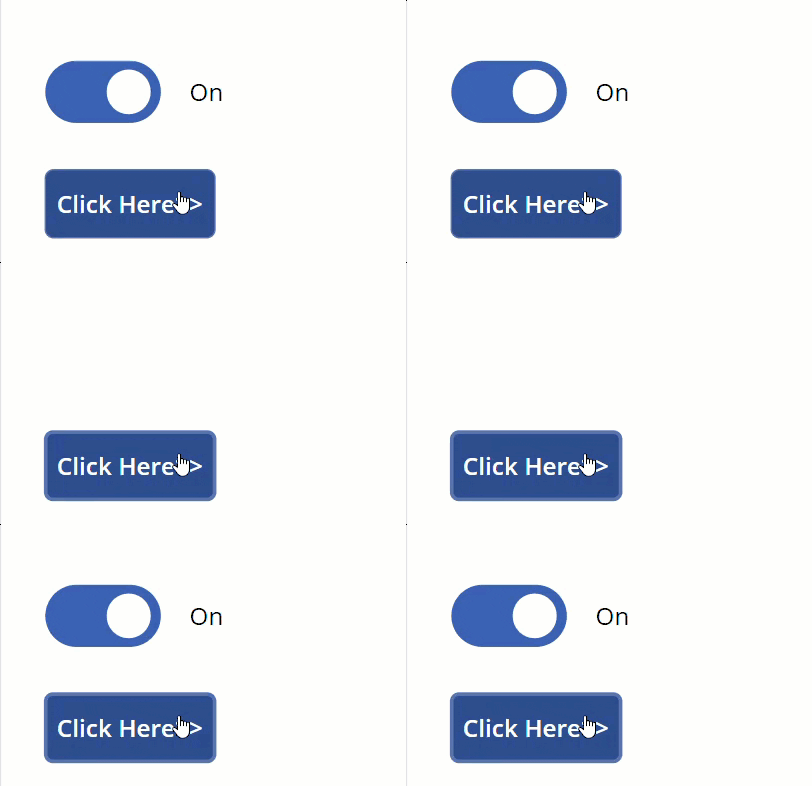
In my Power Apps application, I have toggle and button controls. Pressing the button will control the visibility of the toggle, which means it appears when pressed once and disappears when pressed again.
To do this, provide the formula below on the Button control OnSelect property.
OnSelect = UpdateContext({ToggleValue: !ToggleValue})Where,
- ToggleValue is the context variable name.
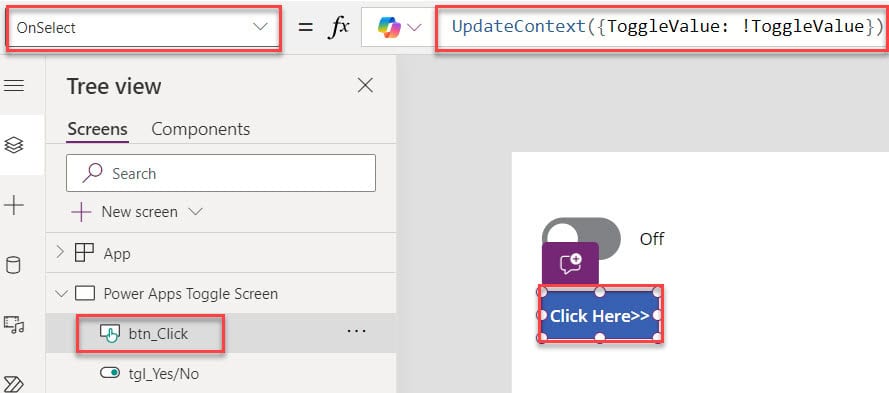
Next, select the Toggle control and set the created variable on its Visible property as:
Visible = ToggleValue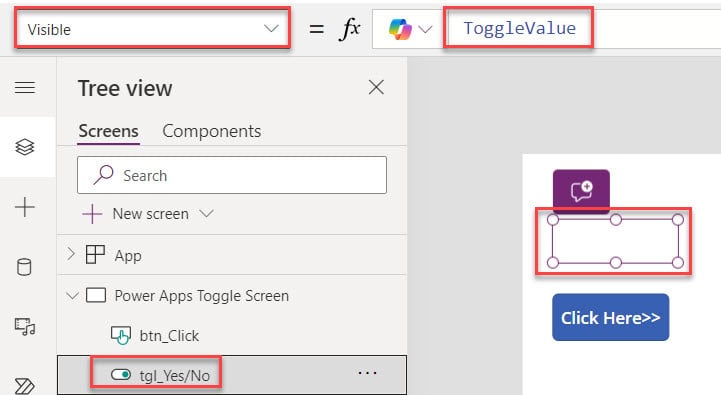
Now, Preview the app. Once the user presses the button, the toggle appears, and when the user taps the button again, it disappears, as shown below.
How to Set Power Apps Toggle Control Default Value
Suppose you want to set the default value of the toggle control; follow the below steps.
Whenever the user adds a Toggle control by default, the toggle control appears with the FalseText [Off]. Now, I want to set the default property of the toggle control as TrueText [On].
For that, select the Toggle control and set its Default property as:
Default = true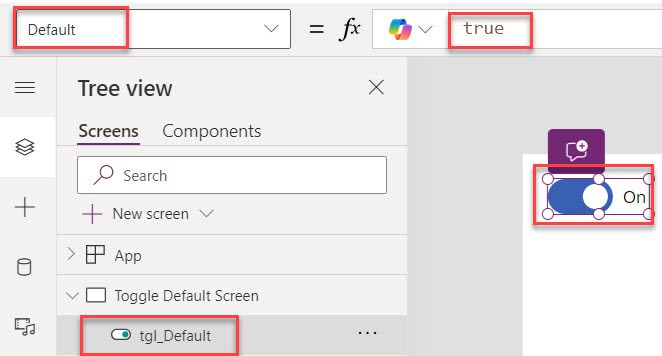
This way, you can work with the Power Apps Toggle Default Value.
How to Control the Text Label Visibility with Toggle Switch in PowerApps
In this example, I will show you how to control the text label visibility in PowerApps using the toggle switch.
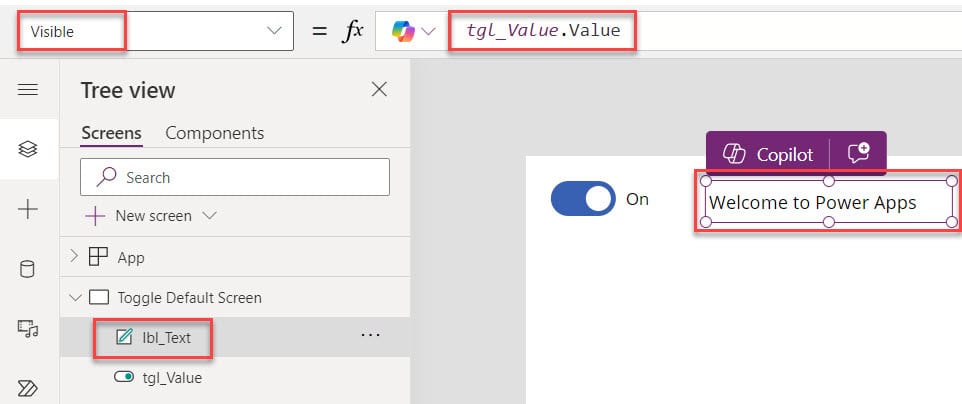
When the toggle switch is turned On, the text label appears. Turning the toggle switch Off hides the text label, as shown in the screenshot below.

To achieve it, set the below code on the label control’s Visible property.
Visible = tgl_Value.ValueWhere,
- tgl_Value is the toggle control name
How to Filter Power Apps Gallery Control based on Toggle Values
Here, we’ll see how to filter the Power Apps gallery items based on the toggle control values. Look at the image below. This is my SharePoint list, which is named Project Tracker.
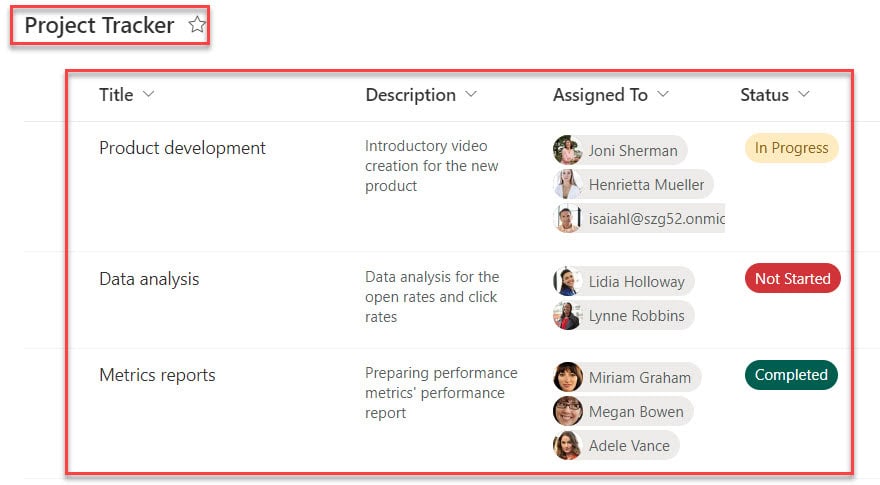
It has the following fields.
| Column Name | Data Type |
|---|---|
| Title | It is a default single line of text |
| Description | Multiple lines of text |
| Assigned To | Person or Group |
| Status | Choice |
Refer to the image below for more clarification.
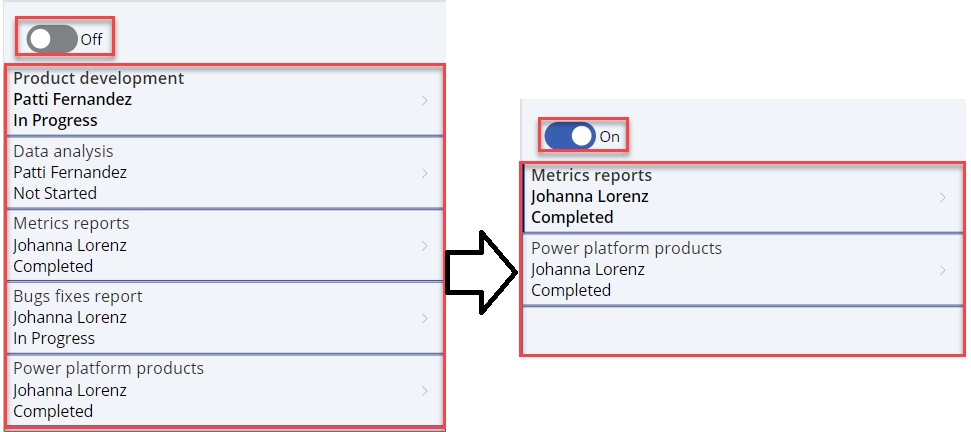
To work around this, follow the below steps.
1. Select the App object from the left navigation and set its OnStart property as:
OnStart = ClearCollect(colProjects, 'Project Tracker')Where,
- colProjects is the collection name
- ‘Project Tracker’ is the name of the data source.

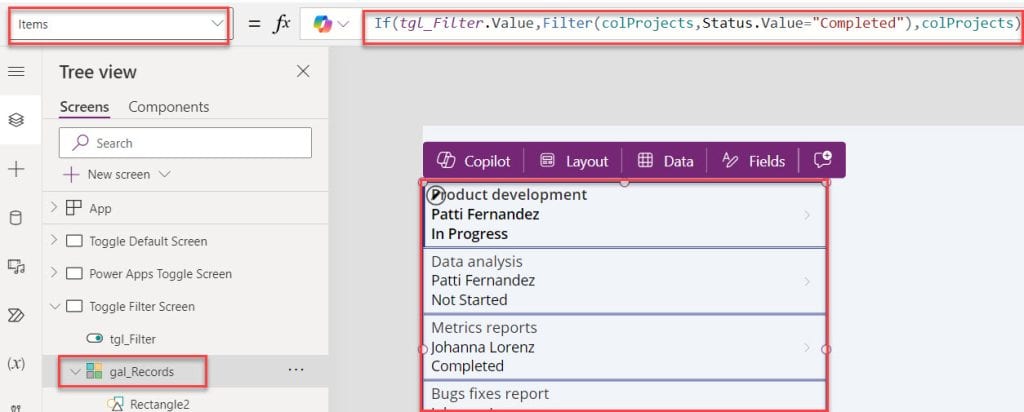
2. Now, insert a Gallery control and set its Items property as:
Items = If(
    tgl_Filter.Value,
    Filter(
        colProjects,
        Status.Value = "Completed"
    ),
    colProjects
)
Where,
- tgl_Filter is the toggle control name.
3. Once it is done, Preview the app. The gallery control displays the filter records based on the toggle button selected value [On/Off], as shown below.
Output:
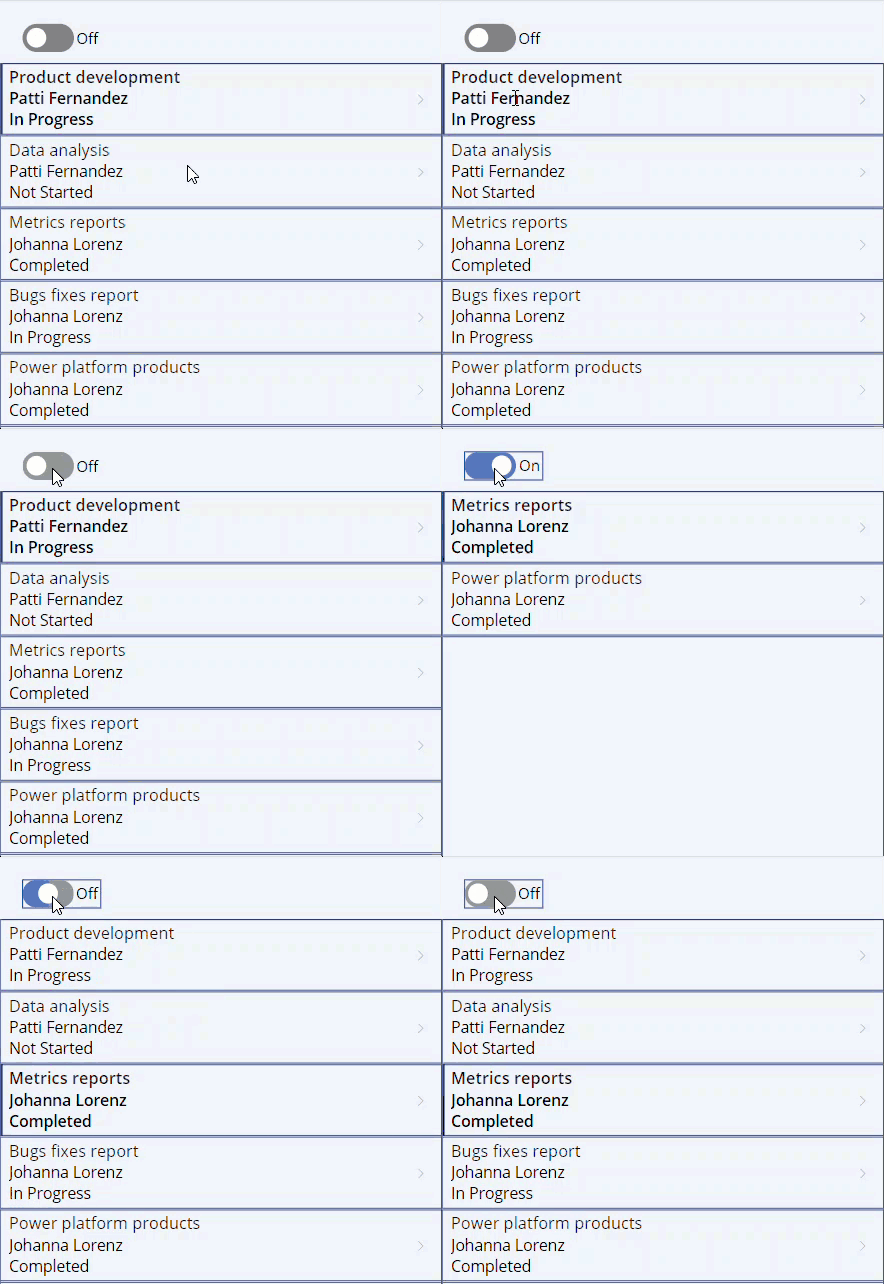
This way, we can filter the Power Apps gallery with toggle control values.
How to Use Toggle Control inside the Power Apps Gallery
In this section, I will explain how to use toggle control in the Power Apps gallery control with a simple example.
Example:
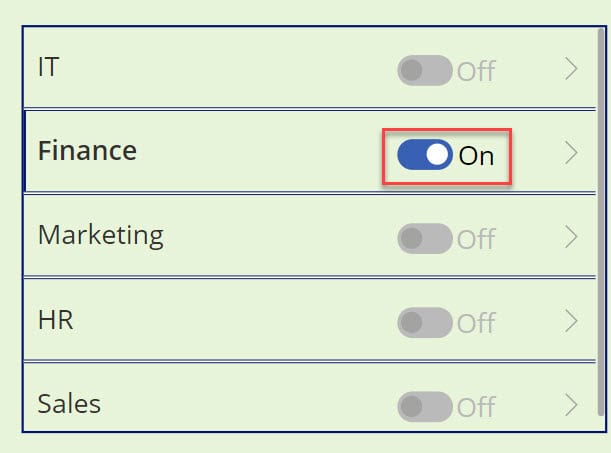
In Power Apps, there is a Gallery control with a Department list and a toggle control. Whenever the user selects or turns on any specific toggle control, the rest of the toggle controls are disabled.
Have a look at the below output.
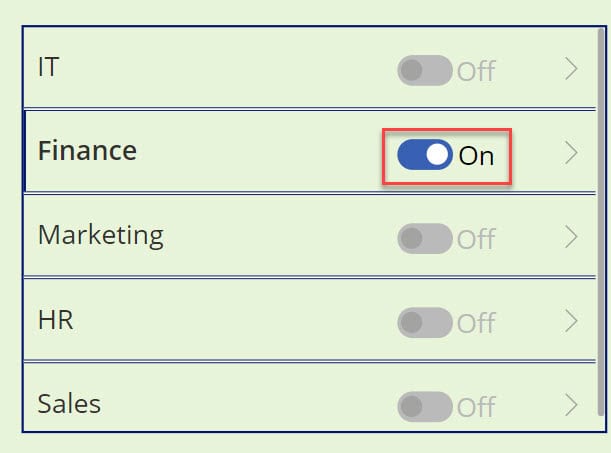
To achieve it, follow the below steps. Such as:
1. On the Power Apps Screen, insert a Gallery control and set its Items property as:
Items = ["IT","Finance", "Marketing", "HR", "Sales"]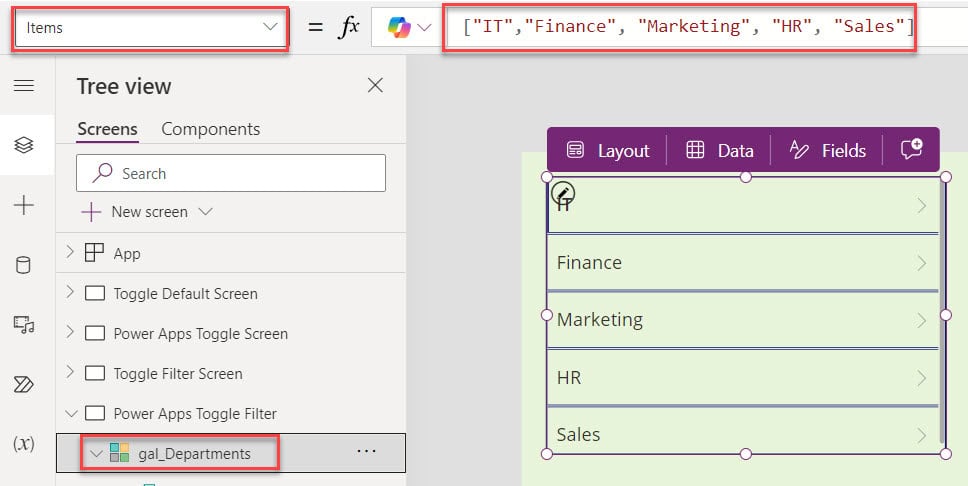
2. Next, add the Toggle control inside the gallery using the Edit icon, as shown below.
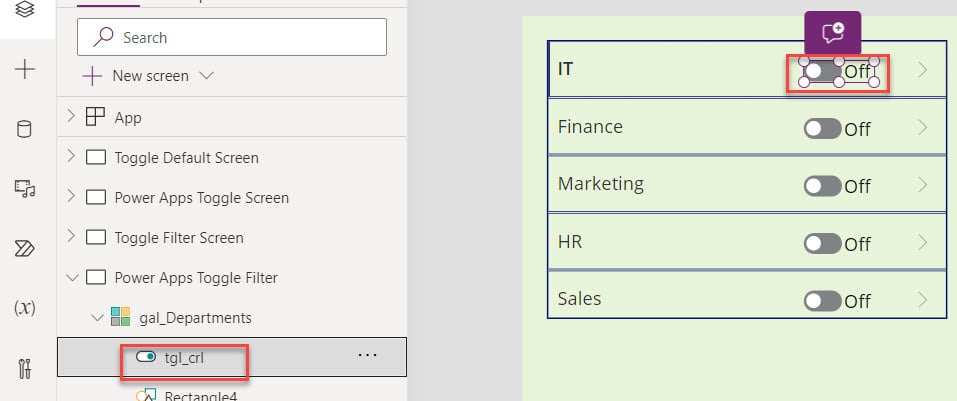
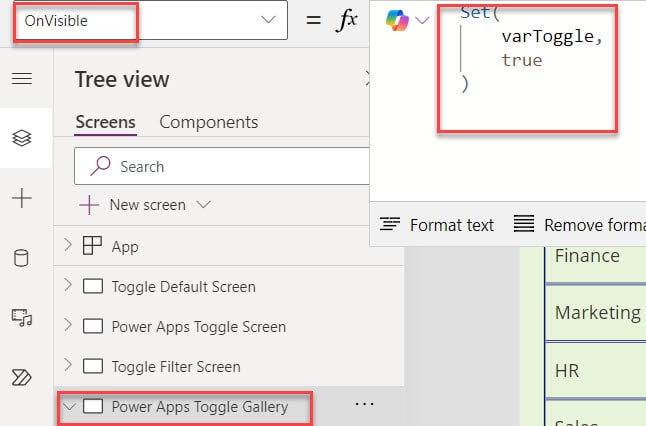
3. Now, select the respective screen and set its OnVisible property to the code below.
OnVisible =  Set(
    varToggle,
    true
)
Where,
- varToggle is the variable name.
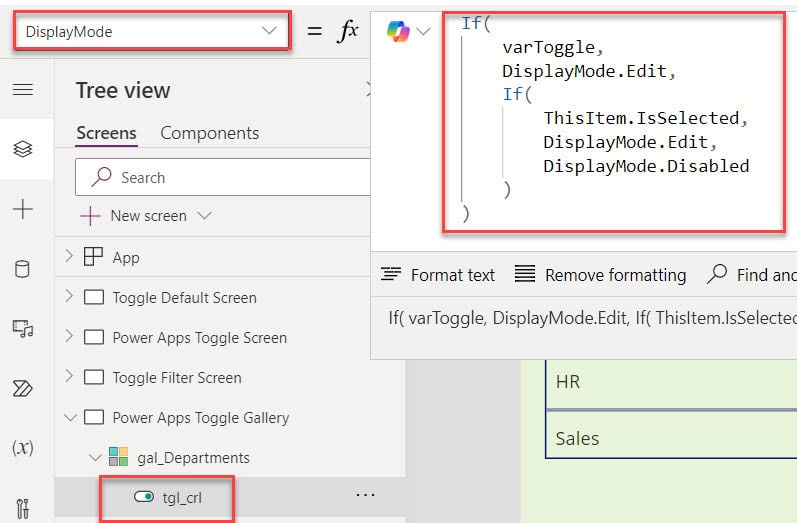
4. Then, select the toggle from the gallery and set its DisplayMode property to the below code.
DisplayMode =  If(
    varToggle,
    DisplayMode.Edit,
    If(
        ThisItem.IsSelected,
        DisplayMode.Edit,
        DisplayMode.Disabled
    )
)
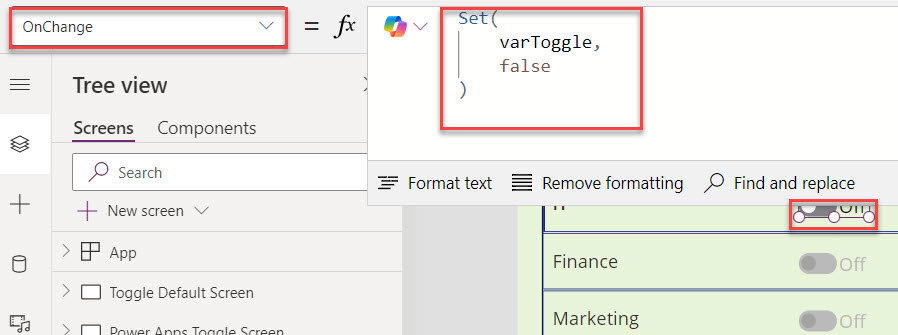
5. Finally, select the OnChange property of the toggle control and apply the below formula.
OnChange = Set(
    varToggle,
    false
)
6. Now, save and publish the app. While previewing the app, you can see the remaining gallery items are disabled when we turn on the toggle control.
How to Customize Power Apps Toggle Text Color based on its State
Suppose you want to change the color of the toggle text. When the user turns on the toggle control, the toggle text will appear in green. In the same way, if you turn Off the toggle control, the toggle text will appear in red.

Add one toggle control and set its Color property to the code below to achieve this.
Color = If(
    tgl_Value.Value,
    Color.Green,
    Color.Red
)
Where
- tgl_Val is the toggle name.
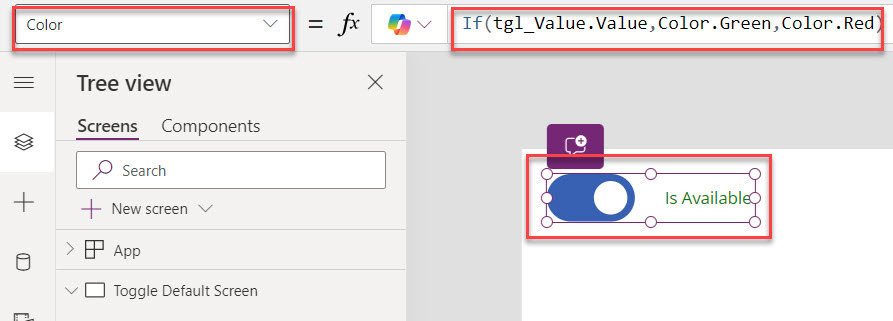
Finally, Preview the app. Once the user turns on the toggle control, the toggle text will change and appear in green. Also, if you turn Off the toggle control, the toggle text will change and appear in red.
Power Apps Toggle Control OnChange Property Usage
Here, I will discuss how to work with the Power Apps toggle OnChange property with a simple example.
Example:
In Power Apps, there is a Toggle control and a Text label control. When the user turns on the toggle control, the text label displays the text [“Approved”]. On the other hand, when the user turns off the toggle control, the text label displays the text [“Rejected”].
Output:

To achieve it, select the Text label control and set the below code on its Text property as:
Text = If (
    tgl_OnChange.Value,
    "Approved",
    "Rejected"
)
Where,
- tgl_OnChange is the toggle control name.
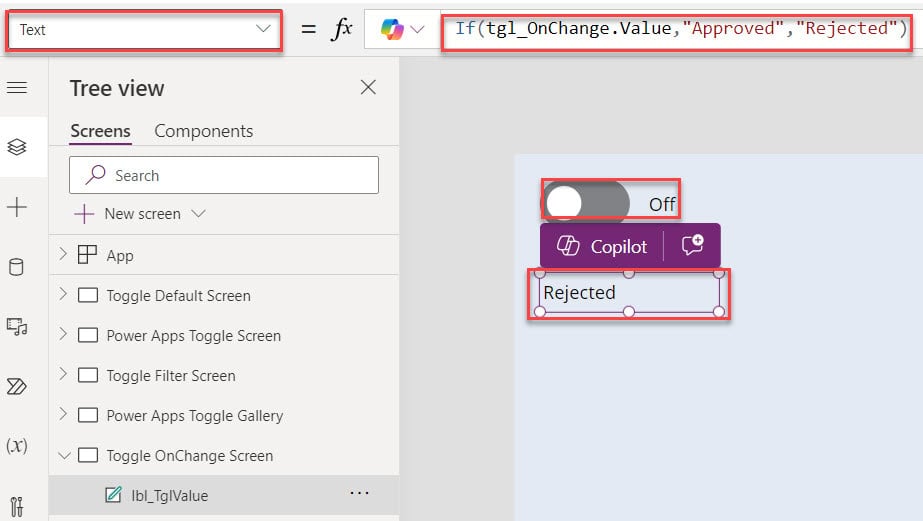
This way, we can work with the Power Apps toggle OnChange property.
How to Reset Power Apps Toggle Control
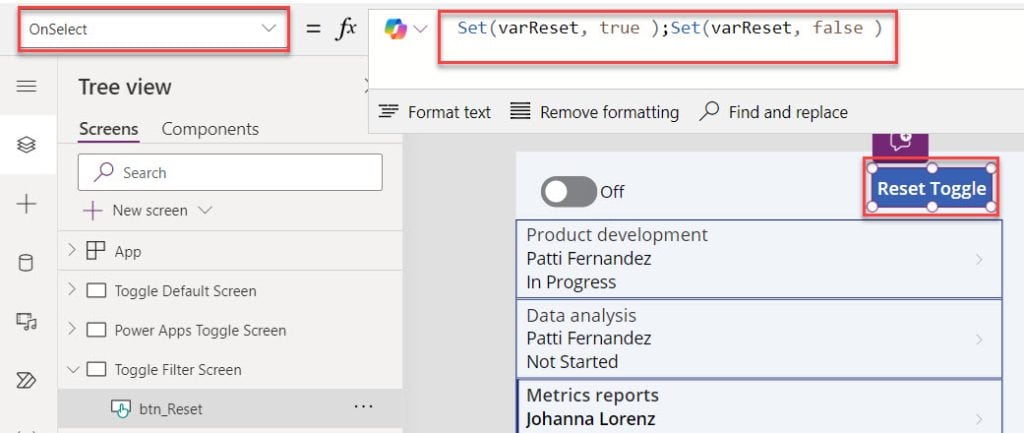
Suppose you want to reset the Power Apps toggle control, add a Button control on the Power Apps screen, and set its OnSelect property as:
OnSelect = Set(
    varReset,
    true
);
Set(
    varReset,
    false
)
Now, select the Toggle control and set its Reset property as:
Reset = varResetWhere,
- varReset is the variable name.
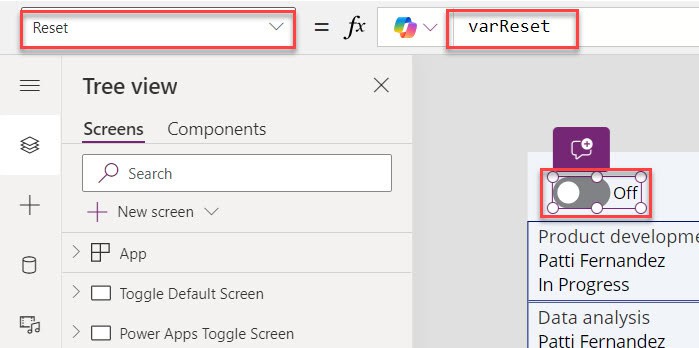
Finally, Preview the app. As shown below, the toggle control will be reset when the user selects the button control.
Output:
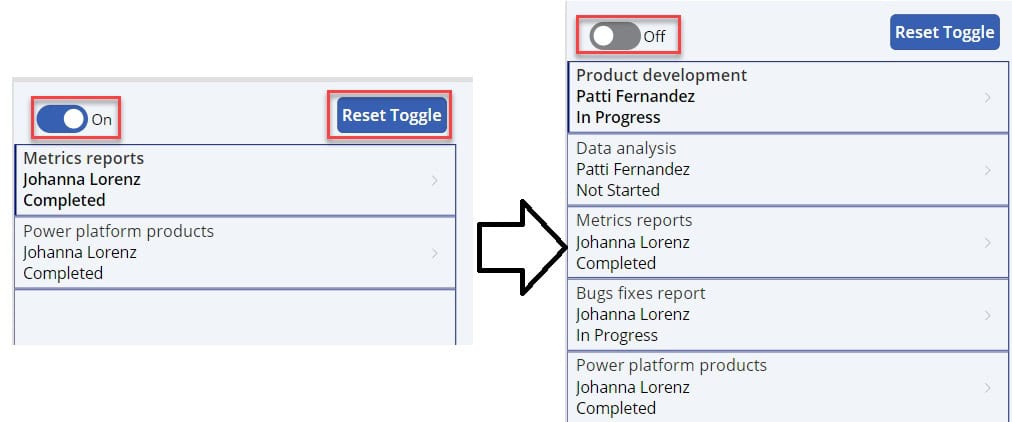
This way, you can reset the Power Apps toggle control.
Additionally, you may like some more articles below:
- Power Apps Loading Spinner
- Create a Header Component in Power Apps
- Power Apps Slider Control
- Power Apps Button Control
- Pagination in Power Apps Gallery
- Power Apps Modern Slider Control
- Power Apps Rating Control
- Filter Power Apps Gallery
I hope you found this article helpful. Here, I have explained how to use Power Apps toggle control with ten different examples. You can take this article as a reference while you’re trying to implement toggle control in your application.
I am Bijay a Microsoft MVP (10 times – My MVP Profile) in SharePoint and have more than 17 years of expertise in SharePoint Online Office 365, SharePoint subscription edition, and SharePoint 2019/2016/2013. Currently working in my own venture TSInfo Technologies a SharePoint development, consulting, and training company. I also run the popular SharePoint website EnjoySharePoint.com
HI, When i Patch SWR1: Toggle1.value the response does not appears on my SP list?
this is such a great info on toggle. Thank you for the effort. I have encountering an issue where togglevalue is saved the sharepoint list but when i open the list item , the toggle does not retain the saved value. Any idea how to fix it ? TIA!
Where is the DEFAULT Value? It is not in the property list.
Hi Guenni,
Select the Classic toggle control -> expand the Property menu. You can specify the Default property as true or false like below: