In this Power BI tutorial, I will explain all about Power BI Power Query examples, Power Query m Language examples, and Power Query Advanced Editor examples.
Also, we will cover the topics below:
- How to use Power Query Editor in Power BI
- M language examples in Power BI
- How to work with Power BI power query
- What is Power Query text.start
- What is Power Query text.end
What is Power Query in Power BI?
Power Query is a feature within Power BI (also available in Excel) that allows users to transform, clean, and shape their data before importing it into Power BI for analysis and visualization.
In other words, Power Query Editor is a tool for preparing data for analysis. It allows you to clean up messy data, combine multiple sources, remove duplicates, and perform various transformations to make your data easy to work with.
How to Use Power Query Editor in Power BI?
Let’s see how to use the power query editor in Power BI Desktop.
1. Open Power BI Desktop, then under the Home tab, click Transform data.

2. Now, you can see Power Query Editor opens.
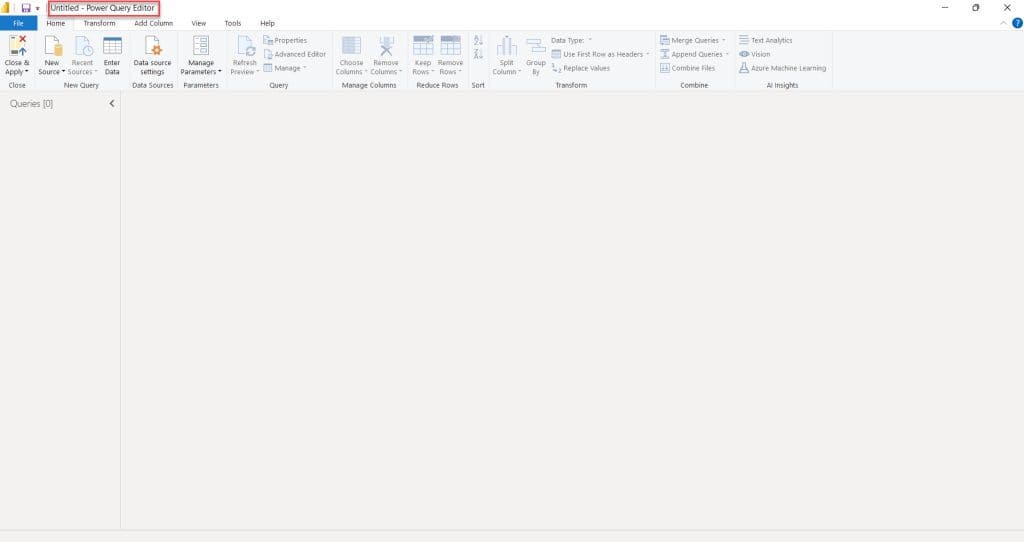
Now, you can use the power query editor in Power BI Desktop.
How to Work with Power BI Power Query?
In this example, we see how to Import Data from a power query editor.
1. Open Power BI Desktop; after that, open Power Query Editor.
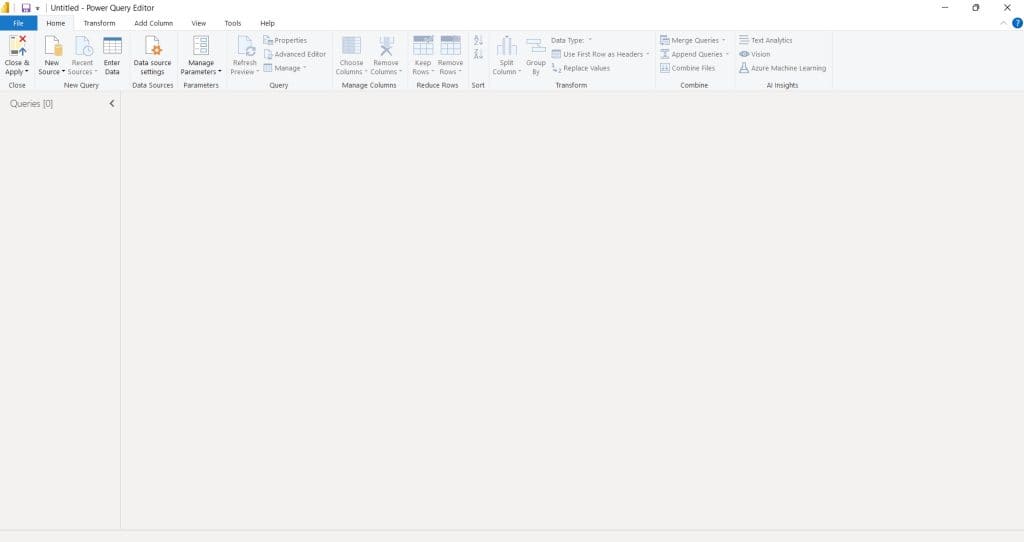
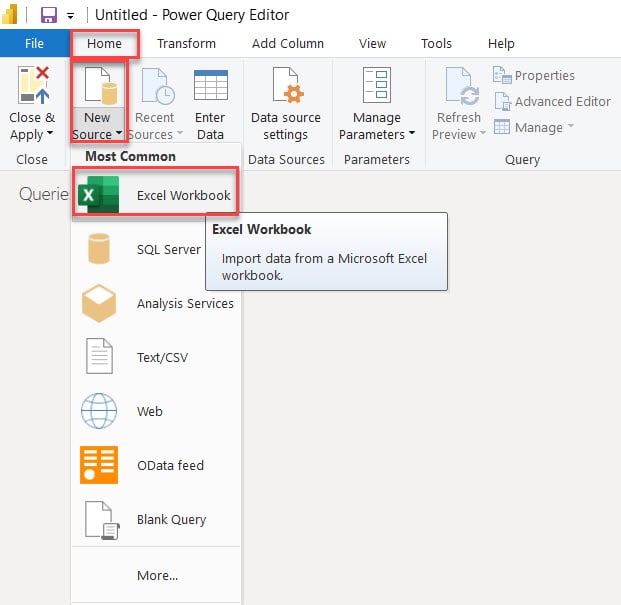
2. Under the Home tab, expand New Source and click Excel Workbook. You can pick any data source you need.
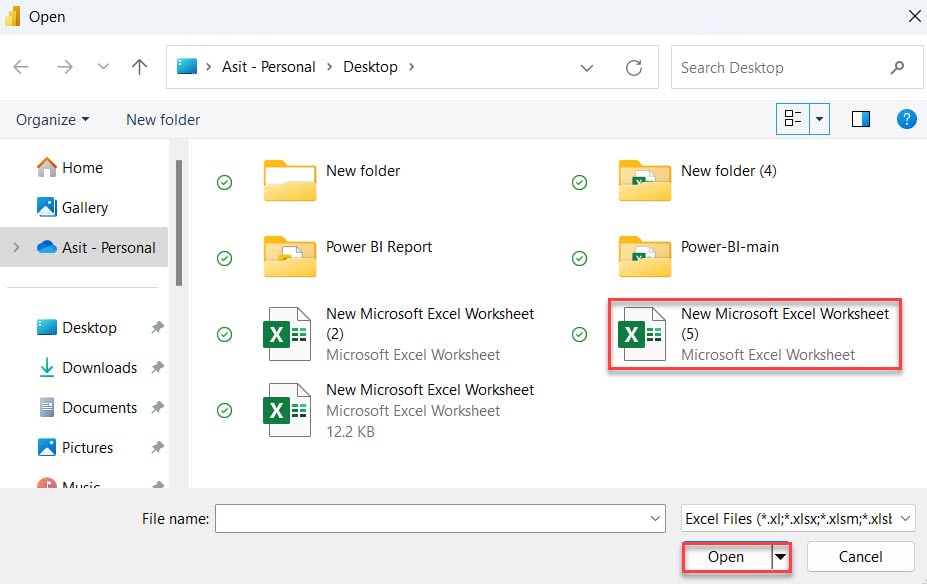
3. This will ask you to browse an Excel file. Here, select the Excel file and click on Open.
4. After that, it will display all the tables in the Excel file you created. Select the table you want to use for creating the report. Click on OK.
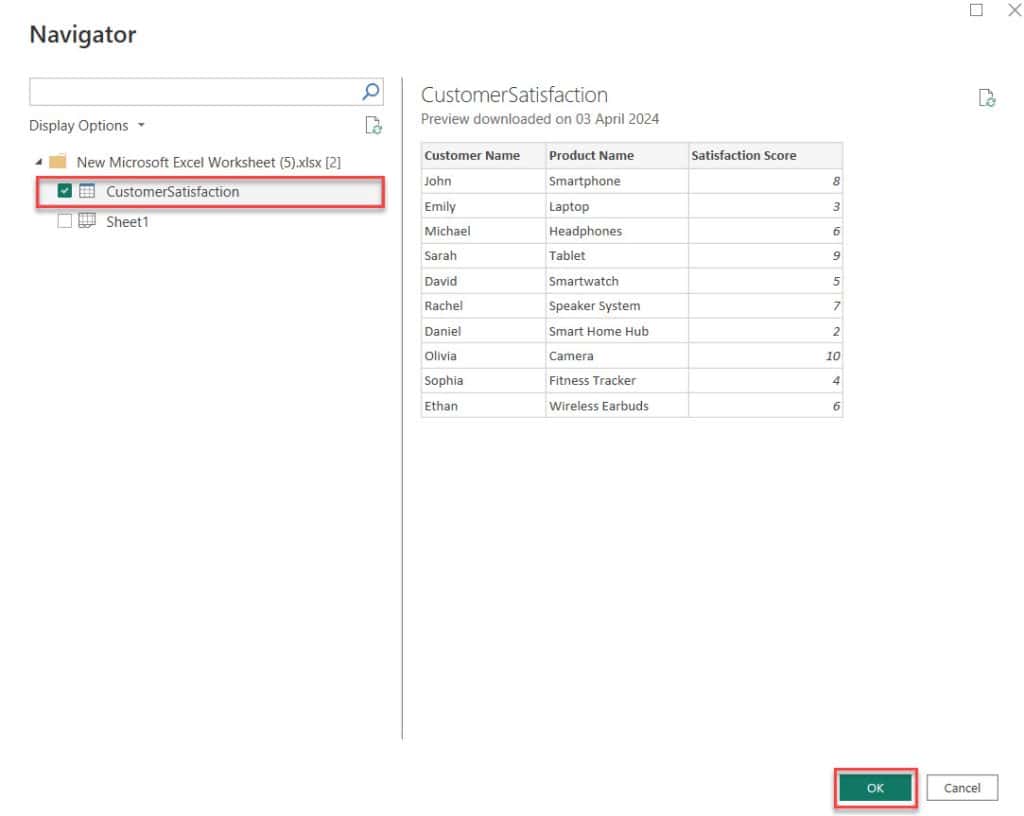
5. Then you can see our loaded in power query editor.

Then, to meet your needs, you can clean and manipulate the data.
Power Query Advanced Editor Examples
Here, we will learn how to use the Power Query Advanced Editor in Power BI.
The Advanced Editor in Query Editor is like a box for your data. Inside, you can edit and organize your data so it looks right for your reports in Power BI Desktop.
The Advanced Editor provides detailed information about your data, including the code for each step of the editing process.
Whenever you make changes to your data, you can check them in the Advanced Editor. It uses Power Query or M-language.
Let’s say we have the table below, and we want to change the task name from Framing to Painting.
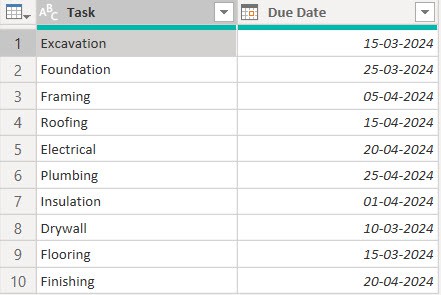
Now follow the below steps:
1. load the above data in Power Query Editor.
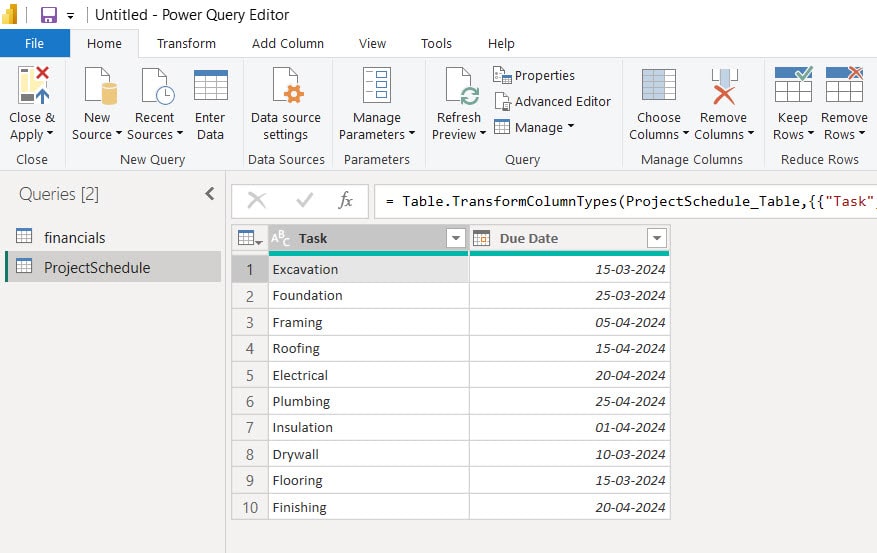
2. In the Power Query editor, under the Home tab, click Advanced Editor from the ribbon.

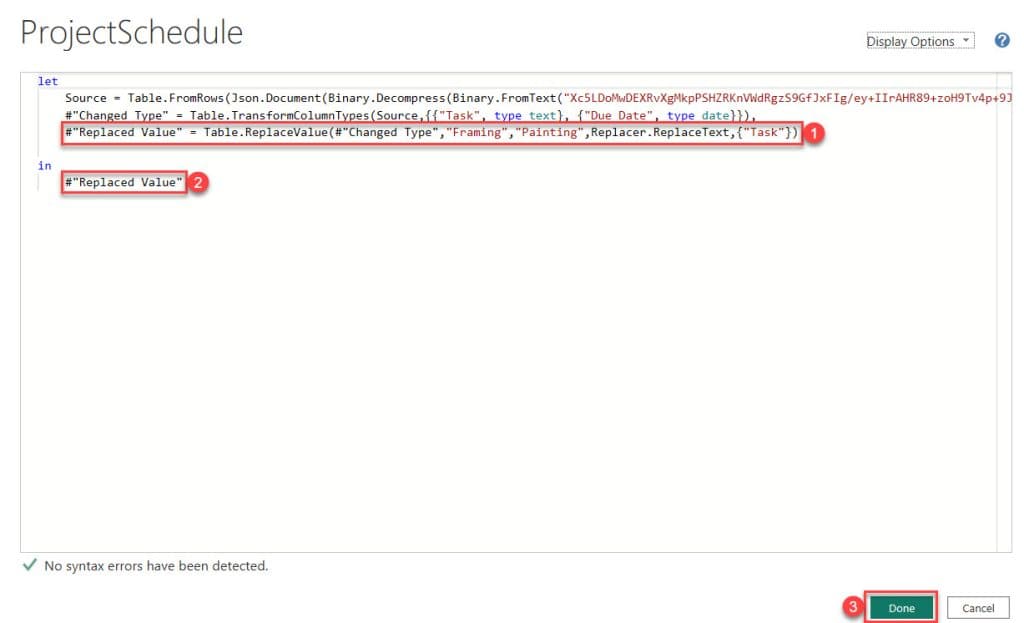
3. we can use the Text.Replace function to Framing to Painting. Put the below expression.
#"Replaced Value" = Table.ReplaceValue(#"Changed Type","Framing","Painting",Replacer.ReplaceText,{"Task"}),Where:
- “Replaced Value” = This is the name given to the new table that will be created after the replacement operation.
- Table.ReplaceValue = This DAX function helps in replacing specific values within a table.
- #”Changed Type” = it’s refers to the name of a table to which replacements will be applied.
- “Framing” = Specifies the value that needs to be replaced.
- “Painting” = Denotes the new value that will replace “Framing.”
- Replacer.ReplaceText = Defines the method to replace text (in this case).
- {“Task”} = Specifies the column where replacements will occur (in this case, the “Task” column).
Then, under the “in,” write #”Replaced Value.” Then Click on Done.
4. Now you can see the name is changed in the table from Framing to Painting.
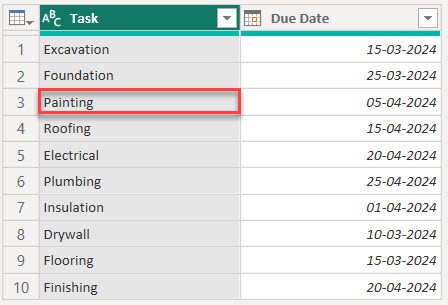
This way, you can use the Power Query Advanced Editor in Power BI.
Power Query M Language Examples
Power Query M Language is a scripting language used in Power BI to manipulate and transform data before loading it into your report.
It’s like giving instructions to clean, organize, and shape your data exactly how you want it.
Suppose you have a dataset with a column of dates, but the dates are in different formats, and you want to standardize them. With Power Query M Language:
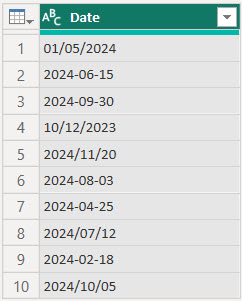
Now Follow the below steps:
1. In the Power Query editor, under the Home tab, click Advanced Editor from the ribbon.

2. To convert the “Date” column to date type and then transform it into a standardized format of “yyyy-MM-dd.” Put below expression:
#"Changed Type" = Table.TransformColumnTypes(Source,{{"Date", type date}}),
    #"Standardized Date" = Table.TransformColumns(#"Changed Type", {{"Date", each Date.ToText(_, "yyyy-MM-dd"), type text}})
Where:
- “#”Changed Type” = Table.TransformColumnTypes(Source,{{“Date”, type date}}) = This M language code transforms the “Date” column in the table named Source to a date data type.
- “#”Standardized Date” = Table.TransformColumns(#”Changed Type”, {{“Date”, each Date.ToText(_, “yyyy-MM-dd”), type text}}) = This M language code converts the values in the “Date” column (previously transformed to dates) into text format, with the specified “yyyy-MM-dd” format, in a new table named #”Standardized Date.”
Then, under the “in,” write #”Standardized Date.” Then Click on Done.
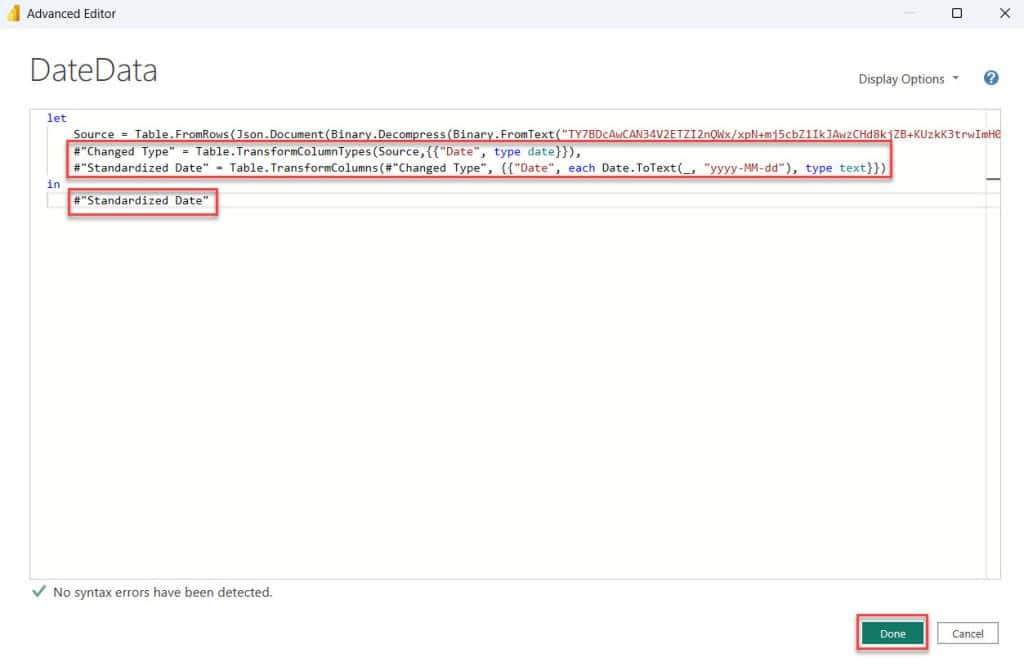
3. Now, the dates are all in the format “yyyy-MM-dd.”
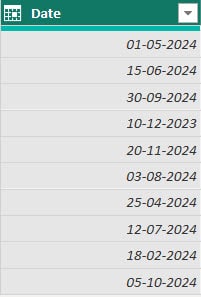
This way, you can use m language in Power BI.
Power BI Power Query text.start
let’s see how to use Text.start in the Power query of Power BI.
In Power Query, the “Text.Start” function is used to extract a specified number of characters from the beginning of a text string.
So, if you have a long text and only need the first few characters, you can use this function to obtain them quickly.
Syntax:
Text.Start(text as nullable text, count as number) as nullable textSuppose you have a dataset with columns of Task and Due Date, like the screenshot below.
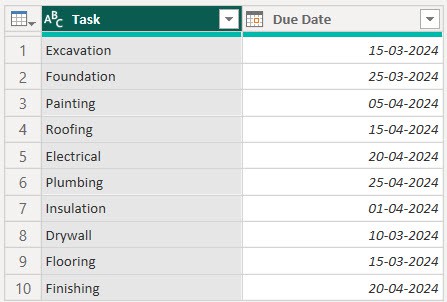
Now follow the below steps:
1. Now, I hope you load the data on the Power BI desktop and open the Power Query editor.

2. Under the Add Column tag, click Custom Column.

3. In the Custom Column window, under “New column name,” give a name. Then, in the custom column formula, enter the below expression. Then click OK.
Text.Start([Task], 5)Where:
- Text.Start =This is likely a function that extracts a specified number of characters from the beginning of a text string.
- ([Task]): This part is likely the input parameter, which
[Task]is probably a placeholder for the text string from which you want to extract the characters. - 5: This number indicates how many characters you want to extract from the beginning of the text string.
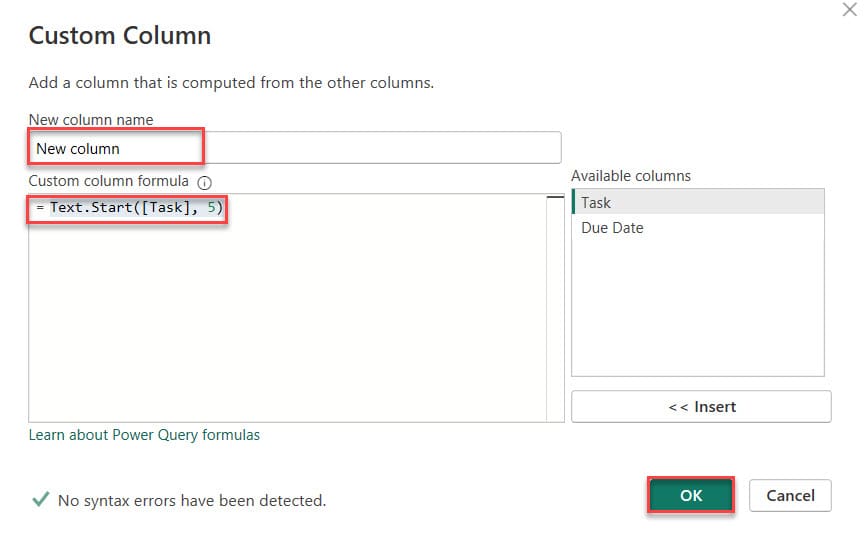
4. Then, you can see that the power query editor extracts 5 characters.
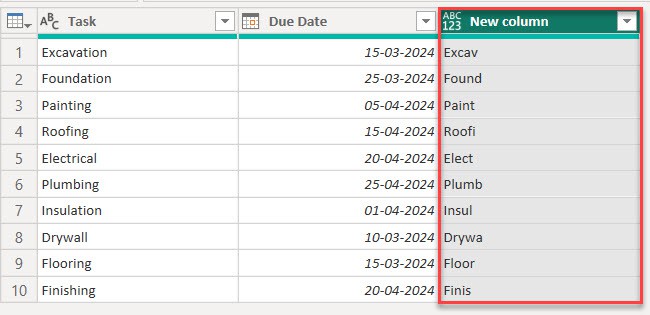
This way, you can use Text.start in the Power query of Power BI.
Power BI Power Query text.end
let’s see how to use Text.end in the Power query of Power BI.
In Power Query, the “.Text.End” function helps you grab a specific number of characters from the end of a text string.
Syntax:
Text.End(text as nullable text, count as number) as nullable textSuppose you have a dataset with columns of Task and Due Date, like the screenshot below.

In the Custom Column window, under “New column name,” give a name. Then, in the custom column formula, enter the below expression. Then click OK.
Text.End([Task], 5)Where:
- Text.End = This is the name of the function. It’s like a command that tells the computer to do something with text.
- [Task] = This is the input or text the function will work on. It could be any text, like a word or a sentence.
- 5 = This is a number that tells the function how many characters from the end of the text it should look at.
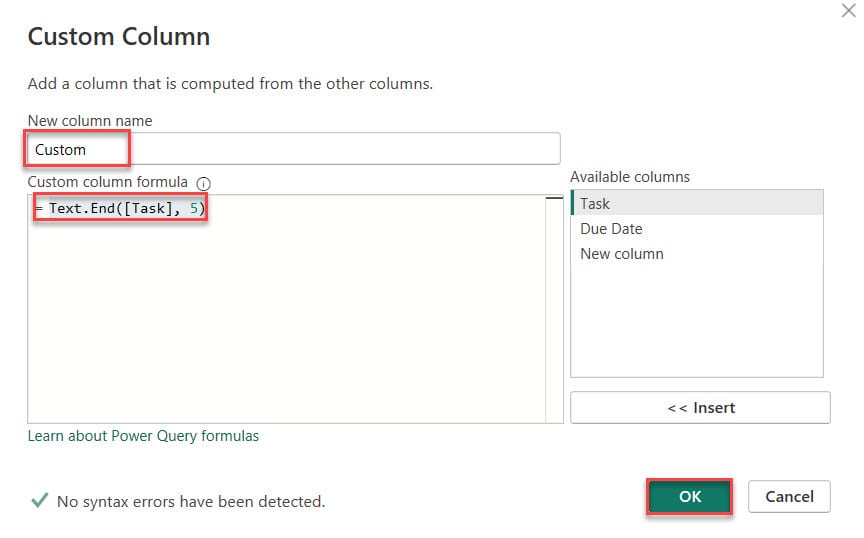
Then, you can see that the power query editor extracts 5 characters.
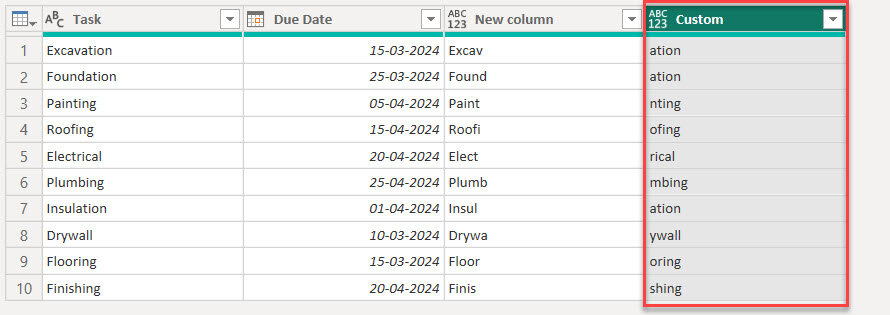
This way, you can use Text.end in the Power query of Power BI.
How to use Power Query Text.contains
Here, we will see how to use Text.contains in the Power query of Power BI.
The Text.contains() function is used to search for specific text within a string. If the text is found in the string, it returns true; otherwise, it returns false.
Syntax:
Text.Contains(text as nullable text, substring as text, optional comparer as nullable function) as nullable logicalSuppose you have a dataset with columns of Task and Due Date, like the screenshot below.

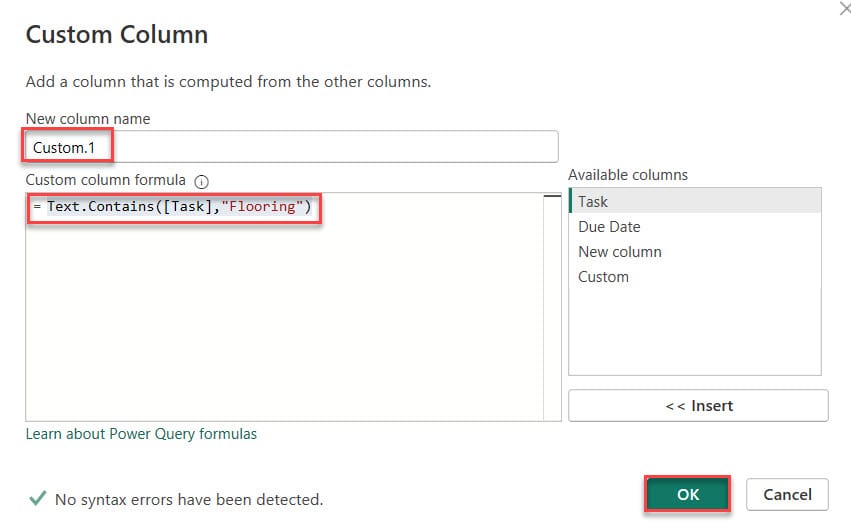
In the Custom Column window, under “New column name,” give a name. Then, in the custom column formula, enter the below expression. Then click OK.
Text.Contains([Task],"Flooring")Where:
- Text.Contains: This is a function used to check if a piece of text contains another specific piece of text.
- [Task]: This is the text or string where we want to search for something.
- “Flooring”: This is the specific word or phrase we’re looking for within the task. In this case, it’s “Flooring”.
Now you can see the custom column with the boolean value, and if the coffee is present, it returns true or else False.
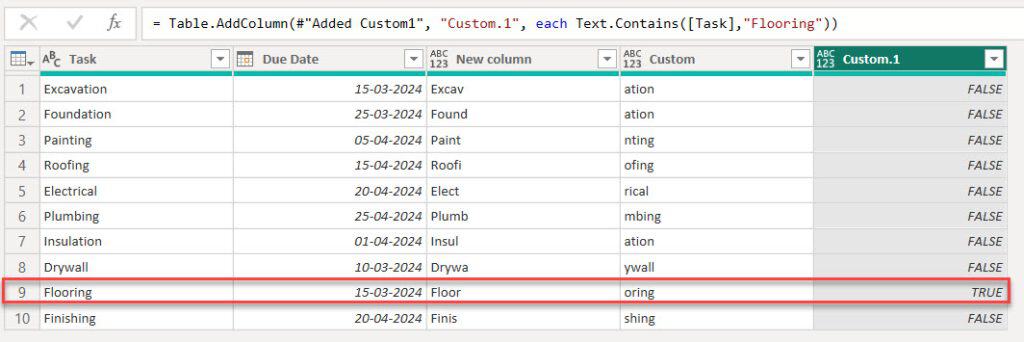
This is an example of Power BI how to use power query text. contains.
Also, you may like:
- Power Query Create Table in Power BI
- Power Query Date Functions
- Power BI If Date is Greater than Specific Date
- Switch in DAX
- Power BI If Statement
- Power BI Pie Chart Multiple Values
Conclusion
In this article, we explored Power Query in Power BI, which is a powerful tool for data transformation and preparation. Also, we learned how to use the Power Query Editor to clean, reshape, and combine data from various sources.
Additionally, we learned power query examples, what is advanced power query, power query advanced editor examples.
I am Bijay a Microsoft MVP (10 times – My MVP Profile) in SharePoint and have more than 17 years of expertise in SharePoint Online Office 365, SharePoint subscription edition, and SharePoint 2019/2016/2013. Currently working in my own venture TSInfo Technologies a SharePoint development, consulting, and training company. I also run the popular SharePoint website EnjoySharePoint.com