As we know, the Power Apps Date picker does not have a time picker control [like Hour/Minute/Seconds] by default. If Power Apps could provide developers with this feature, it would be extremely helpful.
As this PowerApps time picker feature is not available in Power Apps Date picker, we can use a Dropdown control to select time [Hour/Minute/Seconds] alternatively.
In this tutorial, I will explain PowerApps date and time picker, Power Apps time picker format, Date Time Zone in datepicker Power Apps, including:
- Power Apps Date Picker Disable Past Days
- Power Apps Clear Date Picker
Power Apps Date and Time Picker
To add a date and time picker in the Power Apps, follow the below steps.
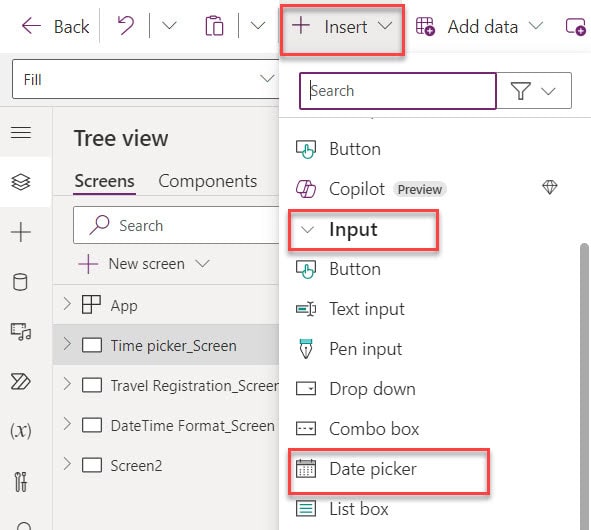
1. On the Power Apps Screen, insert a Date picker control [+ Insert -> Inputs -> Date picker], as shown below.
2. You will see here that whenever the user adds a date picker on the Power Apps app, it only displays the current date without time.
Default = Today()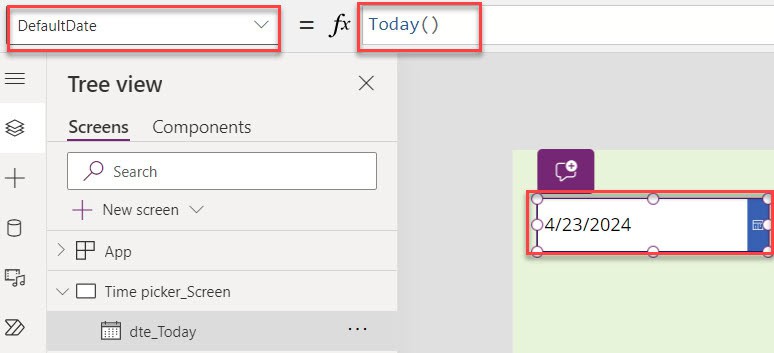
3. As per our requirement, we need to select a date and time. To do that, insert a Dropdown control and set its Items property to the code below.
Items = ["00","01","02","03","04","05","06","07","08","09","10","11","12","13","14","15","16","17","18","19","20","21","22","23"]Where,
- “00”,”01″,”02″, etc. = As Hour represents 24 hours. So, I have applied from “00” to “23”

4. Now, set the Dropdown’s Default property using the below code to get the current time [Hour] based on the current date.
Default = Text(Hour(Now()),"[$-en-US]00")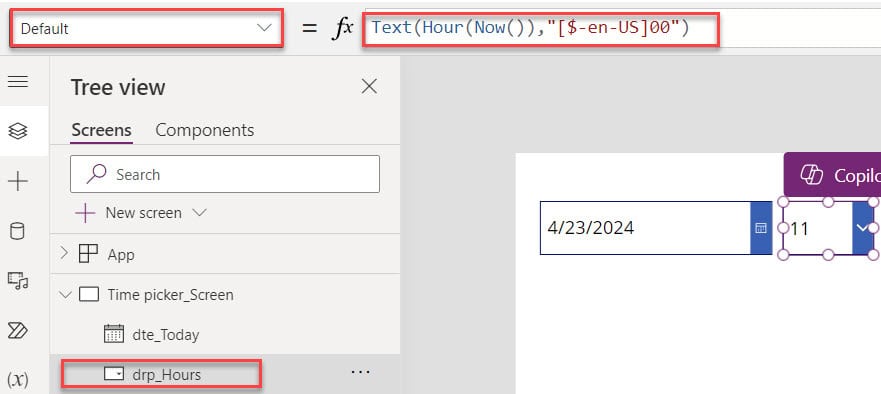
5. In the same way, insert another Dropdown control for Minutes and set its Items property as:
Items = ["00","01","02","03","04","05","06","07","08","09","10","11","12","13","14","15","16","17","18","19","20","21","22","23","24","25","26","27","28","29","30","31","32","33","34","35","36","37","38","39","40","41","42","43","44","45","46","47","48","49","50","51","52","53","54","55","56","57","58","59"]Where.
- “00”,”01″,”02″,”03″,”04″,etc. = As Minutes represents 60 seconds. So I have applied from “00” to “59”

6. Finally, set the Dropdown’s Default property using the below code to get the current time [Minutes] based on the current date.
Default = Text(Minute(Now()),"[$-en-US]00")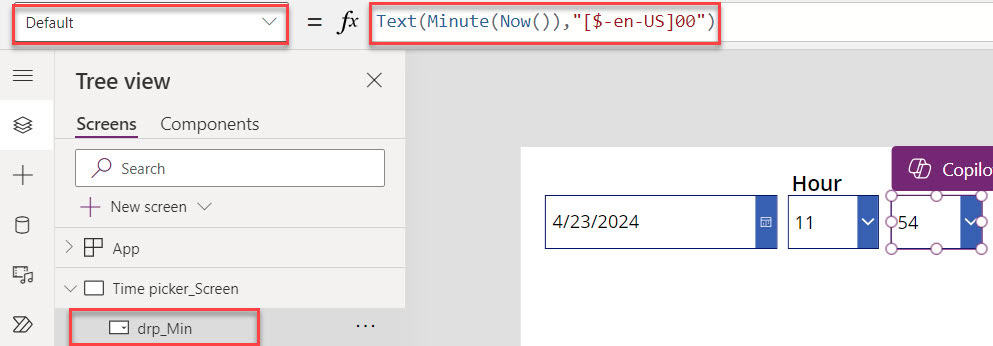
7. Once your app is ready, Save, Publish, and Preview the app. Now, we will get a datetime picker in Power Apps. Have a look at the screenshot below for the output

Power Apps Time Picker AM/PM
Suppose you want to display a datetime picker with AM/PM on a 12-hour basis. In this case, follow the below steps.
1. On the Power Apps Screen, insert a Dropdown control and set its Items property to the code below.
Items = ["AM", "PM"]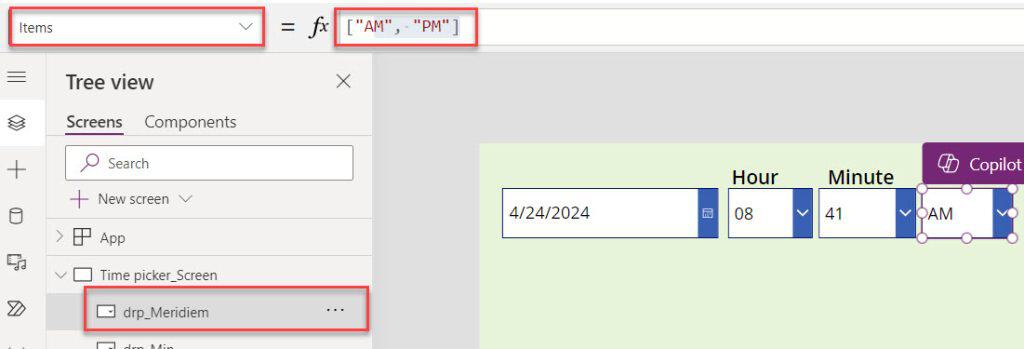
2. Next, set the Dropdown’s Default property using the code below to get the time picker with AM/PM on a 12-hour basis.
Default = If(Hour(Now())<12,"AM","PM")This way, you can work with the datetime picker with AM/PM on a 12-hour basis.

Power Apps Time Picker
Next, I will show you how to add a Power Apps time picker with a simple scenario.
Scenario:
In Power Apps, I have a “Travel Booking Form” with some controls, including datetime pickers, as shown below.
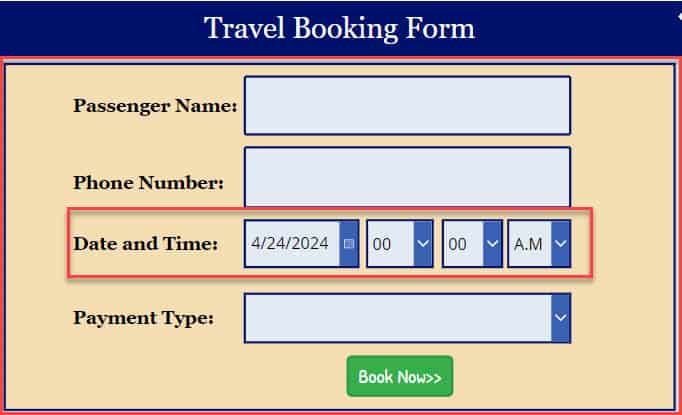
Now, I would like to store the records [Including the time picker] in the Power Apps collection [colTravels].
Output.
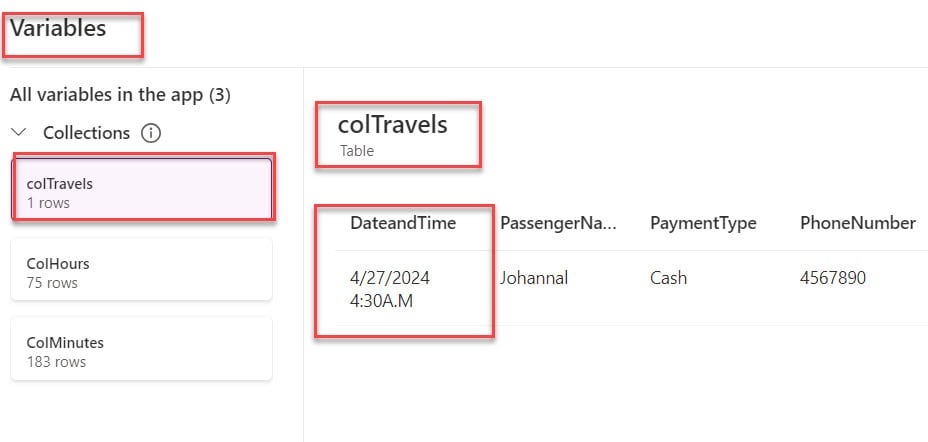
To work around this, follow the below steps.
1. Select the respective Power Apps Screen and set its OnVisible property to the code below.
OnVisible = ForAll(
    Sequence(
        25,
        0,
        1
    ),
    Collect(
        ColHours,
        {
            HourText: If(
                ThisRecord.Value < 10,
                "0" & ThisRecord.Value,
                ThisRecord.Value
            ),
            HourValue: ThisRecord.Value
        }
    )
);
ForAll(
    Sequence(
        61,
        0,
        1
    ),
    Collect(
        ColMinutes,
        {
            MinuteText: If(
                ThisRecord.Value < 10,
                "0" & ThisRecord.Value,
                ThisRecord.Value
            ),
            MinuteValue: ThisRecord.Value
        }
    )
)
Where,
- ColHours = Power Apps collection for hours
- ColMinutes = Power Apps collection for minutes
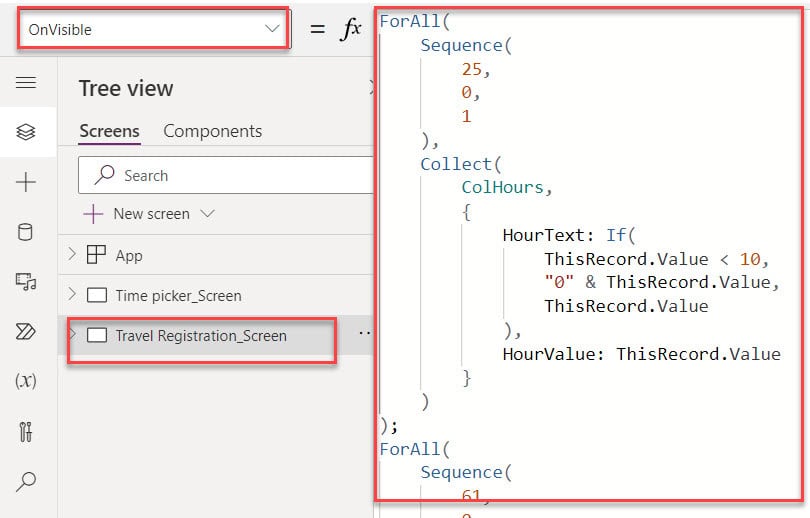
2. On the Power Apps Screen, select Dropdown controls [Hour_drp and Min_drp] and set their Items properties, as shown below.
Items = ColHours                                 //Collection for Hours

Items = ColMinutes                            //Collection for Minutes
3. Now, select the Button control and set its OnSelect property to the code below.
OnSelect = Collect(
    colTravels,
    {
        PassengerName: txt_name.Text,
        PhoneNumber: txt_phonenumber.Text,
        DateandTime: Concatenate(
            dte_selecteddate.SelectedDate,
            "  ",
            Hour_drp.Selected.HourValue,
            ":",
            Min_drp.Selected.MinuteValue,
            "",
            Meridiem_drp.Selected.Value
        ),
        PaymentType: drp_Choices.Selected.Value
    }
)
Where,
- colTravels = Power Apps collection name
- txt_name, txt_phonenumber = Power Apps text input control names
- dte_selecteddate = Date picker control name
- Hour_drp, Min_drp, Meridiem_drp, drp_Choices = Dropdown controls names
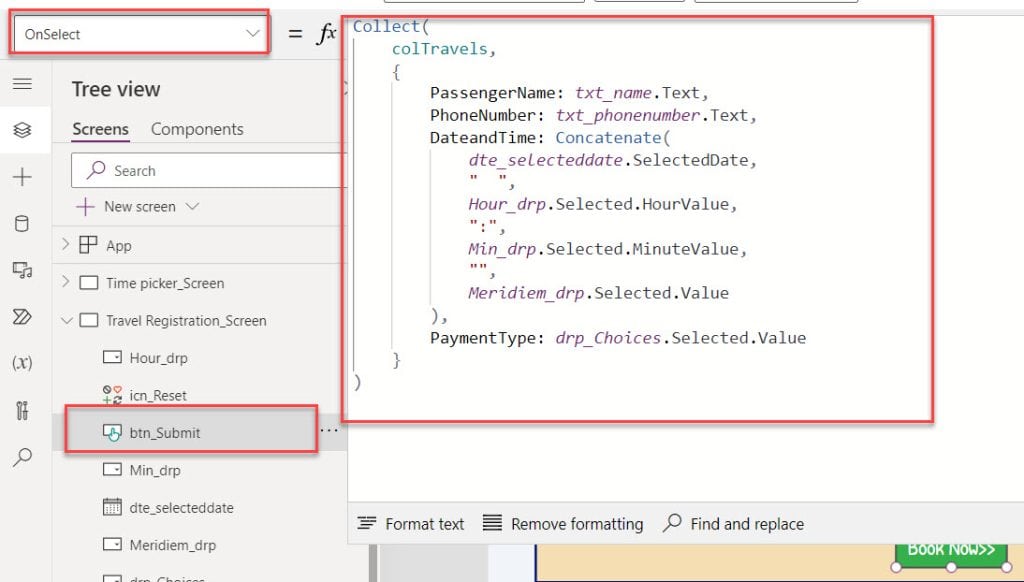
4. Finally, insert a Reset icon and set its OnSelect property as:
OnSelect = Reset(txt_name);
Reset(txt_phonenumber);
Reset(dte_selecteddate);
Reset(Hour_drp);
Reset(Min_drp);
Reset(Meridiem_drp);
Reset(drp_Choices)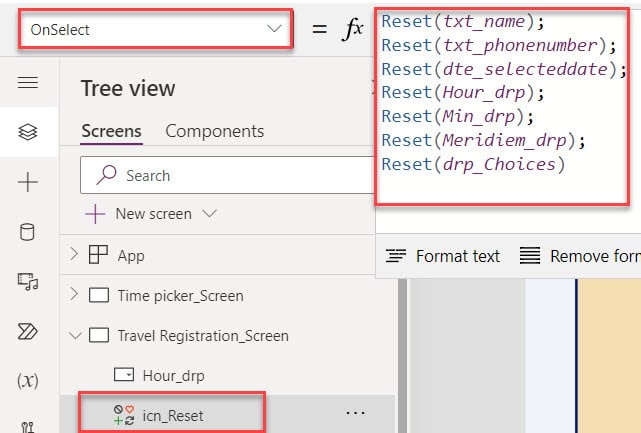
5. Once all updates are done, Preview the app. Whenever the user provides a new record, including a time picker, and clicks on the button control, it will be saved in the Power Apps collection, as in the screenshot below.

Power Apps Datepicker with Time
In this section, I will show you how to work with the Power Apps date picker with time using a SharePoint list.
I have a SharePoint list named “Hotel Reservation,” which contains some fields, including date and time fields.
| Column Name | Data Type |
| Name | It is a default single line of text |
| A single line of text | |
| Phone Number | Number |
| Arrival Date | Date and time [Include time] |
| Departure Date | Date and time [Include time] |
| Address | Multiple lines of text |
| Payment Type | Choice |

Now, I need to add records from the Power Apps Edit form including the date picker with time. Whenever the user connects the SharePoint list to the Power Apps edit form control, it will add two dropdown controls to select the time [For selecting Hours and Minutes] by default.
Refer to the below image.
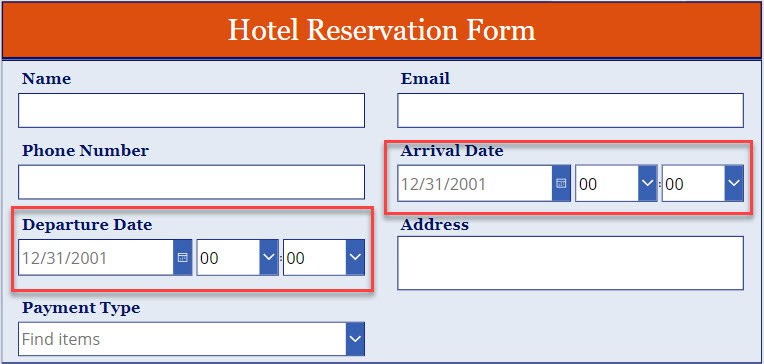
As per my requirement, I need to add another dropdown for selecting time with AM/PM and submit the new record from the Power Apps form to the SharePoint list.
Output:

To achieve it, follow the below steps. Such as:
1. On the Power Apps Form control, select the Date and time data cards [Arrival Date_DataCard1 and Departure Date_DataCard1]; inside those data cards, you can add new dropdowns and set its Items properties.
Items = ["AM","PM"]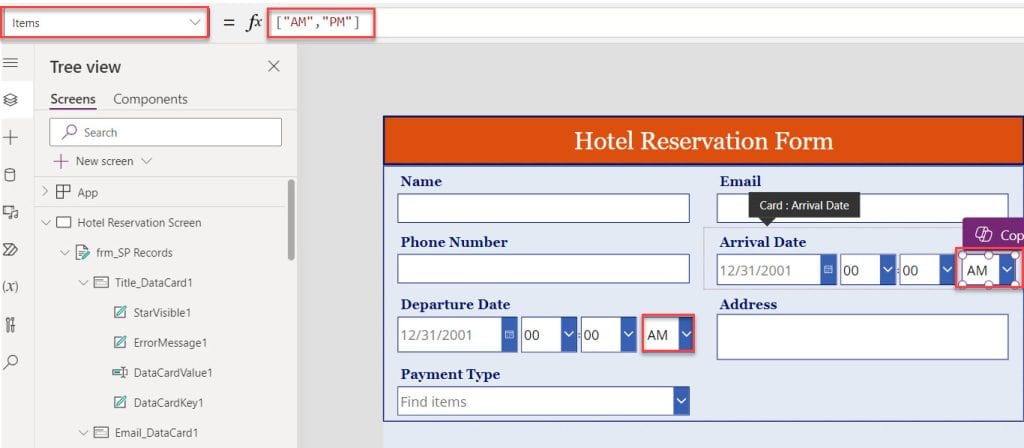
2. Now, insert a Button control [Submit] and set its OnSelect property to the code below.
OnSelect = SubmitForm('frm_SP Records');
ResetForm('frm_SP Records')
Where,
- ‘frm_SP Records’ = Power Apps form control name
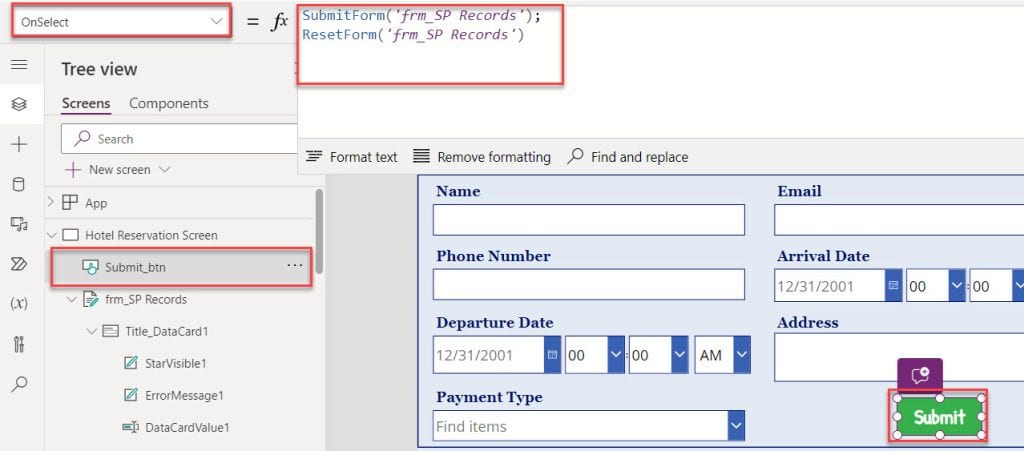
3. Finally, Preview the app. When the user provides new record details, including a time picker, and selects a button control, the record will be saved in the SharePoint list, as shown below.

This is how we can work with the Power Apps date picker with time.
Power Apps Datetime Format
Let’s see how to format the date and time in the Power Apps. To do so, follow the below steps.
1. As I told you, whenever the user adds a Date picker control, it will display the current date without time.
2. Also, you will see the date picker’s DefaultDate as “Today()” and Format as “DateTimeFormat.ShortDate.”
DefaultDate = Today()

Format = DateTimeFormat.ShortDate
3. The date picker Format property has more format functions to change the datetime format. However, it does not include the time, like the one below.

4. To overcome this issue, you can use Text label control to display the datetime instead of Date picker control.
Note:
Whenever you want to display the datetime on the text label, you can use Now() function instead of Today() function.
Text = Now()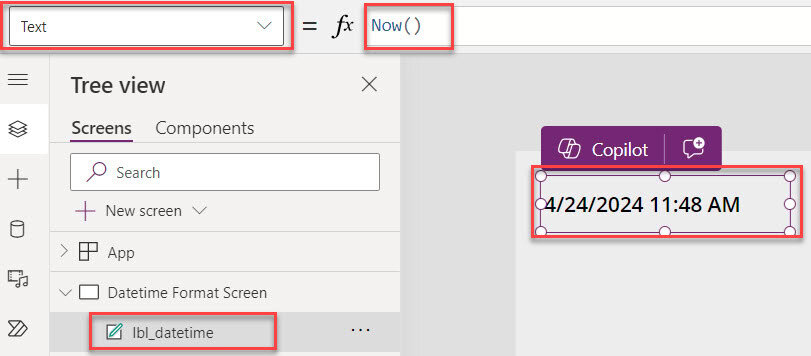
5. In the same way, you can also use different datetime formats to change date and time as well. There are some different formats of Dates. Such as:
- MM/DD/YYYY or MM-DD-YYYY
- DD/MM/YYYY or DD-MM-YYYY
- YYYY/MM/DD or YYYY-MM-DD
- MM/DD/YY or MM-DD-YY
- DD/MM/YY or DD-MM-YY
- DD Mon YYYY
- Month DD, YYYY
- mm/dd/yyyy hh:mm AM/PM
- dd/mm/yyyy hh:mm AM/PM
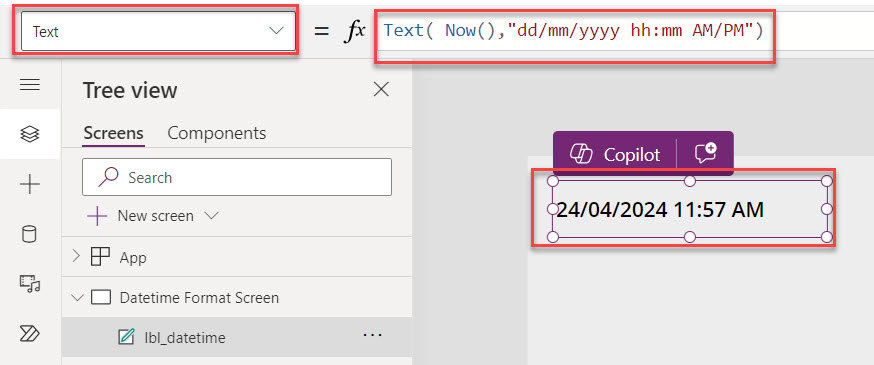
Date Time Zone in Power Apps
When working with a Power Apps application, sometimes we need to change or convert the date and time zone according to our needs.
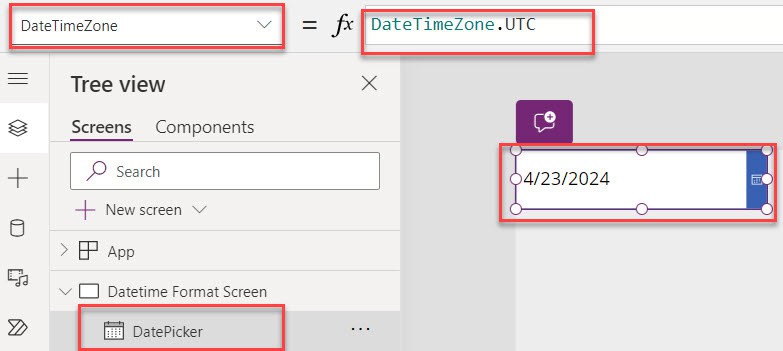
The Power Apps Date picker control has the DateTimeZone property. Under this property, two options are available: “Local” and “UTC. “
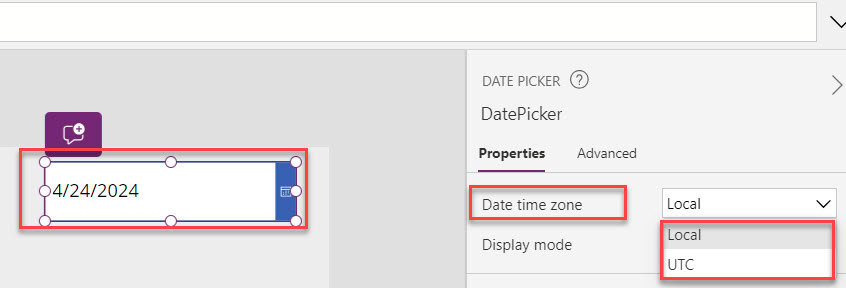
By default, it will selected as a Local date time zone; you can also “convert Local to UTC” as well.
DateTimeZone = DateTimeZone.UTCThis is the way you can work with the Power Apps DateTimeZone.
Power Apps Date Picker Disable Past Days
Suppose you want to disable the Power Apps date picker using the logic [If the selected is less than today]; there is no direct restriction available in this control.
However, you can use alternative ways to do it. For that, you can follow the below different examples.
Example-1:
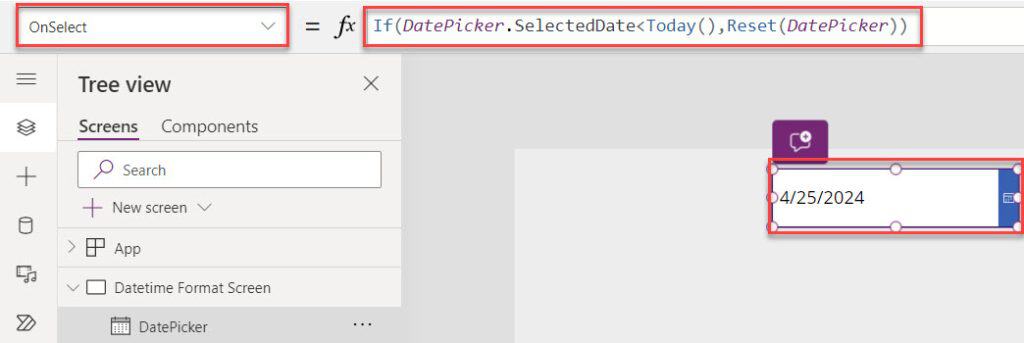
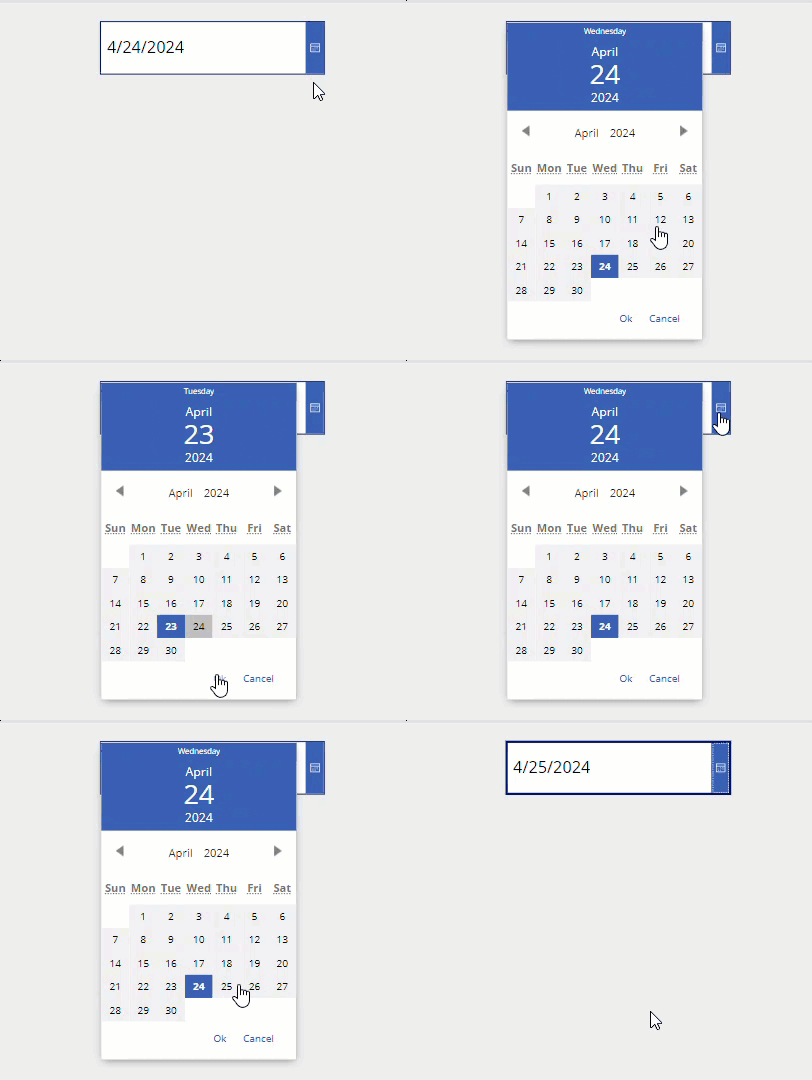
In Power Apps, I have a Date picker control, and now I would like to restrict it. [When a user selects any past dates, it will restrict and return to the default date (i.e., Today). However, the user can select any future dates that he/she wants.
To do so, select the Date picker control and set its OnSelect property to the code below.
OnSelect = If(
    DatePicker.SelectedDate < Today(),
    Reset(DatePicker)
)
Once it is done, Preview the app. Once we select any past dates, it will restrict and return to the current date. However, we can select any future dates that we want, as shown below.
Example-2:
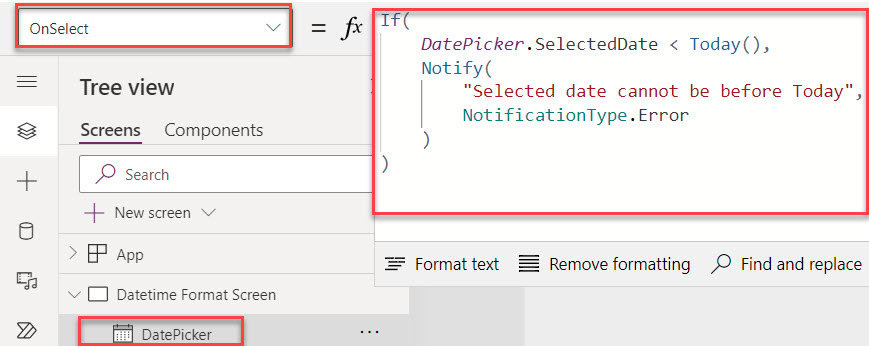
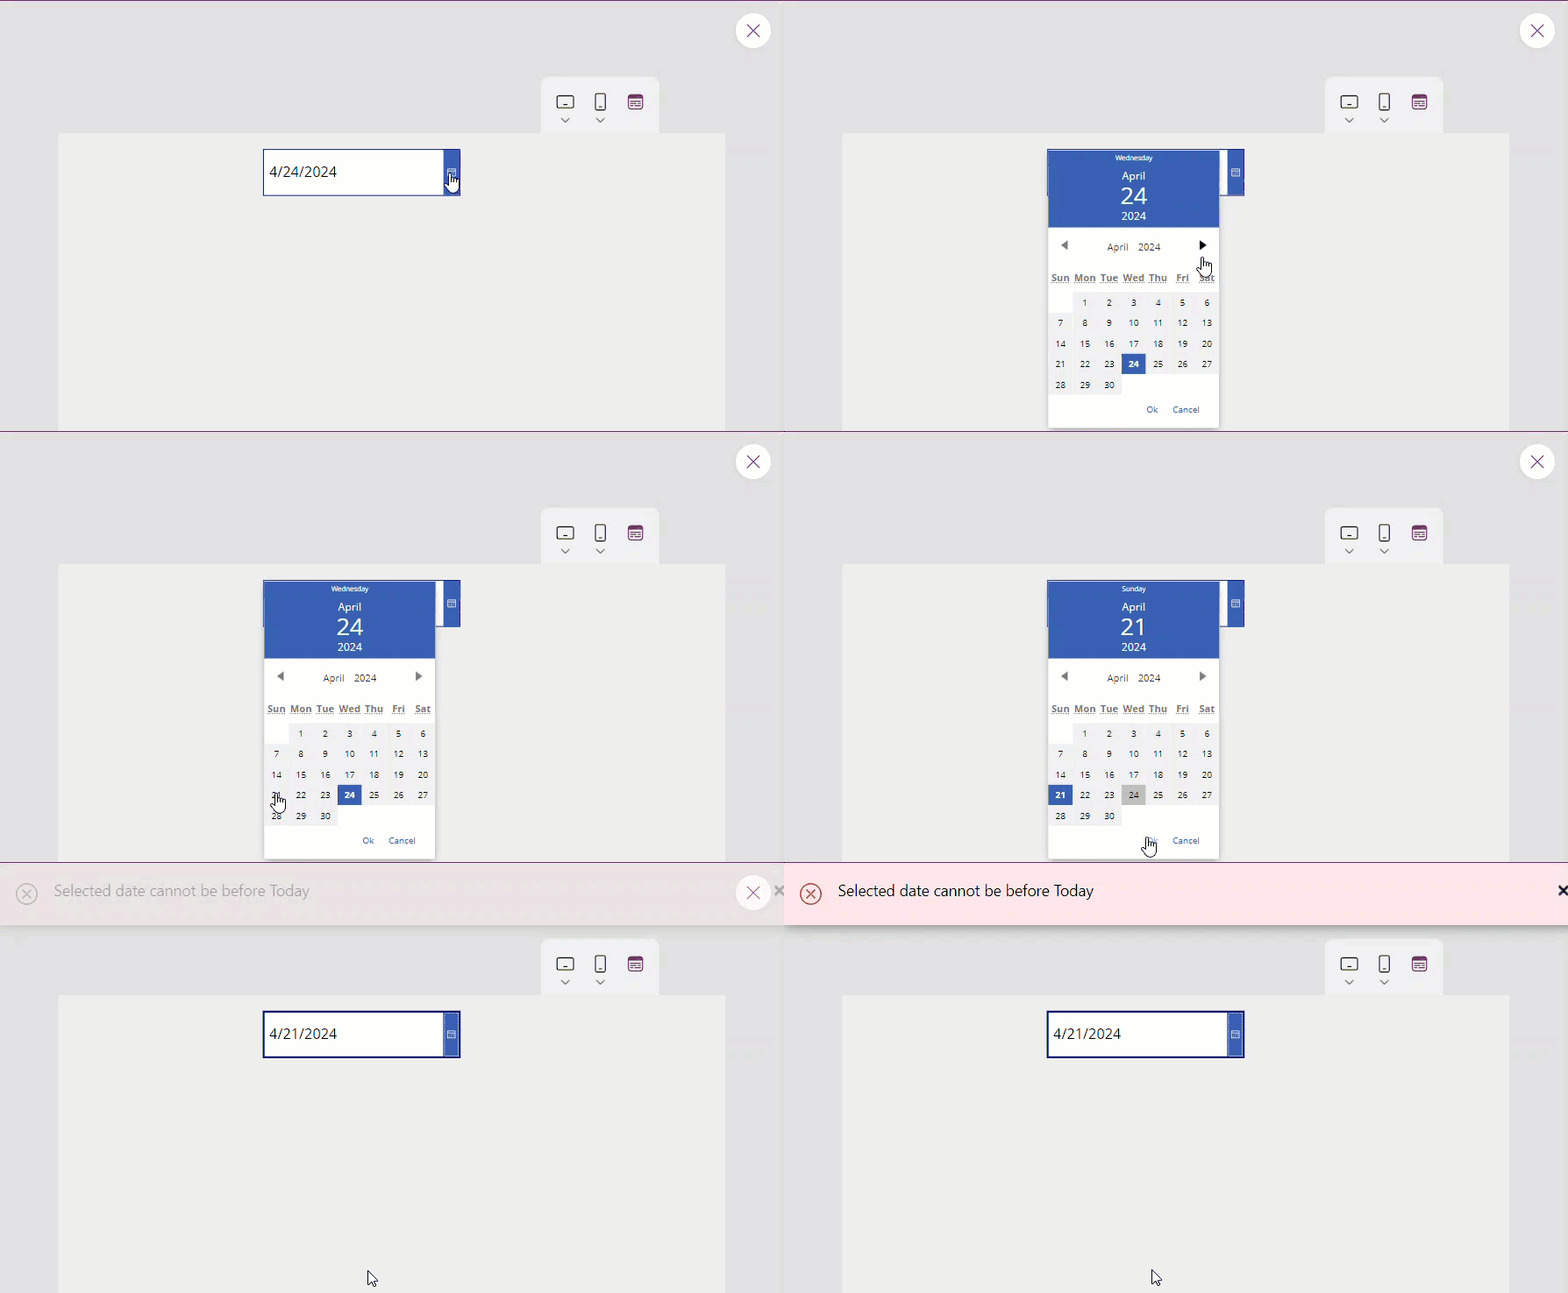
Suppose you select a past date from the date picker control. The error notification [Selected date cannot be before Today] will appear at the top of the page, as shown below.
To achieve it, select the Date picker control and set its OnSelect property as:
OnSelect = If(
    DatePicker.SelectedDate < Today(),
    Notify(
        "Selected date cannot be before Today",
        NotificationType.Error
    )
)
Save and Preview the app. When the user Selects any specific past date from the date picker control and clicks on OK, the error notification will display at the top of the page.
Output:
Power Apps Clear Date Picker
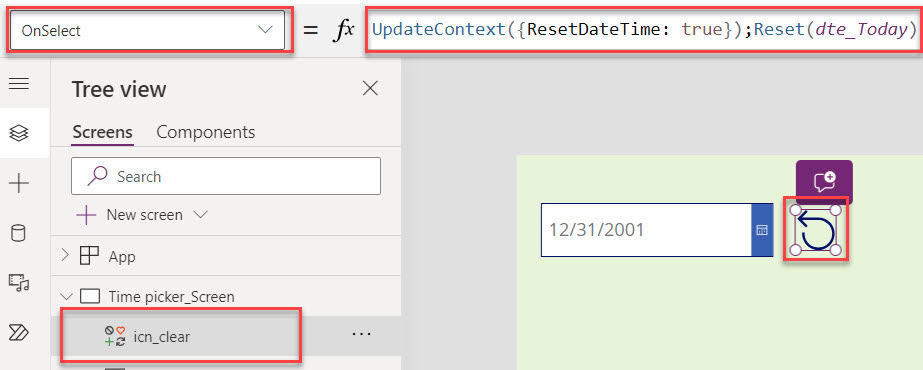
In the last, I will show you how to clear or rest the Power Apps date picker control. To do so, insert a Reset icon and set its OnSelect property to the code below.
OnSelect = UpdateContext({ResetDateTime: true});
Reset(dte_Today)
Where,
- ResetDateTime = Power Apps variable name
- dte_Today = Date picker control name
Now, select the Date picker control and set its DefaultDate property as:
DefaultDate = If(!ResetDateTime,Now())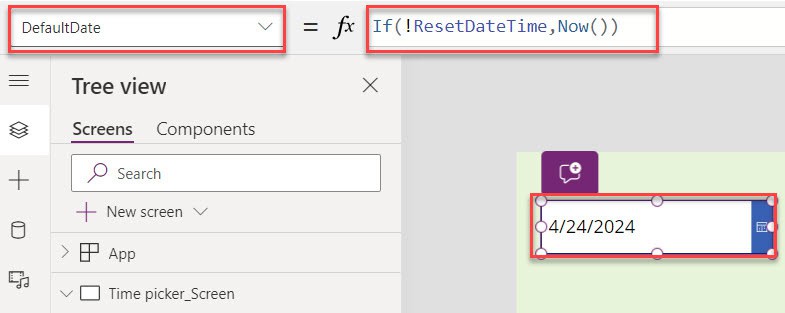
Once it is done, Save and Preview the app. When the user selects any date from the date picker control and clicks the reset icon, the date picker will return a blank value.
Output:
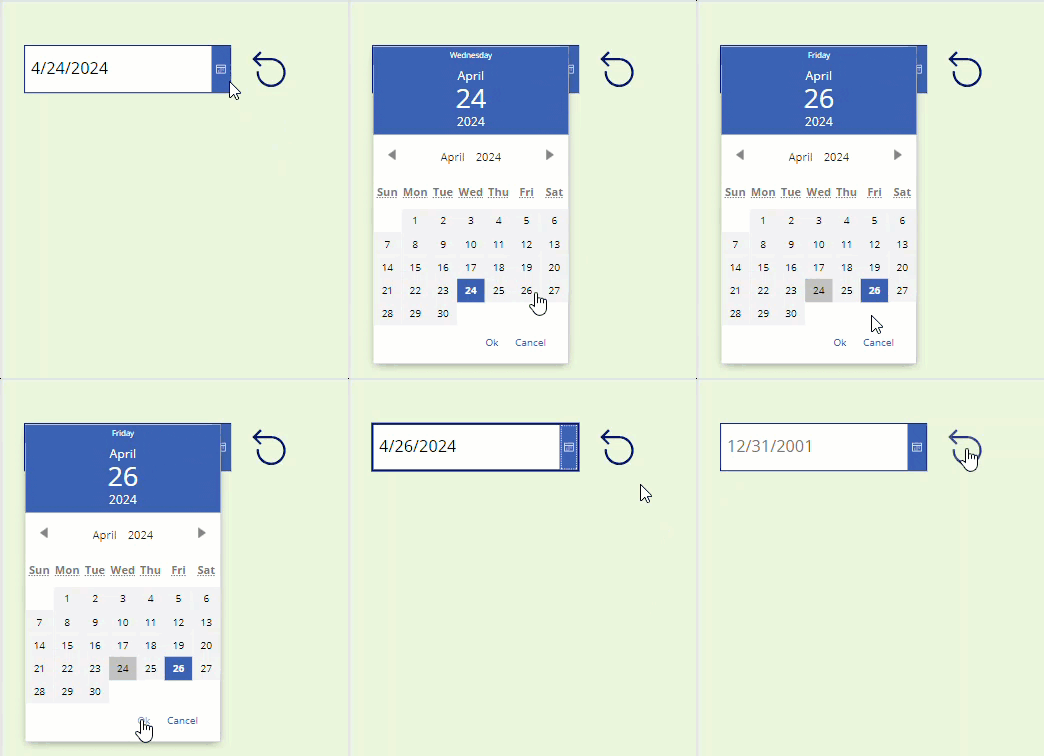
This is how we can clear or reset the Power Apps date picker control.
Also, you may like:
- Power Apps Today Date Without Time
- Power Apps Loading Spinner
- Pagination in Power Apps Gallery
- Power Apps PDF Viewer Control
- Power Apps Remove First Character from String
I trust this Power Apps tutorial is helpful. If you have any requirements related to the Power Apps Date and Time picker, you can follow the above different examples based on the real-time scenarios to do it.
I am Bijay a Microsoft MVP (10 times – My MVP Profile) in SharePoint and have more than 17 years of expertise in SharePoint Online Office 365, SharePoint subscription edition, and SharePoint 2019/2016/2013. Currently working in my own venture TSInfo Technologies a SharePoint development, consulting, and training company. I also run the popular SharePoint website EnjoySharePoint.com
Awesome