Microsoft Provides a list of functions to the Power Apps to make the applications more responsive and attractive. One of the key functions is Power Apps Filter(), which allows users to filter SharePoint list in Power Apps using various conditions.
In this article, we will learn how to filter SharePoint Online list in Power Apps based on various columns and logical operators with examples.
Filter SharePoint List in Power Apps
Let’s take a simple scenario.
I have created a SharePoint Online list named “Product Order Details” with different fields.
| Column Name | Data Type |
| Product Name | It is a default single line of text |
| Price | Currency |
| Quantity | Number |
| Order Date | Order Date |
| Delivery Date | Delivery Date |
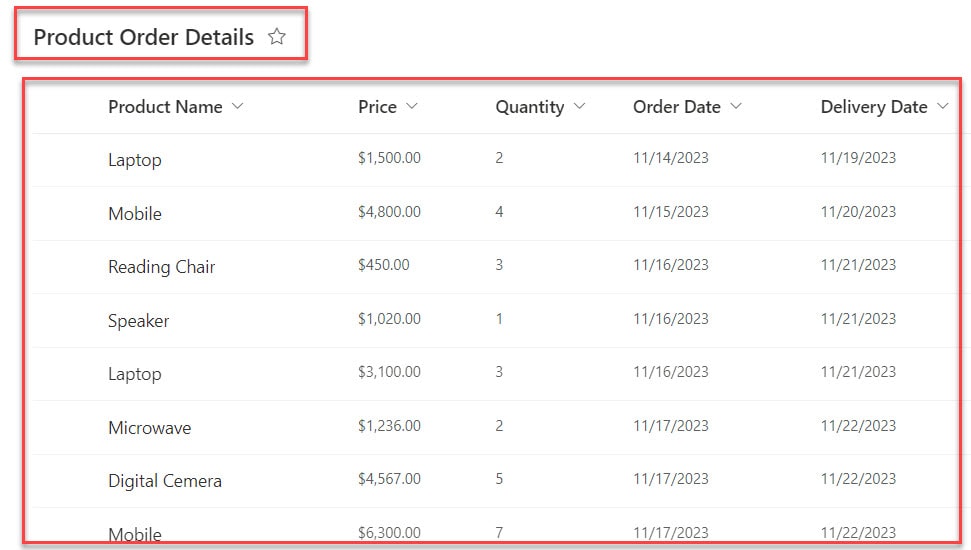
Now, I would like to filter the SharePoint Online list using the Power Apps filter conditions based on the different columns and display the filtered records on the Data table control or Gallery control.
Now, let me discuss how to work with Power Apps filter SharePoint list using different columns [Text, Choice, Person, Number, Lookup, Date and time, etc…]
1. Power Apps Filter SharePoint List Using Text Column
In Power Apps, there is a Data table control that retrieves the data from the SharePoint list [Product Order Details].
Now, I want to filter the data table and display each record from the SharePoint Online list based on the Text column value [“Mobile”].
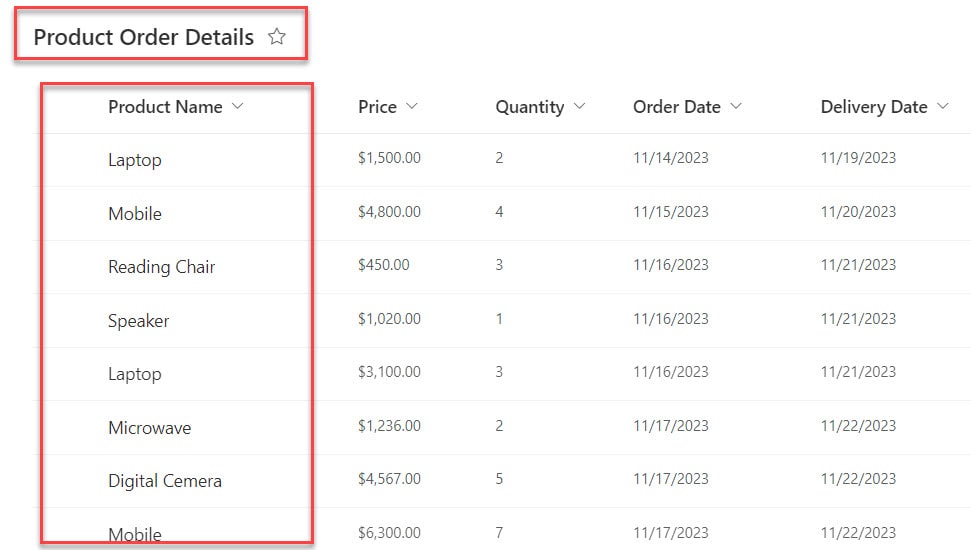
For that, on the Power Apps Screen -> Insert a Data table and set its Items property to the code below.
Items = Filter(
    'Product Order Details',
    Title = "Mobile"
)
Where,
- ‘Product Order Details’ = SharePoint Online list

Have a look at the below screenshot for the output:

Filter SharePoint Text Column Using StartsWith()
Suppose you want to filter the SharePoint text column with the StartsWith function in Power Apps; follow the code below.
Items = Filter(
    'Product Order Details',
    StartsWith(
        Title,
        "Laptop"
    )
)
Output:

Filter SharePoint Text Column Using EndsWith()
Similarly, you can filter the SharePoint Online list text column using the EndsWith function in Power Apps. For that, you can follow the below code.
Items = Filter(
    'Product Order Details',
    EndsWith(
        Title,
        "Camera"
    )
)
Output:

Filter SharePoint Text Column Using Text input
In Power Apps, there is a Text input control and a Data table control. Whenever a user enters or provides the Text column value, the data table filters and displays each record from the SharePoint list based on the text input value.
To do so, set the Data table’s Items property to the code below.
Items = Filter(
    'Product Order Details',
    Title = txt_ProductName.Text
)
Where,
- txt_ProductName = Power Apps text input name
Output:
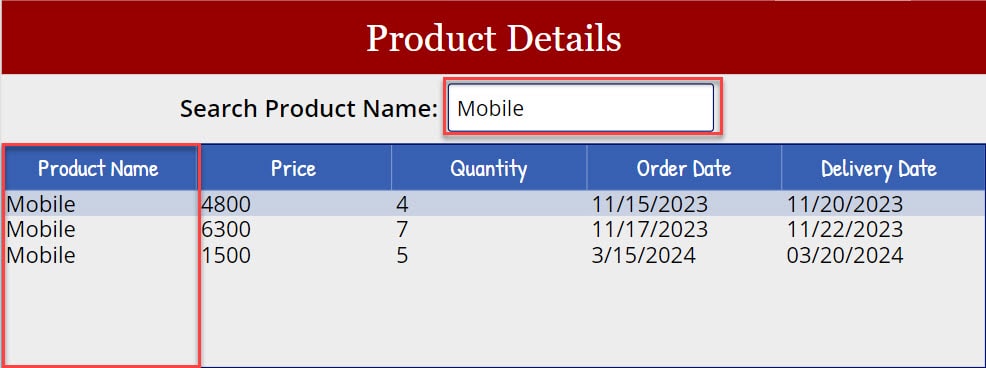
This is how we can filter the SharePoint text field in Power Apps.
2. Power Apps Filter SharePoint List Using Date Column
Next, I will show you how to filter the SharePoint list date and time column using different filter conditions in Power Apps. Such as:
Filter SharePoint List using Date Column By Current Date
I will also take the above SharePoint Online [Product Order Details] for this example. Now, I need to display only today’s or current-day records on the Power Apps data table.
For that, you can use the below code for the Data table’s Items property.
Items = Filter(
    'Product Order Details',
    'Order Date' = Today()
)
Where,
- ‘Order Date’ = SharePoint date and time field
Output:

Filter SharePoint List using Date Column Between Two Dates
You can also filter the SharePoint list date column between two dates [Order Date and Delivery Date]. For that, follow the below code.
Items = Filter(
    'Product Order Details',
    OrderDate>= Date(2024,3,19),
    DeliveryDate <= Date(2024,3,27)
)
Output:

Filter SharePoint List using Date Column By Add Or Subtract Days
Let me show you how to filter the SharePoint date and time column by adding or subtracting days. To achieve this, you can use the code below.
Items = Filter(
    'Product Order Details',
    OrderDate = Today() + 2                //For adding days
)


Filter(
    'Product Order Details',
    OrderDate = Today() -5               //For subtracting days
)
Output:

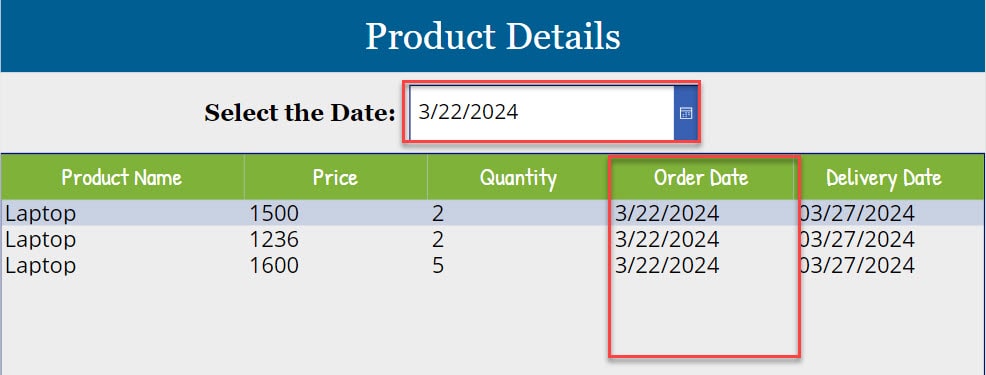
Filter SharePoint List using Date Column By Selected Date
If you want to filter the SharePoint date column by a selected date, you can add a date picker and filter the data table based on the date picker’s selected date.
To achieve it, follow the below code:
Items = Filter(
    'Product Order Details',
    'Order Date' = dte_SelectDate.SelectedDate
)
Where,
- dte_SelectDate = Power Apps date picker name
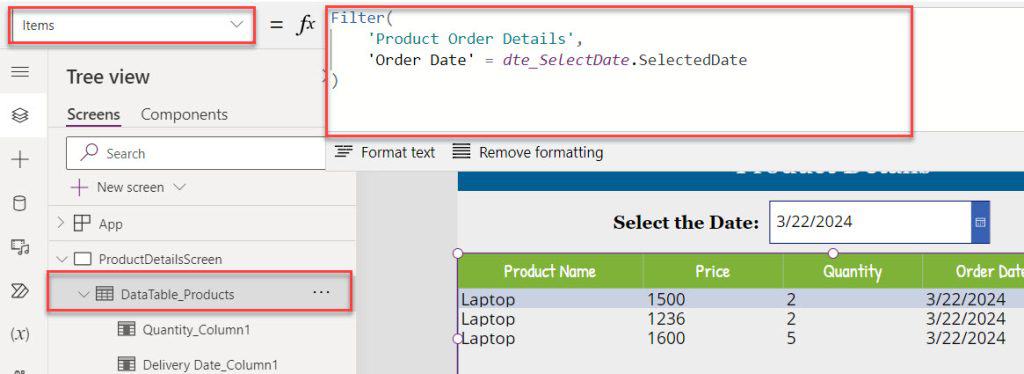
Whenever the user selects a specific date, the data table filters and displays each record from the SharePoint list based on that date.
Have a look at the below screenshot for the output.
Filter SharePoint List using Date Column By Date Range
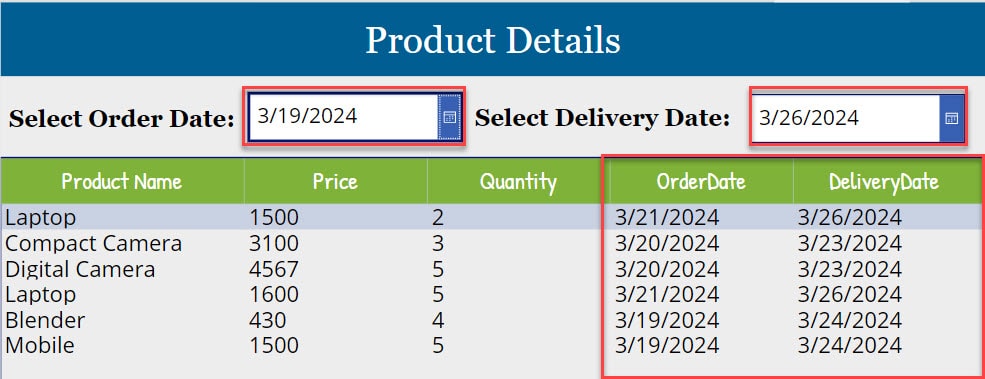
In this example, I will show you how to filter the SharePoint list date column by date range using two date pickers [dte_Orderdate and dte_DeliveryDate].
To do so, you can use the below code for the Data table’s Items property:
Items = Filter(
    'Product Order Details',
    OrderDate >= dte_OrderDate.SelectedDate,
    DeliveryDate <= dte_DeliveryDate.SelectedDate
)
Output:
3. Power Apps Filter SharePoint List Using Number Column
Now, I would like to show you how to filter the SharePoint list number column using different filter conditions. Such as:
Filter SharePoint Number Column Does Equals
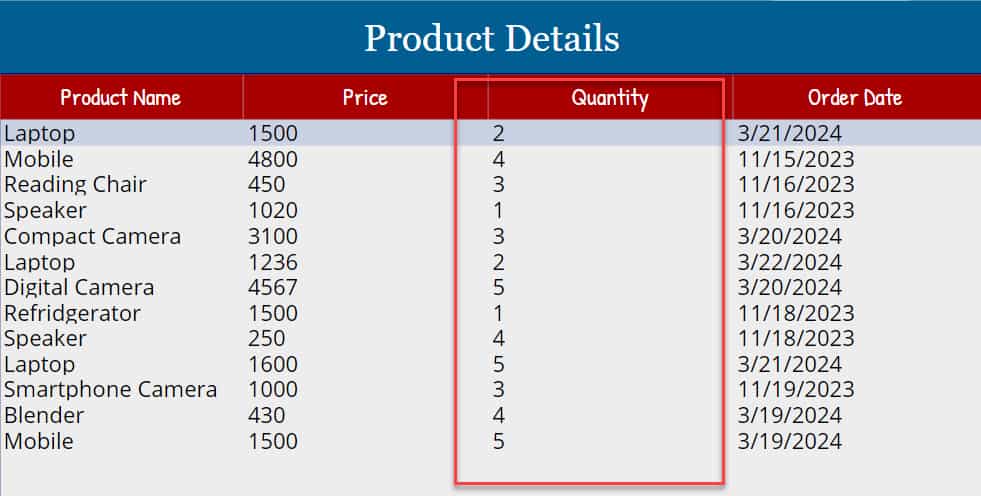
Suppose you want to filter the SharePoint number column value as equal to the specific number, you can follow the below code.
Items = Filter(
    'Product Order Details',
    Quantity = 5                                  //you can change the number
)
Where,
- Quantity = SharePoint number column
Output:

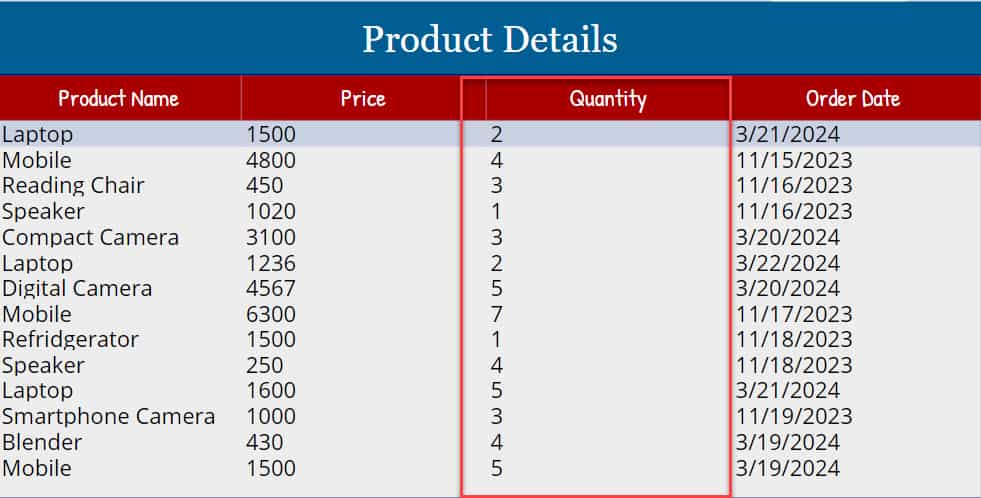
Filter SharePoint Number Column Does Not Equal
Likewise, follow the below code to filter the SharePoint number column that does not equal the specific number.
Items = Filter(
    'Product Order Details',
    Quantity <> 10
)
Output:
Filter SharePoint Number Column is Between Two Numbers
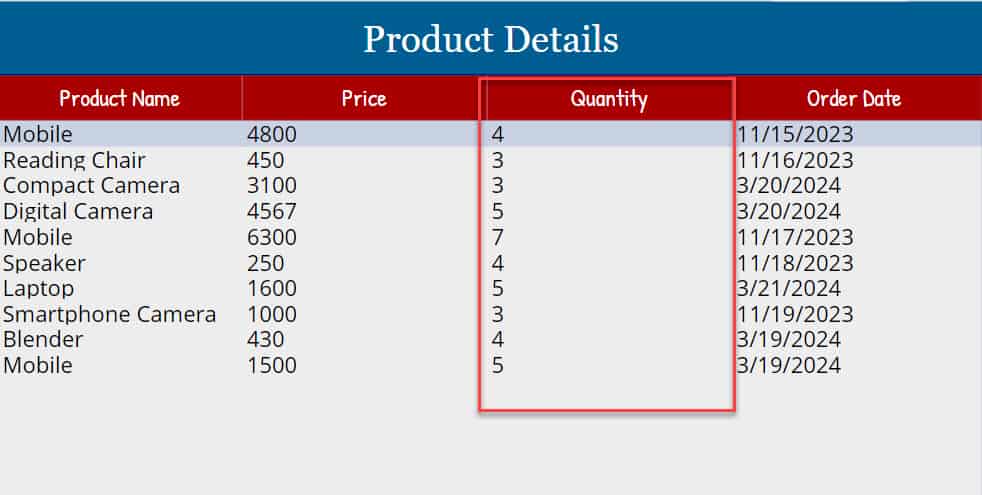
Suppose I would like to filter the SharePoint number column based on the two numbers in Power Apps. In this case, we can use the below code.
Items = Filter(
    'Product Order Details',
    Quantity >= 3 And Quantity <=7
)
Output:
Filter SharePoint Number Column is Greater Than Or Less Than
You can also filter the SharePoint number column that is greater than or less than a specific value. For that, follow the below code.
Items = Filter(
    'Product Order Details',
    Quantity > 3                                        //For greater values
)

Filter(
    'Product Order Details',
    Quantity <5                                      //For less values
)
Output:

Filter SharePoint Number Column is Greater Than Or Equals To/Less Than Or Equals To
Similarly, if you want to filter the SharePoint number field that is greater than or equals/less than or equals a specific value, you can follow the code below.
Filter(
    'Product Order Details',
    Quantity >= 5                                        //For Greater Than Or Equals Values
)

Filter(
    'Product Order Details',
    Quantity <= 5                                      //For Less Than Or Equals Values
)
Output:
Note: Whenever you want to filter the SharePoint Online list by "Currency column", you can follow the above examples [Number column Filter condition applicable for Currency column as well].
4. Power Apps Filter SharePoint List Using Choice Column
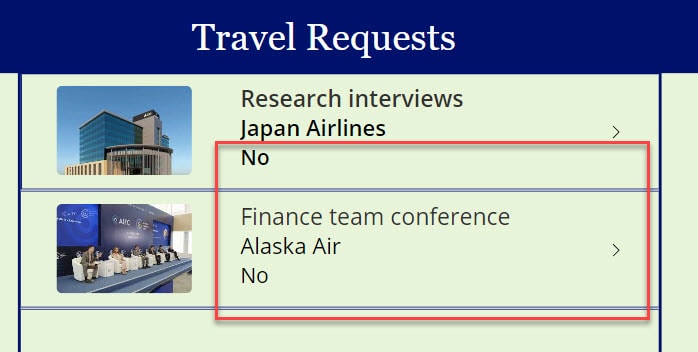
For this example, I have taken another SharePoint Online list named “Travel Requests,” which contains the fields below.
| Column Name | Data Type |
| Trip Title | It is a default single line of text |
| Airline | Choice |
| Travel Start Date | Date and time |
| Travel End Date | Date and time |
| Requester | Requester |
| Estimated Airfare | Estimated Airfare |
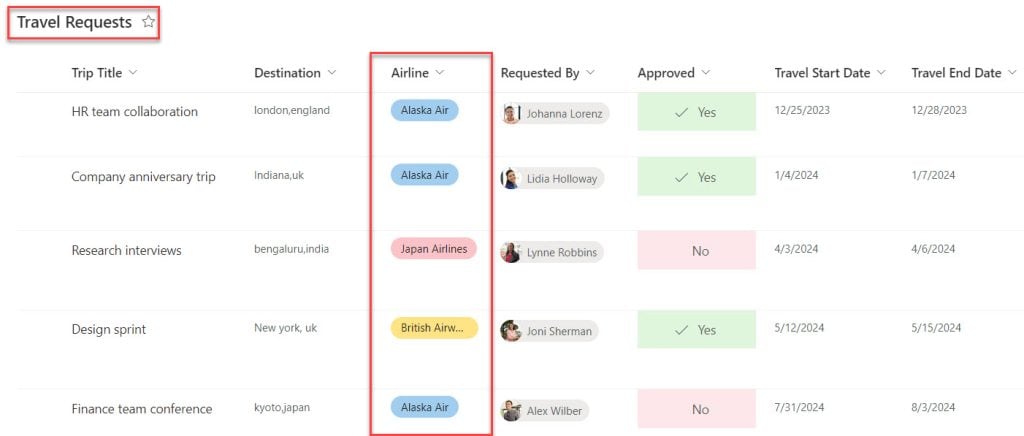
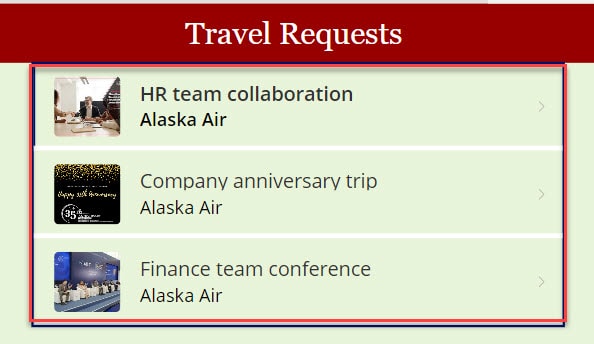
Now, I would like to filter the SharePoint Choice field based on the specific value [Alaska Air] and display the filtered records on the gallery control. The output is shown in the screenshot below.
Output:
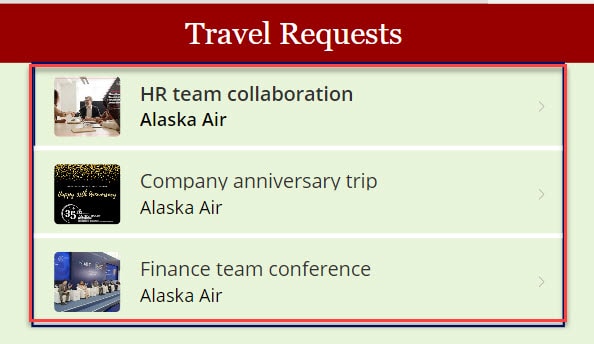
To work around this, follow the steps below. Such as:
1. On the Power Apps Screen -> Insert a Gallery control and set its Items property to the code below.
Items = Filter(
    'Travel Requests',
    Airline.Value = "Alaska Air"
)
Where,
- ‘Travel Requests’ = SharePoint Online List
- Airline = SharePoint Choice Field
- “Alaska Air” = Choice Field Value
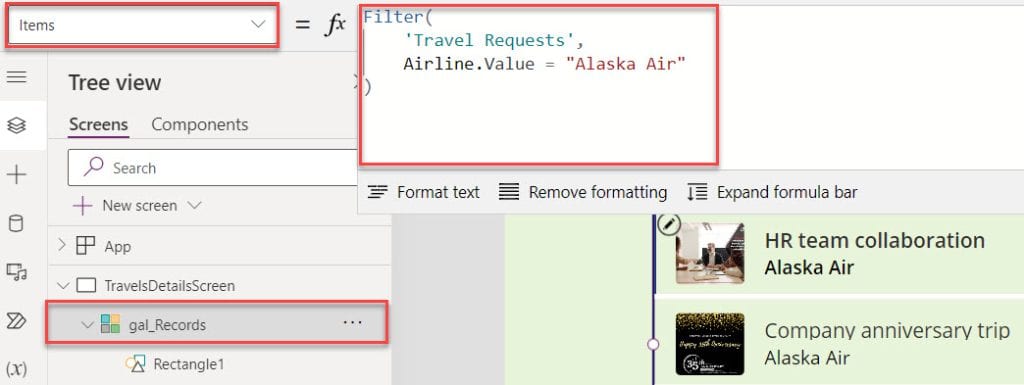
2. Once your app is ready, Save, Publish, and Preview the app. The gallery displays filtered records based on the choice field value, as shown below.
Filter SharePoint Choice Column By Dropdown
Let’s see how to filter the SharePoint choice field by dropdown. To achieve it, follow the below steps.
1. On the Power Apps screen -> Insert a Dropdown control and set its Items property to the code below.
Items = Choices([@'Travel Requests'].Airline)
2. Then, insert a Gallery control and set Its Items property as:
Items = Filter(
    'Travel Requests',
    Airline.Value = drp_Airlene.Selected.Value
)
Where,
- drp_Airlene = Power Apps Drodown Value
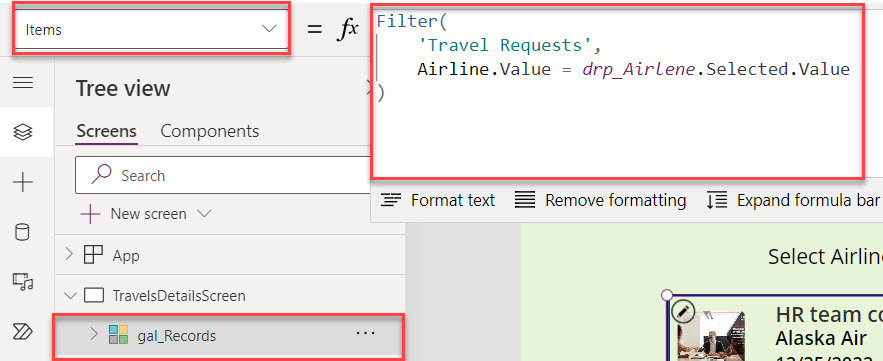
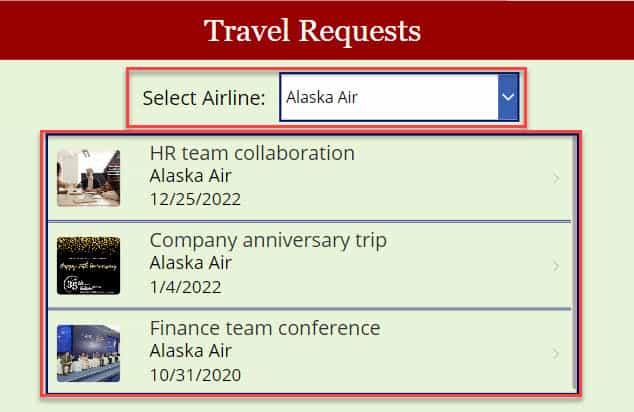
3. Whenever the user selects any value from the dropdown control, the gallery displays filtered records based on the selected choice value.
Refer to the below screenshot:
5. Power Apps Filter SharePoint List Using Person Column
Here, we will discuss the powerapps filter sharepoint list by person column using different filter conditions. Such as:
Filter SharePoint List Person Field By Current User
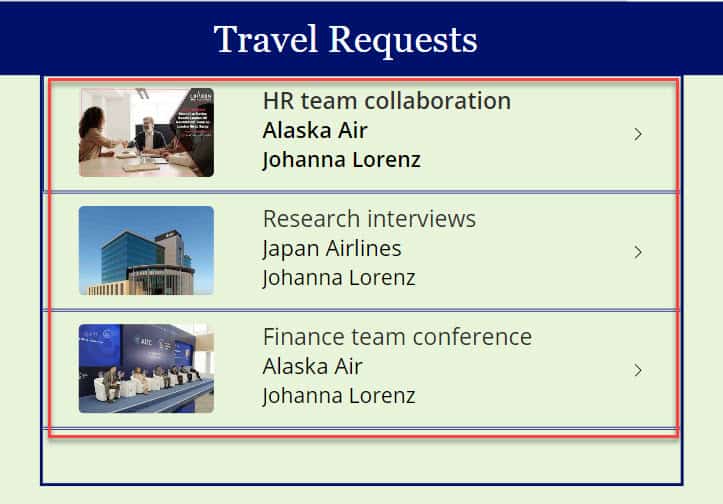
To get the current user records in the Power Apps based on the SharePoint list person field, you can use the code below.
Items = Filter(
    'Travel Requests',
    'Requested By'.DisplayName = User().FullName
)


                                                               OR

Filter(
    'Travel Requests',
    User().Email exactin Requester.Email
)
Where,
- ‘Requested By’ = SharePoint Person or Group column name
Output:
Filter SharePoint List Person Field By User Name/Email
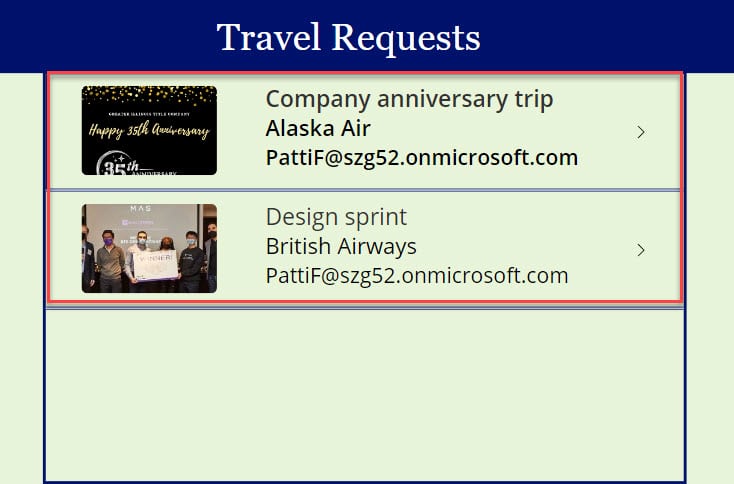
We can filter the SharePoint list person field using a specific user’s name or email. To do so, follow the below given code.
Items = Filter(
    'Travel Requests',
    'Requested By'.Email = "PattiF@szg52.onmicrosoft.com"
)

                                                                 OR

Filter(
    'Travel Requests',
  "PattiF@szg52.onmicrosoft.com" exactin 'Requested By'.Email
)
Output:
Filter SharePoint List Person Field By User Department/JobTitle
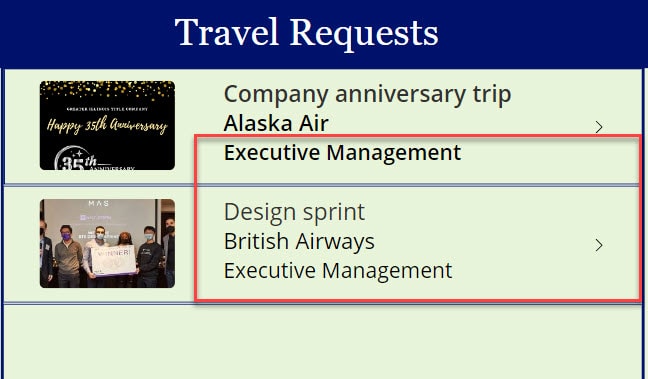
Also, if you want to filter the SharePoint list person column using user Department or Job Title, follow the code below.
Items = Filter(
    'Travel Requests',
    'Requested By'.Email = "PattiF@szg52.onmicrosoft.com"
)

Text = ThisItem.'Requested By'.Department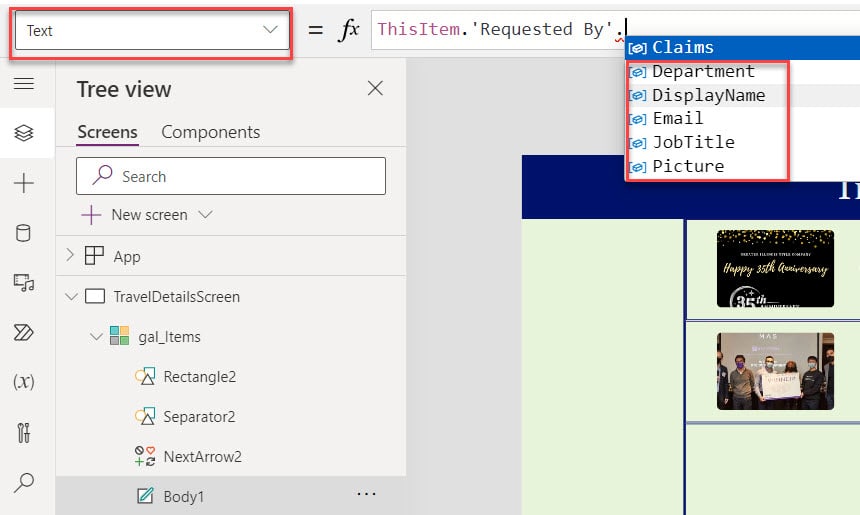
Have a look at the below screenshot for the output:
Output:
6. Power Apps Filter SharePoint List Using Yes/No Column
In this example, I will discuss how to filter the SharePoint list Yes/No column with two different filter conditions. Such as:
Filter SharePoint List Yes/No Column Equals “Yes” Value
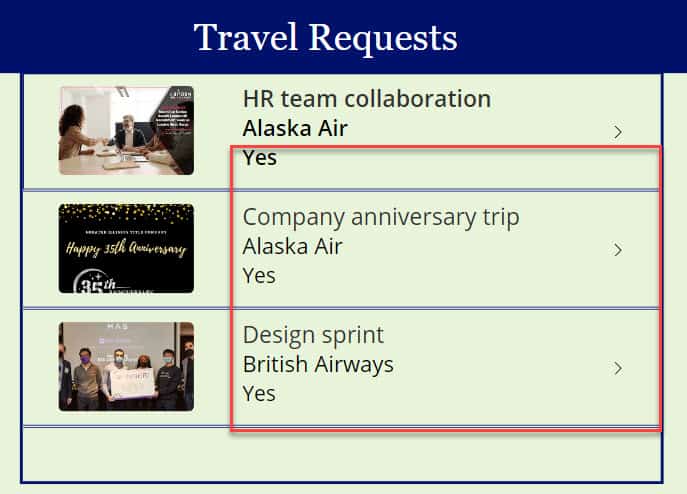
If you want to display only approved records [True values] on the Power Apps gallery control, you can follow the code below.
Items = Filter(
    'Travel Requests',
    Approved=true
)
Where,
- Approved = SharePoint Yes/No filed
Output:
Filter SharePoint List Yes/No Column Equals “No” Value
If you want to display not approved records [False values] on the Power Apps gallery control, you can follow the code below.
Items = Filter(
    'Travel Requests',
    Approved=false
)
Output:
7. Power Apps Filter SharePoint List Using Lookup Column
Let’s see how to filter the Power Apps SharePoint list by lookup column with a simple scenario:
Scenario:
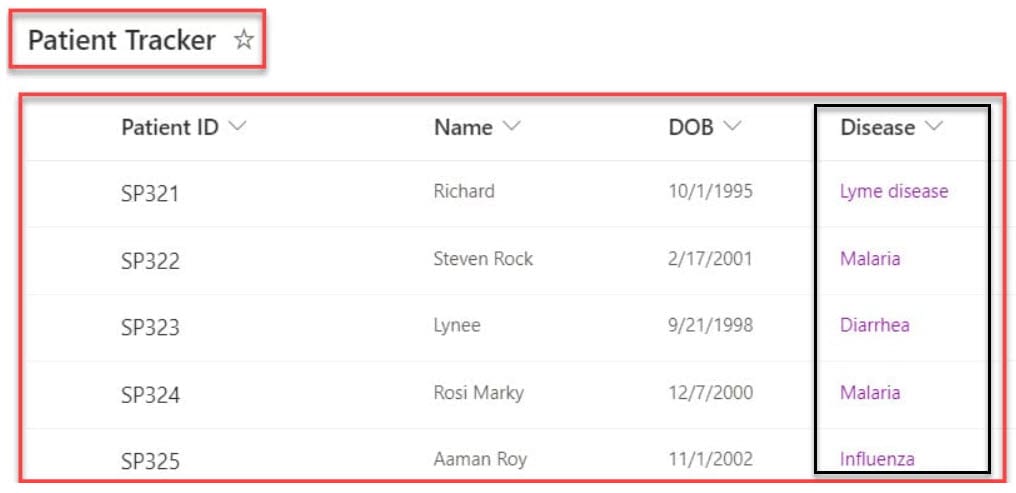
I have a SharePoint Online List named [Patient Tracker] and this list contains the below fields.
Destination List:
| Column Name | Data Type |
| Patient ID | It is a default single line of text |
| Patient Name | A single line of text |
| Date Of Birth | Date of Birth |
| Disease | Lookup |
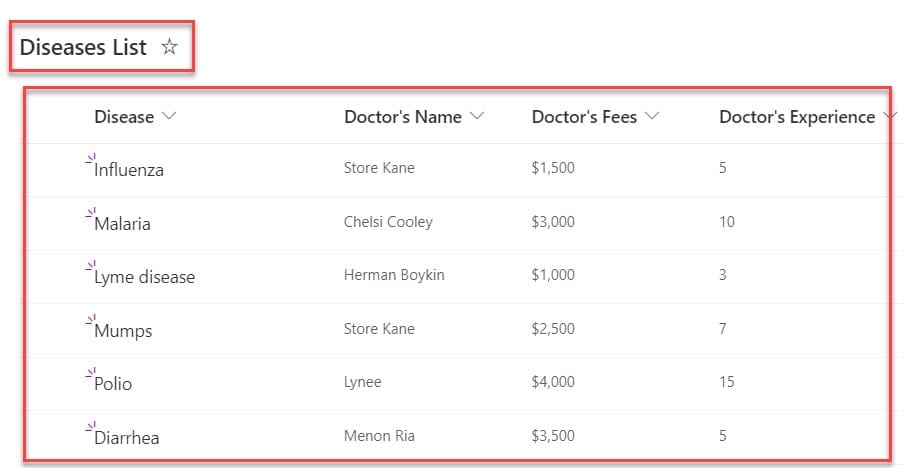
This SharePoint lookup column [Disease] is added from another SharePoint source list named “Diseases List“. This list contains the below fields.
| Column Name | Data Type |
| Disease | It is a default single line of text |
| Doctor’s Name | A single line of text |
| Doctor’s Fees | Currency |
| Doctor’s Experience | Number |
Now, I would like to filter the SharePoint lookup field and display filtered records on the data table in two different ways. Such as:
Filter SharePoint Lookup Field Equals a Specific Value
You can follow the code below whenever you want to filter the SharePoint list records by a specific lookup filed value.
Items = Filter(
    'Patient Tracker',
    Disease.Value = "Malaria"                      //You can change lookup field value
)
Where,
- Disease = SharePoint lookup field
Output:

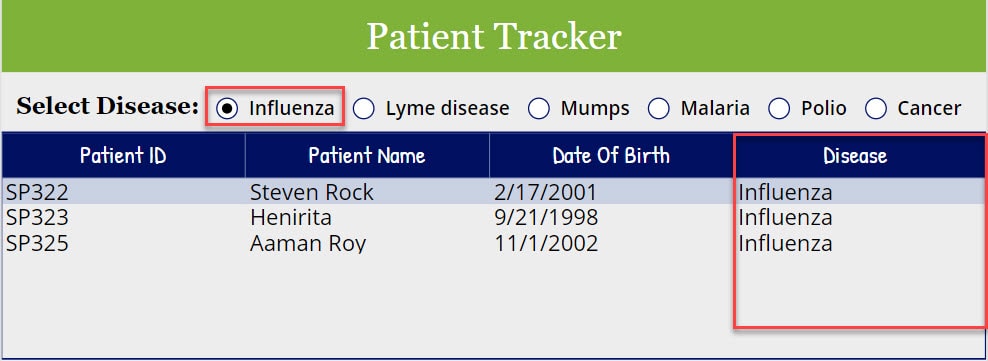
Filter SharePoint Lookup Field By Radio Button
Let me show you how to filter the SharePoint Lookup field by radio button. To achieve this, follow the below steps.
1. On the Power Apps Screen -> Insert a Radio button and set its Items property to the code below.
Items = 'Diseases List'.TitleWhere,
- ‘Diseases List’ = SharePoint source list

2. Then, insert a Data table control and set its Items property as:
Items = Filter(
    'Patient Tracker',
    Disease.Value = rdo_Diseases.Selected.Disease
)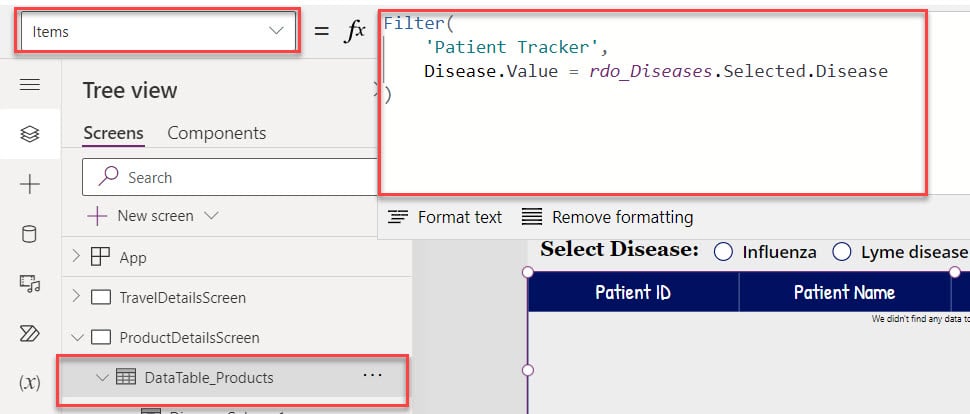
3. Now, when a user selects any lookup field value from the radio button control, the data table displays filtered records, as in the screenshot below.
Output:
Filter SharePoint Lookup Field By ID
In this example, I will show you how to filter the SharePoint Online list lookup column by ID using the code below.
Items = Filter(
    'Patient Tracker',
    Disease.Id=5                        //You can change the ID name
)
Output:

Note: PowerApps is not supported with the SharePoint "Calculated column", "Hyperlink Column", "Image column", and "List views" to filter the SharePoint Online list.
Power Apps Filter SharePoint Online List By Logical Operators
Finally, I will show you how to filter the SharePoint Online list by different logical operators. Such as:
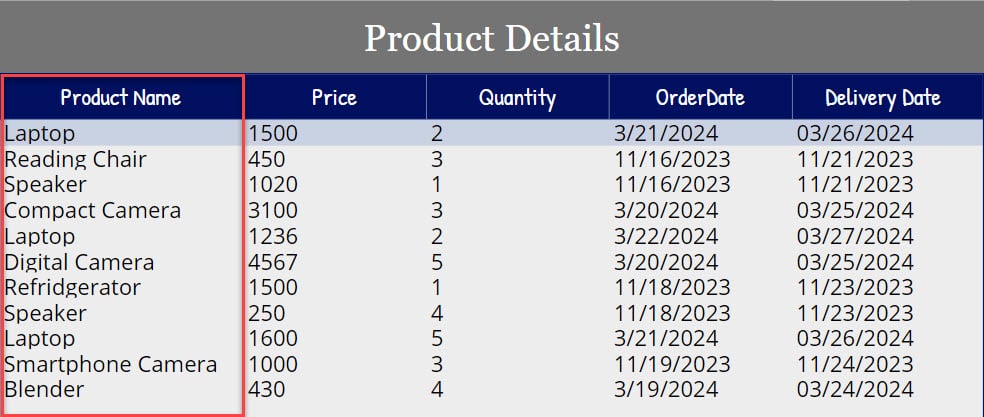
Filter SharePoint Online List By “Not” Logical Operator
You can use the code below to filter the SharePoint list by the “Not” logical operator.
Items = Filter(
    'Product Order Details',
   Not Title = "Mobile"                             //You can change the text value
)

                     OR

Filter(
    'Product Order Details',
    Title <> "Mobile"
)
Output:
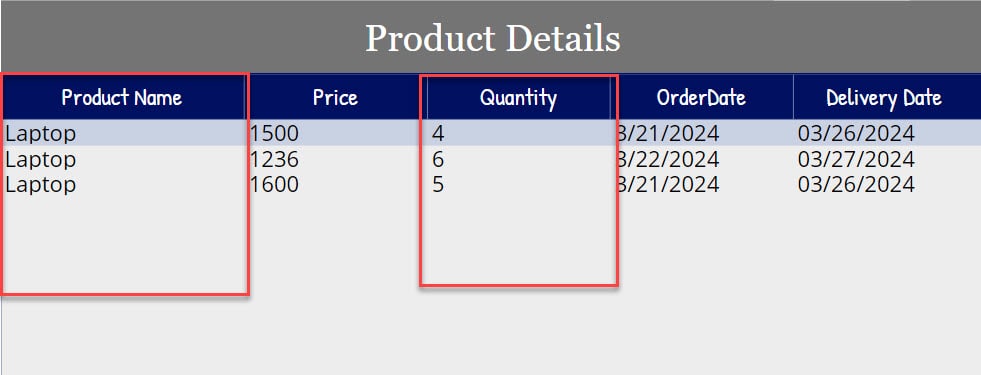
Filter SharePoint Online List By “And” Logical Operator
Here, I will show you how to to filter the SharePoint list by the “And” logical operator using the below code.
Items = Filter(
    'Product Order Details',
    Title = "Laptop" And Quantity >= 2
)
Output:
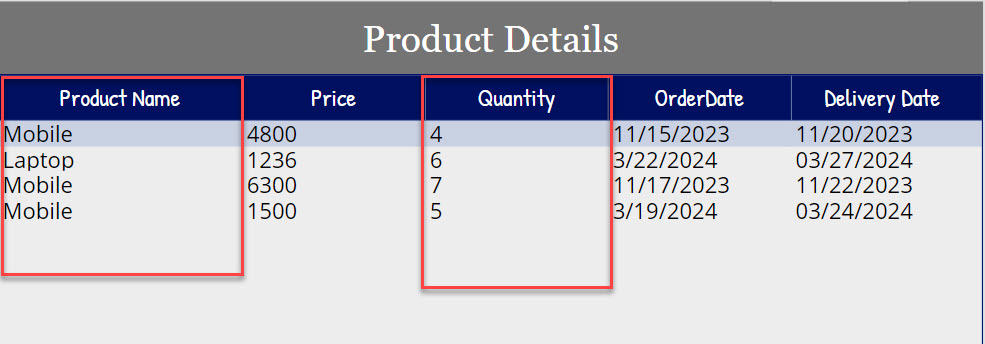
Filter SharePoint Online List By “OR” Logical Operator
Next, we will see how to to filter the SharePoint list by the “OR” logical operator using the below code.
Items = Filter(
    'Product Order Details',
    Title = "Mobile" Or Quantity > 5
)
Output:
Filter SharePoint Online List By Multiple Logical Operators
In the last, I will show you how to filter the SharePoint list by multiple logical operators. For that, you can follow the code below.
Items = Filter(
    'Product Order Details',
    Title = "Laptop" And Quantity > 4 Or Title="Laptop"
)
Output:

This is how we can filter the SharePoint list using different columns and different logical operators in Power Apps.
I trust this tutorial is useful for you. If you have any requirements related to the Power Apps filter SharePoint Online list, you can easily do it by following the above examples.
Also, you may like:
- Filter Power Apps Gallery By SharePoint Lookup Column
- Filter Power Apps Data Table By Dropdown
- Filter Power Apps Gallery By Multiple Dropdowns
I am Bijay a Microsoft MVP (10 times – My MVP Profile) in SharePoint and have more than 17 years of expertise in SharePoint Online Office 365, SharePoint subscription edition, and SharePoint 2019/2016/2013. Currently working in my own venture TSInfo Technologies a SharePoint development, consulting, and training company. I also run the popular SharePoint website EnjoySharePoint.com
This page was very informative, but downloading the data into a collection in chunks from SP list doesn’t work using the ID column.