Suppose you want to filter the Power Apps data table using dropdown. In that case, you can follow this tutorial to get all the information about how to filter Power Apps data table by dropdown.
Here, we will discuss filtering the Power Apps data table by dropdown using the collection and SharePoint Online list.
Also, we will cover the topics below:
- How to filter Power Apps data table by dropdown date
- Filter the Power Apps data table by dropdown and search
- Filtering Power Apps data table by multiple dropdowns
How to Filter Power Apps Data Table By Dropdown
While working with Power Apps data table, we usually need to filter the data table records using different controls [Dropdown, Combobox, Text input, etc…].
Now, I would like to filter the Power Apps data table by dropdown control in two ways. Such as:
- Filter Power Apps Data Table By Dropdown using Collection
- How to Filter Power Apps Data Table By Dropdown using SharePoint List
Filter Power Apps Data Table By Dropdown [Using Collection]
I have a Power Apps collection named “colTravel” that contains some records based on the different columns.
I have added a Data table control to display all the records from the collection.
Input:
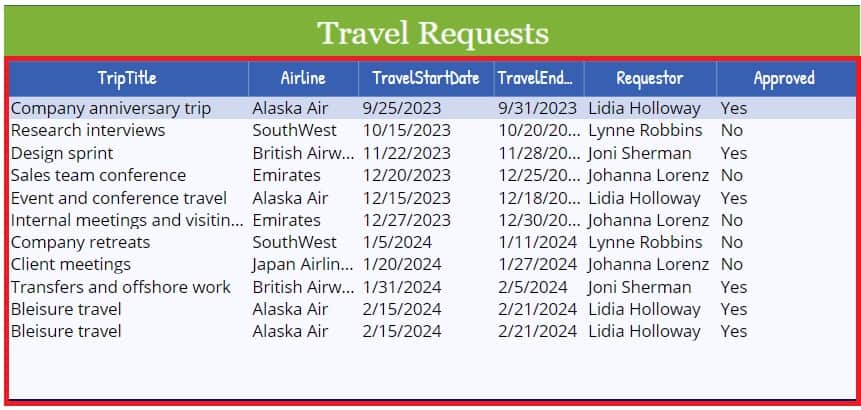
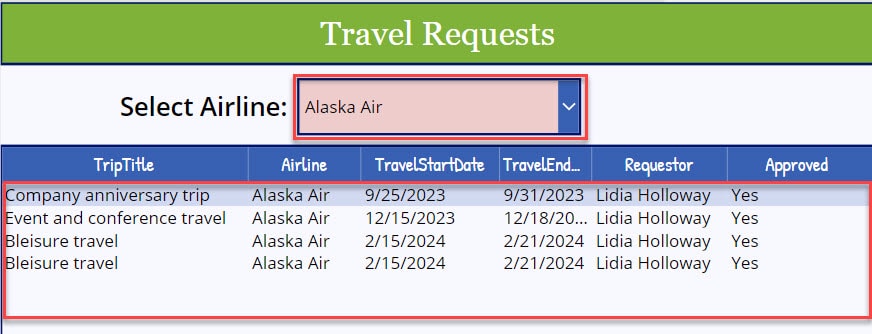
Now, I would like to filter this data table by dropdown selected value [When the user selects any “Airline” option from the dropdown, the data table will display the collection records based on the selected value].
Output:
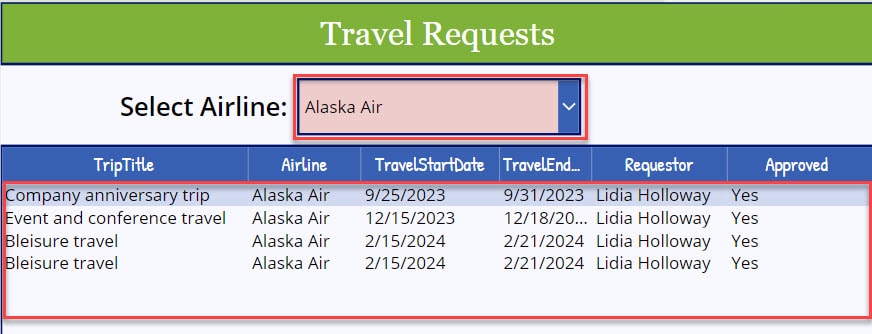
To work around this, follow the below-mentioned steps. Such as:
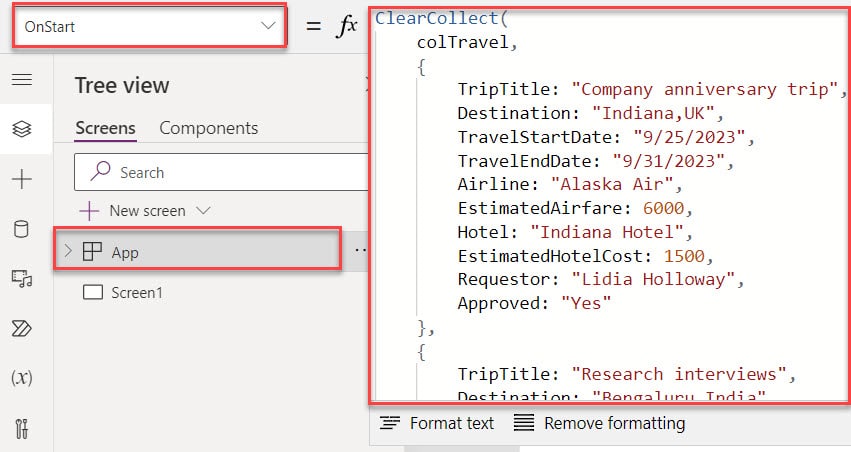
1. On the Power Apps Screen, write the code below on the App’s OnStart property as:
OnStart = ClearCollect(
    colTravel,
    {
        TripTitle: "Company anniversary trip",
        Destination: "Indiana,UK",
        TravelStartDate: "9/25/2023",
        TravelEndDate: "9/31/2023",
        Airline: "Alaska Air",
        EstimatedAirfare: 6000,
        Hotel: "Indiana Hotel",
        EstimatedHotelCost: 1500,
        Requestor: "Lidia Holloway",
        Approved: "Yes"
    },
    {
        TripTitle: "Research interviews",
        Destination: "Bengaluru,India",
        TravelStartDate: "10/15/2023",
        TravelEndDate: "10/20/2023",
        Airline: "SouthWest",
        EstimatedAirfare: 800,
        Hotel: "Hotel Royal Orchid Bangalore",
        EstimatedHotelCost: 1200,
        Requestor: "Lynne Robbins",
        Approved: "No"
    },
    {
        TripTitle: "Design sprint",
        Destination: "New York,UK",
        TravelStartDate: "11/22/2023",
        TravelEndDate: "11/28/2023",
        Airline: "British Airways",
        EstimatedAirfare: 5500,
        Hotel: "Hotel Mela Times Square",
        EstimatedHotelCost: 1800,
        Requestor: "Joni Sherman",
        Approved: "Yes"
    },
    {
        TripTitle: "Sales team conference",
        Destination: "Georgia,UK",
        TravelStartDate: "12/20/2023",
        TravelEndDate: "12/25/2023",
        Airline: "Emirates",
        EstimatedAirfare: 6500,
        Hotel: "Hotel grand",
        EstimatedHotelCost: 2000,
        Requestor: "Johanna Lorenz",
        Approved: "No"
    },
    {
        TripTitle: "Event and conference travel",
        Destination: "Indiana,UK",
        TravelStartDate: "12/15/2023",
        TravelEndDate: "12/18/2023",
        Airline: "Alaska Air",
        EstimatedAirfare: 6000,
        Hotel: "Indiana Hotel",
        EstimatedHotelCost: 1500,
        Requestor: "Lidia Holloway",
        Approved: "Yes"
    },
    {
        TripTitle: "Internal meetings and visiting offices",
        Destination: "Georgia,UK",
        TravelStartDate: "12/27/2023",
        TravelEndDate: "12/30/2023",
        Airline: "Emirates",
        EstimatedAirfare: 6500,
        Hotel: "Hotel grand",
        EstimatedHotelCost: 2000,
        Requestor: "Johanna Lorenz",
        Approved: "No"
    },
    {
        TripTitle: "Company retreats",
        Destination: "Bengaluru,India",
        TravelStartDate: "1/5/2024",
        TravelEndDate: "1/11/2024",
        Airline: "SouthWest",
        EstimatedAirfare: 800,
        Hotel: "Hotel Royal Orchid Bangalore",
        EstimatedHotelCost: 1200,
        Requestor: "Lynne Robbins",
        Approved: "No"
    },
    {
        TripTitle: "Client meetings",
        Destination: "Austria,UK",
        TravelStartDate: "1/20/2024",
        TravelEndDate: "1/27/2024",
        Airline: "Japan Airlines",
        EstimatedAirfare: 7500,
        Hotel: "Hotel Rand",
        EstimatedHotelCost: 1500,
        Requestor: "Johanna Lorenz",
        Approved: "No"
    },
    {
        TripTitle: "Transfers and offshore work",
        Destination: "New York,UK",
        TravelStartDate: "1/31/2024",
        TravelEndDate: "2/5/2024",
        Airline: "British Airways",
        EstimatedAirfare: 5500,
        Hotel: "Hotel Mela Times Square",
        EstimatedHotelCost: 1800,
        Requestor: "Joni Sherman",
        Approved: "Yes"
    },
    {
        TripTitle: "Bleisure travel",
        Destination: "Indiana,UK",
        TravelStartDate: "2/15/2024",
        TravelEndDate: "2/21/2024",
        Airline: "Alaska Air",
        EstimatedAirfare: 6000,
        Hotel: "Indiana Hotel",
        EstimatedHotelCost: 1500,
        Requestor: "Lidia Holloway",
        Approved: "Yes"
    },
    {
        TripTitle: "Bleisure travel",
        Destination: "Indiana,UK",
        TravelStartDate: "2/15/2024",
        TravelEndDate: "2/21/2024",
        Airline: "Alaska Air",
        EstimatedAirfare: 6000,
        Hotel: "Indiana Hotel",
        EstimatedHotelCost: 1500,
        Requestor: "Lidia Holloway",
        Approved: "Yes"
    }
)
Where,
- colTravel = Power Apps collection name
- TripTitle, Destination, TravelStartDate, etc… = Collection Headers/Columns
- “Company anniversary trip”, “Indiana,UK”, etc… = Collection Records/Rows
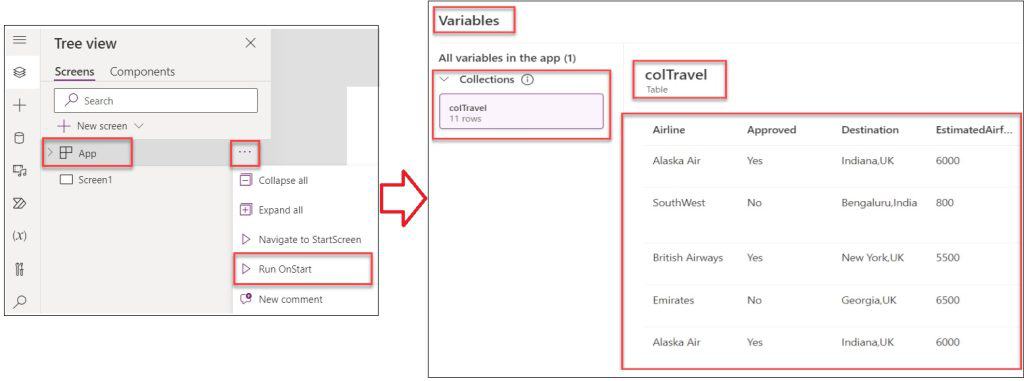
2. Click the App’s Run OnStart button to get the created collection. Also, If you want to find the collection, go to the Variables -> expand the Collections dropdown [colTravel] to get the collection.
Refer to the below screenshot:
3. Next, Insert a Dropdown control and set its Items property as:
Items = Distinct(colTravel, Airline)Where,
- Distinct() = This Power Apps Distinct() function helps to remove all the duplicates from the data source
- colTravel = Power Apps collection name
- Airline = Collection choice field

4. Also, if you want to display all the records on the data table when the dropdown is empty or blank, then follow the below code in the dropdown Items property:
Items = [
    Blank(),
    "Alaska Air",
    "SouthWest",
    "British Airways",
    "Emirates",
    "Japan Airlines"
]
Where,
- Blank() = This function used to create a blank value
- “Alaska Air”, “SouthWest”, etc… = Collection choice field values

5. Then, insert a Data table control and set its Items property to the code below.
Items = If(
    drp_Airline.Selected.Value = Blank(),
    colTravel,
    Filter(
        colTravel,
        Airline = drp_Airline.Selected.Value
    )
)
Where,
- If() = This function is used to evaluate the unrelated conditions
- drp_Airline = Power Apps dropdown name
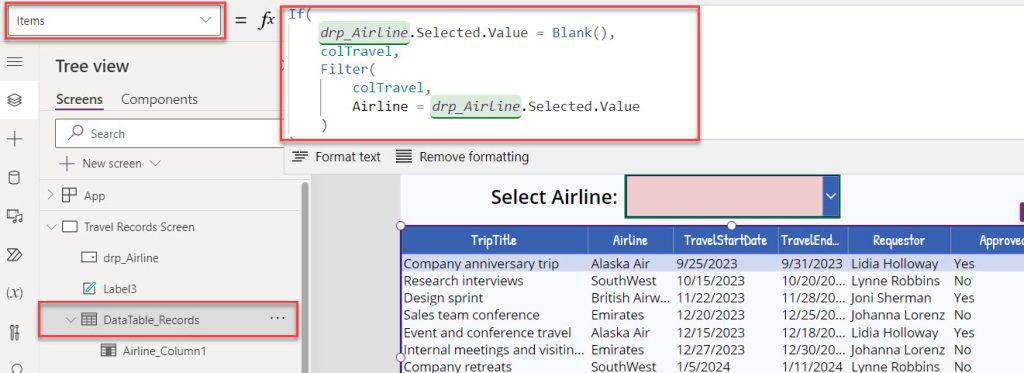
6. Once your app is ready, Save, Publish, and Preview the app. When the user selects a specific value from the dropdown control, the data table will display the filtered records.
Filter Power Apps Data Table By Dropdown [Using SharePoint List]
Similarly, you can also filter the SharePoint list records on the Power Apps data table using dropdown.
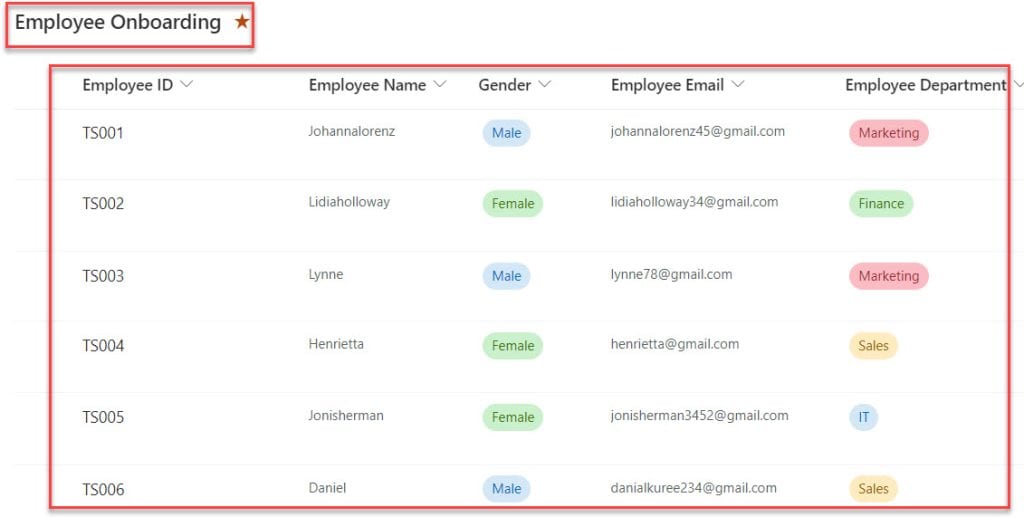
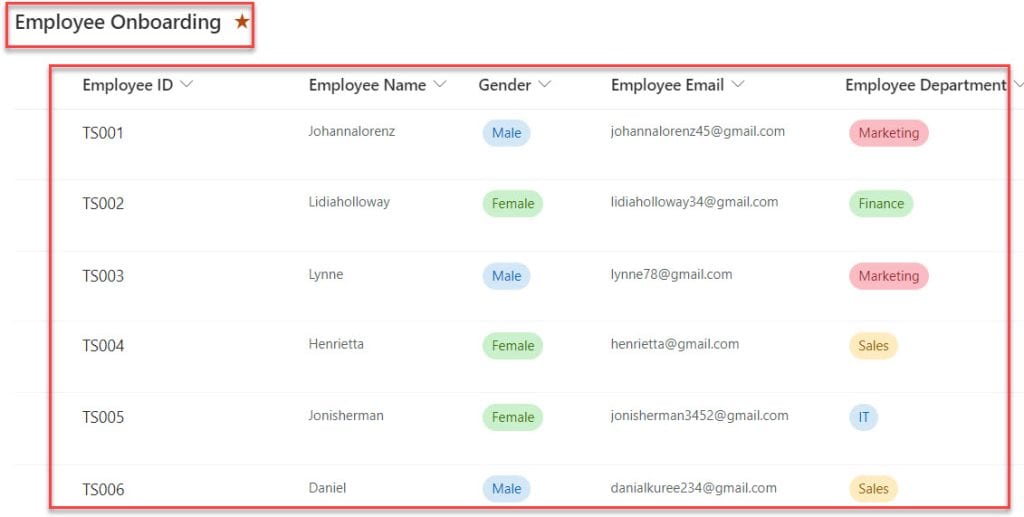
I have taken a SharePoint Online list [Employee Onboarding] containing the fields below.
Input:
In Power Apps, there is a Data table and a Dropdown control. The data table filters and displays all the SharePoint list records based on the dropdown selected value [Employee Department]
Output:
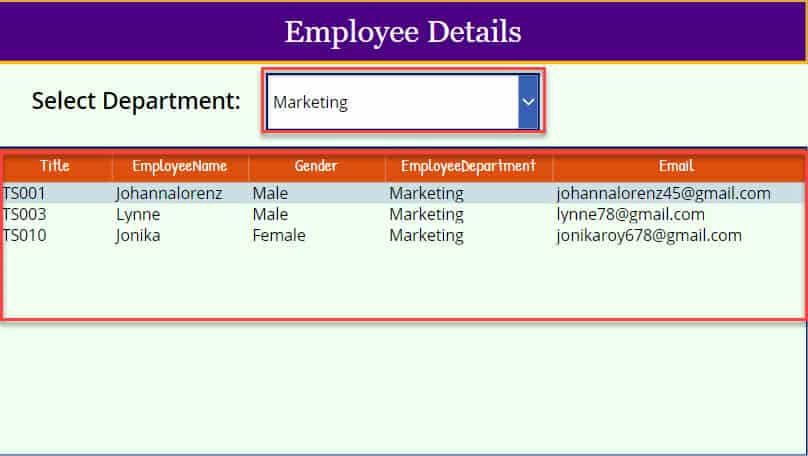
To achieve it, follow the below steps.
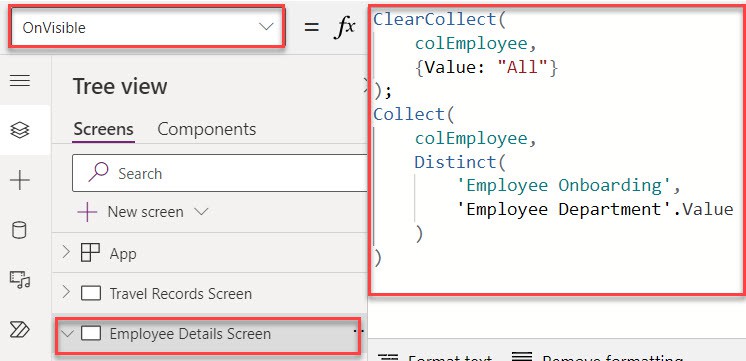
1. On Power Apps, connect the specific SharePoint Online list [Employee Onboarding] to the app -> Select the Power Apps Screen and set its OnVisible property:
OnVisible = ClearCollect(
    colEmployee,
    {Value: "All"}
);
Collect(
    colEmployee,
    Distinct(
        'Employee Onboarding',
        'Employee Department'.Value
    )
)
Where,
- colEmployee = Power Apps collection name
- {Value: “All”} = Collection Item
- Distinct() = This function can remove duplicate values from a data source
- Employee Onboarding = SharePoint Online list
- ‘Employee Department‘ = SharePoint choice field column
2. Next, insert a Dropdown control -> Set its Items property as:
Items = colEmployee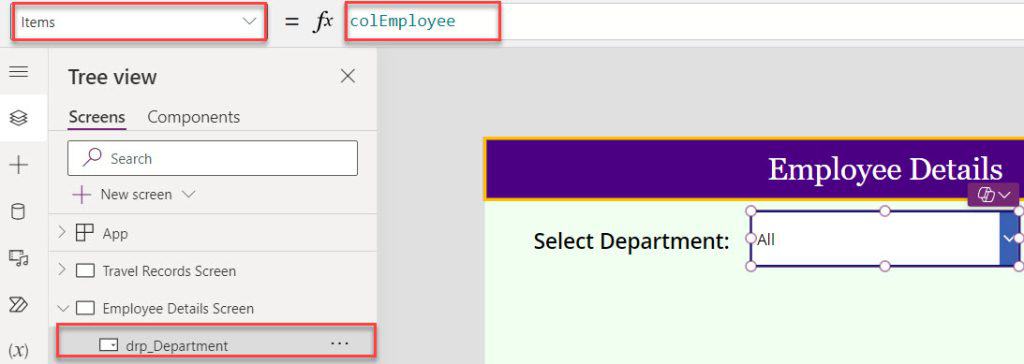
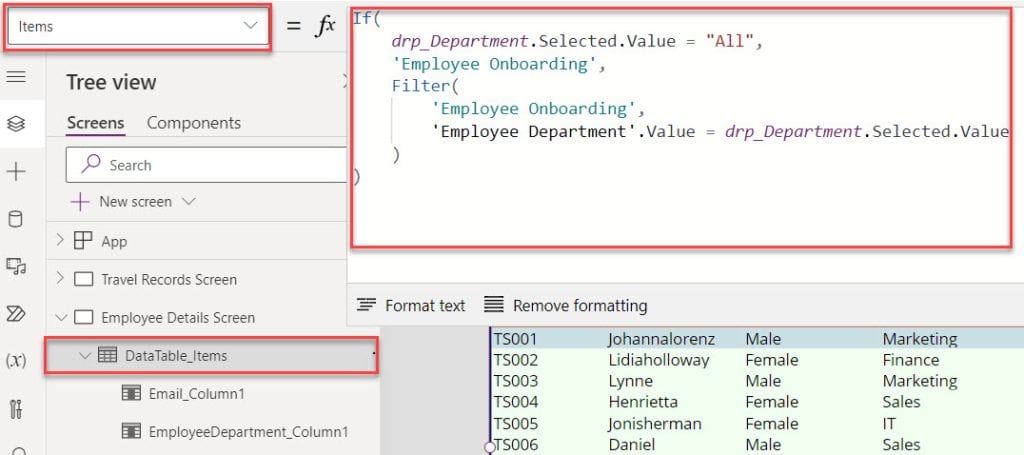
3. Now, insert a Data table control and set its Items property as shown below:
Items = If(
    drp_Department.Selected.Value = "All",
    'Employee Onboarding',
    Filter(
        'Employee Onboarding',
        'Employee Department'.Value = drp_Department.Selected.Value
    )
)
Where,
- drp_Department = Power Apps dropdown name
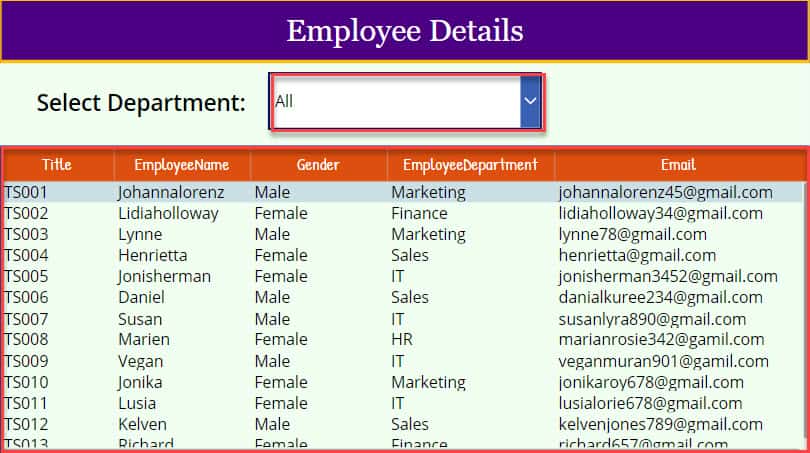
4. Save, Publish, and Preview the app. When the user selects a specific value from the dropdown control, the data table will display the filtered records, as in the screenshot below.
This way, you can filter the Power Apps data table by dropdown control.
Power Apps Filter Data Table By Dropdown Date
Using a simple example, let’s see how to filter a Power Apps data table by dropdown date.
Example:
I will also take the above SharePoint Online list [Employee Onboarding] for this example. Now, I would like to filter and display each record from the SharePoint list based on the dropdown selected date.
Output:
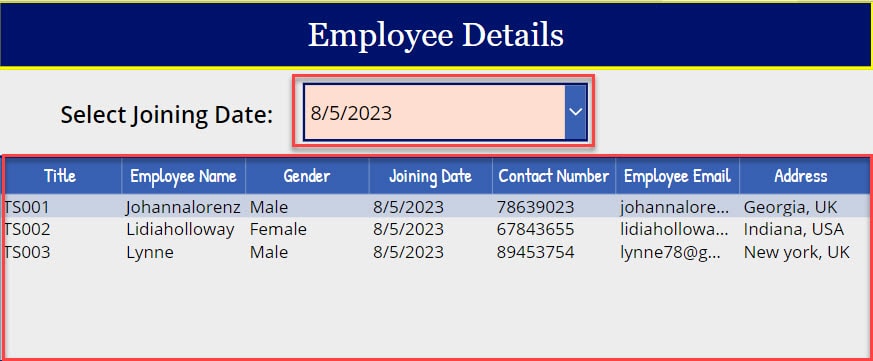
To do so, follow the below steps.
1. On the Power Apps Screen -> Insert a Dropdown control and set its Items property to the code below.
Items = Distinct(
    'Employee Onboarding',
    'Joining Date'
)
Where,
- Employee Onboarding = SharePoint Online list
- Joining Date = SharePoint list date and time field
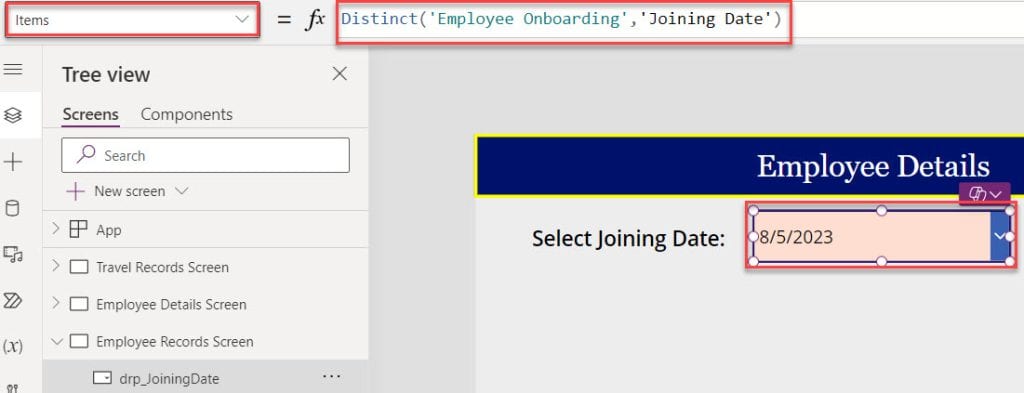
2. Next, insert a Dropdown control and set its Items property as:
Items = Filter(
    'Employee Onboarding',
    'Joining Date' = drp_JoiningDate.Selected.Value
)
Where,
- drp_JoiningDate = Power Apps dropdown name
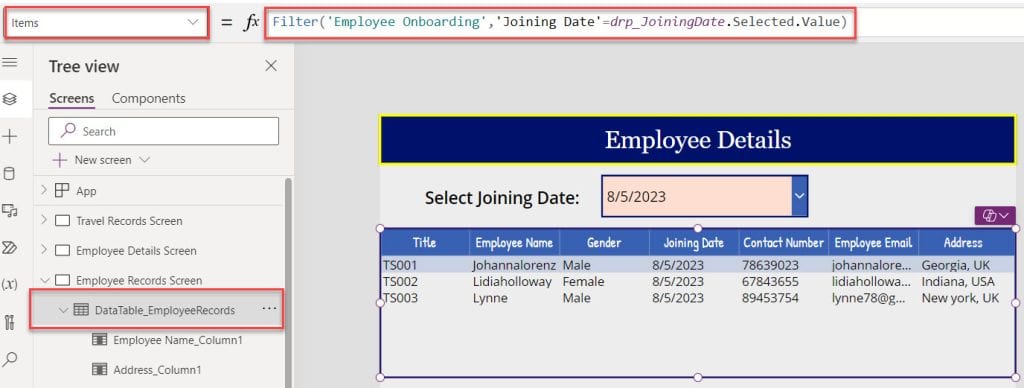
3. Save, Publish, and Preview the app. Whenever the user selects any specific date from the dropdown control, the data table will filter and display all the records based on the dropdown selected date like below.
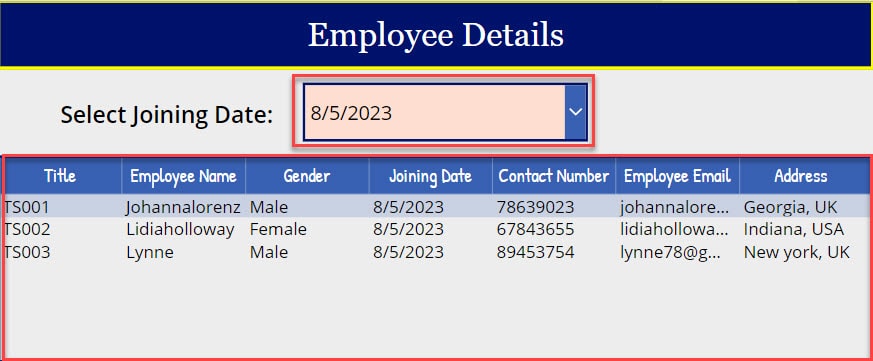
Power Apps Filter Data Table By Dropdown and Search
Here, I will show you how to filter the Power Apps data table by dropdown and search with a simple scenario.
Scenario:
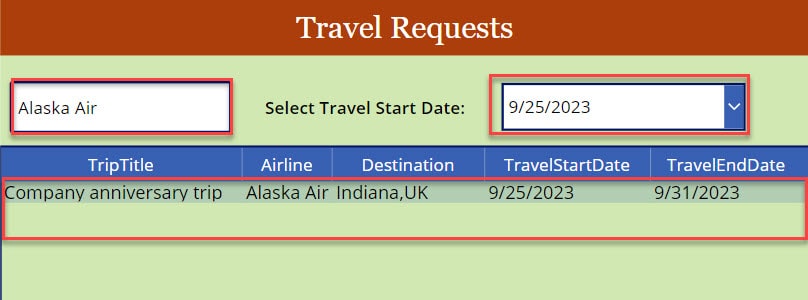
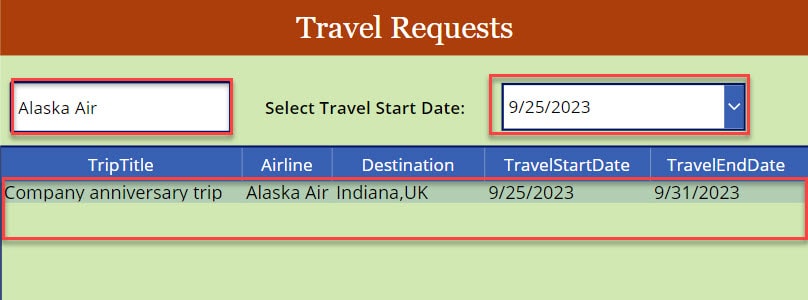
I will take the same above Power Apps collection records [colTravel] for this scenario. Now, I want to filter and display each record from the collection by selecting the dropdown value and search result, as in the screenshot below.
Output:
To achieve it, follow the below steps.
1. On the Power Apps Screen -> Insert a Text input control and set its Default property as:
Default = "Search Airline"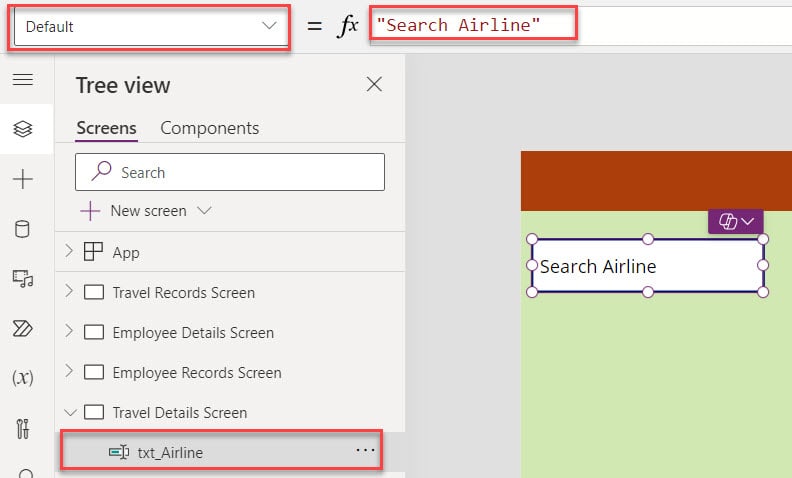
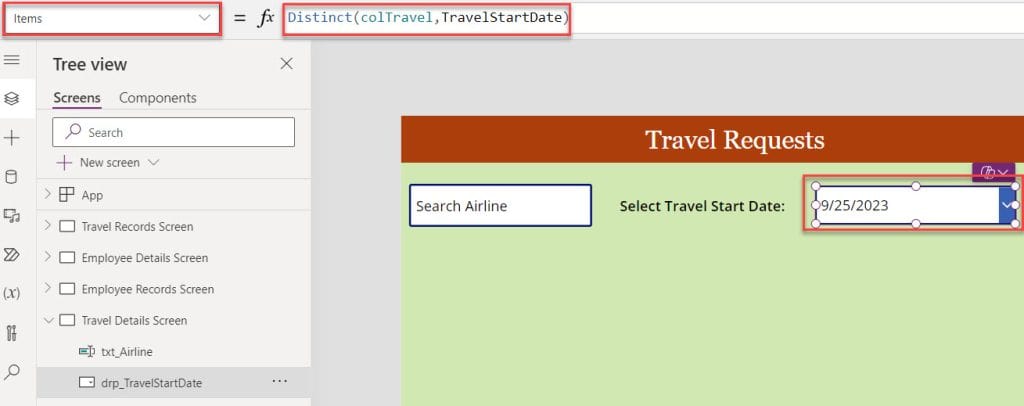
2. Next, insert a Dropdown control and set its Items property like:
Items = Distinct(
    colTravel,
    TravelStartDate
)
Where,
- TravelStartDate = Collection date and time field
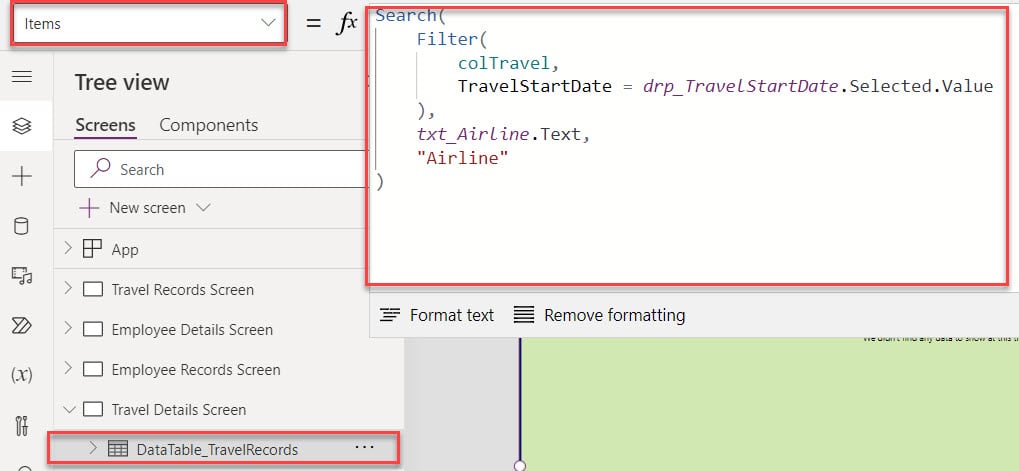
3. Now, insert a Data table control and set its Item property to the code below.
Items = Search(
    Filter(
        colTravel,
        TravelStartDate = drp_TravelStartDate.Selected.Value
    ),
    txt_Airline.Text,
    "Airline"
)
Where,
- drp_TravelStartDate = Power Apps dropdown name
- txt_Airline = Power Apps text input name
4. Save, Publish, and preview the app. This data table will display the filtered records based on the search results and selected dropdown value as in the screenshot below.
Power Apps Filter Data Table By Multiple Dropdowns
Last, using a simple example, I will show you how to filter the Power Apps data table by multiple dropdowns.
Example:
I have a SharePoint Online list, i.e., [Expense Tracker] and this list contains the below fields.
Input:
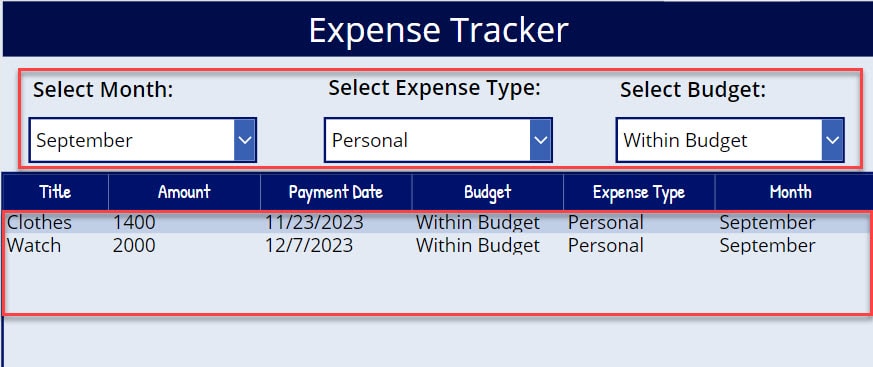
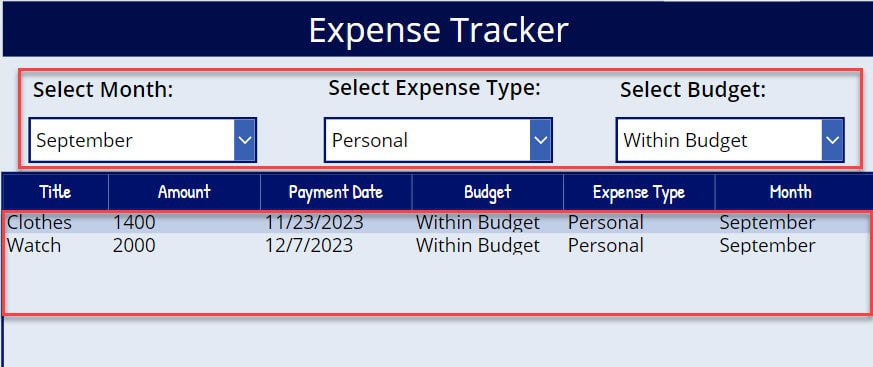
Power Apps has three Dropdown controls [drp_Month, drp_Expense Type, and drp_Budget] and a Data table control. This data table will display each record from the SharePoint Online list based on three dropdowns selected values.
Have a look at the below screenshot for the output:
Output:
To work around this example, follow the below steps. Such as:
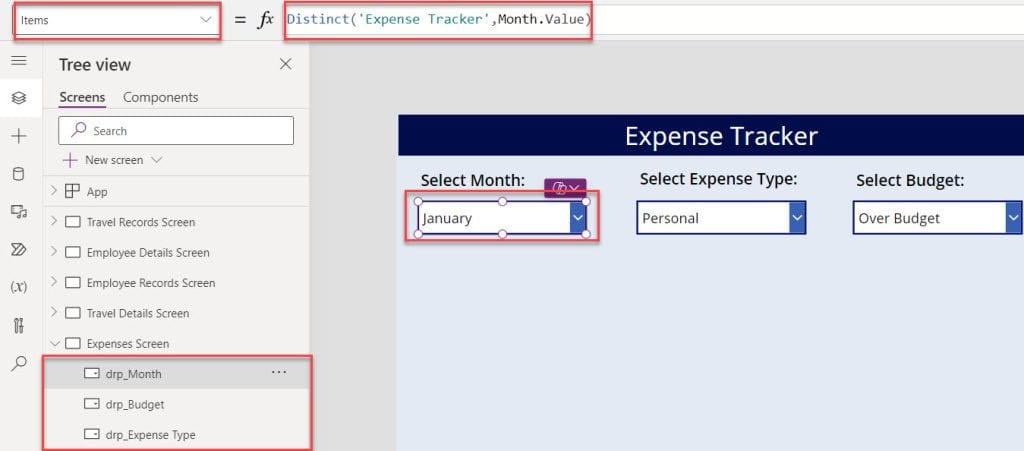
1. Connect the respective SharePoint Online list [Expense Tracker] -> On the Power Apps screen -> Insert three Dropdown controls, i.e., [drp_Month, drp_Expense Tracker, and drp_Budget] and set its Items properties as:
Items = Distinct(
    'Expense Tracker',                                                  //For Month Value
    Month.Value
)

Items = Distinct(
    'Expense Tracker',                                                //For Expense Type Value
    'Expense Type'.Value
)

Items = Distinct(
    'Expense Tracker',                                               //For Budget Value
    Budget.Value
)
Where,
- ‘Expense Tracker’ = SharePoint Online list
- Month, Expense Type, and Budget = SharePoint list choice fields
2. Next insert a Data table control and set its Items property to the code below.
Items = Filter(
    'Expense Tracker',
    Month.Value = drp_Month.Selected.Value,
    'Expense Type'.Value = 'drp_Expense Type'.Selected.Value,
    Budget.Value = drp_Budget.Selected.Value
)
Where,
- drp_Month = Power Apps 1st Dropdown Control Name
- drp_Expense Type = Power Apps 2nd Dropdown Control Name
- drp_Budget = Power Apps 3rd Dropdown Control Name
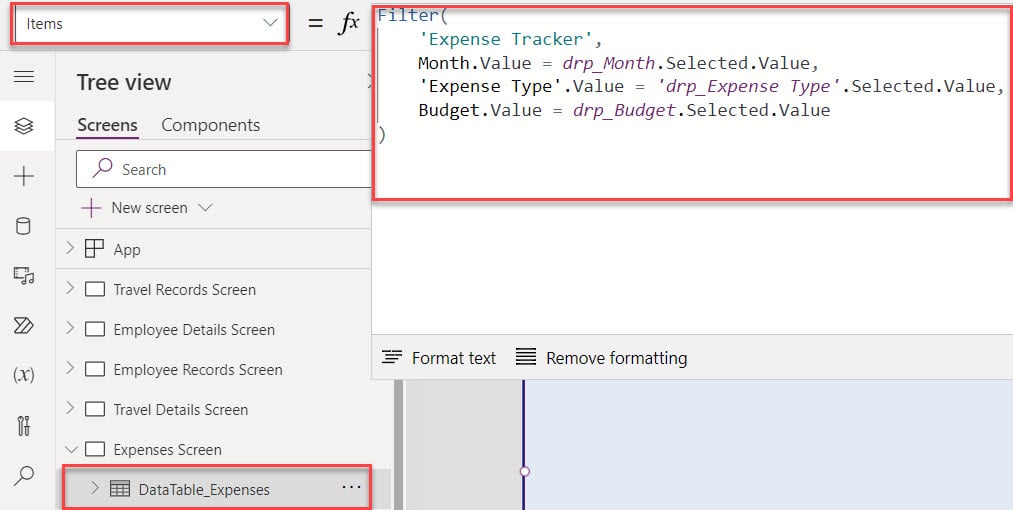
3. Save, Publish, and Preview the app. The Data table will display the filtered records, i.e., [September Month Records] based on the three selected dropdown values as in the screenshot below.
This way, we can filter the Power Apps data table by multiple dropdowns.
Some more Power Apps articles you may also like:
- Filter Power Apps Data Table using Checkbox
- Change Power Apps Dropdown to Radio button
- Filter Power Apps Gallery By Multiple Dropdowns
- Power Apps Data Table vs Gallery
I trust this Power Apps article helps you understand how to filter the Power Apps data table using a single dropdown or multiple dropdowns and how to filter a Power Apps data table using search and dropdown.
I am Bijay a Microsoft MVP (10 times – My MVP Profile) in SharePoint and have more than 17 years of expertise in SharePoint Online Office 365, SharePoint subscription edition, and SharePoint 2019/2016/2013. Currently working in my own venture TSInfo Technologies a SharePoint development, consulting, and training company. I also run the popular SharePoint website EnjoySharePoint.com