Do you want to create multiple tabs in a Power Apps form? Read this complete tutorial to learn the Power Apps tabbed form step by step.
Here, I will discuss how to create multiple tabs in Power Apps and how to use them in Power Apps form. You can also download the app and try it out by yourself.
How to Create Tabs in Power Apps
To create tabs in Power Apps, follow the steps below:
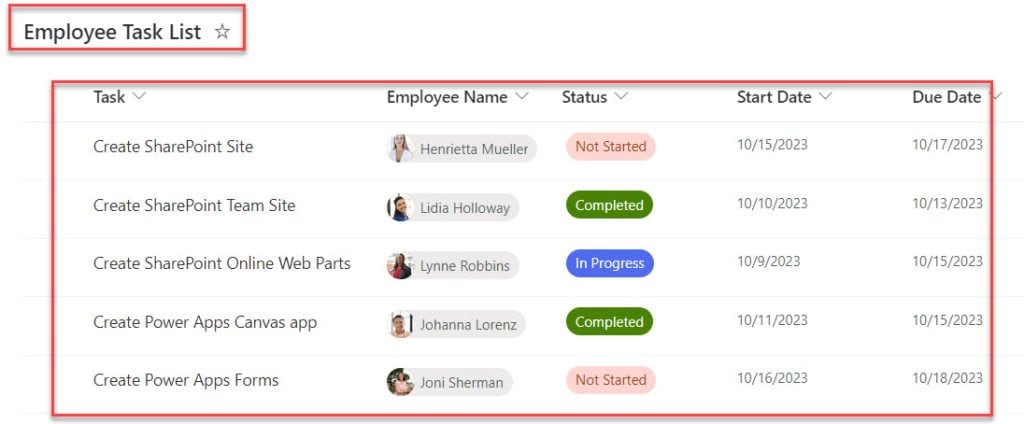
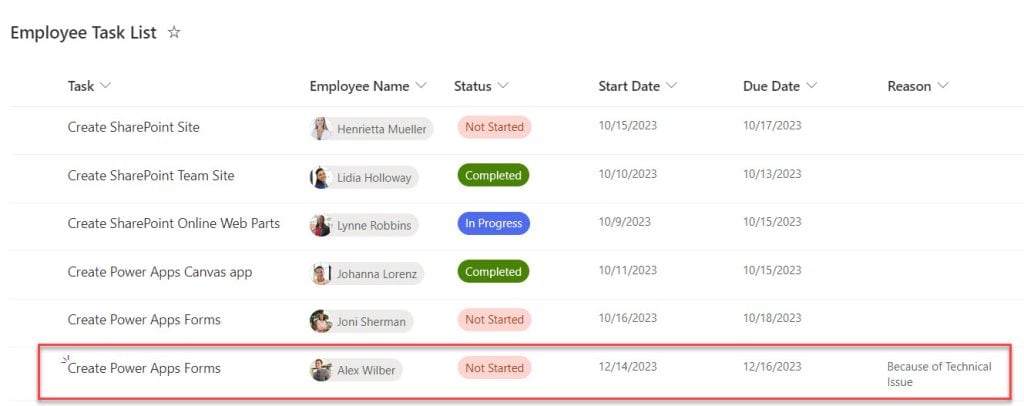
I have a SharePoint Online list [Employee Task List] that contains the fields below.
| Column Name | Data Type |
| Task | It is a default single line of text |
| Employee Name | Person and Group |
| Status | Choice |
| Start Date | Date and time |
| Due Date | Date and time |
In Power Apps, there is a Form control [Retrevies the data from SharePoint list] and three Button controls [New Task, Status, Reason] that act as tabs.
Whenever the user selects a specific tab, the Power Apps form displays relevant columns based on that tab. Have a look at the below output:
To work around this, follow the below steps. Such as:
Step-1:
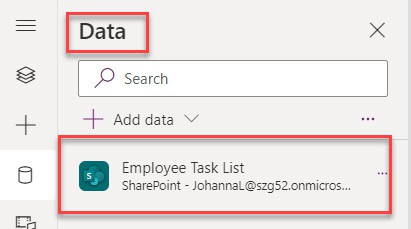
- Open Power Apps with your respective Microsoft credentials -> Create a Blank canvas app and connect it to the SharePoint Online list [Employee Task List] like below.
Step-2:
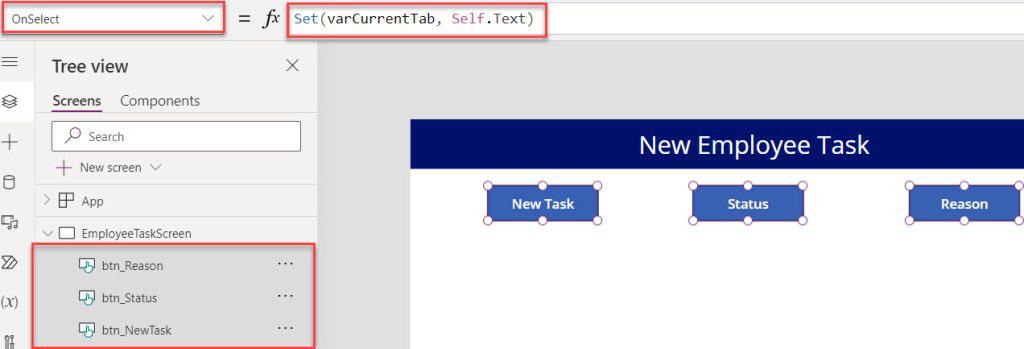
- On the Power Apps Screen -> Insert three Button controls [btn_NewTask, btn_Status, and btn_Reason] and set the OnSelect property for each button control.
OnSelect = Set(varCurrentTab, Self.Text)Where,
- varCurrentTab = Variable Name
Step-3:
- You should make the “New Task Tabbed Form” a default selection. The New Task tab form will appear whenever the user opens or runs the app.
- Select the Power Apps Screen and set its OnVisible property to the code below.
OnVisible = Set(varCurrentTab, "New Task")
Step-4:
- On the Power Apps Screen -> Insert an Edit form control and set its DataSource property as:
DataSource = 'Employee Task List'Where,
- ‘Employee Task List’ = SharePoint Online list
- Then, we need to modify the form as per the requirements, like switching the layout to a one-column format and selecting Layout as Vertical. Also, make the Form’s Default mode as “New” as shown below.
Default mode = "New"
Step-5:
- When a user selects a specific form tab, it displays particular columns or fields, and the remaining fields are hidden.
- For that, set the Visible property of all Tabs using the code below.
Visible = varCurrentTab="New Task"               //For Title, Assigned To, Start Date, and Due Date

Visible =  varCurrentTab="Staus"                     //For Status_DataCard

Visible = varCurrentTab="Reason"                   //For Reason_DataCard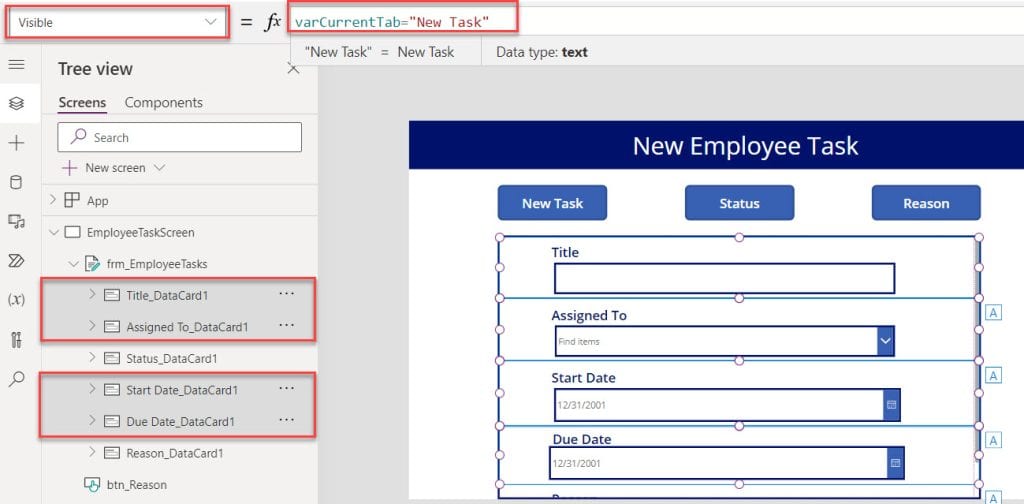
Step-6:
- Finally, insert a Save Icon and set its OnSelect property to the code below.
OnSelect = SubmitForm(frm_EmployeeTasks)Where,
- frm_EmployeeTasks = Power Apps Form Name

Step-7:
- Once your app is ready, Save, Publish, and Preview the app. Select the respective tabs, provide the information, and click on the save icon.

- Whenever the user submits data from the Power Apps tabbed form, the data is saved in the respective SharePoint list, as shown in the screenshot below.
This is how to work with tabs in Power Apps.
Create Multiple Tabs in Power Apps Form: Lead Management Apps Example
Let’s start with a real-world example to show how we may use Power Apps in our everyday lives. We are going to implement a Lead Management System in this instance to work more effectively.
What is Lead Management?
First of all, we need to understand what is Lead Management and why we will use it.
- Whether it’s a small-town cafe or a global group of companies, all businesses want to draw clients and encourage them to buy their products. But a person first starts out as a lead before becoming a customer.
- A ‘Lead‘ is anyone who shows interest in a business’s product or service. For example, if someone signs up for your newsletter, fills out a contact form on your website, or drops their business card into a bowl at a trade show, they’re a lead.
- But just because a person is a lead doesn’t necessarily mean they’re ready to buy. They might still be researching your company, weighing their options, or putting money aside to make a purchase. Therefore, companies need a system to handle these leads, monitor their level of interest, and gently encourage them to make a purchase.
Lead Management System in Power Apps
That’s where a Lead Management System comes in. It’s a software tool that helps businesses keep track of all their leads and remember who they are, what they’re interested in, and where they are in the buying process. It’s like a smart address book, where you can note down details about every lead, schedule follow-ups, and see at a glance who is ready to become a customer.
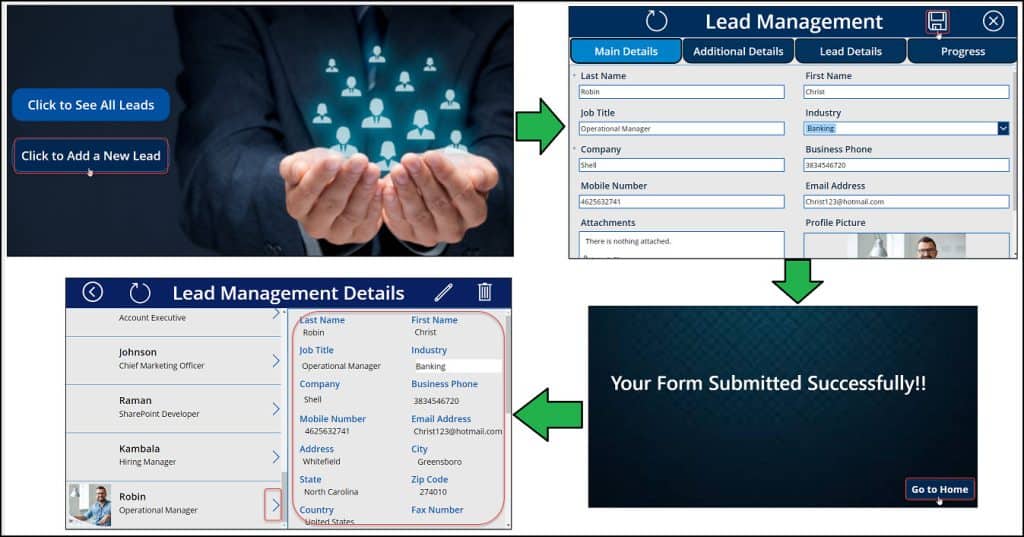
The screenshot below represents four different Power Apps Screens i.e.
- Lead Management Home Screen
- Lead Management Details Screen
- Lead Management Edit Screen
- Lead Management Success Screen

- Lead Management Home Screen is the first or welcome screen having two buttons:
- Click to See All Leads – When users click this button, they are taken to a page where they can access all the Lead Management Details.
- Click to Add a New Lead – Once the user taps on this button, they will be redirected to a new page to add a new lead.
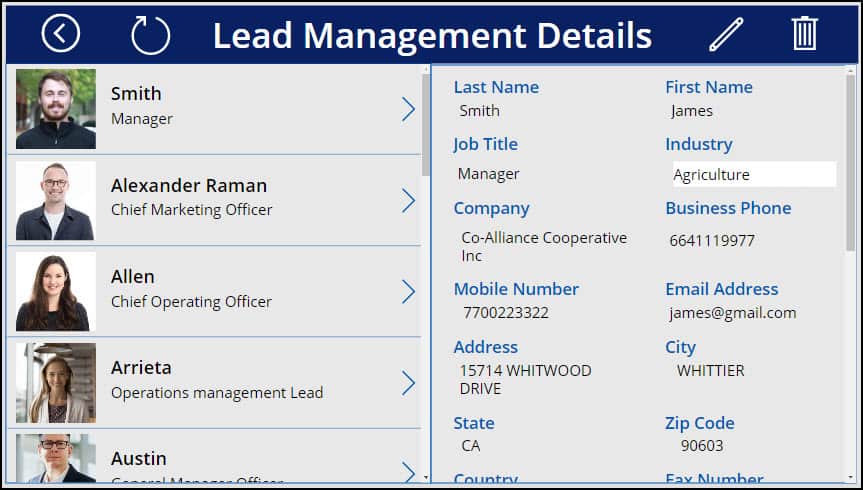
- Lead Management Details Screen is the second screen where a user can see all the lead information like Last Name, First Name, Job Title, etc. Also, users can edit, remove, and refresh any specific lead as per their needs.
- Lead Management Edit Screen is the third screen holding a form where users can enter new lead details. Once the form is filled, the details will save in the SharePoint list. This screen has four tabs:
- Main Details – It contains all the primary fields like Last Name, First Name, Job Title, Industry, etc.
- Additional Details – It contains all the secondary fields like Address, City, State, Zip Code, etc.
- Lead Details – It contains all the lead-related fields like Lead Source, Source Event, Product Line, etc.
- Progress – It contains all the progress-related fields Progress Status, Value, Probability, etc.
- Lead Management Success Screen is the last or fourth screen that helps to display a successful notification to the user once the new lead details are saved into the SharePoint list.
Download The Complete Canvas App and Try it out
We have uploaded the solution that you can download and try it out. It also contains a read me file that explains, how to unzip the solution and use it.
Create a SharePoint Online List with Various Columns
To build this Power Apps scenario, I have taken SharePoint as my data source. So you need to create a SharePoint list first.
The screenshot below represents my SharePoint list (Lead Management) with various fields. Such as:
- Last Name = Single line of text data type
- First Name = Single line of text data type
- Job Title = Single line of text data type
- Industry = Choice data type
- Company = Single line of text data type
- Business Phone = Number data type
- Mobile Number = Number data type
- Email Address = Single line of text data type
- Address = Multi line of text data type
- City = Single line of text data type
- State = Single line of text data type
- Zip Code = Single line of text data type
- Country = Single line of text data type
- Fax Number = Number data type
- Website = Hyperlink data type
- Profile Picture = Image data type
- Lead Source = Choice data type
- Source Event = Choice data type
- Product Line = Choice data type
- Account Manager = Person or Group data type
- Ok Email = Yes/No data type
- Ok Call = Yes/No data type
- Progress Status = Choice data type
- Value = Single line of text data type
- Probability (%) = Choice data type
- Closed Date = Date data type
You don’t need to create any record in this SharePoint List. We will insert records through the Power Apps Form.
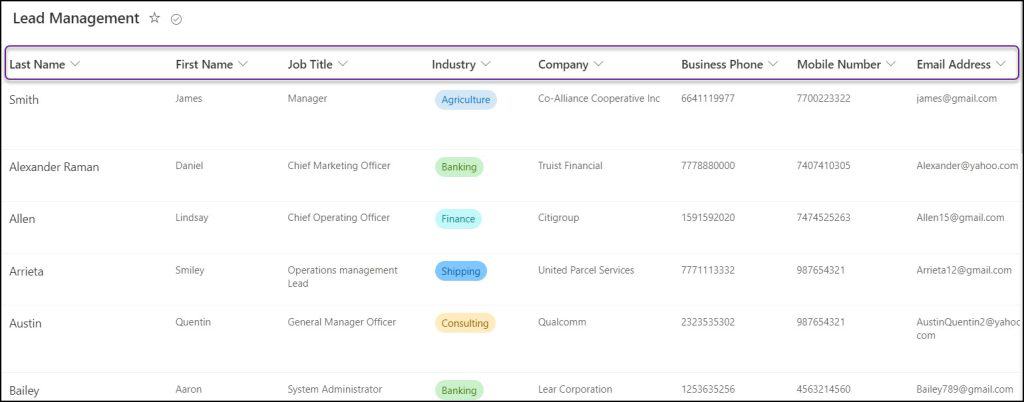
Once the SharePoint list is ready, we will move to developing the Power Apps Canvas app.
Create Power Apps Canvas App
Follow the instructions below to build this Lead Management system requirement in Power Apps.
Create a New Blank Canvas app
- Sign in to Power Apps with your valid Microsoft credentials.
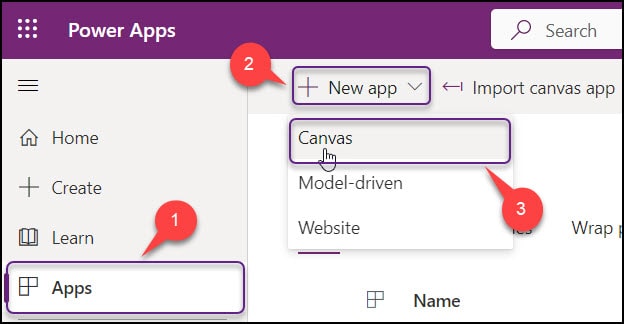
- Create a New Blank Canvas app (Apps -> + New App -> Canvas).
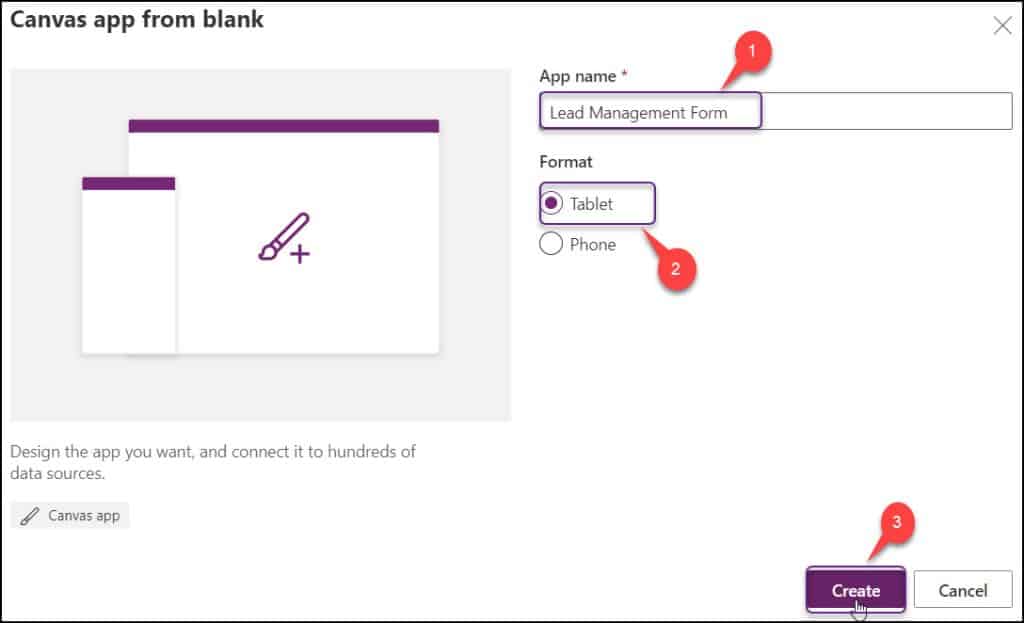
- Provide a unique name to the app (Lead Management Form) -> Choose the Format as Tablet -> Click on Create.
Connect SharePoint List Datasource Connector to Canvas app
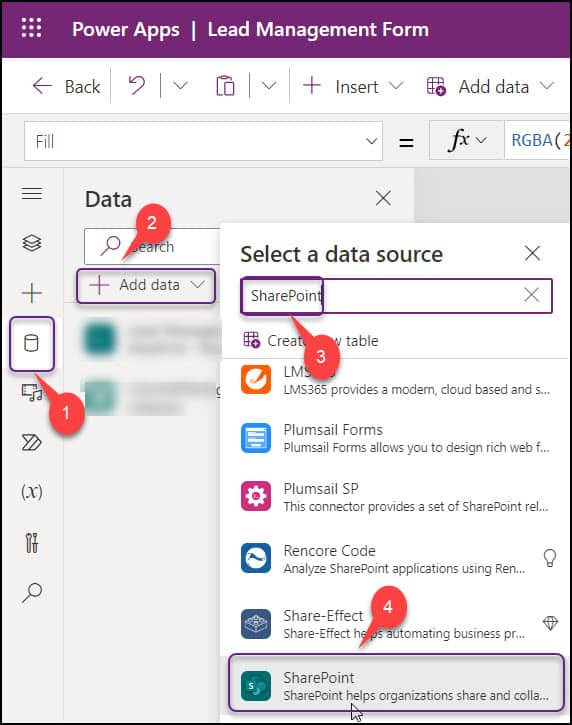
- Next, we have to connect the SharePoint list data source connector to the app. To do so, go to the Data tab (from the left nav) -> Click + Add data -> Search SharePoint in the search bar -> Select SharePoint data source connector.
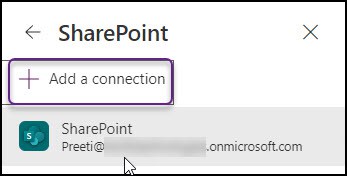
- If you are using it for the first time, you must make a new connection (+ Add a connection); otherwise, click the current SharePoint connection as shown below.
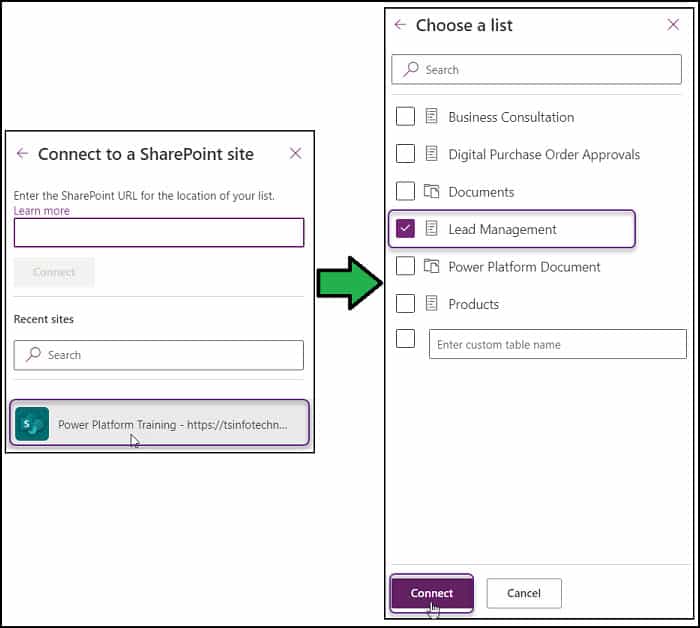
- You can tap the current SharePoint site under the Recent Sites category or enter the SharePoint site URL to connect to it.
- Choose your SharePoint list (Lead Management) -> Click on Connect.
Add Power Apps Screens
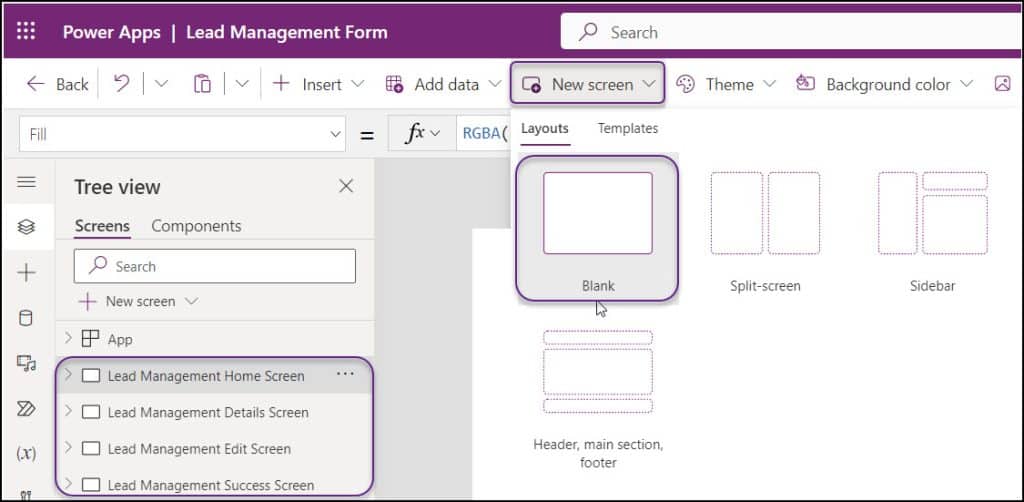
- Next, add four Blank screens to the canvas app. Click on New screen -> Select Blank. By default, the screen name will be like Screen1, Screen2, etc.
- Rename all four screens by double tapping on them:
- Lead Management Home Screen
- Lead Management Details Screen
- Lead Management Edit Screen
- Lead Management Success Screen
We will now go through each Power Apps screen individually.
Lead Management Home Screen
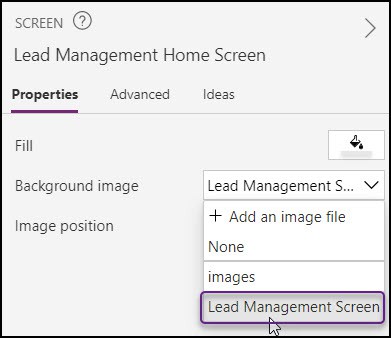
- This screen contains an image background and two button controls (just rename buttons by double-tapping on them):
- Click to See All Leads
- Click to Add a New Lead

- For the Background image, select the screen (Lead Management Home Screen) -> Properties (from the right side pane) -> Background image -> + Add an image file as shown below.
Lead Management Details Screen
On this screen, there are a total of eight Power Apps input controls. Such as:
- Text label – This is the Title (Lead Management Details) of the screen. Select the Label control and set its Text property as:
Text = "Lead Management Details"Where,
“Lead Management Details” = Enter the text that you want to display in the label control
2. Back – This Back button will assist the user in returning to the Home screen. Select the icon and set its OnSelect property to the code below:
OnSelect = Navigate('Lead Management Home Screen')‘Lead Management Home Screen‘ = First or Home screen name
3. Reload – The user can refresh the data from the source with the help of this Reload button. Select the icon and set its OnSelect property to the code below:
Reload = Refresh('Lead Management')‘Lead Management‘ = SharePoint List Name
4. Edit – The user can change a specific record in the display form with the use of this icon. Once the user taps on this edit icon, it will navigate to the third screen (Lead Management Edit Screen) with an edit form.
OnSelect = EditForm(LeadEditForm);
Navigate('Lead Management Edit Screen')- LeadEditForm = Edit form control name (that is available in the third screen [follow the next screen below])
- ‘Lead Management Edit Screen‘ = Third screen name
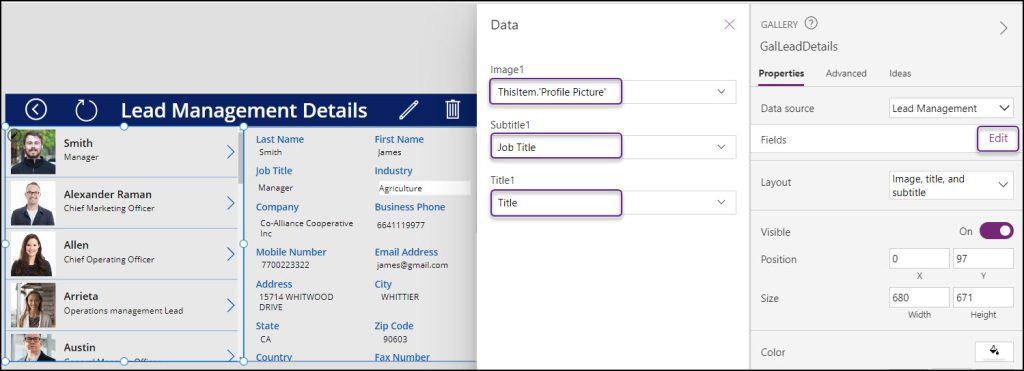
5. Gallery – The user will be able to view all of the leads from the SharePoint list with the help of this gallery. Insert a Vertical gallery control and rename it to GalLeadDetails. Also, set these below properties of the gallery control:
Layout = Image, title, and subtitle
Data source = Lead Management
Items = 'Lead Management'
Fields:
Image1 = ThisItem.'Profile Picture'
Subtitle1 = Job Title
Title1 = Title
Where,
- Lead Management = SharePoint List
- ‘Profile Picture’, Job Title, Title = These are the SharePoint columns where Title represents the Last Name.
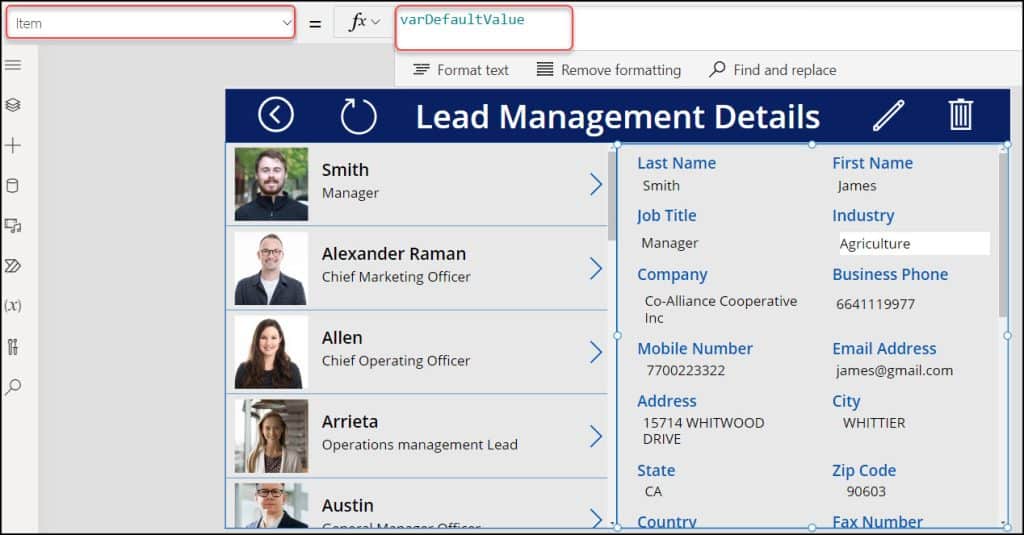
6. Display Form – Add a Power Apps Display Form (next to the gallery control), so the user can view all the information about a certain user from the gallery control. Additionally, this display form should appear with the first item’s details when a user starts or run the app. The form shouldn’t display empty fields.
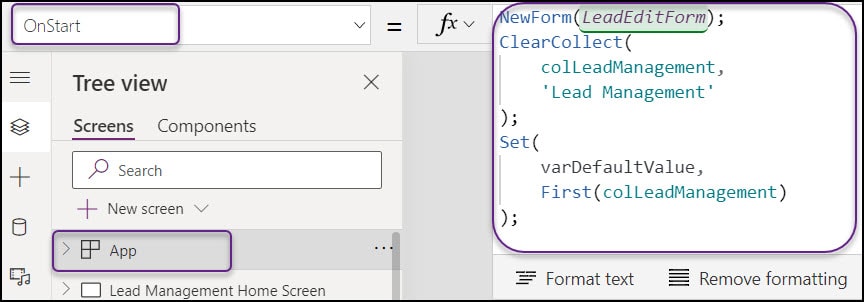
To work around this, we need to create a Power Apps Collection and set a context variable on App’s OnStart property as:
OnStart = NewForm(LeadEditForm);
ClearCollect(
    colLeadManagement,
    'Lead Management'
);
Set(
    varDefaultValue,
    First(colLeadManagement)
);- LeadEditForm = Edit form control name (that is available in the third screen [follow the next screen below])
- ClearCollect = Power Apps ClearCollect function eliminates every record from a collection. And then includes a new set of records in the same collection
- colLeadManagement = Provide a unique Collection name
- ‘Lead Management’ = Provide SharePoint List name
- varDefaultValue = Specify the name of the Context variable
- First(colLeadManagement) = This will return the first item from the collection
Select the Power Apps Display Form and set the variable to its Item property as:
Item = varDefaultValueWhere,
varDefaultValue = Context Variable name that you have created
7. Next Arrow – The gallery next arrow icon in the display form allows the viewer to see all the information about a certain lead.
Select the Next arrow icon (>) from the gallery and apply the code below on its OnSelect property as:
OnSelect = Set(
    varDefaultValue,
    GalLeadDetails.Selected
)
Where,
GalLeadDetails = Gallery control name

8. Trash – When a user clicks the Trash button, the particular record is deleted from the gallery and the SharePoint list. Additionally, the display form will return to the first item once the specific record has been erased.
To do so, apply the code below on the Screen’s OnVisible property: (Lead Management Details Screen)
OnVisible = If(
    GalLeadDetails.AllItemsCount > 0,
    Set(
        CurrentGalleryItem,
        First(GalLeadDetails.AllItems)
    )
)- CurrentGalleryItem = Variable name

Next, Select the Trash icon and set its OnSelect property as:
OnSelect = If(
    GalLeadDetails.AllItemsCount > 0,
    Set(
        varID,
        GalLeadDetails.Selected.ID
    )
);
Remove(
    'Lead Management',
    GalLeadDetails.Selected
);
If(
    GalLeadDetails.AllItemsCount > 0,
    If(
        CurrentGalleryItem.ID = varID,
        Select(
            GalLeadDetails,
            2,
            NextArrow1
        ),
        Select(
            GalLeadDetails,
            1,
            NextArrow1
        )
    )
);
If(
    GalLeadDetails.AllItemsCount = 2,
    Select(
        GalLeadDetails,
        1,
        NextArrow1
    )
);
If(
    GalLeadDetails.AllItemsCount = 1,
    Select(
        GalLeadDetails,
        1,
        NextArrow1
    )
);
If(
    GalLeadDetails.AllItemsCount > 0,
    Set(
        CurrentGalleryItem,
        First(GalLeadDetails.AllItems)
    )
);- GalLeadDetails = Gallery control name
- varID = Variable name
- CurrentGalleryItem = Variable name that you have created in the screen’s OnVisible property
- NextArrow1 = Gallery Arrow icon name

Refer to the screenshot below. Suppose, If I will erase Allen’s records, the gallery record would also be deleted and the display form would then show the first item’s details automatically.
Lead Management Edit Screen [Create Tabs in Power Apps]
This is the third screen, which has four tabs, including a Power Apps Edit form.
- Main Details
- Additional Details
- Lead Details
- Progress
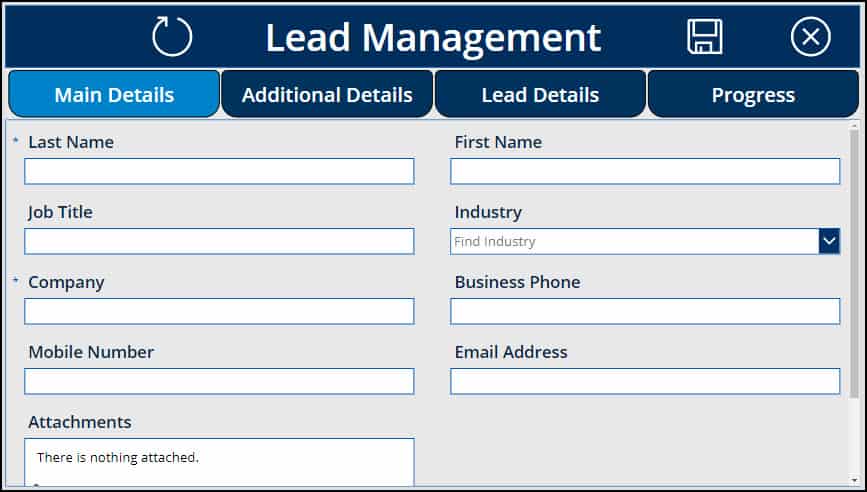
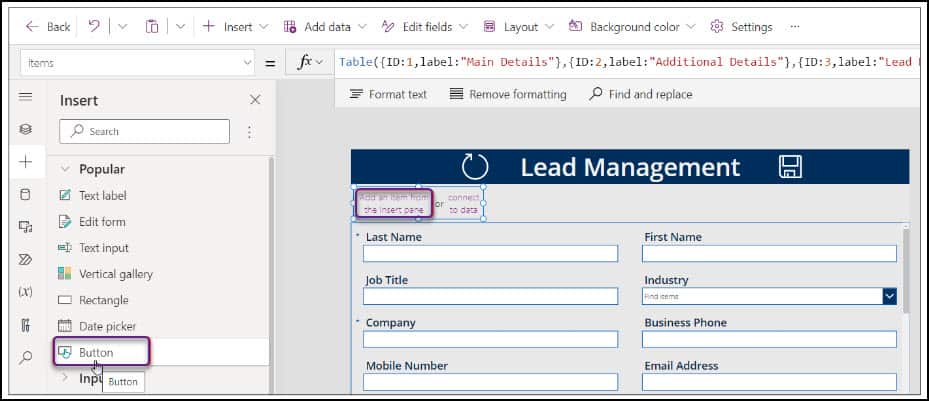
First, add an Edit form and set its Datasource property to the SharePoint list (Lead Management). Also, set its Item property as:
Item = GalLeadDetails.SelectedDrag the edit form a little bit lower and add a Blank horizontal gallery (Click + Insert -> Search Blank -> Select Blank horizontal gallery) above the form shown below.
Select the Blank horizontal gallery and set its Items property to the code below:
Items = Table(
    {
        ID: 1,
        label: "Main Details"
    },
    {
        ID: 2,
        label: "Additional Details"
    },
    {
        ID: 3,
        label: "Lead Details"
    },
    {
        ID: 4,
        label: "Progress"
    }
)
Where,
- Table = By using a list of records as a parameter, the Table function makes a table in Power Apps.
- ID, label = These are the table headers or columns.
- 1, 2, 3, 4 = These are the ID Values.
- “Main Details”, “Additional Details”, “Lead Details”, and “Progress” = These are the label values. Here, I put all the tab names.

Next, click on the Add an item from the insert pane from the Blank Horizontal Gallery -> Insert a Button control into it.
As you can see, the horizontal gallery will have four buttons. Although you began with a horizontal gallery that was empty, as soon as you add a control, the entire gallery will update to reflect that change. Just arrange the four buttons such that they appear as tabs to anyone who looks at it.
Once all four buttons have been adjusted, choose the first one from the gallery and enter the following code in the Text property:
Text = ThisItem.labelWhen the formula is used, all label values—including Main Details, Additional Details, etc.—are shown in each button.

Some significant properties of the button tab (Main Details) need to be modified in order to make the gallery tabs appear more enticing, including:
- Border
- Font
- Font size
- Font weight
- Pressed color
- Hover color
You can alter the color of your button tabs using any of the aforementioned attributes.
Also, select the Main Details tab and set its Fill property to the code below:
Fill = If(ThisItem.IsSelected,RGBA(0,130, 202, 255),RGBA(0,51, 94, 255))According to the code above, the current item or tab will display in sky blue if it is selected, otherwise, it will display in navy blue.

- Now we will set a variable on the Button’s (Main Details) OnSelect property:
OnSelect = Set(varButtonOnClick, ThisItem.ID) - VarButtonOnClick = Variable name
- ID = Table Column name that we have created on the gallery’s Items property

The last step is to set the Visible property of each data card in the edit form. That indicates that a user should be able to read and enter all personal information, such as last name, first name, job title, etc. when he or she clicks on the Main Details tab.
Similarly to this, the user should be able to read all the permanent information, such as an address, city, state, country, and so forth, when they hit on the Additional Details button.
Main Details:
To get around this, we must add the following code to each DataCard Visible property:
Last Name: Visible = varButtonOnClick=1 - VarButtonOnClick = Variable name
- 1 = ID value from the created table
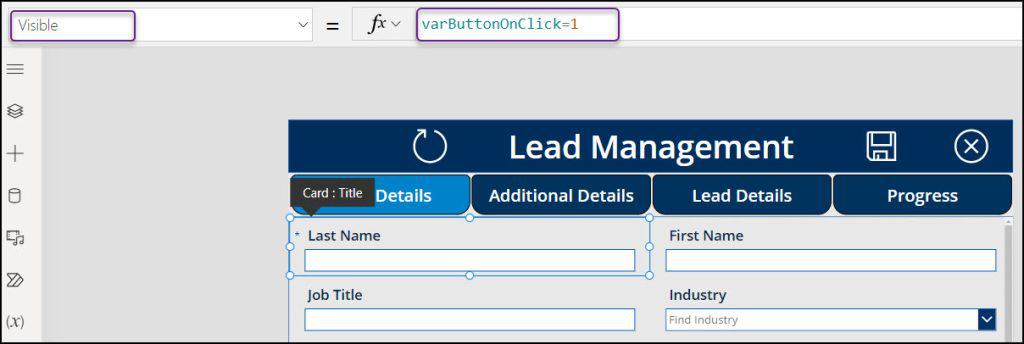
Similarly, set all these below Datacard Visible property to the code below:
First Name: Visible = varButtonOnClick=1
Job Title: Visible = varButtonOnClick=1
Company: Visible = varButtonOnClick=1
Mobile Number: Visible = varButtonOnClick=1
Business Phone: Visible = varButtonOnClick=1
Email Address: Visible = varButtonOnClick=1
Industry: Visible = varButtonOnClick=1
Attachments: Visible = varButtonOnClick=1
ProfilePicture: Visble = varButtonOnClick=1
Additional Details:
Similar to that, update every Datacard’s Visible property to the code below for any fields you want to appear in the second tab (Additional Details):
Address: Visible = varButtonOnClick=2
City: Visible = varButtonOnClick=2
State: Visible = varButtonOnClick=2
Country: Visible = varButtonOnClick=2
Zip Code: Visible = varButtonOnClick=2
Website: Visible = varButtonOnClick=2
Fax Number: Visible = varButtonOnClick=2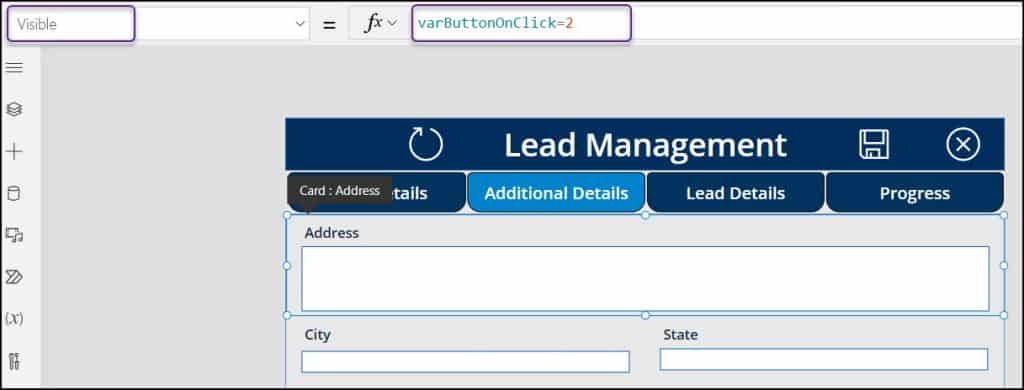
Lead Details:
Like that, update every Datacard’s Visible property to the code below for any fields you want to appear in the third tab (Lead Details):
Ok Call: Visible = varButtonOnClick=3
Ok Email: Visible = varButtonOnClick=3
Lead Source: Visible = varButtonOnClick=3
Source Event: Visible = varButtonOnClick=3
Product Line: Visible = varButtonOnClick=3
Account Manager: Visible = varButtonOnClick=3
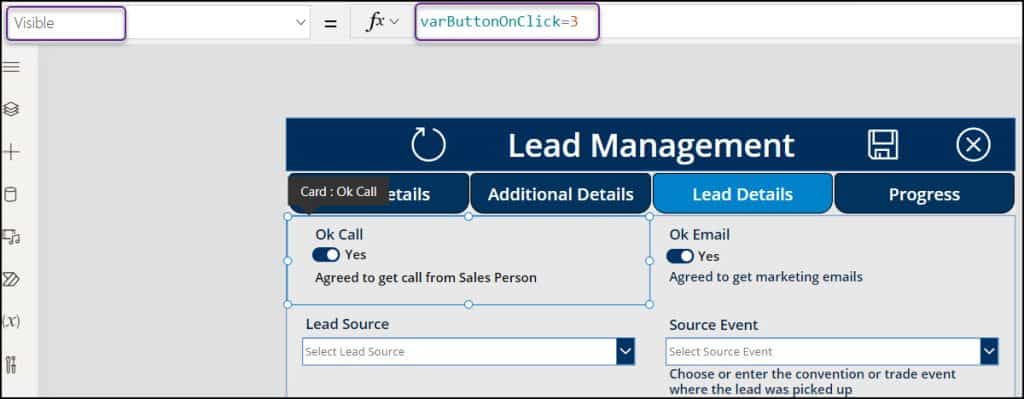
Progress:
Similarly, set all the Datacard’s Visible properties to the code below for any fields you want to appear in the second tab (Progress):
Value: Visible = varButtonOnClick=4
Probability (%): Visible = varButtonOnClick=4
Progress Status: Visible = varButtonOnClick=4 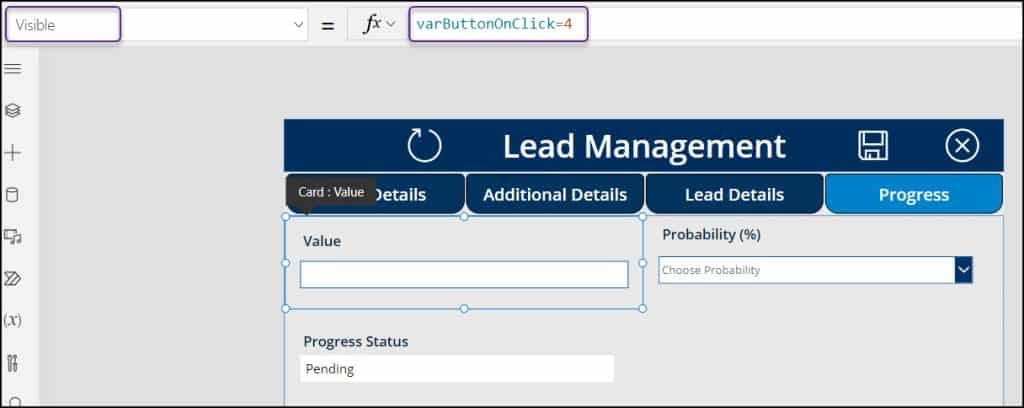
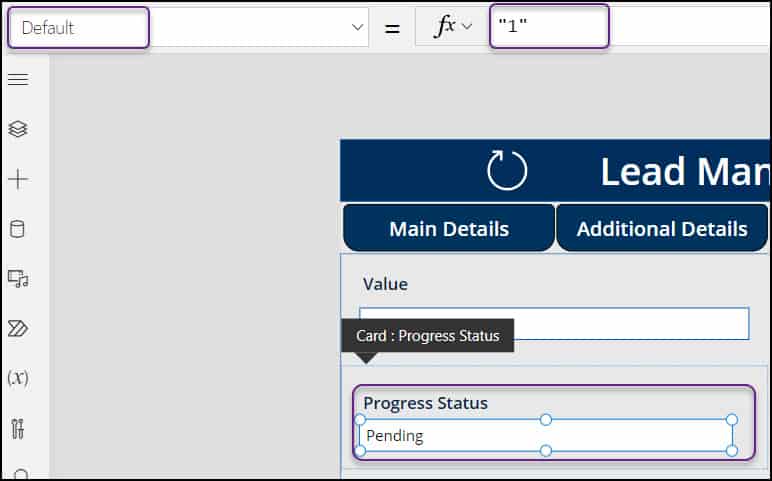
Additionally, as shown in the figure below, the Progress Status field only has a Read view. The user can not change this region, so to speak. This field’s default value in the form will always be Pending, and he or she can only view it.
To do so, first, select the Progress Status Dropdown control and set its Default value to “1”.
Default = "1"“1” = Because the SharePoint Choice values in this control include Pending, Submitted, Approved, and so on. I have set its Default value to “1” since I want to display the Pending value in this case.
The dropdown control’s DisplayMode property must then be set to the following code in order to be read-only:
DisplayMode = DisplayMode.View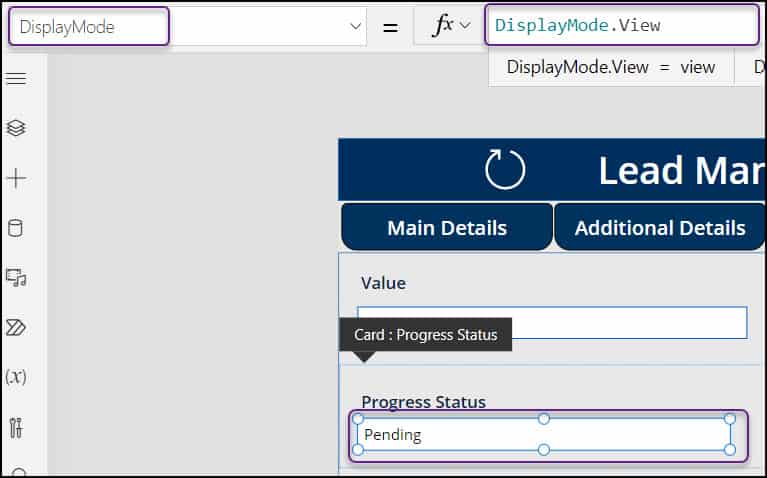
Moreover, this screen has four more controls:
- Title = This is the label control that helps to show the screen title (Lead Management)
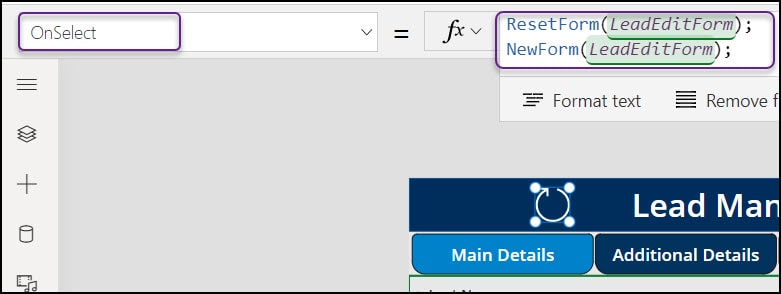
- Reload = Once the user taps on it, the form will reset and appear with a new form. For this, apply the formula below on the Refresh icon’s OnSelect property:
OnSelect = ResetForm(LeadEditForm);
NewForm(LeadEditForm);
LeadEditForm = Edit form name
- Save = When the user clicks on this Save button, then the records will save inside the SharePoint list (Lead Management). Additionally, the record will save if all required fields are completed; otherwise, the user will see an error message that reads “Please enter the Required fields.” And, if the item is submitted successfully, then it will navigate to the success screen (fourth or last screen).
- Set this Save button’s OnSelect property as:
OnSelect = If(
    LeadEditForm.Valid,
    SubmitForm(LeadEditForm);
    Navigate('Lead Management Success Screen'),
    Notify(
        "Please enter the Required fields",
        NotificationType.Error
    )
)- LeadEditForm = Edit form control name
- ‘Lead Management Success Screen‘ = Fourth or Last screen name
- NotificationType.Error = This function helps to show an error message to the user

- Cancel = Once the user clicks on it, it redirects to the first or home screen. Select the Cancel icon and set its OnSelect property as:
OnSelect = Navigate('Lead Management Home Screen')
Lead Management Success Screen
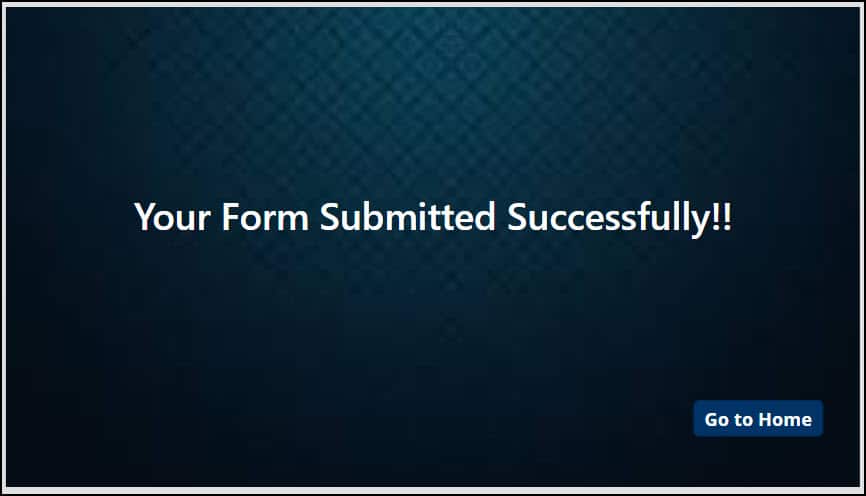
This is the Last or Fourth screen with a Text label control and a Button control. The user will be redirected to this screen to view the success notification once they have submitted the lead management form (including validation).
Also, this screen is covered with a simple Background image.
- Your Form Submitted Successfully = This is the Text label control. You can set its Text property to “Your Form Submitted Successfully!!“.
- Go to Home = Once tapped, this button controls directs the user to the home screen or the first screen. Select the button and set its OnSelect property as:
OnSelect = Navigate('Lead Management Home Screen')‘Lead Management Home Screen‘ = First screen name
After that, you’re finished with Power Apps.
Save and Publish the Power Apps Canvas App
Once complete, your app has to be saved and published. If not, everything you created for the app will be completely lost.
- The top right corner has the Save button.
- Press the app’s Publish button in addition to saving.
- Select “Publish this version” from the menu.

- Now, close the app and play it again. Click on Click to See All Leads -> Select any specific lead (Allen) -> Tap on Edit icon -> Modify the item that you want to change -> Navigate to the Successful screen. Once you click on the Go to Home button, it will redirect to the Home screen.
- Additionally, the exact lead data in the SharePoint list (Lead Management) will also change.
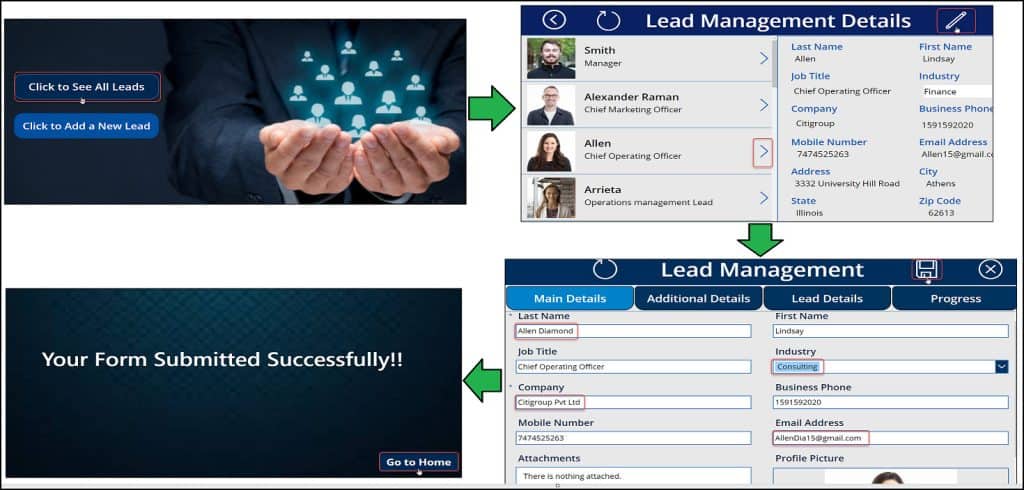
- Again, go to the Home screen -> Tap on Click to Add a New Lead -> Enter the new Lead details in the new form (using all 4 tabs) -> Click on Save -> Redirect to the Successful screen. The Go to Home button will take you to the Home screen after you click it.
- Click on the Click to See All Leads button (from the Home screen) to view the new lead details. Also, the new lead will save into the SharePoint list (Lead Management) as well.
You can make the Power Apps Canvas app available to other members after it is complete and ready for usage. Simply Share the app with other users and let them play.
This is how to work with Power Apps Canvas app using a real case scenario (Lead Management System).
Conclusion
In this Power Apps tutorial, I have explained how to create PowerApps tabs and Power Apps multiple forms on one screen step by step.
I hope you have enjoyed the Lead Management Power Apps app.
Furthermore, you may like some more Power Apps and Dataverse tutorials:
- How to Create a SharePoint Online Site Using Power Automate [Download Complete Flow]
- Power Apps Disable Button
- Power Apps Modern Link Control [Detailed Tutorial]
- Power Apps Modern Badge Control [Complete Guide]
- Power Apps Modern Button Control [Complete Guide]
- Power Apps Modern Information Button Control [Complete Guide]
- Power Apps Modern Text input Control [All in Detail]
I am Bijay a Microsoft MVP (10 times – My MVP Profile) in SharePoint and have more than 17 years of expertise in SharePoint Online Office 365, SharePoint subscription edition, and SharePoint 2019/2016/2013. Currently working in my own venture TSInfo Technologies a SharePoint development, consulting, and training company. I also run the popular SharePoint website EnjoySharePoint.com