In this Power Automate tutorial, we will see how to create a SharePoint Online site using Power Automate. These are the below SharePoint Online sites that we are going to create:
- SharePoint Online Communication site
- SharePoint Online Team site (Group connected)
- SharePoint Online Team site (Non group connected)
Also, we will see how we can set the storage limit of the site and add members to the site.
To create this, We have a SharePoint Online list known as ‘Site request‘, which contains the below columns:
- Title (Single line of Text)
- Site owner (Person)
- Alias (Single line of text)
- Site Url (Hyperlink)
- Site description (Multi-line of text)
- Site member (Person)
- Max Storage limit
- Max storage warning limit
Where the user will request the site, and flow will trigger, it will create a SharePoint site. Also, we have added the functionality of storage limit and added members to the site. Once the functionality is added to the SharePoint site, then the site owner and site member get to notify the site is created.
In Storage functionality, if the user requests the Site storage limit is greater than 50 GB, then it will go for approval to SharePoint Administrator, if it’s approved, then the site gets created with the required storage limit, else the site will not create. If the storage limit is less than 50 GB, then the site gets created with the required storage limit.
In the add member functionality, we will add members to the SharePoint site, once the site is created. Then we will send an email to site members and the site owners.
Also, Read: Create SharePoint Online List and Columns from Excel Using Power Automate [Download Complete Flow]
How to Create a SharePoint Online Site Using Power Automate
Here we will see how to create a SharePoint Online site using Power Automate.
To create a SharePoint site automatically using Power Automate, we need to do two things:
- Setup SharePoint list
- Create the Flow
Setup SharePoint list
Before we create a flow, we need to create a SharePoint list, where the user will submit the request. As I have already set up my SharePoint list, so I will tell u how you can set it up for yourself.
First, we need to create a Blank list with the name ‘Service Request’, and then we will create a column like below:
- Title (Single line of Text)
- Site owner(Person)
- Alias(Single line of text)
- Site Url (Hyperlink)
- Site description(Multi-line of text)
- Site member (Person)
- Max Storage limit (Number)
- Max storage warning limit (Number)
Once we create a column, we need to validate the Max storage warning limit. Because the maximum storage warning limit must be smaller than the Maximum storage limit.
For this, go to the List setting -> Under General setting, click on Validation setting. Then in the Formula box add the below formula, also you can provide the user message. Then click on Save.
=[Max Storage limit]>[Maximum Storage Warning Limit ]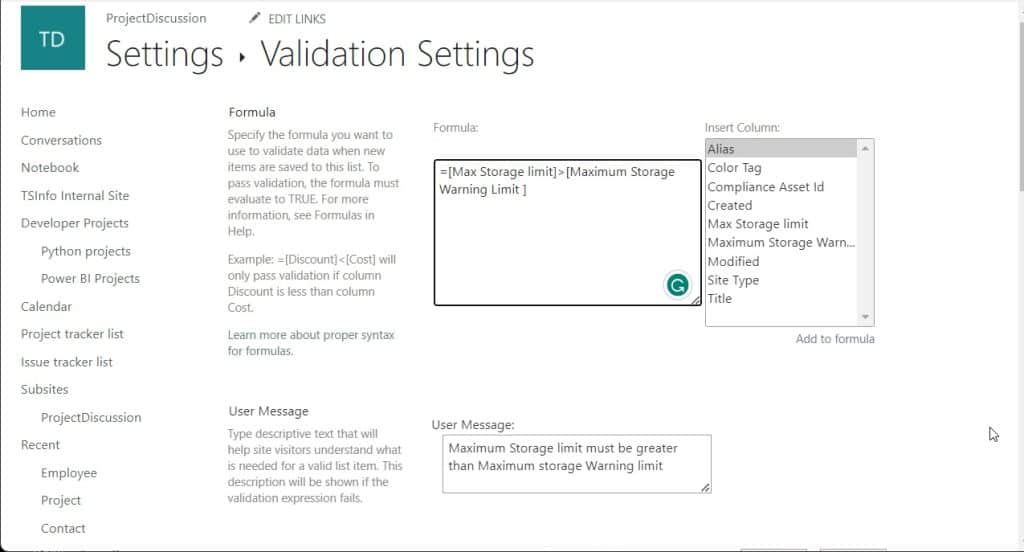
Once you validate the Maximum storage warning limit column, whenever you will provide a larger value than the Maximum storage limit.
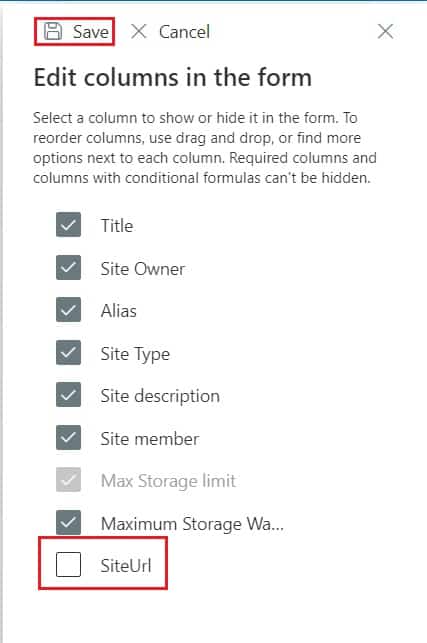
Now we will remove the Site URL field from the List form. Because users don’t need to provide the site URL, it will automatically update in the SharePoint list when the site is created.
For this in the list create a new item -> Then click on the edit form icon -> select Edit columns.
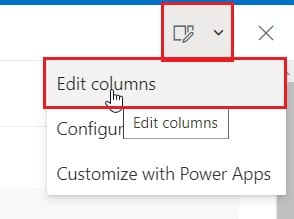
Now in the ‘Edit columns in the form’ window, remove the Site URL column. Click on Save.
Now our SharePoint list is set up, we will move forward to create a flow in Power Automate, so it will create a SharePoint site automatically, when a user requests.
Create a Flow in Power Automate
Now we will create an Automated cloud flow in Power Automate, that will create 3 different types of SharePoint sites. These are:
- Communication site and the flow diagram
- Team site(group connected) and flow diagram
- Team site( not group connected)
Note:
In this flow when ever we will use the SharePoint action, the connection must be same as the Site owner of the creating SharePoint site. Let’s say if we are creating a Communication site, and our site owner is xyz@tenant.onmicrosoft.com, then connector id (xyz@ tenant.onmicrosoft.com) must be same in the choosen SharePoint actions.
Now, we will create a Flow, in 3 parts:
- For communication site
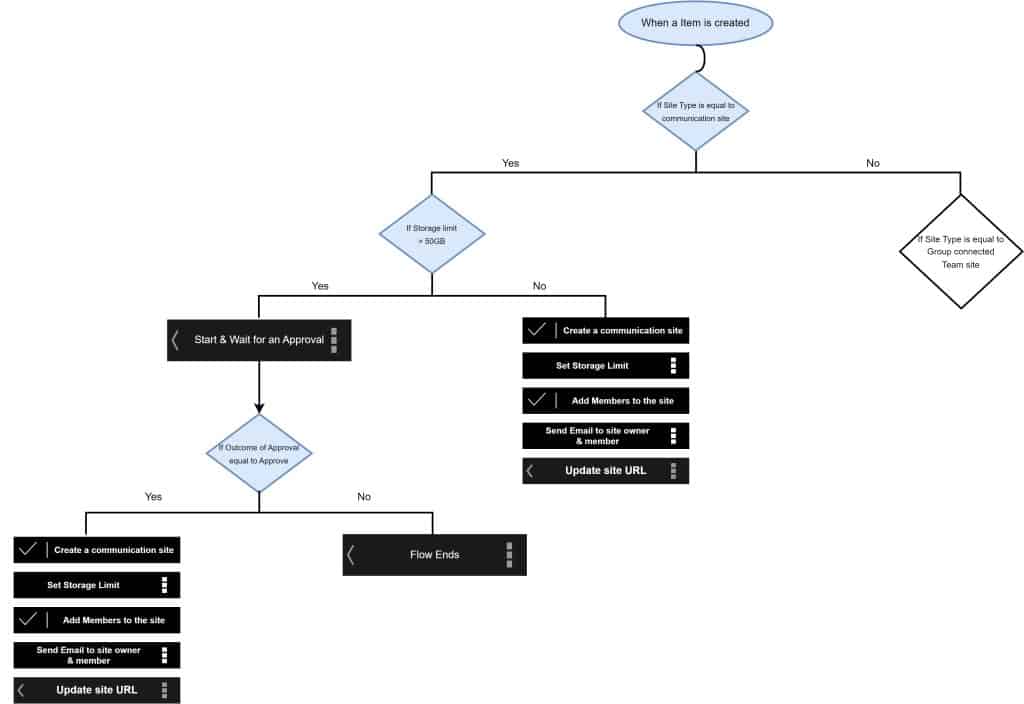
2. For group-connected Team site
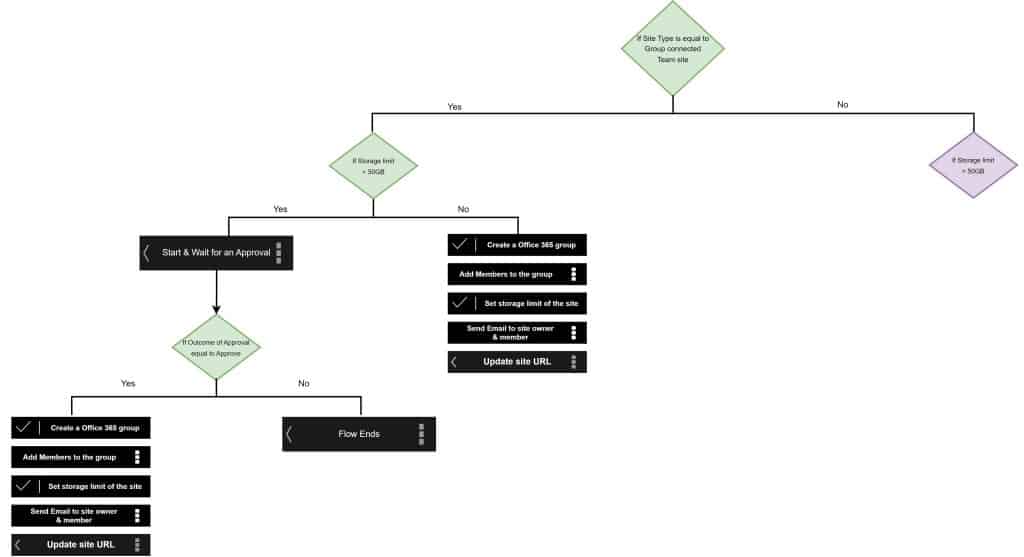
3. For not group connected Team site
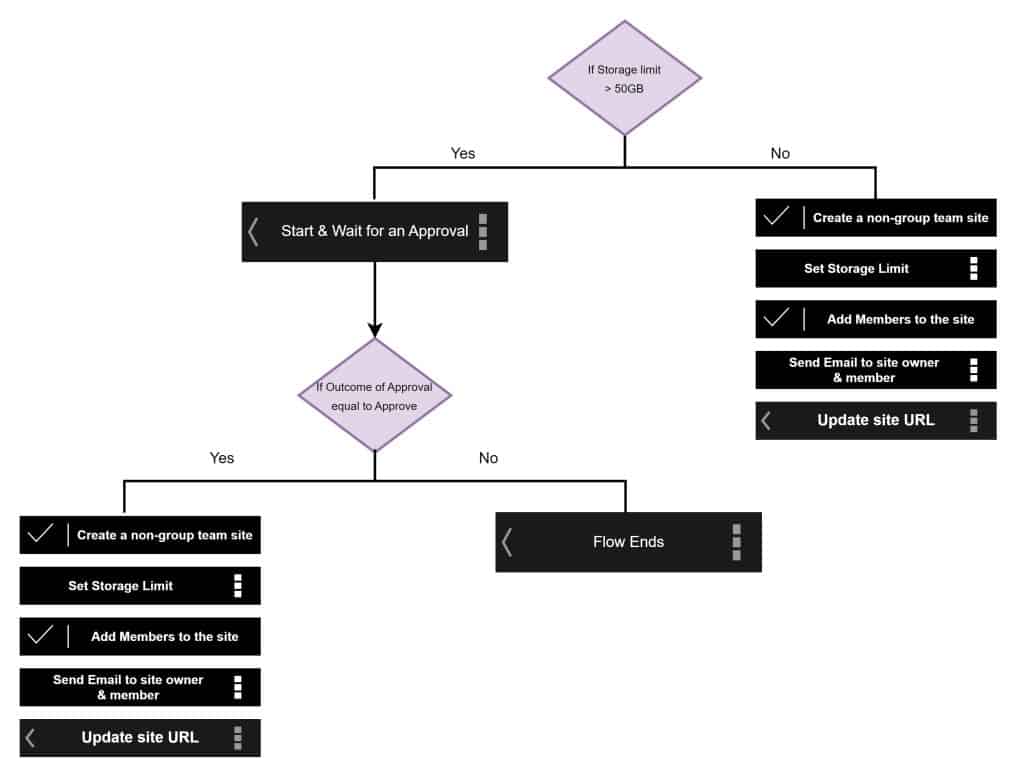
Let’s create the Flow in Power Automate by following the below steps:
Create a Flow in Power Automate
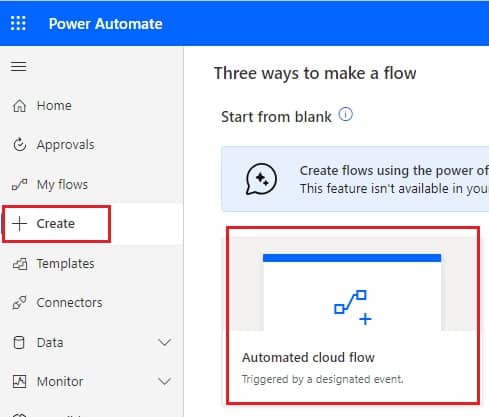
Step 1: Logged in to Power Automate, with your Microsoft credential, and then click on the +Create icon -> select Automated Cloud flow.
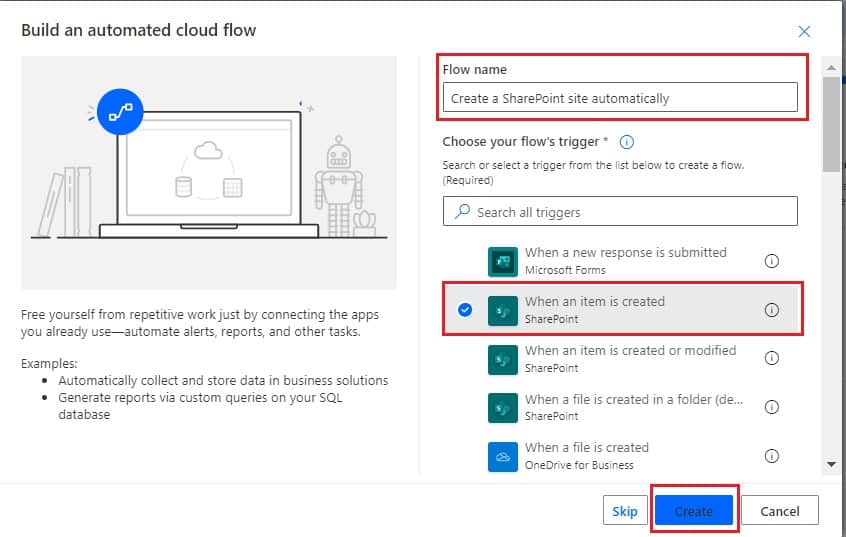
Then provide the flow name and select the trigger action as ‘When an item is created’-SharePoint.
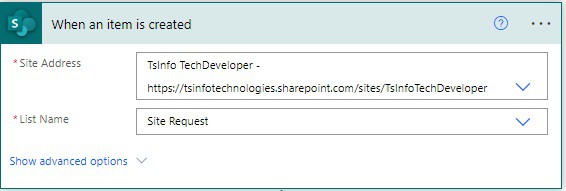
Now you can see ‘When an item is created’ is added to the Flow, then provide the below information:
- Site Address: Select the SharePoint site from the dropdown, where you have created the List.
- List name: Select the List from the dropdown.
Flow for a communication site
Here we will see how in a flow we can add an action that will create a communication site and add a storage limit and add members to the site.
Step 2: Add a condition, that will check the type of SharePoint site, here we are checking the Site type containing ‘Communication site’.
Check the Site type
So, click on +New step -> select the Condition– control action. Then provide the below information:
- Choose a value: Select the Site type (when an item is created) from the dynamic content.
- Operator: Choose ‘is equal to’ as the operator from the dropdown.
- Choose a value: Here provide the value as ‘Communication site’.

Now if the condition is true, we will add an action in the ‘If yes’ part that will create a communication site, ‘If no’ part of the condition we will check the Site type is ‘Team site- Group connected’, based on that we will build the if no part of the condition.
Check the Storage limit
Now, we will build the ‘If yes’ part of the condition, so in the if yes part click on Add an action and select a Condition action that will check whether the Storage limit is greater than 50GB or not. Then provide the below information:
- Choose a value: Select the ‘Maximum storage limit’ -SharePoint from the dynamic content.
- Operator: Choose an operator as ‘ is greater than’ from the dropdown
- Choose a value: Here we need to provide a 50 GB. As in Power Automate, we can use a megabyte, so the value will be ‘51200’.
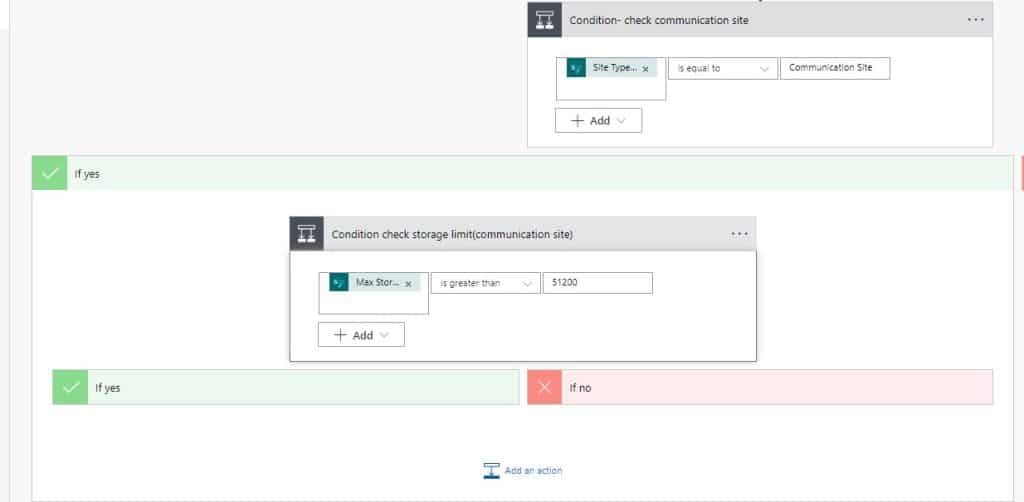
Now if the condition is true, then If the Yes part will run, that will send an approval notification to the ‘SharePoint Administrator, if they will approve then only we can create a SharePoint communication site, whose storage limit is greater than 50 GB.
If the storage limit is less than 50 GB then it will directly create a SharePoint Communication site and add storage limit as well as Member to the site. This functionality we will add If No part of the condition
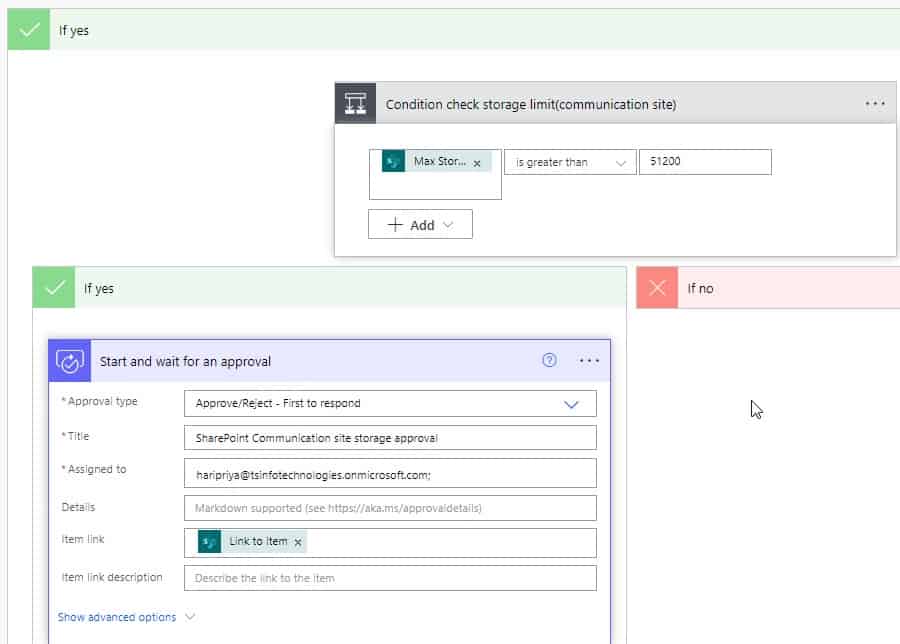
So, click on Add an action ->select Start and Wait for an Approval action, Then provide the below information:
- Approval type: Select the Approval type as ‘ Approve/Reject – First to respond’ from the dropdown.
- Title: Provide the Approval title
- Assigned to: Provide Assigned to email. You can see an example like below
- Item Link: Select ‘Link to item’ from the dynamic content.
Check the Approval outcome
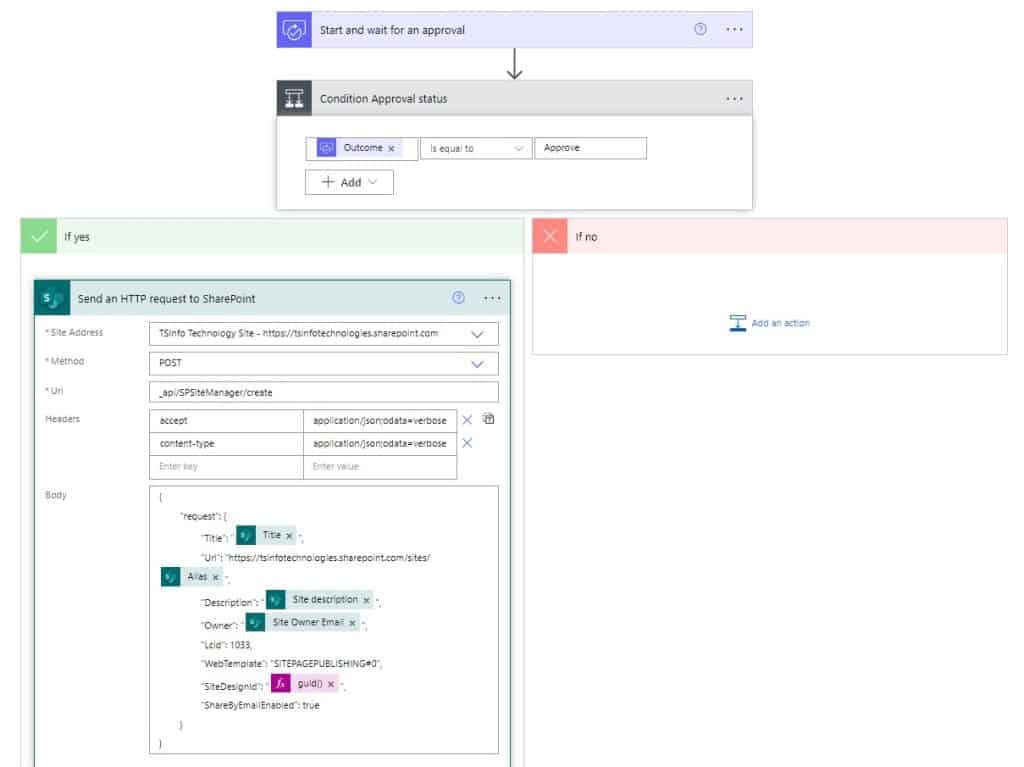
Now we will add another condition that will the outcome of Approval, if the outcome of Approval is Approved -> it will create the Communication site, Set the storage limit, and add members to the site.
So, click on Add an action -> select Condition action, and provide the below information.
- Choose a value: Select the ‘Outcome’ from the dynamic content.
- Operator: Choose an operator as ‘ is equal to’ from the dropdown.
- Choose a value: Here provide the value as ‘Approved’.
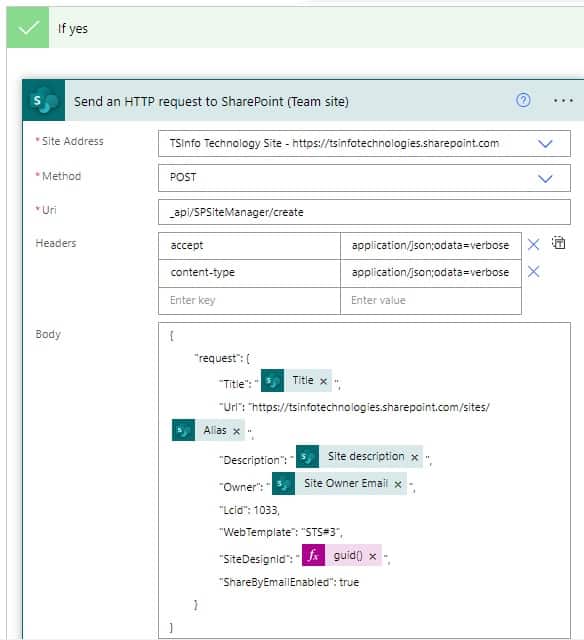
In the If Yes part of the condition, click on Add and action -> select ‘Send an HTTP request to SharePoint‘ action. Then provide the below information:
- Site address -provide the SharePoint tenant address
- Method– Select method as Post, we are creating the SharePoint communication site
- Uri -We provide the ‘/_api/SPSiteManager/create’ to call the SharePoint API endpoint.
- Headers: Provide the headers like below:
{
  "accept": "application/json;odata=verbose",
  "content-type": "application/json;odata=verbose"
}- Body: Provide the essential information below to create a SharePoint communication site.
{
	"request": {
		"Title": "@{triggerOutputs()?['body/Title']}",
		"Url": "https://tsinfotechnologies.sharepoint.com/sites/@{triggerOutputs()?['body/Alias']}",
		"Description": "@{triggerOutputs()?['body/Sitedescription']}",
		"Owner": "@{triggerOutputs()?['body/SiteOwner/Email']}",
		"Lcid": 1033,
		"WebTemplate": "SITEPAGEPUBLISHING#0",
		"SiteDesignId": "@{guid()}",
		"ShareByEmailEnabled": true
	}
} 
Now we have created the SharePoint Communication site, next, we will define the storage limit.
Set the Storage limit
To set the storage limit of the SharePoint site, we need the site URL and Site id.
For this, we will use the Parse json action, which will take the output of ‘ Send an HTTP request to SharePoint‘ parsed it and add it to the dynamic content.
So, click on the +New step -> select the Parse Json action, and then provide the below information.
- Content: Select the body(Send an HTTP request to SharePoint) from the dynamic content.
- Schema: To add the schema, just click on the ‘Generate from sample’, then add the below code and click on done. Now you can see the Schema
{
  "type": "object",
  "properties": {
    "d": {
      "type": "object",
      "properties": {
        "Create": {
          "type": "object",
          "properties": {
            "__metadata": {
              "type": "object",
              "properties": {
                "type": {
                  "type": "string"
                }
              }
            },
            "SiteId": {
              "type": "string"
            },
            "SiteStatus": {
              "type": "integer"
            },
            "SiteUrl": {
              "type": "string"
            }
          }
        }
      }
    }
  }
}
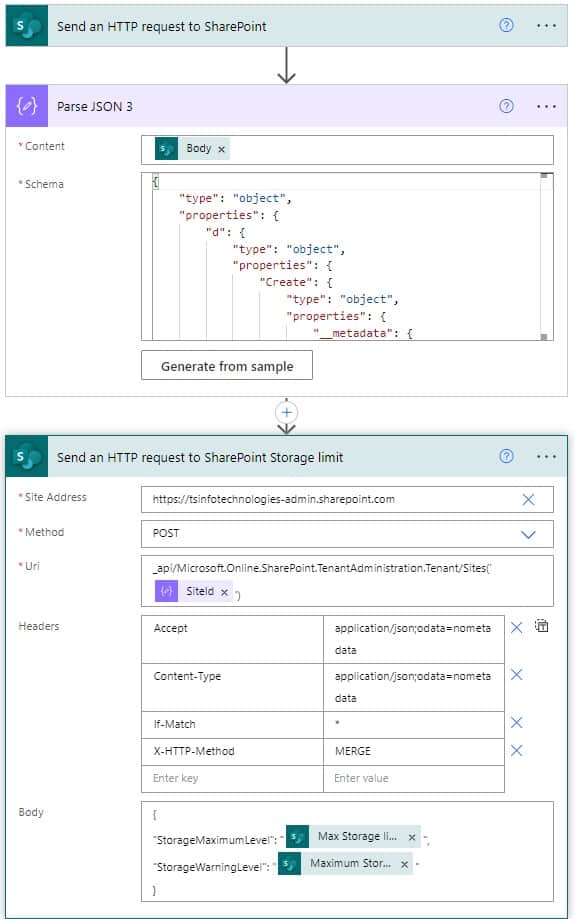
After that, we will set the storage limit using two parameters i.e. ‘ StorageMaximumLevel’ and ‘StorageWarningLevel’ using the SharePoint rest API call.
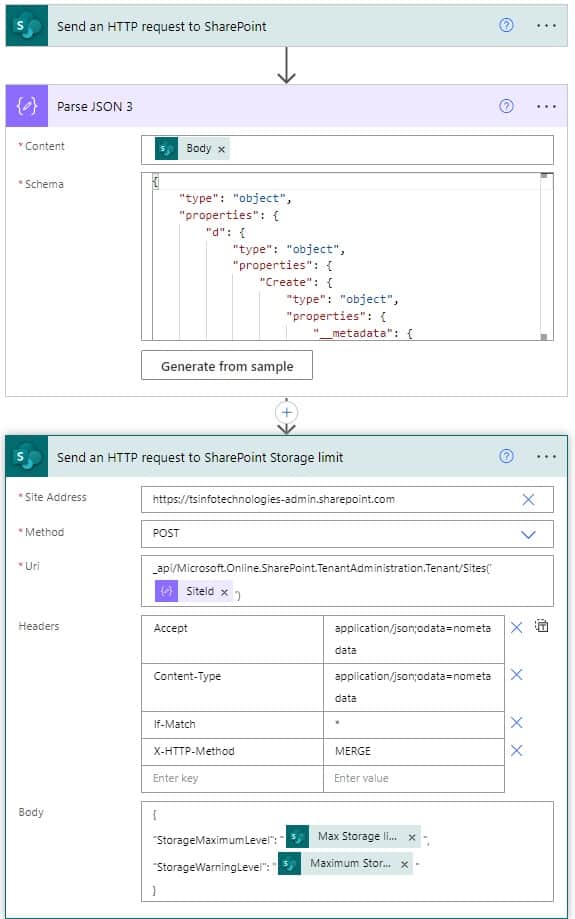
So, click on the +Add an action -> then select the ‘Send an HTTP request to SharePoint’ action, and provide the below information.
- Site Address: Select or provide the SharePoint Admin center address
- Method: Select POST, we are providing the storage limit.
- Uri: Provide the Uri as ‘_api/Microsoft.Online.SharePoint.TenantAdministration.Tenant/Sites(‘_api/Microsoft.Online.SharePoint.TenantAdministration.Tenant/Sites(‘@{body(‘Parse_JSON_3’)?[‘d’]?[‘Create’]?[‘SiteId’]}’)’)’, we are doing API calls to that site to set the storage limit of the site.
- Headers: Provide like the below code example (There are required while you are calling a rest API call)
{
  "Accept": "application/json;odata=nometadata",
  "Content-Type": "application/json;odata=nometadata",
  "If-Match": "*",
"X-HTTP-Method": "MERGE"- Body: Provide the below code example (There are required while you are calling a rest API call)to set the storage limit. Also, you can change the storage based on your requirement.
{
"StorageMaximumLevel": "@{triggerOutputs()?['body/MaxStoragelimit']}",
"StorageWarningLevel": "@{triggerOutputs()?['body/MaximumStorageWarningLimit']}"
}
As, we have set the Storage limit of the SharePoint Online Communication site, next we will add members to the Communication site.
Add a member to the SharePoint Communication site
To add members to the SharePoint Communication site, first, we will fetch the group id of the Communication site, and then by using that id we will add one member or multiple members to the Communication site.
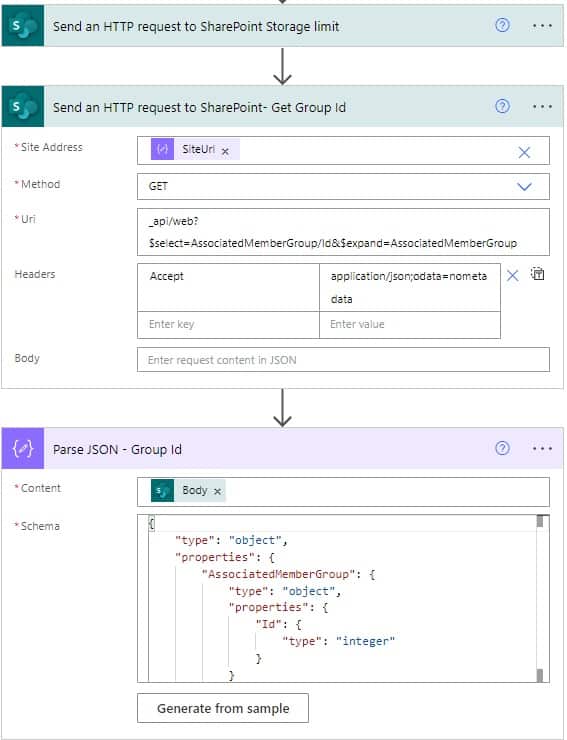
So, click on the + Add an action, then -> select ‘Send an HTTP request to SharePoint’, to get the group id.
Then provide the below information:
- Site Address: Select or provide the site address from the dynamic content
- Method: Select Get, we need to get the group id.
- Uri: Provide the Uri as ‘_api/web?$select=AssociatedMemberGroup/Id&$expand=AssociatedMemberGroup’, we are doing API calls to SharePoint to get the group id of the SharePoint site member group.
- Headers: Provide like the below code example (There are required while you are calling a rest API call)
{
  "Accept": "application/json;odata=nometadata"
}
Now we will use parse json to get the group id, so click on + Add an action -> select Parse json action -> then provide the below information:
- Content: Select the Body of the above action(Send an HTTP request to SharePoint) from the dynamic content
- Schema: To get schema, click on the ‘ Generate from sample’ and then provide the below code. You see the schema is auto-generated.
{
  "AssociatedMemberGroup": {
    "Id": 5
  }
}
Now we will add the member to the Share Point site, as we have the group id, so click on the +New step. Then select ‘Send an HTTP request to SharePoint’, action, and provide the below information.
- Site Address: Select the Site URL -Parse json from the dynamic content.
- Method: Select Post, we need to add the member to the SharePoint site.
- Uri: Provide the Uri as ‘/_api/web/sitegroups/getById(5)/users’, we are doing API calls to that site to add member to the SharePoint site.
- Headers: Provide like the below code example (There are required while you are calling a rest API call)
{
  "accept": "application/json;odata=verbose",
  "content-type": "application/json;odata=verbose"
}- Body: Provide the below code, where we have provided the member details to add it to the SharePoint Communication site.
{
    "__metadata": {
        "type": "SP.User"
    },
    "LoginName": "i:0#.f|membership|@{items('Apply_to_each-Member_id')?['Email']}"
}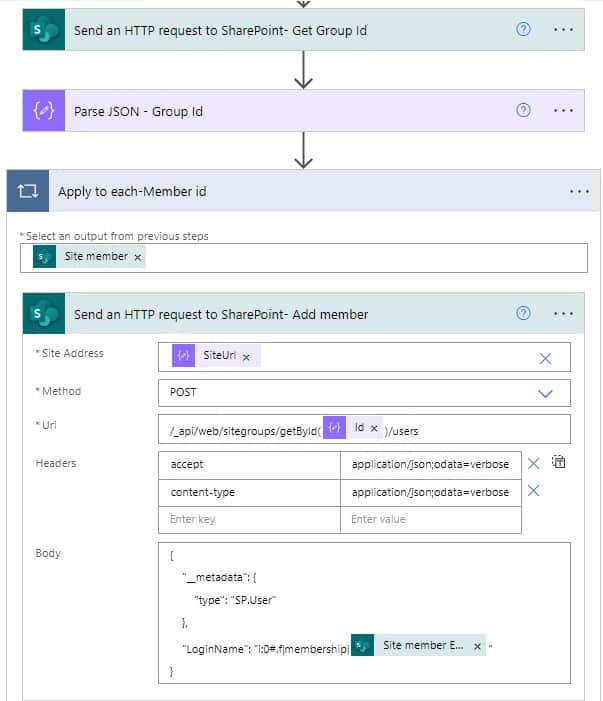
Once you select the ‘Site member’ email that will automatically add the ‘Apply to each‘ action because we are adding multiple members to the site.
Send an email to site owner and site member
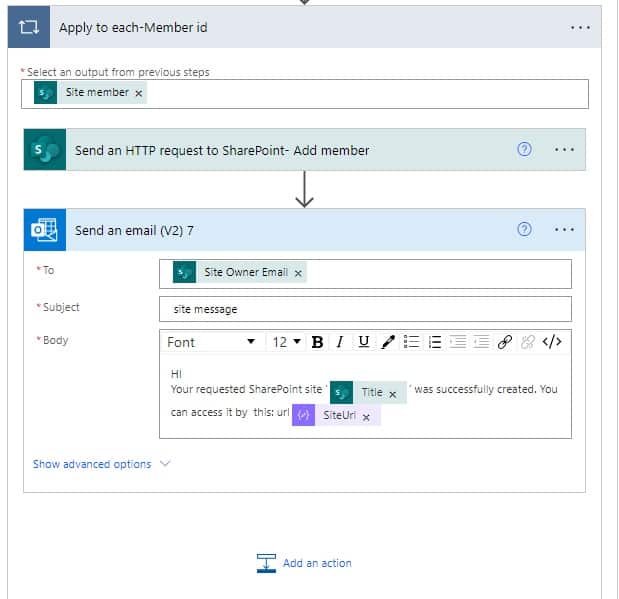
Next inside the Apply to each action click on ‘Add an action’ -> select ‘Send an Email(V2)’ action. Then provide the below information
- To -provide whom you want to send an email
- Subject– Provide the subject of an email
- Body– Provide the body of an email.
- cc– provide the site member as cc of an email
Now we will update the Site URL in the SharePoint list ‘ Site request’.
So, click on Add an action (outside the last Apply to each action) -> select Update item action. Then provide the below information.
- Site address: Provide the site address
- List name: provide the list name
- ID: provide the id value
- Title : provide the title value
- Max Storage limit: It is a mandatory column
- Site Url: Select the Site URL from the dynamic content
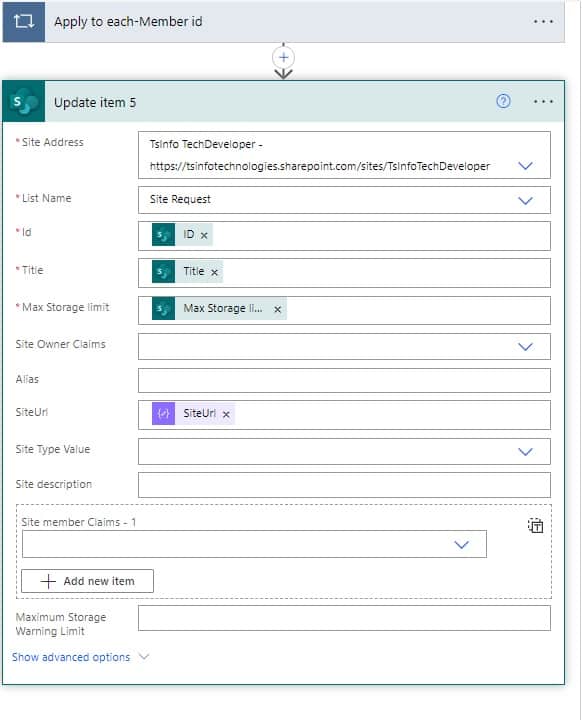
As of now, we have created a flow that will create a communication site, whose storage limit is greater than 50 GB and approved by Admin.
Similarly, you can create a communication site, set a storage limit and add members to the site, If no part of the condition (Storage limit ). This will work when the Storage limit is less than 50GB.
Now we will create 2nd part of the flow, where we will create a Team site (group connected).
Flow for a Team site(Group connected)
Here we will create a Group connected team site (office 365), where we will directly create an Office 365 group and add members to it. As we know when we create a group in Office 365 the SharePoint team site is associated with it. So we will get the Site URL -> by using site URL, we will get site id -> then we will set the storage limit.
Check the SIte type
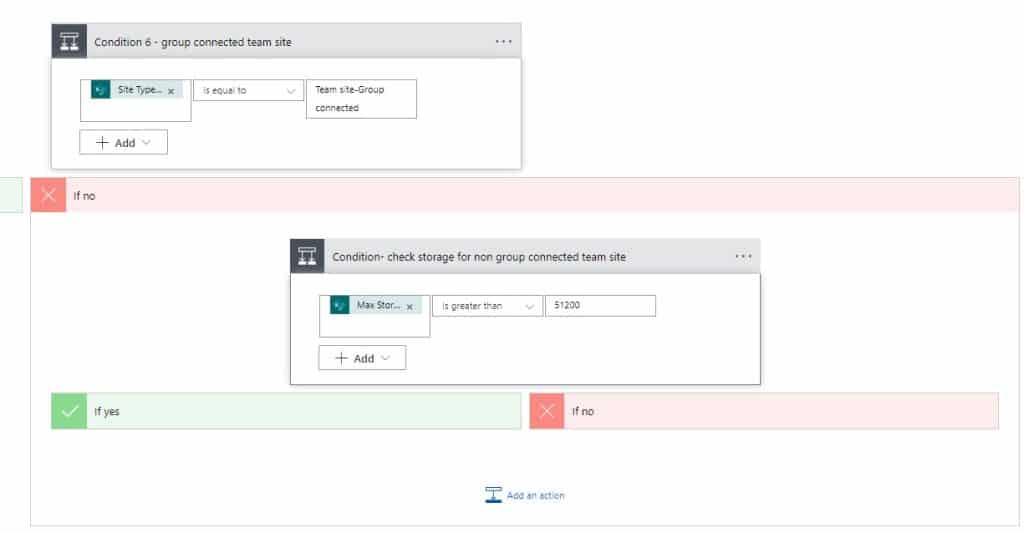
Step 3: We will add the condition in the If no part of the First part of the flow, where we check the Site type = Team site-Group connected.
If no part, click on Add an action, -> select Condition -> then provide the below information, so that we can check the site type.
- Choose a value: Select the ‘Site type’ from the dynamic content.
- Operator: Choose an operator as ‘ is equal to’ from the dropdown.
- Choose a value: Here provide the value as ‘Team site-Group connected’.
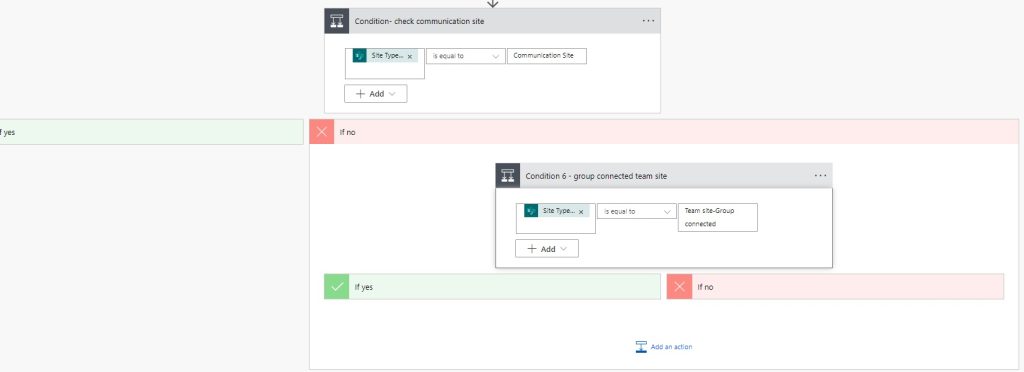
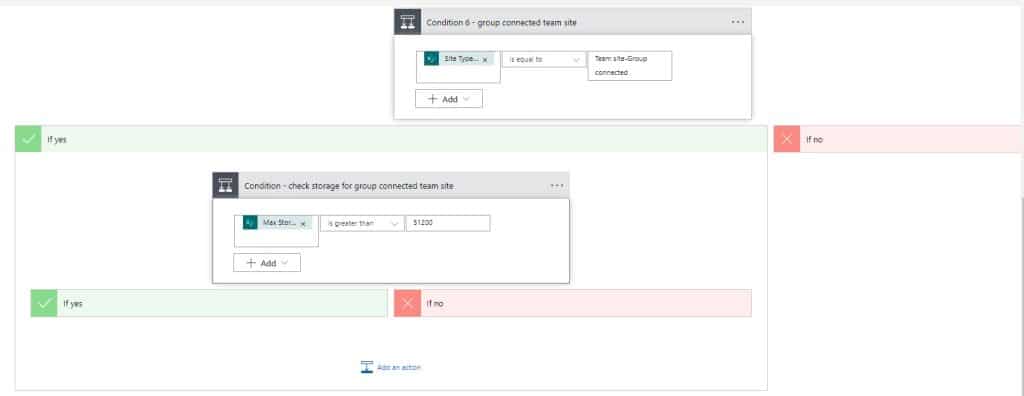
Next, we will check the storage limit is requested by the user. if the Storage limit is greater than 50 GB, then it will go for approval to Admin, if it is approved, then the SharePoint group connected team site gets created. If it is less than 50 GB then it will directly create a SharePoint site.
Check Storage limit
To check the Storage limit, in the If yes part, click on Add an action -> Select Condition action. Then provide the below information:
- Choose a value: Select the ‘Maximum storage limit’ -SharePoint from the dynamic content.
- Operator: Choose an operator as ‘ is greater than’ from the dropdown
- Choose a value: Here we need to provide a 50 GB. As in Power Automate, we can use a megabyte, so the value will be ‘51200’.
Add an approval, and check outcome of the approval
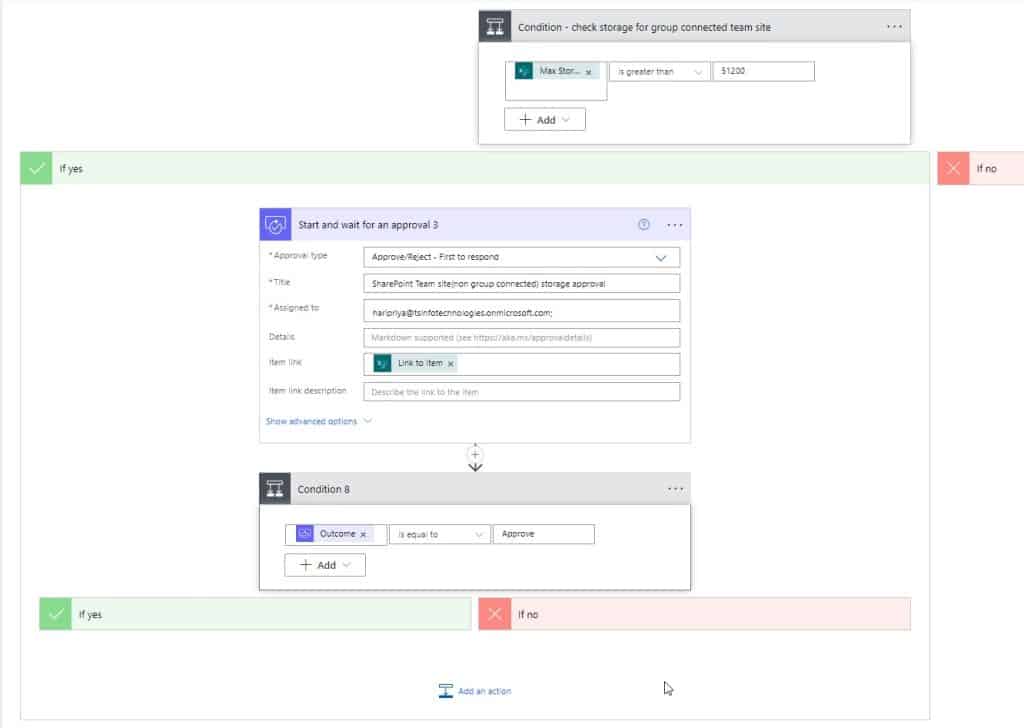
If the condition is true, then it will go for approval, so click on Add an action in If yes part of the Condition. Then select Start and Wait for an approval action, then provide the below information:
- Approval type: Select the Approval type as ‘ Approve/Reject – First to respond’ from the dropdown.
- Title: Provide the Approval title.
- Assigned to: Provide Assigned to email. You can refer to the example below.
- Item Link: Select ‘Link to item’ from the dynamic content.
Now we check the outcome of the Approval i.e. Approved or rejected. So, click on Add an action -> select Condition control. Then provide the below information:
- Choose a value: Select the ‘Outcome’ from the dynamic content.
- Operator: Choose an operator as ‘ is equal to’ from the dropdown
- Choose a value: Here we need to provide the value as Approved.
Create a Office 365 group
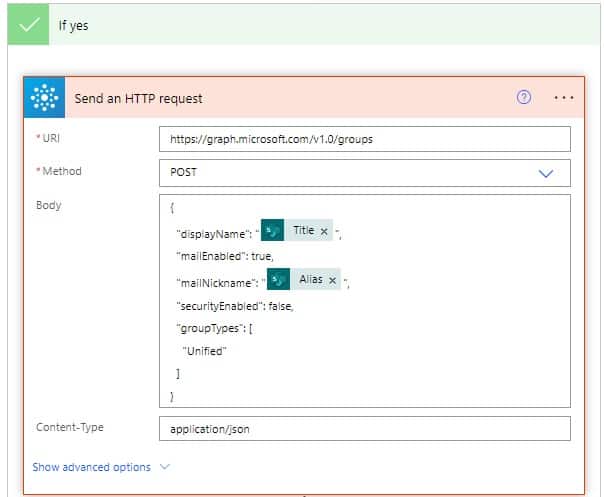
If the outcome is Approved, then we will create group connected team site in SharePoint. So, click on the Add an action in the ‘If yes’ part. Select ‘Send an HTTP request‘ -office 365 group action, then provide the below information:
- Uri: provide the API as ‘ https://graph.microsoft.com/v1.0/groups’, as we creating office 365 group using Graph api.
- Method: Select the POST, as we are creating the group
- Body: In body provide the json that contains information about group.
{
  "displayName": "@{triggerOutputs()?['body/Title']}",
  "mailEnabled": true,
  "mailNickname": "@{triggerOutputs()?['body/Alias']}",
  "securityEnabled": false,
  "groupTypes": [
    "Unified"
  ]
}- Content-Type: As it is required for API calls so, the content type will be ‘ application/JSON
Add members to the group
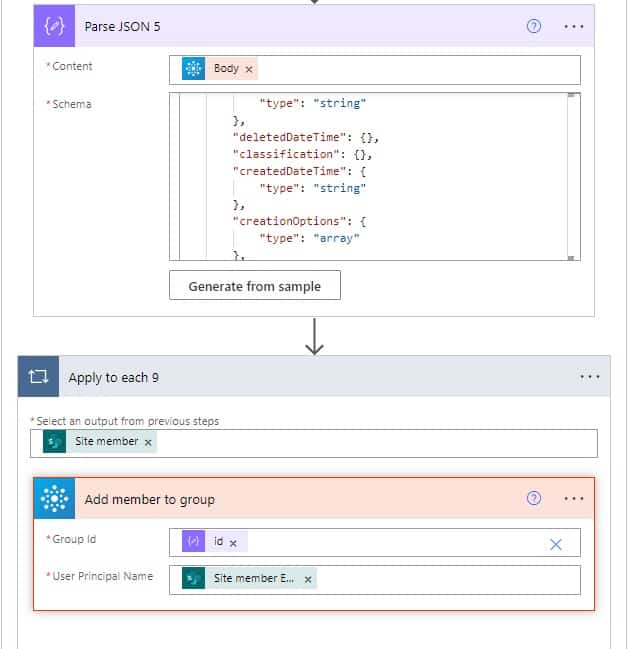
Once the group is created, we will parse json the output of ‘Send an HTTP request’, so click on Add an action -> Select parse json action. Then provide the below information:
- Content: Select the Body(parse json) from the dynamic content
- Schema: To add schema, click on ‘Generate from sample’, then add the output json code from the above HTTp request action. Then click on Done. You can see the generated schema.
{
  "@odata.context": "https://graph.microsoft.com/v1.0/$metadata#groups/$entity",
  "id": "730ef07c-65c6-4fa9-a4b1-326a5aacc0a7",
  "deletedDateTime": null,
  "classification": null,
  "createdDateTime": "2023-06-02T06:33:18Z",
  "creationOptions": [],
  "description": null,
  "displayName": "Sleepwell",
  "expirationDateTime": null,
  "groupTypes": [
    "Unified"
  ],
  "isAssignableToRole": null,
  "mail": "sleepwell@tsinfotechnologies.onmicrosoft.com",
  "mailEnabled": true,
  "mailNickname": "sleepwell",
  "membershipRule": null,
  "membershipRuleProcessingState": null,
  "onPremisesDomainName": null,
  "onPremisesLastSyncDateTime": null,
  "onPremisesNetBiosName": null,
  "onPremisesSamAccountName": null,
  "onPremisesSecurityIdentifier": null,
  "onPremisesSyncEnabled": null,
  "preferredDataLocation": null,
  "preferredLanguage": null,
  "proxyAddresses": [
    "SMTP:sleepwell@tsinfotechnologies.onmicrosoft.com"
  ],
  "renewedDateTime": "2023-06-02T06:33:18Z",
  "resourceBehaviorOptions": [],
  "resourceProvisioningOptions": [],
  "securityEnabled": false,
  "securityIdentifier": "S-1-12-1-1930358908-1336501702-1781707172-2814422106",
  "theme": null,
  "visibility": "Public",
  "onPremisesProvisioningErrors": []
}
Now we will add members to the group using the group id, so click on Add member to group– office 365 group action. Then provide the below information.
- Group id: Select id (parse json) from the dynamic content.
- User principal name: Select Site members from the dynamic content. That will automatically add Apply to each action.
It will take time to create an Office 365 group and add members to it, so, I have to delay the flow for 30 seconds. So, click on Add an action, select the Delay action, and provide the information below.
- Count: provide 30, as we are delaying the flow for 30 seconds.
- Unit: Select the unit as Seconds.

Get the site URL using group id
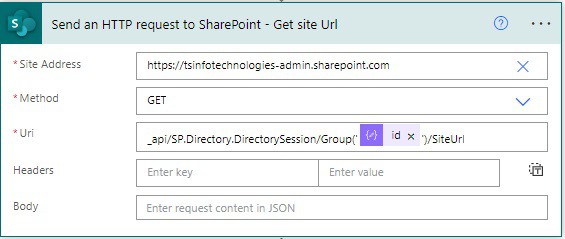
Now we will get the site URL by using the group id, so, click on the Add an action -> select Send an HTTP request to SharePoint action. Then provide the below information:
- Site address: Provide the SharePoint administrator URL address
- Method: Select the Get method, as we get the Site URL of the SharePoint site.
- Uri: Provide the API to get the Site URL ‘_api/SP.Directory.DirectorySession/Group(‘@{body(‘Parse_JSON_5’)?[‘id’]}’)/SiteUrl’, to get the site URL.
Set storage limit
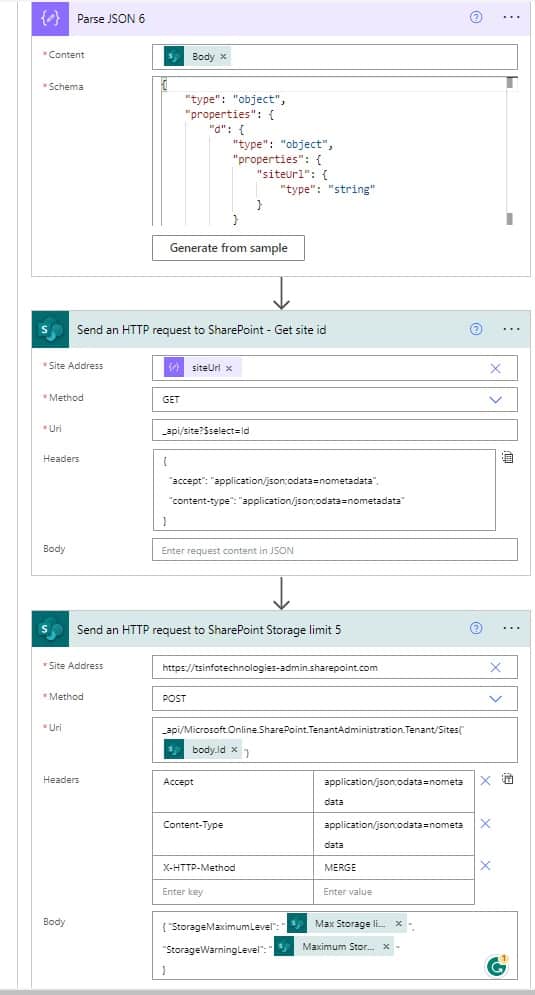
After that, we will parse above json output, to get the site URL, so click on the Add an action -> then select Parse json action. Provide the below information:
- Content: Select the Body from the dynamic content.
- Schema: To add the schema, click on ‘Generate from sample’, then add the output of the JSON.
{
  "d": {
    "siteUrl": "https://tsinfotechnologies.sharepoint.com/sites/sleepwell"
  }
}
Then, we will get the site id, so click on Add an action, then select ‘Send an HTTP request to SharePoint’. Then provide the below information
- Site address: Provide the SharePoint administrator URL address.
- Method: Select the Get method, as we get the Site URL of the SharePoint site.
- Uri: Provide the API ‘_api/site?$select=Id’ to get the Site URL
- Headers: Provide the header as shown below, as it is required for the rest API calls.
{
  "accept": "application/json;odata=nometadata",
  "content-type": "application/json;odata=nometadata"
}
Next, we will set the storage limit of the group connected team site. For this task, click on the Add an action, then select ‘Send an HTTP request to SharePoint‘. Then provide the following details:
- Site address: Provide the site URL from the dynamic content.
- Method: Select the POST method, as we will set the storage limit of the SharePoint site.
- Uri: Provide the API ‘api/Microsoft.Online.SharePoint.TenantAdministration.Tenant/Sites(‘@{outputs(‘Send_an_HTTP_request_to_SharePoint-_Get_site_id’)?[‘body’][‘Id’]}’)’ to set the storage limit.
- Headers: Provide the header as shown below, as it is required for the rest API calls.
{
  "Accept": "application/json;odata=nometadata",
  "Content-Type": "application/json;odata=nometadata",
  "X-HTTP-Method": "MERGE"
}
Body: Here we will provide the Storage Maximum Limit and Storage Warning Limit. The sample body related to this is shown below.
{
"StorageMaximumLevel": "@{triggerOutputs()?['body/MaxStoragelimit']}",
"StorageWarningLevel": "@{triggerOutputs()?['body/MaximumStorageWarningLimit']}"
}
With the above steps, we have successfully created a group-connected team site with a specified storage limit. Next, we will move to the step where an email will be sent to the Site Owner and Site Members.
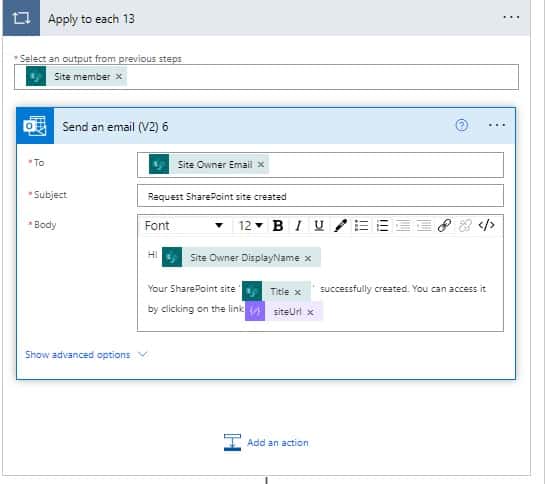
For this implementation, click on Add an action and then select Send an Email(V2). Then provide the below information:
- To -provide whom you want to send an email
- Subject– Provide the subject of an email
- Body– Provide the body of an email
- cc– Provide the site member as cc of an email. Then it will automatically add Apply to each action, as we are adding multiple members.
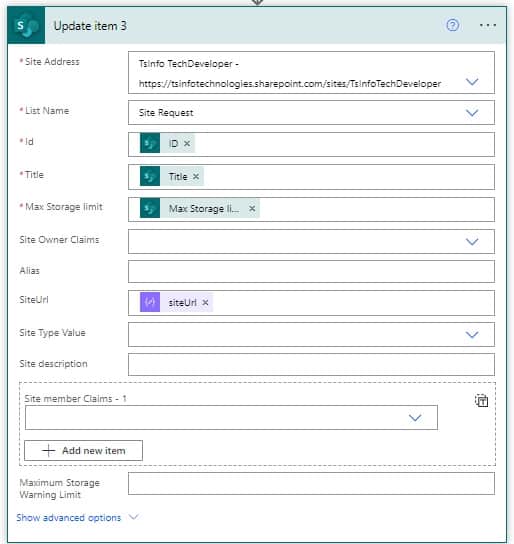
At last, we will update the site URL, in the SharePoint list. So, click on Add an action -> then select ‘Update item‘ action, then provide the below information:
- Site address: Provide the site address
- List Name: provide the list name
- ID: provide the id value
- Title: provide the title value
- Max Storage limit: It is a mandatory column
- Site Url: Select the Site URL from the dynamic content
Till now, we have seen how to create a group-connected team site based on the condition that the specified storage limit is greater than 50GB. And when the storage limit is greater than 50 GB, it will send an approval email as well.
Next, let us come to the condition when the specified storage limit is less than 50 GB. In this case, no approval email will be sent instead the group-connected team site will be created directly. So, for the implementation of this section, we can follow the same steps as discussed above.
Next, we will do the 3rd part of the flow i.e. we will create a Not group connected team site in SharePoint.
Create Not group connected Team site
Here we will not check the site type, as it is the last type, so, we will directly check the storage limit of the site.
Check the Storage limit
Step 4: Now, we will build the ‘If no’ part of part 2- check site type condition, so in the if no part click on Add an action and select a Condition action that will check whether the Storage limit is greater than 50GB or not. Then provide the below information:
- Choose a value: Select the ‘Maximum storage limit’ -SharePoint from the dynamic content.
- Operator: Choose an operator as ‘ is greater than’ from the dropdown
- Choose a value: Here we need to provide a 50 GB. As in Power Automate, we can use a megabyte, so the value will be ‘51200’.
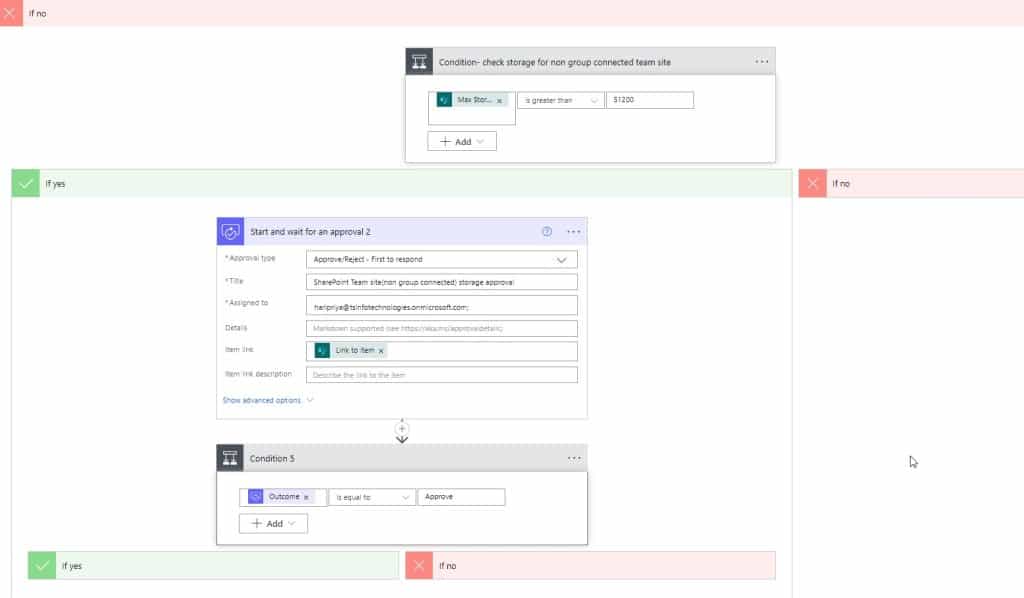
Now if the condition is true, then If the Yes part will run, that will send an approval notification to the ‘SharePoint Administrator, if they will approve then only we can create a SharePoint communication site, whose storage limit is greater than 50 GB.
If the storage limit is less than 50 GB then it will directly create a SharePoint Communication site and add storage limit as well as Member to the site. This functionality we will add If No part of the condition
So, click on Add an action ->select Start and Wait for an Approval action, Then provide the below information:
- Approval type: Select the Approval type as ‘ Approve/Reject – First to respond’ from the dropdown.
- Title: Provide the Approval title
- Assigned to: Provide Assigned to email. You can see an example like below
- Item Link: Select ‘Link to item’ from the dynamic content.
Check the Approval outcome
Now we will add another condition that will the outcome of Approval, if the outcome of Approval is Approved -> it will create the SharePoint Non grouped team site, Set the storage limit, and add members to the site.
So, click on Add an action -> select Condition action, and provide the below information.
- Choose a value: Select the ‘Outcome’ from the dynamic content.
- Operator: Choose an operator as ‘ is equal to’ from the dropdown.
- Choose a value: Here provide the value as ‘Approved’.
In the If Yes part of the condition, click on Add and action -> select ‘Send an HTTP request to SharePoint‘ action. Then provide the below information:
- Site address -provide the SharePoint tenant address
- Method– Select method as Post, we are creating the SharePoint Non grouped team site
- Uri -We provide the ‘/_api/SPSiteManager/create’ to call the SharePoint API endpoint.
- Headers: Provide the headers like below:
{
  "accept": "application/json;odata=verbose",
  "content-type": "application/json;odata=verbose"
}- Body: Provide the essential information below to create a SharePoint Non grouped team site
{
	"request": {
		"Title": "@{triggerOutputs()?['body/Title']}",
		"Url": "https://tsinfotechnologies.sharepoint.com/sites/@{triggerOutputs()?['body/Alias']}",
		"Description": "@{triggerOutputs()?['body/Sitedescription']}",
		"Owner": "@{triggerOutputs()?['body/SiteOwner/Email']}",
		"Lcid": 1033,
		"WebTemplate": "STS#3",
		"SiteDesignId": "@{guid()}",
		"ShareByEmailEnabled": true
	}
}
Now we have created the SharePoint Non grouped team site, next, we will define the storage limit.
Set the Storage limit
To set the storage limit of the SharePoint site, we need the site URL and Site id.
For this, we will use the Parse json action, which will take the output of ‘ Send an HTTP request to SharePoint‘ parse it and add it to the dynamic content.
So, click on the +New step -> select the Parse Json action, and then provide the below information.
- Content: Select the body(Send an HTTP request to SharePoint) from the dynamic content.
- Schema: To add the schema, just click on the ‘Generate from sample’, then add the below code and click on done. Now you can see the Schema
{
  "type": "object",
  "properties": {
    "d": {
      "type": "object",
      "properties": {
        "Create": {
          "type": "object",
          "properties": {
            "__metadata": {
              "type": "object",
              "properties": {
                "type": {
                  "type": "string"
                }
              }
            },
            "SiteId": {
              "type": "string"
            },
            "SiteStatus": {
              "type": "integer"
            },
            "SiteUrl": {
              "type": "string"
            }
          }
        }
      }
    }
  }
}
After that, we will set the storage limit using two parameters i.e. ‘ StorageMaximumLevel’ and ‘StorageWarningLevel’ in the SharePoint rest API call.
So, click on the +Add an action -> then select the ‘Send an HTTP request to SharePoint’ action, and provide the below information.
- Site Address: Select or provide the SharePoint Admin center address
- Method: Select POST, we are providing the storage limit.
- Uri: Provide the Uri as ‘_api/Microsoft.Online.SharePoint.TenantAdministration.Tenant/Sites(‘_api/Microsoft.Online.SharePoint.TenantAdministration.Tenant/Sites(‘@{body(‘Parse_JSON_3’)?[‘d’]?[‘Create’]?[‘SiteId’]}’)’)’, we are doing API calls to that site to set the storage limit of the site.
- Headers: Provide like the below code example (There are required while you are calling a rest API call)
{
  "Accept": "application/json;odata=nometadata",
  "Content-Type": "application/json;odata=nometadata",
  "If-Match": "*",
"X-HTTP-Method": "MERGE"- Body: Provide the below code example (There are required while you are calling a rest API call)to set the storage limit. Also, you can change the storage based on your requirement.
{
"StorageMaximumLevel": "@{triggerOutputs()?['body/MaxStoragelimit']}",
"StorageWarningLevel": "@{triggerOutputs()?['body/MaximumStorageWarningLimit']}"
}
As, we have set the Storage limit of the SharePoint Online Communication site, next we will add members to the Communication site.
Add a member to the SharePoint Non grouped team site
To add members to the SharePoint Non grouped team site first, we will fetch the group id of the Communication site, and then by using that id we will add one member or multiple members to the SharePoint Non grouped team site.
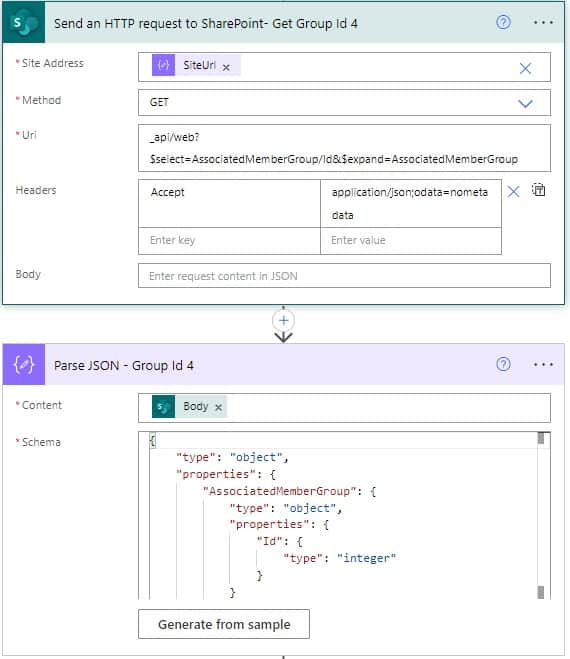
So, click on the + Add an action, then -> select ‘Send an HTTP request to SharePoint’, to get the group id.
Then provide the below information:
- Site Address: Select or provide the site address from the dynamic content
- Method: Select Get, we need to get the group id.
- Uri: Provide the Uri as ‘_api/web?$select=AssociatedMemberGroup/Id&$expand=AssociatedMemberGroup’, we are doing API calls to SharePoint to get the group id of the SharePoint site member group.
- Headers: Provide like the below code example (There are required while you are calling a rest API call)
{
  "Accept": "application/json;odata=nometadata"
}
Next, we will use parse json to get the group id, so click on + Add an action -> select Parse json action -> then provide the below information:
- Content: Select the Body of the above action(Send an HTTP request to SharePoint) from the dynamic content
- Schema: To get schema, click on the ‘ Generate from sample’ and then provide the below code. You see the schema is auto-generated.
{
  "AssociatedMemberGroup": {
    "Id": 5
  }
}
After that, we will add the member to the Share Point site, as we have the group id, so click on the +New step. Then select ‘Send an HTTP request to SharePoint’, action, and provide the below information.
- Site Address: Select the Site URL -Parse json from the dynamic content.
- Method: Select Post, we need to add the member to the SharePoint site.
- Uri: Provide the Uri as ‘/_api/web/sitegroups/getById(5)/users’, we are doing API calls to that site to add member to the SharePoint site.
- Headers: Provide like the below code example (There are required while you are calling a rest API call)
{
  "accept": "application/json;odata=verbose",
  "content-type": "application/json;odata=verbose"
}- Body: Provide the below code, where we have provided the member details to add it to the SharePoint Non grouped team site.
{
    "__metadata": {
        "type": "SP.User"
    },
    "LoginName": "i:0#.f|membership|@{items('Apply_to_each-Member_id')?['Email']}"
}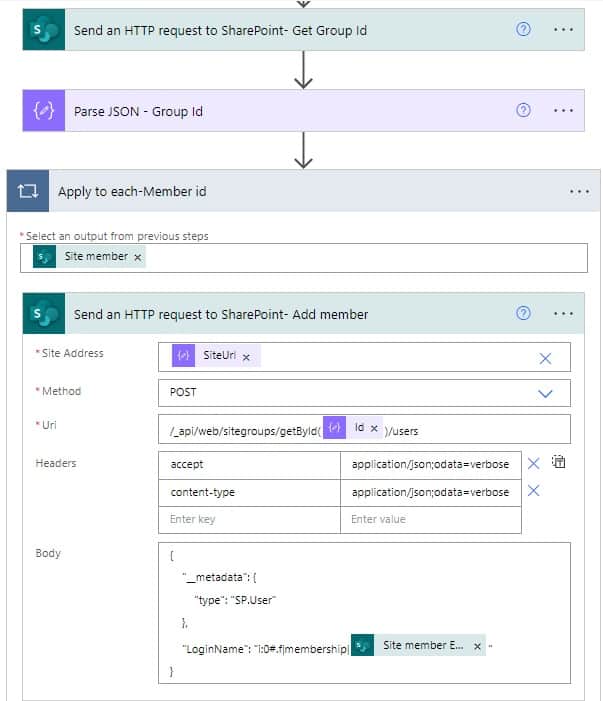
Once you select the ‘Site member’ email that will automatically add the ‘Apply to each‘ action because we are adding multiple members to the site.
Send an email to site owner and site member
Next inside the Apply to each action click on ‘Add an action’ -> select ‘Send an Email(V2)’ action. Then provide the below information
- To -provide whom you want to send an email
- Subject– Provide the subject of an email
- Body– Provide the body of an email.
- cc– provide the site member as cc of an email
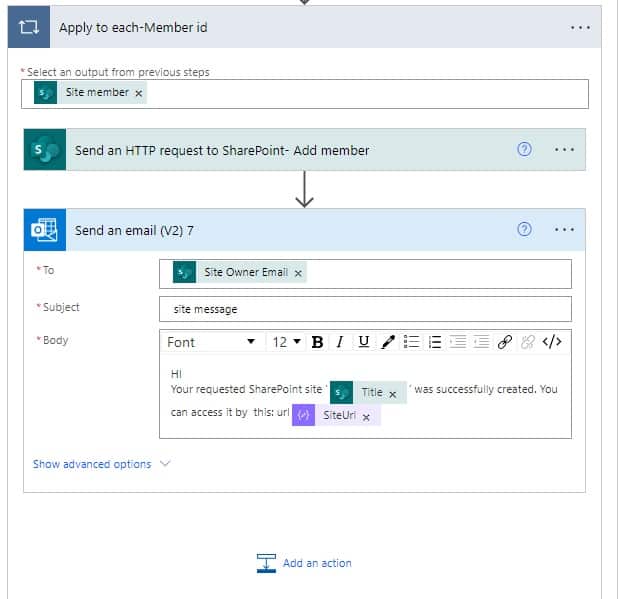
Now we will update the Site URL in the SharePoint list ‘ Site request’.
So, click on Add an action (outside the last Apply to each action) -> select Update item action. Then provide the below information.
- Site address: Provide the site address
- List name: provide the list name
- ID: provide the id value
- Title : provide the title value
- Max Storage limit: It is a mandatory column
- Site Url: Select the Site URL from the dynamic content
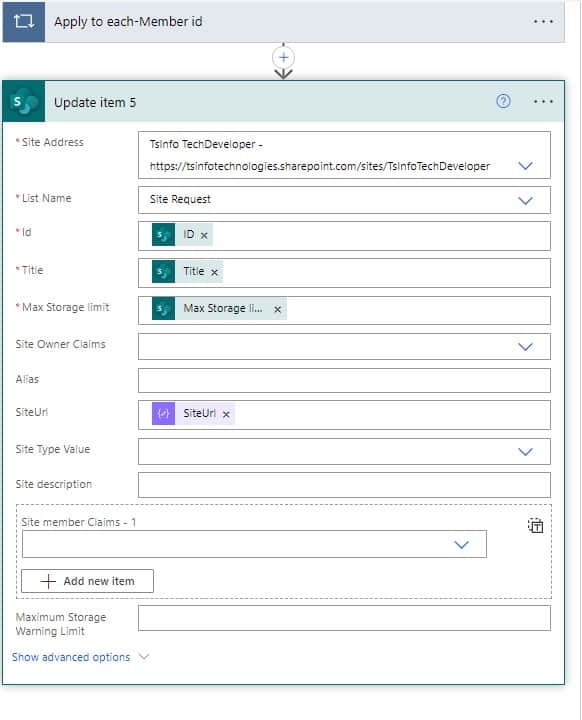
Till now, we have seen how to create a not group connected team site based on the condition that the specified storage limit is greater than 50GB. And when the storage limit is greater than 50 GB, it will send an approval email as well.
Next, let us come to the condition when the specified storage limit is less than 50 GB. In this case, no approval email will be sent instead the not group-connected team site will be created directly. So, for the implementation of this section, we can follow the same steps as discussed above.
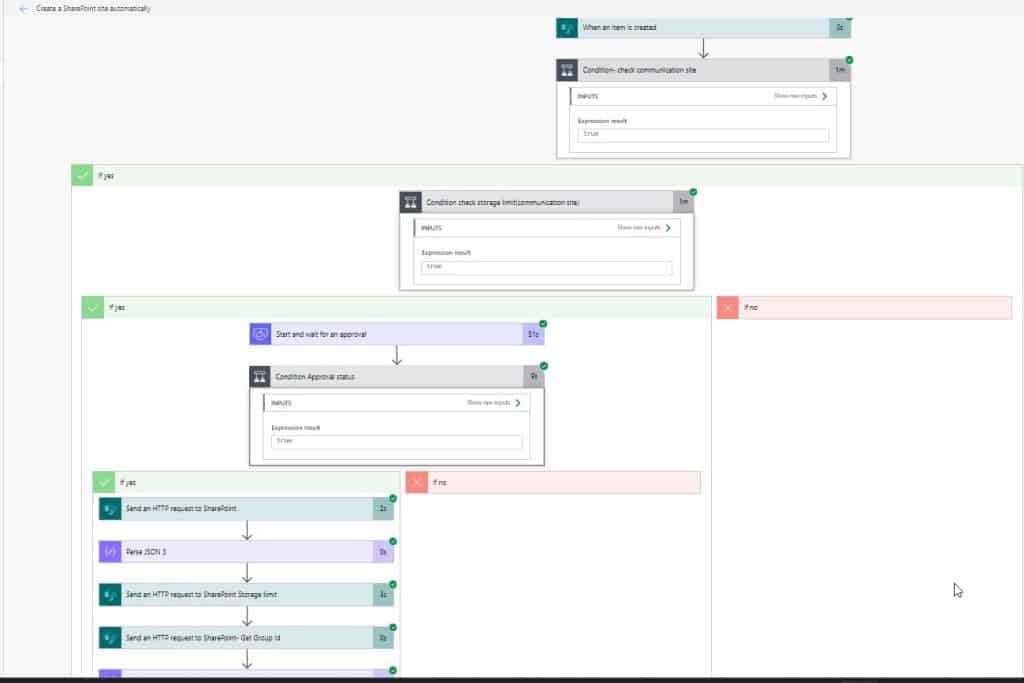
Now, our flow is ready to go, so we can test it by creating an item in the SharePoint list.
Run the Flow
To run the flow, click on Test -> then select the Manually -> click on the Test button. Now you will create an item in the SharePoint list ‘Site request’ the flow will trigger.
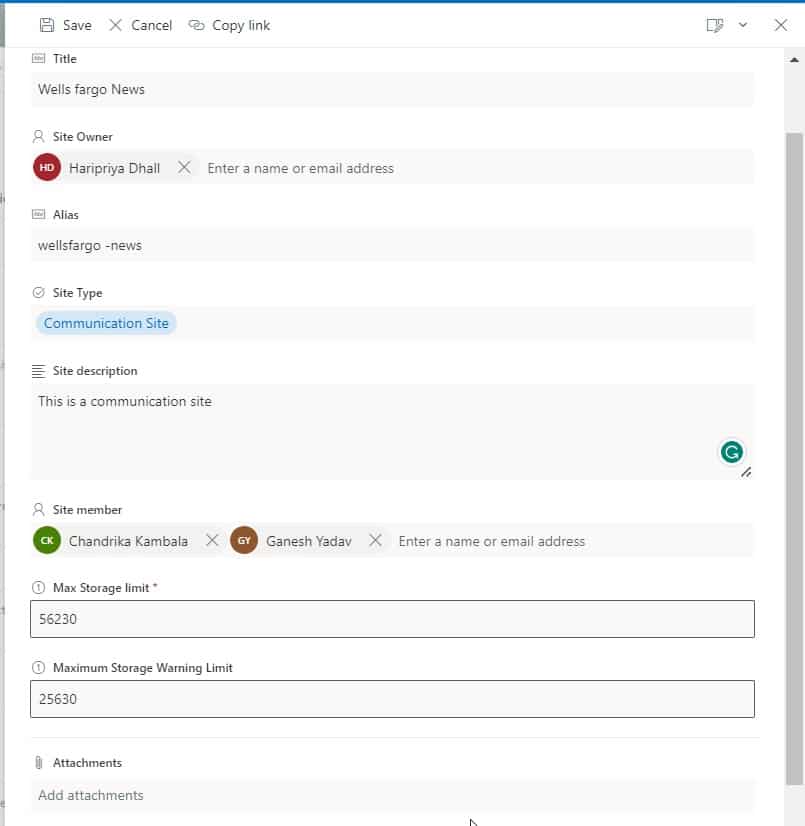
As you can see I have created a communication site, with having storage limit of more than 50 GB, so you will get approval on Outlook as well as the teams. So, once you approved, you can see flow ran successfully
Once you created the flow, you can check whether the site is created properly or not. For this navigate to the SharePoint admin center, search for the sites and check the Storage limit and members.
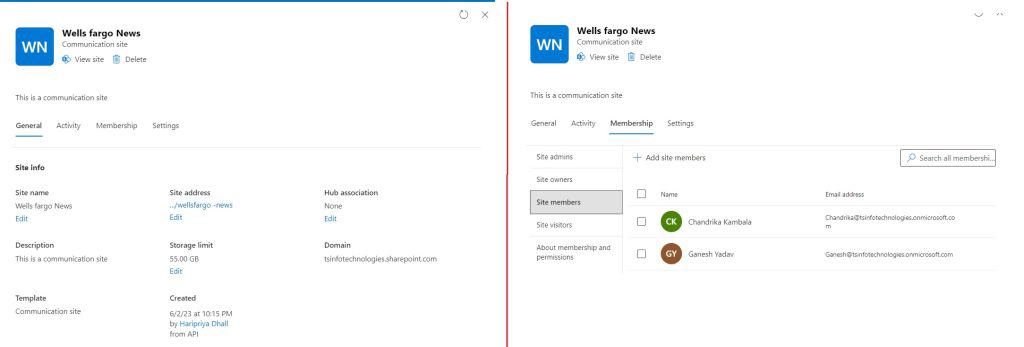
Similarly, you can check for other sites by adding an item to the list and choosing the required site type.
Additionally, you may like some more Power Platform articles and solutions:
- Create Multiple Tabs in Power Apps Form [Lead Management Apps Example]
- Power Apps CRUD Operations: Business Consultation App [Download Complete Package]
- Power Apps Modern Tab List Control [Everything in Detail]
- How to Filter Gallery by Current User in Power Apps
- How to Save Microsoft Forms Responses and Attachments to SharePoint Lists using Power Automate?
- How to merge pdf files in Power Automate?
- power automate copy data from Excel to Excel
Conclusion
In this Power Automate tutorial, we saw how we can create 3 different SharePoint sites i.e. communication sites, group-connected team sites, and non-group-connected team sites automatically using power automate.
Also, we saw how we can set the required storage limit of the site, and add members to the site.
I am Bijay a Microsoft MVP (10 times – My MVP Profile) in SharePoint and have more than 17 years of expertise in SharePoint Online Office 365, SharePoint subscription edition, and SharePoint 2019/2016/2013. Currently working in my own venture TSInfo Technologies a SharePoint development, consulting, and training company. I also run the popular SharePoint website EnjoySharePoint.com