In this Power Automate tutorial, we will see how to copy data from one Excel to another Excel in Power Automate automatically.
Here we will cover two examples to copy data from Excel to Excel using Power Automate.
- Copy data from one Excel to another
- Copy Excel data from two Excel files to another Excel file
Now, let’s discuss our first example ‘Copy data from one Excel to another’ using Power Automate.
How to Copy data from one Excel to another using Power Automate
Here we will see how to copy data from one Excel to another using Power Automate.
Now, we will create an Instant cloud flow that will copy Excel 2 to Excel 1 file from SharePoint Folder using Power Automate.

Let’s see how we can create an Instant cloud flow that will copy an Excel file to another Excel file.
Step 1: Log in to Power Automate, click on +Create, and select the Instant Cloud flow.

Now provide the flow name and select Manually trigger a flow action. Then click on Create.
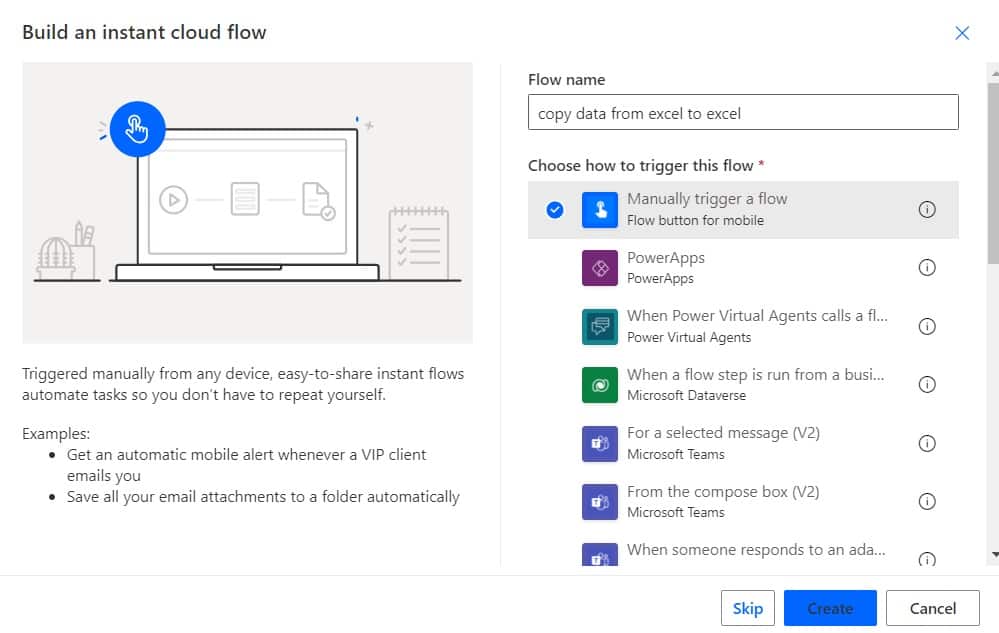
You can see a Manual trigger a flow action is added to the flow in Power Automate.

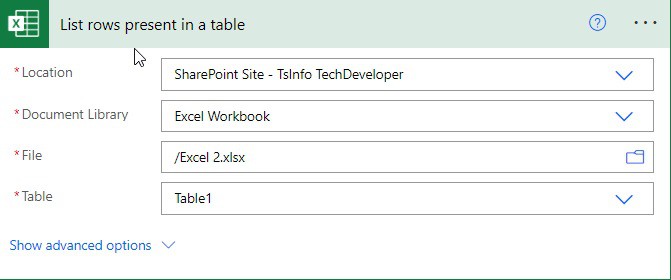
Step 2: Next, click on the +new step and then select List rows present in a table action. Then provide the below information:
- Location: Select or Provide the location of the Excel file.
- Document Library: Select the Document Library.
- File: Select the file. In this case Excel2.xlsx
- Table: Select the table of the Excel file.
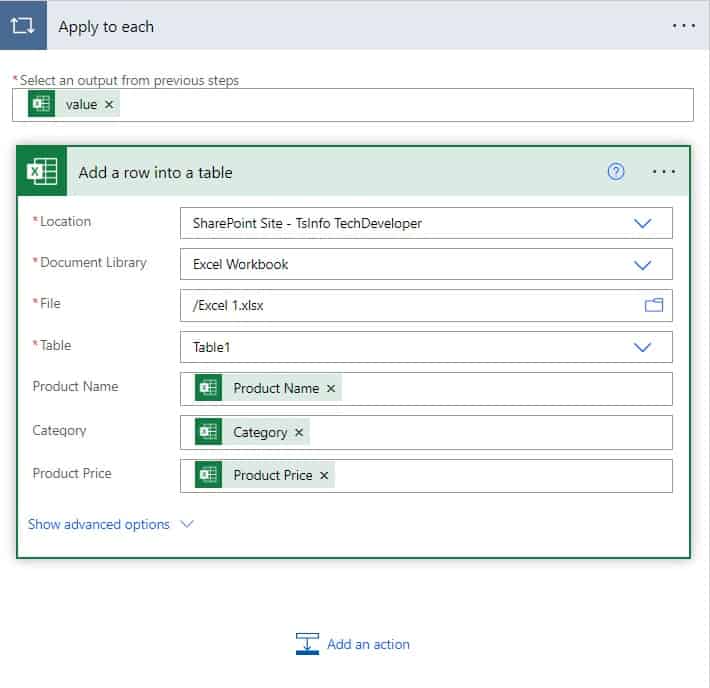
Step 3: Now we will add the row from Excel 2 file to Excel 1 file, so, click on the +New step -> select Add row into a table action. Then provide the below information:
- Location: Select or Provide the location of the Excel file.
- Document Library: Select the Document Library.
- File: Select the file. In this case Excel1.xlsx
- Table: Select the table of Excel file.
- Product name: Select the product name from the dynamic content
- Category: Select the Category from the dynamic content.
- Product Price: Select the product price from the dynamic content.
Step 4: To run the flow click on Test icon, click on the Test icon-> select Manually -> click on Test -> configure the action with connectors, then click on Run flow -> Then click on Done
Now you can see your flow ran successfully, and go to the SharePoint folder, and open the Excel 1 file. You can see the data from Excel 1 is copied to Excel 1.

Copy Excel data from two Excel files to another blank Excel file in Power Automate
Here we will see how to copy Excel data to another blank Excel file using Power Automate.
We will create a schedule flow in Power Automate that will run every Wednesday for a week. Every week on Wednesday it will extract all the data from Excel 1 , and Excel 3 -> also we will create a blank Excel sheet (Final Excel) using the Excel template.
Finally, in the final Excel, we will copy the data from Excel 1 and Excel 3.
Excel 1: Then excel 1 contains the below columns:
- Product name
- Category
- Product price

Excel 3: This Excel contains below columns:
- Product name
- Area
- Availability

Excel Template: This template contains below columns:
- Product name
- Category
- Product price
- Area
- Availability

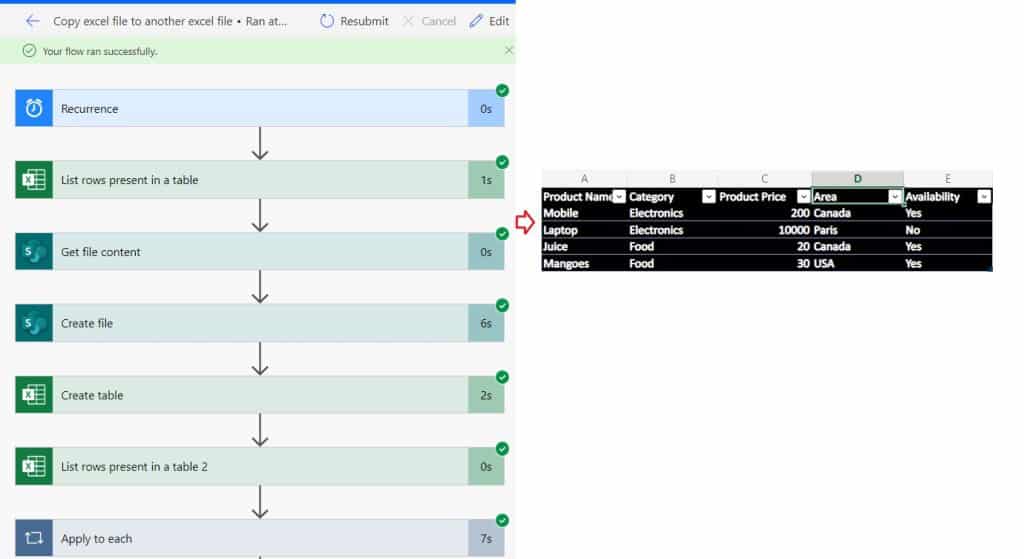
Here is how our Final Excel looks like

Let’s see how we can create the flow to copy data from Excel to blank Excel using Power Automate.
Step 1: Log in to Power Automate, click on +Create, and select the Schedule Cloud flow.
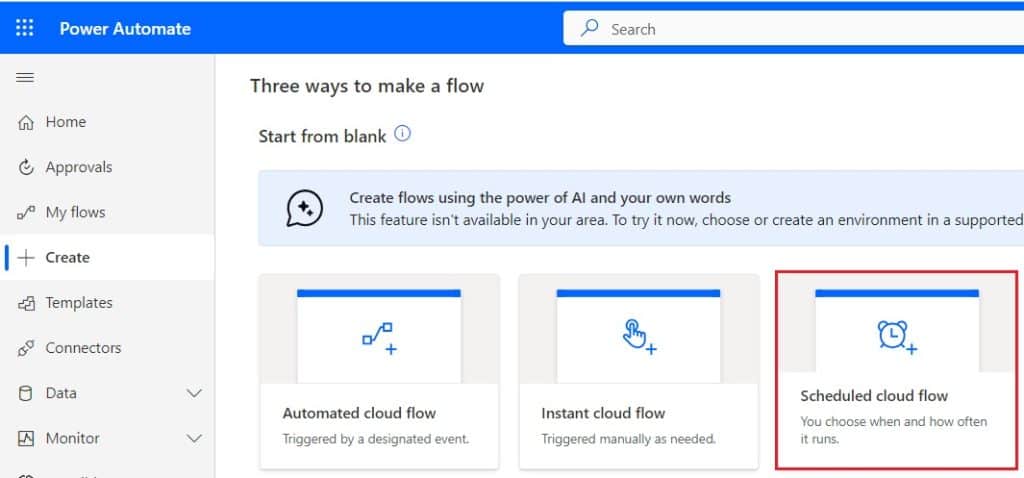
Now provide the flow name and select 1 and select week -> select time -> lastly select any day from a week (I choose Wednesday). Then click on Create.
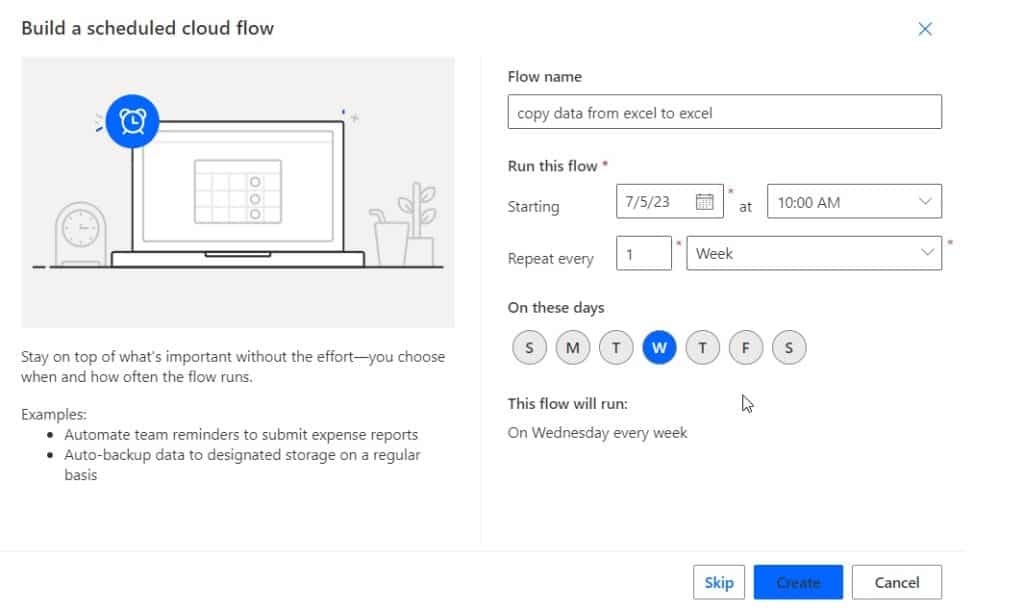
Now you can see the Schedule flow trigger i.e. Reccurence is added to the flow page.

Step 2: Get the rows from Excel 1, so click on the +New step and select the ‘List rows present in a table‘ action. Then provide the below information:
- Location: Select or Provide the Location of the Excel file
- Document Library: Select or provide the Document Library
- File: select the Excel file
- Table: Select the Table of Excel
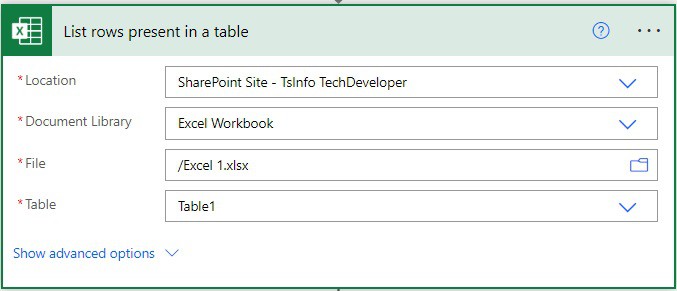
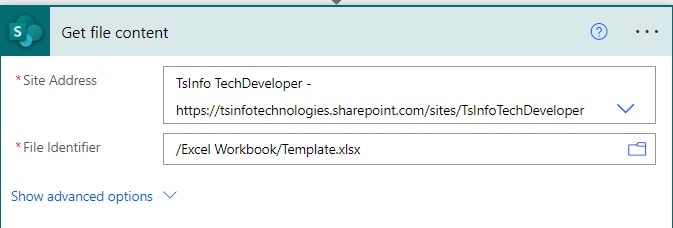
Step 3: Now we will get the File content of the Template Excel file, so click on the + New step -> select Get file content action. Then provide the below information:
- Site address: Select or Provide the SharePoint site address.
- File Identifier: Select the path of your template file.
Step 4: Now we will create a New blank Excel file, so, click on the +New step -> select Create File action. Then provide the below information:
- Site address: Select or provide the site address
- Folder path: select or provide the folder path.
- File name: Select or provide the file name.
- File content: select or provide the file content.

Step 5: We will create the table in the new Excel file i.e. Final Excel file. So, click on the +New step -> select Create Table action, then provide the below information:
- Location: Select or provide the Location of Excel.
- Document Library: Select the Document Library where the Excel file is present.
- File: Select the Excel file below.
- Table range: Select the table range like below.
- Column names: provide the column names with commas separated.

Step 6: Then click on Add an action -> select ‘List rows present in a table action. Then provide the below information:
- Location: Select or Provide the Location of the Excel file
- Document Library: Select or provide the Document Library
- File: select the Excel file
- Table: Select the Table of Excel
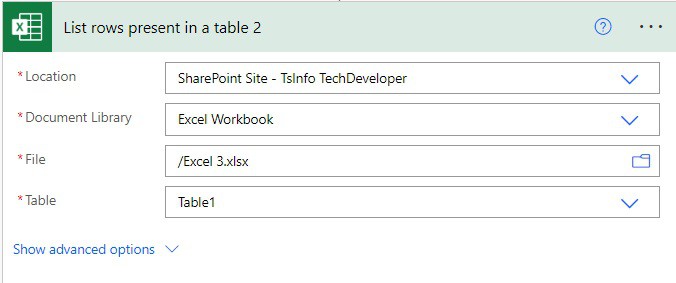
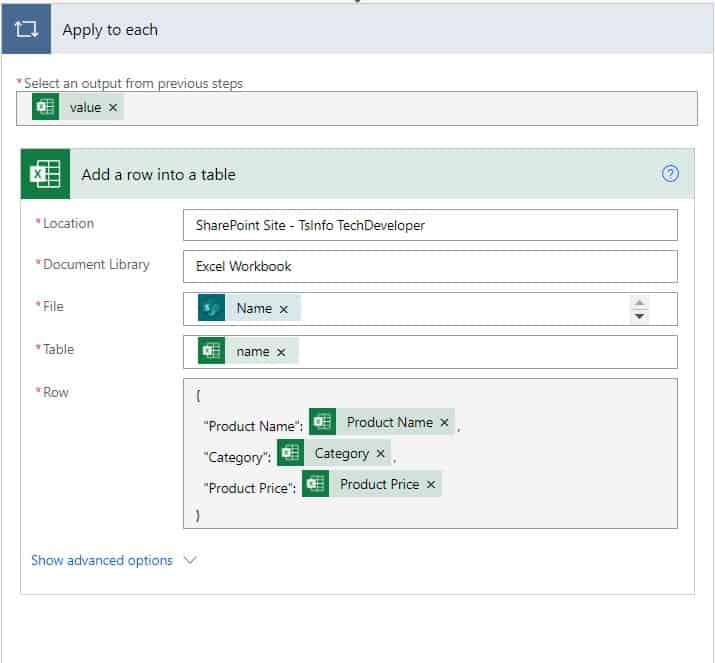
Step 7: Next we will copy the data from Excel 1 to the Final Excel file. So, click on the +New step -> select ‘Apply to each action. Then provide the below information:
- Select an output from previous steps: Select the value -List rows present in a table, from dynamic content.
In this Apply to each action, click on Add an action -> select Add a row into a table action. Then provide the below information:
- Location: Select or Provide the location from dynamic content.
- Document library: Select the Document library from the dynamic content
- File: Select or Provide the file.
- Table: Select or provide the table
- Row: Provide the below code:
{
  "Product Name": @{items('Apply_to_each_2')?['Product Name']},
  "Category": @{items('Apply_to_each')?['Category']},
  "Product Price": @{items('Apply_to_each')?['Product Price']},
}
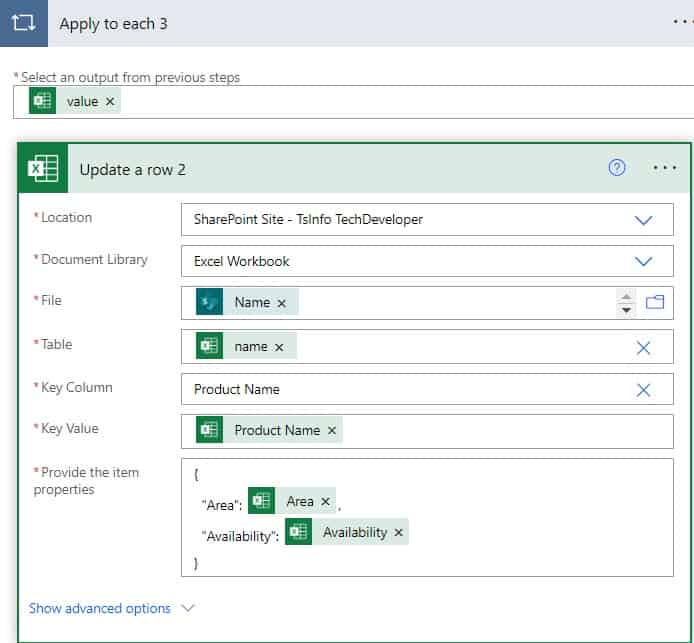
Step 8: Next we will copy Excel 3 to the Final Excel file, so click on the +New step -> select Apply to each action. Then provide the below information:
- Select an output from previous steps: Provide the value of List rows present in a table for Excel file 3.
Then click on Add an action-> select Update a row action. Then provide the below information:
- Location: Provide the location of the Final excel file
- Document Library: Select or provide the document library
- File: Select the File
- Table: Provide the table name from dynamic content.
- Key Column: Write the Key Column as Product Name (Unique Id)
- Key Value: Select the value as a Product name from dynamic content.
- Provide the item properties: Provide the below code:
{
  "Area": @{items('Apply_to_each_3')?['Area']},
  "Availability": @{items('Apply_to_each_3')?['Availability']}
}
Step 9: To test the flow click on the Test icon -> select Manually -> click on the Test button -> configure the action with connectors, then click on Run flow -> Then click on Done.
Now you can see your flow ran successfully. Also, you can see the Excel 1 and Excel 3 data is successfully copied to the final Excel file.
Conclusion
In this Power Automate tutorial, we saw how to copy data from an Excel file to an Excel file using Power Automate. Also, we saw how to copy data Excel file to another new Excel file in Power Automate.
You may also like:
- Create SharePoint List Views using Power Automate
- Apply Filter Between Dates in Power Automate
- Create SharePoint Group using Power Automate
- Create Calendar Events from a SharePoint list using Power Automate
- How to send email from excel using Power automate?
- Update SharePoint List from Excel using Power Automate
I am Bijay a Microsoft MVP (10 times – My MVP Profile) in SharePoint and have more than 17 years of expertise in SharePoint Online Office 365, SharePoint subscription edition, and SharePoint 2019/2016/2013. Currently working in my own venture TSInfo Technologies a SharePoint development, consulting, and training company. I also run the popular SharePoint website EnjoySharePoint.com