In this Power Automate tutorial, we will see how to create a SharePoint list and columns from Excel using Power Automate.
We got a requirement to create a SharePoint list and multiple data type columns using Power Automate. In this requirement, we will create an Instant cloud flow to do such tasks to fulfill the requirements.
- Get the Excel data to create different types of columns using the ‘List rows present in a table’ operation.
- Create a Sharepoint list, if not exists. If exists delete the old list and create a new SharePoint list.
- Then we will use the parse Json operation, in which we pass the output of the ‘List rows present in a table’ operation to get the values that we can use from the dynamic content.
- Then we will check the column whether is required or not. And then we will use it while creating the column in the SharePoint list.
- Then based on the data type we will create columns in the Sharepoint list. For this we will use ‘Apply to each operation’, here we will pass the body of the parse JSON to get the values in the dynamic content, which we can easily use. This solution supports the below data type:
- Single line of text
- Choice
- Number
- Person
- DateTime
- Yes/No
- Hyperlink
- In the case of the choice data type, we will store the options in a variable and then transform the string into an array. And we’ll use this array to create a choice column in the SharePoint list.
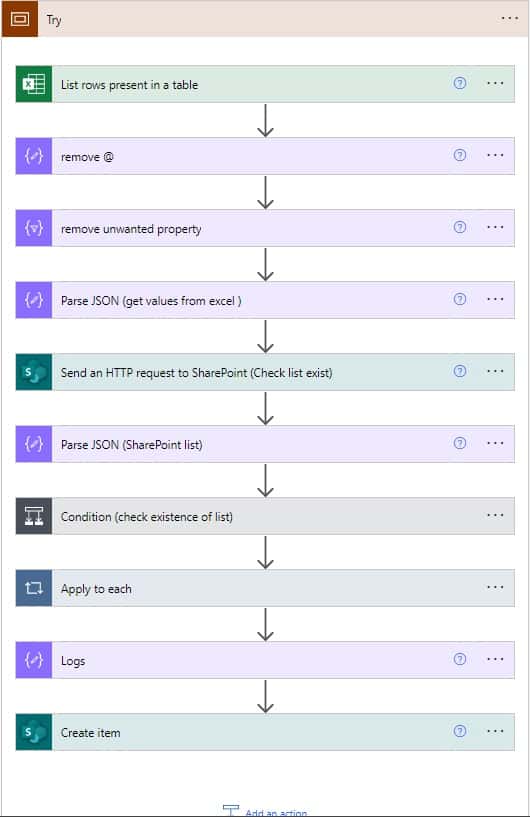
- To tackle the error in the action we have created two scopes i.e. try and catch. In the try scope, we have added all the functionality to create a Sharepoint list and columns. In the catch scope, we have used the ‘configure run after‘, functionality, which will run the catch scope, if the Try scope is failed, timed out, and skipped.
- In case there is any error in the Try scope, you will get notified in Outlook with error details i.e. Action, status, and error message. This functionality is added to the Catch scope.
- Also to track whether the column is created or not, we have added the logging functionality. If the column is created successfully we will store the success message in the Sharepoint list.
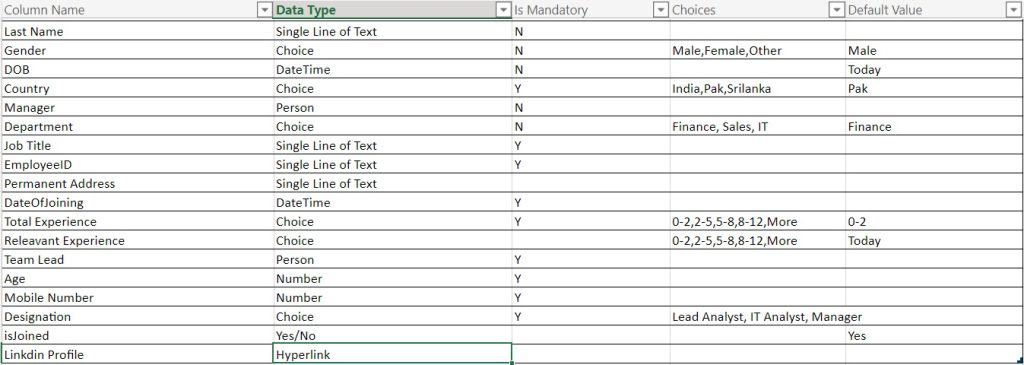
Here you can see the Excel sheet, which we used while creating the solution. Then excel sheet contains the below columns.
- Column Name
- Data Type
- Is Mandatory
- Choices
- Default value
Now let’s create the Sharepoint list and columns using Power Automate. The flow will look like the below.
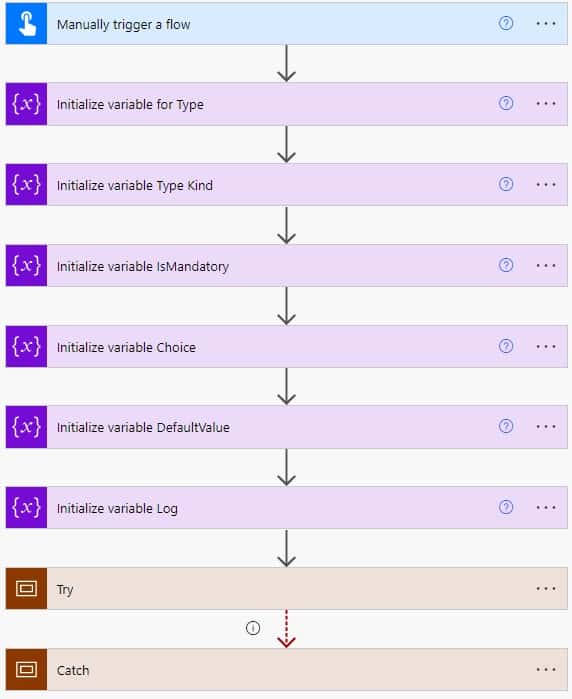
Create SharePoint List and Columns from Excel Using Power Automate
Here we will see how to create a SharePoint list with multiple types of columns automatically using Power Automate.
Follow the below steps to create the Flow in Power Automate or Microsoft Flow.
Create an Instant Cloud Flow
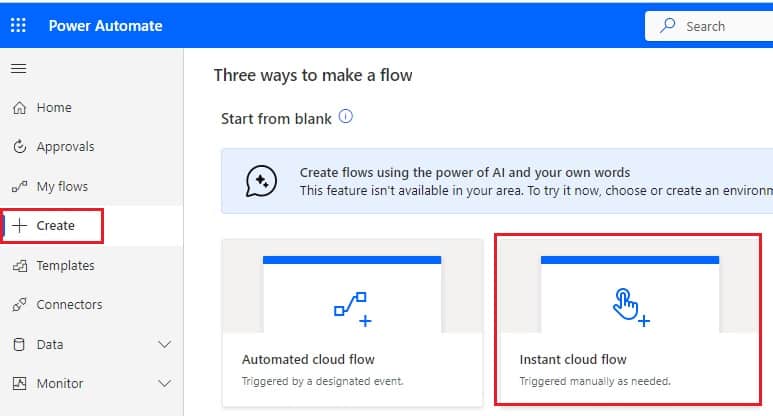
Step 1: Logged in to Power Automate with your Microsoft credential, and click on +Create to create the flow. Then select Instant cloud flow.
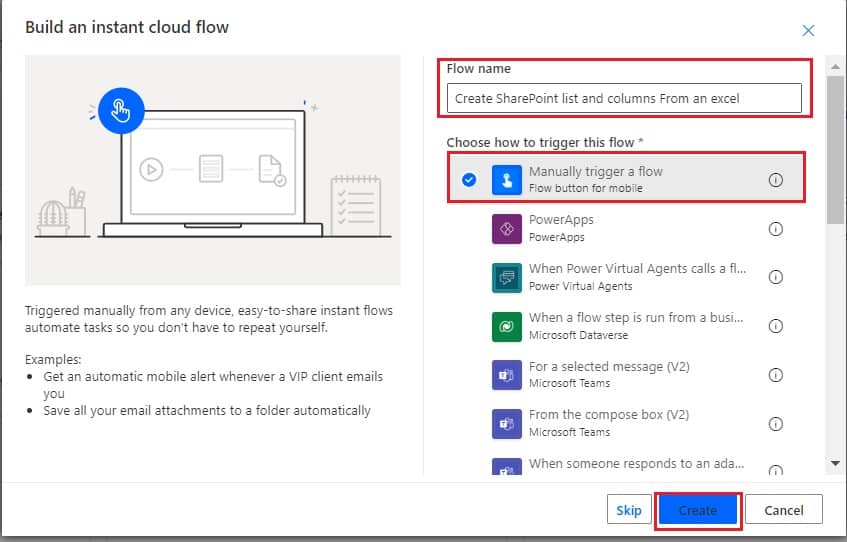
Now provide the Flow name, and choose ‘Manually triggered flow’. then Click on Create.
Now you can see Manually trigger Flow action is added to the Flow workspace.

Initialize the variable required
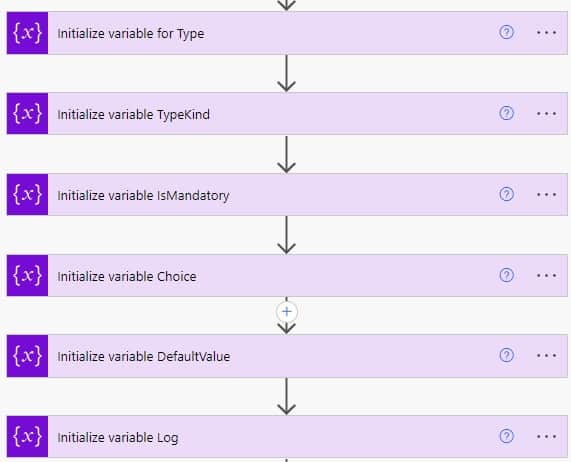
Step 2: Now we will initialize the variable required in our flow later to work with data. So, click on the +New step -> Select Initialize variable action. Then provide the Name of the variable and the type of the variable.
In this solution, we will initialize the below variables:
| Name | Type |
|---|---|
| Type | String |
| TypeKind | Integer |
| IsMandatory | String |
| Choice | Array |
| Defaultvalue | String |
| Log | String |
Get the data from an Excel
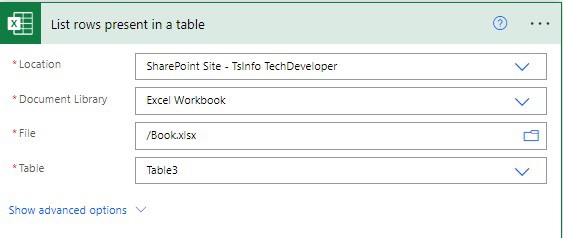
Step 3: Now we will get the data from the Excel table by using ‘List rows present in a table’ in Power Automate. So, click on the +New step -> select ‘List rows present in a table’ actions.
Then provide the below information:
- Location – Select the location where the Excel file exists, which can be the SharePoint site or OneDrive
- Document library– Select the library where Excel files exist.
- File– Select the File that we will use in this flow
- Table– Then select the table from the file which has data that we will use in this flow.
Remove unwanted properties
Step 4: Now we will remove unwanted properties i.e. @odata.etag and ItemInternalId, which we don’t need in our flow.
First, we will remove the @ from @odata.etag, so, click on +New step -> select Compose action. Then provide the below information.
- Inputs: provide the below expression:
json(replace(string(outputs('List_rows_present_in_a_table')?['body/value']), '@odata.etag', 'odataetag'))Next, we will remove the unwanted properties, so, click on +New step -> select Select action. Here provide the below information
- From: Select the outputs from the above compose action.
- Map: provide the below expressions:
removeProperty(removeProperty(item(), 'odataetag'), 'ItemInternalId')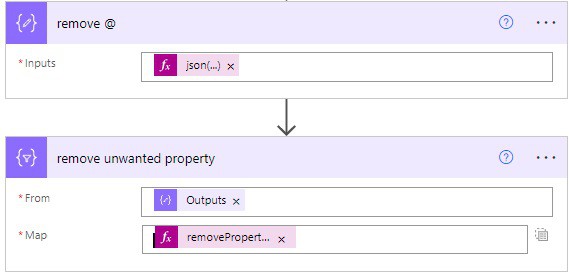
Get the values using Parse JSON
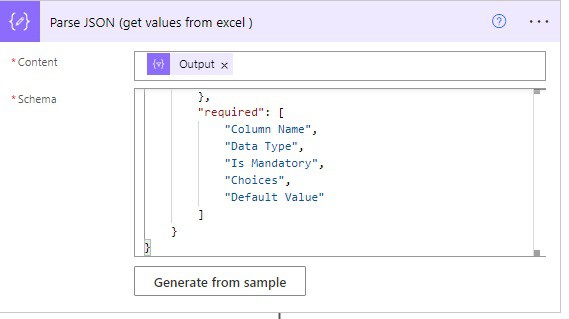
Step 5: Now we will parse json the output from the Select(remove unwanted property), to get the values in the dynamic content.
So click on the +New step -> select Parse json action, then provide the below information:
- Content: Select the output of the Select action from the dynamic content.
- Schema: To add schema click on the ‘Generate from Sample‘ and then add the json code from the output of the select operation in the ‘Insert a sample from JSON’. Click on Done
[
  {
    "Column Name": "First Name",
    "Data Type": "Single Line of Text",
    "Is Mandatory": "Y",
    "Choices": "",
    "Default Value": ""
  },
  {
    "Column Name": "Last Name",
    "Data Type": "Single Line of Text",
    "Is Mandatory": "N",
    "Choices": "",
    "Default Value": ""
  },
  {
    "Column Name": "DOB",
    "Data Type": "DateTime",
    "Is Mandatory": "N",
    "Choices": "",
    "Default Value": "Today"
  },
  {
    "Column Name": "Country",
    "Data Type": "Choice",
    "Is Mandatory": "Y",
    "Choices": "India,Pak,Srilanka",
    "Default Value": "Pak"
  },
  {
    "Column Name": "Manager",
    "Data Type": "Person",
    "Is Mandatory": "N",
    "Choices": "",
    "Default Value": ""
  },
  {
    "Column Name": "Department",
    "Data Type": "Choice",
    "Is Mandatory": "N",
    "Choices": "Finance, Sales, IT",
    "Default Value": "Finance"
  },
  {
    "Column Name": "Job Title",
    "Data Type": "Single Line of Text",
    "Is Mandatory": "Y",
    "Choices": "",
    "Default Value": ""
  },
  {
    "Column Name": "EmployeeID",
    "Data Type": "Single Line of Text",
    "Is Mandatory": "Y",
    "Choices": "",
    "Default Value": ""
  },
  {
    "Column Name": "Permanent Address",
    "Data Type": "Single Line of Text",
    "Is Mandatory": "",
    "Choices": "",
    "Default Value": ""
  },
  {
    "Column Name": "DateOfJoining",
    "Data Type": "DateTime",
    "Is Mandatory": "Y",
    "Choices": "",
    "Default Value": ""
  },
  {
    "Column Name": "Total Experience",
    "Data Type": "Choice",
    "Is Mandatory": "Y",
    "Choices": "0-2,2-5,5-8,8-12,More",
    "Default Value": "0-2"
  },
  {
    "Column Name": "Releavant Experience",
    "Data Type": "Choice",
    "Is Mandatory": "",
    "Choices": "0-2,2-5,5-8,8-12,More",
    "Default Value": "Today"
  },
  {
    "Column Name": "Team Lead",
    "Data Type": "Person",
    "Is Mandatory": "Y",
    "Choices": "",
    "Default Value": ""
  },
  {
    "Column Name": "Age",
    "Data Type": "Number",
    "Is Mandatory": "Y",
    "Choices": "",
    "Default Value": ""
  },
  {
    "Column Name": "Mobile Number",
    "Data Type": "Number",
    "Is Mandatory": "Y",
    "Choices": "",
    "Default Value": ""
  },
  {
    "Column Name": "Designation",
    "Data Type": "Choice",
    "Is Mandatory": "Y",
    "Choices": "Lead Analyst, IT Analyst, Manager",
    "Default Value": ""
  },
  {
    "Column Name": "isJoined",
    "Data Type": "Yes/No",
    "Is Mandatory": "",
    "Choices": "",
    "Default Value": "Yes"
  },
  {
    "Column Name": "Linkdin Profile",
    "Data Type": "Hyperlink",
    "Is Mandatory": "",
    "Choices": "",
    "Default Value": ""
  },
  {
    "Column Name": "Experienced",
    "Data Type": "Yes/No",
    "Is Mandatory": "Y",
    "Choices": "Yes, No",
    "Default Value": "Yes"
  },
  {
    "Column Name": "Experienced Years",
    "Data Type": "Number",
    "Is Mandatory": "Y",
    "Choices": "",
    "Default Value": ""
  },
  {
    "Column Name": "Willing to travel",
    "Data Type": "Yes/No",
    "Is Mandatory": "N",
    "Choices": "",
    "Default Value": "Yes"
  },
  {
    "Column Name": "Blood group",
    "Data Type": "Choice",
    "Is Mandatory": "Y",
    "Choices": "A +ve, A -ve, AB +ve, AB -ve, B +ve, B -ve, O +ve, O -ve ",
    "Default Value": ""
  },
  {
    "Column Name": "Blog/Website",
    "Data Type": "Hyperlink",
    "Is Mandatory": "N",
    "Choices": "",
    "Default Value": ""
  },
  {
    "Column Name": "Current Address",
    "Data Type": "Single Line of Text",
    "Is Mandatory": "Y",
    "Choices": "",
    "Default Value": ""
  },
  {
    "Column Name": "Current Project Lead",
    "Data Type": "Person",
    "Is Mandatory": "N",
    "Choices": "",
    "Default Value": ""
  },
  {
    "Column Name": "Github",
    "Data Type": "Hyperlink",
    "Is Mandatory": "",
    "Choices": "",
    "Default Value": ""
  },
  {
    "Column Name": "AlternativeContatct",
    "Data Type": "Number",
    "Is Mandatory": "N",
    "Choices": "",
    "Default Value": ""
  },
  {
    "Column Name": "Gender",
    "Data Type": "Choice",
    "Is Mandatory": "Y",
    "Choices": "Male, Female, other",
    "Default Value": ""
  },
  {
    "Column Name": "Project Name",
    "Data Type": "Single Line of Text",
    "Is Mandatory": "Y",
    "Choices": "",
    "Default Value": ""
  },
  {
    "Column Name": "Project Member",
    "Data Type": "Choice",
    "Is Mandatory": "Y",
    "Choices": "4-6, 6-8, 8-10, More",
    "Default Value": "45022"
  }
]
Now you can see the schema in the Shema field area, like below.
Create SharePoint list
Step 6: Now we will create the SharePoint list, before that we need to get the list ‘Employee’ available on the SharePoint site, if the list exists in the same name, then it will delete the previous list and create the list, else it will directly create the list.
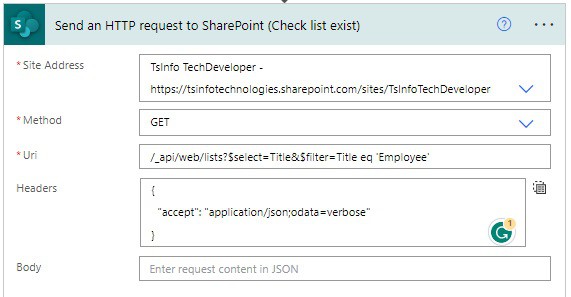
So first we will fetch the list having Employee names using the ‘Send an HTTP request to SharePoint’ action.
- Site address: Select the SharePoint site address, where the list can be available.
- Method: Select the ‘GET’ because we want to fetch the list.
- Uri: Provide the Uri _api/web/Lists/, to fetch the list with the Rest API call.
- Header: Provide like the below code example (There are required while you are calling a rest API call)
- Body: Blank
Here is the code you will add to the Uri and Header of the ‘Send an HTTP request to SharePoint’.
Uri:
/_api/web/lists?$select=Title&$filter=Title eq 'Employee'

Headers:
{
  "accept": "application/json;odata=verbose"
}
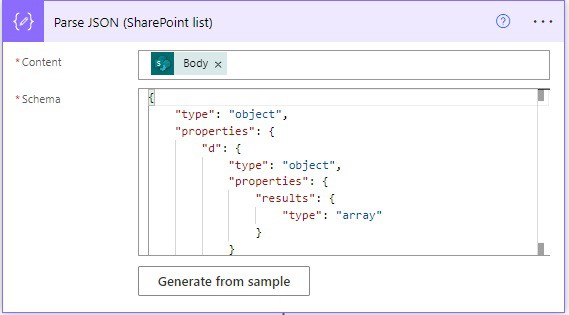
Then we will Parse json the output of the above action ‘Send an HTTP request to SharePoint’, to extract the value as dynamic content. Click on the +New step ->Select the ‘Parse Json‘ action. Then provide the below information:
- Content: Select the Body( Send an HTTP request to SharePoint) from the dynamic content.
- Schema: To get the schema, click on ‘Generate From Sample’, and then add the below code. Click on Done.
"body": {
        "d": {
            "results": [
                {
                    "__metadata": {
                        "id": "https://tsinfotechnologies.sharepoint.com/sites/TsInfoTechDeveloper/_api/Web/Lists(guid'c9284c31-7bb5-4841-847e-874adb7872b6')",
                        "uri": "https://tsinfotechnologies.sharepoint.com/sites/TsInfoTechDeveloper/_api/Web/Lists(guid'c9284c31-7bb5-4841-847e-874adb7872b6')",
                        "etag": "\"10\"",
                        "type": "SP.List"
                    },
                    "Title": "Employee"
                }
            ]
        }
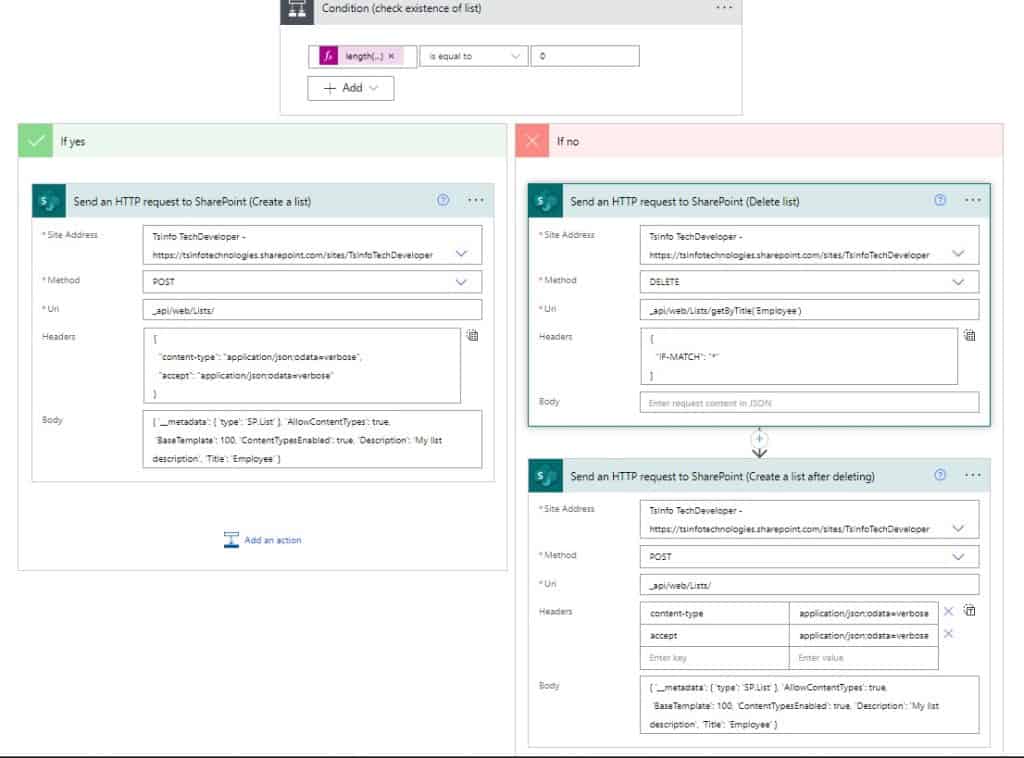
Step 7: Now we will check the length of the results ‘Send an HTTP request to SharePoint’, if the length is equal to 0 then there is no list available in SharePoint, so we create the list. If the length is not 0, then it will first delete the list from SharePoint, then it will create the list in SharePoint.
So, click on the +New Step -> Select Condition operation and provide the below information
- Choose a value: Here provide the below expression:
length(body('Parse_JSON_(SharePoint_list)')?['d']?['results'])- Operator: Select is equal to from the dropdown
- Choose a value: 0
If the condition is true, then we will create a list, so in ‘If yes‘ part-> click on Add an action ->select ‘Send an HTTP request to SharePoint‘, and provide the below information:
- Site Address: Select or provide the SharePoint Online site address
- Method: Select POST, we are creating a list.
- Uri: Provide the Uri as _api/web/Lists/ as we are doing list operations.
- Headers: Provide like the below code example (There are required while you are calling a rest API call)
- Body: Provide the below code example (There are required while you are calling a rest API call). Here I have provided BaseTemplate as 100, as we are creating a custom list.
Below is information you can add in the Uri and Headers to create the list.
Uri: _api/web/Lists/
Header:{
  "content-type": "application/json;odata=verbose",
  "accept": "application/json;odata=verbose"
}
Body:{ '__metadata': { 'type': 'SP.List' }, 'AllowContentTypes': true,
 'BaseTemplate': 100, 'ContentTypesEnabled': true, 'Description': 'My list description', 'Title': 'Employee' }
If the condition is false, then it will delete the list and create the list using the Rest API call. So, If no part of the condition, click on Add an action -> select ‘ Send an HTTP request to SharePoint‘ action. Then provide the below information.
- Site Address: Select or provide the SharePoint Online site address.
- Method: Select DELETE from the dropdown, we are deleting a list.
- Uri: Provide the Uri as _api/web/Lists/ as we are doing list operations.
- Headers: Provide like the below code example (There are required while you are calling a rest API call).
- Body: It will remain blank
Here to delete the list provide the below Uri and Headers fields.
Uri : _api/web/Lists/getByTitle('Employee')
Headers: {
  "IF-MATCH": "*"
}
Once we delete the old list, we need to create the list in SharePoint, so you can similarly create a list by following the ‘If yes’ part of the condition, after that it will look like the below image.
Now our list is ready, let’s move forward to create a column from an Excel.
Create different types of column in SharePoint list
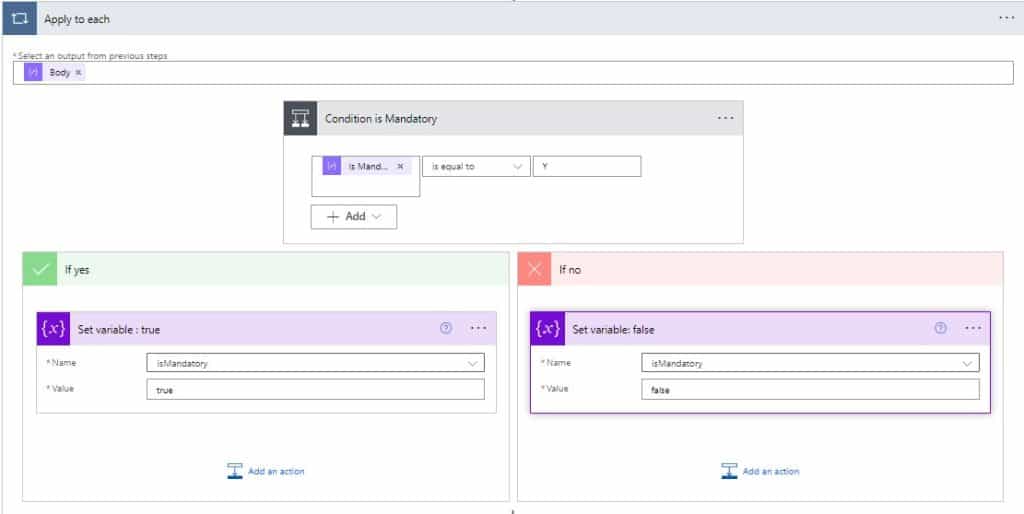
Step 8: To create a column in the SharePoint list from Excel, need to create an ‘Apply to each’ action, which will loop through the data (extracted from Excel).
And in our Excel sheet, is Mandatory column is common for each row of data, so either it will contain a Yes or No value.
For that, we need to create a Condition, which will check what each row contains, if it contains ‘Y’ then we set the variable’ IsMandatory’ to true else ‘false’.
So click on the +New step -> select ‘Apply to each action’ and then provide the below information:
- Select an output from previous steps: Select the Body (parse_Json) from the dynamic content.

Next, we will add a condition to check whether the columns we are going to create are required columns or not, which means it is mandatory to fill in the data in that column. So, click on Add an action -> select Condition, then provide the below information.
- Choose a value: Select isMandatory (parse_json) from the dynamic content.
- Operator: Select the operator ‘ is equal to’ from the dropdown.
- Choose a value: Write the value ‘ Y’.
Then in the ‘If yes’ part, click on ‘Add an action-> select ‘Set variable‘ action and then provide the below information:
- Name: Select the name of the variable as isMandatory from the dropdown.
- Value: true
And in ‘If no’ part of the condition, click on ‘Add an action-> select ‘Set variable‘ action and then provide the below information:
- Name: Select the name of the variable as isMandatory from the dropdown.
- Value: false
Now we will add a switch case, that will check the data type, based on the data type it will create a column in the SharePoint list.
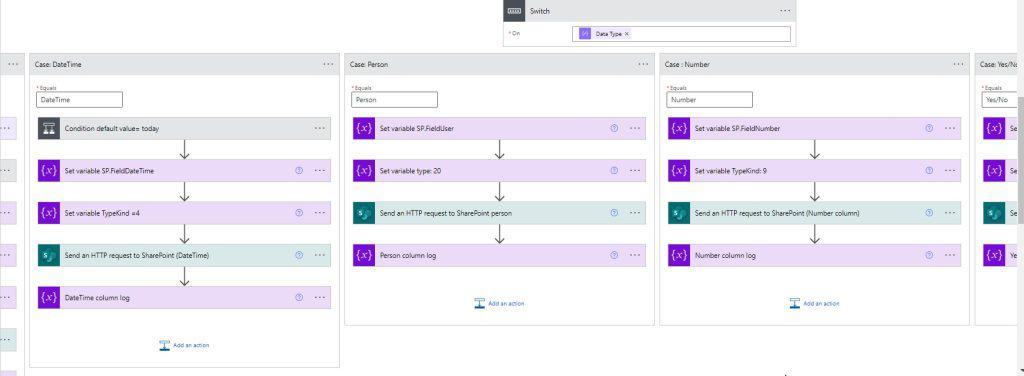
So here we will discuss how to create a column of 3 data types, and just follow the pattern to create other data types columns. The three data types we will discuss is:
- Single line of Text
- Choice
Single line of Text
To create a Single line of text column, click on Add an action -> then select Switch action and provide the below information.
- On: Select the Data type(parse json) from the dynamic content.
Then if Case 1 equals Single line of text, do the below tasks by adding the below actions by clicking on Add an action.
- Set variable for TypeKind =2, so here add an action ‘Set variable‘ and then select Name as TypeKind from the dropdown and value as 2.
- Set variable for Type =SP.FieldText, so here add an action ‘Set variable‘ and then select Name as Type from the dropdown and value as SP.FieldText.
- Send an HTTP request to SharePoint to Create a column in the Sharepoint list, so click on Add an action and select ‘Send an HTTP request to SharePoint’ and provide the below information.
- Site Address: Select or provide the SharePoint Online site address.
- Method: Select POST from the dropdown, we are creating a field in a SharePoint list.
- Uri: Provide the Uri as _api/web/Lists/getByTitle(‘Employee’)/fields as we are creating a field in the list.
- Headers: Provide like the below code example (There are required while you are calling a rest API call).
- Body: Provide the information related to creating a column of type a Single line of text. Here provide the type, typeKind, Required, and Title of the column.
Here is the code for the field Uri, Header, and Body
Uri : _api/web/Lists/getByTitle('Employee')/fields
Header: {
  "content-type": "application/json;odata=verbose"
}
Body:
{
"__metadata": {
          "type": "@{variables('Type')}"
        },
        "FieldTypeKind":@{variables('TypeKind')} ,
        "Title": "@{items('Apply_to_each')['Column Name']}",
"Required": @{toLower(variables('isMandatory'))}
},
4. Set variable, to log the success message, so here add an action Set variable, and then select the Name as Log and value as ‘We have successfully created @{items(‘Apply_to_each’)[‘Column Name’]}!’.
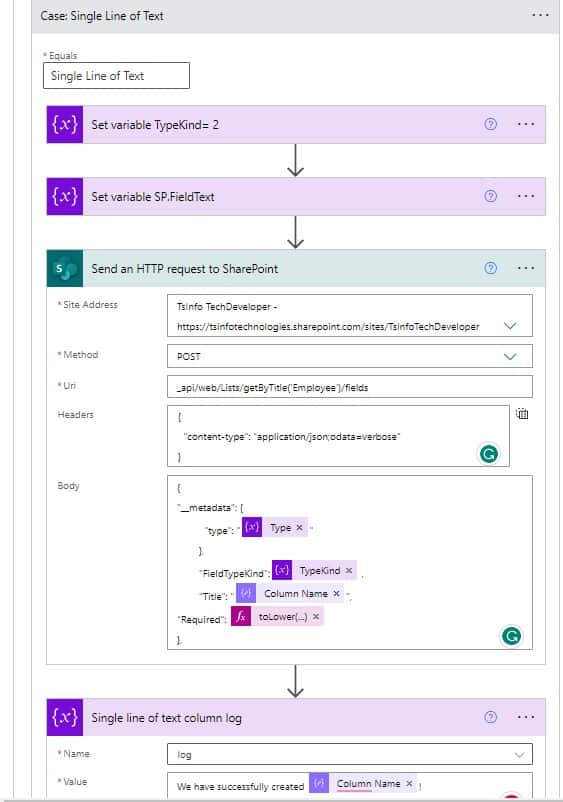
Now if case 1 satisfies, we can create the column of a Single line of Text.
Choice
To create a choice column, add Case 2 by clicking on the + icon next to Case 1. Now in the equals field provide the value as ‘ Choice’, if the data type is equal to Choice, then this case will run.
When this case will run it will perform the below task by adding the below actions by clicking on Add an action.
- Store the values of the choice, to do this add a Compose action, and then select Choice(parse json) from dynamic content.
- Condition to check the default value, to do this create a Condition action, and select choose a value as Default value (parse json) from dynamic content, operator as ‘is equal to‘ and value as ‘Male’. If the condition is true, then Add an action to Set variable, select the Name as the Default value from the dropdown, and the value as “Male”. In If no part of the condition, create a condition, to check the Default value as Pak, if the condition is true, then set the Default value variable as “Pak”, and if the condition is false, then Set the Default value as first value of the choice so, for this write the expression: “first(split(outputs(‘Choice’), ‘,’))“.
- Set variable for TypeKind =6, so here add an action ‘Set variable‘ and then select Name as TypeKind from the dropdown and value as 6.
- Set variable for Type =SP.FieldChoice, so here add an action ‘Set variable‘ and then select Name as Type from the dropdown and value as SP.FieldChoice.
- Set variable for choice, so here add an action ‘Set variable‘ and then select Name as Choice from the dropdown and Value as an expression because we need to convert the choices string to array, so we can pass this array in step 6 while creating the choice column. The expression is ‘split(outputs(‘Choice’), ‘,’)’
- Send an HTTP request to SharePoint to Create a Choice column in the Sharepoint list, so click on Add an action and select ‘Send an HTTP request to SharePoint’ and provide the below information.
- Site Address: Select or provide the SharePoint Online site address.
- Method: Select POST from the dropdown, we are creating a field in a SharePoint list.
- Uri: Provide the Uri as _api/web/Lists/getByTitle(‘Employee’)/fields as we are creating a field in the list.
- Headers: Provide like the below code example (There are required while you are calling a rest API call).
- Body: Provide the information related to creating a column of type a Single line of text. Here provide the type, typeKind, Required, choices, default value, and Title of the column.
Here is the code for the field Uri, Header, and Body
Uri : _api/web/Lists/getByTitle('Employee')/fields
Header: {
  "content-type": "application/json;odata=verbose"
}
Body:
{
  "__metadata": {
    "type": "@{variables('Type')}"
  },
  "Title": "@{items('Apply_to_each')['Column Name']}",
  "FieldTypeKind": @{variables('TypeKind')},
  "Required": @{variables('isMandatory')},
  "Choices": {
    "__metadata": {
      "type": "Collection(Edm.String)"
    },
    "results":@{variables('Choice')}
  },
  "DefaultValue": @{variables('DefaultValue')}}
4. Set variable, to log the success message, so here add an action Set variable, and then select the Name as Log and value as ‘We have successfully created @{items(‘Apply_to_each’)[‘Column Name’]}!’.
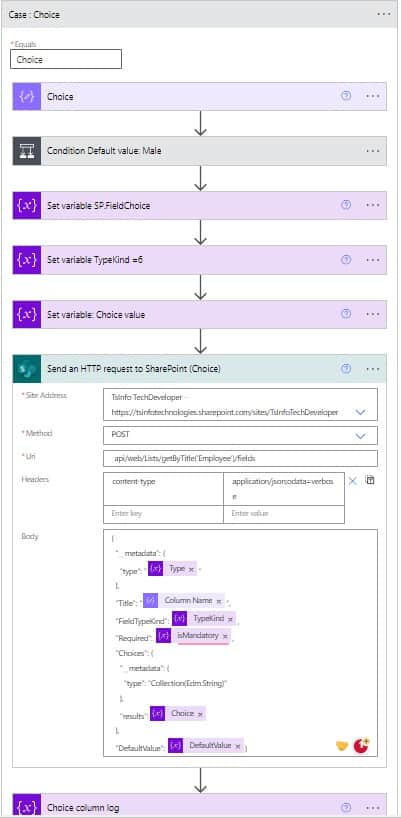
For that, we have added columns for type DateTime, Person, Hyperlink, Yes/No, and Number.
Log the message in the SharePoint list
Step 9: In every case of switch condition, we have added the variable ‘Log’, with the message: ‘We have successfully created @{items(‘Apply_to_each’)[‘Column Name’]}!’. This expression ‘@{items(‘Apply_to_each’)[‘Column Name’]}!’ will return the present column name.
So, we will add the compose action to get all the messages and create items in the SharePoint list. For this i have created a list i.e. Power Automate Log, which has 2 columns Title and Description.
For this click on +New step -> select ‘Compose action’ and provide the below information:
- Inputs: Select the variable Log from the dynamic content.
After that, we will create an item, so click on +New step -> select Create item action, and then provide the below information
- Site address: Select the SharePoint site from the dropdown.
- List name: Select the list name from the dropdown
- Title: Write ‘Create SharePoint list and columns from an excel workflow’
- Log Description: Choose the output (above compose action) from dynamic content.
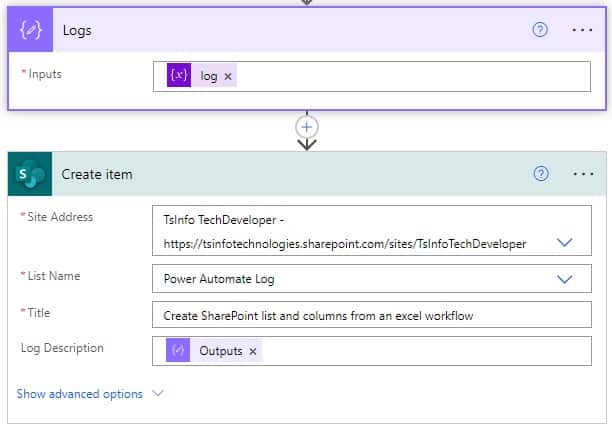
Now if we will run the flow in Power Automate, it will read the Excel and create lists and columns in SharePoint. But if the action gets failed and the whole flow stopped, then how we will know where an error occurs? So for the complex flow, it is best practice to do exceptional handling using Try catch block, so we can track the error and rectify it.
Add Try catch block to handle the exception
Step 10: To handle the error, we will add Try catch block to the flow. So, in the Try block, we will add all the functionality of the flow, and we will configure the catch block will run after if the Try block is failed, skipped, and timed out, using the functionality ‘Configure run after’.
So if any of the run-after conditions are satisfied, then the catch block will run and notify which action is failed, skipped, and timed out in the flow.
So, click on the +New step -> select the Scope action, and then drag and drop all the actions inside the scope. And rename the scope as ‘Try’. After that it will look like below.
Now we will move forward to create a catch block, so we can track the error that occurred in the Try block. So in the catch block what we will do, is first enable the ‘Configure run after functionality’, and filter the result from the Try block based on the condition.
Then we will create an HTML Table of errors, and Format the HTML Table. After that, we will send that HTML table as an email.
Now click on the +New step -> select Scope action and rename it as ‘Catch’. Then click on Add an action and select the ‘Filter array’ action. Then provide the below information:
- From: Provide the expression.
result('Try')- Condition: Here click on ‘ Edit in advance mode’ and then write the below expression:
@or(equals(item()?['Status'], 'Failed'), or(equals(item()?['Status'], 'Skipped'), equals(item()?['Status'], 'TimedOut')))

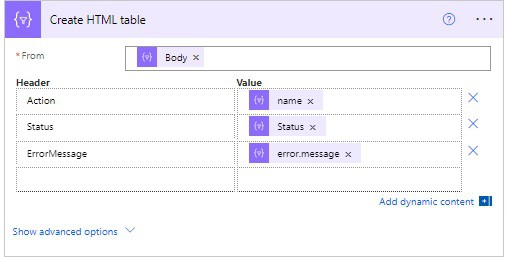
Next, we will create an HTML table of error, which we will send in an email, so, click on the +New step and then select the ‘Create HTML table’ action and select Custom table. Then provide the below information:
- From: Select Body(Filter array) from the dynamic content.
- Header and Value: You can insert the Header and Value based on the below table
| Header | Value |
|---|---|
| Action | @item()?[‘name’] |
| Status | @item()?[‘Status’] |
| Error message | @item()?[‘error’]?[‘message’] |
Let’s style the Html table, by formatting the Html table, so, click on Add an action-> select Compose action and rename it to ‘Format Html table’. Then provide the below information:
- Inputs: Here provide the below expression:
replace(body('Create_HTML_table'), '<table>', '<table border="3">')
At last, we will send an email with error details, to the SharePoint owner or the person who is using the flow.
So, click on Add an action -> select Send an email(V2) action-Outlook, and then provide the below information
- To: Provide the email below, so that the person will get notified there is an error occurred.
- Subject: Write the subject like this ‘Error occurred ‘Creating SP List from Excel Workflow’
- Body: As in the body we will provide the error details, as well we will provide the link of the flow so that the user will directly come back to the flow.
- For this click on this icon </>, to enable HTML functionality in the Body of the ‘Send an email(V2) action‘. Here is the code:
<p>@{outputs('Format_Html_table')}<br>
<br>
</p>
<a href= '@{concat('<provide the url of the Power automate Flow>', workflow()?['tags']['environmentName'], '/flows/', workflow()?['name'], '/runs/', workflow()?['run']['name'])}'> Check Flow Run</a>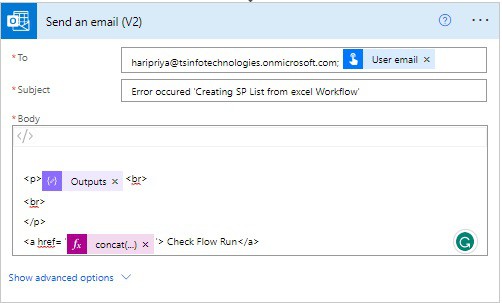
Below you can see the catch block we have created which will help us to track the error,
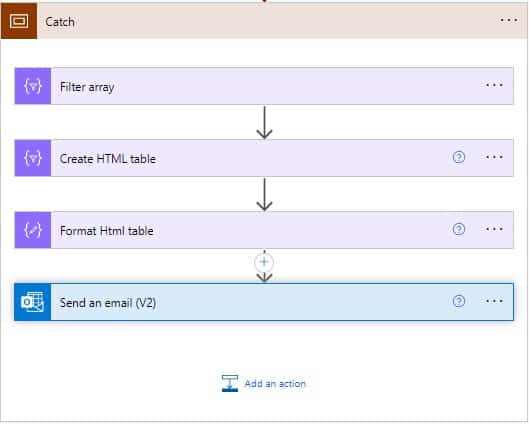
So, if any error occurred in the Flow, we can get the notification in the Outlook email.
Now our flow is ready so we can test the flow, whether it is working properly.
Run the Flow
Step 11: To check the flow, we will add data in our Excel -> we will run the flow manually -> check the SharePoint site list and columns get created properly or not.
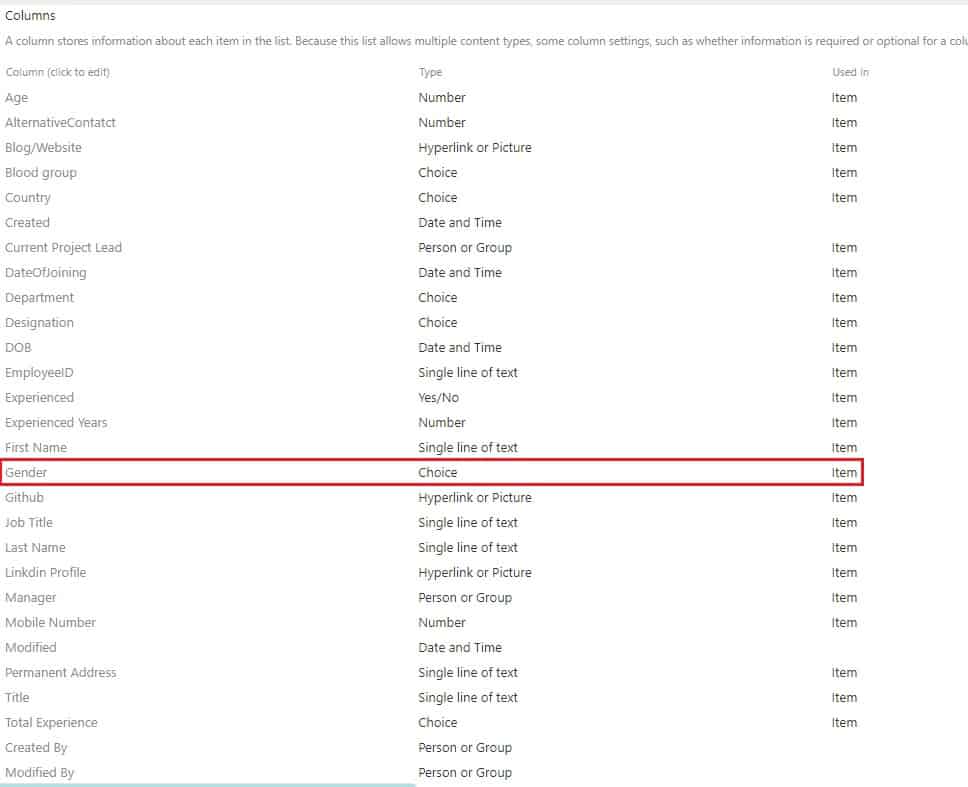
Here I have added the ‘Gender’ as a column name and the data type as Choice, then the default value as Male.

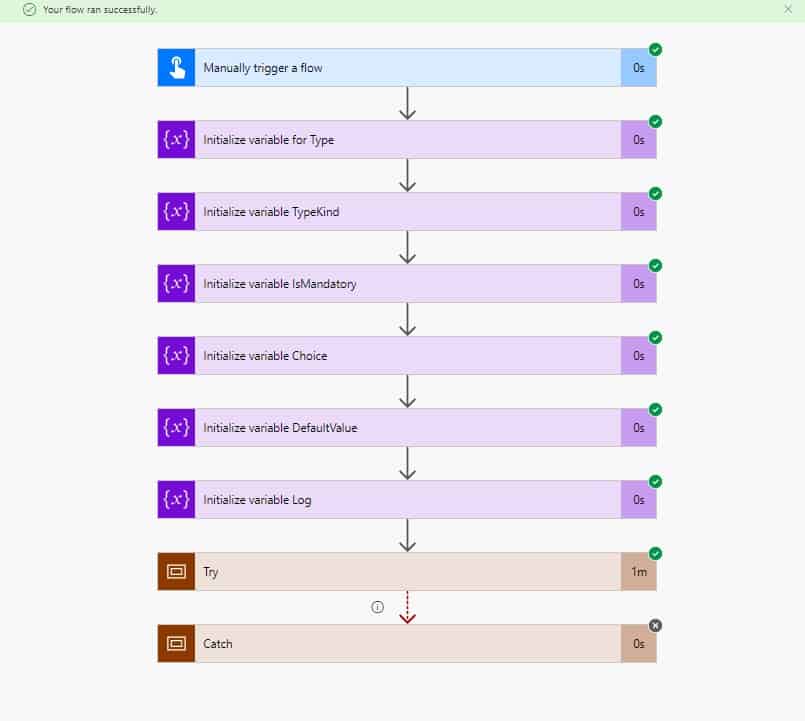
Then go to the Flow in Power Automate -> run the flow manually, you can see the flow ran successfully.
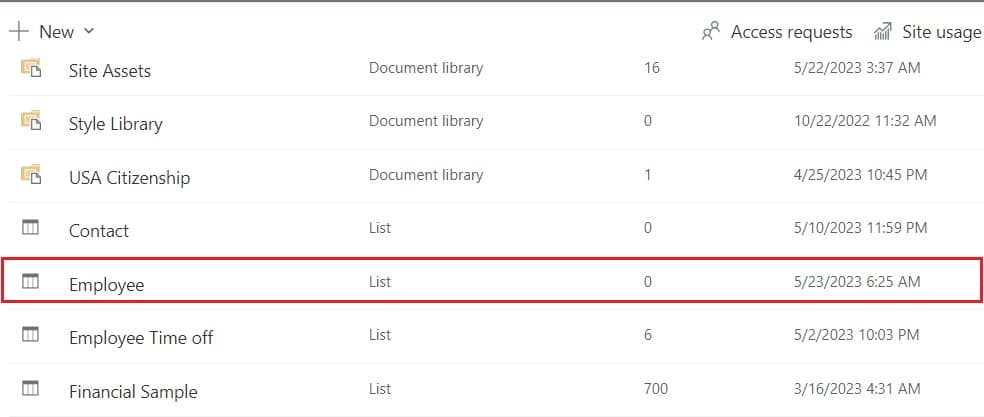
Now go to your SharePoint site -> Site contents -> you can see the list ‘Employee’.
Open the list,-> click on Settings -> List settings, under columns you can see the columns get created. As there in Excel, 23 columns are added, and you can see all the columns get created. Also, you can see the Gender column, which we have added in our Excel.
Additionally, you may like some more Power Platform tutorials:
- How to Create a SharePoint Online Site Using Power Automate [Download Complete Flow]
- How to Create PDF from Excel using Power Automate
- Power Automate Dataverse Update Multiple Rows
- Power Apps Modern Text input Control [All in Detail]
- Power Apps Modern Information Button Control [Complete Guide]
Conclusion
In this Power Automate tutorial, we saw how to create a SharePoint list and different types of columns using Rest API call in Flow (from Excel) using Power Automate Instant cloud flow.
So, this flow will fetch the data from Excel, and create a SharePoint list-> then it will create columns in the list based on the data type defined in the Excel sheet.
Also, we add the functionality of logging the message if the column gets created successfully, which gets saved in the SharePoint list ‘ Power Automate Log’, and the functionality of exception handling using Try catch block.
I am Bijay a Microsoft MVP (10 times – My MVP Profile) in SharePoint and have more than 17 years of expertise in SharePoint Online Office 365, SharePoint subscription edition, and SharePoint 2019/2016/2013. Currently working in my own venture TSInfo Technologies a SharePoint development, consulting, and training company. I also run the popular SharePoint website EnjoySharePoint.com