Are you new to the PowerApps canvas app? This is a complete tutorial on how to create a canvas app in powerapps from a sharepoint list. Step by step, I will explain, how to customize the SharePoint New, Edit, and Disp forms using Microsoft PowerApps.
We’ll go through what a Power Apps Canvas app is, how to make one, how to connect a Power Apps Canvas app to a SharePoint list, and other things step by step. Additionally, we’ll look at the below topics:
- How to create a Canvas app from SharePoint List in Power Apps
- How to create a List Screen in Power Apps
- How to create a Display Form in Power Apps
- How to create an Edit Form in Power Apps
- Preview Canvas app in Power Apps
- How we can Save and Publish Power Apps Canvas App
- How to share the Power Apps Canvas App with other members
What is Power Apps Canvas app?
Users of Microsoft Power Apps can create business apps with little to no coding using Power Apps Canvas Apps.
Microsoft offers a variety of sources from which you can automatically create apps, including but not limited to:
- Template
- Excel
- Dataverse
- SharePoint
Create a canvas app in PowerApps from a SharePoint list
Follow the instructions below to construct a canvas app in Power Apps from a SharePoint list.
As we are working with Power Apps with SharePoint, a SharePoint list is required in order to develop a Power Apps Canvas App. Let’s first establish a SharePoint list before creating a Power Apps Canvas app.
The image below shows a SharePoint Online List (Hospital Registration Details).

The fields below in this SharePoint list each carry a distinct type of data. Such as:
- Title (Patient Name) = Single line of text
- Contact Number = Number
- Patient Email Address = Single line of text
- DOB = Date and Time
- Age = Number
- Gender = Choice and so on
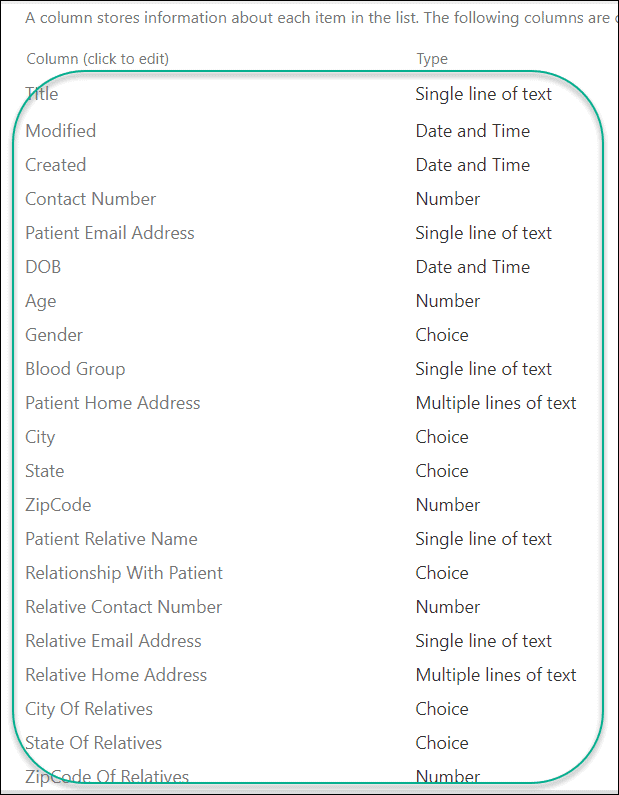
Now the SharePoint list is ready to implement in Power Apps. But before that, just have a look at the Power Apps Requirement.
Requirement:
We’ll now talk about the precise requirements for building a canvas app in Power Apps utilizing a SharePoint list.
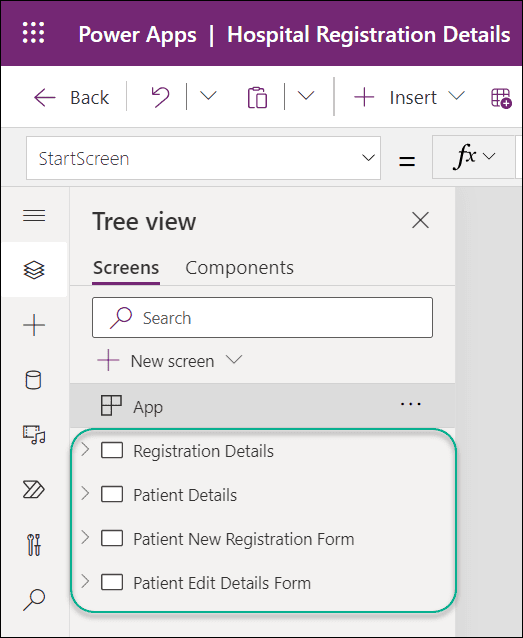
In Power Apps, there will be four screens i.e.
- Registration Details (List Screen)
- Patient Details (Blank Screen with Display Form)
- Patient New Registration Form (Blank Screen with Edit Form)
- Patient Edit Details Form (Blank screen with Edit Form)
Registration Details (List Screen):
For this, we will use the Power Apps List screen. This is the first screen where you can view the list of records from the SharePoint list. Also, this screen will have the below features:
- Reload = The records will be refreshed when you click the Reload symbol.
- Add (+) = Upon clicking the Add icon, a new registration form will appear.
- Next Arrow (>) = The next screen will load when you click the next arrow icon (>) of a certain record.
Patient Details (Blank Screen with Display Form):
The second screen, titled “Patient Details Screen,” will have a Power Apps Display form with all the patient’s information on it. Also, you can click the Edit icon to make any changes to the display form; otherwise, click the Back or Trash icons.
Patient New Registration Form (Blank Screen with Edit Form):
There is a Power Apps Edit form on the third screen, which is the Patient New Registration Form. The first screen, the Patient Registration Details Screen, will navigate to this Edit form when you click the add icon there.
Patient Edit Details Form (Blank screen with Edit Form):
When you click on the edit icon on the second screen (Patient Details Screen), it will take you to this edit form on the fourth screen (Patient Edit Details Form).
The below screenshot represents all four screens in Power Apps.
Also Read: Customize SharePoint List Forms with PowerApps (Step by Step)
Connect SharePoint Connector to Power Apps
Next, we will connect the specific SharePoint list (Hospital Registration Details) to Power Apps. Follow the steps below.
Step – 1: (Create Canvas App from Blank)
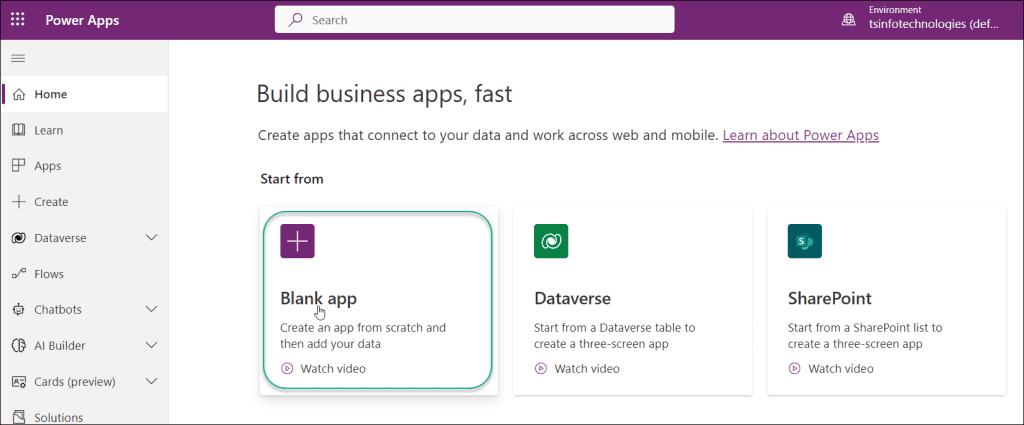
- Sign in to Power Apps using your valid credentials. Choose the Blank app from the list of options under “Start from” on the Power Apps Home page, as seen below.
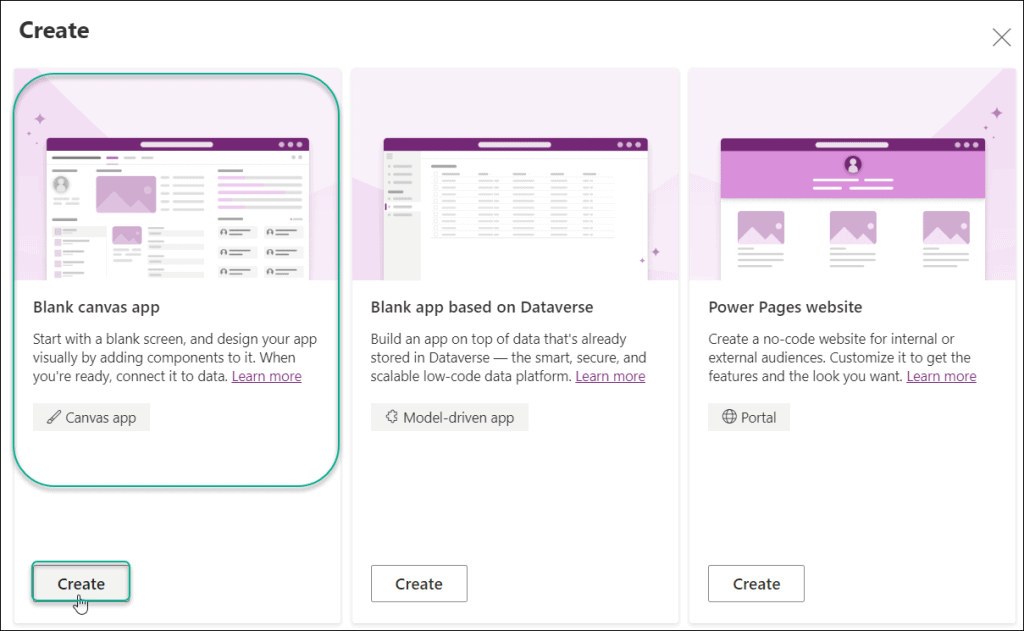
- Select the Blank canvas app and click on the Create button.
Step – 2: (Provide Canvas App Name)
- On the following screen, enter the app’s name (Hospital Registration Details) and select between a tablet or phone layout for the format. Select Create.
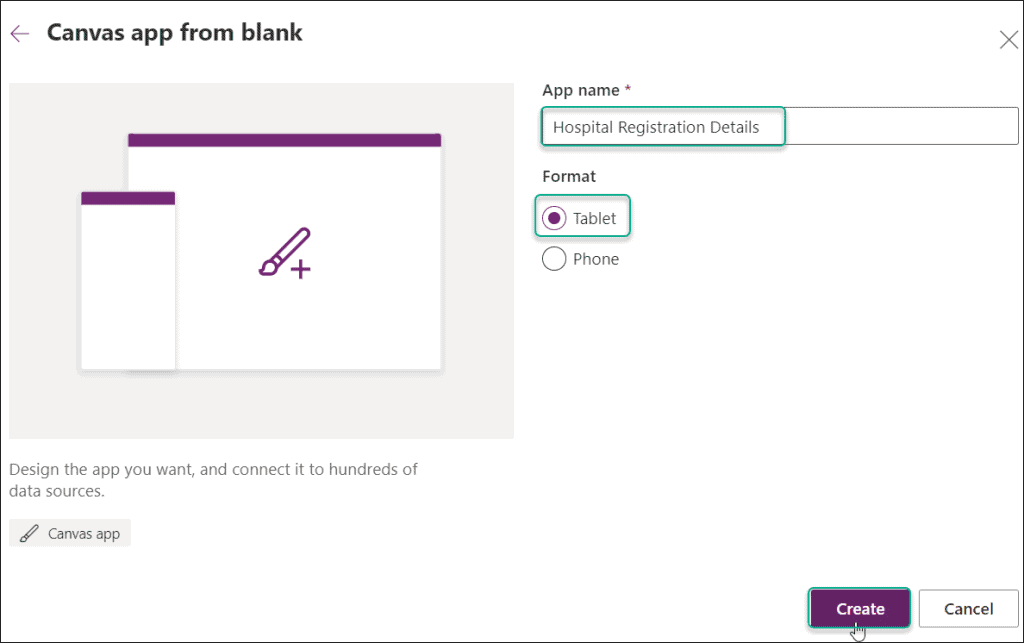
- When you select “Create“, then the Power Apps studio will launch. If the Welcome to Power Apps Studio dialogue box appears, choose Skip.
Step – 3: (Connect SharePoint List Data source to app)
- The canvas app needs to be connected to the SharePoint list data source connector right now. Alternatively, we can use the Data tab (from the left navigation) or click directly on the connect to data link option in the middle of the screen.
- Expand the + Add data, and search the SharePoint connector in the search bar. Click on SharePoint.
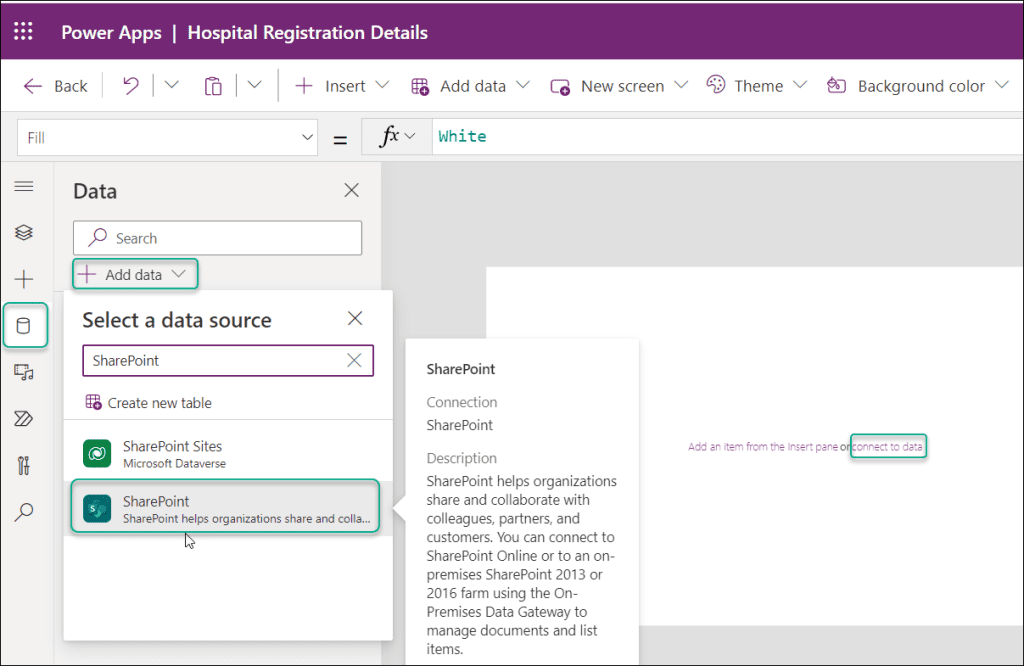
- If the SharePoint connection already exists, you do not need to create a new one. But if you are using the connection for the first time, you need to create a new SharePoint connection by providing valid credentials.
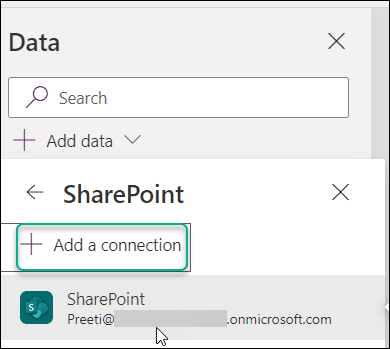
- Enter the URL of the SharePoint site where your list is located in the Connect to a SharePoint site window. After entering the site’s URL, select Connect.
- Additionally, you can choose the URL for the SharePoint site directly in the section of the Recent sites, as shown in the screenshot below.
- Select the Hospital Registration Details checkbox in the Choose a list window, and then click Connect.
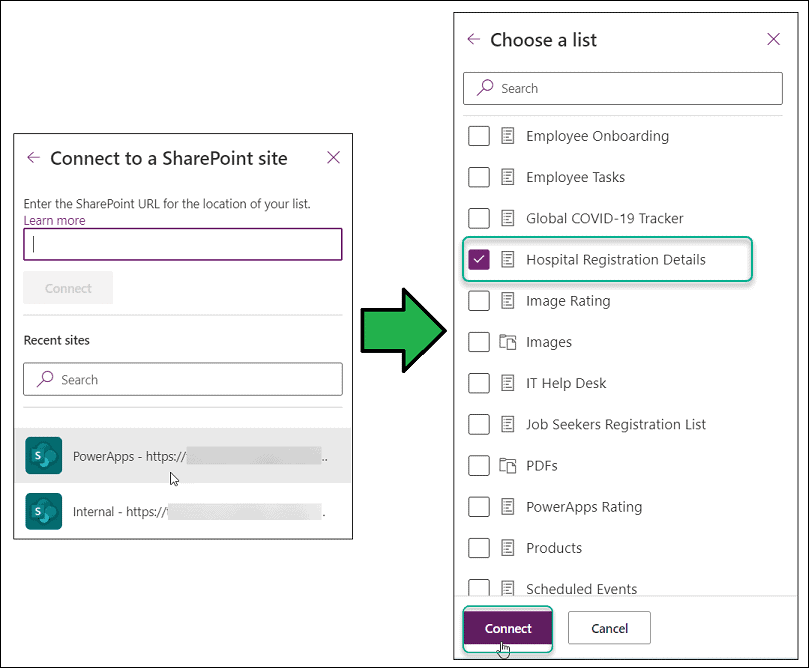
- Finally, we can see the SharePoint list connector has been added to the Power Apps Canvas app as shown below.
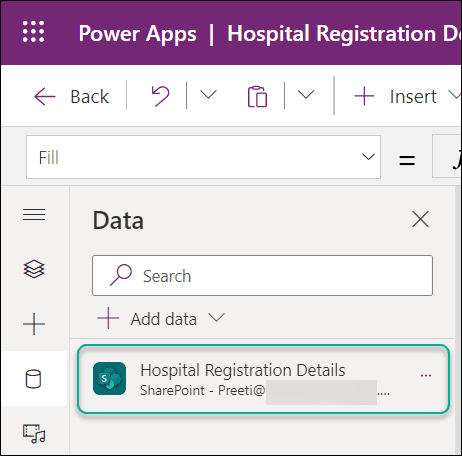
This is how we can connect the SharePoint list connector to the Power Apps Canvas app.
In the following section, we’ll look at how to use these SharePoint list fields in Power Apps’ Edit form, Display form, etc.
Check out: Create Collection from SharePoint List in PowerApps
What is Power Apps Edit Form?
The Form control’s mode is changed to FormMode.Edit using the EditForm function. This Power Apps Edit form helps to create a new record, modify the record, and save the record in the data source.
Consider a new patient who just arrived at the hospital and needs to register. The patient would next enter the information in the Power Apps edit form. The record will be saved into the SharePoint list after the user presses the SUBMIT button.
What is Power Apps Display Form?
Alternatively, Power Apps Display form FormViewer is used to read-only inspect all or a selection of properties for every given item in the source. We can view data in PowerApps with the help of FormViewer.
Let’s say you want to view the details of a specific patient, then, in that case, we can use the Power Apps Display form.
Create a List Screen in Power Apps (Registration Details)
Now in the app, we will create our first screen (List screen) i.e. Registration Details.
- To insert a Power Apps List screen, go to the New screen from the top command bar -> Select Scenarios -> Click on the List as below.
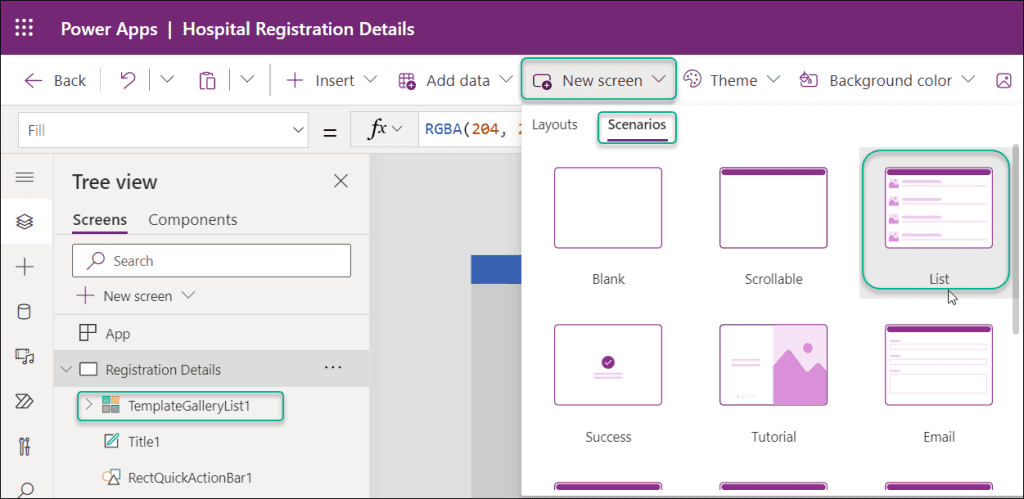
- Once the Power Apps List screen adds to the app, it will appear like the image below. This list screen contains three input controls. Such as TemplateGalleryList, Title, and RectQuickActionBar. If you want to add some more control to this screen, then you can add it over here.
- To view all the SharePoint list records in this list screen gallery, select the list gallery -> Go to the Properties pane -> Select the specific SharePoint list (Hospital Registration Details) under the Data source field.
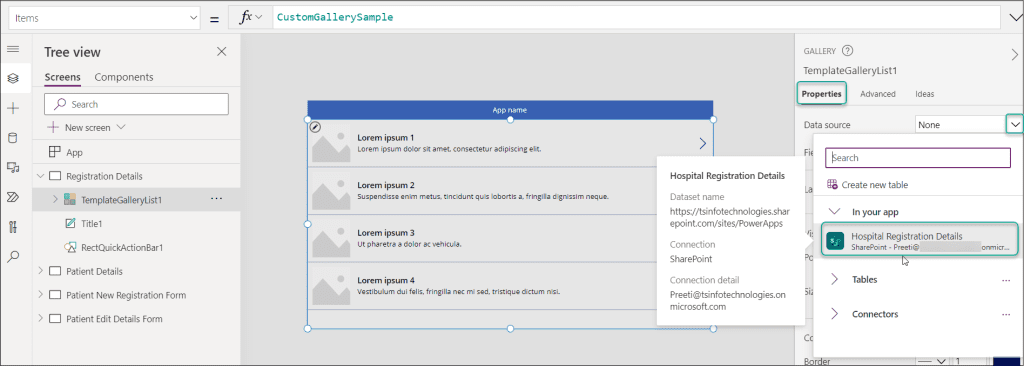
Furthermore, you can change some properties and label control names. Such as:
- The app will be shown as the screen title at the top of the new screen. Simply double-clicking the App Title will allow you to change its name. Registration Details is the new name I gave it.
- Similarly to this, you can view the Header Title properties in the LABEL section on the right side of the page. The title’s properties, such as the font, size, weight, style, and text alignment, are all editable.
- In the Power Apps list gallery, choose the screen gallery -> Properties -> Select the Edit option under the Fields section.
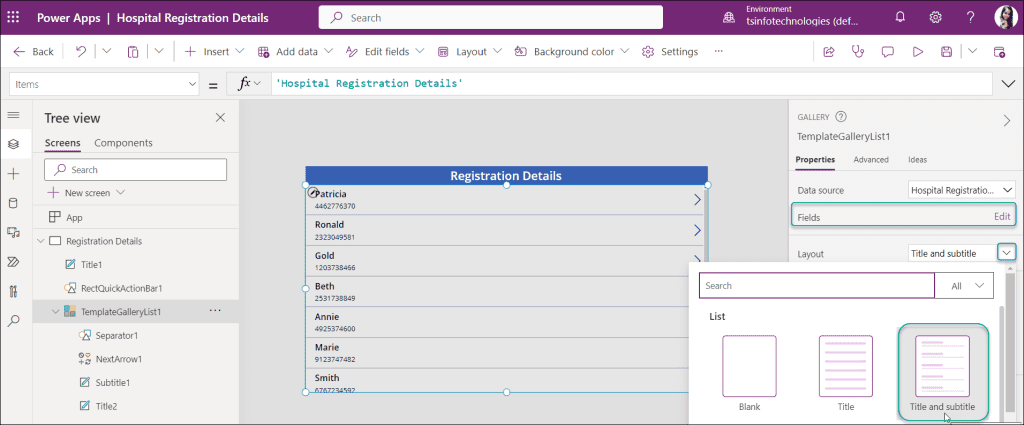
- Add the icons below to the new List screen now: (Select Insert -> Expand Icons -> Click Reload and Add icon)
- Reload: Updating the records is beneficial.
- Add: Making a new record is helpful.
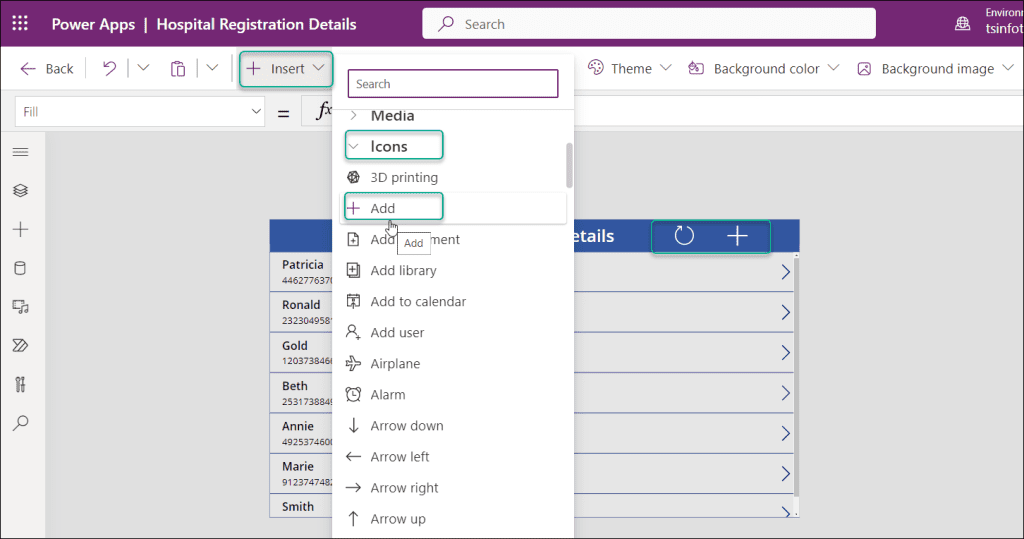
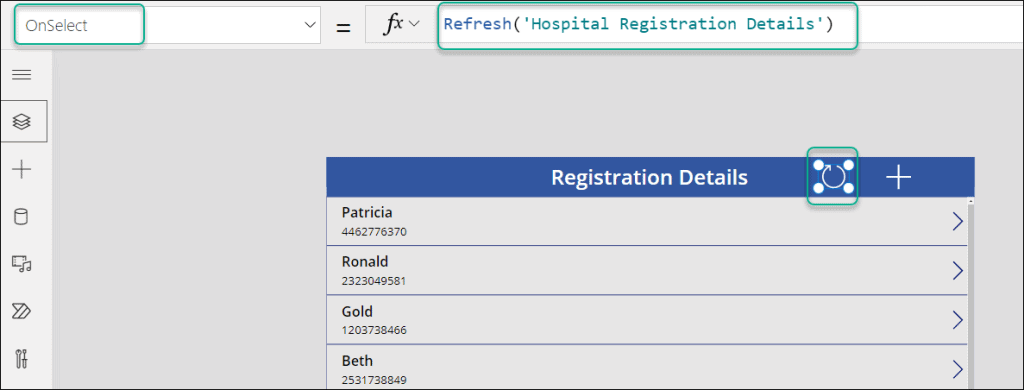
- Select the Reload icon and apply the code below on its OnSelect property:
OnSelect = Refresh('Hospital Registration Details')Where,
‘Hospital Registration Details‘ = SharePoint list name
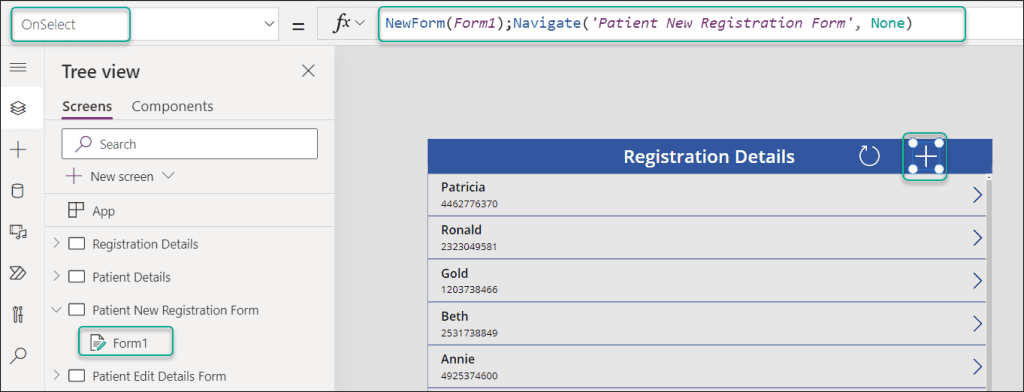
- Next, select the Add icon and set the code below on its OnSelect property:
OnSelect = NewForm(Form1);Navigate('Patient New Registration Form', None)Where,
- Patient New Registration Form = This is the third screen name in the app
- Form1 = This is the Power Apps edit form available on the third screen i.e. Patient New Registration Form.
The user can add a new record by using the new edit form that appears after clicking the Add icon.
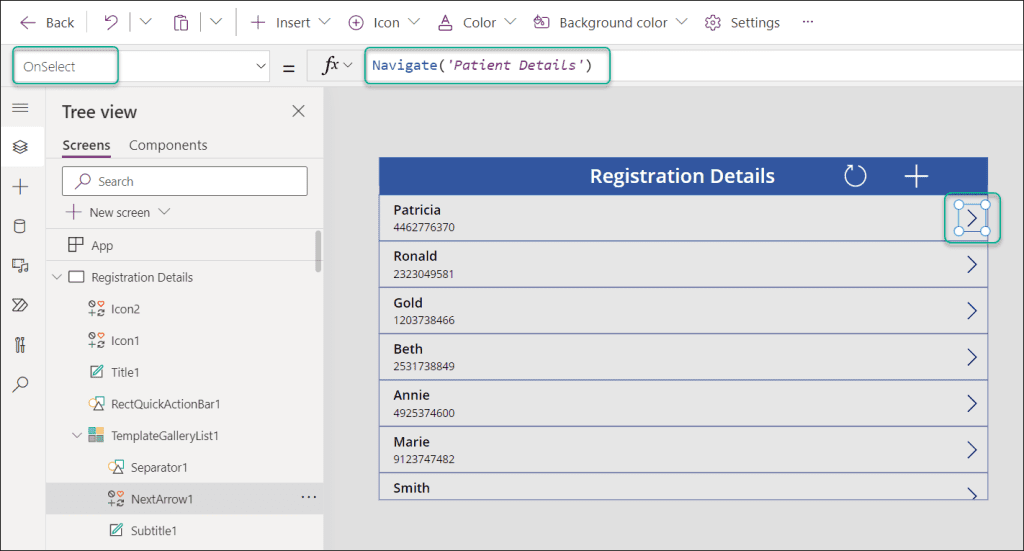
- Now, suppose a user wants to display the record details of a particular patient. In that case, once he/she will click on the next arrow of the specific item, it will redirect to the display screen (Patient Details screen or Second screen).
- To do so, select the next arrow icon from the list gallery and set its OnSelect property as:
OnSelect = Navigate('Patient Details')Where,
‘Patient Details‘ = Name of the second screen
This is all about the first screen in the Power Apps Canvas app. Next, we will jump to the second screen.
Read: Power Apps Display SharePoint List Items – 5 Ways
Create a Display Form in Power Apps (Patient Details)
This is the second screen in Power Apps that will display only the details of a specific patient or person.
- For this, we need to insert a Display form on the second screen. Go to + Insert -> Expand Input -> Display form as shown below.
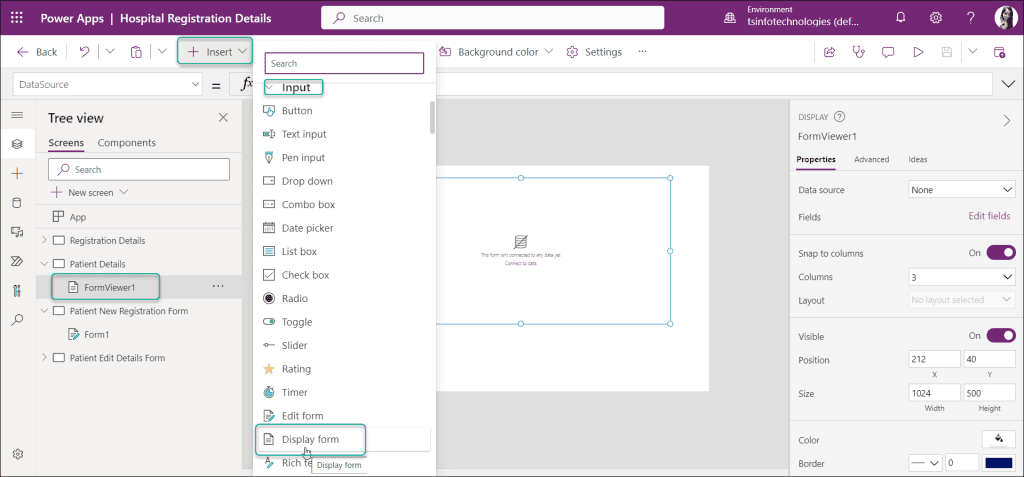
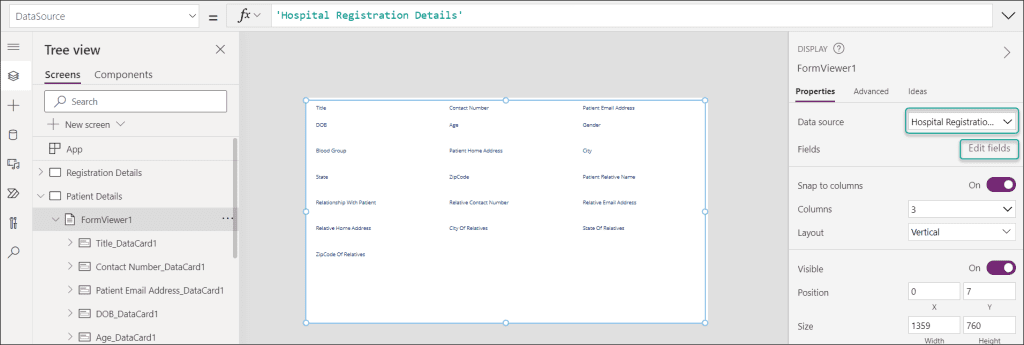
- From the DISPLAY form, choose Data source as SharePoint List (Hospital Registration Details) under the Properties area. Also, you can add or remove some more fields using the Edit fields option. Additionally, if you want to change the form properties, you can use more properties like Columns, Layout, Size, etc.
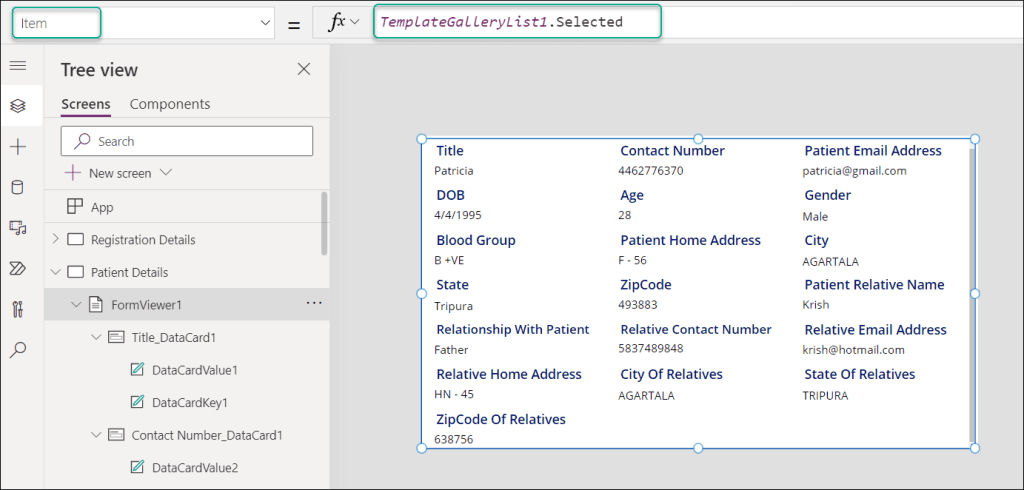
- Click on FormViewer1 and write the formula on its Item property as below:
Item = TemplateGalleryList1.SelectedWhere,
TemplateGalleryList1 = This is the list gallery control that is presented inside the first screen i.e. Registration Details
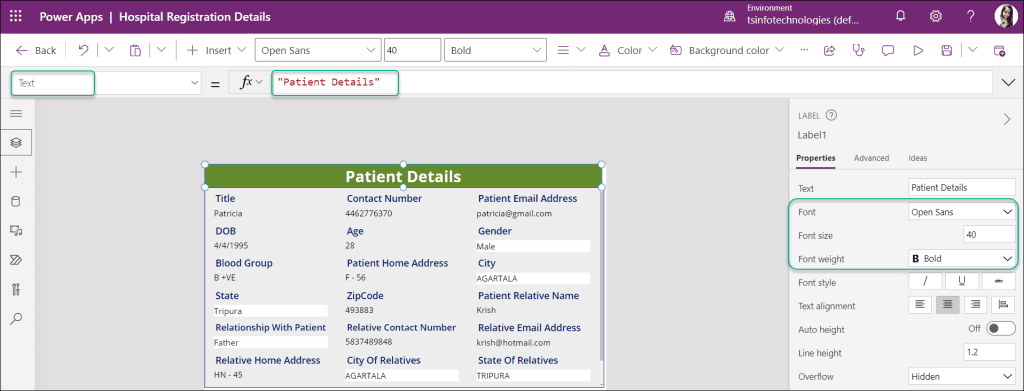
- Next, we will add a header section on the top of the display form. To achieve this, we will insert a Label control (Insert -> Text label) and set its Text property to the below name:
Text = "Patient Details"Where,
“Patient Details” = This is the title name of the Patient Details form. You can provide any name for the title.
In addition, we can provide some more properties to the title like Font, Font size, Font weight, Color, etc.
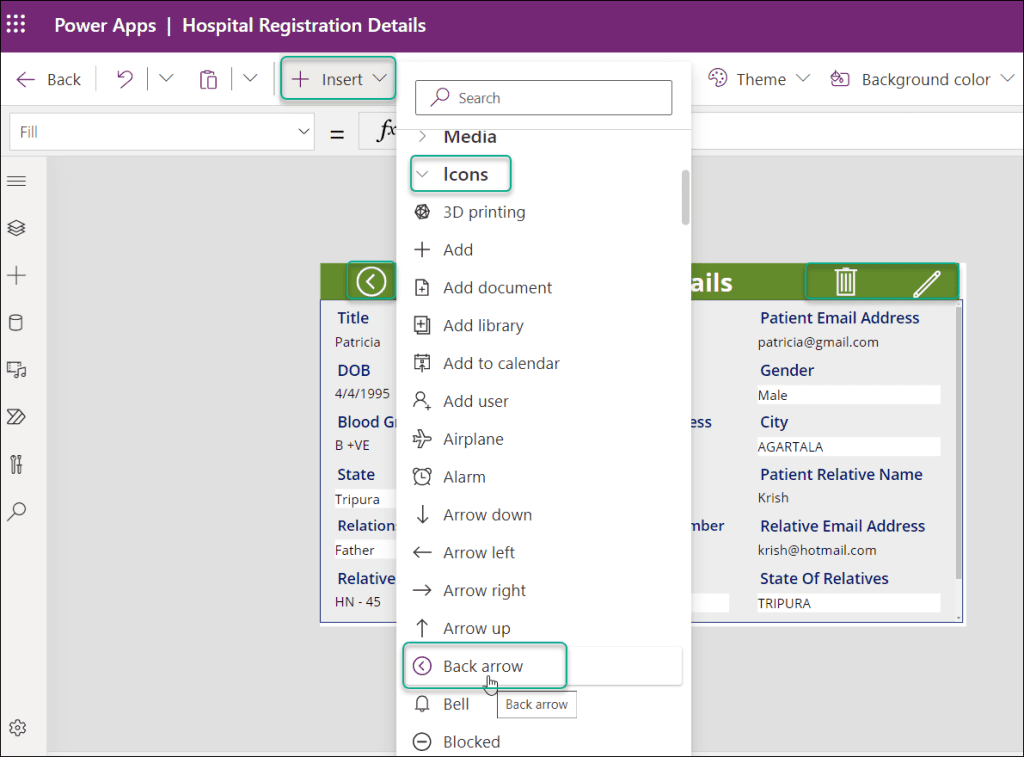
- Add the icons listed below to the Display form (title bar): (Insert -> Icons -> Back arrow & Trash & Edit)
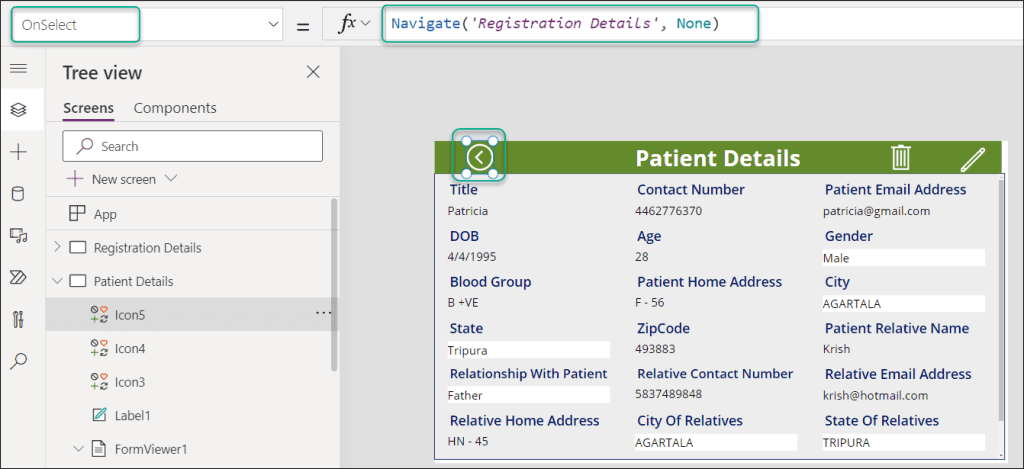
- Select the Back icon (<) and apply the below formula on its OnSelect property:
OnSelect = Navigate('Registration Details', None)As a result, the initial screen will be reached when a user clicks the back icon (Registration Details).
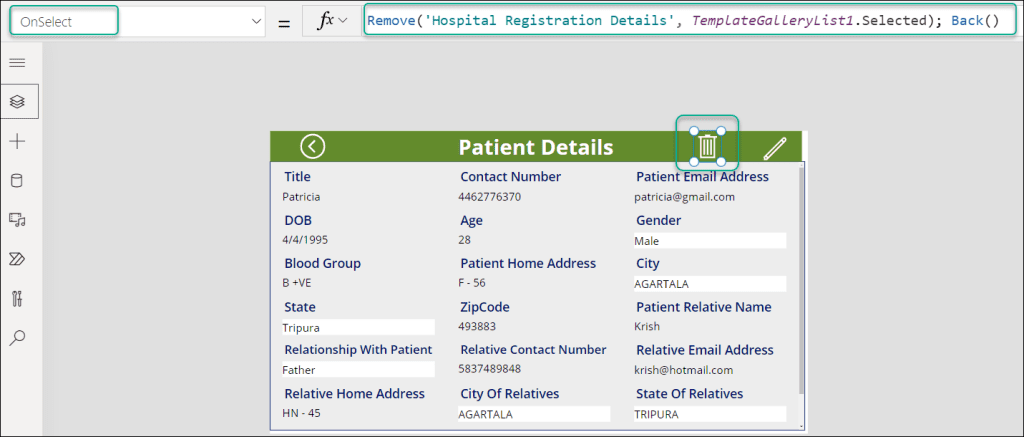
- Similarly, choose the Trash icon and enter the following formula into its OnSelect property:
OnSelect = Remove('Hospital Registration Details',TemplateGalleryList1.Selected); Back()Where,
- ‘Hospital Registration Details‘ = SharePoint List name
- TemplateGalleryList1 = Gallery control name from the list screen
Whenever the user will click on the Trash icon, the specific item will remove from the template gallery as well as from the SharePoint list.
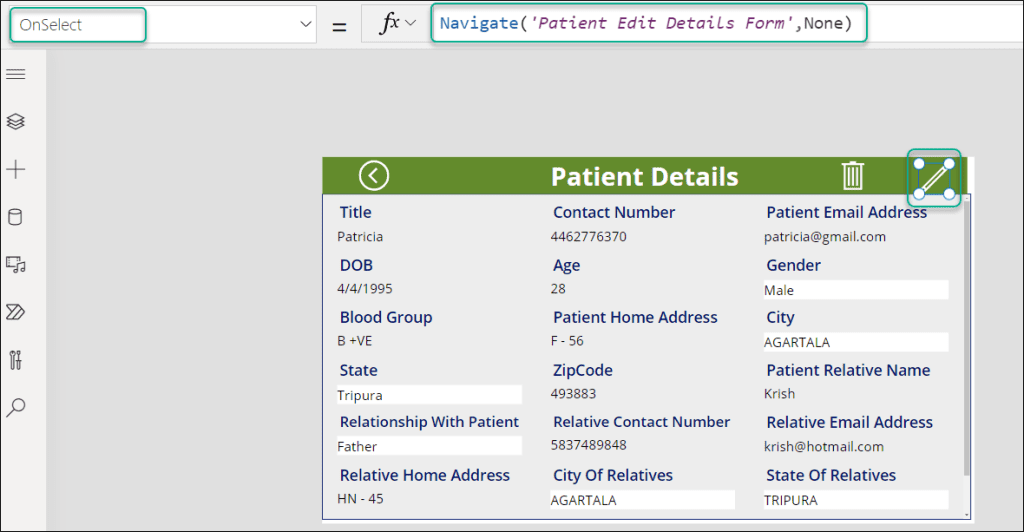
- Apply the following code to its OnSelect property after selecting the Edit icon:
OnSelect = Navigate('Patient Edit Details Form', ScreenTransition.None)Where,
Patient Edit Details Form = This is the fourth or last screen that helps to edit the form.
The user can edit or modify any particular item once they have chosen the edit icon.
This is all about the second screen Display Form. Next, we will work on the third screen (Patient New Registration Form).
Have a look: PowerApps submit form to SharePoint Online list
Create an Edit Form in Power Apps (Patient New Registration Form)
This is the third screen named Patient New Registration Form. As the name suggests, this form will help you to enter a new record of the patient. To construct an Edit form in the third screen (Patient New Registration Form), follow the steps below:
- To insert an Edit form on the third screen, go to + Insert -> Expand Input -> Click on the Edit form option.
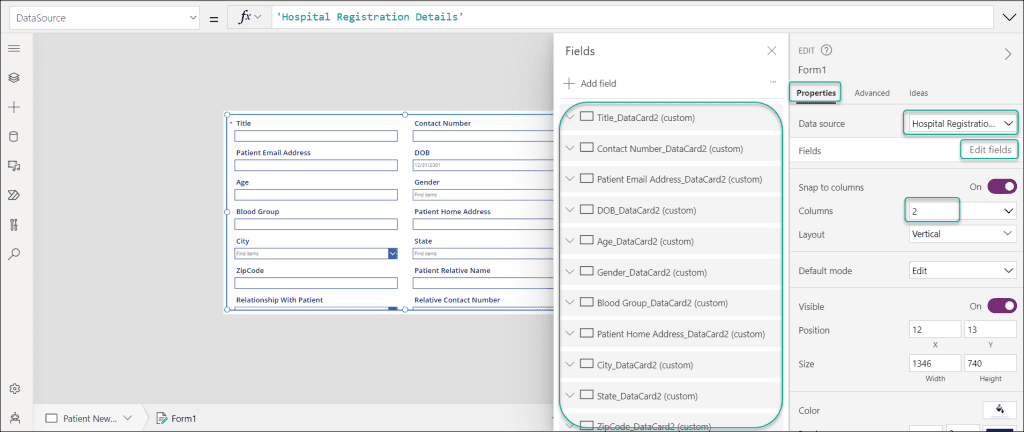
- From the Edit form, choose Data source as SharePoint List (Hospital Registration Details) under the Properties area. Also, you can add or remove some more fields using the Edit fields option.
- Additionally, if you want to change the form properties, you can use more properties like Columns, Layout, Size, etc. But before doing anything inside the form, you need to unlock the data cards first (Select the DataCard -> Advanced -> Unlock the key).
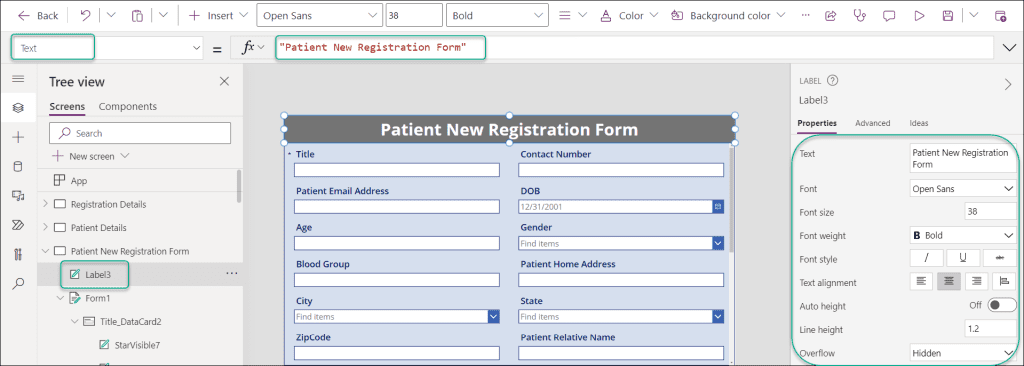
- The top of the edit form will then have a header section. In order to accomplish this, we will enter a Label control (Insert -> Text label) and set its Text property to the name listed below:
Text = "Patient New Registration Form"The title of the edit form is “Patient New Registration Form“. For the title, you can use any name. We can also add more attributes to the title, such as the Font, Font size, Font weight, Color, etc.
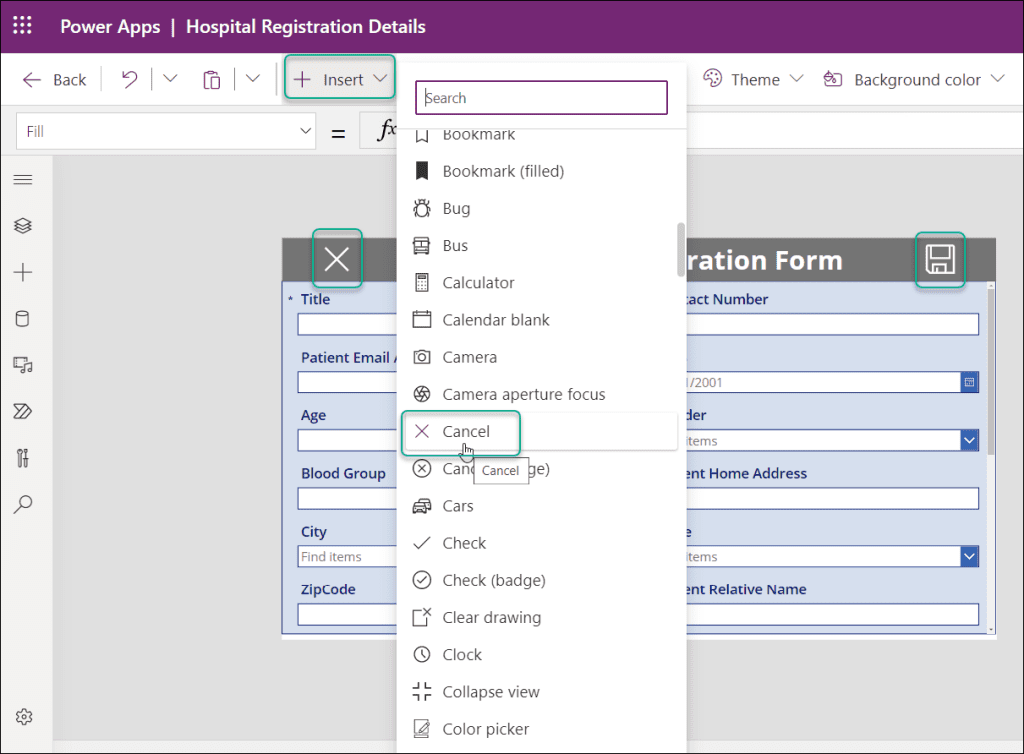
- Insert the icons listed below into the Edit form (title bar): (Insert -> Icons -> Cancel & Save).
- Save: This icon helps to save the edit form.
- Cancel: This icon helps to cancel the Edit form and go back to the Display form.
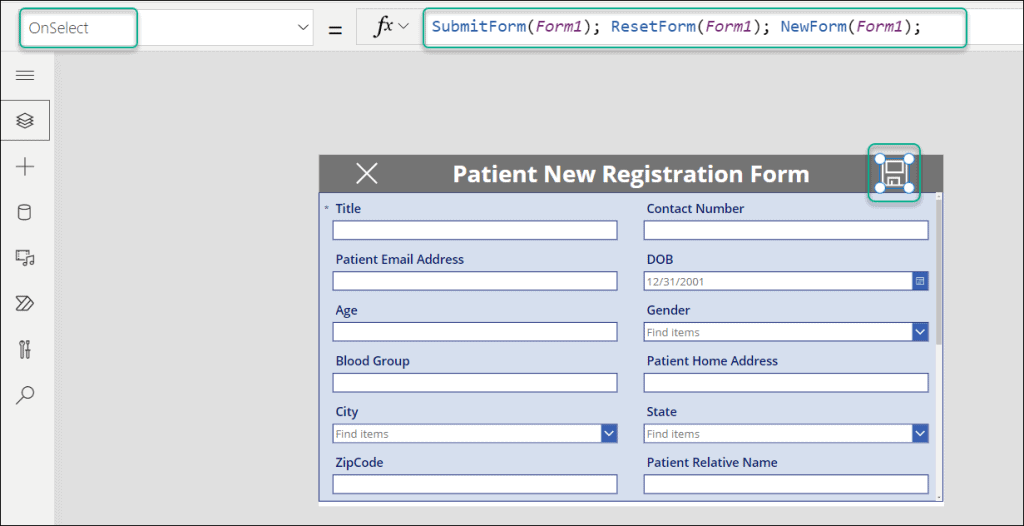
- Select the Save icon and apply the below formula on its OnSelect property:
OnSelect = SubmitForm(Form1); ResetForm(Form1); NewForm(Form1); Where,
- Form1 = Edit form name
- SubmitForm = This SubmitForm function helps to update the data source with any changes made in a Form control.
- ResetForm = The ResetForm function restores a form’s contents to their original state, prior to any changes made by the user.
- NewForm = This NewForm function always helps to open the new form after submitting the last record by the user.
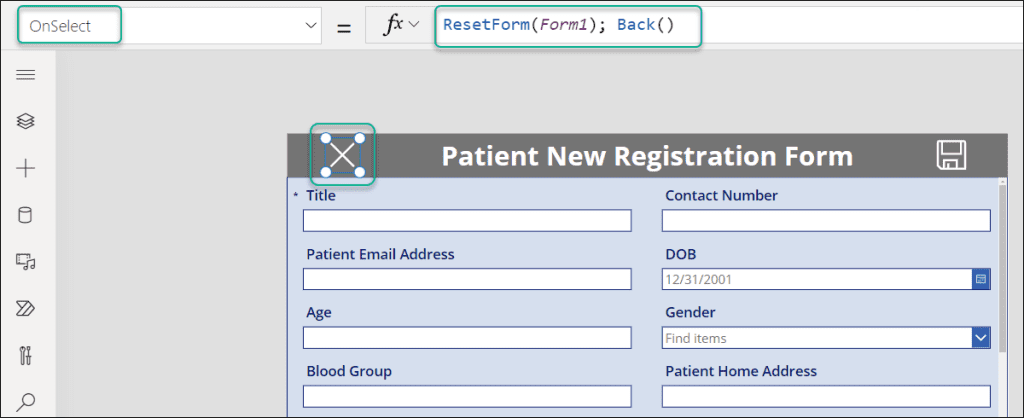
- Similarly, select the Cancel icon and set its OnSelect property as:
OnSelect = ResetForm(Form1); Back()This above code helps you to reset the edit form and go back directly to the first registration screen.
That’s it to do on the third screen in the Power Apps Canvas app.
Check Post: How to display images from a SharePoint Online library in PowerApps
Create an Edit Form in Power Apps (Patient Edit Details Form)
The fourth and last screen to feature an edit form is this one. This form can be used to alter or modify any specific list gallery record.
- Go to + Insert -> Expand Input -> Click on the Edit form option to add an Edit form to the fourth screen.
- Select the Data source as SharePoint List (Hospital Registration Details) from the Edit form’s Properties section. Additionally, by selecting the Edit fields option, you can add or remove other fields.
- Moreover, you can use additional properties like Columns, Layout, Size, etc. to modify the form’s features. However, you must first unlock the data cards (Select the DataCard -> Advanced -> Unlock the key) before performing anything further inside the form.
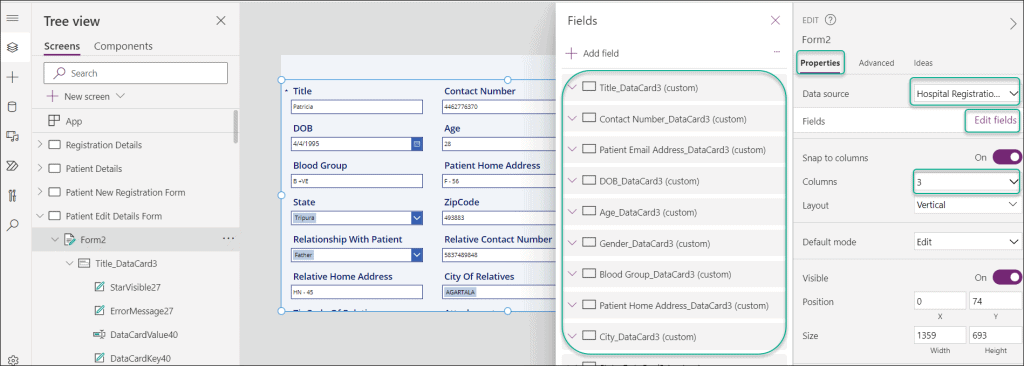
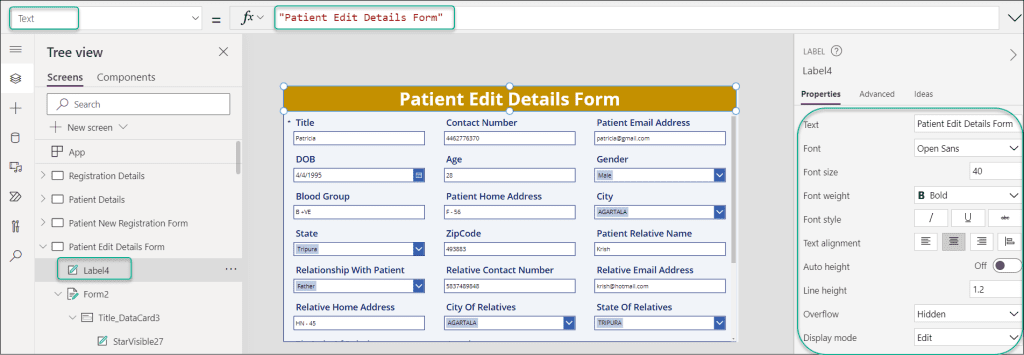
- The header section will then appear at the top of the edit form. We will enter a Label control (Insert -> Text label) and set its Text attribute to the name provided below in order to achieve this:
Text = "Patient Edit Details Form"Where,
“Patient Edit Details Form” = Header/Title of the fourth screen
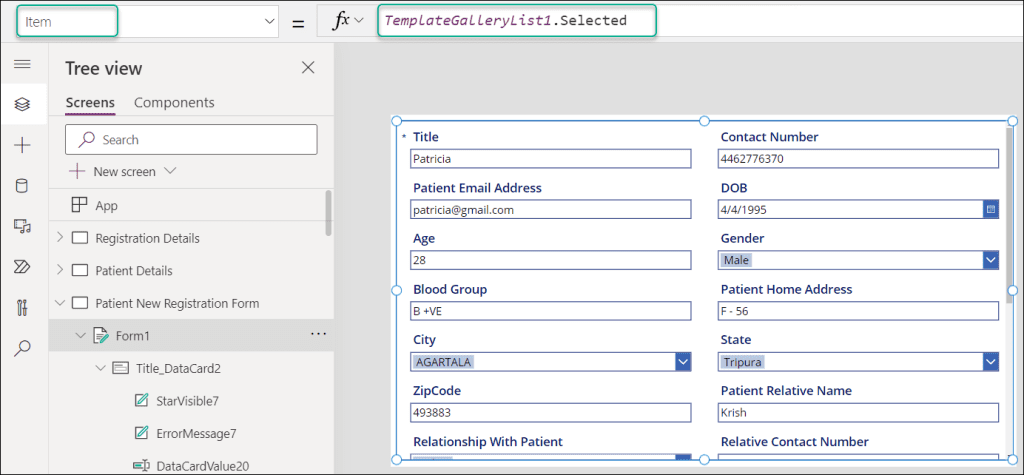
- Next, select the edit form and set its Item property as:
Item = TemplateGalleryList1.SelectedTemplateGalleryList1 = List gallery name of the first screen (Registration Details)
- Add the below icons in the Edit form: (Insert -> Icons -> Save & Cancel)
- Save: This icon helps to save the edit form.
- Cancel: This icon helps to cancel the Edit form and go back to the Display form (Patient Details Form).
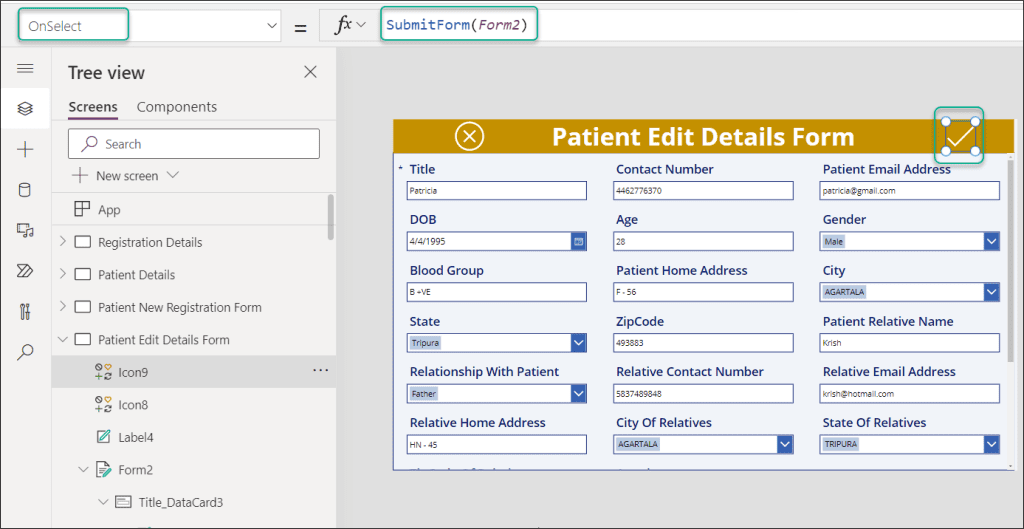
- Select the Save icon and apply the below formula on its OnSelect property:
OnSelect = SubmitForm(Form2)Where,
Form2 = Edit form name of the current or fourth screen
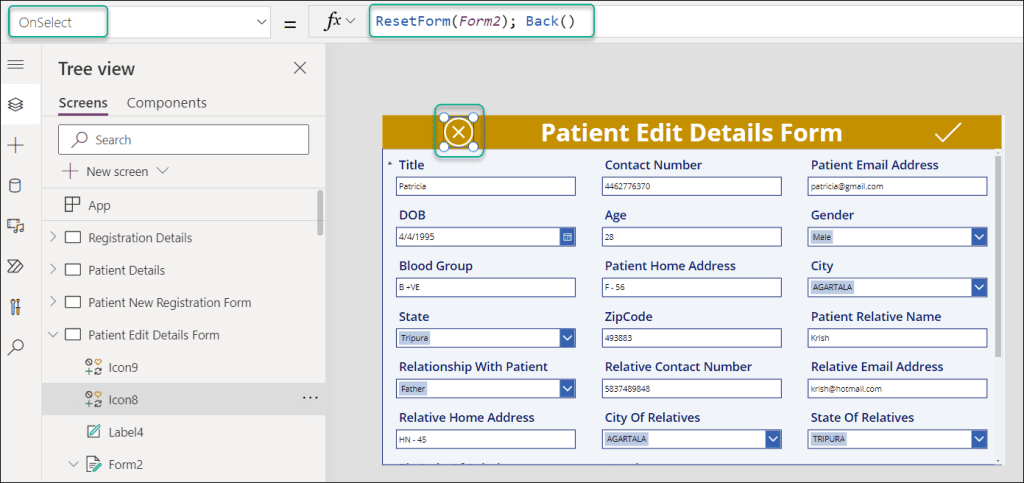
- Select the Cancel icon and set its OnSelect property as:
OnSelect = ResetForm(Form2); Back()The above formula will help you to go back to the display form.
This is all about the fourth screen and that’s it to do in the Power Apps Canvas app. Now we will see how we can preview, save, and publish the Canvas app.
Read Post: How to Create CSV in SharePoint using PowerApps and Power Automate
Preview Canvas app in Power Apps
When the Power Apps Canvas app is complete, we can test it. Power Apps has a feature called Preview that allows users to test the application.
- Press the F5 key or the Run icon at the top of the page to preview the Power Apps Canvas app as shown below.

- When you click the Preview button, the Registration Details screen, which has a list of all the SharePoint List records, will appear.
- If you like to see a specific patient’s details, click the Next arrow icon (>) next to the name of the patient you want to view. You may see all the details about that particular patient on the second screen (Patient Details).
- You can choose a specific record and then click the Trash button to delete it. Later, the specific record will be deleted from both the SharePoint list and the list gallery.
- If you wish to change some data, simply click the Edit icon, and an edit form will then display (fourth screen). Utilize the Edit form to make changes to the data, then click Check to save the information. If not, you can use the Cancel symbol to end the record.

- Similarly, suppose a patient wants to make a new entry or register, then click on the Add (+) icon from the first screen (Registration Details) -> Fillup all the fields in the new form (Patient New Registration Form) -> Click on the Save icon.
- All of the information will be stored in the SharePoint list once you save the record (Hospital Registration Details). After you reload the SharePoint list, the new entry will show up there.

This is how we can preview the Canvas app in Power Apps.
Save and Publish Power Apps Canvas App
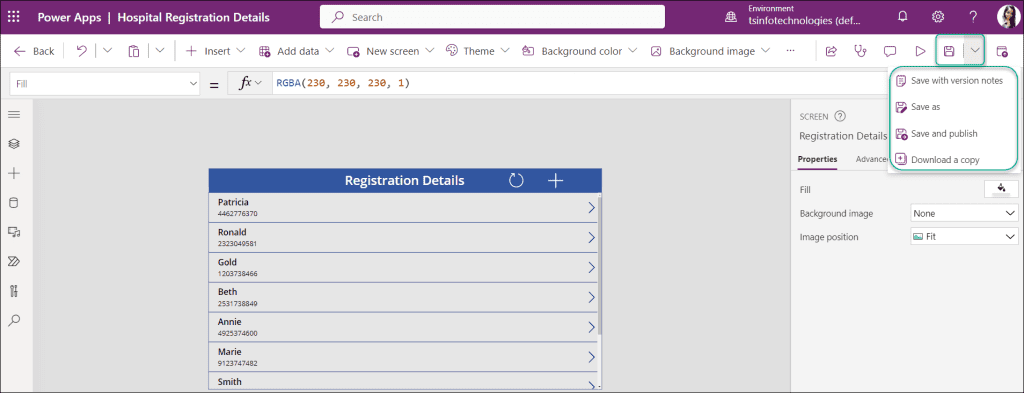
Once the testing part is done, you need to Save and Publish the Canvas app. You can view the Save and Publish button on the top right corner.
When you will expand the Save button, there are four options available. Such as:
- Save with version notes
- Save as
- Save and publish
- Download a copy
To save and publish the canvas app directly we can choose the third option.
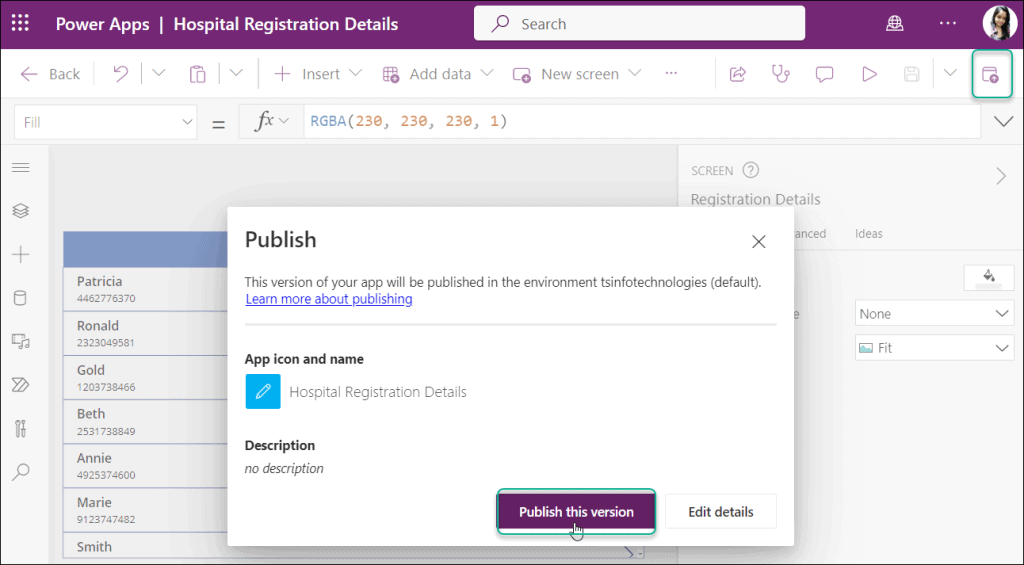
Additionally, the Publish icon located in the top right area can be used to publish the canvas application.
Click on Edit details if you want to alter any of the app’s details before publishing, such as the App Name, Icon, or Description; otherwise, click on Publish this version.
This is how we can save and publish the Power Apps Canvas App.
Have a look: How to create tabs in PowerApps in SharePoint Online List Form
Share the Power Apps Canvas App
Finally, we will see how to share the Power Apps Canvas app with other users or members.
We can distribute the Power Apps Canvas app to other users or employees in our company. so that people may effortlessly use the canvas app.
- In order to share the Power Apps Canvas app with others, there are now two techniques. The first is that you may use the Apps studio page to share the app.
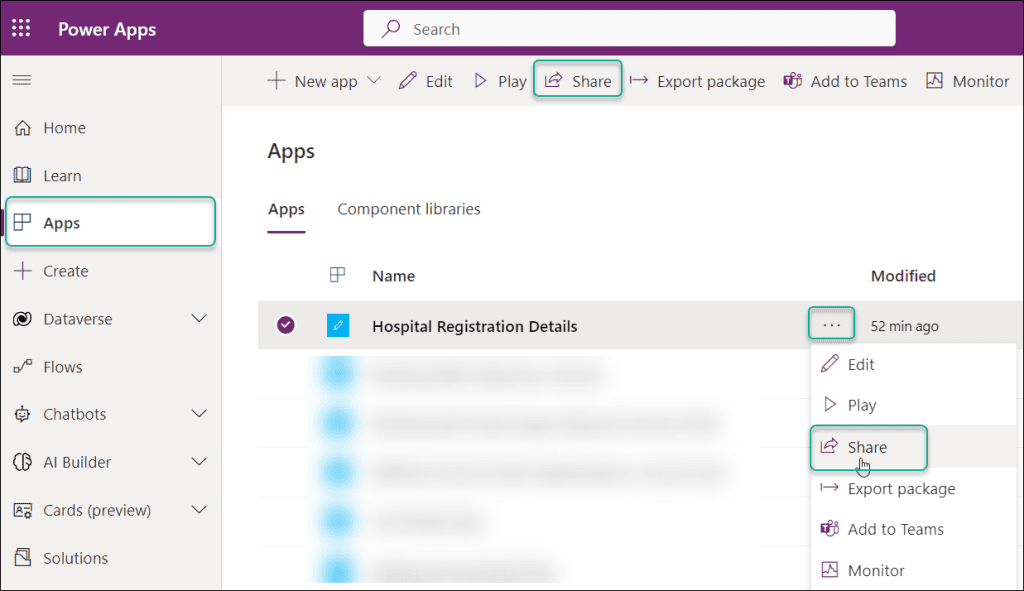
- Go to Apps (from left nav) -> Select the specific Canvas app (Hospital Registration Details) -> Click on ellipses (…) -> Share.
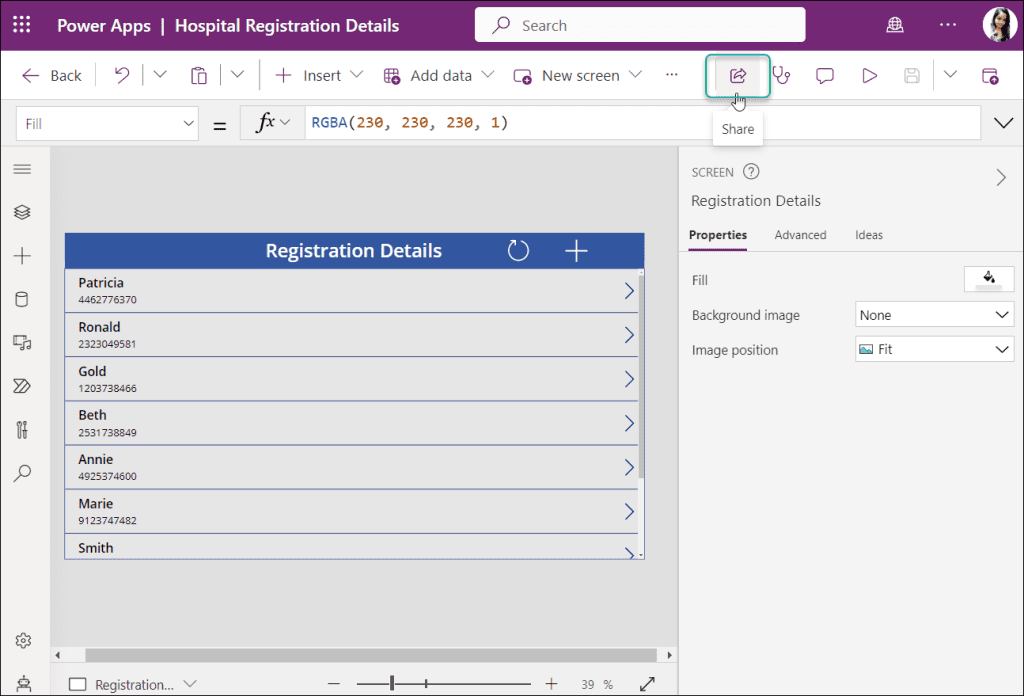
- The other way, we can share the canvas app from the app itself. Just click on the Share icon from the top of the screen like below.
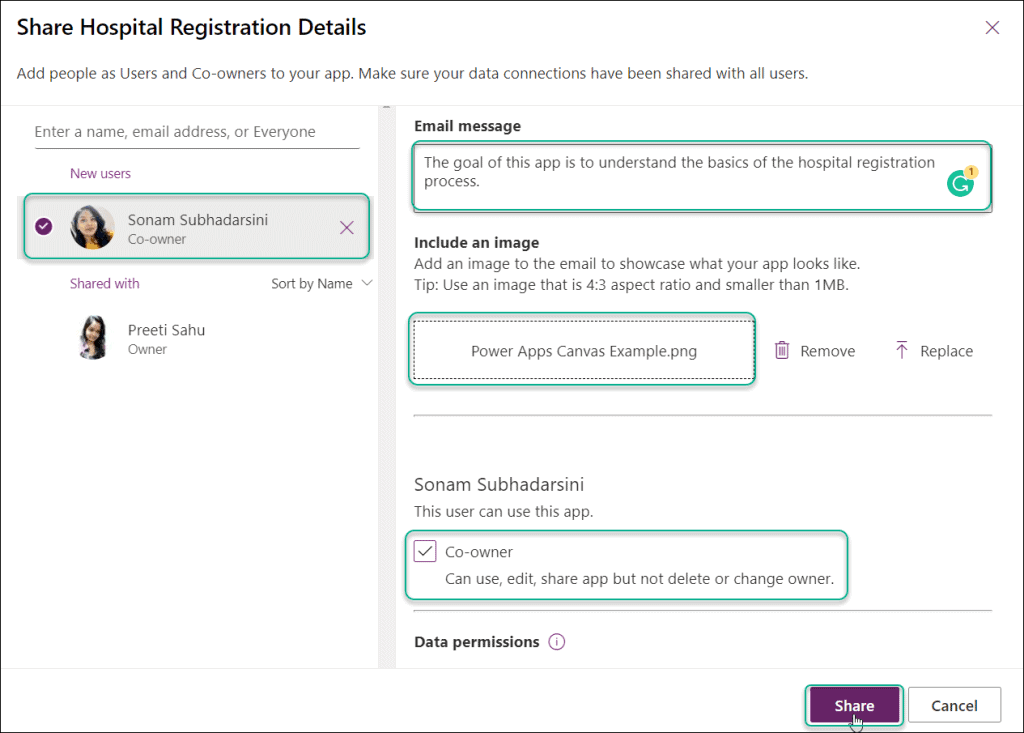
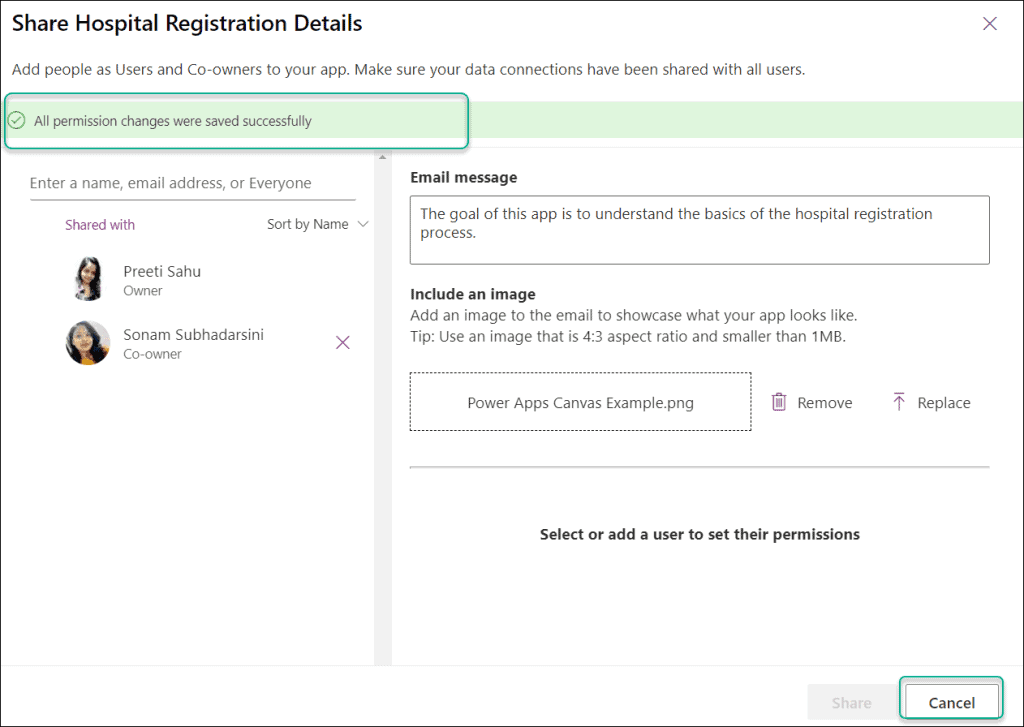
- On the next screen, Provide the name or email address of the user with whom you want to share the particular Power apps Canvas app.
- Enter some email messages to let colleagues know what your app does and how it can help them.
- Also, you can upload an image to the email to showcase what your app looks like. But its an optional.
- Select the Co-owner (if you want). If you select this option, then the user can use, edit, and share the canvas app but not delete or change the owner of the app. Once everything is ready, just click on the Share button.
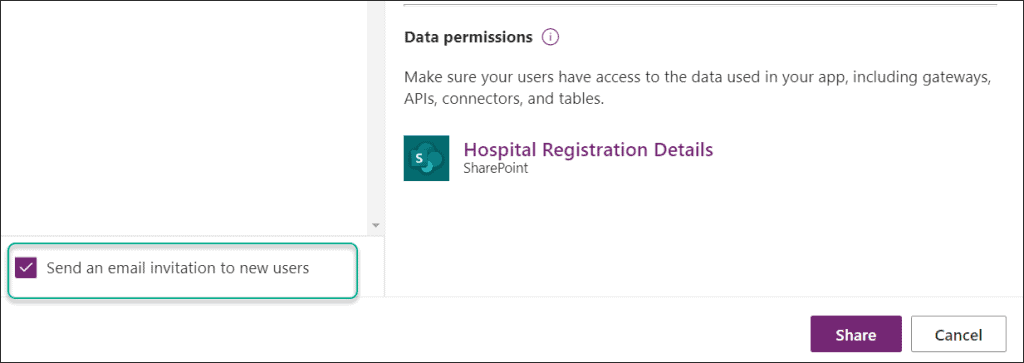
- All above the fields will visible if you choose the below option “Send an email invitation to new users“. Otherwise, you will not see any of the above fields except the last one (Co-owner).
- When you will share the app with another user, then an App Web link will generate automatically. You can open this canvas app through this weblink as well.
- When you will click on the Share button, you can view the below successful notification “All permission changes were saved successfully“. Finally, click on the Cancel button.
This is how we can share the Power Apps canvas app with other users.
Furthermore, you may like some more Power Apps tutorials:
- Create a PowerApps App from PowerApps template
- Create a canvas app from Excel in PowerApps (Step by Step tutorial)
- Create a Data Table from Excel Data using PowerApps
- PowerApps Functions Tutorial
- PowerApps gallery control filter example
- How to use PowerApps Table() Function
- PowerApps show hide fields based on Yes/No column
In this Power Apps tutorial, we learned all about what is Power Apps Canvas app, how to create a canvas app in powerapps from a sharepoint list, how to connect the SharePoint list connector to the app, and many more.
Additionally, we covered some more topics:
- Create a Canvas app from SharePoint List in Power Apps
- Create a List Screen in Power Apps
- Create a Display Form in Power Apps
- Create an Edit Form in Power Apps
- Preview Canvas app in Power Apps
- Save and Publish Power Apps Canvas App
- Share the Power Apps Canvas App with other users
I am Bijay a Microsoft MVP (10 times – My MVP Profile) in SharePoint and have more than 17 years of expertise in SharePoint Online Office 365, SharePoint subscription edition, and SharePoint 2019/2016/2013. Currently working in my own venture TSInfo Technologies a SharePoint development, consulting, and training company. I also run the popular SharePoint website EnjoySharePoint.com
Trash not working. The word ‘TemplateGalleryList1.selected’ has a green underline. HOW should I fix?????????