Do you know how to create a table in Power Apps? No worries at all. It’s effortless.
This Power Apps tutorial will assist you with everything about Power Apps Table, Power Apps Table function, its syntax, and how to create table in Power Apps.
Furthermore, we will discuss working with Power Apps create table from collection with various examples.
Power Apps Table Function
The Power Apps Table() function creates a temporary table in Power Apps.
In Power Apps, a table is a value, much like a string or a number. A table can be passed to a function as an input, and functions can return tables. A table cannot be made permanent.
Using the syntax [ value1, value2,… ], you can make a Power Apps table with just one column.
Power Apps Table() Syntax
Refer to the syntax below of the Power Apps Table function:
Table( Record1 [, Record2, ... ] )Where,
Record(s) = Required. The records to add to the table.
Table( Untyped )Where,
Untyped = Required. The untyped object that represents a table or array. Acceptable values are dependent on the untyped provider. For JSON, the untyped thing is expected to be a JSON array. Note that regardless of the content type of the Untyped array, the resulting table will be a single-column table of Untyped objects.
Power Apps Create Table
Let’s see how to create a table in Power Apps with different scenarios.
Example – 1:
1. In this example, I have created a Country table and displayed the table values in the Power Apps Dropdown control.
2. To do so, insert a Dropdown control and set its Items property to the code below:
Items = Table(
    {Color: "America"},
    {Color: "Australia"},
    {Color: "Canada"},
    {Color: "France"}
)
Where,
- Color = Table header
- “America“, “Australia“, etc. = Records or Items
NOTE:
Every record in this case needs to be enclosed in a { }. Each record’s fields needs to be divided by a “,“. By using “:“, we may assign the field value to the field.
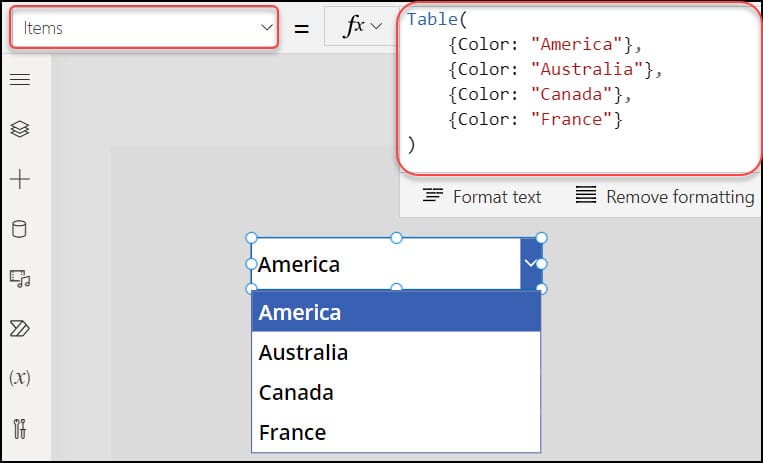
3. Save, Publish, and Preview the app. Once you expand the Dropdown menu, you can see all the table records as shown above.
Example – 2:
1. In this example, we will create a Power Apps table with multiple columns, and the records will be displayed in a Data table control.
2. To work around this, add a Data table control and set its Items property as:
Items = Table(
    {
        ProductName: "MI Mobile",
        Price: 13000,
        Review: "Good",
        Quantity: 12
    },
    {
        ProductName: "Lenove Laptop",
        Price: 4000,
        Review: "Average",
        Quantity: 70
    },
    {
        ProductName: "MI TV",
        Price: 30000,
        Review: "Bed",
        Quantity: 20
    },
    {
        ProductName: "HP Laptop",
        Price: 43000,
        Review: "Good",
        Quantity: 90
    },
    {
        ProductName: "Dell Laptop",
        Price: 12300,
        Review: "Very Good",
        Quantity: 9
    }
)
Where,
- ProductName, Price, Review, Quantity = Table Headers
- “MI Mobile“, 13000, “Good“, 12, and so on = Table Records/Values

3. To add the field values in the Power Apps Data table, go to Properties -> Edit fields -> + Add field -> Select the fields -> Add.
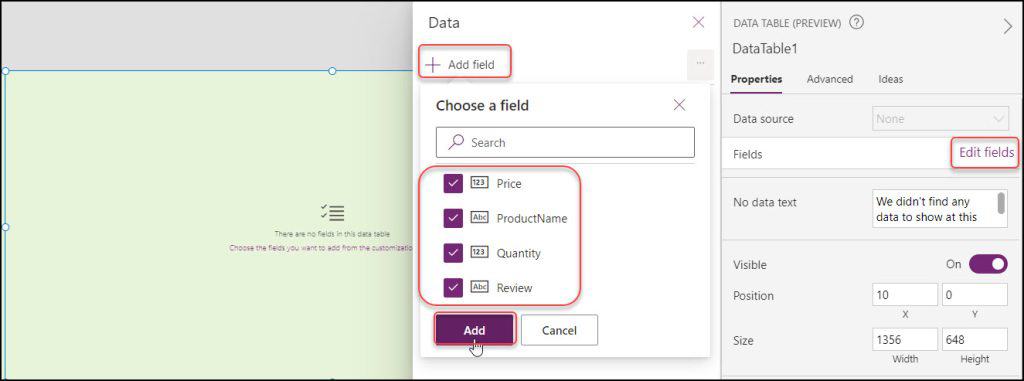
4. Now, all the table-selected records are added to the Power Apps Data table control, as shown below.

This is how to create a table in Power Apps.
Power Apps Create Table from Collection
Next, we will create a table from the Power Apps collection with two scenarios. Here, let’s see two different approaches to create a Power Apps table from the collection, i.e.,
- Power Apps create table from Collection without using variable
- Power Apps create a table from Collection using variable
Example – 1:
1. Select the Power Apps Screen and set its OnVisible property to the code below: [Not only Screen’s OnVisible property but also we can use the code on App’s OnStart and Button’s OnSelect property]
OnVisible = ClearCollect(
    colCarDetails,
    Table(
        {
            CarName: "GMC Terrain SLT AWD",
            Price: "$34,300",
            Review: "Good",
            Quantity: 3
        },
        {
            CarName: "Ford Bronco Heritage",
            Price: "$48,770",
            Review: "Average",
            Quantity: 4
        },
        {
            CarName: "Chevrolet Trax ACTIV",
            Price: "$23,900",
            Review: "Average",
            Quantity: 2
        },
        {
            CarName: "Rolls Royce Droptail",
            Price: "$30,000,000",
            Review: "Good",
            Quantity: 5
        },
        {
            CarName: "Lexus GX 550 Overtrail",
            Price: "$70,000",
            Review: "Very Good",
            Quantity: 3
        }
    )
)
Where,
- colCarDetails = Collection Name
- CarName, Price, Review, Quantity = Table Headers
- “GMC Terrain SLT AWD”, “$34,300”, “Good”, “Quantity,” and so on = Table records

2. Insert a Gallery control and set its Items property as:
Items = colCarDetails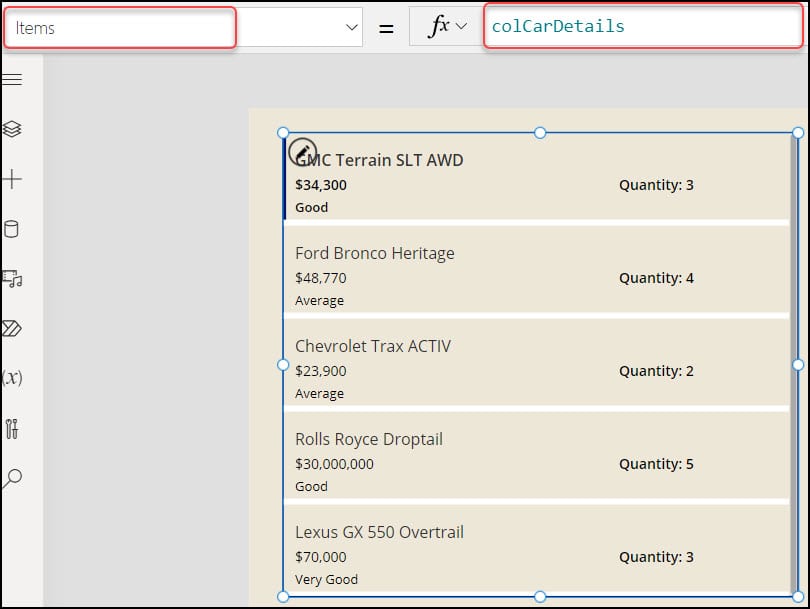
3. Save, Publish, and Close the app. Play or run the app once. The gallery will appear with all the table records from the specific Power Apps Collection.
Example – 2:
In this example, we will use a Variable to create a Power Apps table.
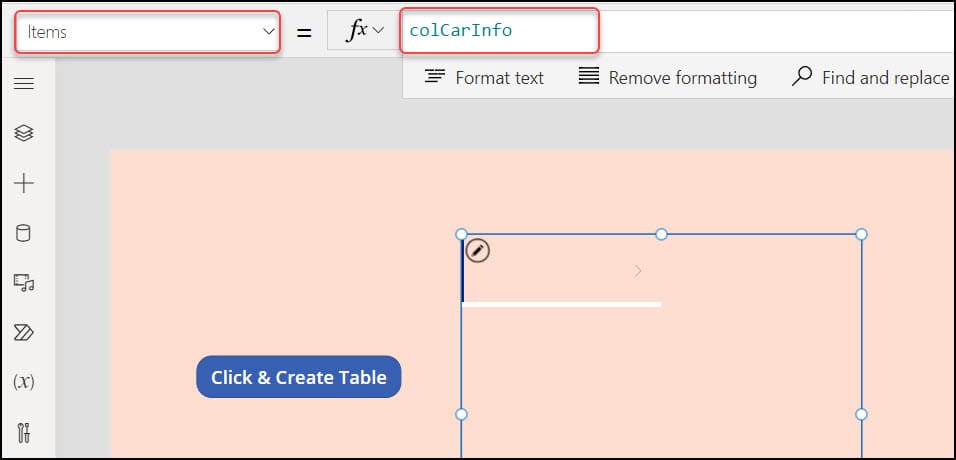
1. The screenshot below represents a Power Apps Button control [Click & Create Table] and a Gallery control. When a user clicks the button, the table records will be saved to the variable. Then, the collection will be created with the table records and displayed in the gallery.
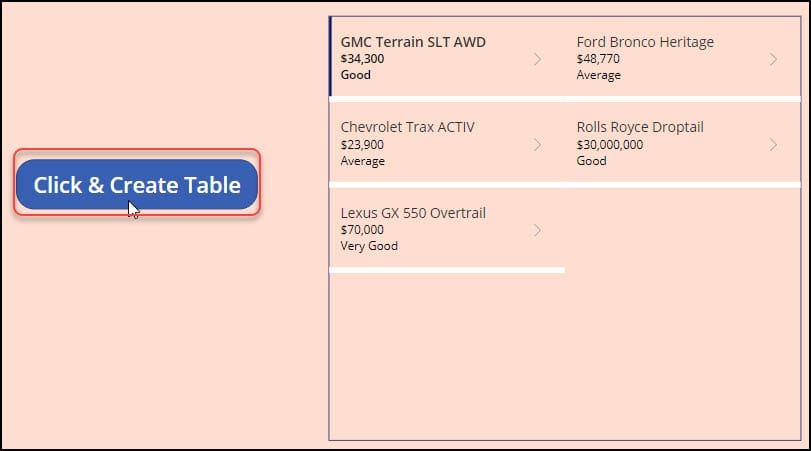
2. To achieve this, apply the code below on the Button’s OnSelect property:
OnSelect = Set(
    varCarInfo,
    Table(
        {
            CarName: "GMC Terrain SLT AWD",
            Price: "$34,300",
            Review: "Good",
            Quantity: 3
        },
        {
            CarName: "Ford Bronco Heritage",
            Price: "$48,770",
            Review: "Average",
            Quantity: 4
        },
        {
            CarName: "Chevrolet Trax ACTIV",
            Price: "$23,900",
            Review: "Average",
            Quantity: 2
        },
        {
            CarName: "Rolls Royce Droptail",
            Price: "$30,000,000",
            Review: "Good",
            Quantity: 5
        },
        {
            CarName: "Lexus GX 550 Overtrail",
            Price: "$70,000",
            Review: "Very Good",
            Quantity: 3
        }
    )
);
ClearCollect(
    colCarInfo,
    varCarInfo
)
Where,
- varCarInfo = Variable Name
- CarName, Price, Review, Quantity = Table Headers
- “GMC Terrain SLT AWD”, “$34,300”, “Good”, “Quantity,” and so on = Table records/items
- colCarInfo = Collection Name

3. Then, add a Vertical gallery control and set its Items property as:
Items = colCarInfoRefer to the image below.
4. Save, Publish, and Preview the app. Once you tap the button, the collection will create and display all the table records in the gallery control.
This is how to create a Power Apps table from a collection.
Conclusion
I hope, from this Power Apps article, you learned what is Power Apps Table function, its syntax, and how to create a table in Power Apps.
Additionally, we saw how to create a Power Apps table from a collection using various approaches.
Moreover, you may like some more Power Apps tutorials:
- Power Apps Data Table
- Power Apps Add Data to Dataverse Table
- PowerApps repeating table
- Create a Data Table from Excel Data using PowerApps
I am Bijay a Microsoft MVP (10 times – My MVP Profile) in SharePoint and have more than 17 years of expertise in SharePoint Online Office 365, SharePoint subscription edition, and SharePoint 2019/2016/2013. Currently working in my own venture TSInfo Technologies a SharePoint development, consulting, and training company. I also run the popular SharePoint website EnjoySharePoint.com