Looking for more information on Power Apps Modern Table Control? This Power Apps article covers all the details about Modern table control in Power Apps, including its key properties and how to use it in a simple scenario.
We will also learn how to enable the Power Apps Modern Controls for the Canvas app.
Power Apps Modern Table Control
- Power Apps Modern table control is a type of control that displays a group of data in a tabular or list format.
- The tabular format has column titles for each field displayed and a footer containing information about the dataset, like the number of records.
- The Table control maintains a Selected property that points to the selected row and can be used to connect the Table control to other controls, much like the Gallery and Data table controls.
Refer to the screenshot below that how a Power Apps modern table control looks like:

This is the overview of the Modern table control in Power Apps.
Power Apps Modern Table Control Properties
The table below represents all the important properties of a Power Apps modern table control:
| Property | Description |
|---|---|
| Items | Where the information came from for the table’s items. |
| Allow range selection | It indicates whether users can pick a table area and copy its values. The default value is Yes. If you set this option to No, the user can not select the table area. It will only select a single line. Yes:  No:  |
| Reflow behavior | There are three types of reflow behavior. Such as: Reflow:  Grid only:  List only: 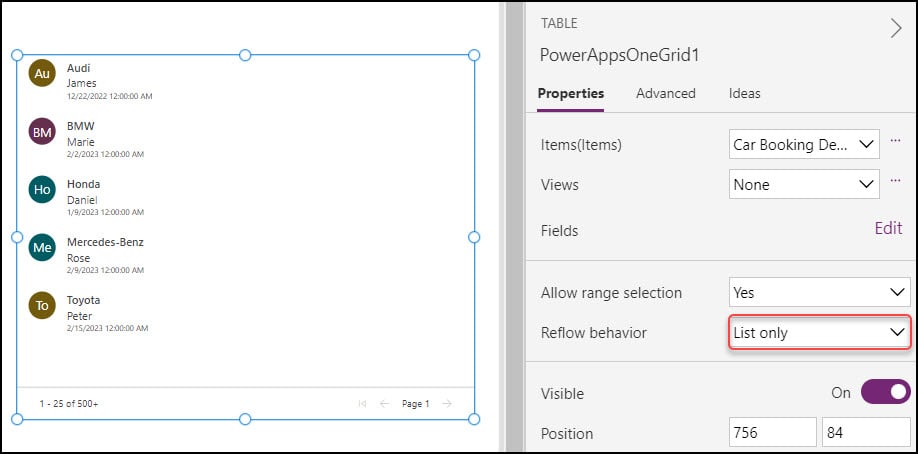 The default responsive behavior of the table. Reflow means the table displays in tabular form when the control is 480 or more pixels wide and transitions to a list format in narrower conditions. GridOnly (or ListOnly) means the table always displays in a tabular (or list) format regardless of the control width, and you can use Power Fx formulas to create your breakpoints for defining the responsive behavior of the table. |
| Visible | Specifies whether to display or hide the Modern Table Control. |
| Position | X – Distance between the control’s left side and the screen’s left edge. Y – Distance between the top of the control and the top edge of the screen. |
| Size | Width – The distance between the control’s left and right sides. Height – Distance between the control’s top and bottom. |
| Selected | The selected row in the Table control. |
These are the properties of a Power Apps Modern Table Control.
Add Power Apps Modern Table Control
Here, we’ll see how to add a Modern Table Control in the Power Apps Canvas app.
You must first enable the “Modern controls and themes” option on the Power Apps Canvas app’s Settings page.
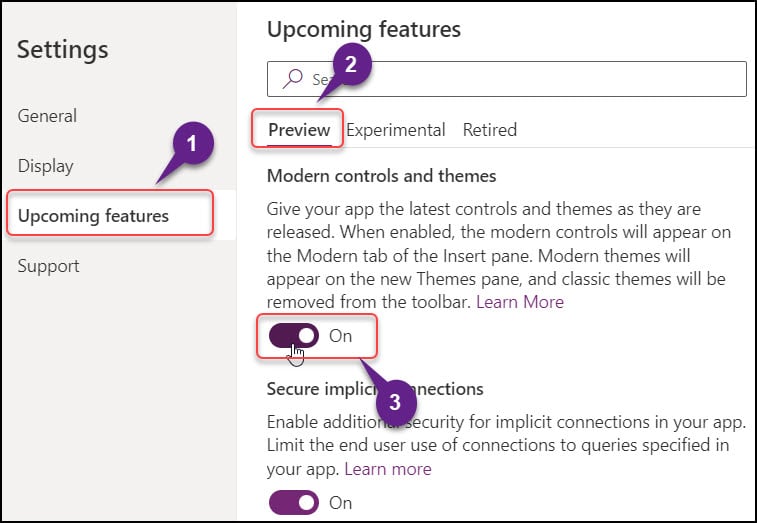
If you don’t enable this option, you won’t be able to see the Modern controls in Power Apps. Use these steps to enable Power Apps Modern Controls:
1. Sign in to Power Apps with your valid Microsoft credentials.
2. Create a New Blank Canvas app (Apps -> + New App -> Canvas).
3. Provide a unique name for the app (Power Apps Modern Data table Control) -> Choose the Format as Tablet -> Click on Create.
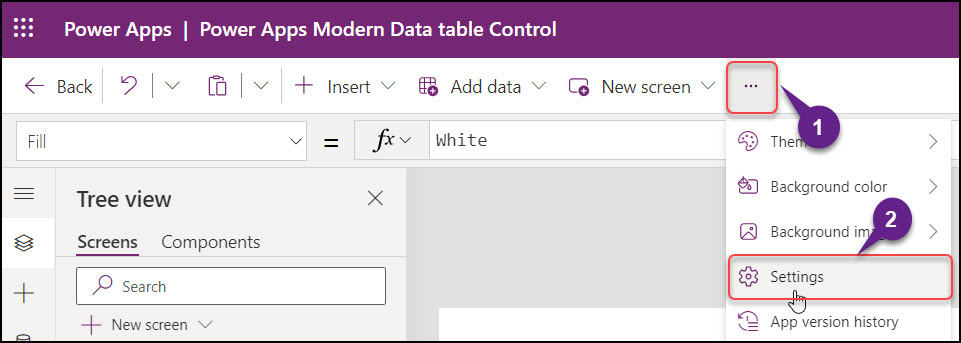
4. On the Power Apps Screen, Click on ellipses (…) from the top -> Settings.
5. In the Settings pane, Select Upcoming features -> Preview -> Scroll down and Enable the Modern controls and themes as shown below.
6. Save and Publish the canvas app once.
7. Expand the + Insert tab (from the top) -> go to the Modern tab -> Select the Table (Dataverse only) as below.
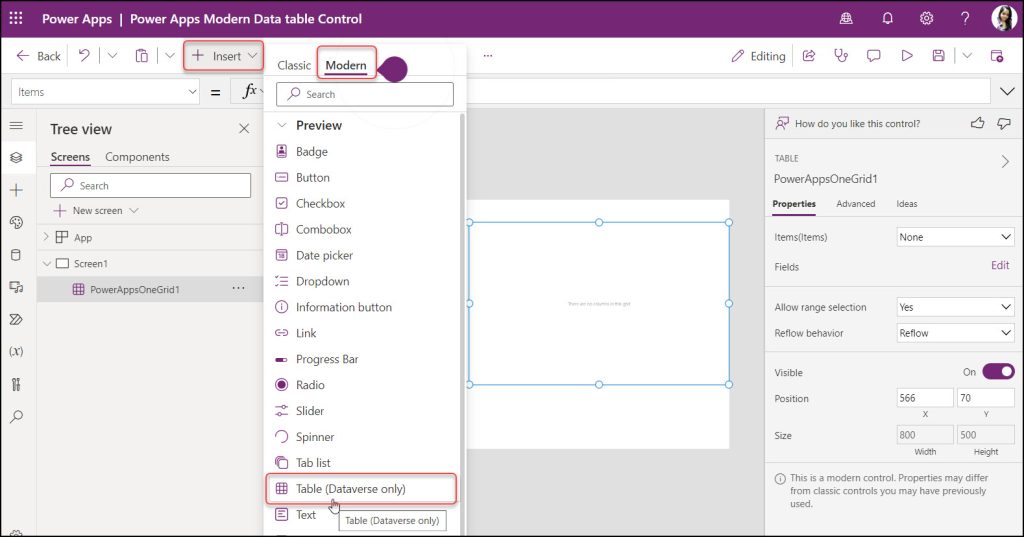
- After being added, the Modern table control’s default name, PowerAppsOneGrid1, will appear on the screen. You can change the name to whatever you want.
This is how to add Modern table control in the Power Apps Canvas app.
How to Use Power Apps Modern Table Control
In the example below, I will explain how to use the Modern Table Control in the Power Apps Canvas app.
1. After inserting the Power Apps modern table, select a Dataverse data source because only the Dataverse connector will be used to access the data.
2. You can connect the Dataverse connector from the Data tab or select the table, and then you can choose your Dataverse table from the right side pane.
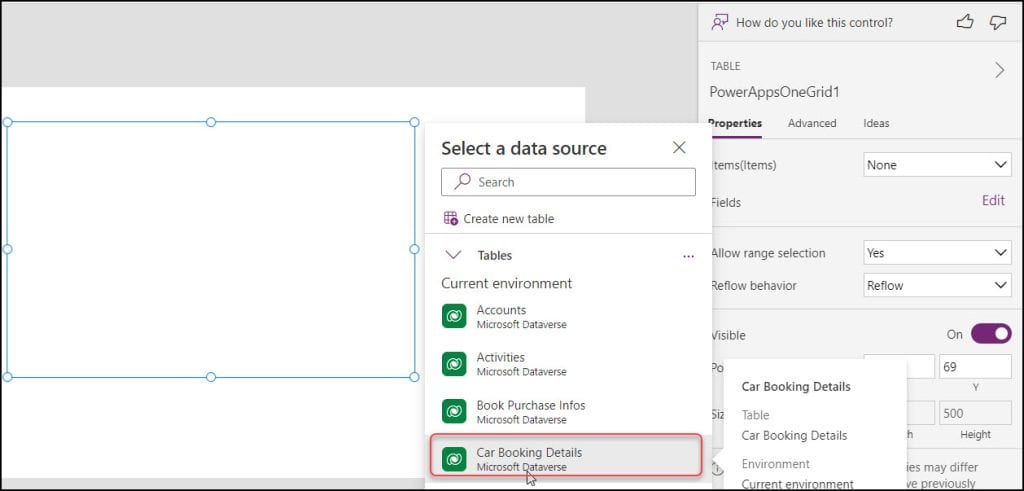
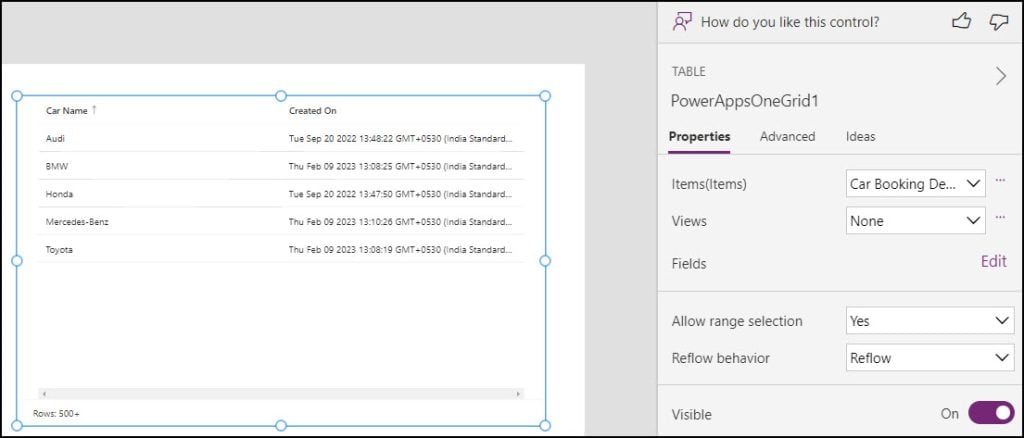
3. Once you select the Dataverse table, the modern table will appear only with two fields [Car Name, Created On] like the one below. Also, it will show the Row count at the bottom below.
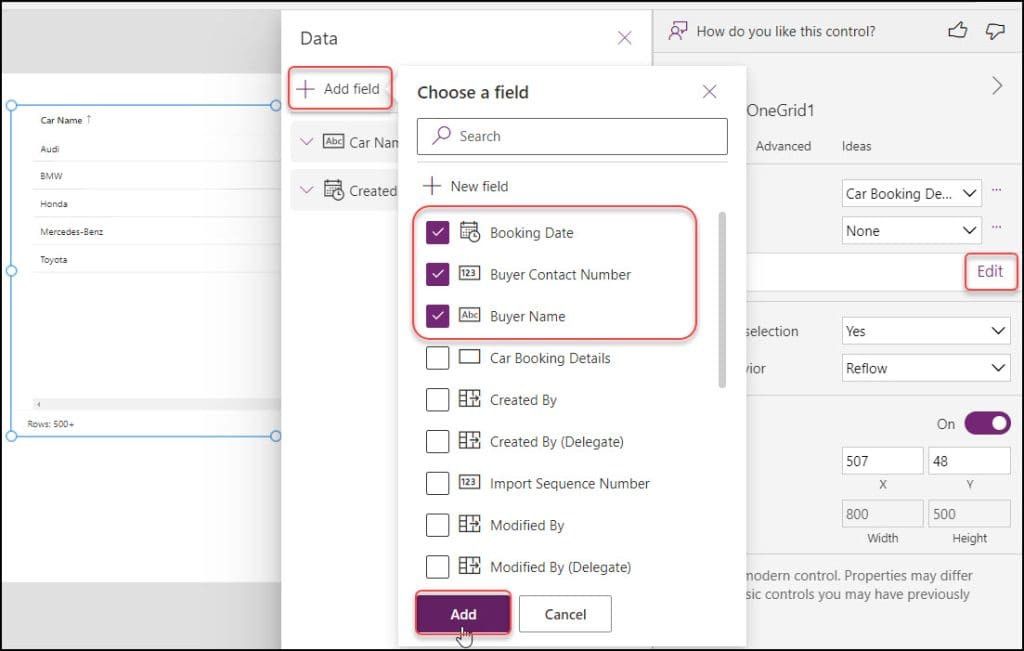
4. To add more fields in the modern table, select table -> Click on Edit from the Fields section -> + Add field -> Select the fields you want to add -> Click on Add.
5. Also, you can remove any unnecessary fields from the modern table control.
6. The Power Apps modern table will appear with all the selected fields, as shown below.

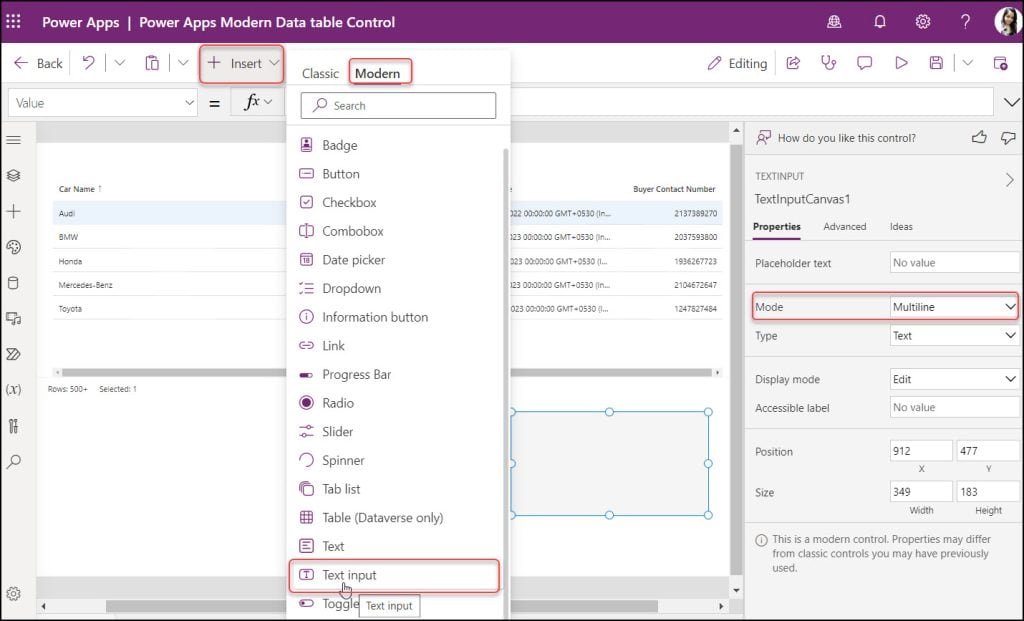
7. Next, add a Text input control (+ Insert -> Modern -> Text input) below the modern table control. Also, make its Mode property to Multiline.
8. Save, Publish, and Preview the app. Copy some content or portion from the table (ctrl+c). [Make sure the table’s Allow range selection property should be Yes]
9. Click inside the text input box and paste the content (ctrl+v).
10. You will see all the table-selected content displayed in the text input control as in the image below.

This is how to use Power Apps modern table control.
Supported and Unsupported Features of Power Apps Modern Table
The table below represents all supported and unsupported features or capabilities of Power Apps modern table control:
| Supported Features | Unsupported Features |
|---|---|
| The data in the table control is read-only. | You cannot change the Table’s style or certain columns. |
| Only Microsoft Dataverse tables are supported for linking with the Modern table control. | No other connectors can be linked to. Only it supports Dataverse table. |
| A specified set of fields are automatically displayed when you connect a Table control to a right connector, like Microsoft Dataverse. You can also display or hide other fields depending on what you need. | |
| Without paging controls, the tabular format provides an updated data viewing experience with limitless scroll. | |
| The modern data table control can switch tabular and list forms automatically. The Reflow property can be used to control this behavior manually. | |
| The Table control lets you change the column width when your application runs. Your modifications aren’t saved on control while the application runs. Your modifications are not saved. |
These are the Supported and Unsupported Power Apps Modern table control features.
Conclusion
This Power Apps tutorial explained the Modern Table Control in Power Apps, including its essential properties and how to use it with a simple example.
We also learned to make the Canvas app’s Power Apps Modern Controls available.
Also, you may like some more Power Apps Modern Control tutorials:
- Power Apps Modern Radio Group Control
- Power Apps Modern Combobox Control
- Power Apps Modern Checkbox Control
- Power Apps Modern Text input Control
- Power Apps Modern Tab List Control
- Power Apps Modern Badge Control
I am Bijay a Microsoft MVP (10 times – My MVP Profile) in SharePoint and have more than 17 years of expertise in SharePoint Online Office 365, SharePoint subscription edition, and SharePoint 2019/2016/2013. Currently working in my own venture TSInfo Technologies a SharePoint development, consulting, and training company. I also run the popular SharePoint website EnjoySharePoint.com