Are you interested in learning how to use Power Query to upload Power Apps Data to a Dataverse Table? No cause for concern. This Microsoft Dataverse tutorial will guide you through each step of adding data to a table using Power Query in Microsoft Dataverse.
Add Data to Dataverse Table in Power Apps
- Using Power Query, we will build a table in Dataverse and populate it with data from an OData feed in this process.
- The following online and offline (on-premise) sources can also be integrated with data using the same methods:
- Excel
- Text files
- OData feeds
- Salesforce
- SQL Server
- Access
- IBM DB2
- Web APIs
Before loading data into an existing or new table, we may filter, modify, and combine it.
Also read: How to create and use dataflow in Dataverse
Power Apps Add Data to Dataverse Table Using Power Query
To work around with Power Apps Add Data to Dataverse Table using Power Query, the 5 steps listed below must be followed:
- Decide where the output data will be loaded, or the destination.
- The source from which data should be received.
- Apply the Power Query.
- Schedule the execution of dataverse tables.
- Utilize the data you moved to the destination storage location.
We may use Power Query to add data to a Dataverse table by following the instructions below.
Step – 1:
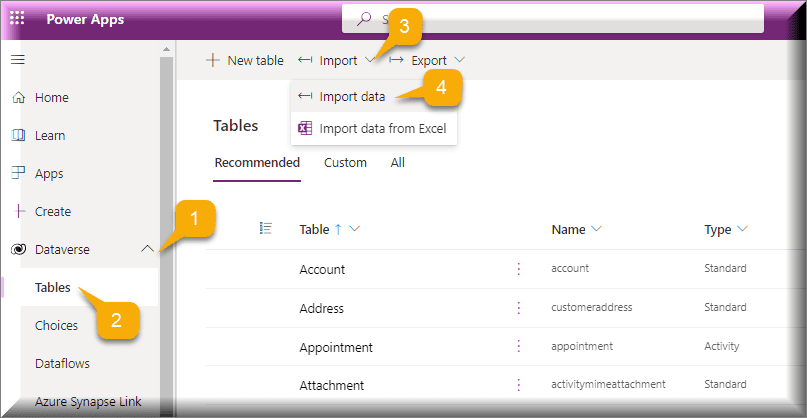
- Sign in to Power Apps first using your credentials. Expand Dataverse on the Power Apps Home screen, and then choose Tables in the left menu.
- Select the Import data option as shown below by clicking on or expanding the Import option in the top command bar.
Step – 2:
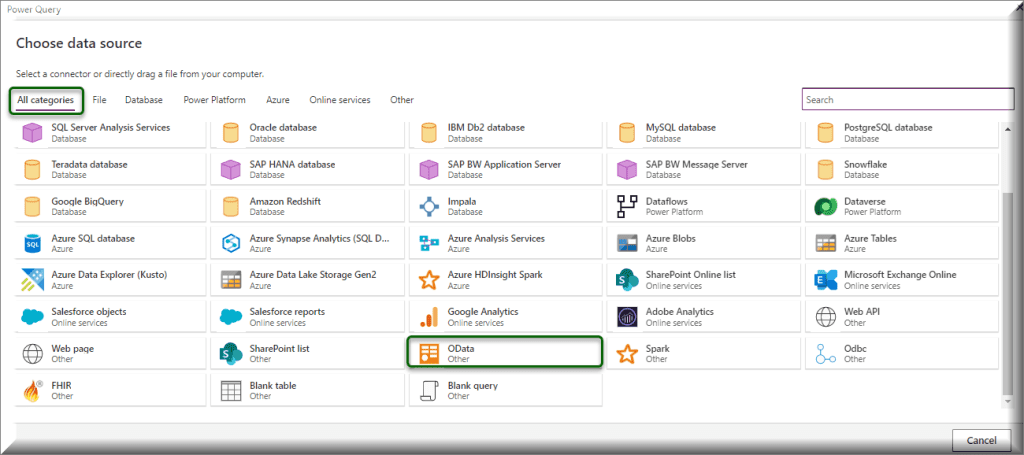
- The data source from which you want to get the data will be asked for by the user.
- There are several tabs that make it simpler to identify certain connections from a particular tab, like All categories, File, Database, etc. Furthermore, we can use the search box to look for any connection name.
- Since we will get the data via the Power Apps, we will select the OData connection as seen below.
Step – 3:
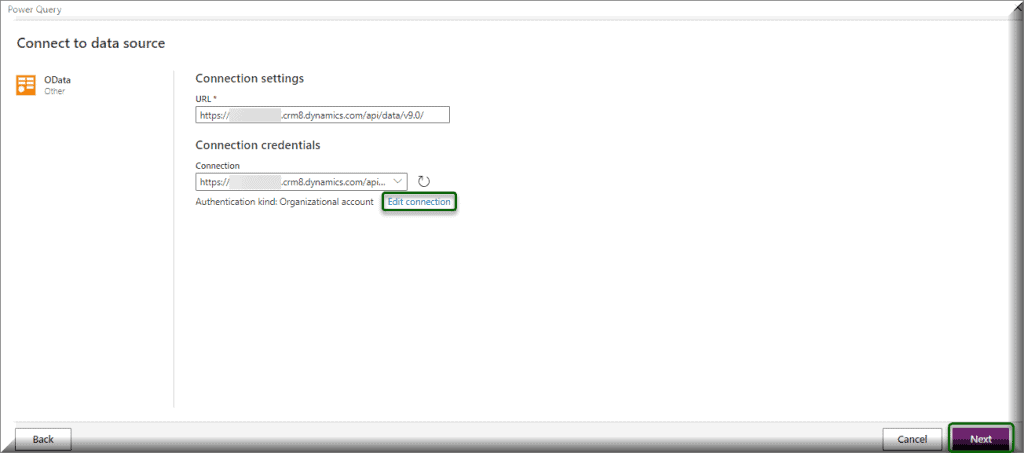
- When we choose the OData connection, a new page will open up where we must connect the OData data source.
- The two various connection setups are as follows. such as:
- Connection settings:
There is just one field in this setup, i.e.
URL = Here, we need to provide the OData feed URL that looks like the below:
https://<your_org_name.crm.dynamics.com/api/data/v9.1/<your_query> Where,
- your_org_name.crm.dynamics.com = Organization instance or service URL
- your_query = entity / tablename + any filters if you want to
- Where can we get this organization’s service URL in Power Apps? To achieve it, click on the Gear or Settings icon from the right top corner and select Session details.
- Next, go to the Instance URL and copy the full URL link as below. This instance URL gives us the organization’s service link or path that we can use in OData connection Settings URL.
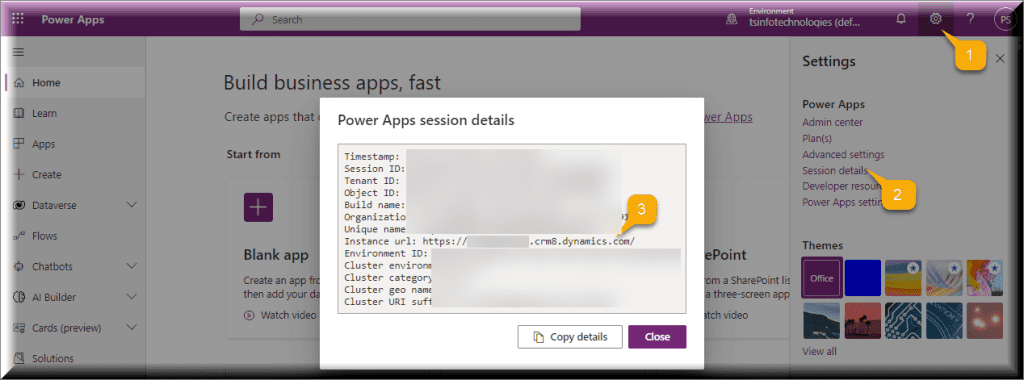
- Now paste the service URL in a notepad along with “/api/data/v9.0” and the whole URL will look like this:
https://your_org_name.crm8.dynamics.com/api/data/v9.0/
Return to the OData Data source page and insert the complete URL in the Connection settings section.
2. Connection credentials:
- Additionally, as we can see by default, the specified URL will also display automatically under the Connection name (Connection credentials).
- After selecting Organizational account in the entry for authentication type, you will be prompted to sign in (if not signed in before). Provide the necessary credentials and sign in.
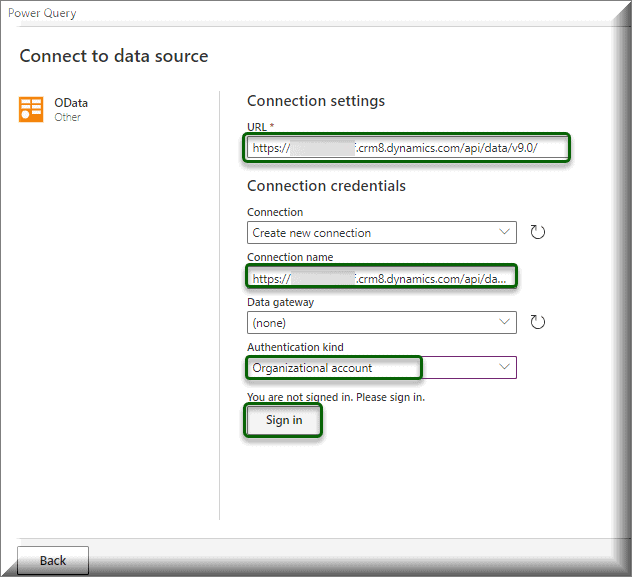
- If you have previously logged in, you won’t see the above options. Instead of that, you only have access to the Edit connection button. When the connection is completed, click the Next button to proceed.
Step – 4:
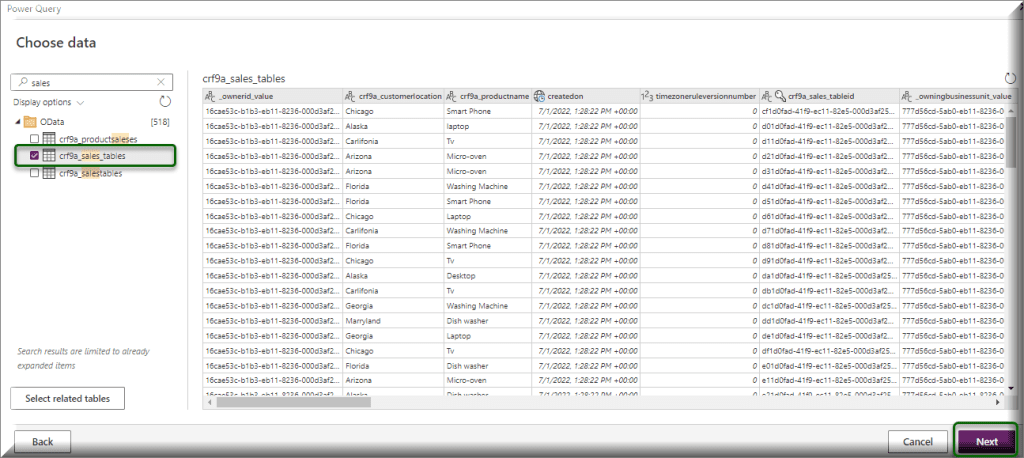
- Then, on the following page’s left menu, we will choose the data table. After selecting the specific OData table (crf9a_sales_tables), and loading all the columns, and data, a Power Query editor will appear. Select the Next button.
Step – 5:
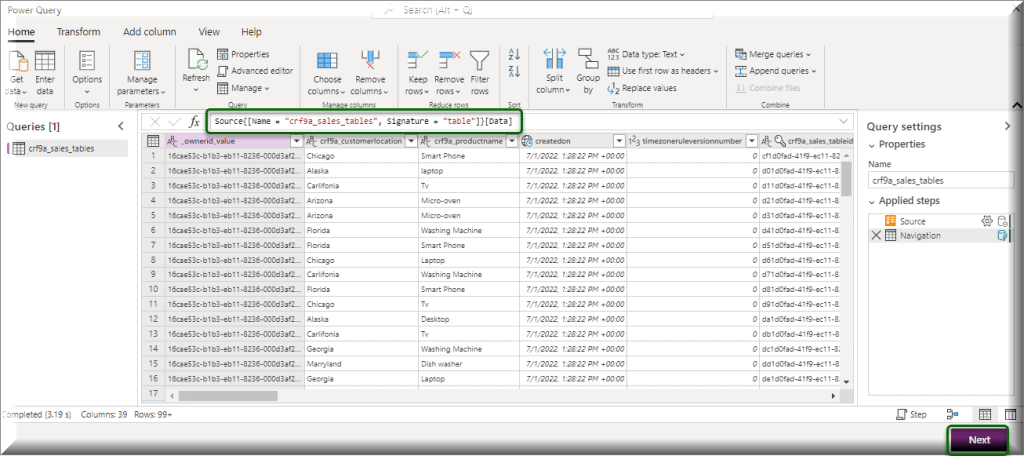
- Choose which columns to include, alter the table in one or more ways, add an index, or a conditional column, or make other adjustments necessary to customize the schema to your needs. But it is optional.
- You have access to all possible edits on this page. You’ll observe that the designer is comparable to Power BI. Let’s say you want to change this page such that you may remove a row or a column using the Advanced editor.
- The bottom section also displays information about the loading time (3.19s), the number of columns (39), and the amount of data rows (99+, omitting headers and column names), following which you may choose Next.
Step – 6:
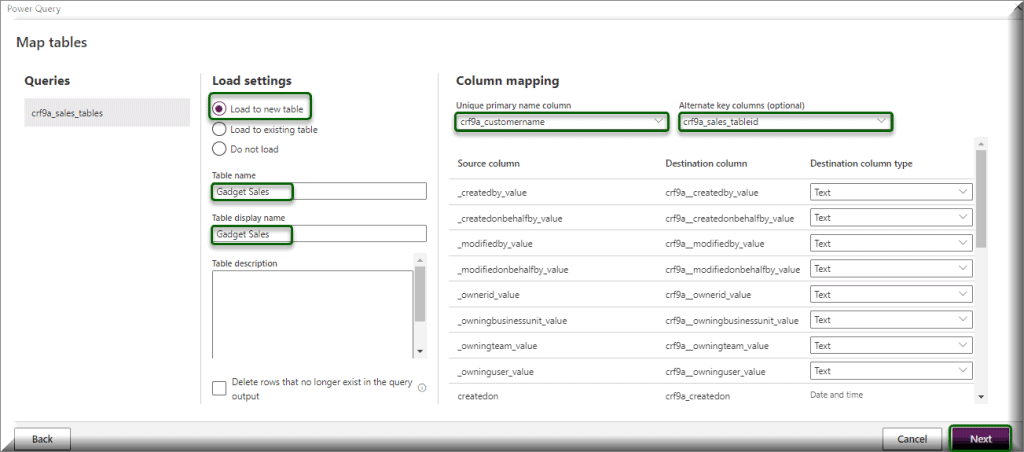
- The tables, columns, and load settings will now be mapped. Either create a new table or load it into an existing one. We have decided to include it in a new table.
- If you want to follow this tutorial exactly, you may give the new table a different name or display name but keep the default values alone.
- A different primary-name column can be specified, a different column from the source table can be mapped to each column in the new table you’re generating, or both can be done.
- Additionally, you may indicate whether Multiline Text or Single-Line Text should be created as Text columns in the query result for the Dataverse. Once everything is finished, click on Next.
Step – 7:
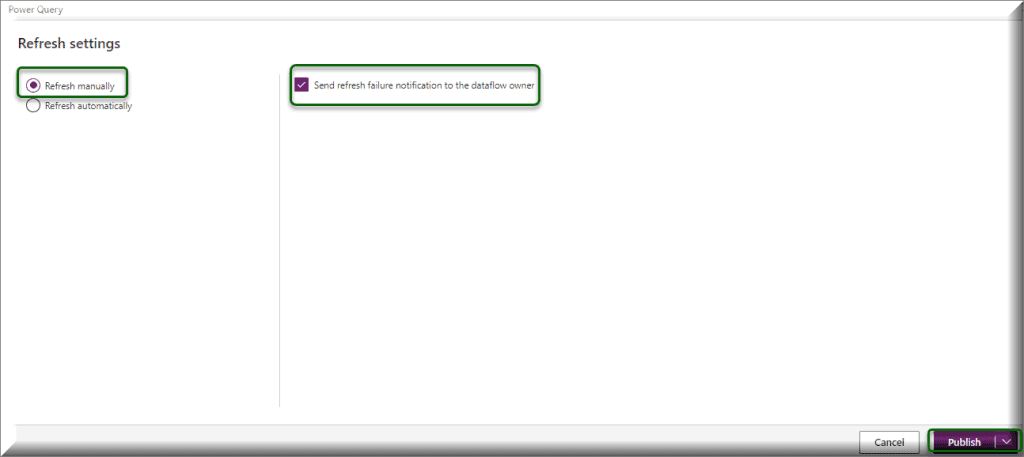
- The Refresh settings page offers two options: Refresh manually and Refresh automatically. You must select between manually or automatically refreshing. If you select Refresh automatically, you must specify a time period.
- For Power Query – Refresh Settings, choose Refresh manually as shown in the screenshot below.
- Furthermore, if you want to alert the dataflow owner of a refresh failure, check the “Send refresh failure notification to the dataflow owner” option.
- Choose Publish -> Publish now, after that, then hold off for a while.
Step – 8:
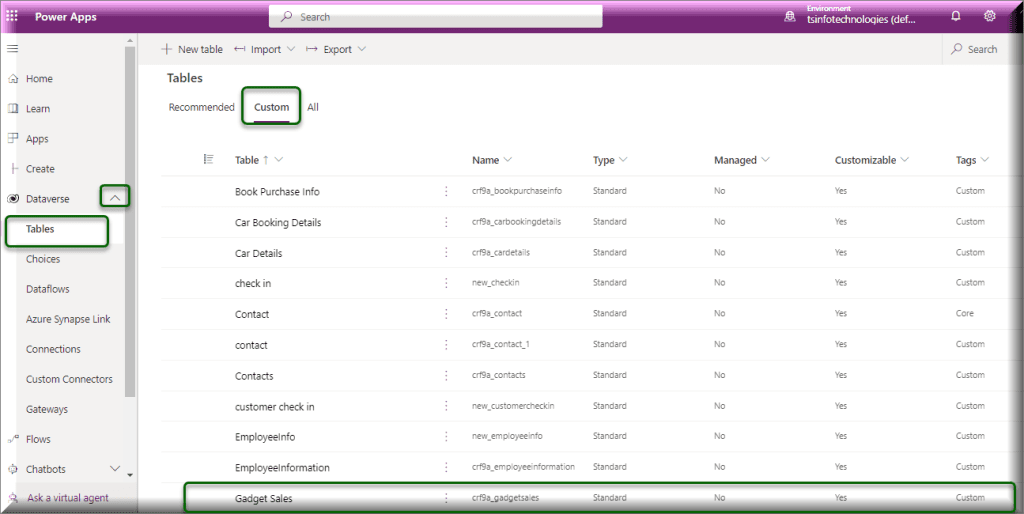
- To see a list of the tables in your database, choose Tables from the Dataverse section (near the left edge). Open the Custom tab and you can see that the Gadget Sales table you made using an OData stream now seems to be a custom table.
NOTE:
When adding data to a Dataverse table with a primary key column specified or the option to remove rows that don’t exist in the query output enabled, existing data may be changed or destroyed.
These are the steps to add data to the dataverse table in Power Apps.
Also, you may like the below Dataverse & Power Apps tutorials:
- How To Get Dataverse List Rows Count Using Power Automate
- How To Get Row by ID From Dataverse Table
- Power Apps Different Home Screen Based On Different User
- How to Export Dataverse Table to Excel
- Dataverse Solution [Complete Tutorial]
- How to Create Dataverse File Field
- How to Create Dataverse View
- How to Upload images to Dataverse from Power Apps
- Filter Dataverse Choice Column [With Various Examples]
- Dataverse Primary Name Column Autonumber
- Delete All Records From Dataverse Table [With Examples]
This Dataverse tutorial described how to establish a Dataverse table, what data sources are used to add data to it, and how to upload Power Apps data to it using Power Query.
I am Bijay a Microsoft MVP (10 times – My MVP Profile) in SharePoint and have more than 17 years of expertise in SharePoint Online Office 365, SharePoint subscription edition, and SharePoint 2019/2016/2013. Currently working in my own venture TSInfo Technologies a SharePoint development, consulting, and training company. I also run the popular SharePoint website EnjoySharePoint.com