Have you ever wanted to make a file column for a dataverse table? Not to worry. The purpose of a file column in Dataverse and how to add a file field to a Dataverse table are both covered in this Microsoft Dataverse tutorial.
Additionally, we will learn about all of the following topics that are connected to the Dataverse file field:
- Create Dataverse File field
- Dataverse file size limit
- Dataverse zip file limit
- Dataverse file storage
- Dataverse file storage pricing
- How to add file column to Dataverse Form
- Dataverse delete file
- Download the Dataverse file from Power Apps
- Dataverse file URL
Dataverse File Field
- For storing the binary data, we can utilize the Dataverse File column. This File column’s essential to use to keep a single picture, text, or attachment.
- A standard configurable table that already exists or a new table can be added to one or more columns of this data type.
- The maximum file size by default is 32 MB, and 131072 KB is the maximum size you may choose (131 MB). The maximum file size cannot be modified once it has been saved.
- Each file type column added to a table can have its own file size limitation specified.
- Business process flows, business rules, charts, rollup columns, and calculated columns cannot be used with Dataverse file columns.
Create Dataverse File field
Next, we will see how to create a file column in the Dataverse Table.
NOTE:
Wondering how to create a table in Dataverse? Are you also interested in learning how to add other columns to a Dataverse table? Refer to this complete dataverse tutorial to learn more: Dataverse Create Table [With Various Examples]
Let’s say we have a Dataverse Custom table named Job Seekers Registration Lists. In this table, we will create a file field called Candidate Documents that will help us to store the various attachments (like images, notes, etc.).
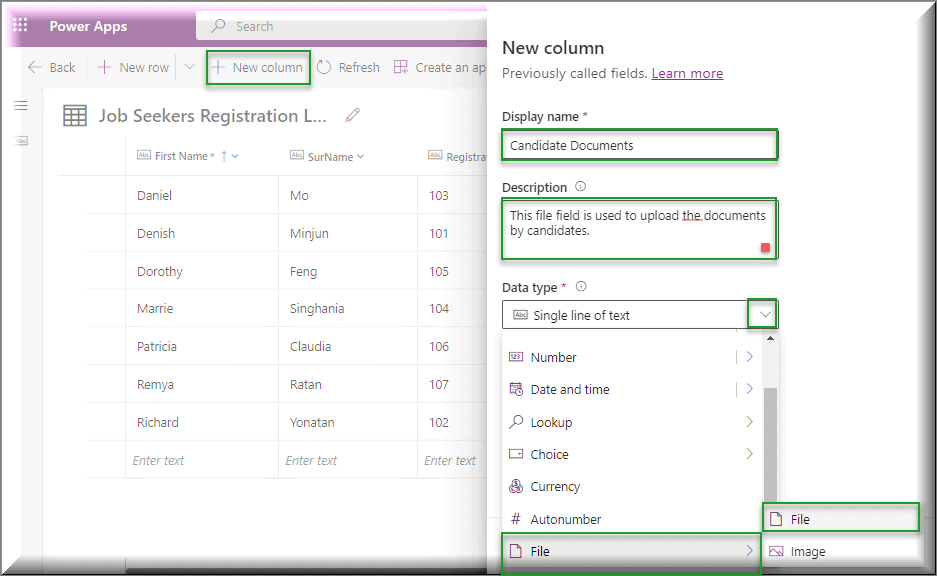
In the Dataverse table, to create a file column, click on + New column and then enter the below field details on the new column pane:
- Display name = This is a mandatory field. Enter the name of the file column (Candidate Documents) that you want to create in the Dataverse table.
- Description = This is an optional field. Provide the field description for the purpose to create it.
- Data type = Expand the chevron, go to the File and then select the File option.
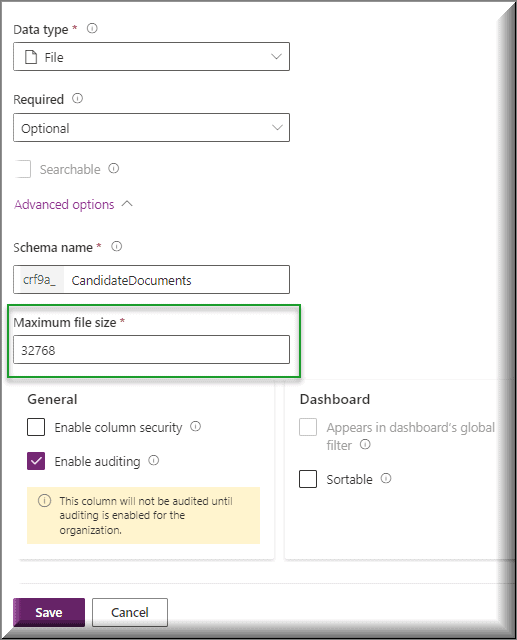
- Required = Specify the requirements of the table. There are three types of requirements: Business recommended, Business required, and Optional.
- Searchable = This option will be disabled. We can not make this field searchable.
- Schema name = This is a pre-populated column from the Display name. It includes the Dataverse solution publisher’s customization prefix. After you’ve saved the table, you won’t be able to edit it.
- Maximum file size = The maximum file size limit is 32 MB. It is impossible to adjust the maximum file size once it has been saved.
- Enable column security = If it is enabled, then it will be used to restrict access to particular columns.
- Enable auditing = This option will allow tracking user access changes and table record modifications so that you may evaluate the activity later.
- Sortable = It defines how the column will be set up for interactive dashboards.
Once everything is done, click on Save. After a while, the file column will be created in the existing dataverse table.
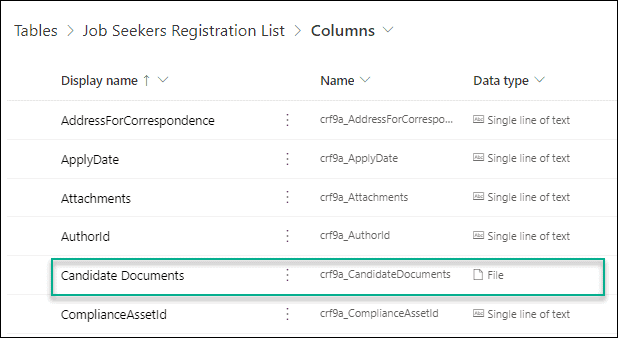
- The created file field will be visible when you navigate to the table’s Columns section, as seen below.
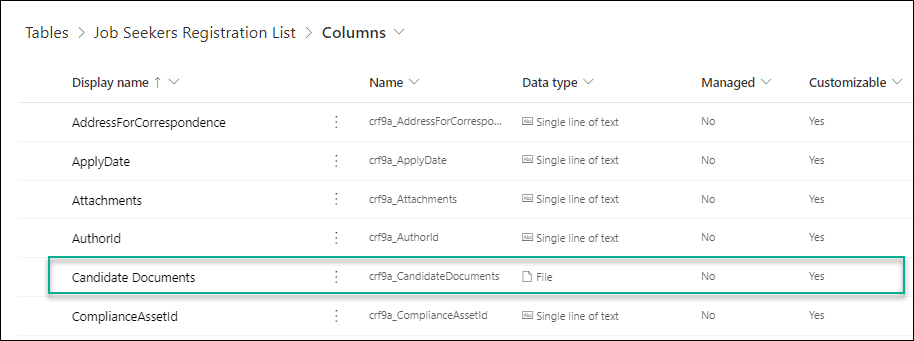
This is how to create a file column in the Dataverse Table.
Also read: How to Create Dataverse View
Dataverse file size limit
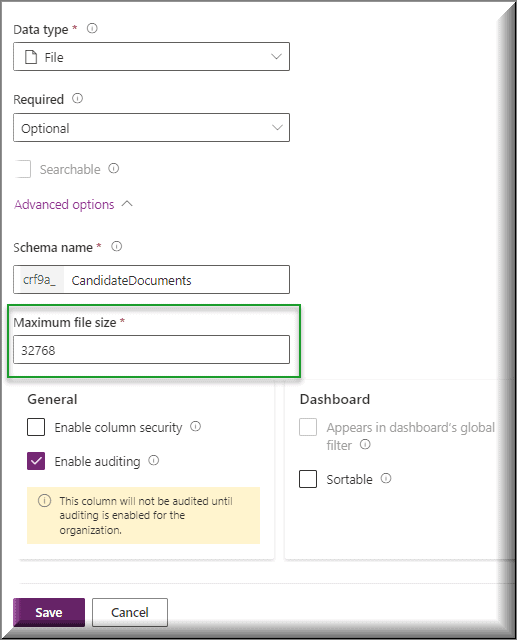
- As we discussed above, the maximum size limit of the Dataverse file is 32 MB (by default). The largest size you can set is 10 GB. The file size limit can be set individually for each file type column added to a table. Please check the ‘Maximum file size‘ of the file field in the Dataverse table.
- Moreover, A single service request from a web service endpoint can only transport up to 16 MB of file data.
Dataverse zip file limit
The Dataverse File column accepts zip files. The most extensive file that may be uploaded individually is 3 GB.
Check out: How to Upload images to Dataverse from Power Apps
Dataverse file storage
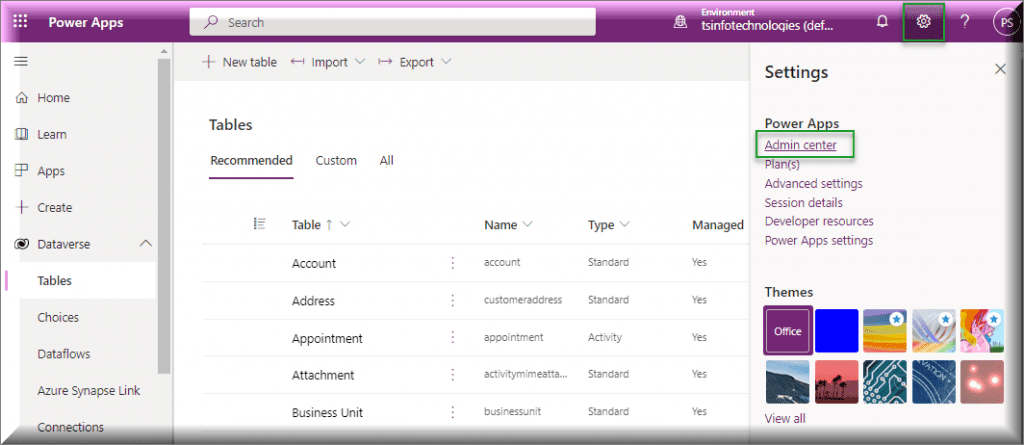
Do you know where the dataverse file storage location may be found? You can see the total file storage capacity in the Power Apps Admin Center.
- On the Power Apps Home page, click on the Gear icon (right top of the page) -> Admin center.
- Expand the Resources and then select Capacity from the left navigation menu. Once you choose this option, you can see all the file storage capacity usage, storage capacity by source, and many more as shown below.
- It specifies how much space you have for both storing files and data under the Storage capacity by source section. The Database part shows how much data is stored in the dataverse or through common data services, while the Files section on the right shows how much available space you have.
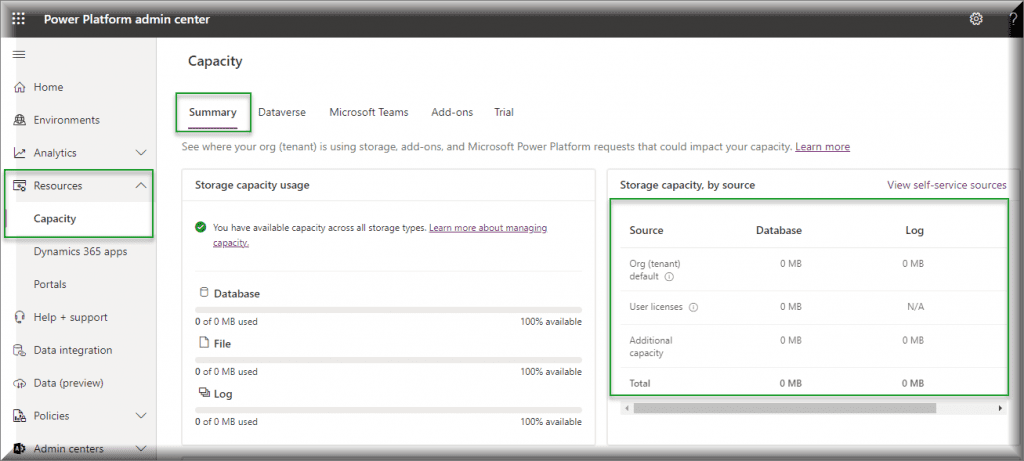
This is how to find the Dataverse file storage location.
Read: Filter Dataverse Choice Column [With Various Examples]
Dataverse file storage pricing
- The 3 GB of Dataverse database capacity, 3 GB of Dataverse file capacity, and 1 GB of Dataverse log capacity are all included in the default environment’s storage capacity.
- The capacity for the following environments, which are shown as 0 GB, is not used:
- Microsoft Teams
- Trial
- Preview
- Support
- Developer
The below table represents all the file storage pricing in Dataverse.
| Type of Storage | Description | Default Storage Capacity | Price ($ per GB per month) | Additional Storage Entitlements Per User |
|---|---|---|---|---|
| Database | Storage for record data and item definitions | 10 GB | 40 | @250 MB per user |
| Logs | Storage space for audit logs that track changes to records and attributes (including field value updates, security role modifications, and date/time of access) | 2 GB | 10 | None |
| Files | Dynamics 365 applications and Power Apps provide storage for emails’ attachments and comments notes (word files, image files, pdf, spreadsheets, videos, and other files) | 20 GB | 2 | @2 GB per user |
To know more details, refer to the MSDN: Dataverse file storage pricing
How to add file column to Dataverse Form
We will now explain how to include a file column in the Dataverse Form. To allow users to upload or download attachments from the dataverse form itself, just follow the instructions below to add the dataverse file field to the main form.
Step – 1:
First, Expand the Dataverse (from the left navigation) -> Tables -> Select the specific Dataverse table (Job Seekers Registration List). In the Dataverse list, select Forms under the Data experiences section.
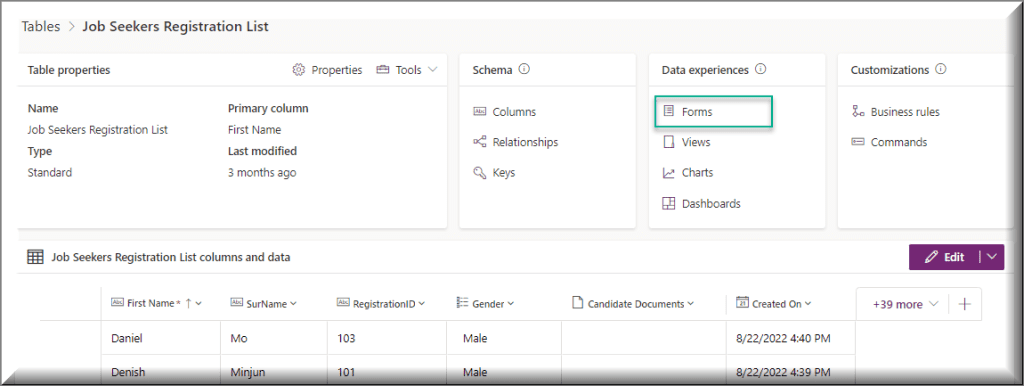
Step – 2:
You may view three different forms on the Dataverse forms page after it has opened. Click on the Information Main form as shown in the screenshot below.

Step – 3:
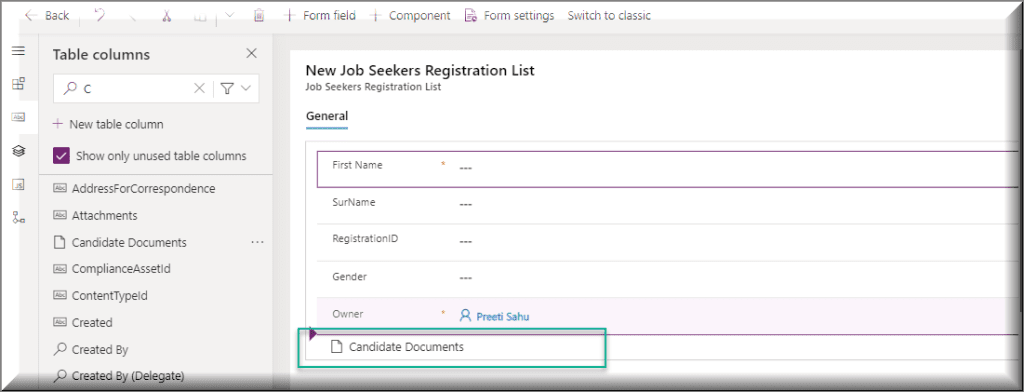
Here, we will insert the file column at the bottom section of the form. Go to Table columns from the left navigation. Search the file column name (Candidate Documents).
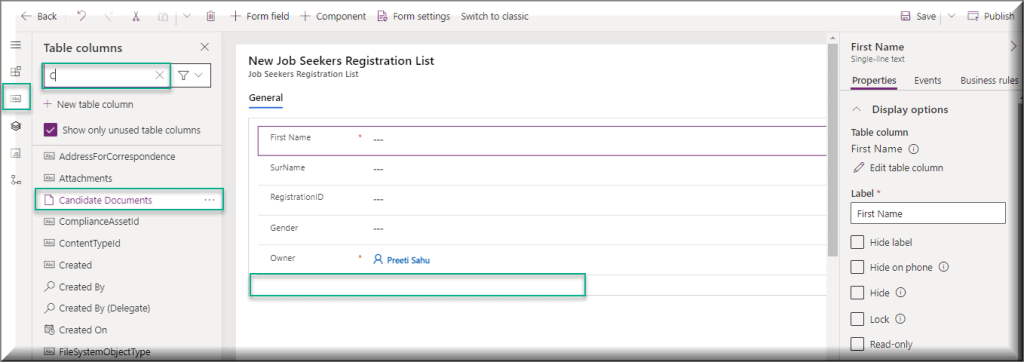
Step – 4:
Once we got the file column under the table column (Candidate Documents), we just need to drag and drop the field at the bottom section of the form as in the below image.
Step – 5:
The file field (Candidate Documents) has now been added to the form, as we can see. But until we create and save a record in the dataverse table, the file field will remain locked. Simply save and publish the Dataverse form when you’re finished.

Step – 6:
Now we will create a new record in the dataverse table (Job Seekers Registration List) including the File column (Candidate Documents). Click on the Edit button in the Dataverse list -> Expand + New row -> Select New row using form as shown below.

Step – 7:
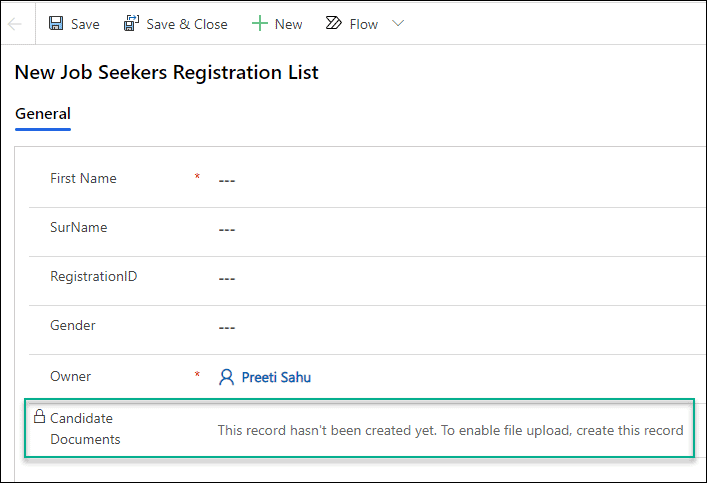
The form shown below will then display, allowing us to add a new entry to the Dataverse list. Here, we can see the file column appears with a notification like “This record hasn’t been created yet. To enable file upload, create this record“. This message simply states that we must create a record in any case before the file field becomes active.
Step – 8:
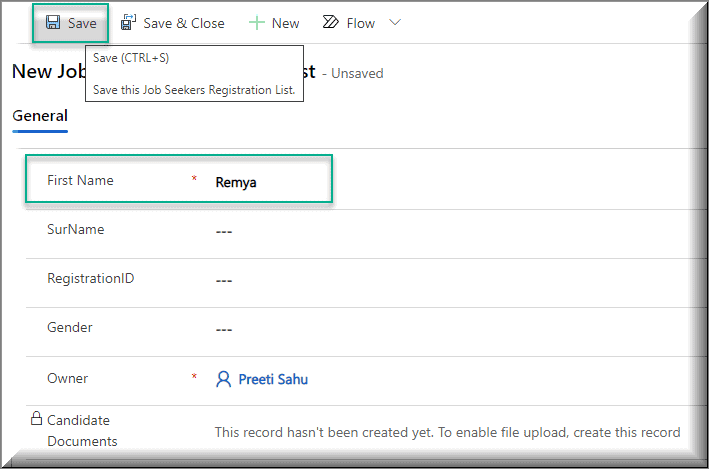
To create a record, we will enter a Name or Title (Remya) and then use the Save option to save the form.
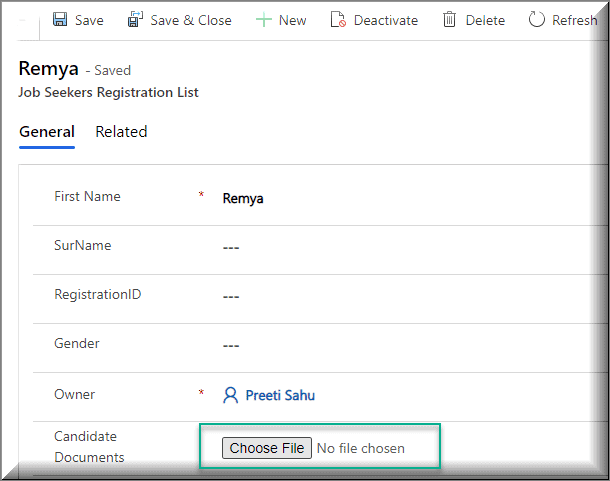
Once the entry has been saved, we can see that the file field (Candidate Documents) will prompt you to select a file from your system.
Step – 9:
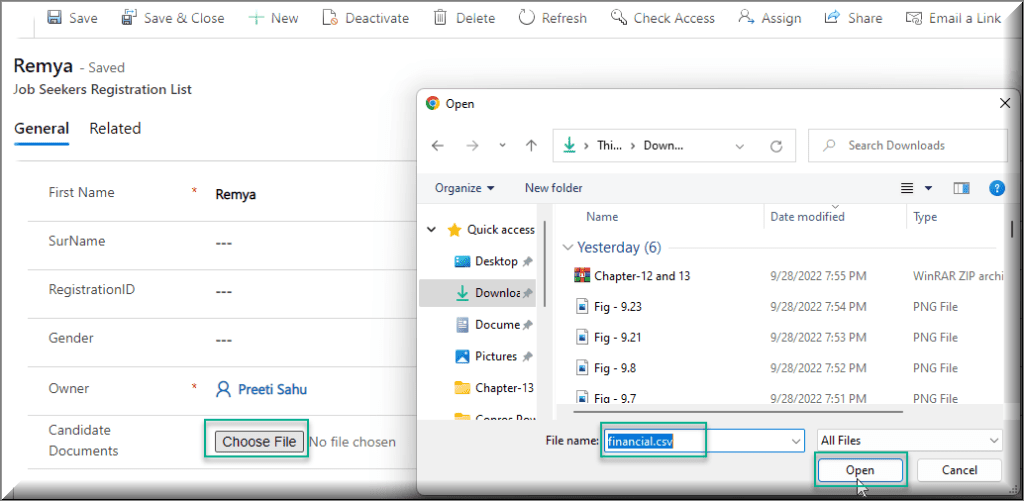
To upload any document or file, click on the Choose File option and then select any file from your system. Click on Open.
Step – 10:
If you need to download or save a particular file or document to your system using the dataverse form, just click on the name of the desired file (link). As soon as we select the Save option, it will prompt you to select a directory on your system, after which the file will download. As soon as you’re done, remember to save the dataverse form.
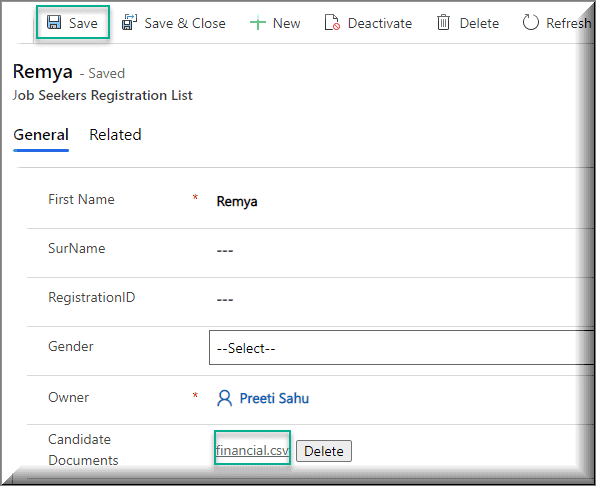
This is how to add a file column to Dataverse Form.
Have a look: Dataverse Primary Name Column Autonumber
Dataverse Delete File
Next comes how to delete an attachment or file from the Dataverse form.
- Suppose, we have uploaded one attachment named “financial.csv” to the Dataverse form, and then we got to know that is an unnecessary file. So we need to delete it.
- In the File column, you can view an option called Delete that helps remove the specific file from the dataverse file field.
- When we click on the Delete button, a pop-up window will display that checks whether you are sure to delete the file or not. Click on OK to remove the file otherwise touch on the Cancel option.
- The screenshot below shows how the file appears after it has been erased from the Dataverse form.
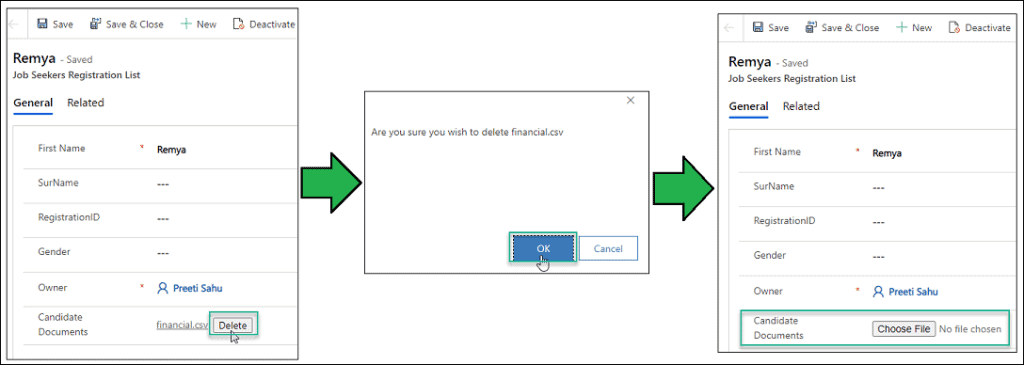
This is how to delete the Dataverse file from the Dataverse Form.
Also check: Delete All Records From Dataverse Table [With Examples]
Download the Dataverse file from Power Apps
Now we will see how to perform this dataverse file download operation from the Power Apps Canvas app. That means, how we can download the Dataverse attachment from the Power Apps application.
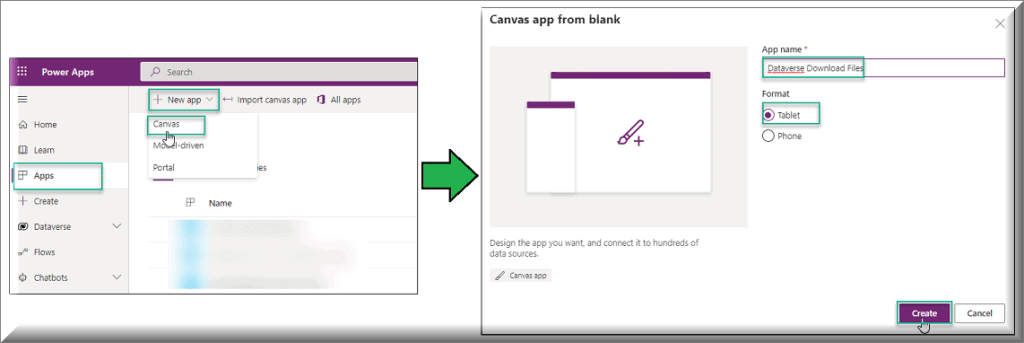
- Open Power Apps with your credentials -> Click on Apps (from left navigation) -> Expand + New app -> Select Canvas.
- Provide the app name (Dataverse Download Files) and choose any Format (Tablet) for the app. Tap on Create.
- Now the Canvas app is ready to use. On the Power Apps Screen, insert a Button control and set its Text property to DOWNLOAD.

- Select the Button control (DOWNLOAD) and apply the code below on its OnSelect property as:
OnSelect = Download("https://org50e260af.crm8.dynamics.com/api/data/v9.0/crf9a_jobseekersregistrationlists(866eb592-2f3f-ed11-bba2-002248d5deda)/crf9a_candidatedocuments/$value?size=full")Where,
- Download = A file from the web is downloaded to the local device using the Power Apps Download feature.
- “https://org50e260af.crm8.dynamics.com/api/data/v9.0/” = This is the organization URL. You can find this URL once we hover over the file link inside the Dataverse form. The file link is visible at the bottom of the form.
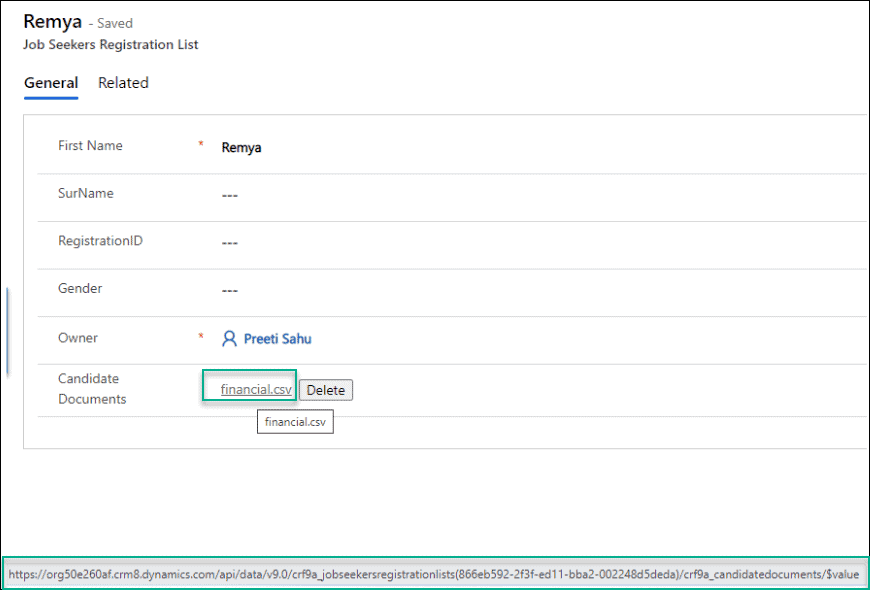
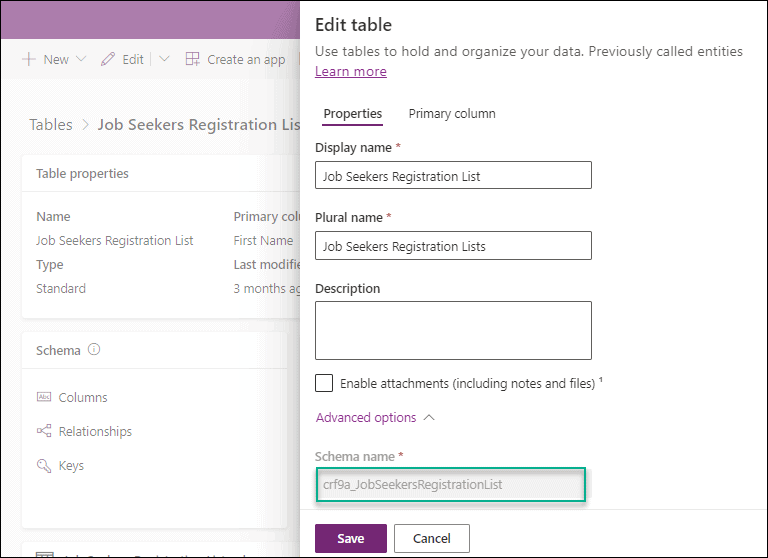
- crf9a_jobseekersregistrationlists = This is the internal name or schema name of the Dataverse table. Once you edit the dataverse table, you may locate the schema name. But, it takes the plural name of the table. Here, my table Display name is Job Seekers Registration List and the Plural name is Job Seekers Registration Lists.
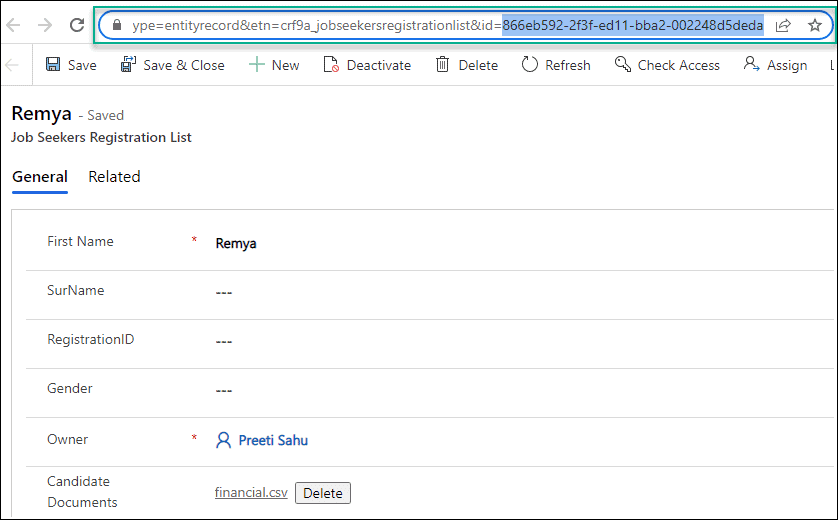
- 866eb592-2f3f-ed11-bba2-002248d5deda = This represents the file ID. From the top URL link, as shown below, you may get the specific file id.
- crf9a_candidatedocuments = This is the internal or schema name of the File column. You can view this name once you edit this file column.
- The total structure of the Power Apps looks like the screenshot below.

- Finally, save, publish, and preview the app. Click on the DOWNLOAD button to download the Dataverse file. Next, it will ask you the path to store the file in your system and then save it. The supplied path will be applied to download the particular file.
This is how to download the Dataverse file from Power Apps.
Dataverse file URL
To work with the Dataverse File URL, have a look at this forum link: Dataverse file URL
Also, you may like the below Dataverse and Power Apps tutorials:
- How to Export Dataverse Table to Excel
- Power Apps Add Data to Dataverse Table
- How to create and use dataflow in Dataverse
- Dataverse Solution [Complete Tutorial]
- Power Apps Sort Gallery [With 15 Useful Examples]
- PowerApps Search Function + How to use with example
- Power Apps Search SharePoint List Examples
- PowerApps toggle control + How to use with examples
This Dataverse tutorial explained what is Dataverse File field and how to use it in a Dataverse table. Also, we covered these topics below with various scenarios.
- How to create Dataverse File field
- What is Dataverse file size limit
- What is Dataverse zip file limit
- Dataverse file storage
- Dataverse file storage pricing
- How to add file column to Dataverse Form
- How to work with Dataverse delete file
- Download the Dataverse file from Power Apps
- Dataverse file URL
I am Bijay a Microsoft MVP (10 times – My MVP Profile) in SharePoint and have more than 17 years of expertise in SharePoint Online Office 365, SharePoint subscription edition, and SharePoint 2019/2016/2013. Currently working in my own venture TSInfo Technologies a SharePoint development, consulting, and training company. I also run the popular SharePoint website EnjoySharePoint.com