In this Microsoft Dataverse tutorial, we will discuss everything about Tables like what is a table in Dataverse, what its use is, What are the various table types are available in Dataverse, and many more.
Also, we will cover all the below points that are related to the Dataverse table:
- Types of tables in Microsoft Dataverse or Dataverse table types
- Activity Table in Dataverse
- Dataverse table ownership
- Dataverse tables permissions
- Dataverse table row limit
- Dataverse table data types
- Create a Custom table in Microsoft Dataverse
- Display Dataverse Custom Table
- Various ways to create columns in a Dataverse Table
- Create Different Columns in Microsoft Dataverse Table
- Dataverse Table create item
- Dataverse create table from SharePoint list
- Dataverse create table from excel
- Dataverse create table from another table
- Dataverse table change primary name column
- Dataverse duplicate table
- Dataverse table enable attachments
What is a Dataverse Table?
- Dataverse helps to store and manage data that is utilized by business applications in a safe manner. Dataverse’s standard and custom tables offer a safe, cloud-based storage alternative for your data.
- Modeling and managing corporate data is done via tables. You can utilize standard tables, custom tables, or both when creating an app.
- Standard tables are included by default in Dataverse. These are meant to capture the most typical concepts and circumstances inside a company, in line with the best practices.
Also Read: Dataverse Primary Name Column Autonumber
Types of tables in Microsoft Dataverse or Dataverse table types
Here we will see the various table types in Microsoft Dataverse.
In Dataverse, there is a total of three types of tables. Such as:
- Standard:
- A Dataverse environment comes with several basic tables, sometimes known as out-of-the-box tables. Standard tables in Dataverse include account, business unit, contact, task, and user tables.
- The majority of Dataverse’s default tables may be changed.
2. Managed:
Tables that have been imported into the environment as part of a managed solution are not editable.
3. Custom:
These are the unmanaged tables that are either imported from another source or developed from scratch in the Dataverse environment. These tables can be totally customized by any user with the necessary permissions.
Also Read: Filter Dataverse Choice Column [With Various Examples]
Activity Table in Dataverse
These are the unique tables where they can only be owned by a single user or team, not by a whole company. You may choose whether to create a standard or activity table when creating table.
These are the below activity tables that are present under the default Dataverse environment.
| Table Name | Illustration | Show in activity menus |
| Appointment | A time period with start/end times and duration is represented by a commitment. | Yes |
| Email protocols are used to transmit activity. | Yes | |
| Fax | Tracks the conclusion of a phone conversation and the number of pages in fax, as well as storing an electronic copy of the document if desired. | Yes |
| Letter | An activity that keeps track of a letter’s delivery. The electronic copy of the letter might be included in the activity. | Yes |
| Phone Call | Tracking a phone call is happening in this activity. | Yes |
| Recurring Appointment | A repeating appointment series’ master appointment. | Yes |
| Task | Work to be done is represented by a generic activity. | Yes |
You may use a new custom activity table to read instant message conversations if you have the ability to do so. Because you don’t provide a primary column when establishing an activity table, it differs from a non-activity table.
The Primary Field in all activity tables is set to Subject, while additional common fields are determined by the Activity table.
Dataverse table ownership
- There are two forms of table ownership: standard and custom. When you build a custom table, you have the choice of having it owned by a user, a team, or an organization. The ownership type of a table cannot be altered once it has been created.
- You must remove your custom table and build a new one if you eventually decide that it must be of a different kind.
| Ownership | Explanation |
| Organization | The organization owns the data. Data access is managed at the organizational level. |
| User or Team | A user or a team owns the data. On a user level, the actions that may be performed on these rows can be regulated. |
- A few Dataverse system tables are comparable to standard tables but have a different form of ownership than an organization, user, or team ownership:
- None: Some system tables, such as the Privilege table, do not have an owner.
- Business Unit: A few system tables are held by the company. Tables for Business Units, Calendars, Teams, and Security Roles are among them.
Dataverse tables permissions
The below represents the different permissions that are available in a Dataverse table. Such as:
- Full Access = This is the permission where the end users can see and change all of the table’s records.
- Collaborate = This is a type of permission where the end users can view all records and create new ones. However, they can only make changes to or remove their own records.
- Reference = This permission will give you a read-only view of your data.
- Private = Users have the ability to generate new records.
Dataverse table row limit
The default item limit when utilizing the List Row action in the Power Automates Dataverse connection is 5000 items. If your table has more than 5,000 entries, you may use the Pagination option in the List rows action’s options. It’s possible to get up to 100,000 records using this method.
Non-delegable filters will only operate up to the Data row limit, which is set at 500 by default but it may be increased to 2,000. The documentation on what is delegable for Dataverse may be found in this.
Dataverse table data types
The below table represents all the data types that support by the Dataverse table.
| Power Apps Data types | Solution Explorer type | API type |
| Big Integer | Time Stamp | BigIntType |
| Choice | Option Set | PicklistType |
| Choices | MultiSelect Field | MultiSelectPicklistType |
| Currency | Currency | MoneyType |
| Customer | Customer | CustomerType |
| Date and Time | Date and Time Date and Time Format | DateTimeType |
| Date Only | Date and Time Date Only Format | DateTimeType |
| Decimal Number | Decimal Number | DecimalType |
| Duration | Whole Number Duration Format | IntegerType |
| Single Line of Text Email Format | StringType | |
| File | File | FileType |
| Floating Point Number | Floating Point Number | DoubleType |
| Image | Image | ImageType |
| Language | Whole Number Language Format | IntegerType |
| Lookup | Lookup | LookupType |
| Multiline Text | Multiple Lines of Text | MemoType |
| Owner | Owner | OwnerType |
| Phone | Single Line of Text Phone Format | StringType |
| Status | Status | StatusType |
| Status Reason | Status Reason | StatusType |
| Text | Single Line of Text Text Format | StringType |
| Text Area | Single Line of Text Text Area Format | StringType |
| Ticker Symbol | Single Line of Text Ticker Symbol Format | StringType |
| Timezone | Whole Number Time Zone Format | IntegerType |
| Unique Identifier | Unique Identifier or Primary Key | UniqueidentifierType |
| URL | Single Line of Text URL Format | StringType |
| Whole Number | Whole Number None Format | IntegerType |
| Yes/No | Two Options | BooleanType |
Create a Custom table in Microsoft Dataverse
A table is a collection of data that contain information such as the firm name, location, goods, email address, and phone number. The data may then be exposed by creating an app that references the table.
There are some standard “out-of-the-box” tables available in Power Apps to handle common scenarios within an organization (such as monitoring Addresses), but you may need to develop custom tables to store data that is unique to your company. For our own individual requirements, we will create a custom table in Microsoft Dataverse.
Now we will see how to create a custom table in Microsoft Dataverse. Though, it’s very easy to make and use in the Dataverse. Let’s follow the below steps.
Step – 1:
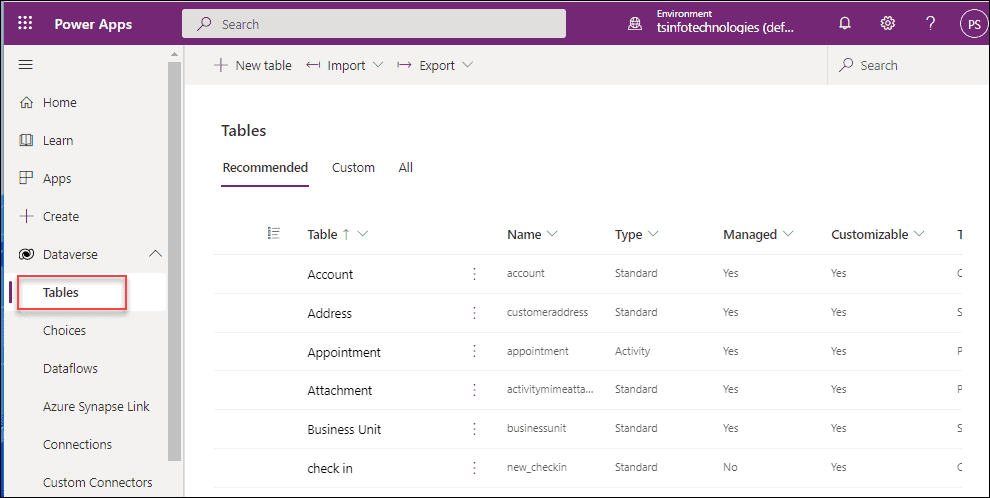
- First, Sign in to Power Apps using your office 365 credentials. On the Power Apps Home page, Expand the Dataverse from the left navigation and click on Tables.
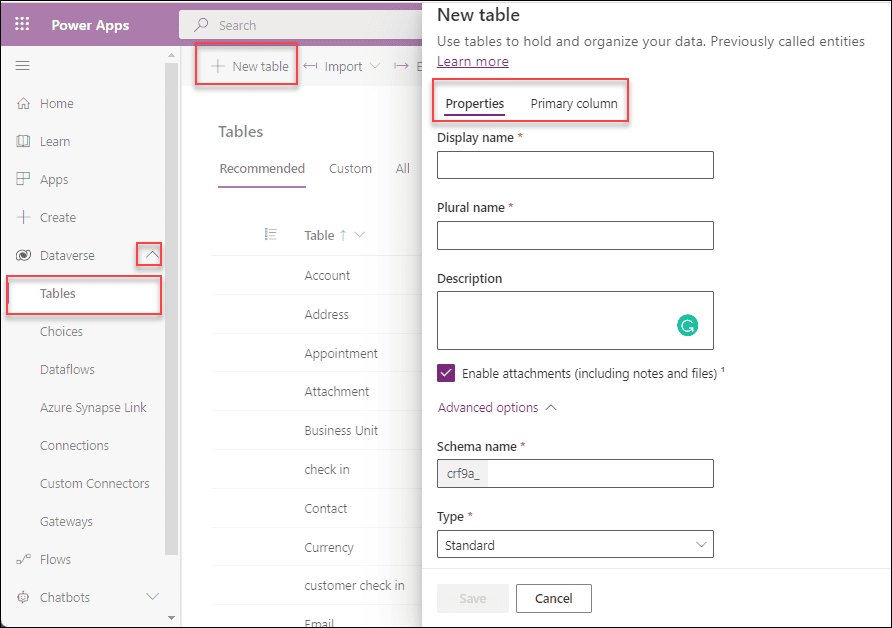
- Once you will select + New table on the top command bar, then the new table panel will open where you can enter the table information like Display name, Description, etc.
- In the below screenshot, you can see there are two sections or tabs as Properties and Primary column.
Step – 2:
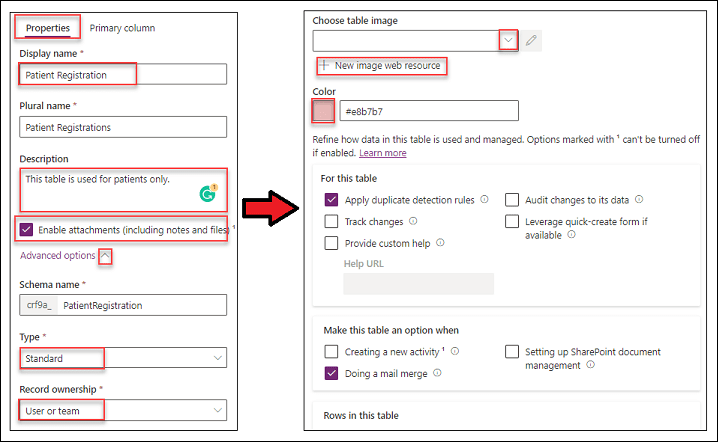
Click on the Properties tab and enter the below table details (those fields have an asterisk mark [*], that should be mandatory fields):
- Display name = As this field has an asterisk, it is a required column. This is the name of the table that will be displayed in the app as a single entity. This is something that can be modified afterward.
- Plural name = It is also a mandatory field that appears automatically when you are entering the Display name. This is the app’s plural name for the table that will be displayed. This is something that can be modified afterward.
- Description = If you want, you may give your table a description. If this table will be used by others, descriptions are useful. This is optional.
- Enable attachments (including notes and files) = If you will enable this option, then the attachments control is added to the table. To add or delete files and notes from records, utilize this control. When this option is enabled, users can add files from their PC or existing images from their mobile device. Files can be up to 10 MB in size when attached. This option cannot be altered once the table has been created.
Once you expand the Advanced options, you will get all the below fields:
- Schema name = This is the logical name used by the system for the table. You can notice a prefix on the name, which is the publisher ID. Whatever the tables you create in Dataverse, the schema name must be present. Also, this is auto-populated and if you want to change it, then you can do it before saving it. This value must be unique and can not be changed after it has been saved.
- Type = Here, you have to select the table type that you want. Either you can select Standard, Activity, or Virtual.
- Record ownership = Who can do operations in a row is dictated by the type of ownership. The table records can include data about customers, such as accounts or contacts if they are owned by a user or a team. For each user or team, security may be set according to the business unit. Records in the Organization Ownership Table include information about anything that belongs to or can be accessed by the whole organization. Table records that belong to an organization cannot be allocated or shared.
- Choose table image = If you want to provide an image to the Dataverse table, then either you can expand the chevron and select the image or else select the image from the + New image web resource option.
- Color = If you want to provide some color to the Dataverse table, then click on the color section and then select the color from the color box that you want.
Apart from that, there are certain options for this table to perform some other actions inside the Dataverse table. If you want any particular option to do some specific operation, then you have to enable it here. Such as:
- Apply duplicate detection rules = You may define duplication detection rules for this table if you enable this option.
- Track changes = It allows for efficient data synchronization by determining what data has changed since the data was first extracted or last synced.
- Leverage quick-create form if available = When this option is selected for a custom activity table, it will appear in the group of activity tables when users click the Create button. When the custom table icon is selected, however, the main form will be utilized because activities do not enable rapid build forms.
- Creating a new activity = For this table, associate activities with records. This setting cannot be turned off after it has been activated.
- Doing a mail merge = This table may now be used with mail merge.
- Setting up SharePoint document management = Enabling this feature allows this table to participate in SharePoint integration when other actions to enable document management for your company have been completed.
- Can have connections = Use the connections feature to illustrate how this table’s records are linked to records from other tables with connections enabled. This setting cannot be turned off after it has been activated.
- Can be linked to feedback = It allows consumers to leave comments on any table row or rate table records within a set of parameters. This setting cannot be turned off after it has been activated.
- Have an access team = If you check this option, then you can easily create team templates for this table.
- Can be taken offline = When the Dynamics 365 for Outlook program is not connected to the network, this option allows row data for this table to be available.
- Can be added to a queue = Make use of the queue table. Queues facilitate task routing and sharing by storing records for this table in a central location where everyone can see them. This setting cannot be turned off after it has been activated.
Refer to the below screenshot.
Step – 3:
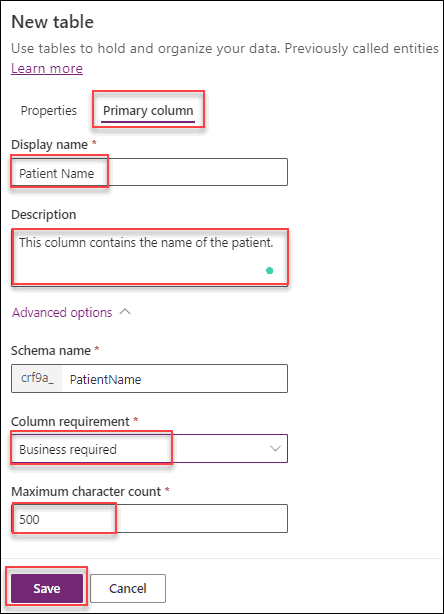
Next, go to the Primary column tab and enter the below field values. Such as:
- Display name = Every table has a Primary Name Column by default, which lookup columns utilize to form relationships with other tables. Before saving the table for the first time, you can change the name of the primary name column.
- Description = Provide some description of what the column is used for. This is optional and it can be editable at any time.
Once you expand the Advanced options, you will get all the below fields:
- Schema name = The Primary Column Display name you give is used to pre-populate this column. It includes the Dataverse solution publisher’s customization prefix. After you’ve saved the table, you won’t be able to edit it.
- Column requirement = Specify the requirement of the table. There are three types of requirements: Business recommended, Business required, and Optional.
- Maximum character count = There is a certain limitation in the column length and the maximum length must be a value between 1 and 4,000.
Once everything is done, just Save the table.
After a while, you can see the Custom table is ready to use and it will look alike the below image. Inside the table page, you can view all the table information like Table properties, Schema, Data experiences, Customizations, etc.
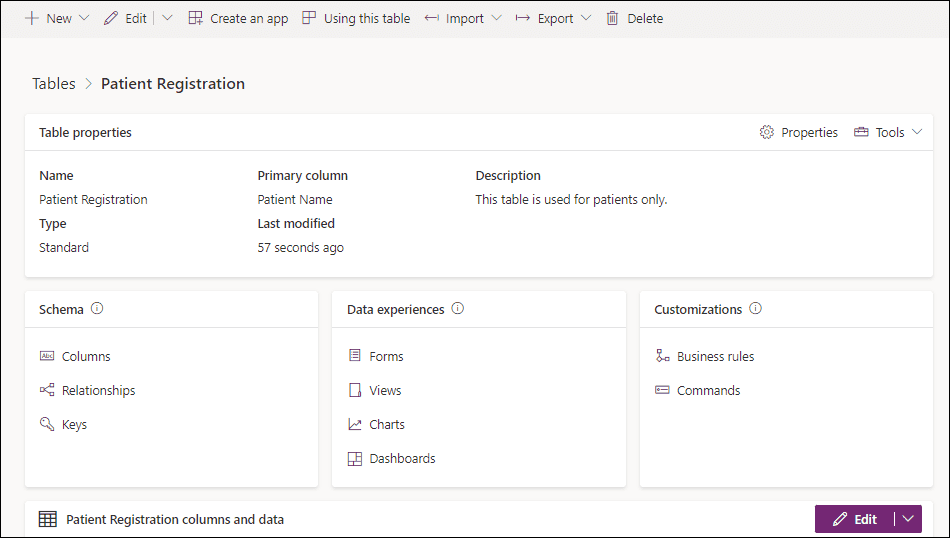
Display Dataverse Custom Table
Suppose you want to view your created custom table in the Dataverse, then follow the below process:
- First, log in to the Power Apps.
- Expand the Dataverse from the left navigation and then select Tables.
- Go to the Custom tab from the top and then search for your own custom table on the top right search box. Also, you can get your table under the All tab section.
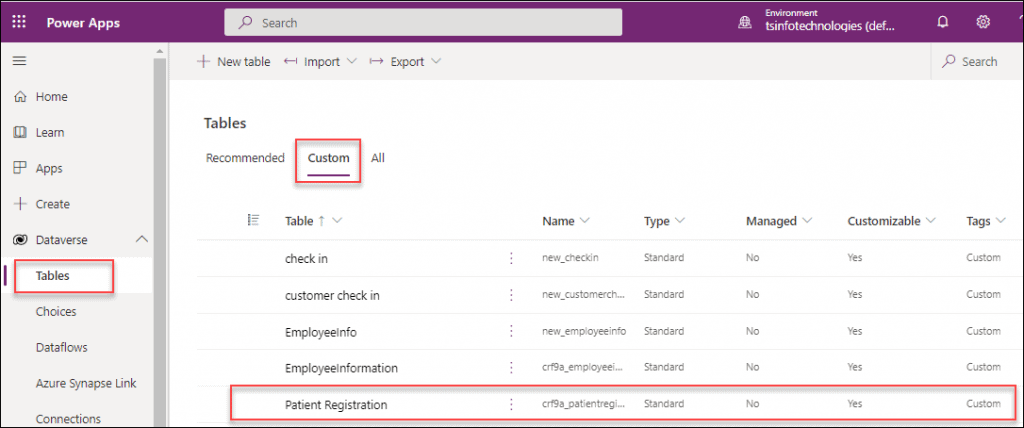
This is how to display the custom table in Dataverse.
Various ways to create columns in a Dataverse Table
Once the Custom table is ready, we need to create various data fields on that. So that the user can specify the values in the Dataverse table. Below represents some of the columns that we can create easily.
In the Dataverse Custom table, we can create a column in many different ways. Such as:
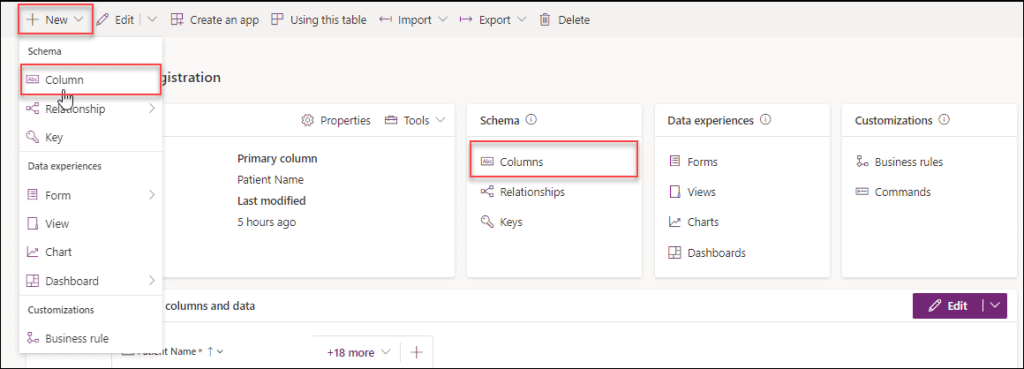
- On the Dataverse Tables page, tap on the custom table where you want to create the column. On the next page (below image), click on the + New -> Select Column -> Tap on + New column as shown below.
- Secondly, we can directly select the Columns option under the Schema section. Next, the New column page will open where we can enter the column details.
3. Thirdly, we can create a new column by using the Edit option on the specific table page. Expand the Edit option and select either Edit or Edit in new tab.
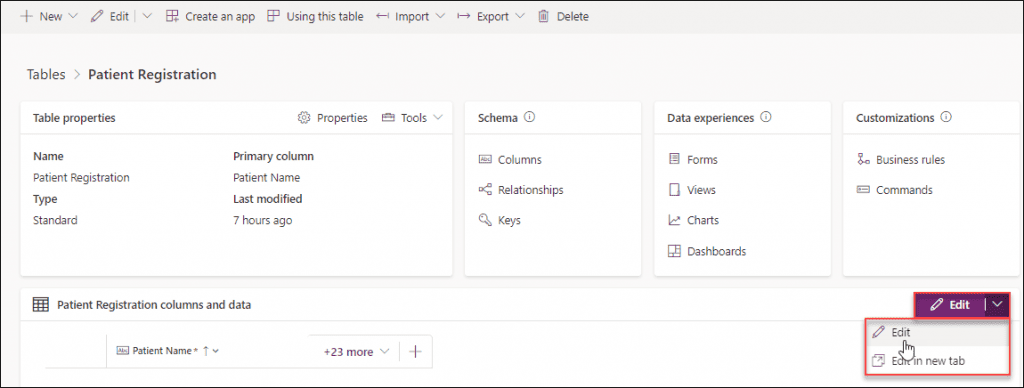
- Then on the next page, we can click on the + New column option (from the top) to create the new column in the Dataverse custom table.
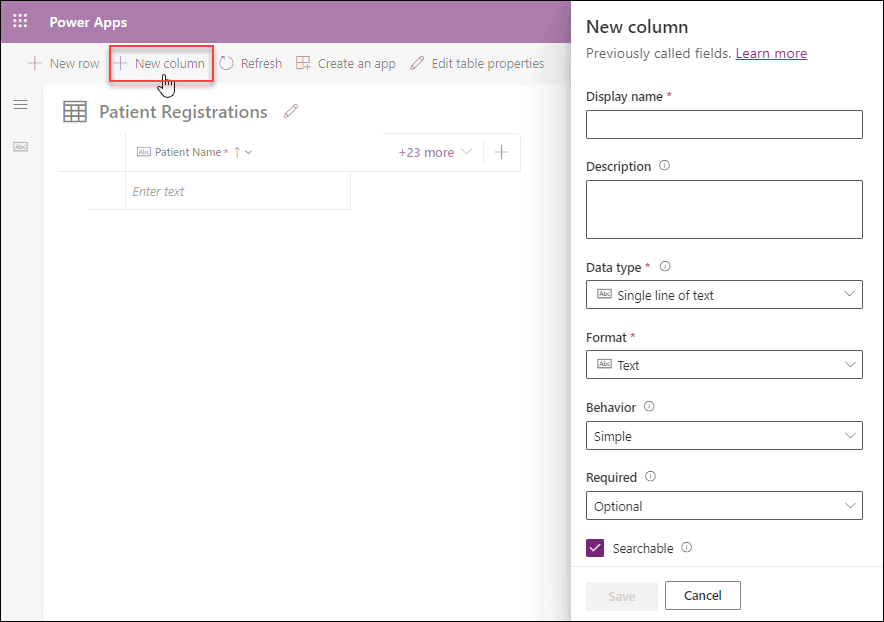
4. At last, there is much easy to create a column by clicking one icon i.e. + as it is present under the Patient Registration columns and data section like the image below.
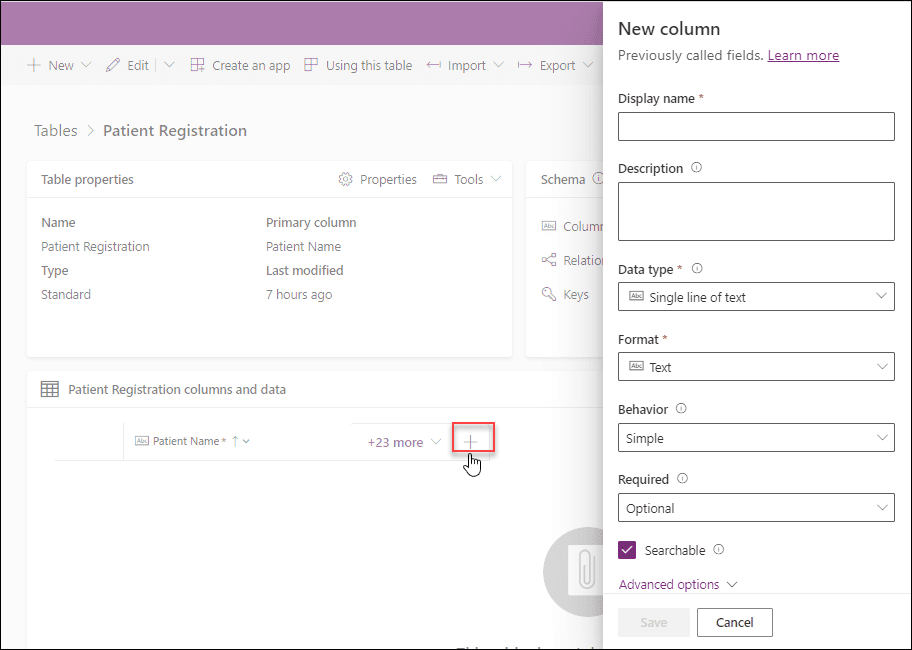
These are the various ways to create a column in Microsoft Dataverse Custom Table.
Create Different Columns in Microsoft Dataverse Table
Now we will see how we can create various columns or fields in the Dataverse Custom Table. As we already discussed there are different types of data types in a Dataverse table such as Text, Number, Date and time, Lookup, Choice, Currency, File, etc.
Below represents some of them:
Dataverse Create Number Column
Do you want to create a Number column inside the Dataverse Custom Table? Let’s follow the below process.
- Inside the Custom data table, click on the + New column. On the New column pane, specify the below fields:
- Display name = This is a required column. Enter the name of the integer column (suppose Age) that you want to create in the Dataverse table.
- Description = This is an optional field. Provide the field description for the purpose to create it.
- Data type = Expand the chevron and select the data type as a Number and then select the Whole number. Not only the whole number, but also you can select the options like Decimal, Float, Language code, Duration, and Time zone as per your need.
- Format = There are four types of field formats. Such as Duration, Language code, None, and Time zone. Select as per your need.
- Behavior = Select the field behavior either Simple, Calculated, or Rollup.
- Required = Choose it either for your Business recommended, Business Required, or Optional.
- Searchable = If you want to make this field searchable, then put a checkmark on this option.
- If you want to enable more options for this number column (like Enable column security, Appear’s in dashboard’s global filter, etc.), then expand the Advanced options and set the values.
- Also, you can specify the Size of number, Minimum value, Maximum value, etc.
Once all the fields are filled up, just Save the column as shown below. After a while, the new number column is ready to use in the Dataverse table.
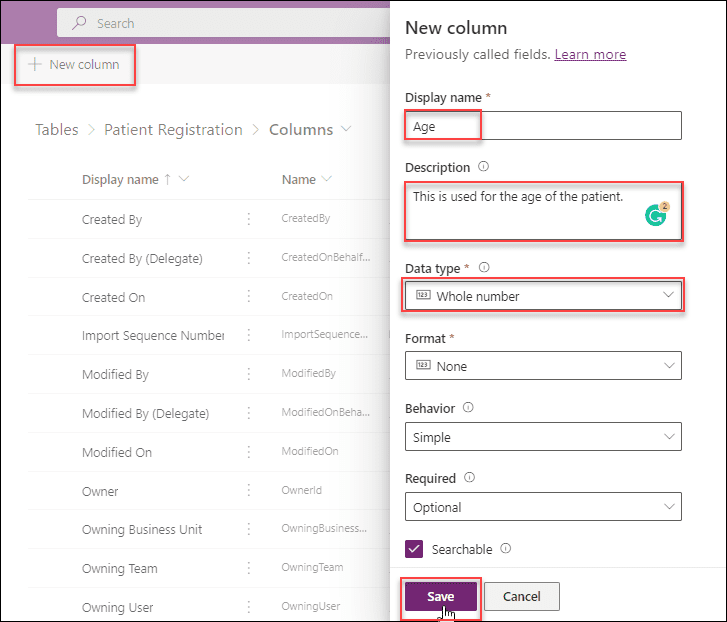
This is how we can create a Number field inside the Dataverse Custom Table.
Dataverse Create Date Column
Suppose you want to create a Date column inside the Dataverse Custom table, then refer to the below things to do.
- Go to your specific Custom data table, and click on the + New column. On the New column pane, specify the below fields:
- Display name = This is a required column. Enter the name of the Date column (suppose DOB) that you want to create in the Dataverse table.
- Description = This is an optional field. Provide the specific field description for the purpose to create it.
- Data type = Expand the chevron and select the data type as a Date and time and then select either the Date and time or Date only as per the need.
- Format = Whatever you will select the Data type, it will auto-populate in this Format field.
- Behavior = Select the field behavior either Simple, Calculated, or Rollup.
- Required = Choose it either for your Business recommended, Business Required, or Optional.
- Searchable = If you want to make this field searchable, then put a checkmark on this option. By default, it is enabled.
Then, once you expand the Advanced options, you will get all these below fields. Such as:
- Schema name = As we already discussed, it is a pre-populated column that is coming from the Display name. It includes the Dataverse solution publisher’s customization prefix. After you’ve saved the table, you won’t be able to edit it.
- Time zone adjustment = There are two types of time zones. Such as User local and Time zone independent. By default, it will be User local only.
- Input method editor (IME) mode = There are four IME modes like Active, Auto, Disabled, and Inactive. By default, it will be Auto mode only.
- Also, if you want to enable more options for this Date and time column (like Enable column security, Appear’s in dashboard’s global filter, etc.), then set the values as per the need.
Once all the fields are filled up, just Save the column as shown below. After a while, the new date column is ready to use in the Dataverse table.
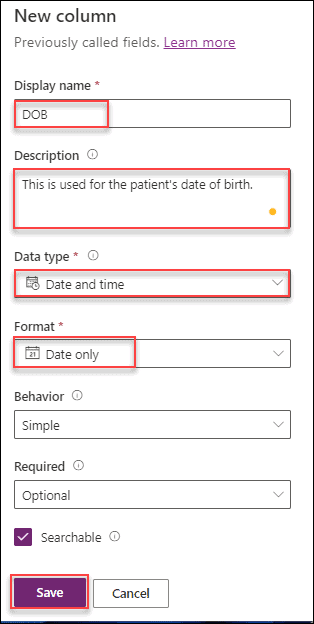
This is how we can create a Date and time field inside the Dataverse Custom Table.
Dataverse Create Choice Column
Next, we will discuss one of the most important data types in Dataverse i.e. Choice column.
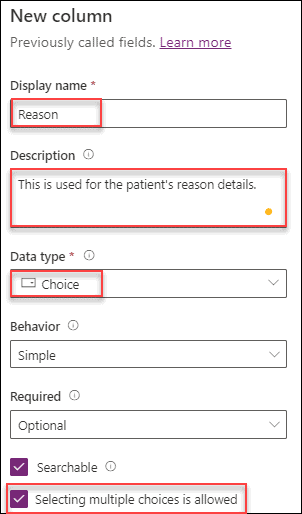
In the same way, Go to your specific Custom data table, and click on the + New column. On the New column pane, specify the below fields:
- Display name = This is a required column. Enter the name of the Choice column (suppose Reason) that you want to create in the Dataverse table.
- Description = Provide the specific field description for the purpose to create it. This is an optional column.
- Data type = Once you will expand the chevron, you can able to view two types of options i.e. Choice and Yes/no. Select the data type as a Choice to add a choice field.
- Behavior = Select the field behavior either Simple, Calculated, or Rollup.
- Required = You can choose it either for your Business recommended, Business Required, or Optional.
- Searchable = If you want to make this field searchable, then put a checkmark on this option. By default, it is enabled.
- Selecting multiple choices is allowed = If you will enable this option, then the user can able to select multiple-choice values.
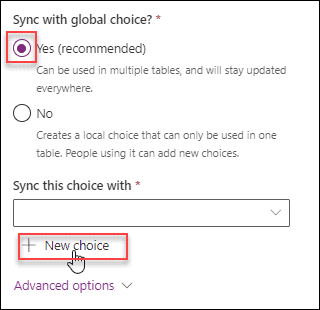
- Sync with global choice? = This is a recommended field that contains two values:
- Yes (recommended) = If the user enables this option, then it can be used in multiple tables, and will stay updated everywhere.
- No = If the user enables this option, then it creates a local choice that can only be used in one table. People using it can add new choices.
- Sync this choice with = This is a required field where you can create your own choices. To create it, click on the + New choice option.
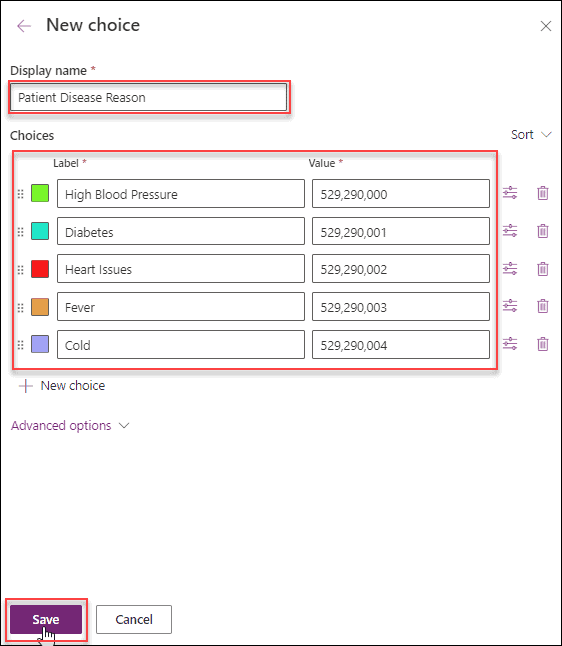
In the New choice pane, enter the below field values:
- Display name = Provide a display name of the choice values (Suppose Patient Disease Reason). That means, under this name, all the choices will be stored.
- Choices = In the field, there are two options. Such as:
- Label = Specify one or multiple numbers of choice values (like High Blood Pressure, Diabetes, etc.). You can add more choices by using the + New choice option.
- Value = Also, if you want, then you can provide their values too. The value must be between 0 and 2147483646.
Moreover, you can provide individual colors to the choice values and also you can sort or delete any of the choice values that you want as shown below.
Next, expand the Advanced options and then you can see these below fields:
- Name = it is a pre-populate column that is coming from the Choice Display name.
- External type name = This is an optional field. Specify the external name to the choice field.
- Description = Provide the description of the choice field. It is optional.
Once everything is done, Save the new choice pane.
Now, expand the chevron of Sync this choice with field and select the Patient Disease Reason that you have created recently.
If you want to modify some choice values, then click on the Edit choice option and do the modifications as per your need.
Similarly, if you want to create another category of the choice column, then click on the + New choice option and add choice values within that.
Once all the fields are filled up, just Save the choice column as shown above. After a while, the new choice column is ready to use in the Dataverse table.
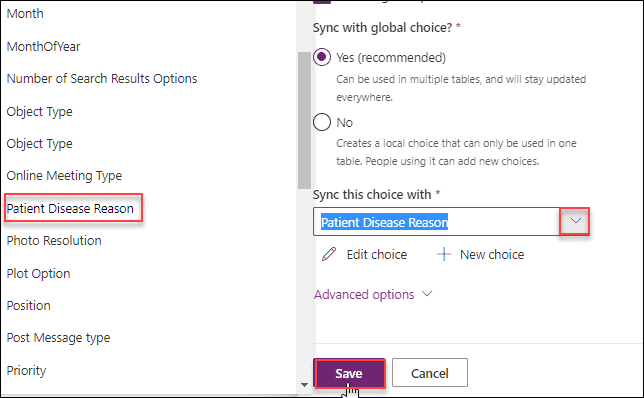
This is how to create a Choice field inside the Dataverse Custom Table.
Dataverse Create Multiline/TextArea Column
Now comes how we can add a Multiline or Text Area field into the Dataverse Custom table.
There is a total of three types of text columns in Dataverse and the below table represents the details:
| Column Type | Default Value | Maximum Value | Illustration |
| Text | 100 | 4000 | Allows for a single line of text to be entered. |
| Text Area | 100 | 4000 | Allows for several lines of text to be entered. The number of rows that appear in the column can be customized. Use for short bursts of text. |
| Multiline text | 150 | 1048576 | Text can be entered in numerous lines. The number of rows shown in the column may be customized. When a lot of text is needed, this is the option to use. |
To create it, go to your specific Custom data table, and click on the + New column. On the New column pane, specify the below fields:
- Display name = This is a required column. Enter the name of the multi-field column (suppose Address) that you want to create in the Dataverse table.
- Description = Provide the specific field description for the purpose to create it. This is an optional column.
- Data type = Once you will expand the chevron, you can able to view two types of sections i.e. Single line of text and Multiple lines of text.
- In the Single line of text sections, there are some options such as Plain text, Text area, Rich text, Email, Phone number, etc.
- In the Multiple lines of text sections, there are two options i.e. Plain text and Rich text. You can choose either Text area or Plain text to enter the address value.
- Behavior = Select the field behavior either Simple, Calculated, or Rollup.
- Required = You can choose it either for your Business recommended, Business Required, or Optional.
- Searchable = If you want to make this field searchable, then put a checkmark on this option. By default, it is enabled.
When every field is filled-up, Save the column as shown below. After a while, the address field is ready to use in the Dataverse table.
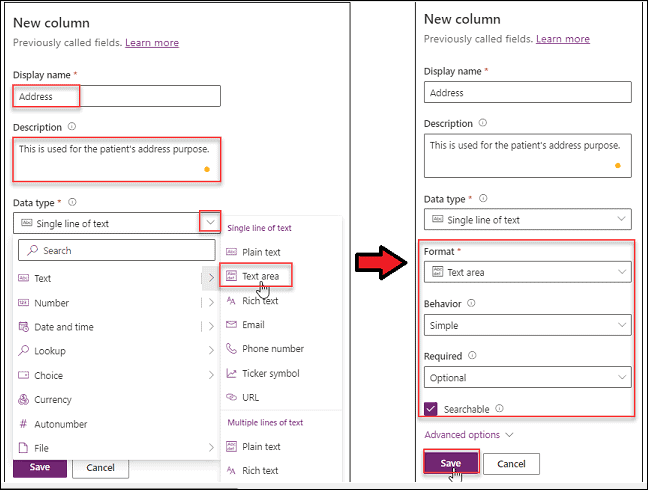
This is how to create a Multiline field inside the Dataverse Custom Table.
Dataverse Create Phone Number Column
Do you want to create a Phone Number or Email field in the Dataverse table? It’s very simple as the Dataverse text column.
- On the New column pane, enter the below fields to make a Phone Number field:
- Display name = This is a required column. Enter the name of the Phone Number column (suppose Patient Phone Number) that you want to create in the Dataverse table.
- Description = Provide the specific field description for the purpose to create it. This is an optional column.
- Data type = Once you will expand the chevron, you can able to view two types of sections i.e. Single line of text and Multiple lines of text. Select the Phone number under the Single line of text section. Similarly, if you want to create an Email field, then you can click on the Email option under this section.
- Behavior = Select the field behavior either Simple, Calculated, or Rollup.
- Required = You can choose it either for your Business recommended, Business Required, or Optional.
- Searchable = If you want to make this field searchable, then put a checkmark on this option. By default, it is enabled.
Now Save the column as shown below. After a second of time, the Phone number field is ready to use in the Dataverse table.
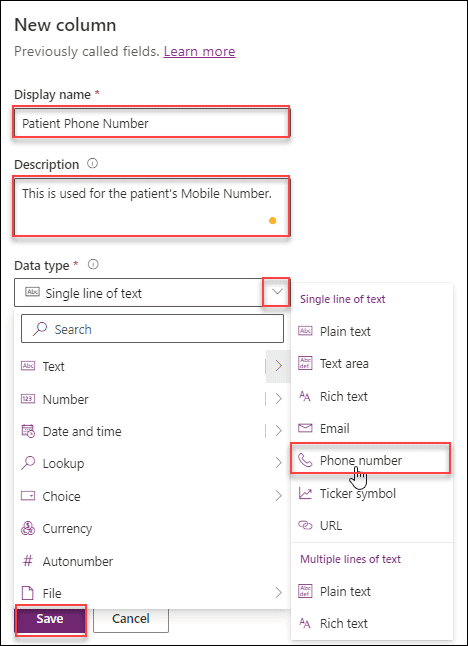
This is how to create a Phone number field inside the Dataverse Custom Table.
Create Item in Dataverse Table
Once everything is set up, we need to create items or records in the Dataverse Custom Table. As we know that a table is nothing without the records or data. For that, we should know the process that how we can insert data into the table.
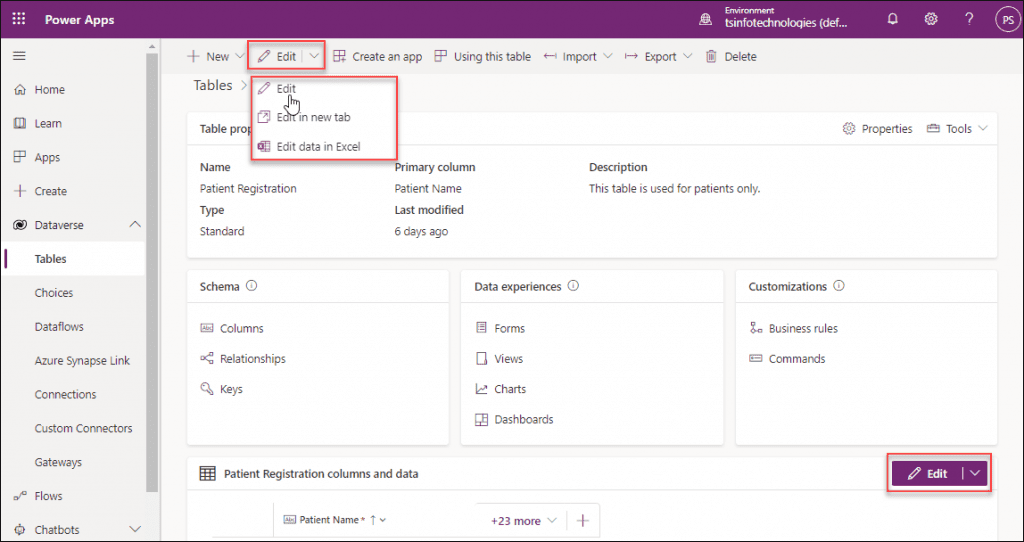
- Go to the Tables under the Dataverse section (from the left navigation). Click on the specific table (Patient Registration) from the table list and then expand the Edit option from the top bar.
- As you can see in the below screenshot, there are three different types of options where you can enter and edit the data inside the Dataverse custom table. Such as:
- Edit = When you will choose this option, a user can enter or edit the records in the same tab itself.
- Edit in new tab = When you will choose this option, a new tab will open where a user can enter or edit the records.
- Edit data in Excel = When you will choose this option, an Excel spreadsheet will open where a user can enter or edit the records. Once you will save and publish the excel, then the data will save or store in the Dataverse custom table.
- Also, you can tap on the Edit button directly i.e. present under the table. But here if you will expand this Edit button, then you can view only two options i.e. Edit and Edit in new tab.
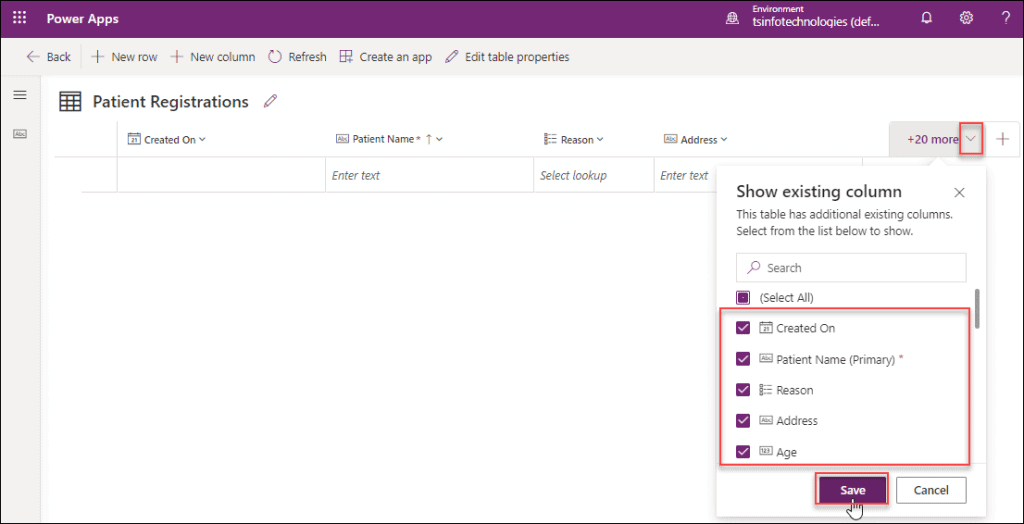
- On the next page, first, select or choose the columns that you want to add to the custom table. As in the below screenshot, I have chosen all the columns that I have created recently. Also, you can select the (Select All) option if you want to add all the columns in the Dataverse custom table. Next, Save it.
- Now enter or insert the record into individual fields. If you want to add any extra new row or new column, then you can do it by using the + New row and + New column option as shown below. Here, the data will save automatically in the custom table. Refer to the below screenshot.

This is the way to create Item(s) in a Custom Dataverse Table.
Dataverse create table from SharePoint list
Do you know how to create a Dataverse table from the SharePoint list? Check out this post to know more details: Dataverse create table from SharePoint list
Dataverse create table from excel
Do you want to create a Dataverse table from an Excel spreadsheet? Follow the below stuffs to achieve this.
There are two different ways where we can import the excel data to a Dataverse table. Such as:
- Import data from excel by creating a new Dataverse Custom Table
- Dataverse create a table from excel by using the Dataverse Import data option
Refer to the instructions below.
Approach – 1: (Import data from excel by creating a new Dataverse Custom Table)
Here, we will create a dataverse table from excel by using a Custom table. Follow the steps below to do so.
Step – 1:
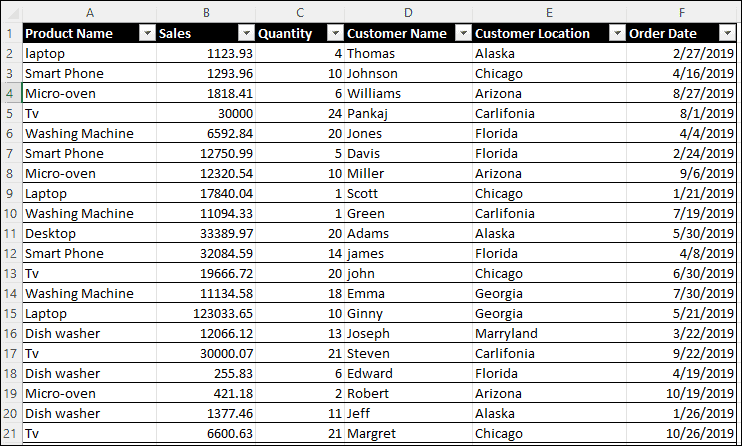
- As we are importing the excel data to a Dataverse table, in this case, we must need an Excel spreadsheet that should contain some fields and records as shown below.
- The below excel sheet contains six different fields (like Product Name, Sales, Quantity, Customer Name, etc.) and has more than around 100+ records. Also, this excel sheet is in the table format named Sales_Table.
Step – 2:
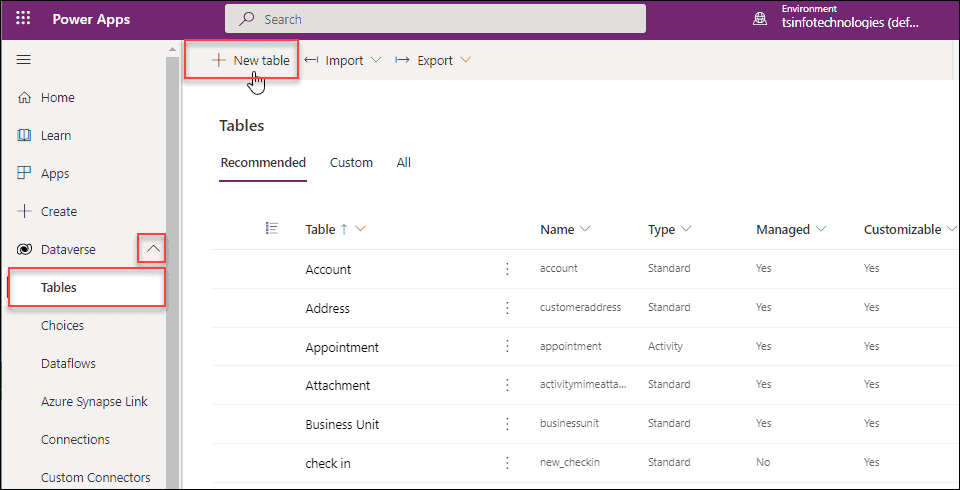
- Open Power Apps and Sign-in with your credentials. Once it opens, Select Tables under the Dataverse option (from the left navigation).
- Click on + New table from the top bar of the page.
Step – 3:
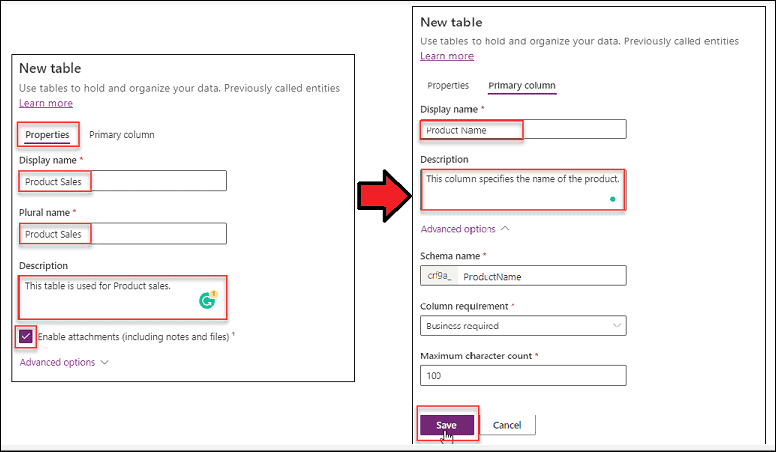
- On the New table pane, go to the Properties tab and enter the below field values:
- Display name = Enter the new table name (like Product Sales).
- Plural name = This field is auto-populated. Whenever you will enter the table display name, this field value generates automatically with the same display name.
- Description = Provide the table description (optional).
- Enable attachments = By default, this field is enabled.
- Similarly, go to the Primary column tab and enter the below field values:
- Display name = Provide the Primary column name (like Product Name) of the custom table.
- Description = Provide the Primary column description (optional).
Once everything is done, click on the Save button.
Step – 4:
- Next, the new custom table is ready to use. To view all the default columns, click on the Column option under the Schema section.
- The next page will come up with all the default columns that are present inside the new custom table as in the below screenshot.

Step – 5:
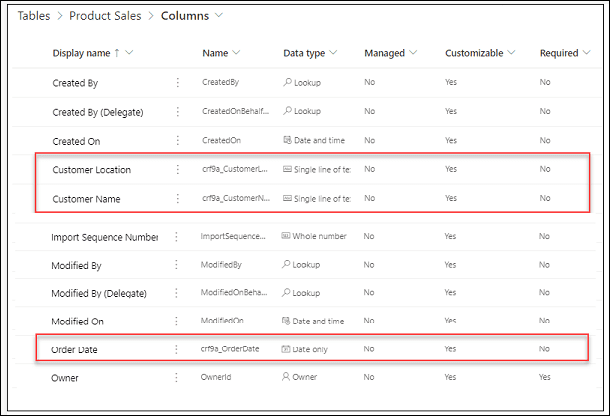
Now, we will create our remaining own custom columns (like Sales, Quantity, Customer Name, etc.) that the excel sheet has.
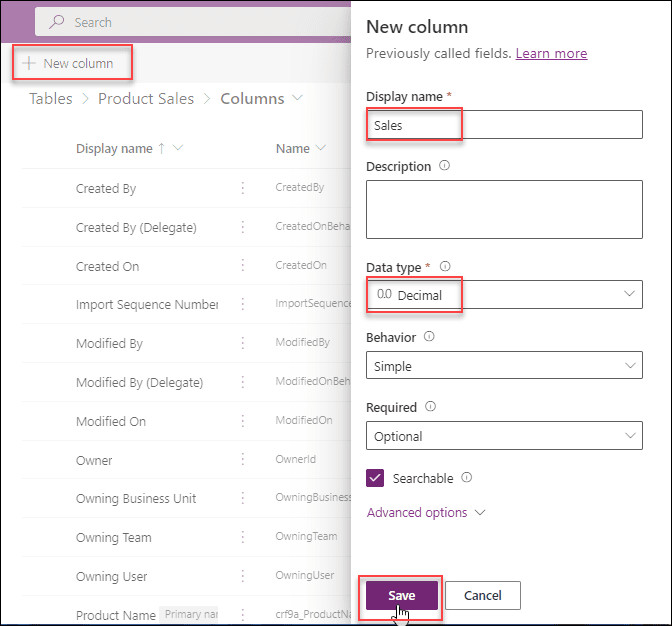
- Sales: To create a Sales field, in the Dataverse table columns page, click + New column and enter these fields below:
- Display name = Enter the field name (Sales).
- Description = This is optional. Provide the field description.
- Data type = As this field contains the Decimal number (in excel), that’s why we need to choose the Data type as Decimal.
Once everything is done, just click on Save.
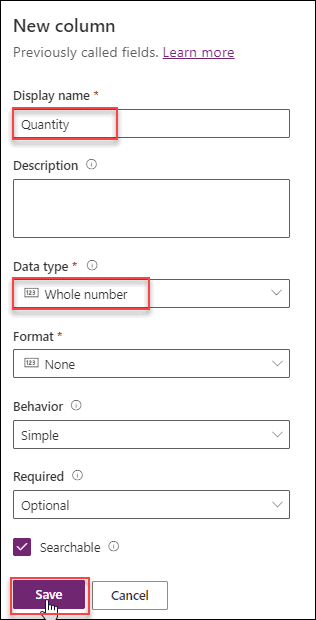
2. Quantity: To create a Quantity field, in the Dataverse table columns page, click + New column and enter these fields below:
- Display name = Enter the field name (Quantity).
- Description = This is optional. Provide the field description for quantity.
- Data type = As this field data type is a Whole number (in excel), that’s why we need to choose the Data type as a Whole number.
Once everything is done, just click on Save.
In the same way, we will create all the custom columns (with different data types) in the specific Dataverse table (Product Sales) like the below screenshot.
Step – 6:
- Once all the custom columns are ready, now it’s time to import all the excel data to the dataverse table.
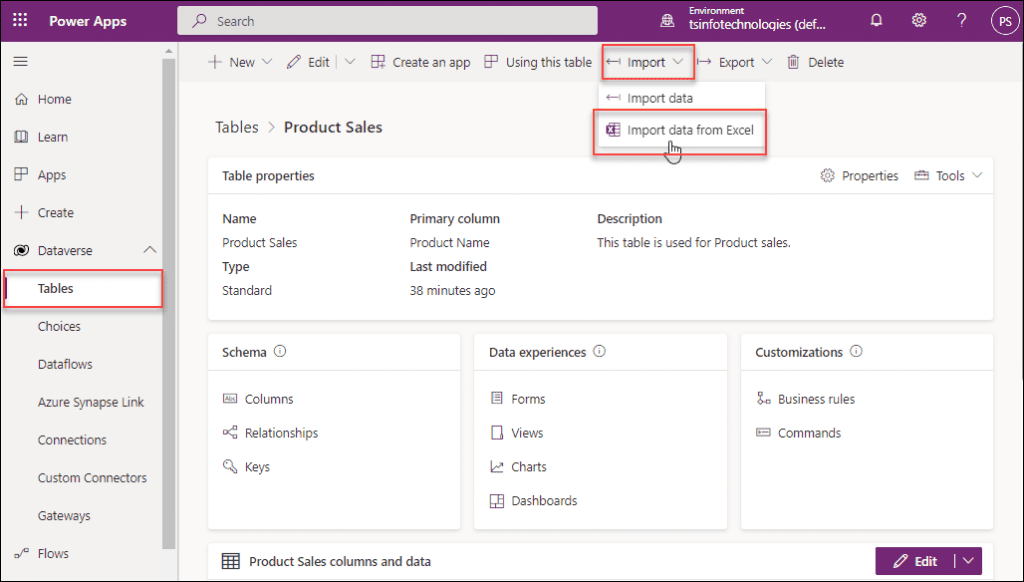
- To work around this, go to the Power Apps Home page -> Expand Dataverse (from the left nav) -> Select Tables -> Expand Import -> Select Import data from Excel.
Step – 7:
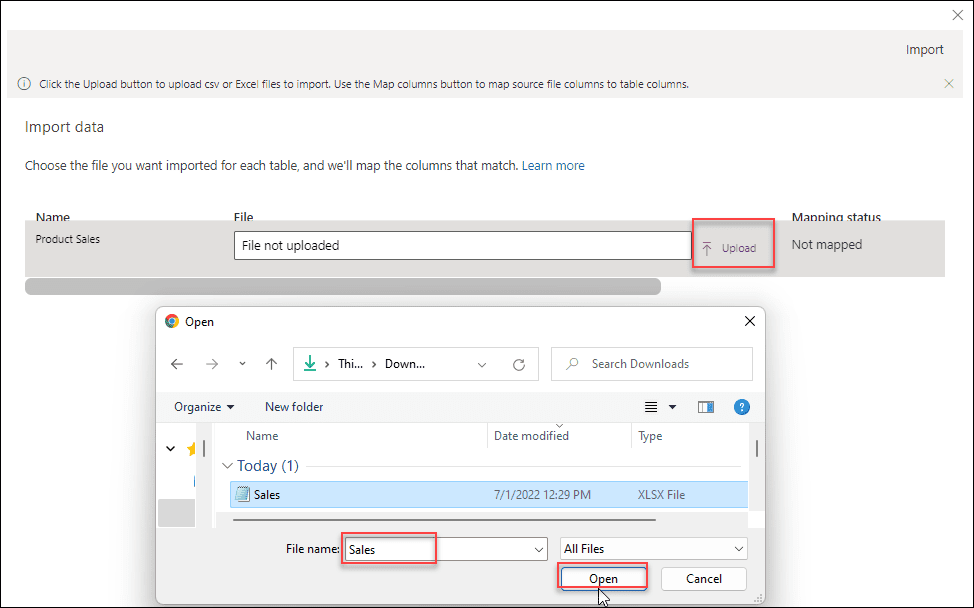
- After a while, it will ask you to choose the excel file that you want to import to the dataverse table.
- Click on the Upload button to upload the existing excel file to import. When you will select the excel file from your local system, click Open.
Step – 8:
- Once the excel file uploads, you will see a mapping error (“Mapping errors exist“) will occur under the Mapping status field. That means the excel columns did not map with the Dataverse table columns that we created.
- In this case, we need to map both the excel and the dataverse table columns manually. To achieve this, click on the Map columns where you can map the fields manually.

Step – 9:
- On the next mapping page, you can see a warning notification on the top of the page where it specifies all the dataverse table custom columns that have not been mapped to the excel sheet columns.
- Suppose, for the Customer Location, expand the chevron and select the Source value as Customer Location as shown below. Similarly, select every source value of unmapped custom columns that have not been mapped.
- Once every field is mapped with the source values, select the Save changes (from the top right section).
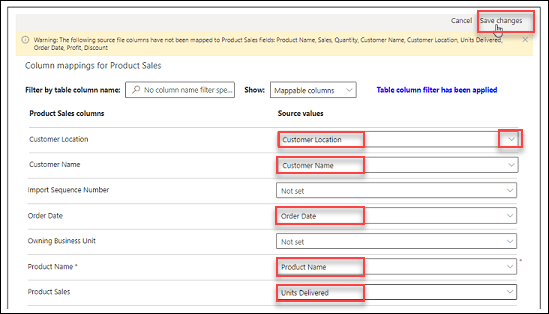
Step – 10:
- Next, it will redirect to the Import data screen where you have uploaded the excel file. You can see a green color information icon that notifies the Mapping was successful. If not, then again you have to map the fields correctly and save the changes.
- Once the mapping is successful, click on the Import button (from the top right corner).

- If the file is imported successfully, then you will get a success message “Import completed successfully“. Also, you can see the table name with the total count of records in it.

This is one of the processes to create the Dataverse table from the Excel spreadsheet. Now we will discuss how to view all the Excel fields and records that we have created recently in the dataverse.
Read: Delete All Records From Dataverse Table [With Examples]
Access the Excel Data Migrate table in Dataverse
In Dataverse, to view the Excel Data migrate table and its records, follow the below instructions:
- In Power Apps, go to the Tables option under the Dataverse section (from the left navigation).
- Go to the Custom tab or search and select the new dataverse table (Product Sales) that you have created recently from the Excel spreadsheet.
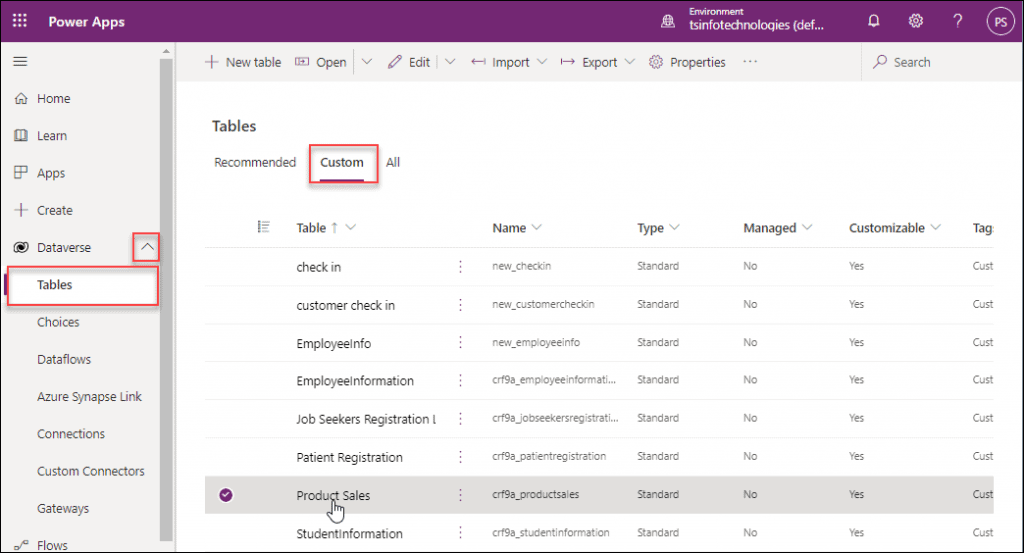
- The selected new table will appear with all the Table properties, Primary column, Description, Schema, etc. as shown below. To view all the fields and records, click on the Edit button.
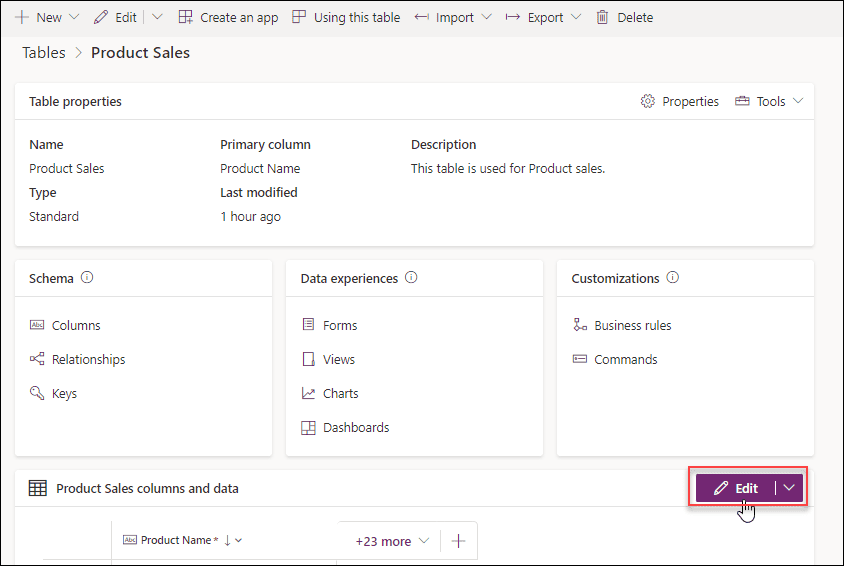
- By default, the specific Dataverse table will appear with 2/3 columns from the SharePoint list like Name, Created On, etc.
- To view more fields and values, expand more column options and select the existing column (like Customer Location, Customer Name, Sales, Quantity, etc.) from the Show pane, and then Save it.
- Once you saved it, all the selected existing fields are added to the Dataverse table.
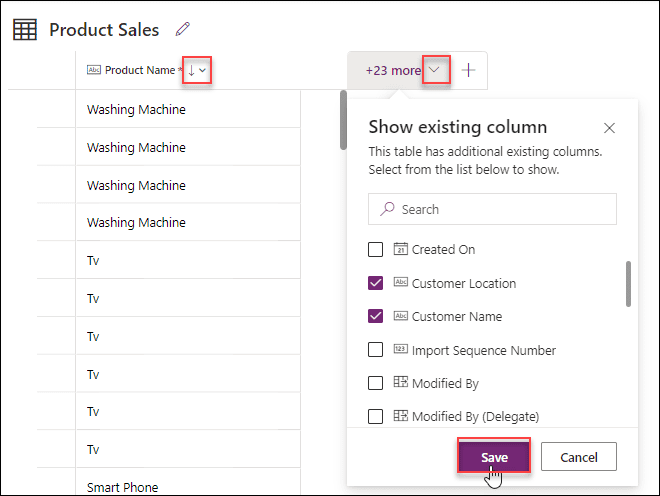
- Once all the fields are added to the Dataverse table, it looks like the screenshot below. I just sorted the order of the Primary column i.e. Product Name.
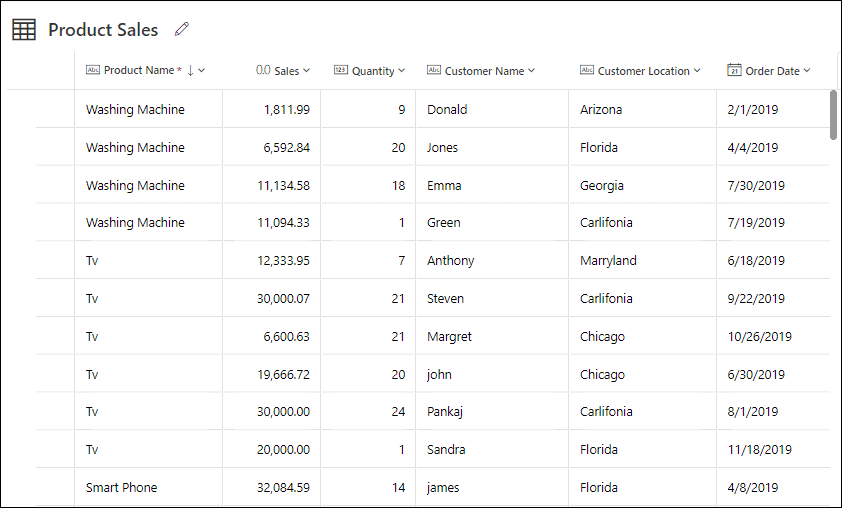
That’s how we can view the excel data in the Dataverse custom table.
Approach – 2: (Dataverse create a table from excel by using the Dataverse Import data option)
There is another approach that we can follow to create a Dataverse table from the Excel sheet i.e. by using the Import Data option.
Step – 1:
Here, I have taken the same Excel spreadsheet named Sales (having with same attributes and records). Before importing the excel to dataverse, you must upload it to your OneDrive. And the excel sheet should be in a table format as shown below.

Step – 2:
In Power Apps, Go to Dataverse -> Select Tables -> Choose Import data under the Import section (from the top of the page).
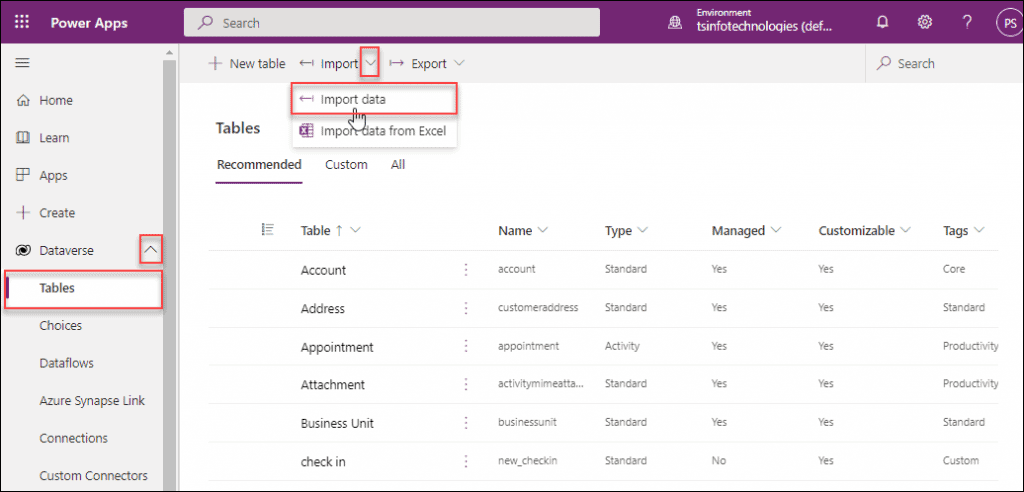
Step – 3:
On the next page, you need to choose the data source as an Excel workbook. Also, you can search the excel data source from the search bar.
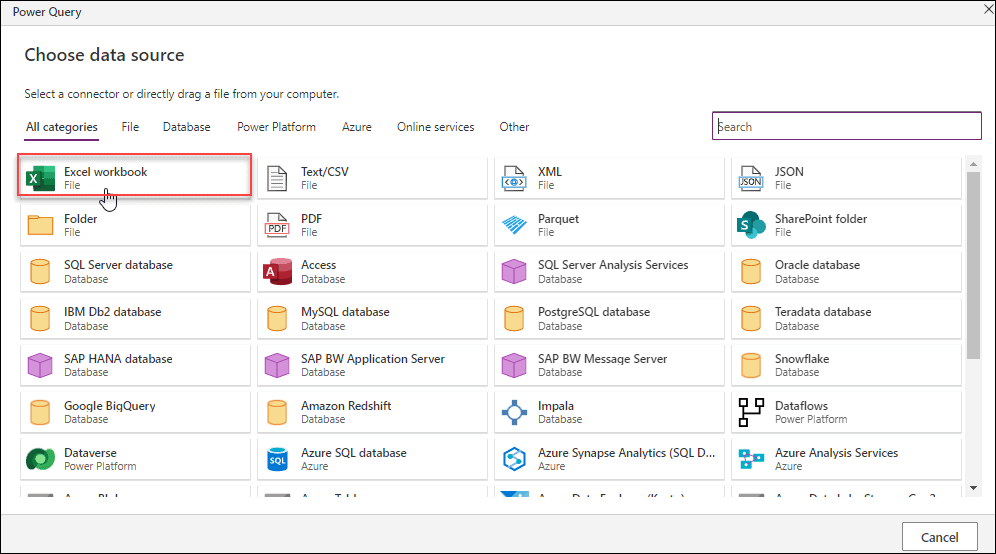
Step – 4:
- Next, we need to provide the connection settings. By default, it will be selected with the Link to file option. Do not change anything.
- Then, click on the Browse OneDrive button from the File path or URL field. Choose your specific excel file (Sales.Xlsx) from the OneDrive and click on the Select button.

Step – 5:
- Once you will select the excel file, then the file path will reload automatically on the data source page. Click on Next.
- On the next page, you need to choose the Excel table (Sales_Table) and then tap on the Next button.

Step – 6:
- As soon as you choose the specific excel table, a Power Query editor page will appear that loads all the columns and data.
- We have access to any alterations that might be made to the current page. The designer is identical to Power BI, as you’ll see. Let’s imagine you want to update this page such that you may delete a row or a column.
- In the bottom section, we can see some information like how long it took to load, the number of columns (6), and the amount of data rows (99+, excluding headers and column names). And then, tap on the Next button.
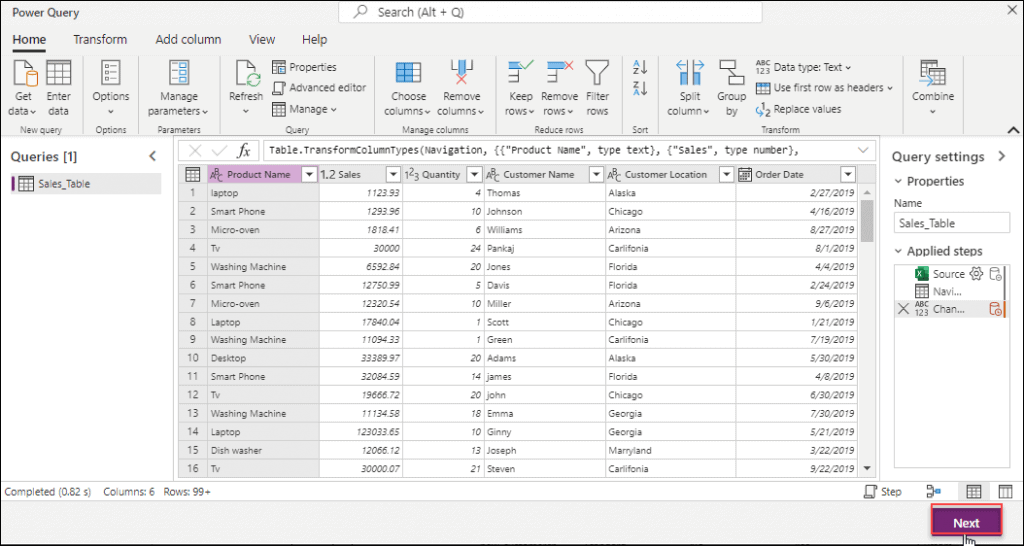
Step – 7:
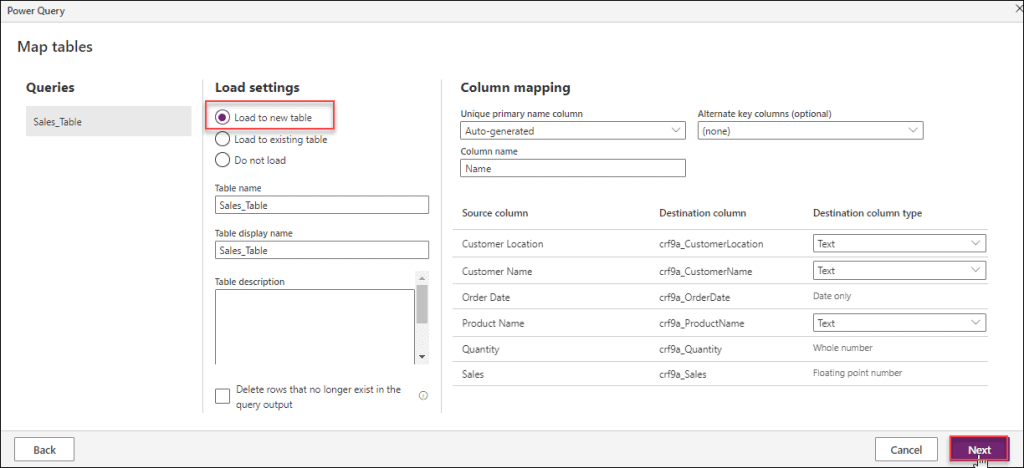
On this page, we may either load it into an existing table or make a brand-new one. I’ve made the decision to add it to a new table. The Table name and Table display name will automatically populate this field. Also optional is the field for the Table description. Other column mapping things let’s keep with as it is. Click on Next.
Step – 8:
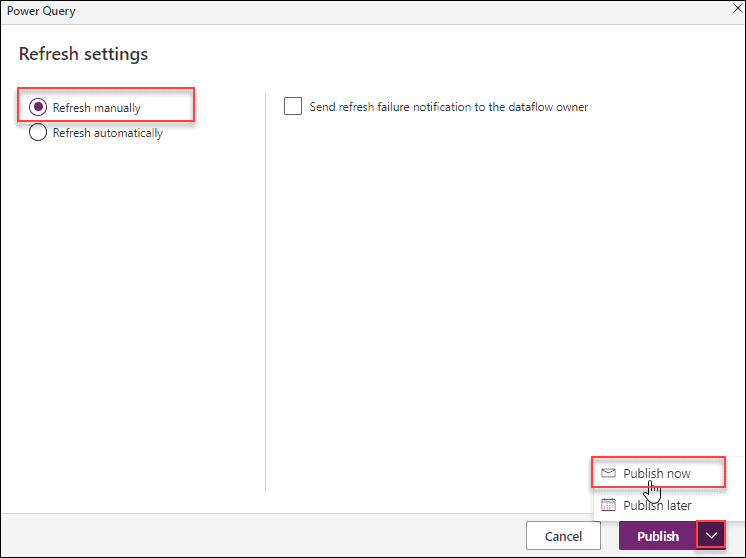
- Refresh manually and Refresh automatically are the two choices available on the Refresh settings page. Either manually or automatically refreshing must be chosen.
- We must choose a time interval if you choose the Refresh automatically option.
- Additionally, choose the “Send refresh failure notification to the dataflow owner” option if you wish to notify the dataflow owner of a refresh failure. Finally, select Publish -> Publish now (to refresh manually) and wait for a while.
- The Dataverse dataflow will refresh and the progress status will show up after some time. The Next refresh field for the data flow will also change once it is published. Because it was a manual refresh for me, my next refresh will be N/A. Refer to the image below.
- If you selected any automatic refresh period in the window prior to this one, the date and time will change automatically.

Now the new Dataflow is ready to use. By default, the data flow saves with the name New dataflow 1, New dataflow 2, etc.
Step – 9:
Suppose, you want to rename your data flow, then click on the ellipses (…) -> Rename -> Provide a new name to the data flow (Sales Data) -> Click on Rename button.

Once you renamed the data flow, then it will appear like the below screenshot.

Step – 10:
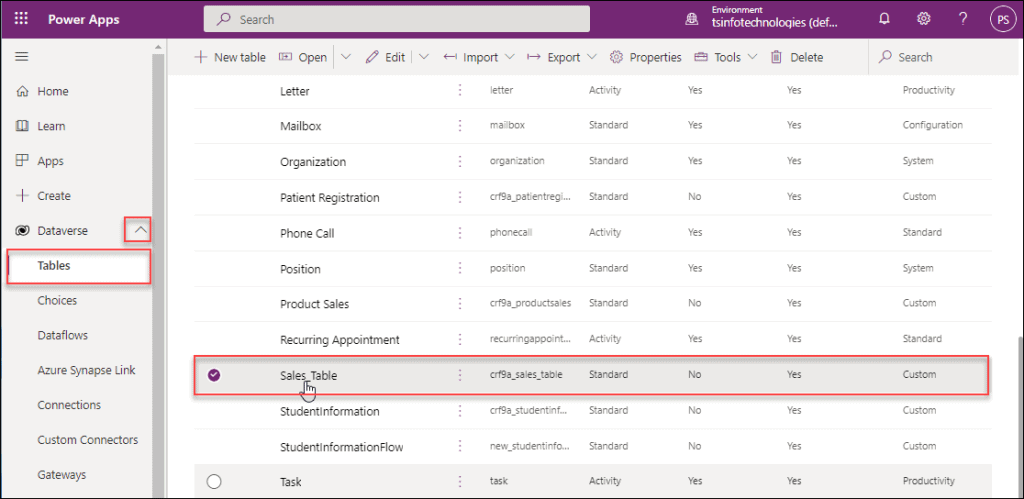
To view the Dataverse table and all the records, go to the Tables option under the Dataverse section and then select your table (Sales_Table). Here, the dataverse table name will appear as per the excel table name.
Step – 11:
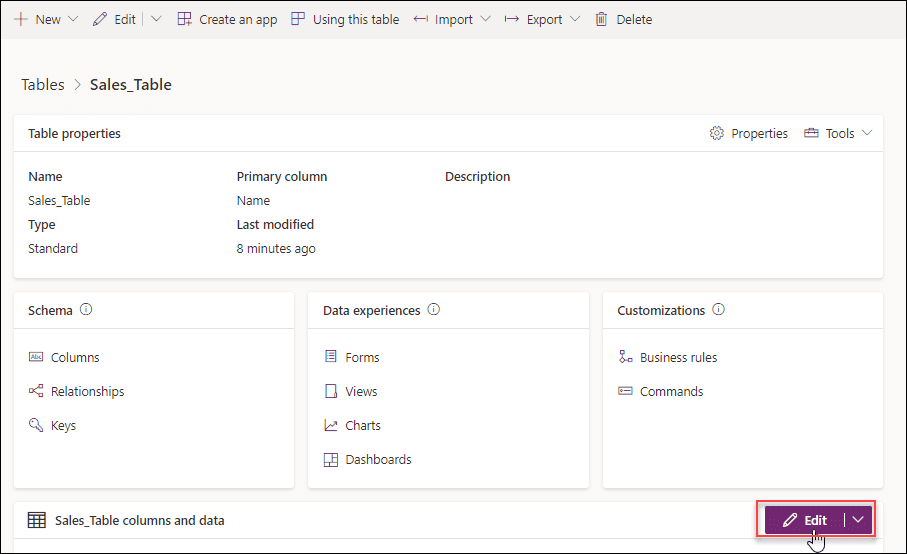
On the next page, click on the Edit button to add the fields and records to the dataverse table as below.
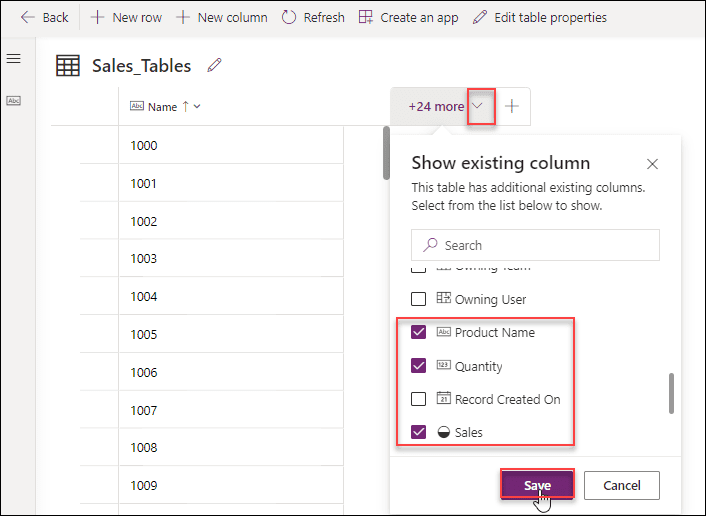
- To view more fields and values, expand more column options and select the existing column (like Product Name, Quantity, Sales, etc.) from the Show pane, and then Save it.
- Once you saved it, all the selected existing fields are added to the Dataverse table (including all the excel records).
Step – 12:
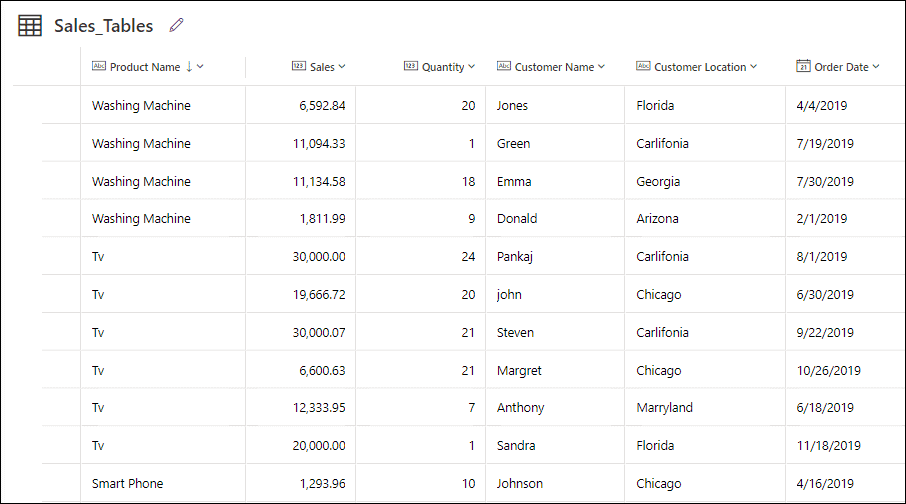
Finally, the dataverse migrate table looks like the below figure. As I sorted the Product name field in descending order, that’s why all the records are displayed in descending order.
This is how to work with Dataverse create table from excel.
Dataverse create table from another table
Do you want to create a table from another table in Microsoft Dataverse or do you want to create a duplicate table in Microsoft Dataverse?
- The answer to this question is, No, there are no out-of-the-box features to create a duplicate table in Dataverse. Alternatively, we can use the XRM Toolbox plugin called the Clone Field Definitions Plugin which may duplicate every column (field) in your tables. If you want to update data, I will use “Bulk Data updater” to update the data again using XRMToolbox.
- A comparable tool is the Attributes Factory, where you may build new columns for a table by exporting the columns from an existing entity. Just make the new table first, that’s all.
- Also, if you need to create the same table in the same tenant but a different Dataverse environment, then simply export and import a solution.
- If you need the same table in the same Dataverse environment, then export a solution with your table (include all components). Unzip the solution file, edit the physical table name, and change guids on forms, and views. Re-zip and re-import.
Dataverse table change primary name column
- Sometimes what happens is, In the Dataverse table, you want to modify the Primary name column name that you have already created.
- The logical name of the column that holds the string value identifying the table record is the value of the PrimaryNameAttribute attribute. If you have already created this Primary name column in the dataverse table, then there is impossible to modify it.
- The “Primary Name” column is the primary key for the tables made in Dataverse, that’s why its value cannot be modified. Of course, you may alter the value in this field, but you cannot switch to another table column.
- So in this case, you can delete the column from the dataverse table and again create a new Primary column with the new name.
Dataverse duplicate table
As we already discussed above (Dataverse create table from another table), we can not create a duplicate table in Microsoft dataverse. Instead, we can use the XRM Toolbox plugin called the Clone Field Definitions Plugin to create duplicate fields in the table.
Dataverse table enable attachments
- Suppose in your Dataverse table, you want to enable the attachments so that you can use some notes and files inside the table.
- In that case, in the dataverse table, there is a field present called Enable attachments (including notes and files). If you will enable this option, then you can use all types of notes and files in the dataverse table.
- To enable it, go to Dataverse -> Tables -> Properties -> Enable attachments (if not enabled) -> Save as shown below. Whenever you are creating a new dataverse table, by default, this option will be in disable mode. You can easily enable this option while creating the Dataverse table.
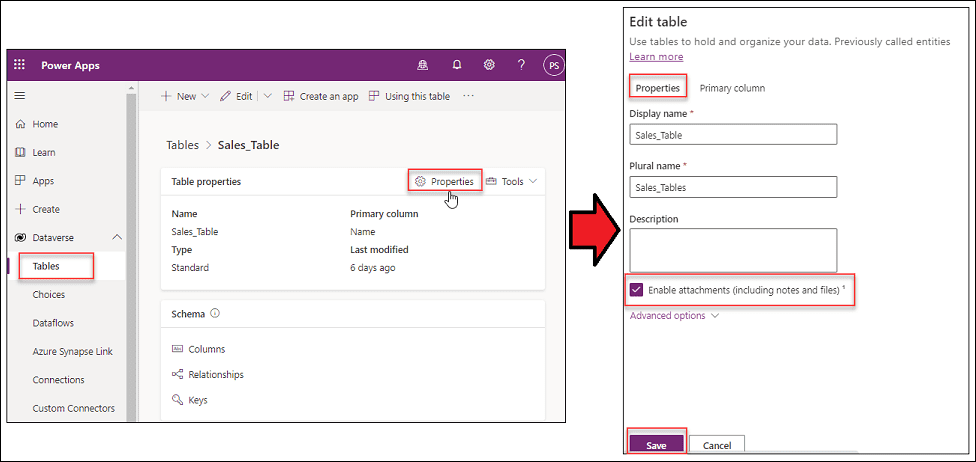
This is how we can enable attachments in the Dataverse table.
Also, you may like the below Power Apps and Dataverse Tutorials:
- Power Apps Sort Function
- Power Apps Sort Gallery
- PowerApps Search Function + How to use with example
- Power Apps Search SharePoint List Examples
- PowerApps Search User
- Power Apps Search Gallery + 19 Examples
- PowerApps Find Function With Examples
This Microsoft Dataverse tutorial explains everything about Tables like what is a table in Dataverse, what its use is, What are the various table types are available in Dataverse, and many more.
Also, we covered all the below points that are related to the Dataverse table:
- Types of tables in Microsoft Dataverse or Dataverse table types
- Activity Table in Dataverse
- Dataverse table ownership
- Dataverse tables permissions
- Dataverse table row limit
- Dataverse table data types
- Create a Custom table in Microsoft Dataverse
- Display Dataverse Custom Table
- Various ways to create columns in a Dataverse Table
- Create Different Columns in Microsoft Dataverse Table
- Dataverse Table create item
- Dataverse create table from SharePoint list
- Dataverse create table from excel
- Dataverse create table from another table
- Dataverse table change primary name column
- Dataverse duplicate table
- Dataverse table enable attachments
I am Bijay a Microsoft MVP (10 times – My MVP Profile) in SharePoint and have more than 17 years of expertise in SharePoint Online Office 365, SharePoint subscription edition, and SharePoint 2019/2016/2013. Currently working in my own venture TSInfo Technologies a SharePoint development, consulting, and training company. I also run the popular SharePoint website EnjoySharePoint.com
What role do you need to create tables. That option is currently grayed out for me. I need to build a flow to archive data but I need to create the table.