Ever wished to remove a large number of records from the Dataverse Table? Do not worry about it. This Microsoft Dataverse Tutorial will guide you to understand how to clean the records from Dataverse in simple and easy steps.
Let’s say you have a dataverse table with some records on it. It was initially made as test records but which you no longer wish to maintain since you want to migrate these solutions to different manufacturing or testing sites.
You may use this article to learn how to delete every entry from the dataverse table without doing it manually one by one in this scenario.
In case of if you don’t want to remove every entry from the data table, you may also target a view on that particular dataverse table. You can use that view to delete some specific records from the dataverse table that can fit with the provided view condition.
Also read: Dataverse Primary Name Column Autonumber
Delete Specific Records From Dataverse
Now we will see how to clean some specific records from a dataverse table. As earlier, we discussed, to remove specific data from the dataverse table, we can target or create a View in the dataverse.
With the help of a view, we can easily remove some particular records from the dataverse table. Additionally, we may filter the data in the view to remove it from the dataverse table. Let’s check out the below simple scenario.
Example:
- Go to Power Apps. Expand the Dataverse from the left navigation and then click on Tables. Now, you can see all the inbuilt tables (Account, Address, Appointment) and as well as custom tables that are created by the user.
NOTE:
If you are new to dataverse and want to create a dataverse custom table, then refer to this link to know more details: Dataverse Create Table [With Examples]
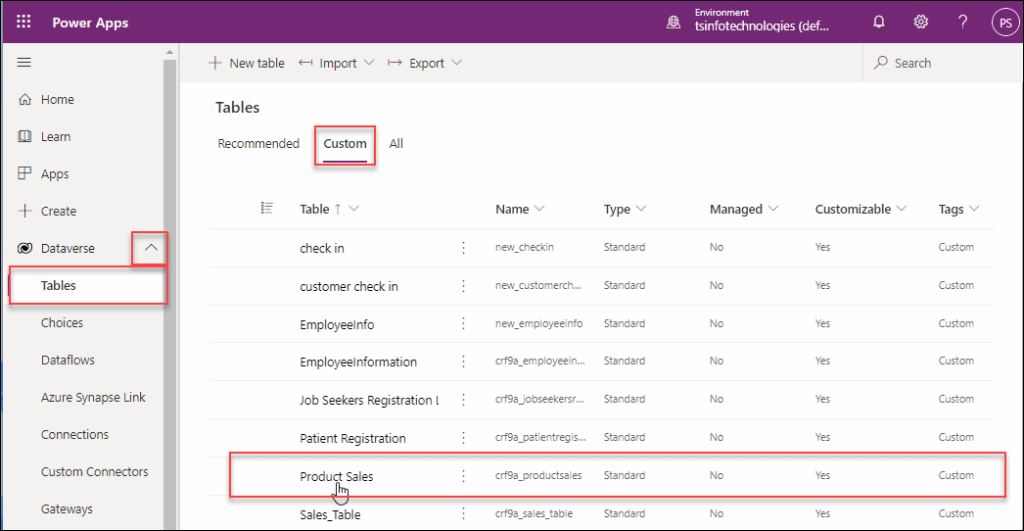
- Go to the Custom tab and tap on the specific custom table (let’s say Product Sales) from the dataverse table (As I want to remove the specific record from my Custom table).
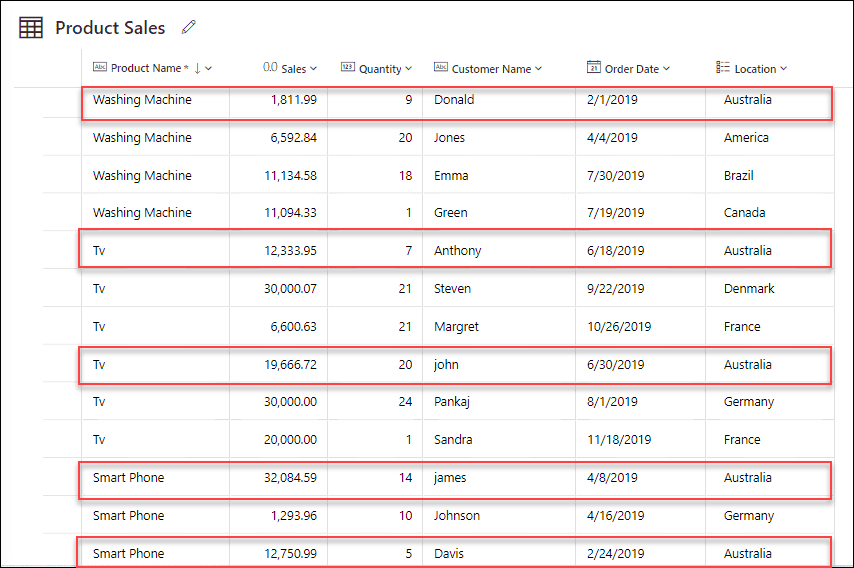
- Once you will click on the Edit button, then you can see the specific table details. The below screenshot represents the view of the Product Sales table that contains various fields like Product Name, Sales, Quantity, Location, etc. Also, this table has a number of records.
- Now, I would like to remove only those records where the Location is only Australia. That means, all the Australia location data will be removed from the dataverse table (Product Sales).
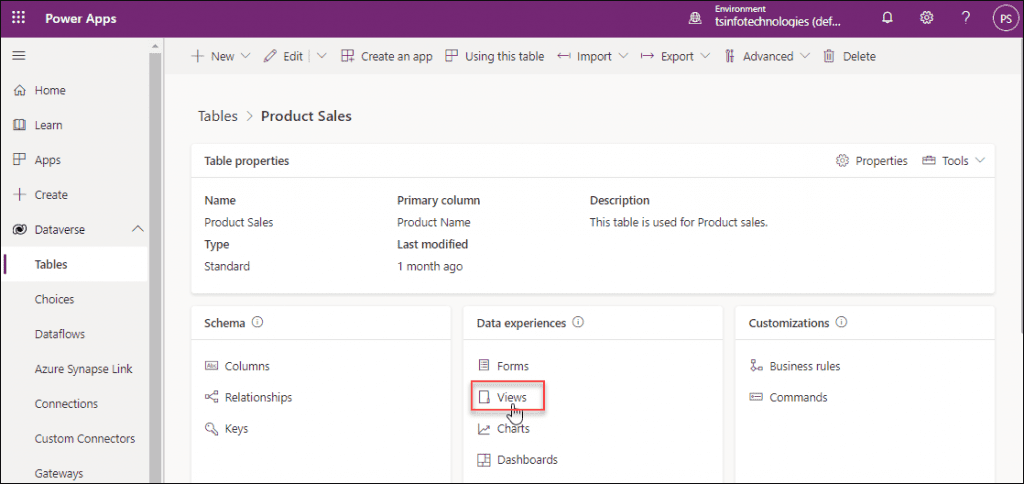
- To make it easy, we will create a new View for that specific table. Click on the Views under the Data experiences section as shown below.
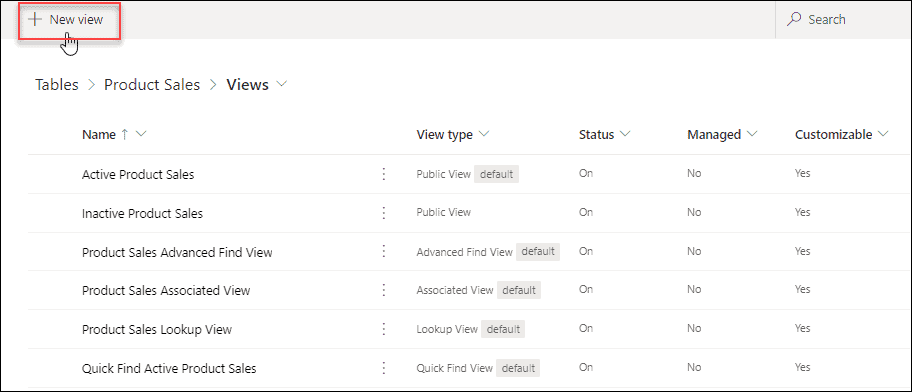
- The view page will appear like the figure below. To create a new view for the dataverse table, click on the + New view button.
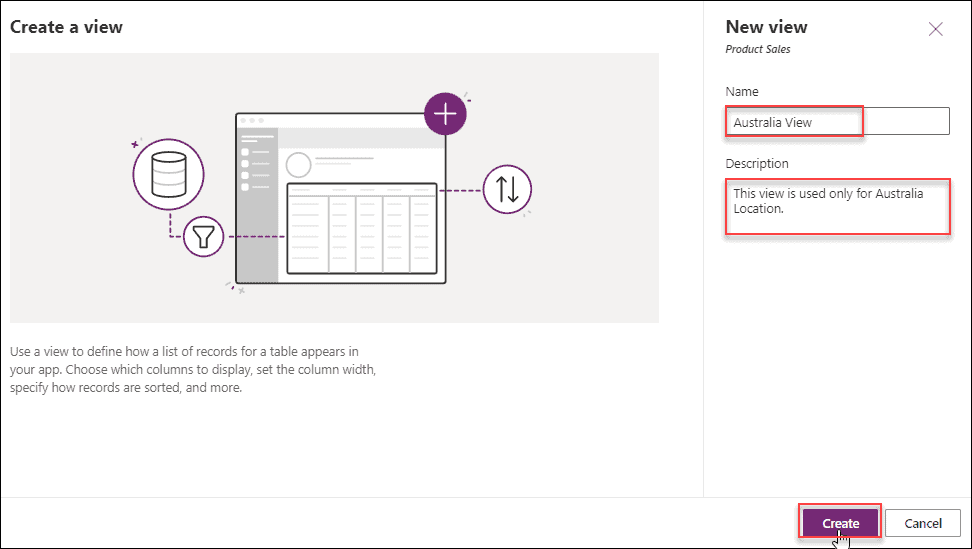
- On the New View page, Provide a Name and a Description for the new view. Then, tap on the Create button.
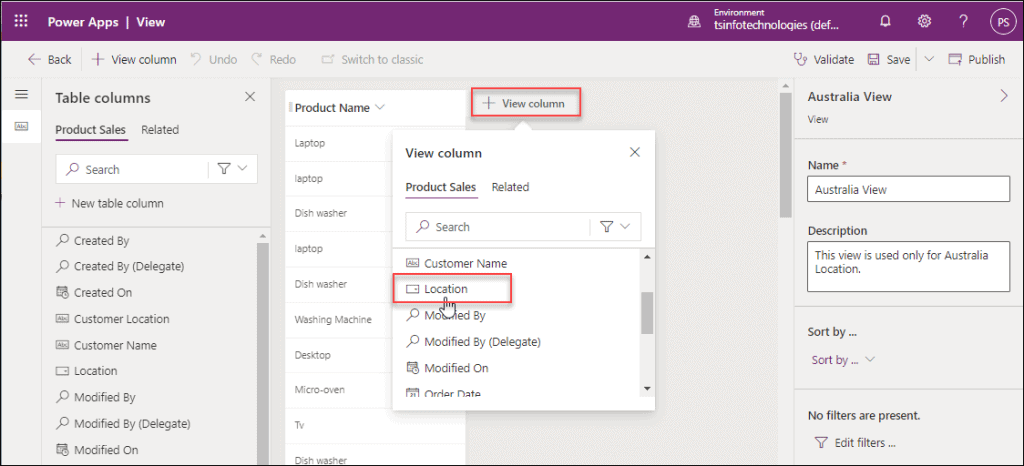
- Now, you can add more other columns that you want to view on the view page. Here, I will add the Location field because I want to filter only the Australia values. Click on the + View column and select the Location field as shown below.
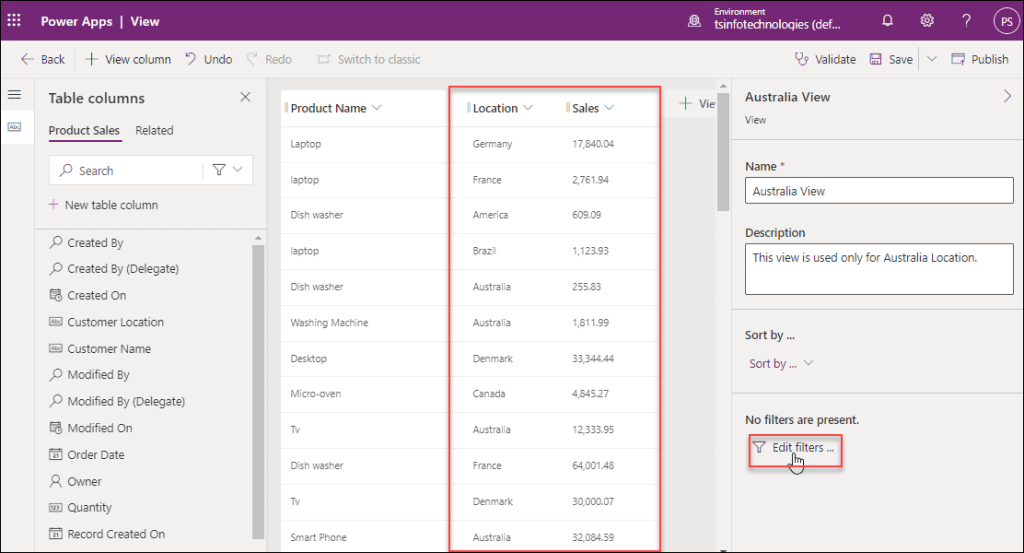
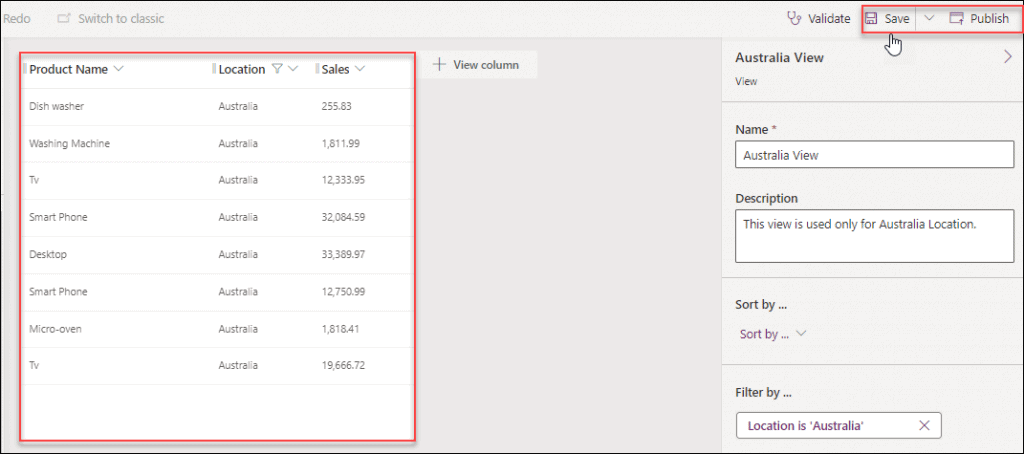
- Similarly, on the view page, I have added one extra column i.e. Sales that looks like the below. Now it’s time to filter the data where the Location is equal to Australia. To filter it, Click on the Edit filters option.
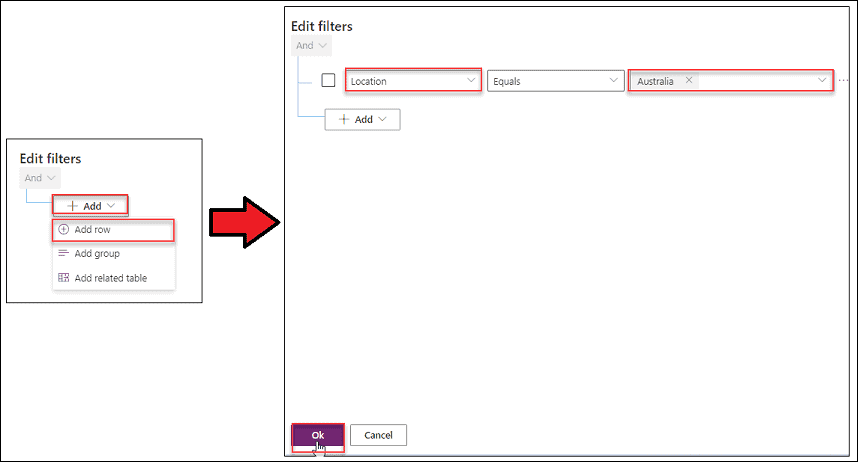
- When you click on the Edit filters, the next page will look like the below figure. Now we have to add a row where we can apply the specific condition.
- Click on + Add -> Add row -> Select Location from the dropdown field -> Select Equals from the operator field -> Select Australia from the dropdown field. Next, click on OK.
- Now, the data table will filter out and it will return only the rows where the Location is equal to Australia. Once everything is done, click on the Save and then Publish button. It will take a while to save and publish the view in the dataverse.
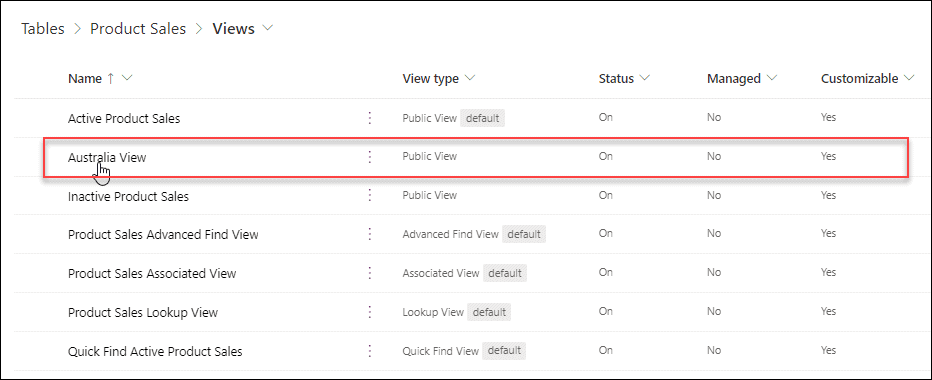
- Now just go back to the View page by using the Back button (top left) and then you will see the created new view (Australia View) will be added to the view page.
- Next comes how we will delete this new view from the Dataverse and that will be easy for us to remove those specific records from the data table.
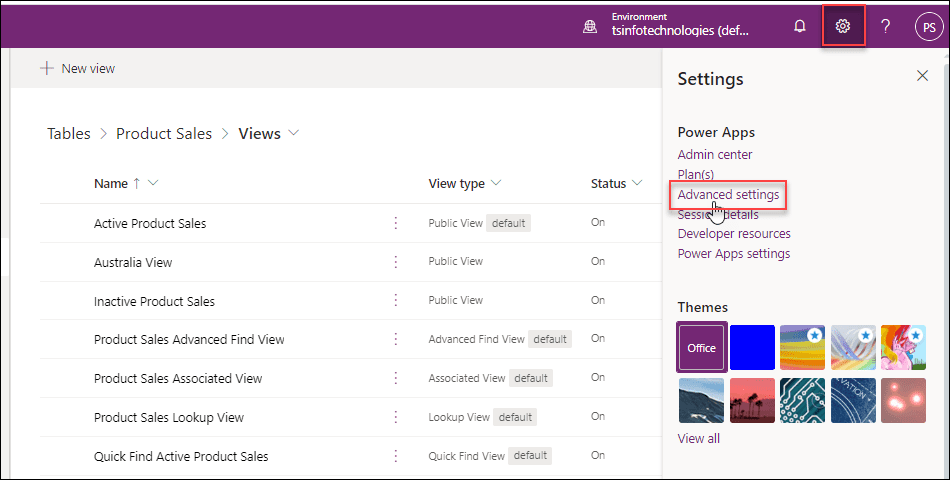
- To do so, go to the Gear settings icon (upper top right corner) -> Select Advanced settings as shown below.
- On the Advanced Settings page, you can see various setting options like Business Management, Settings, Queues, Connection Roles, etc. Click on the Settings dropdown and then select the Data Management option.

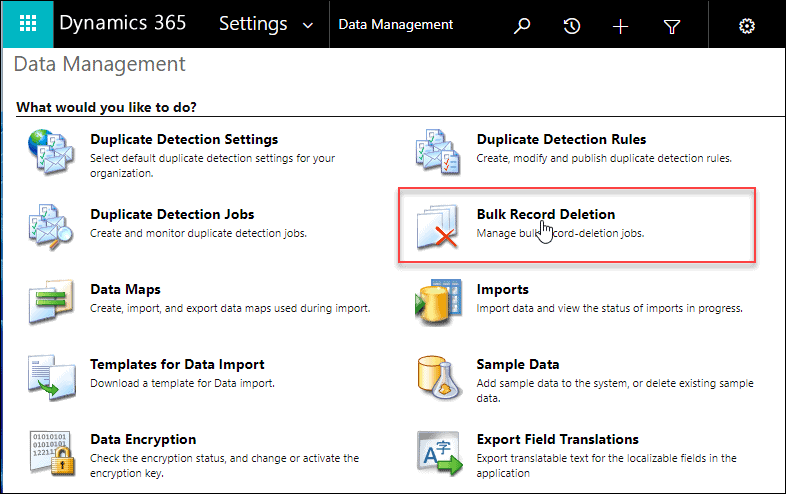
- Now, you can see different data management options like Duplicate Detection Settings, Data Maps, Imports, etc. Click on the Bulk Record Deletion as shown below.
- Next, on the Bulk Record Deletion page, Click on the New button in the top left corner. After a while, a bulk deletion wizard will appear on the screen. This wizard helps you to delete selected records from selected record types in Microsoft Dynamic 365. Without doing anything, click on the Next button.
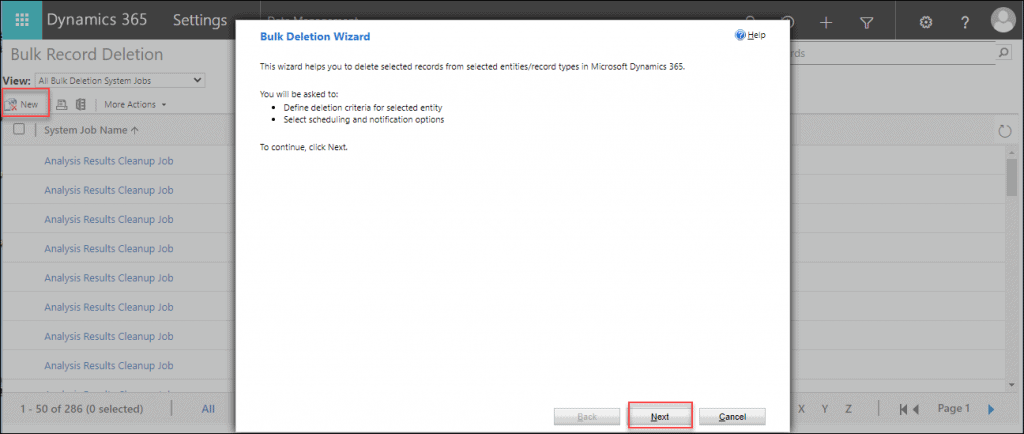
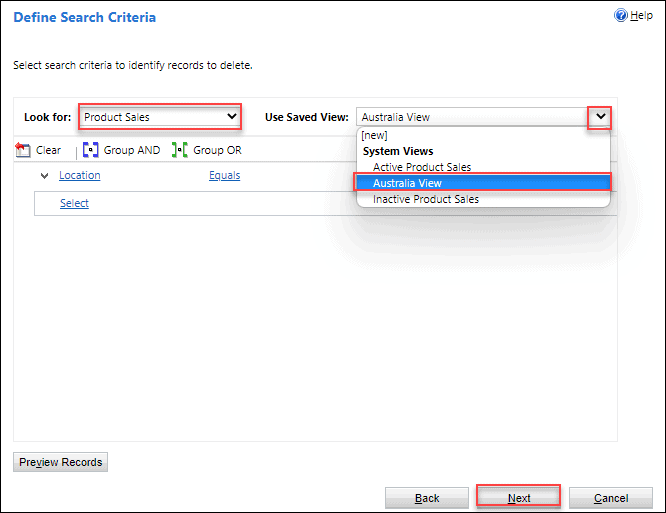
- On this Search Criteria page, we need to select our specific dataverse table and the specific created view.
- Select the table name (Product Sales) from the Look for dropdown menu and select the view (Australia View) from the Use Saved View dropdown menu. Click on Next.
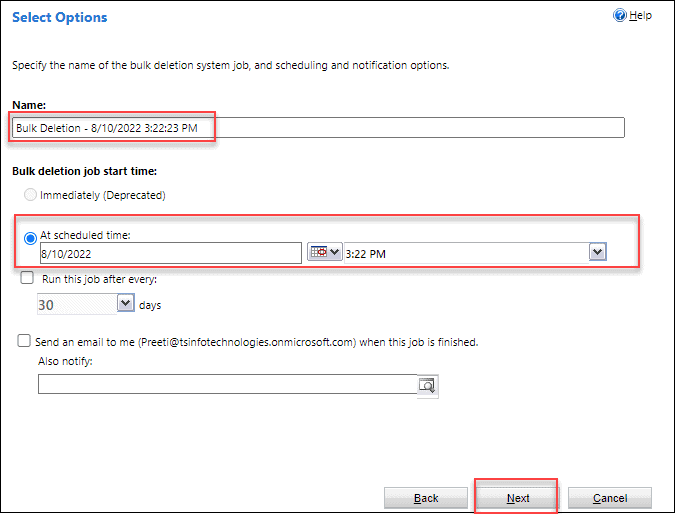
- Here, specify the name of the bulk deletion system job, and scheduling and notification options.
- By default, the bulk deletion name will be “Bulk Deletion – 8/10/2022 3:22:23 PM” which includes the current date and time. You can provide any name that you want and select the job start time whether you want to delete it immediately or at any particular time.
- Also, in case you want to delete the records on any particular day, then you can check the Run this job after every option and provide the number.
- Additionally, if you will check the “Send an email to me” option, then you will get a notification once the deletion job is done.
After it’s all finished, select the Next button.
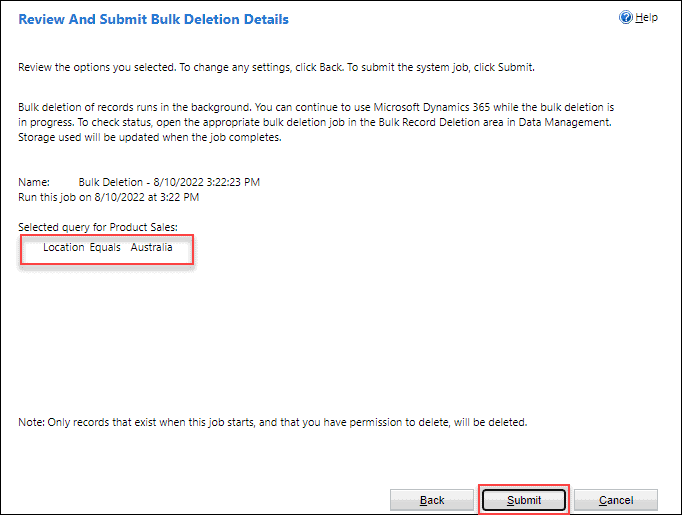
- At last, it will ask you to review the options that you have selected. Click the Back button to make any necessary changes. Click the Submit button to submit the system job.
- After some seconds, you will see the job deletion will be completed and all the deletion information will save under the Bulk Record Deletion page. If you click on the name of the bulk deletion, you may view the information as seen in the screenshot below.

- Moreover, if you will go to the specific view (Australia View), then you can not see any records that are related to the Australia location. It has been deleted.
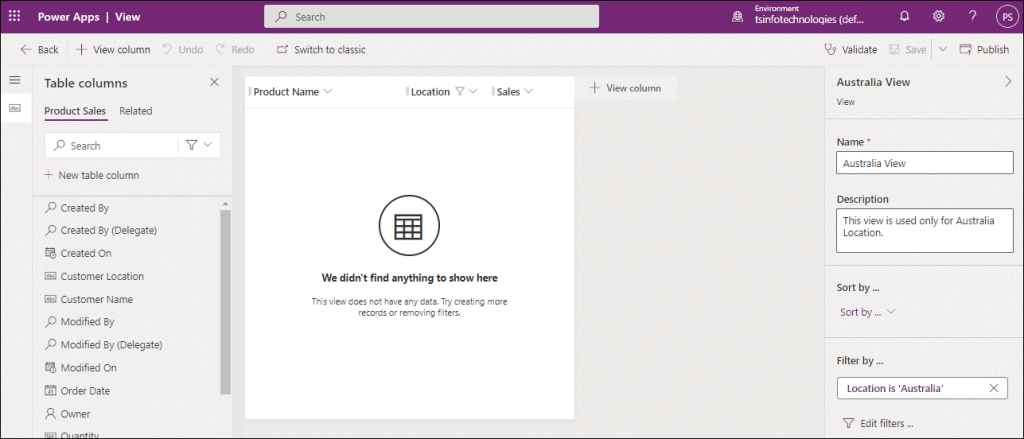
- Now, go to the specific Dataverse table (Product Sales) and the data for Australia won’t appear if you see the Location column.
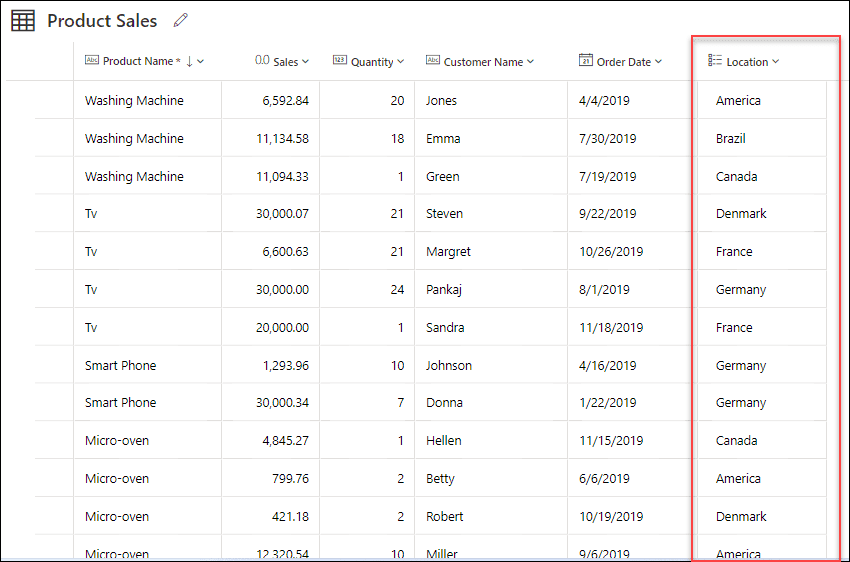
This is how we can delete specific records from the dataverse table.
Also, read: Dataverse create table from SharePoint list
Bulk Delete Dataverse
The next step is to explain how to remove every entry at once from the Dataverse table. To do this, we must repeat the procedure described above. The below screenshot represents the dataverse table that contains around 119 records.
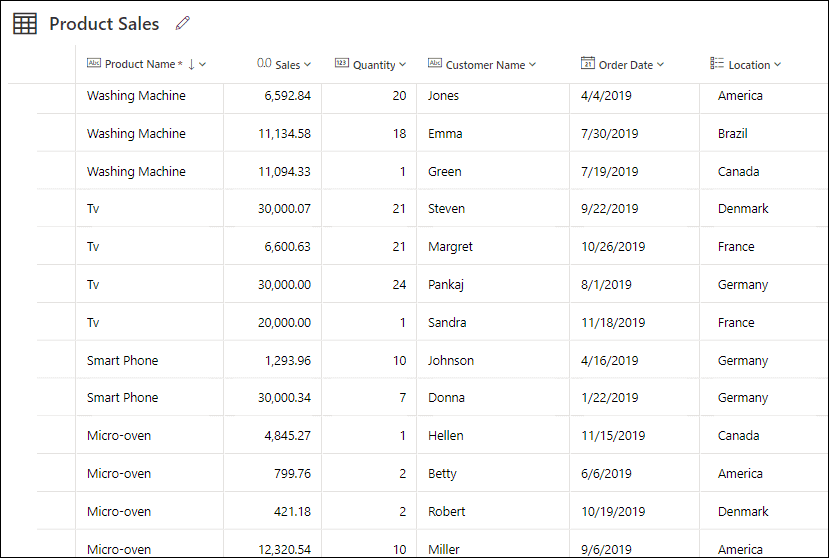
- To clean up all the records from the dataverse table (Product Sales), go to the Gear settings icon (upper top right corner) -> Select Advanced settings -> Click on the Settings dropdown and then select Data Management option -> Select Bulk Record Deletion.
- Click the New button in the upper left corner of the Bulk Record Deletion screen to continue. A bulk deletion wizard will eventually show up on the screen.
- With the use of this wizard, you may remove particular records from particular record kinds in Microsoft Dynamic 365. Click the Next button without taking any further action.
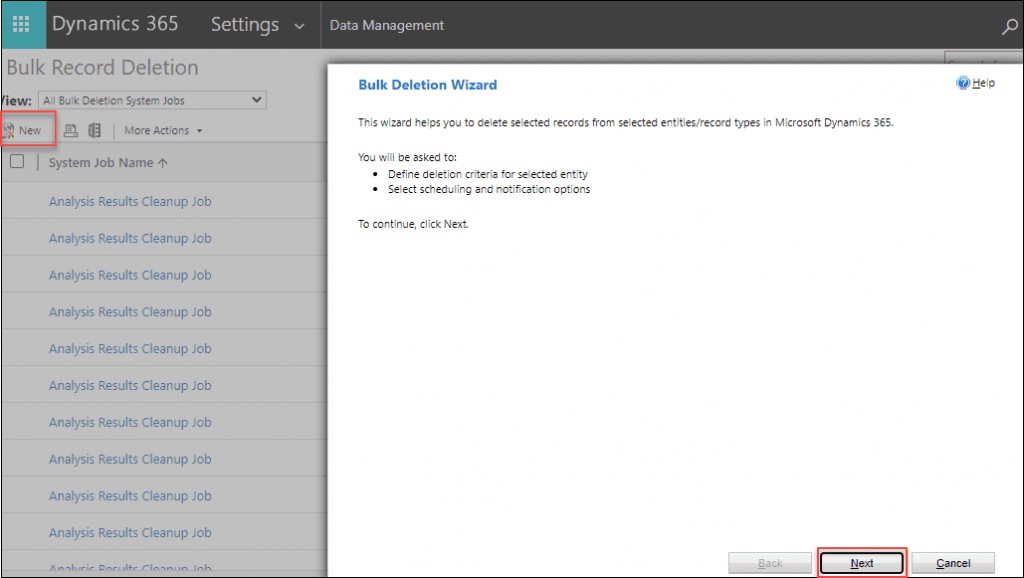
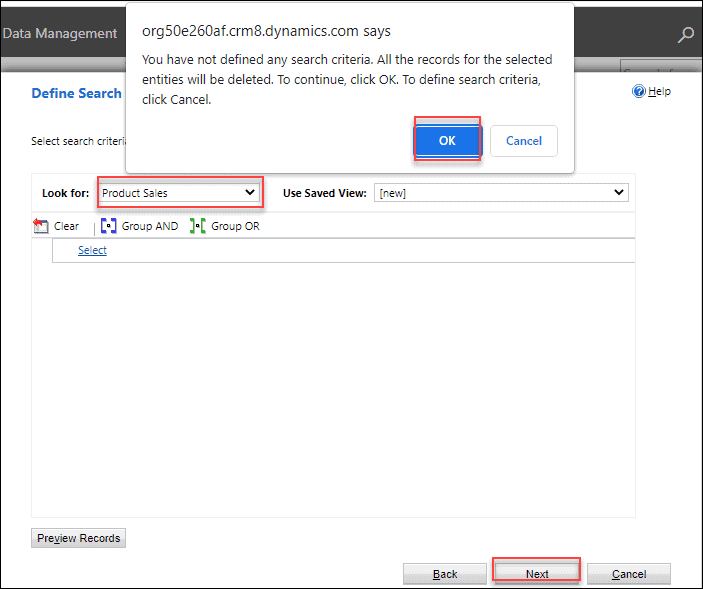
- On this Search Criteria page, Select the table name (Product Sales) from the Look for the dropdown menu and no need to select anything from the Use Saved View dropdown menu (because we are going to delete all the records from the dataverse table). Click on the Next button.
- An alert pop-up will show at the top of the page when you click the Next button to confirm the deletion of the record. To proceed, click OK. Click Cancel to provide any search criteria.
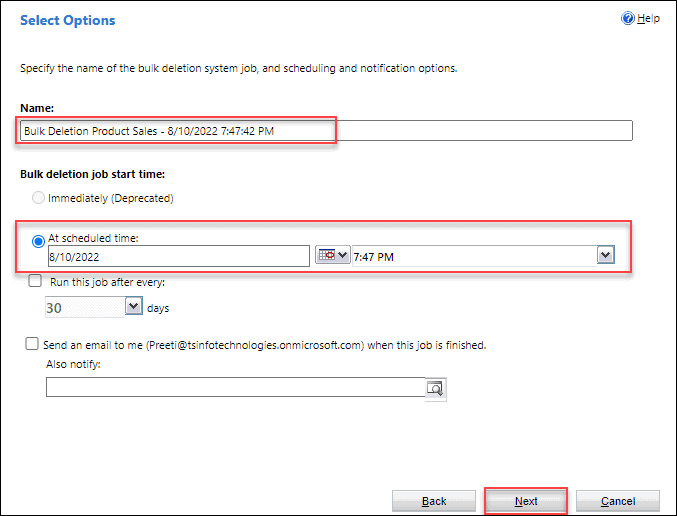
- The name of the bulk deletion, which includes the current date and time, will by default be “Bulk Deletion Product Sales – 8/10/2022 7:47:42 PM“. If you want to remove anything instantly or at a specific time, you may enter any name you choose and choose the job start time.
- Additionally, you may select the Run this task after every option and enter a number if you wish to remove the records on a certain day.
- Furthermore, if you choose to “Send an email to me“, you will receive a notification when the deletion process is complete.
When everything is completed, click Next.
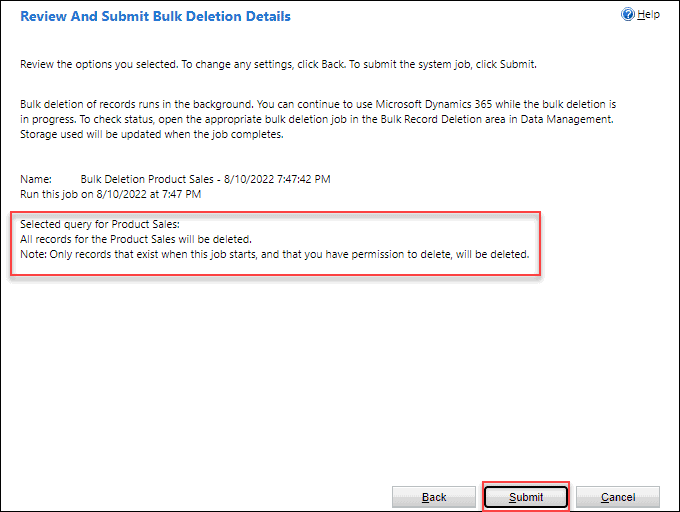
- Finally, you will be prompted to review the options you have chosen. The Back button may be used to make any needed modifications. To submit the system job, click the Submit button.
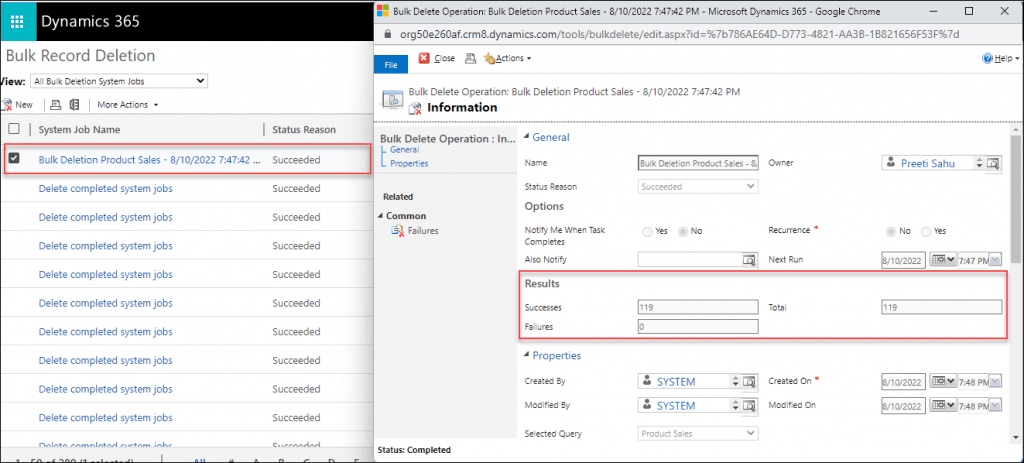
- You will see that the task deletion has been finished a short while later and that all deletion information has been saved on the Bulk Record Deletion page. Once you refresh the page, you may view the details shown in the screenshot below by clicking on the name of the bulk deletion (Bulk Deletion Product Sales).
- Under the Results section, you can see a total of 119 records are deleted successfully in the Successes field without any fail.
- Go to the relevant Dataverse table (Product Sales) now, and refresh the page. You may see since all of the records in the table have been removed, it will seem blank as shown below.

This is how we can delete all the records from the Dataverse table.
Also, you may like the below tutorials:
- How to Create Dataverse View
- How to Upload images to Dataverse from Power Apps
- Filter Dataverse Choice Column [With Various Examples]
- Power Apps Sort Function [With 19 useful examples]
- Power Apps Sort Gallery [With 15 Useful Examples]
- PowerApps Search Function + How to use with example
- Power Apps Search SharePoint List Examples
This Microsoft Dataverse Tutorial explained how we can remove or clean up the specific records from the dataverse table. Also, we saw how we delete all bulk data at a time in the dataverse table.
I am Bijay a Microsoft MVP (10 times – My MVP Profile) in SharePoint and have more than 17 years of expertise in SharePoint Online Office 365, SharePoint subscription edition, and SharePoint 2019/2016/2013. Currently working in my own venture TSInfo Technologies a SharePoint development, consulting, and training company. I also run the popular SharePoint website EnjoySharePoint.com