In this Microsoft Dataverse tutorial, we will discuss how we can create a Dataverse table from a SharePoint List. Also, we will see how we can display the SharePoint Data Migrate table in Dataverse.
If you are new to Microsoft Dataverse and do not know to create a Custom Dataverse table, check out this detailed tutorial: Dataverse Create Table [With Examples]
Migrate SharePoint Data to Dataverse Table
Suppose, you have a SharePoint list with various fields and records. Now, in Microsoft Dataverse, you have a requirement where you need the same field and data as the SharePoint list has. For this, what the thing will come to your mind is to create the same list or table in the Dataverse which is totally time-wasting.
In this case, Rather than creating a new table in Dataverse, what you can do is, you will copy the specific SharePoint list structures and contents to the Dataverse table and use it in many different ways. This can be possible by using the Power Apps Dataflow.
Power Apps Dataflow is a group of tables that are produced and maintained in Power Apps service environments. You may control data refresh schedules and add and change tables straight from the environment where your data flow was developed.
Now, we will discuss how we can move the records from the SharePoint list (Source) to a Dataverse table (Destination). You can load the SharePoint list data either in a new table or an existing table in Dataverse. Let’s follow the steps below.
Step – 1:
The below screenshot represents the SharePoint List (Job Seekers Registration List) that has some different data type fields and values like:
- First Name = By default, this is a Title field with a Single line of text data type. I just renamed it to First Name.
- SurName = This is also a single line of the text field.
- Registration ID = It is a Number data type field.
- Apply Date = This is a Date time field.
- Matric Percentage, 12th Percentage, Graduation SGPA = All these columns are a single line of text data types.
- Status = This is a Choice field having some choice values like Submitted, Approved, InProgress, Rejected, etc.
Now, I would like to copy all these SharePoint list contents to a Datverse table.

Step – 2:
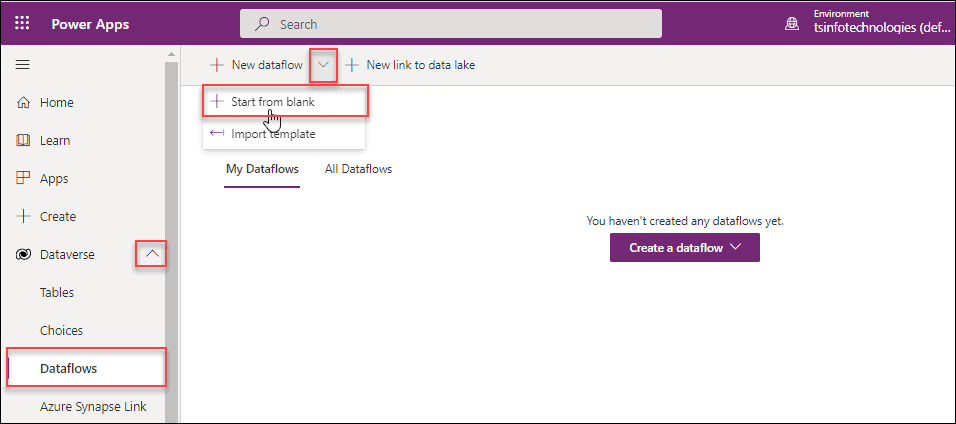
Sign in to Power Apps. On the Power Apps Home page, expand the Dataverse and click on the Dataflows from the left navigation.
On the top of the page, expand the + New dataflow and then select the + Start from blank option as shown below.
Step – 3:
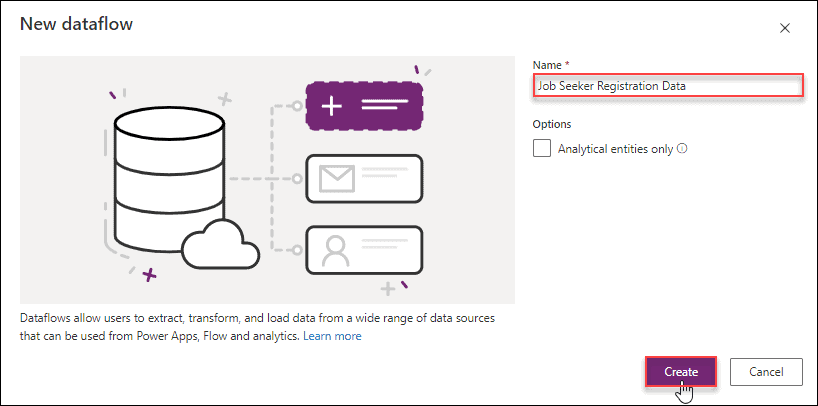
On the New dataflow page, Provide a new name (like Job Seeker Registration Data) to the Data flow, and then click on the Create button. Make ensure to provide a unique name to the data flow, so that you can find it easily.
Step – 4:
The next page will come with all types of data sources and connectors from where your data might be retrieved. You can also search any connector by using the search box.
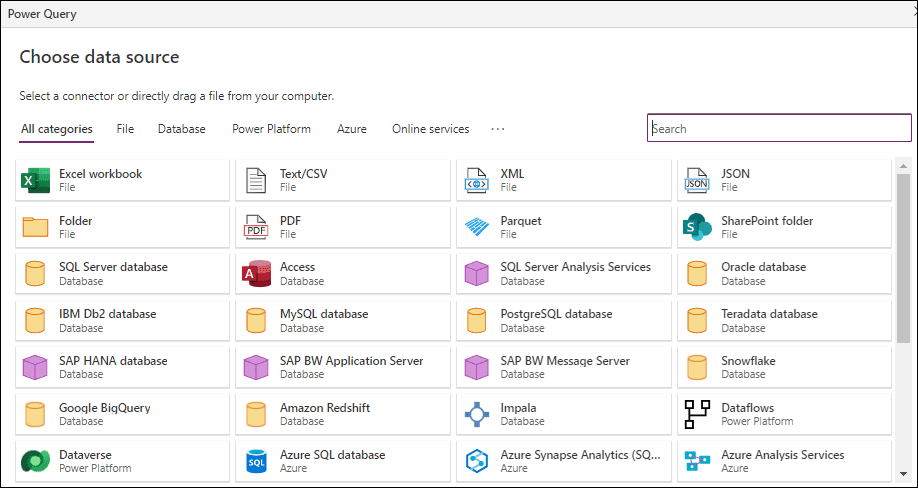
As we are using the SharePoint List, so we need to connect the SharePoint List connector. Once you will search the SharePoint keyword within the search box, you can see there are two different connectors i.e. SharePoint Online list and the other one is SharePoint list. Click on the SharePoint Online list.

Step – 5:
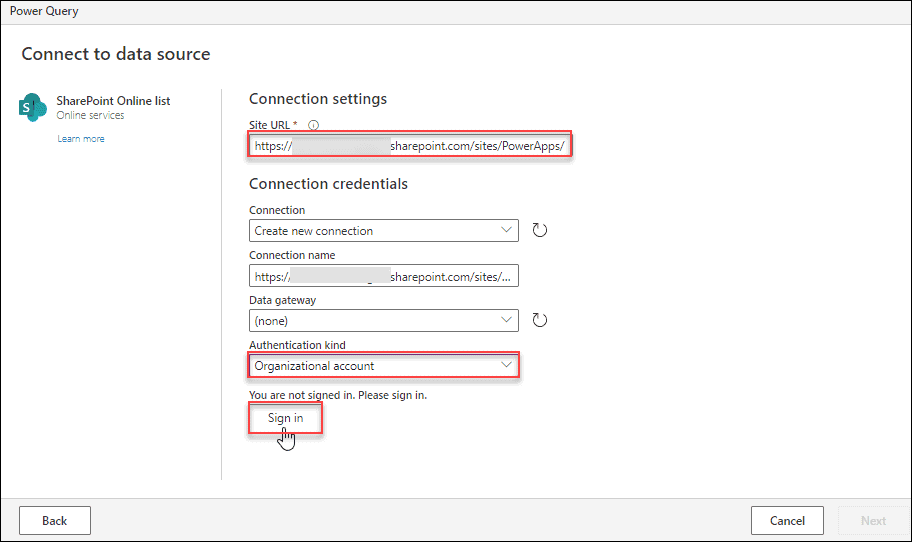
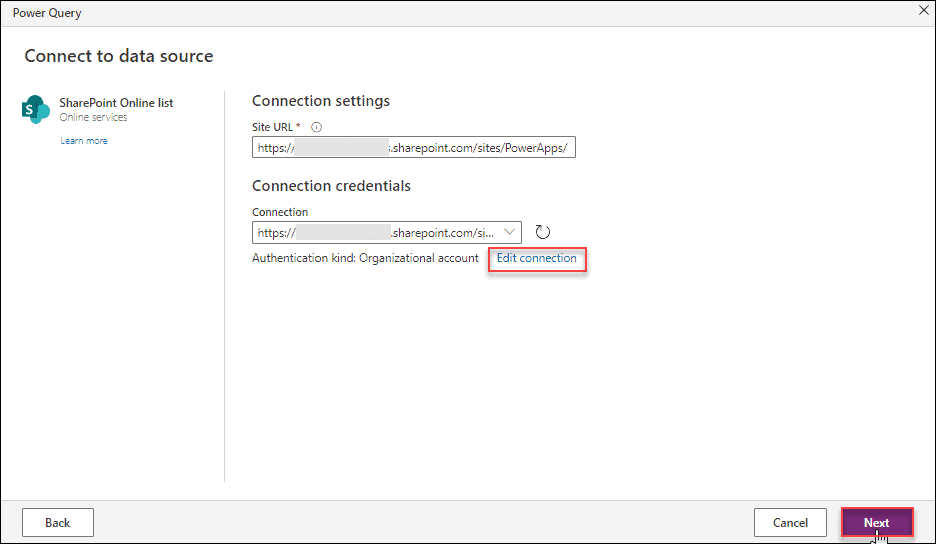
On the next page, you need to provide the SharePoint list connection settings information. There are two types of connection settings. Such as:
- Connection settings:
Under this setting, there is only one field i.e.
Site URL = Provide the SharePoint Site URL where the SharePoint list presents. You can enter the URL like “https://<tenant>.sharepoint.com/sites/PowerApps/“.
2. Connection credentials:
Under this setting, there are four fields i.e.
- Connection = Select either Create new connection or existing connection.
- Connection name = This will auto-populate from the Site URL field.
- Data gateway = By default, this is selected with none.
- Authentication kind = Select the Authentication kind as an Organizational account.
And next, if you are not signed in still, then click on the Sign-in button and provide your Microsoft credentials to sign in with the SharePoint Online list.
Step – 6:
Once you signed in to the account, the below page will appear. In case, if you want to edit the connection, then you can do the changes by using the Edit connection option. Otherwise, click on the Next button.
NOTE:
You will get the error message “Invalid credentials” if you have entered the incorrect URL, username, or password. The error could also occur if the incorrect source is chosen.

Step – 7:
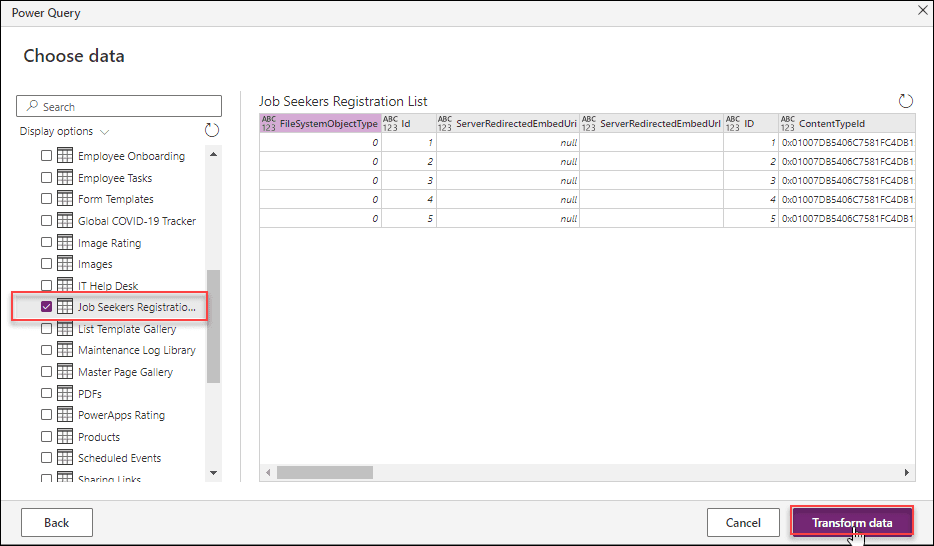
On the next page, you need to choose the data or SharePoint list that are appearing in the left navigation. As soon as you choose the specific SharePoint list (Job Seeker Registration List), a Power Query editor will appear that loads all the columns and data. Tap on the Transform data button.
Step – 8:
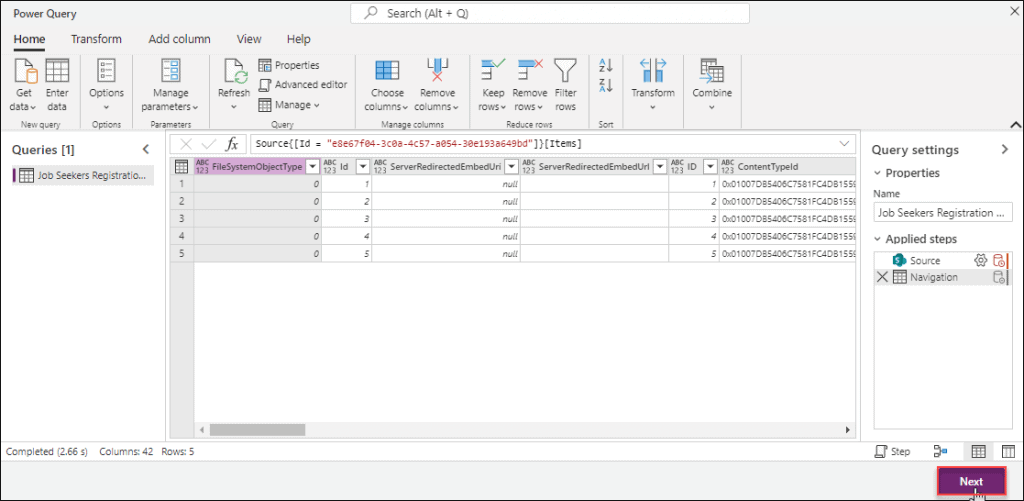
You have access to all possible modifications on this page. You’ll see that the designer is comparable to Power BI. Let’s say if you want to remove any row or any column, then you can do the changes on this page.
Also, you can see the bottom section provides information on how long it took to load, the number of columns (42), and the amount of data rows (5, excluding headers and column names). And then click on Next.
Step – 9:
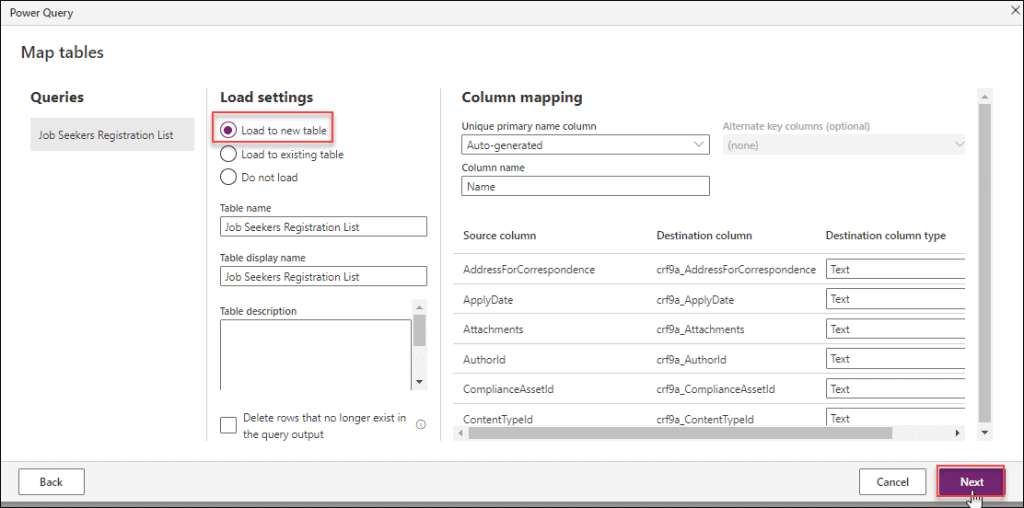
Now we will map the tables, map the columns, and do the load settings as well. You have the option of loading it into an existing table or creating a new one. I’ve decided to load it into a new table. Here the Table name and Table display name will be auto-populated. And the Table description field is optional.
Next, we have to choose the primary key (or unique column in SQL) for the table. you may leave it as Auto-generated or use an existing column if you already have one. In my instance, I’ll go with the default one only i.e. Auto-generated.
You can view every Destination column type as a Text type on the current page. The whole mapping screen will look like the below. Finally, tap on the Next button.
Step – 10:
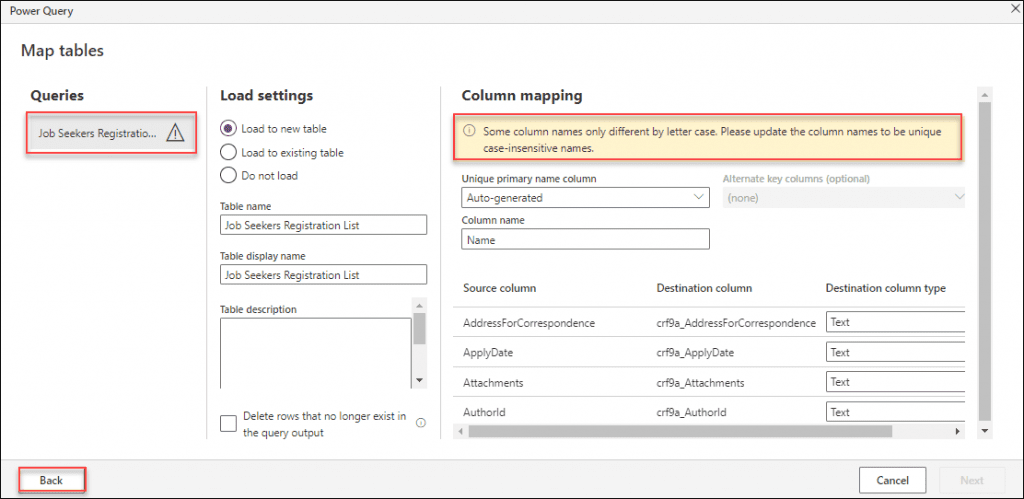
Now what will happen, once you clicked the Next button, it won’t redirect to the next page. It will show a warning error message under the Column mapping section i.e. “Some column names only different by letter case. Please update the column names to be unique case-insensitive names.“
This warning error suggests that the column name in the source is not unique even if it’s in upper or lower case. So for further process, we need to update the column names to be unique.
To overcome this issue, we will go back to the Query editor page by using the bottom left Back button.
Step – 11:
On the Power Query editor page, you can see there is a column attribute with the same name i.e. ID where one is in lower case and the other one is in upper case as shown below. We have to remove one ID column to make it a unique attribute.
NOTE:
It’s not only the ID column but also if the query editor has some unwanted fields or some other attributes with the same name, then you can remove them.

Step – 12:
Select the Id (lower case) column and click on the Remove columns under the Remove columns section from the command bar.
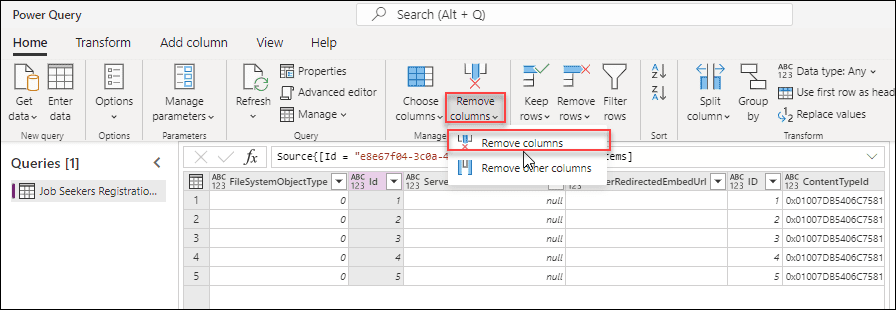
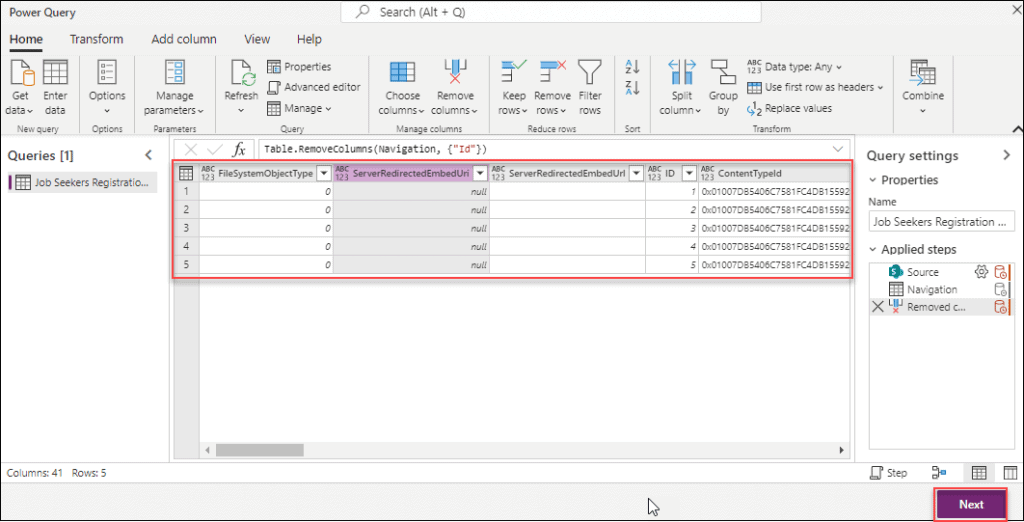
Now one of the specific Id columns has been removed from the query editor. Once it’s done, click on Next.
Step – 13:
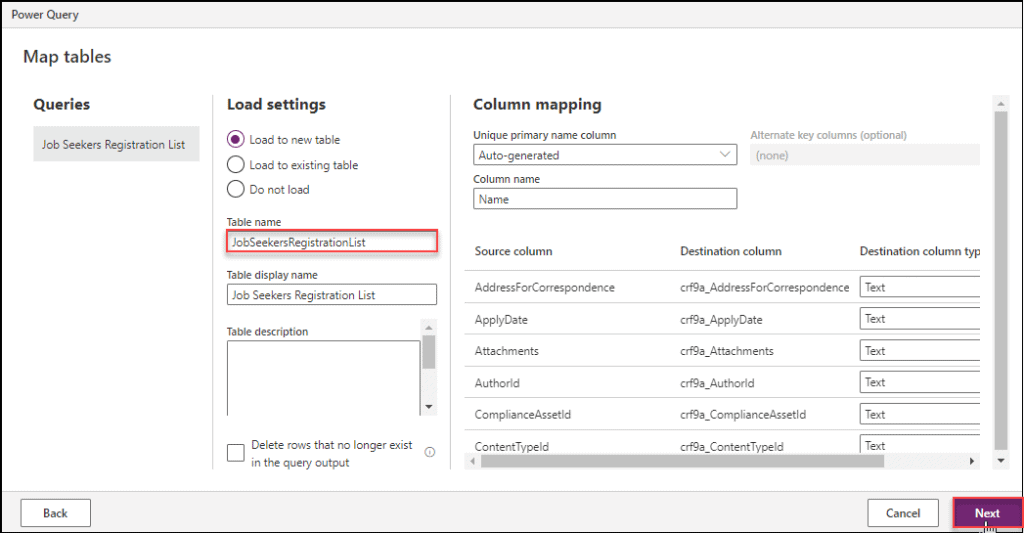
Again we will see the Map table page on the next screen. Just change something in the Table name and then click on the Next button.
Step – 14:
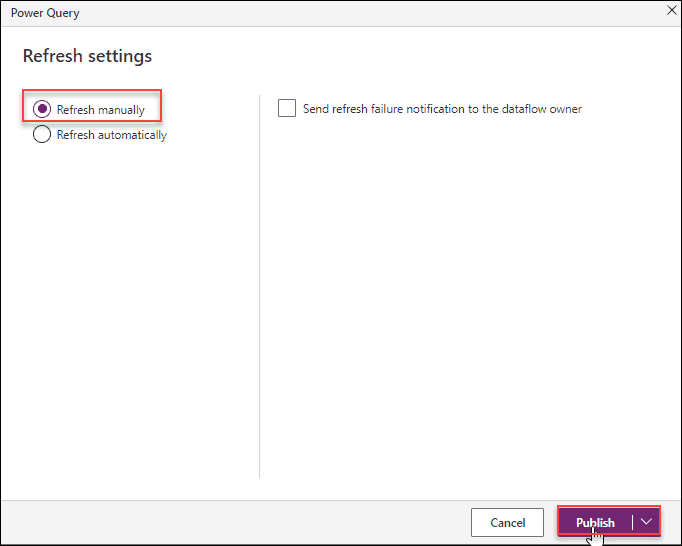
On the Refresh settings page, there are two options: Refresh manually and Refresh automatically. Either we need to choose the refresh as manually or automatically. Don’t take any action in this section if the data migration is a one-time event.
If you will select the Refresh automatically option, then you need to select a time interval.
Also, if you want to send the refresh failure notification to the dataflow owner, then check this option “Send refresh failure notification to the dataflow owner“. Next, select Publish -> Publish now and wait for a while.
Step – 15:
After some time, the data flow will update and the progress status will appear. And then the final confirmation message will display on the top of the page i.e. “Your dataflow “JobSeekersRegistrationList” was published successfully and is currently refreshing“.
Once published, it will also change the data flow’s Next refresh field. My Next refresh will be N/A because it was a manual refresh for me. Refer to the below screenshot.
The date and time will automatically update here if you chose any automatic refresh interval in the preceding window.

These are the process to move SharePoint list Data into the Dataverse table. Now how we can view all the SharePoint fields and records that we have created recently in the dataverse dataflow?
Also Read: Dataverse Primary Name Column Autonumber
Access the SharePoint Data Migrate table in Dataverse
In Dataverse, to view the SharePoint Data migrate table, follow the below instructions:
- In Power Apps, go to the Tables option under the Dataverse section (from the left navigation).
- Search and select the new dataverse table (Job Seekers Registration List) that you have created recently from the SharePoint list.
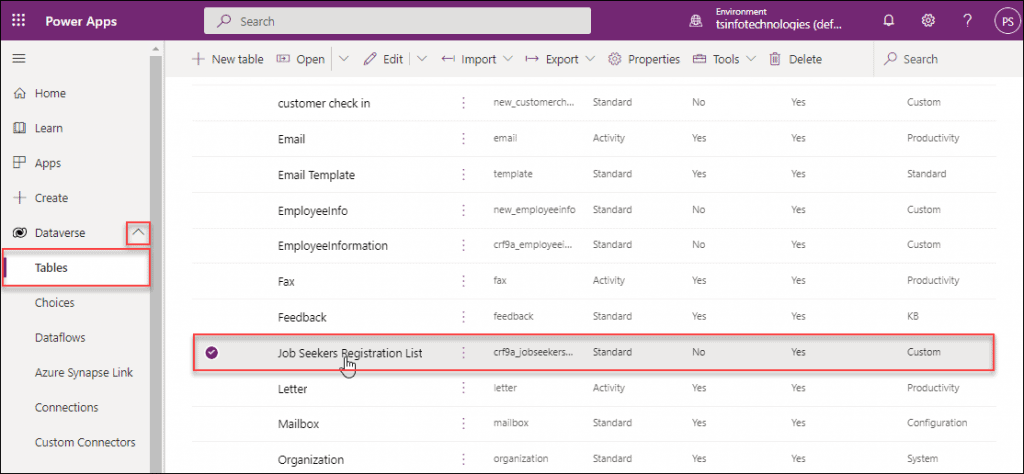
- The selected new table will appear with all the Table properties, Primary column, Description, etc. as shown below. To view all the fields and records, click on the Edit button.

- By default, the specific Dataverse list will appear with 2/3 columns from the SharePoint list like Name, Created On, etc.
- To view more fields and values, expand more column options and select the existing column (like Surname, Title, Registration ID, Apply Date, etc.) from the Show pane, and then Save it.
- Once you saved it, all the selected existing fields are added to the Dataverse table.
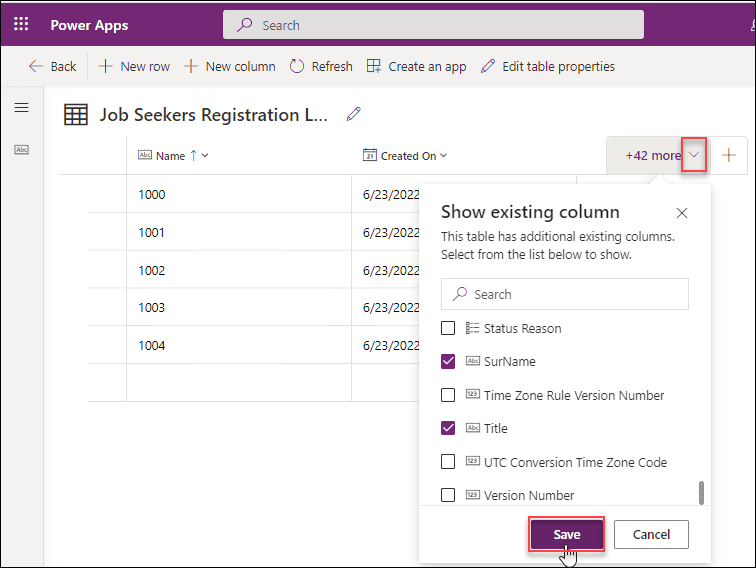
- Once all the fields are added to the Dataverse table, it looks like the screenshot below.

That’s how we can migrate the SharePoint list Data into the Dataverse table and access the SharePoint Data Migrate table in Dataverse.
Also, you may like some of the below Dataverse and Power Apps Tutorials:
- How to Create Dataverse View
- Delete All Records From Dataverse Table [With Examples]
- Filter Dataverse Choice Column [With Various Examples]
- Power Apps Sort Function
- Power Apps Sort Gallery
- PowerApps Search Function + How to use with example
- Power Apps Search Gallery + 19 Examples
- PowerApps Now, Today, and IsToday function
- Upload PowerApps Attachments to SharePoint Library Folder
This Microsoft Dataverse tutorial explained how we can create a Dataverse table from a SharePoint List or how to migrate/move/copy the SharePoint list data to the Dataverse table. Also, we covered how to access the SharePoint Data Migrate table in the Dataverse.
I am Bijay a Microsoft MVP (10 times – My MVP Profile) in SharePoint and have more than 17 years of expertise in SharePoint Online Office 365, SharePoint subscription edition, and SharePoint 2019/2016/2013. Currently working in my own venture TSInfo Technologies a SharePoint development, consulting, and training company. I also run the popular SharePoint website EnjoySharePoint.com
how to migrate the created by display name and person field from SharePoint to dataverse.