From this Microsoft Power Automate tutorial, users will get to know how to use REST API in Power Automate. Also, we will discuss below topics such as:
- power automate REST API connector
- power automate REST API call
- power automate REST API authentication
- power automate REST API pagination
- power automate REST API json
- power automate REST API SharePoint
- power automate REST API SharePoint list
- power automate REST API SharePoint update list item
- power automated REST API SharePoint creates the list item
- power automate REST API SharePoint get items
- power automate REST API send email
- power automate REST API SharePoint delete file
- power automate REST API get
- power automate approval REST API
- power automate Azure DevOps REST API
- power automate REST API power bi
- power automate desktop REST API
- power automate SharePoint REST API create the list item
- power automate send REST API
- power automate create REST API
- power automate custom connector REST API
- power automate HTTP request REST API
- power automate outlook REST API
In REST API, the REST stands for Representational State Transfer created by the computer scientist Roy Fielding and based on ODATA (standard Open Data Protocol).
We can use the REST API in Power Automate to manage the cloud flow and the SharePoint list, such as creating a list to update the items, delete files, get the items, etc.
In this topic, we will see how to work with REST API in Power Automate with different scenarios. It is similar to JSOM or CSOM which is another form of the client object model.
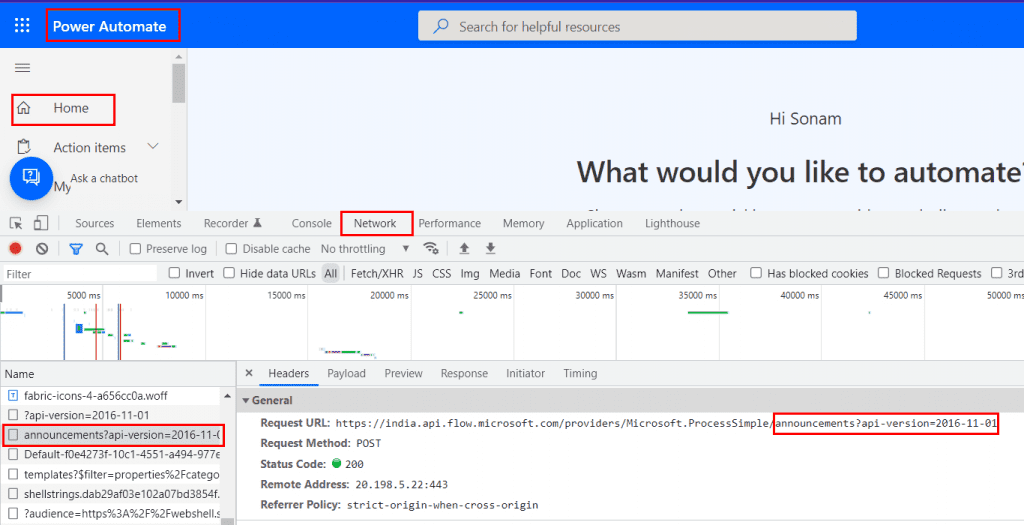
We can find the API version on our home screen of Power Automate. To find this, On Power Automate > Home > Right-click > Inspect > Network > Announcements?api-version i.e. 2016-11-01.
Power Automate REST API connector
In Power Automate there is a connector ‘HTTP’ that is used to invoke the REST API to the workflow and get the responses as needed, but this action is only for a premium connection.
There is another action ‘Send an HTTP request to SharePoint‘ that construct a SharePoint REST API to invoke. This SharePoint REST API allows operations to work with SharePoint list, list items, sites, folders, and files.
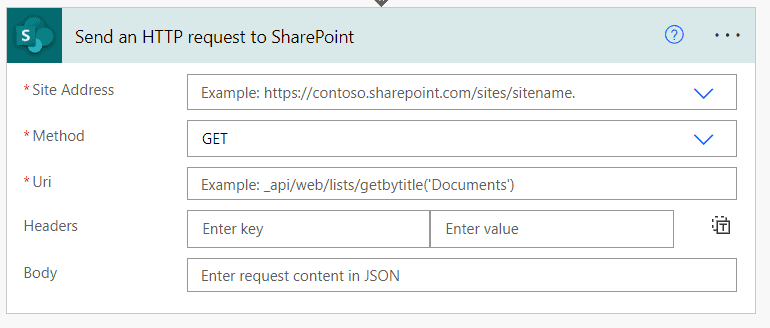
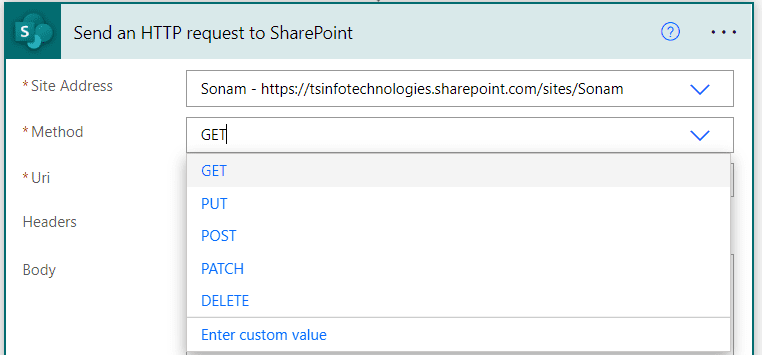
To perform the operations, we need to insert the method from the drop-down list. The available methods are:
- GET– This HTTP GET method is used to read or retrieve the information from the SharePoint server.
- POST– To create or write a new item in the SharePoint list, we need to use the REST API POST method.
- PATCH– This method is used to update an item in the SharePoint online list.
- DELETE– This HTTP method is used to delete a SharePoint object like a SharePoint list, document library, and an item.
- PUT– This method is used to remove the old item from the SharePoint list and update the existing object (i.e. an item in the SharePoint list).
Next, we have to provide the Uri by invoking an API. The Uri stands for Uniform Resource Identifier which identifies one resource from another.
Microsoft provides a document where users can get more ideas about how to set uri or rest API endpoints for different operations. For example,
http://<site collection>/<site>/_api/web/listsRead Power Automate Trigger Conditions
Power Automate REST API SharePoint list
In this example, we will see how to create a dynamic SharePoint list from a template using the REST API.
To create the SharePoint list, the following steps are:
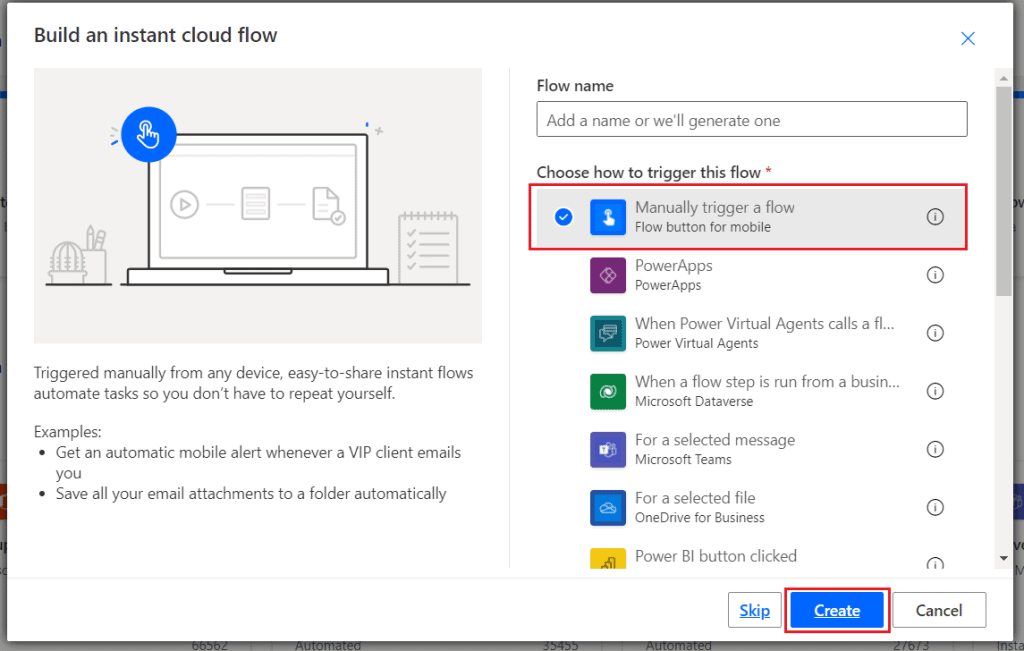
- Let’s create an Instant cloud flow that triggers the flow manually. On Power Automate, click on create > Instant Cloud Flow > Manually trigger a flow > Create.
- Add an action ‘Send an HTTP request to SharePoint‘ under the trigger and provide the SharePoint site address where to create the SharePoint list. Also, set the properties such as:
- Method – Post
- Uri – _api/web/Lists/
- Headers –
- accept – application/json;odata=verbose
- content-type – application/json;odata=verbose
- Body–
{ '__metadata': { 'type': 'SP.List' }, 'AllowContentTypes': true,
 'BaseTemplate': 100, 'ContentTypesEnabled': true, 'Description': 'My list description', 'Title': 'MonthlySalesReport' }
Note- We have provided the name ‘MonthlySalesReport’ for the newly created SharePoint list.
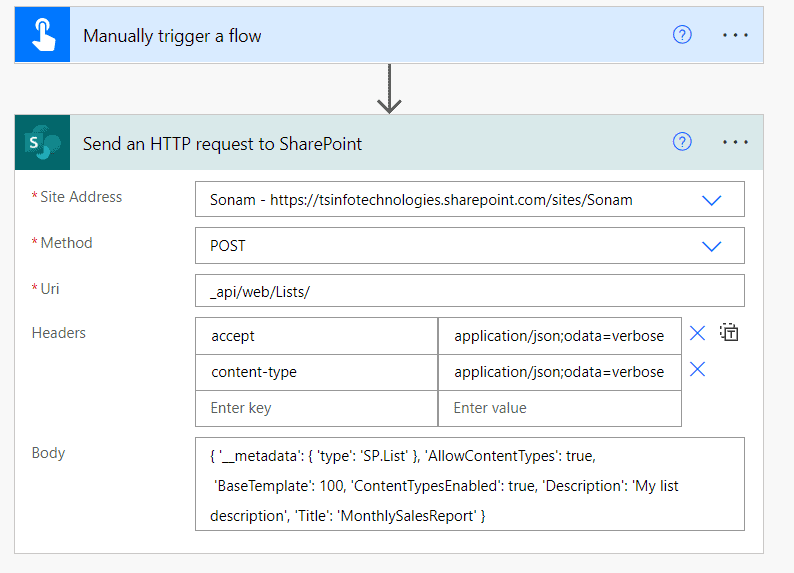
Now save the flow, then test it manually. We can see it will create a SharePoint list on the provided SharePoint site.
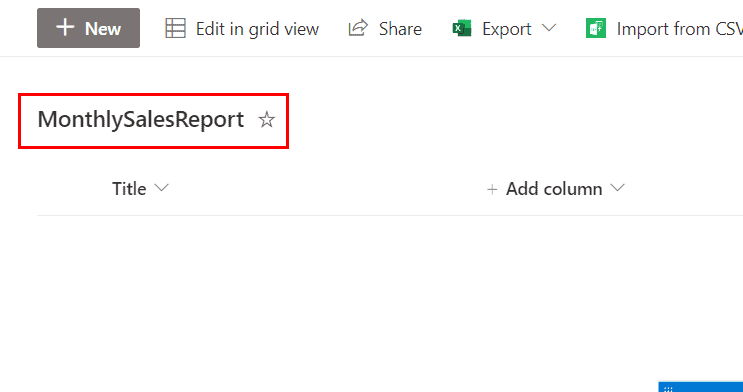
This is how to create a SharePoint list on the SharePoint site using Power Automate REST API.
Read Power Automate IF Expression
How to create a SharePoint list item using Power Automate REST API
Similarly, we will see how to create an item in the SharePoint list using Power Automate REST API. Here we are going to use the previous SharePoint list i.e. MonthlySalesReport and add some random columns such as Products(Single line text) and Quantity(Number).
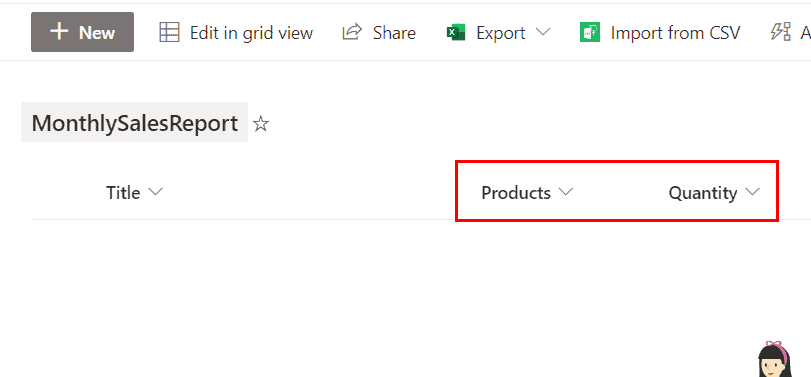
To insert the data in the SharePoint list, we will create a flow using Power Automate REST API. The following steps are:
- On Power Automate, create an instant cloud flow that will trigger the flow manually.
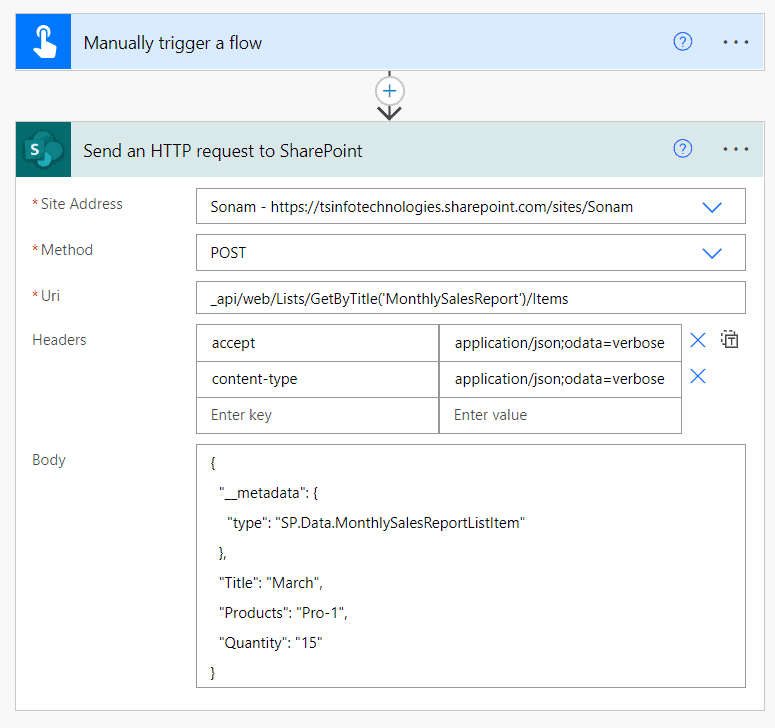
- Then add a ‘Send an HTTP request to SharePoint‘ action and provide the site address of the SharePoint. Also, set the properties such as:
- Method – POST
- Uri – _api/web/Lists/GetByTitle(‘MonthlySalesReport’)/Items
- Headers –
- accept – application/json;odata=verbose
- content-type – application/json;odata=verbose
- Body– (Insert the below REST API code)
{
  "__metadata": {
    "type": "SP.Data.MonthlySalesReportListItem"
  },
  "Title": "March",
  "Products": "Pro-1",
  "Quantity": "15"
}
Now, click on save and test the flow manually. We can see it will create an item in the SharePoint list.
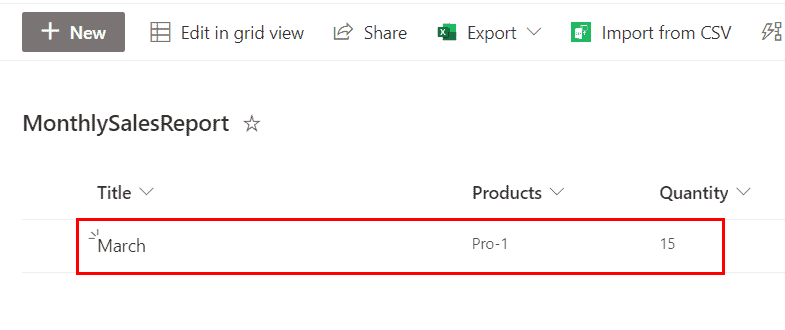
This is how to create an item in the SharePoint list using Power Automate REST API.
Read Power Automate Multiple Conditions
Power Automate REST API gets SharePoint list items
Here, we will see how to get the item from the SharePoint list using Power Automate REST API. Let’s take the previous SharePoint list to implement this.
To read the items from the SharePoint list, we are going to create a flow. The following steps are:
- On Power Automate, create an instant cloud flow that triggers the flow manually.
- Under the trigger, add an action ‘Send an HTTP request to SharePoint‘ and provide the SharePoint site address. Set the below properties such:
- Method- GET
- Uri- _api/web/Lists/getByTitle(‘MonthlySalesReport’)/items
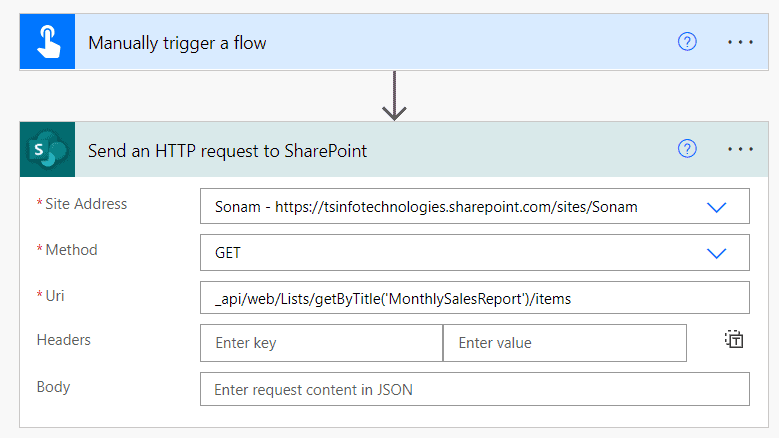
Now, click on save and test it manually. We can see it will retrieve the items that store in the SharePoint list. (As there is 1 item, it will so only that item).
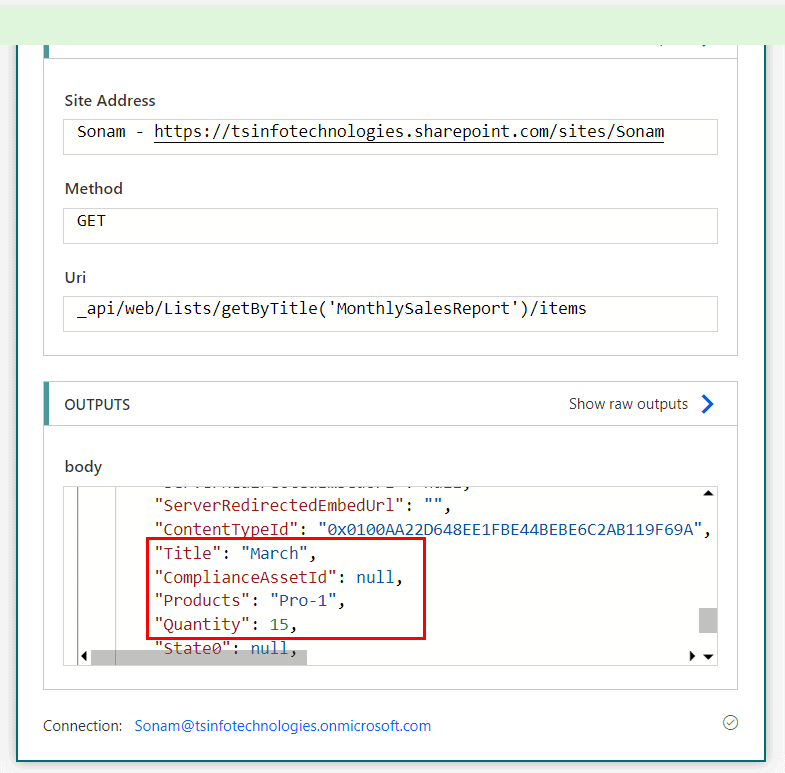
This is how to retrieve the SharePoint item using Power Automate REST API GET method.
Read Power Automate Parallel Branch with Examples
Power Automate REST API creates a column
In this example, we will see how to create a custom column in a specified Sharepoint list using Power Automate REST API.
To implement this, we are going to use the SharePoint list that will created previously i.e. MonthlySalesReport.
Now, we will create a flow that will create a custom column in the existing SharePoint list. The following steps are:
- On Power Automate, create an instant cloud flow that triggers the flow manually.
- Under the trigger, add an action ‘Send an HTTP request to SharePoint‘. Provide the SharePoint site address and give the below details on the properties.
- Method – POST
- Uri – _api/web/Lists/getByTitle(‘MonthlySalesReport’)/fields
- Headers –
- accept – application/json;odata=verbose
- content-type – application/json;odata=verbose
- Body –
{ '__metadata': { 'type': 'SP.Field' },
     'FieldTypeKind': 2,
     'Title':'State'
}
Note – Here the field name is State and the FieldTypeKind as 2 refers to the type of the field i.e. text. You can get more ideas about it from the FieldType Enumeration provided by Microsoft.
Similarly, we will create another column (currency type) i.e. Price in the existing SharePoint list. For this, add another ‘Send an HTTP request to SharePoint‘ action, and in the body, add the below REST API code.
{ '__metadata': { 'type': 'SP.Field' },
     'FieldTypeKind': 10,
     'Title':'Price'
}
Note- As the column is a currency type, the ‘FieldTypeKind‘ is 10.
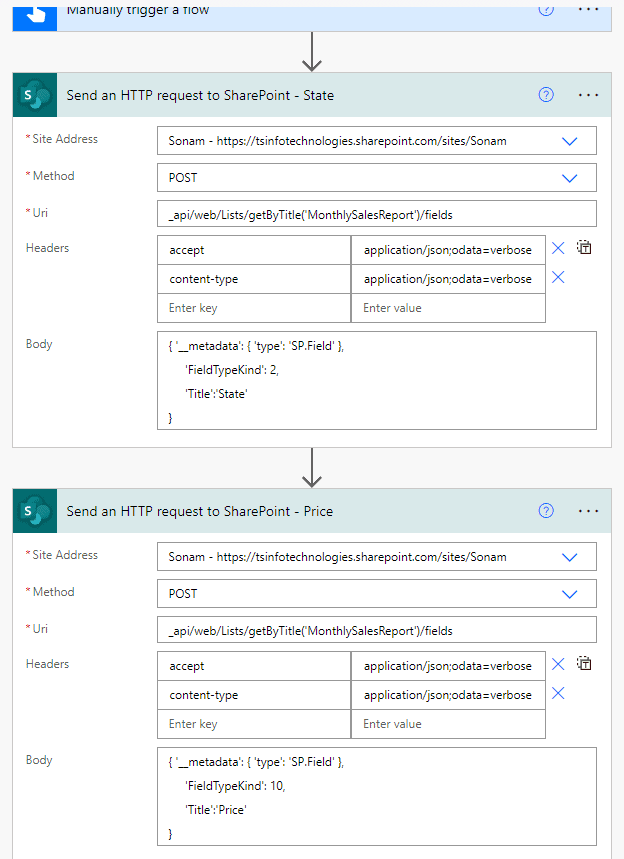
Now save the flow and test it manually. We can see it will create the columns in the specified SharePoint list.

This is how to create columns in the SharePoint list using Power Automate REST API.
Read Power Automate email body formatting
Power Automate REST API SharePoint update list item
Now we will see how to update an existing list in the specified SharePoint list using Power Automate REST API. For example, we will update the title from March to February in the previous SharePoint list(i.e. MonthlySalesReport).
To create the flow, the following steps are:
- On Power Automate, create an instant cloud flow the trigger the flow manually.
- Under the trigger, add the action ‘Send an HTTP request to SharePoint‘ and provide the SharePoint site address.
- Method – PATCH
- Uri – _api/web/Lists/getByTitle(‘MonthlySalesReport’)/items(2)
- Headers –
- content-type – application/json;odata=verbose
- IF-MATCH – *
- Body –
{ '__metadata': { 'type': 'SP.Data.MonthlySalesReportListItem' },
     'Title':'February'
}
Note- In the Uri, we used 2 as the item ID that we want to update.
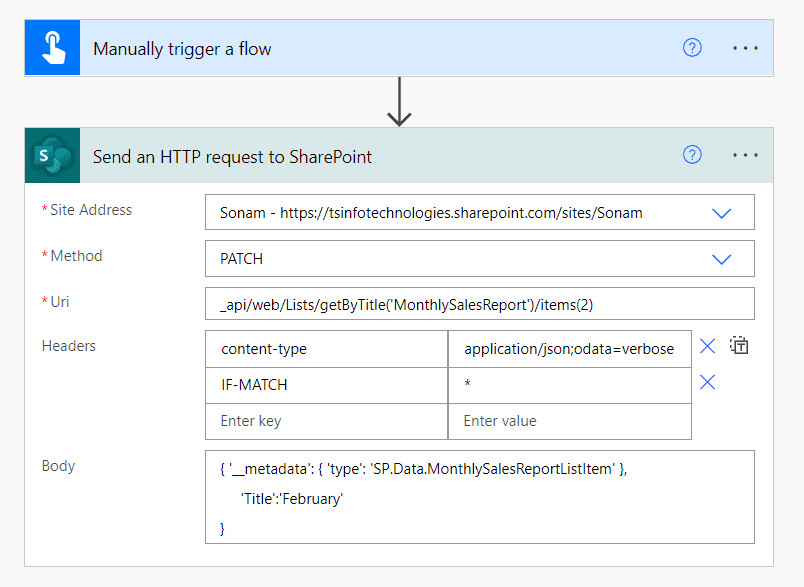
Now save the flow and test it manually. We can see the item will update to February from March.
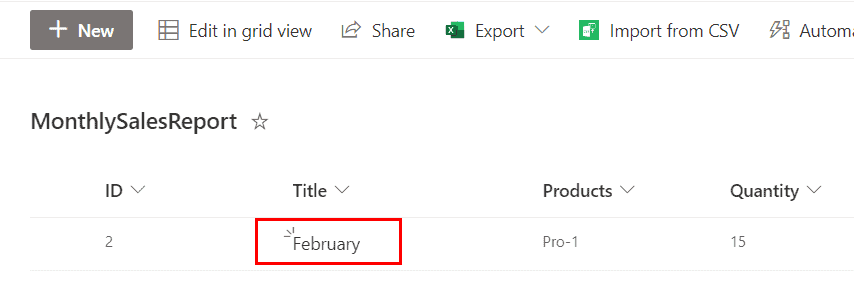
This is how to update a list item in the SharePoint list using Power Automate REST API.
Power Automate REST API delete a SharePoint list item
Similarly, here we will see how to delete an existing item from the SharePoint list using REST API. Let us take the previous SharePoint list to implement this.
Follow the below steps to create the flow.
- On Power Automate, create an instant cloud flow that trigger the flow manually.
- Add an action ‘Send an HTTP request to SharePoint‘ and provide the SharePoint site address.
- Method- DELETE
- Uri- _api/web/Lists/getByTitle(‘MonthlySalesReport’)/items(2)
- Headers-
- content-type – application/json;odata=verbose
- IF-MATCH – *
- X-HTTP-Method – DELETE
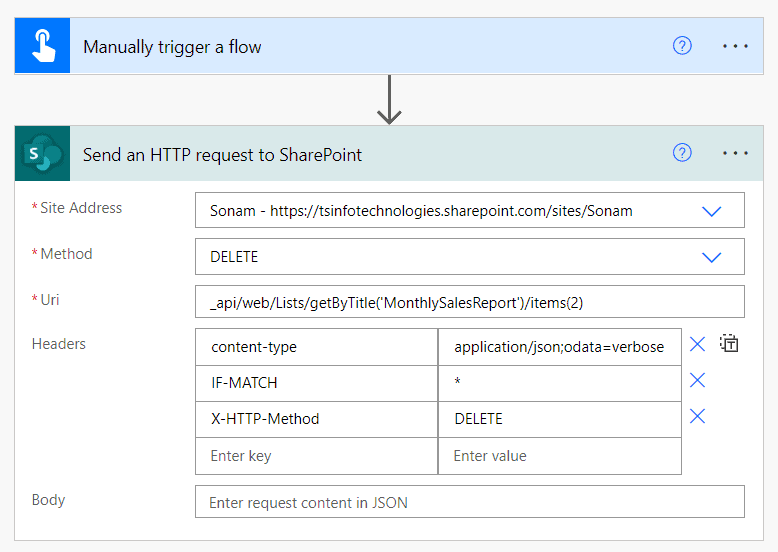
Now, save the flow and test it manually. We can see it will delete the item whose ID is 2. (As there is only 1 item, so the list will appear as blank).
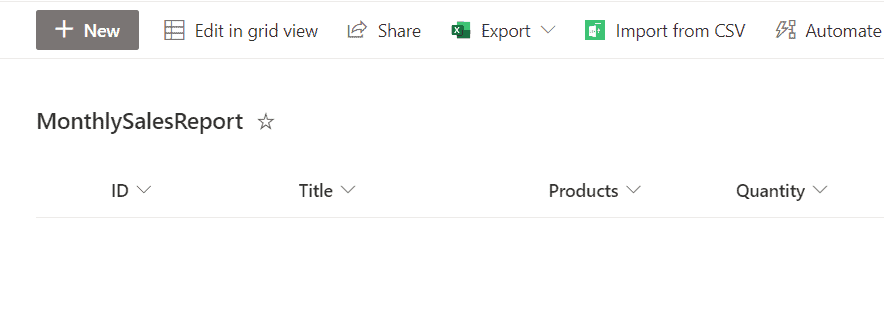
This is how to delete a specific item from the SharePoint list using Power Automate REST API.
Read Power Automate create a task in Microsoft Planner
Power Automate REST API using JSON
Here, we will see how to create a SharePoint list in a SharePoint site that retrieves from another SharePoint list.
For example, we have a sample SharePoint list having some random data on a specific SharePoint site.
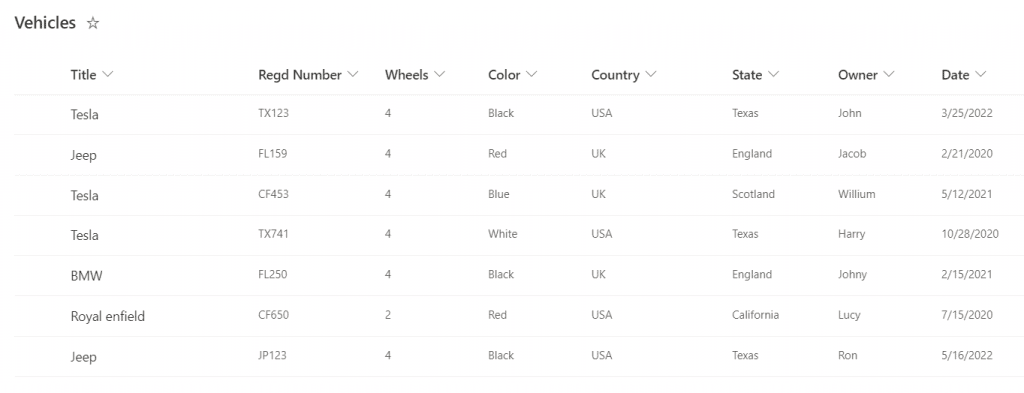
Now we will call an API to SharePoint using JSON that will get all the information from the above SharePoint list and create a new SharePoint list on another SharePoint site. To implement this, we are going to create a flow and the following steps are:
- On Power Automate, create an instant cloud flow that will trigger the flow manually.
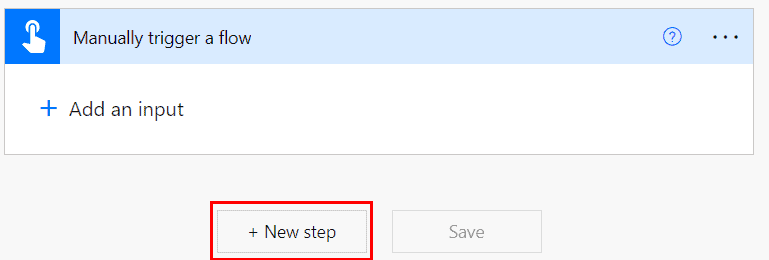
- Next, we will add a ‘Send an HTTP request to SharePoint‘ action to retrieve the data from the above list of the source SharePoint site.
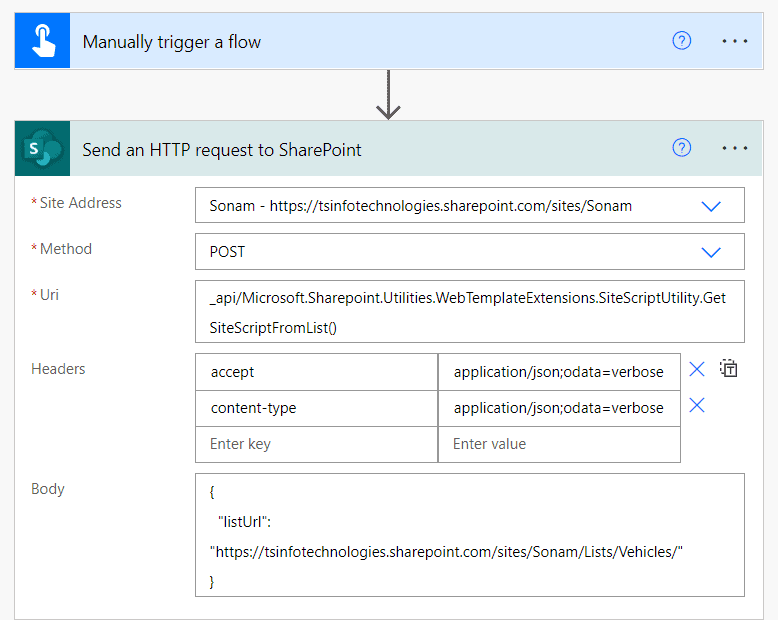
- Click on + New step > Send an HTTP request to SharePoint. Give the source SharePoint site address and the below parameters:
- Method – POST
- Uri-_api/Microsoft.Sharepoint.Utilities.WebTemplateExtensions.SiteScriptUtility.GetSiteScriptFromList()
- Headers–
- accept – application/json;odata=verbose
- content-type – application/json;odata=verbose
- Body-
{
  "listUrl": "https://tsinfotechnologies.sharepoint.com/sites/<Source_SharePoint_SiteName>/Lists/<List_Name>/"
}
- Now save the flow and run it. We can see the JSON code in the body of the ‘send an HTTP request to SharePoint‘ action. Copy those codes.
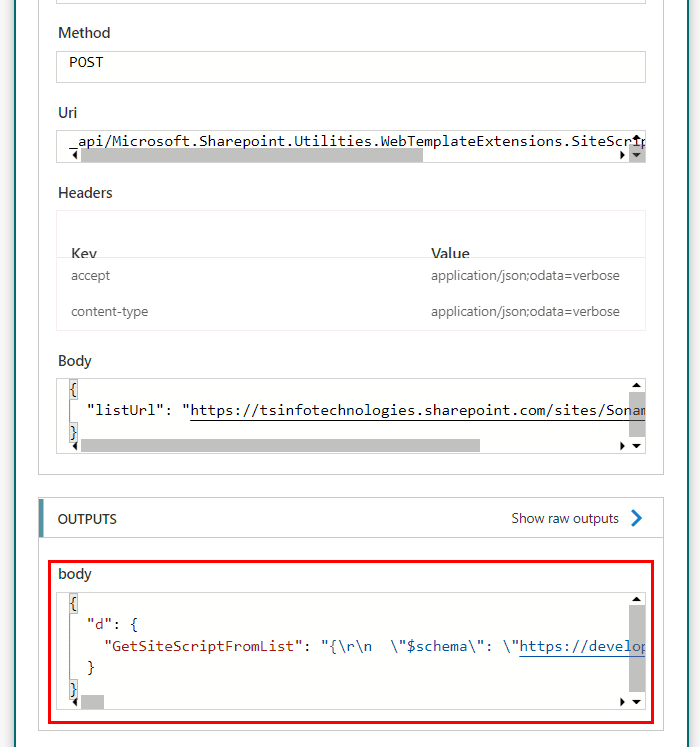
- Now, we will parse the JSON code to create a new SharePoint list. Click on +New step > add the ‘Parse JSON’ action. Set the properties such as:
- Content – set the belowexpresstoion
outputs('Send_an_HTTP_request_to_SharePoint')?['body']?['d']?['GetSiteScriptFromList']- Schema – click on the ‘Generate from sample’ and paste the json code that copied from the above action.
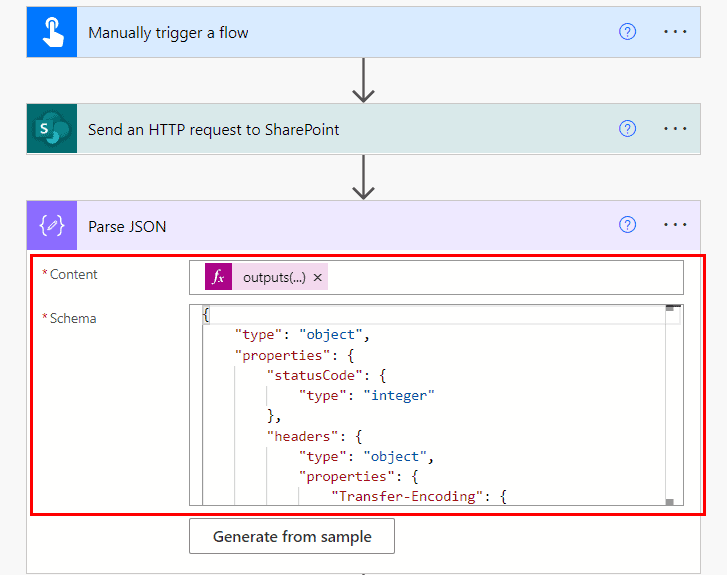
- To create a list on another SharePoint site, add another ‘Send an HTTP request to SharePoint ‘ action, provide the destination SharePoint site address, and set the rest properties such as:
- Method- Post
- Uri- _api/Microsoft.Sharepoint.Utilities.WebTemplateExtensions.SiteScriptUtility.ExecuteTemplateScript()
- Headers-
- accept – application/json;odata=verbose
- content-type – application/json;odata=verbose
- Body- paste the below expression
{"script": "{\"actions\":@{replace(replace(string(body('Parse_JSON')?['actions']),'\','\\'),'"','\"')}}"}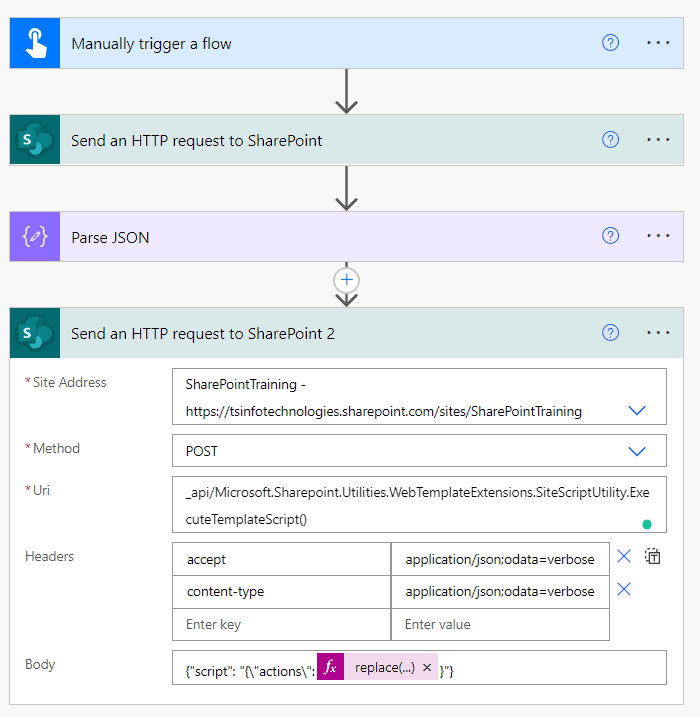
Now the flow is ready to run, so just click on save, and test it manually. We can see it will create a new blank list in the provided SharePoint site like below:

This is how to use the JSON to create a SharePoint list in the Power Automate REST API.
Read Power Automate Copy Folders
Power Automate REST API document library
Now, we will see how to create a folder in the SharePoint document library using Power Automate REST API.
To do this, we are going to create a flow and the following steps are:
- On Power Automate, create an instant cloud flow that triggers the flow manually.
- Then add a ‘Send an HTTP request to SharePoint’ action. Provide the SharePoint site address and set the below properties such:
- Method- POST
- Uri- _api/Web/GetFolderByServerRelativeUrl(‘Resumes’)/Folders
- Headers-
- accept – application/json;odata=verbose
- content-type – application/json;odata=verbose
- Body-
{ '__metadata': { 'type': 'SP.Folder' }, 'ServerRelativeUrl': 'Resumes/Candidates'}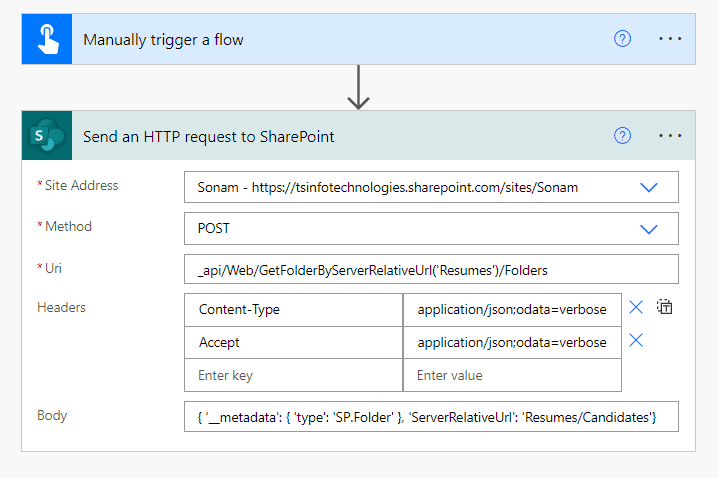
Now, save the flow and test it manually. We can see it will create a folder named ‘Candidates’ in the ‘Resumes‘ document library.
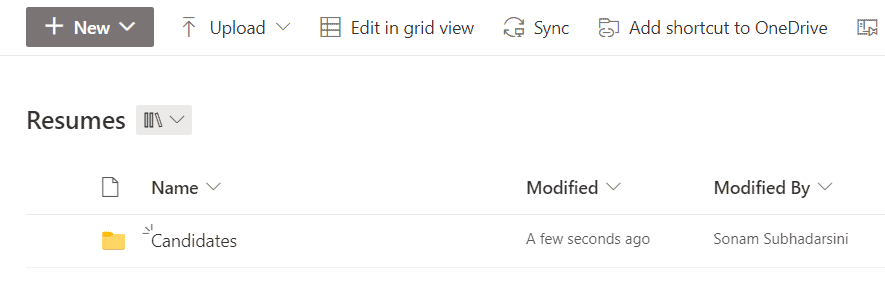
This is how to create a folder in the document library using Power Automate REST API.
Read Power Automate Copy Files
Power Automate REST API get files
Here we will see how to get all the files from the document library using Power Automate REST API.
For example, we have a folder ‘TestFolder’ in the SharePoint document library having some files.
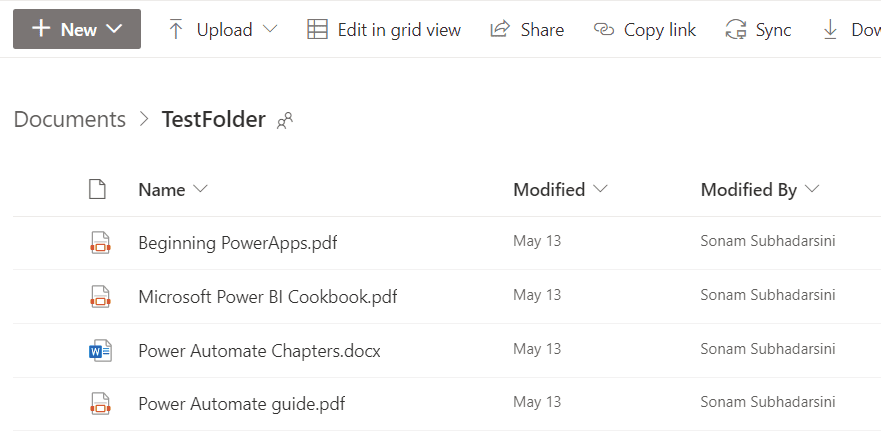
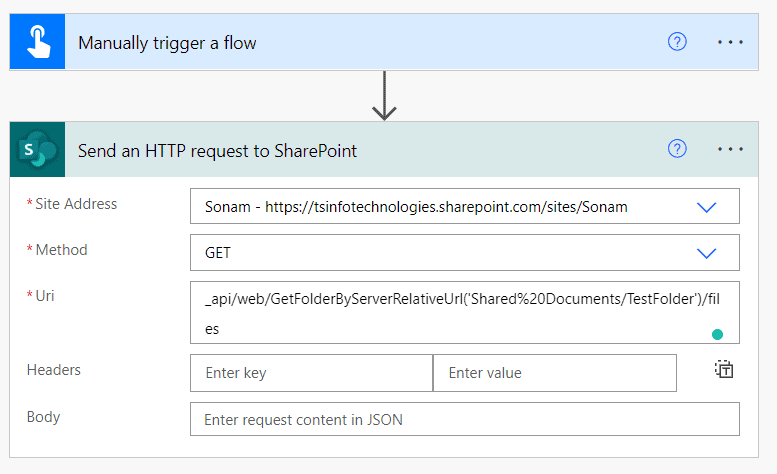
Now, we will create a flow that will get the files from the SharePoint document library folder. To create the flow, the following steps:
- On Power Automate, create an instant cloud flow that trigger the flow manually.
- Then add a ‘Send an HTTP request to SharePoint‘ action, specify the SharePoint site address, and set the properties such as:
- Method – GET
- Uri – _api/web/GetFolderByServerRelativeUrl(‘Shared%20Documents/TestFolder’)/files
Now, save the flow and test it manually. We can see it will show all the files details in the body of the ‘Send an HTTP request to SharePoint’ action.
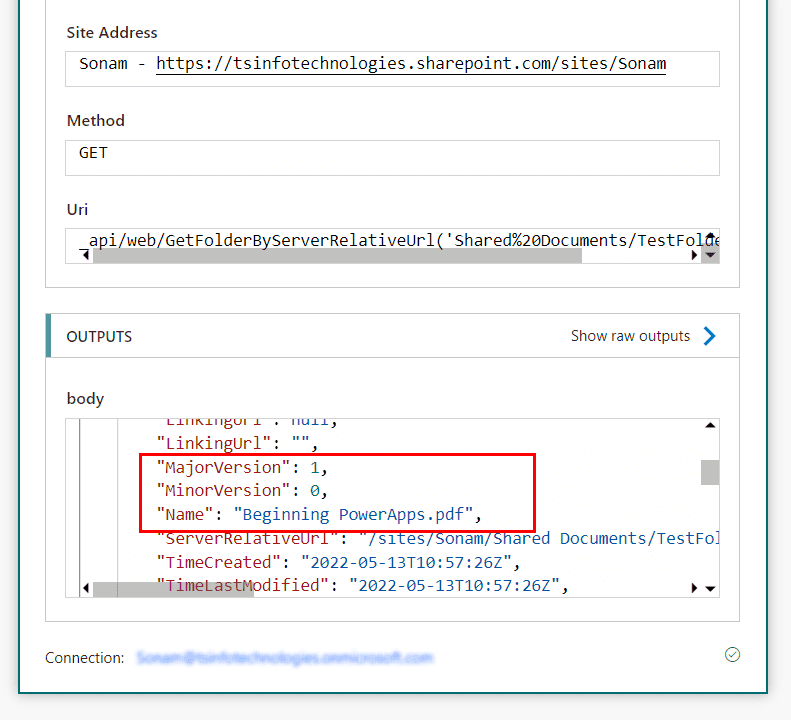
This is how to get all files in a SharePoint folder using Power Automate REST API.
Read Power Automate Create PDF + 11 Examples
Power Automate REST API SharePoint delete a file
Here, we will see how to delete a file from the document library folder using Power Automate REST API.
To implement this, we are going to use the previous document library folder ‘TestFolder’ which contains some sample files.
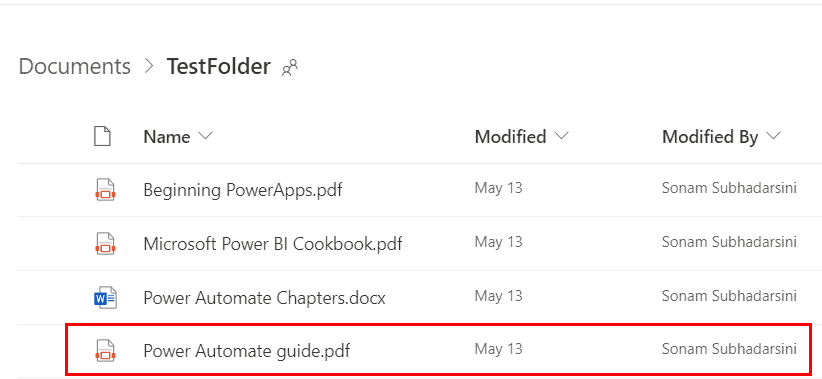
Now, we will create a flow that will delete a specific file (i.e. Power Automate guide.pdf) from the document library folder using Power Automate by invoking REST API. The following steps are:
- On Power Automate, create an Instant cloud flow that will trigger the flow manually.
- Add a ‘Send an HTTP request to SharePoint‘ action under the trigger. Provide the site address as well as the properties such as:
- Method- DELETE
- Uri- _api/web/getFileByServerRelativeUrl(‘/sites/Sonam/Shared%20Documents/TestFolder/Power Automate guide.pdf’)
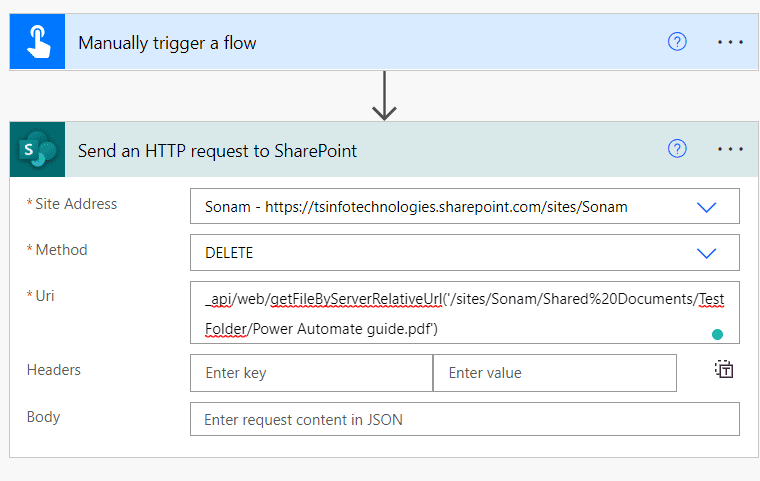
Let’s save the flow and test it manually. We can see it will delete that file from the folder like below:
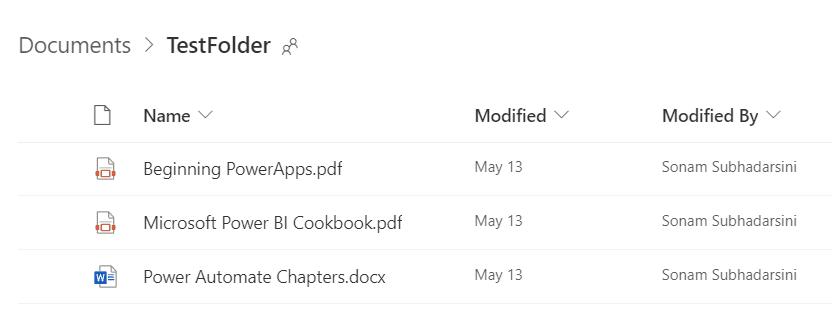
This is how to do SharePoint delete a file using power automate REST API.
Read Power Automate dynamic content
Power Automate REST API sends an email
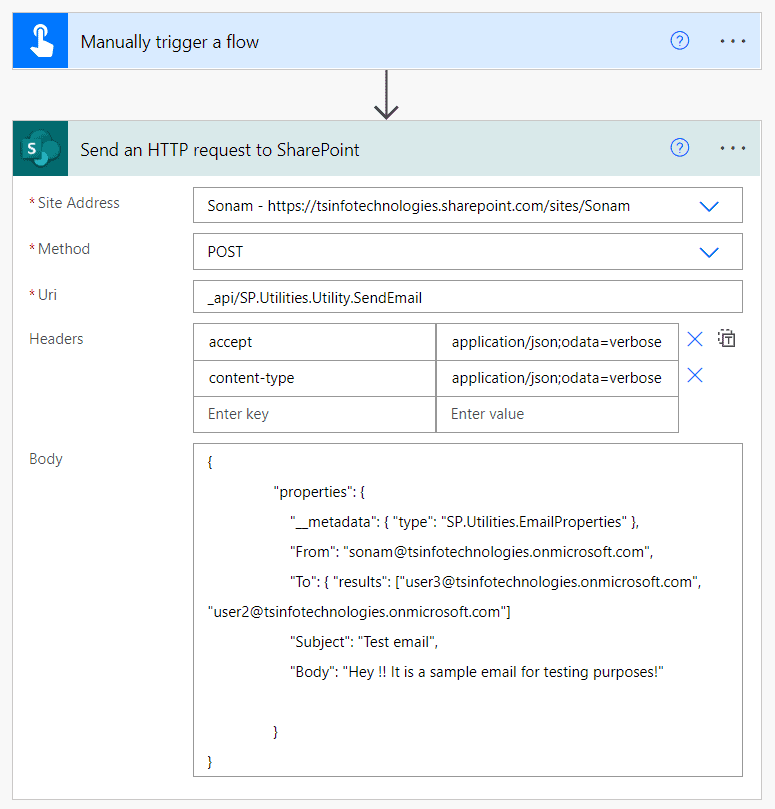
Here, we will see how to send an email via outlook using Power Automate REST API. Also, it allows you to send emails to multiple users. To implement this, let us create a flow and the following steps are:
- On Power Automate, create an instant cloud flow that will trigger manually.
- Under the trigger, add a ‘Send an HTTP request to SharePoint‘. Then provide the SharePoint site address and set the properties such as:
- Method – POST
- Uri- _api/SP.Utilities.Utility.SendEmail
- Headers-
- accept – application/json;odata=verbose
- content-type – application/json;odata=verbose
- Body–
{
                "properties": {
                    "__metadata": { "type": "SP.Utilities.EmailProperties" },
                    "From": "sonam@tsinfotechnologies.onmicrosoft.com",
                    "To": { "results": ["user3@tsinfotechnologies.onmicrosoft.com", "user2@tsinfotechnologies.onmicrosoft.com"] },
                    "Subject": "Test email",
                    "Body": "Hey !! It is a sample email for testing purposes!"

                }
}
Now, save the flow, test it manually, and run the flow. We can see it will send an email notification to the mentioned user(s) via outlook like below:

similarly, an email has been sent to another user. This is how to send an email using Power Automate REST API.
Read Start and wait for an approval Power Automate
Power Automate custom connector rest API
Here we will see how to create a custom connector by using an API call on Power Automate. Suppose, we are going to create a custom connector based on the weather forecasts. Also, we will use see how to work with Automate flow.
To create the custom connector the following steps are:
- On Power Automate, click on Custom connectors under the Date(Left navigation panel).
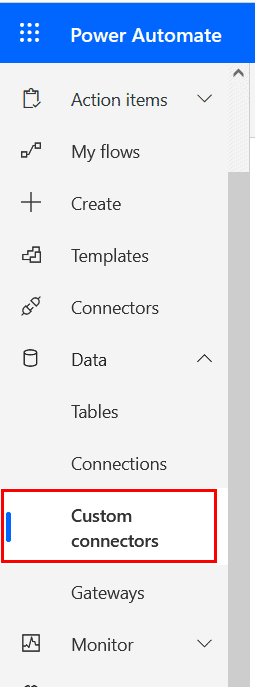
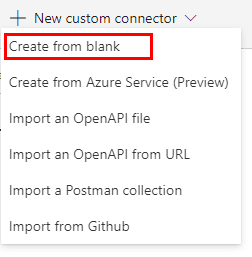
- To create a new connector, click on +New custom connector > Create from blank.
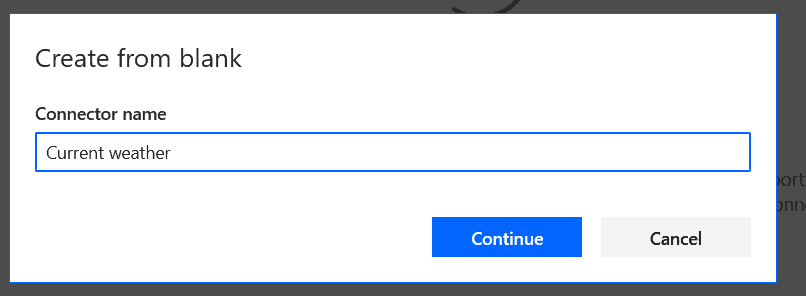
- Give a connector name and then click on continue.
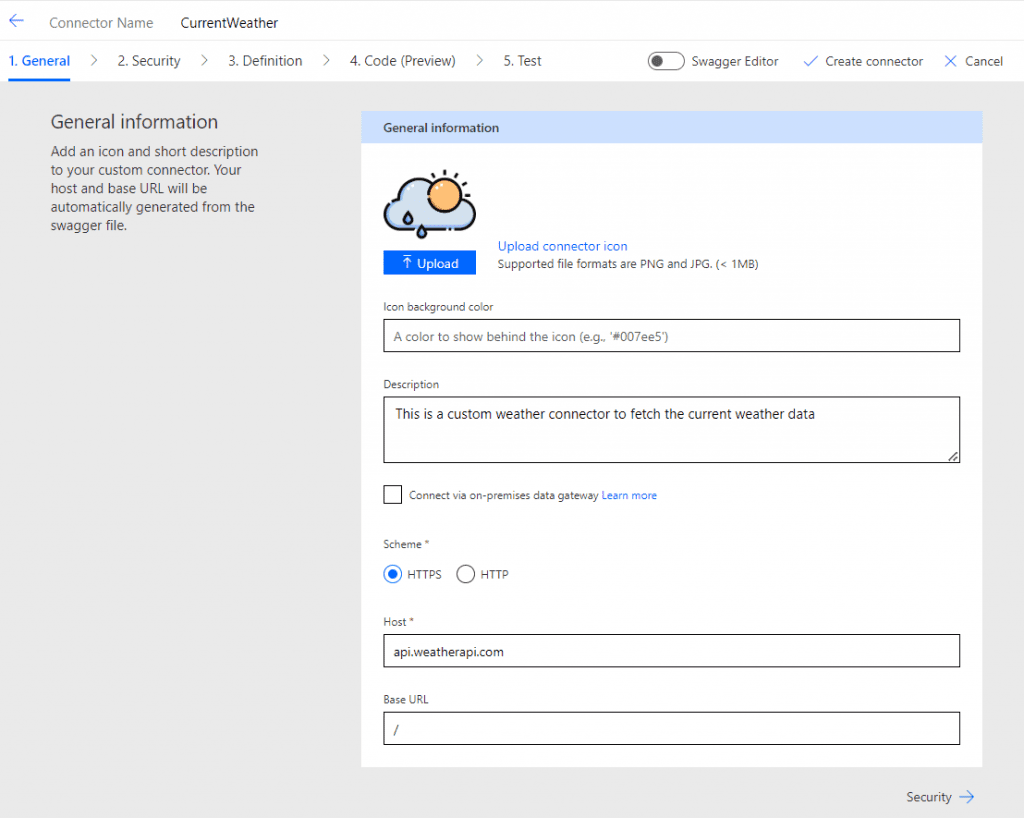
- Next, give the general information of the custom connector such as the connector icon, background color, description, scheme, and host.
Note- Here, we have used the public API (weatherapi.com) for testing purposes as well as for security reasons. So the host will be ‘api.weatherapi.com‘.
- Click on security.
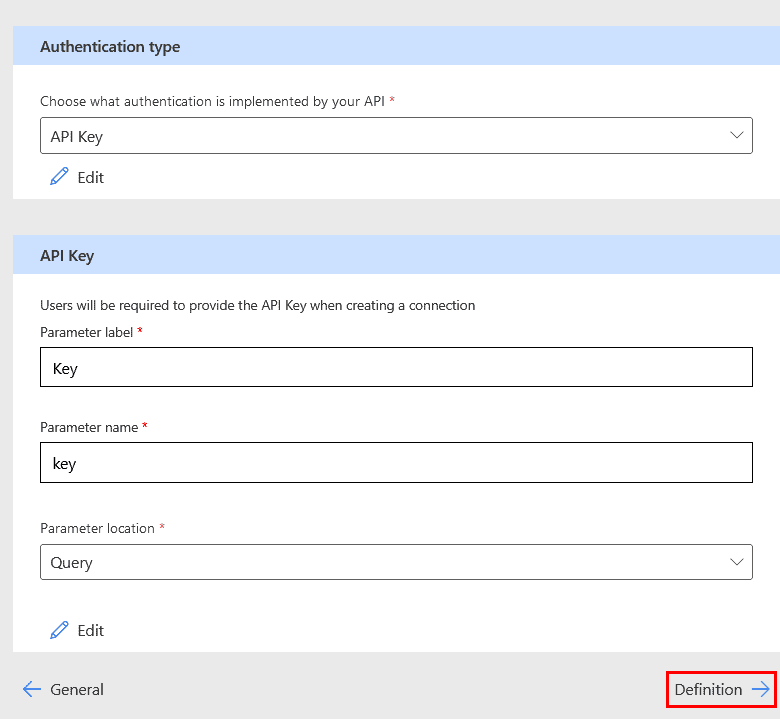
- On this page, set the authentication type as API Key. In the API key section, set the properties such as:
- Parameter label: Key
- Parameter name: Key
- Parameter location: Query
- Click on the ‘Definition’.
- On that page, click on +New action. Provide the summary, description, and operation id.
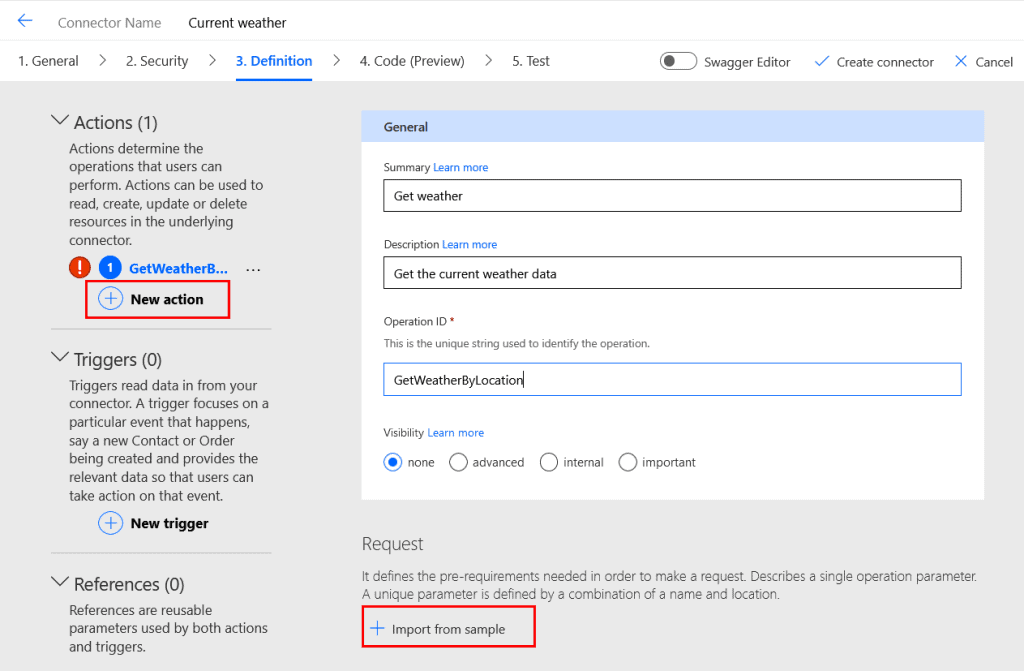
- Next, click on ‘+ Import from sample’. Insert the below parameters such:
- Verb- GET
- URL- Insert the API CALL.
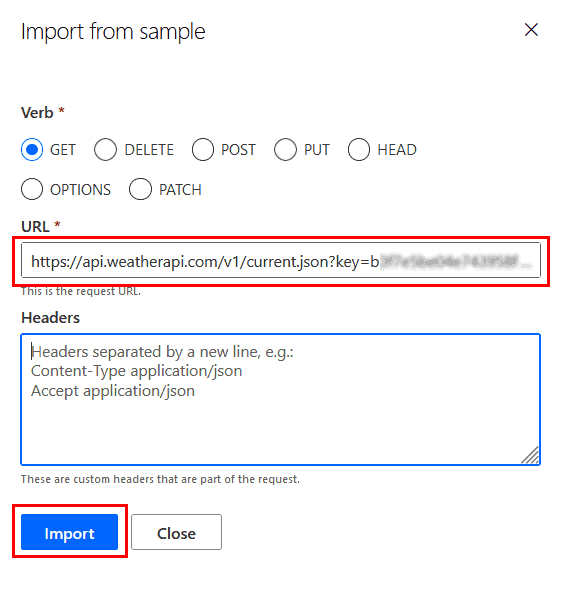
*Make sure to remove the API Key from the URL.

Note- To get the API call, log in to the weatherapi.com > API explorer > Insert the API key (You can get it on the My account of the weatherapi) > Show response.

- Next, click on the code(Preview). On that page, click on ‘Update connector’ (top right corner). It will show the code.
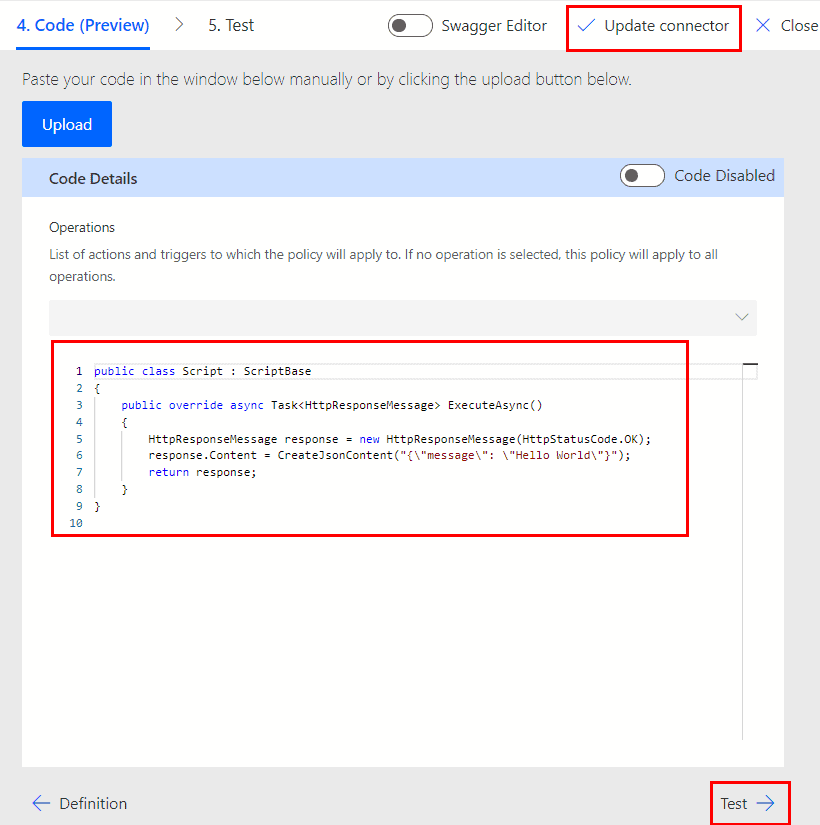
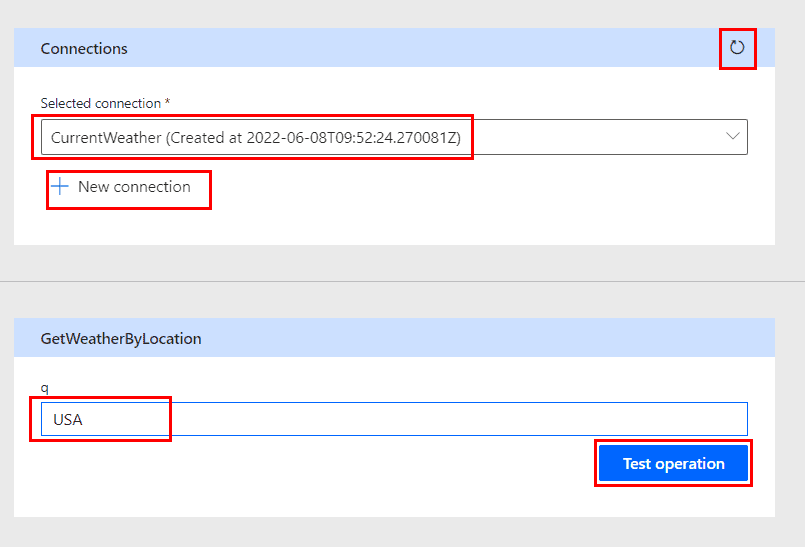
- It will refer to the test page where we have to test the custom connector. So click on +New connection.
- It will open a new tab where we need to insert the API key that we got from the weatherapi website. Then click on the ‘Create connection‘ button.
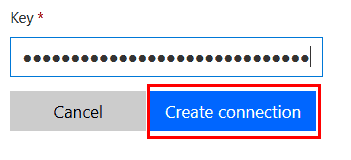
- Now, we can see it will show the connector’s connection on the ‘test‘ page; or you can click on the refresh icon of the connection section.
- To test the connector, provide a location name in the parameter. Click on the ‘test operation‘.
We can see, that it will show the current weather of the provided location like below:
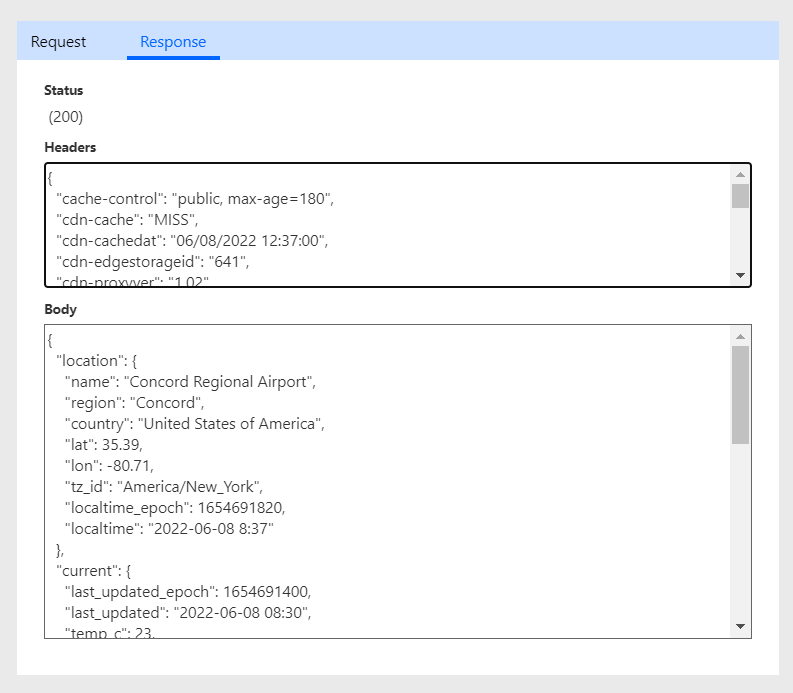
Then click on Close. It will return to the custom connector page having the connector that we have created.

Read Power Automate shared mailbox
Use Custom connector on Power Automate
Let’s create a flow to see how the custom connector works in Power Automate. For example, we will create an instant cloud flow that triggers the flow manually.
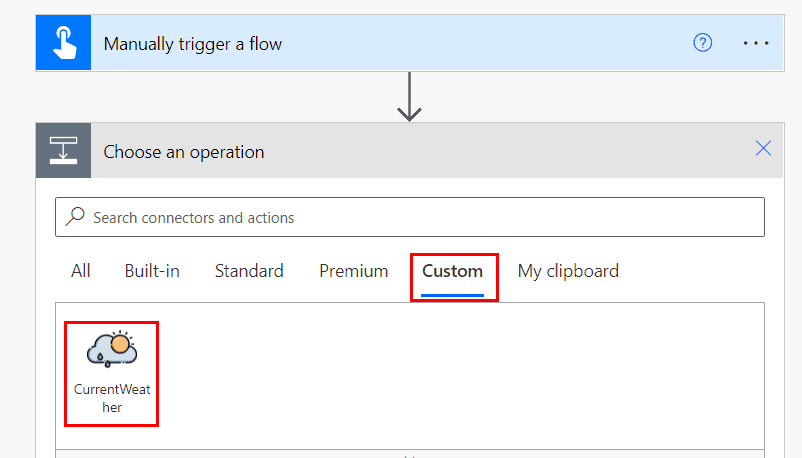
Next, under the trigger, add the custom connector and provide a location. Click on + New step > Custom > select the ‘CurrentWeather‘.
Next, insert any location name (as a country) in the parameter:
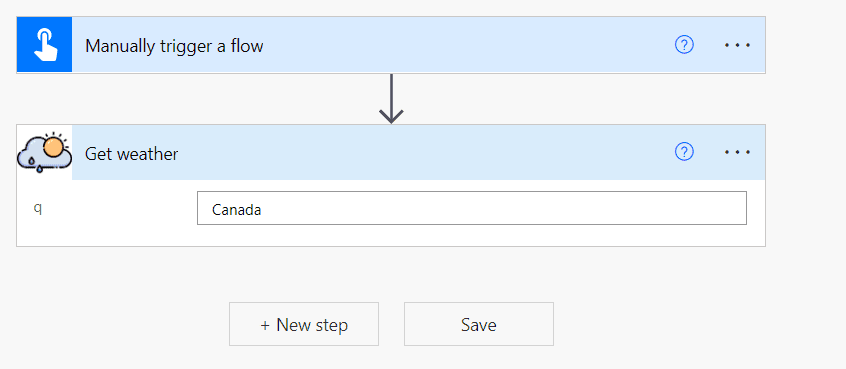
Now save the flow and test it manually. We can see it will retrieve all the details of the provided location:
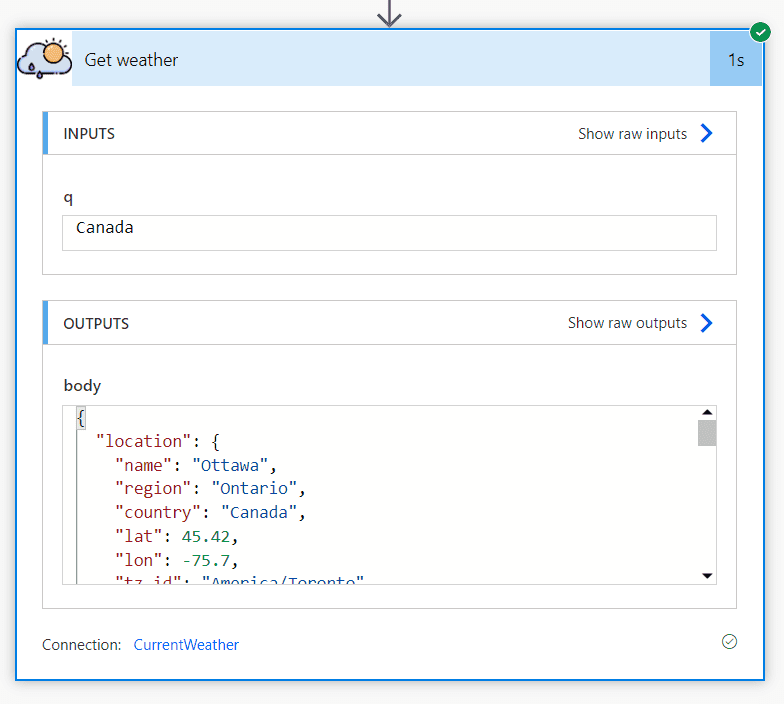
This is how to create a custom connector using API CALL and use this custom connector on the Power Automate flow.
Read Power Automate flow with Microsoft teams
Conclusion
From this Power Automate Tutorial, we have learned all about SharePoint REST API. Also, we have discussed below topics such as
- Discuss Power Automate REST API connector.
- How to create a Sharepoint list using Power Automate REST API?
- How to create a Sharepoint list item using Power Automate REST API?
- How to get the list item using Power Automate SharePoint REST API?
- How to create a custom column using Power Automate SharePoint REST API?
- How to update the existing list item using Power Automate SharePoint REST API?
- How to delete the list item using Power Automate SharePoint REST API?
- How to use JSON in Power Automate SharePoint REST API?
- How to create a folder inside the document library using Power Automate REST API?
- How to get all the file details using Power Automate SharePoint REST API?
- How to delete a specific file using Power Automate SharePoint REST API?
- How to send an email to the user(s) using Power Automate REST API?
- How to create a custom connector using API CALL in Power Automate?
- How to use the custom connector in the Power Automate flow?
You may also like the following Power Automate tutorials:
- Power Automate or Microsoft Flow delete all files in a folder
- Upload PowerApps Attachments to SharePoint Library Folder
- Power Automate add days to date
- Power Automate Increment Variable
- Power Automate SharePoint Get items filter query contains is not valid
I am Bijay a Microsoft MVP (10 times – My MVP Profile) in SharePoint and have more than 17 years of expertise in SharePoint Online Office 365, SharePoint subscription edition, and SharePoint 2019/2016/2013. Currently working in my own venture TSInfo Technologies a SharePoint development, consulting, and training company. I also run the popular SharePoint website EnjoySharePoint.com
how to get azure devops areapath and other values in power automate?
Where’s the apgination example?
Please, how can I use multiple filters in a GET metod?
Today I use it:
/_api/ProjectData/[en-us]/AssignmentBaselineTimephasedDataSet()?$Select=ProjectId,ProjectName,AssignmentBaselineModifiedDate,BaselineNumber,TaskName&$Filter=ProjectName eq ‘Project1’
but I also need to filter BaselineNumber. How can i do it?