In this Microsoft Power Automate Tutorial, I will show you how to work with start and wait for an approval action in Power Automate. Also, I will cover all the below topics:
- Start and wait for an approval action in Power Automate
- How to configure and options of start and wait for an approval action Power Automate
- Start and wait for approval in Power Automate timeout
- Power Automate condition approval outcome
Power Automate Start and Wait for an Approval
In everyday business processes, you might encounter some common scenarios where we have to review, and approvals are required. In Power Automate, a user can do this automatically.
Power Automate has many flow actions that connect the Power Automate flow and will be useful for the approval process.
Power Automate has three approval connection actions in it:
- Create an approval: This flow action will start an approval process, but the flow execution does not stop; the following actions will continue to execute.
- Start and wait for an approval: This flow action will start an approval and wait for the assigned user to approve before executing the next flow action.
- Wait for approval – This flow action waits until a specific approval task is completed.
Configure Start and Wait for an approval action
Below are the parameters that can be present in start and wait for an approval action of Power Automate:
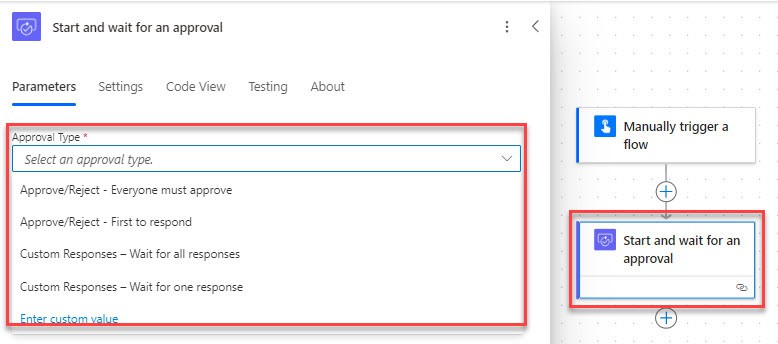
1. Approval Type: It has four approval type options that can be selected. You can see those types as mentioned in below points:
- Approve/Reject—Everyone must approve: This type requires each approver to respond to the approval request. If all the approvers approve, the outcome will be Approved; if one user rejects, the outcome will be Rejected.
- Approve/Reject—First to respond: In this type, the approval outcome will be the first response from any assigned approvers.
- Custom Responses – Wait for all responses: In this approval type, we can provide custom options for the assigned person to select other than Approve/Reject. Here, it will wait for all the responses to complete the request.
- Custom Responses—Wait for one response: This is similar to the above approval type, where we can give custom approval options. If any of the approvers submit a response, the flow will be executed for the next steps.
2. Title: Enter the name manually or take the title from the dynamic content.
3. Assigned to– It accepts the approver’s email address, separated by a semicolon.
4. Details– Specify the details of the approval request.
5. Item link- Add a link to the item to approve.
6. Item link description- Describe the link to the item.
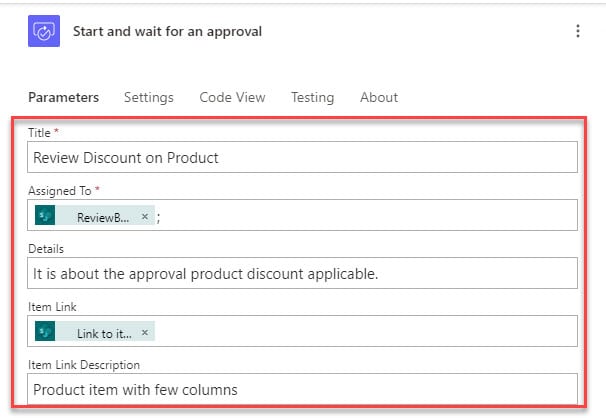
Now, click on Showall to display all the advanced parameters:
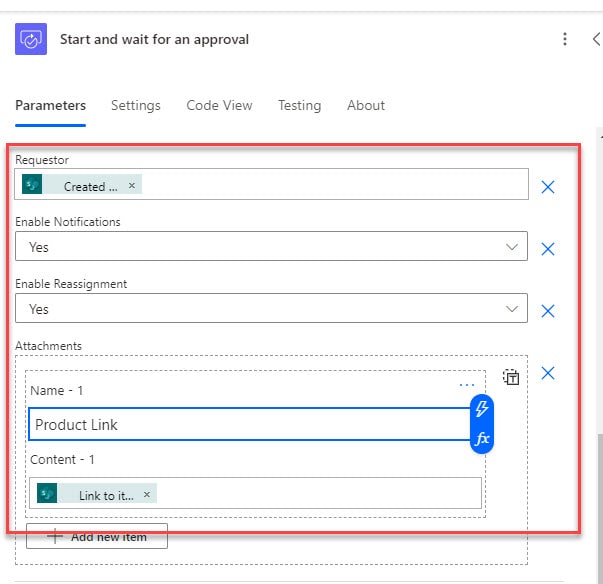
7. Requestor: By default, the user creating the flow is the requestor. But we can also add any other user as the requestor by entering the email address.
8. Enable notifications: This option is used to enable or disable email and push notifications which the approver receives. By default, it is set to Yes.
9. Enable reassignment: By setting this option to No, the approver will not be able to reassign a different approver. By default, it is set to Yes.
10. Attachments: We can attach any files or links to be sent along with the approval request.
This is how to configure start and wait for approval in Power Automate.
Start and Wait for an Approval in Power Automate Timeout
Here, I will explain how to set the time out for a start and wait for an approval action in Power Automate.
In Power Automate, a user can set the time-out at the start and wait for an approval action. If the time-out is not set, it will take the default value as empty, indicating the flow will run for 30 days.
To provide the time-out duration for approval requests, it is specified using ISO 8601 format. You can check this link.
For example:
- PT30M- 30 Minutes
- PT5H- 5 Hours
- P1D- 1 day
- P15D- 15 day
Example:
In my requirement, I want the approval request to be sent and responded to within 7 days. Also, I need to update the Discount Approved value to Yes if the approval outcome is Approved. If the Approval outcome is Rejected, then the Discount Approved value to No..
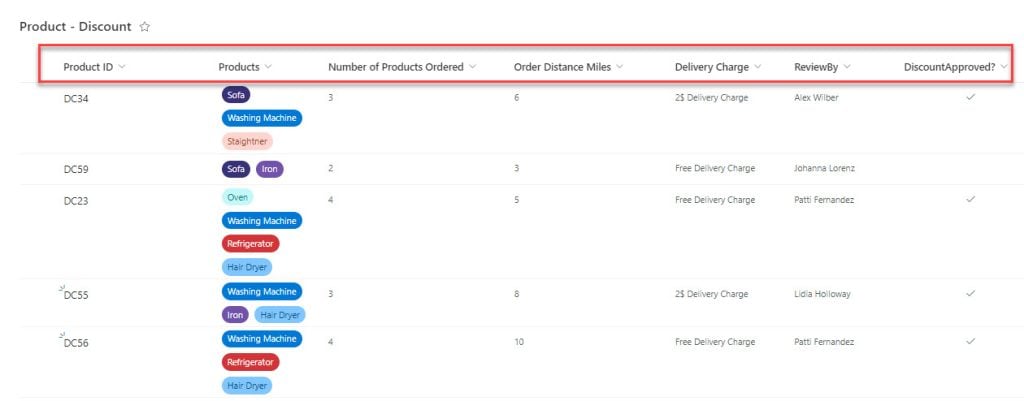
Check the instructions:
1. Take ‘When an item is created trigger‘ in Power Automate Automated cloud flow. Provide the parameters like Site Address and List Name.

2. After that, Start and wait for an approval flow action, set the required properties:
- Approval type– Approve/Reject – First to Respond.
- Title– Select Title from dynamic content.
- Assigned to– Approver name email from dynamic content.
- Details– Set the details of the approval request.
- Item link– Link to item from dynamic content.
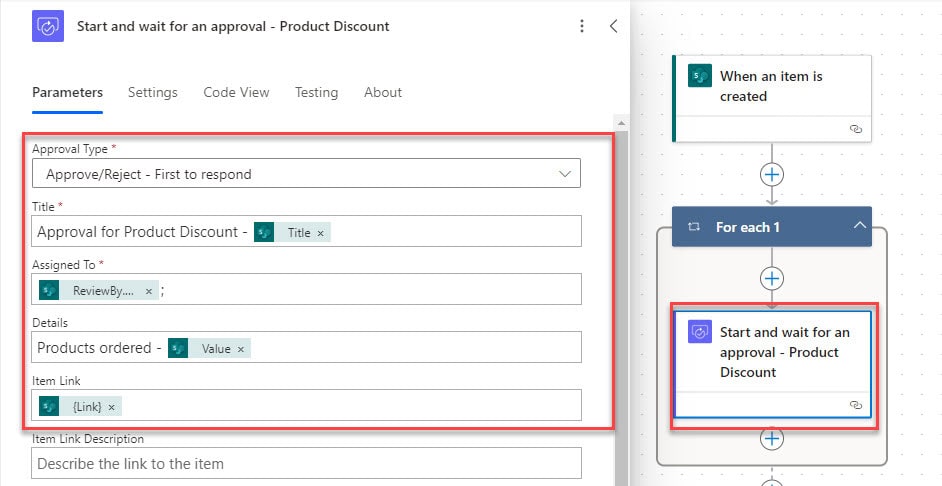
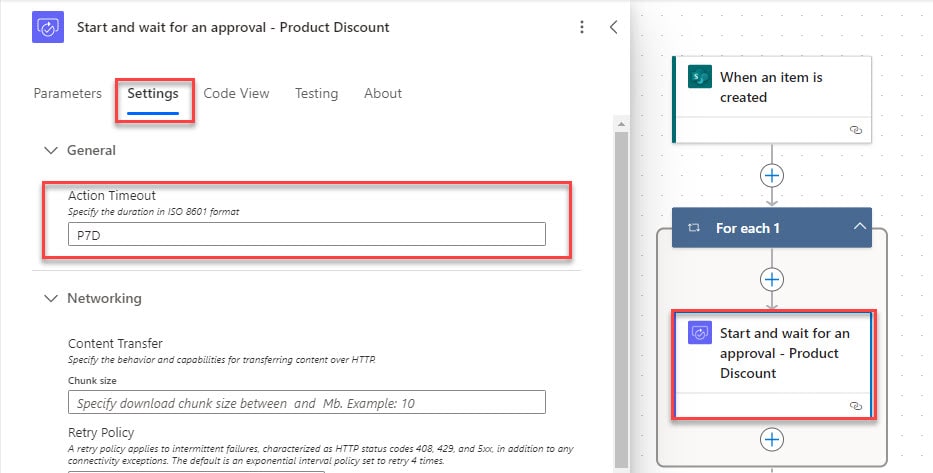
Now, I wanted to wait for the approval request only for 7 days, so I set the Timeout at the start and waited for an approval action.
- Inside the action, click Settings -> Set the ISo format of time in the Action Time out option like below:
3. Next, I will add a condition to check the outcomes, i.e., whether the response is Approved or rejected. Based on the response, it will update the SharePoint list item value.
Outcome is equal to Approve
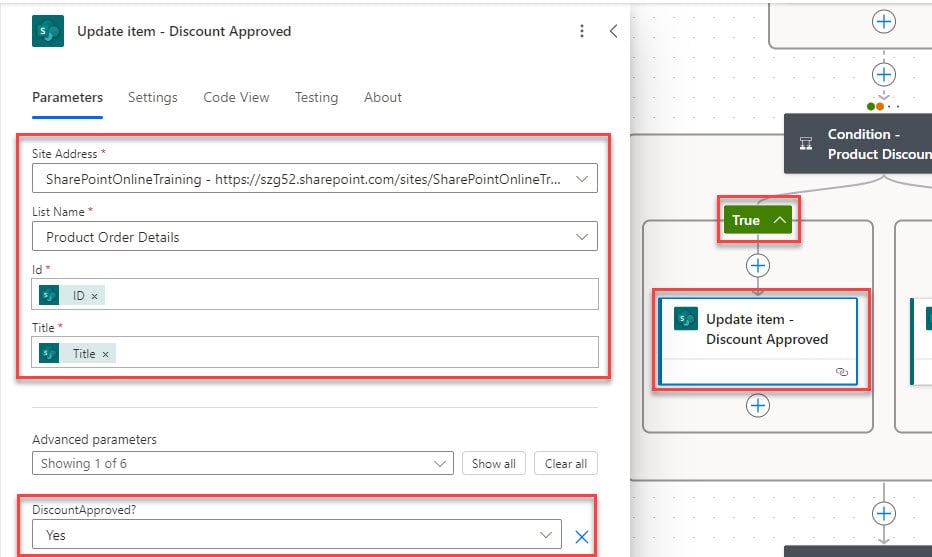
4. Under the True condition, add the Update item flow action to update the item with an approved discount. Configure the parameters like site address and list name.
- Id: Take the Id column from the dynamic content.
- Title: Choose the Title column from the dynamic content.
- Discount Approved?: Choose the value to Yes from the drop-down.
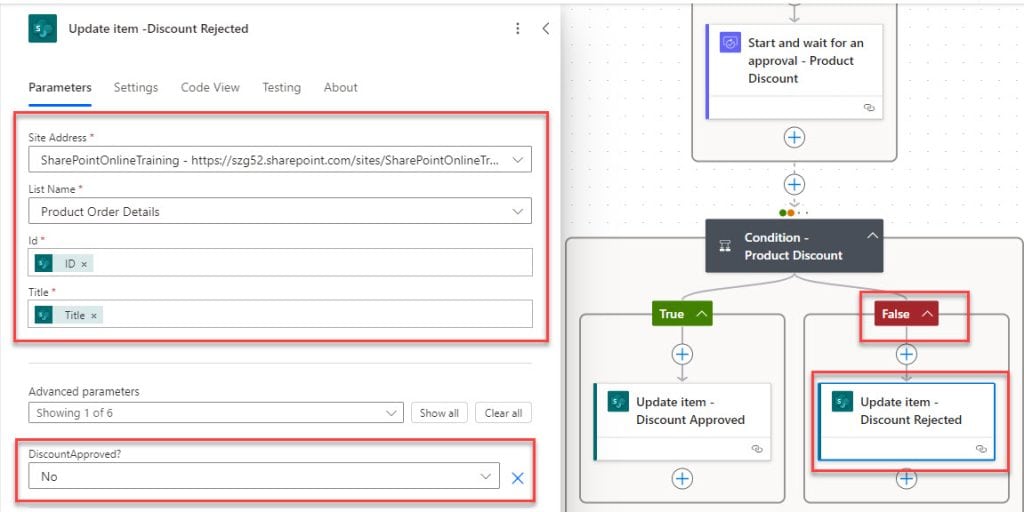
5. Under the False condition, take the Update item flow action to update the approved discount value.
Set the parameters like Site address, list name, ID, and Title from the dynamic content.
- Discount Approved? : Set the value to No from the drop-down options.
6. Now the flow is ready, save and run the flow manually once. To trigger the flow, add an item to the SharePoint list, as you can see from the below image:
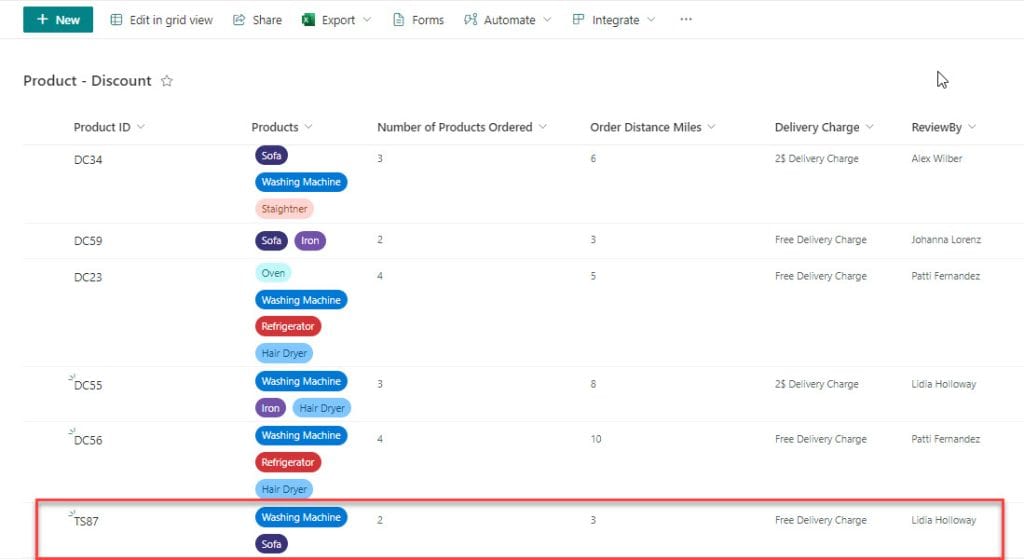
Approval requests will be received by Review by person as shown in the figure below:
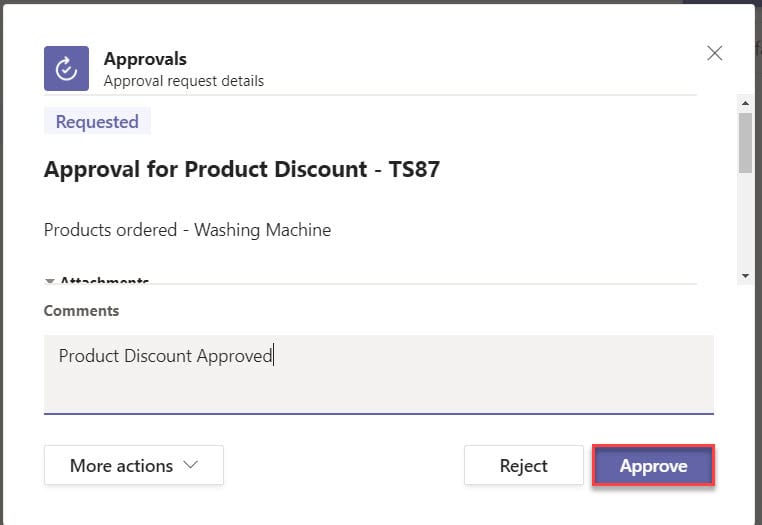
7. When the flow runs successfully, if the approval outcome is approved, it will update the Discount approved value to yes.
Refer to the image:
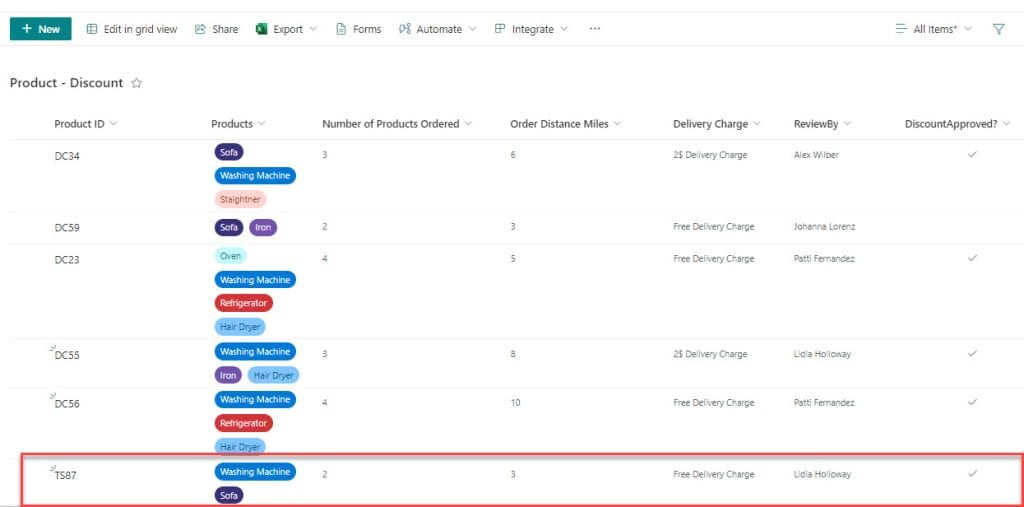
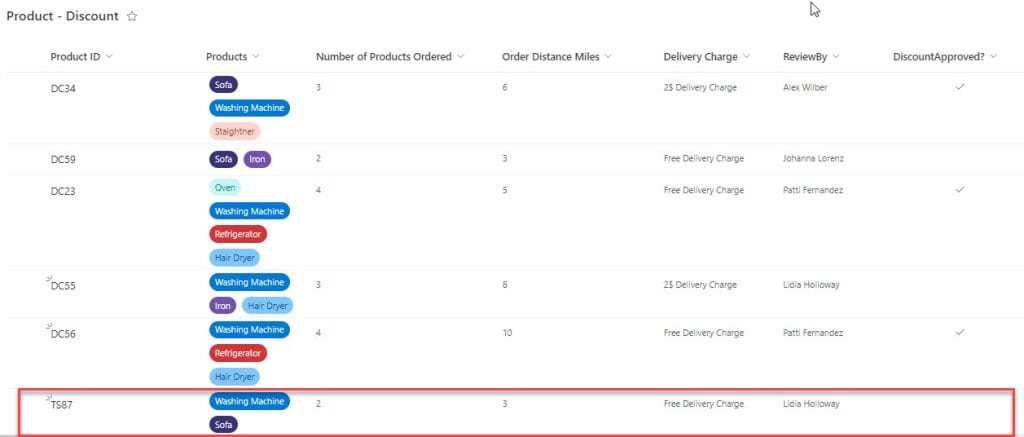
8. If the approval outcome is rejected -> Then, it will update the Discount approved value to No, as shown in the image below:
What will happen to the approval if the approval does not give the outcome within the time?
The flow will first check the outcome if the approval is on time. The following flow actions will not execute, and the flow won’t run in case the approval is timed out.
To make the flow run successfully, we must set the Run after property for the following actions.
- Inside the condition action, Click on Settings -> Under the Run after click on context menu -> Select the check boxes like Is successful and Has timed out.
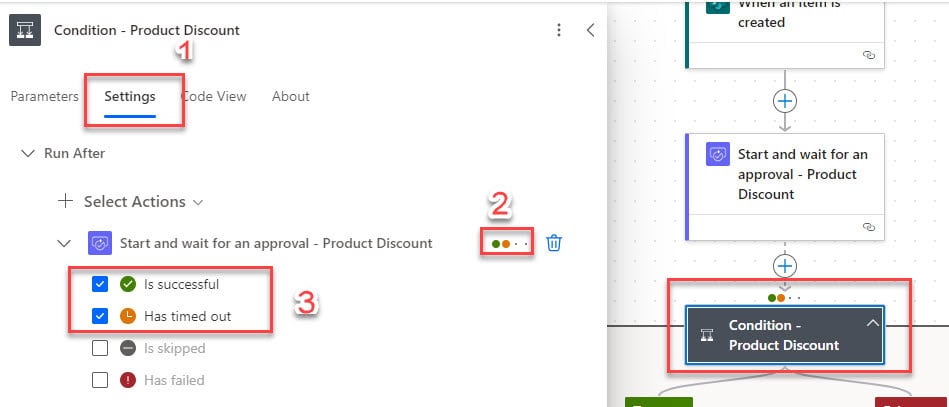
This is how to set timings in the start time and wait for an approval flow action in Power Automate.
Power Automate Condition Approval Outcome
To get the response of the approval condition in a Power Automate flow, follow the below-given requirement:
Example:
I have created a SharePoint list named ‘Products Ordered Details‘ with a few columns here.
Refer to the image below:
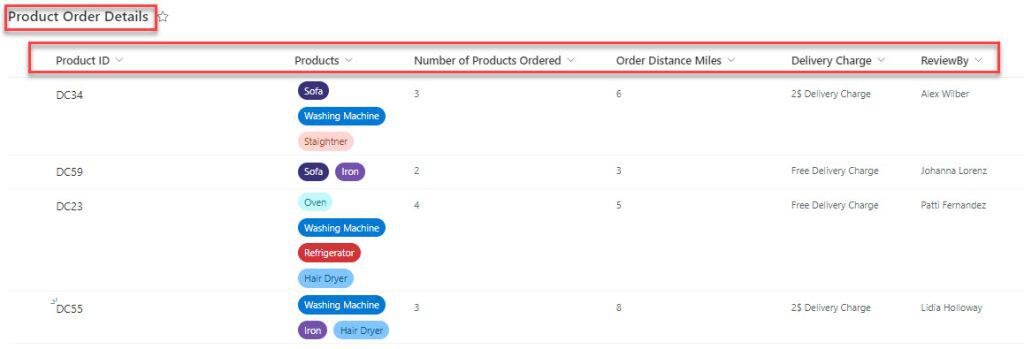
In the above SharePoint list, when a user adds an item to the list:
- Condition: If the number of products ordered is greater than or equal to 3.
Then, an approval request with the custom possible discount options should be sent to the product review person. After that, the user should receive an Outlook email with the Outcome.
Create an Approval flow in Power Automate:
1. In the Automate cloud flow, choose When an item is created trigger. Set the parameters like Site Address and List Name.

2. After that, I will take a Condition control flow action to provide a condition.
| Choose Value | Operator | Choose Value |
| Number of products ordered | is greater than or equal to | 3 |

3. Under True conditions, take Start and wait for an approval action to send an approval request to product review by a person with the custom responses.
- Approval Type: Select Custom Responses – wait for one response.
- Response Options: Provide the response options according to your requirements manually.
- Title: Give a title name for the approval request.
- Assigned To: Choose Review By email from dynamic content.
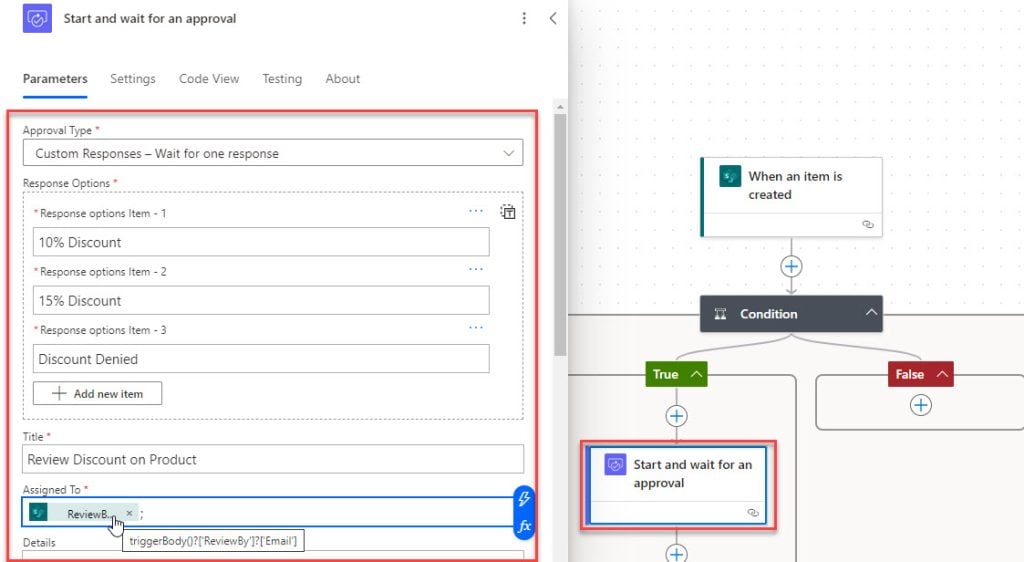
4. Next, add the Send an email(V2) flow action to send an email to the person who added the item to the SharePoint list.
- To: Choose Created By email from the dynamic content.
- Subject: Provide a subject line about the email
- Body: Format the email body with a message and Outcome from the dynamic content.
If you have taken response comments in the body from dynamic content, each loop will be added automatically.
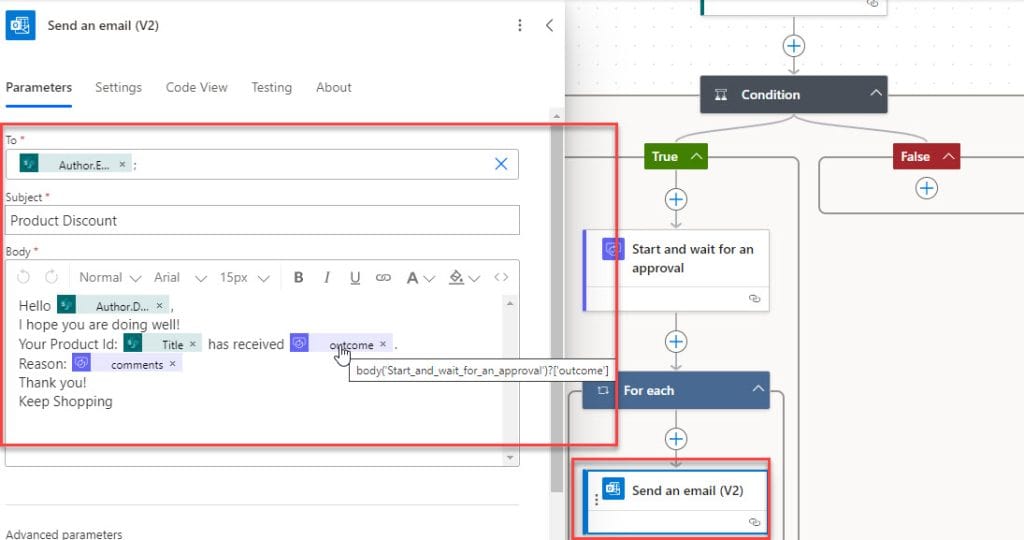
5. Once the flow is completed, save and run the flow manually. To trigger the flow, create an item in SharePoint as represented in the image below:
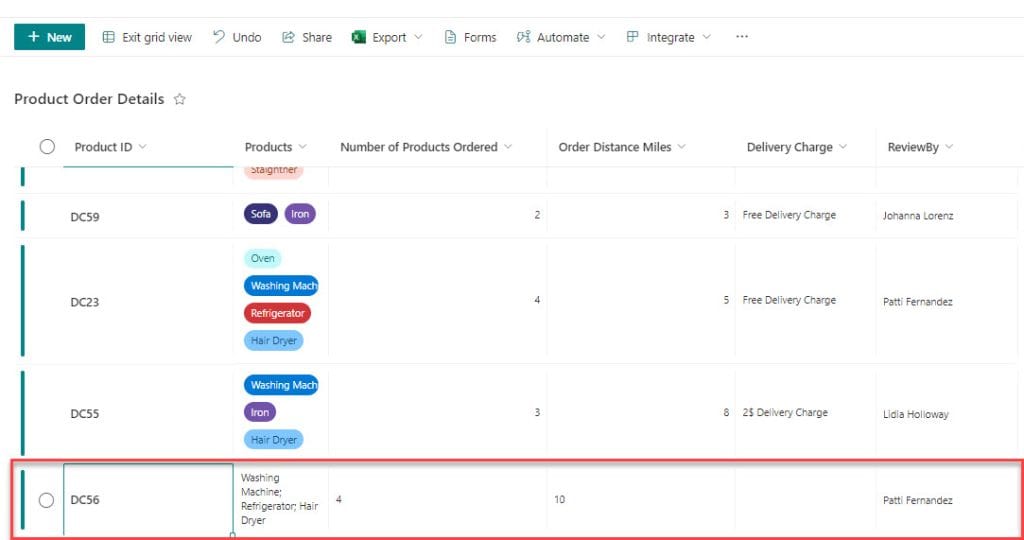
6. The below image shows the Approval request received by Review By person:
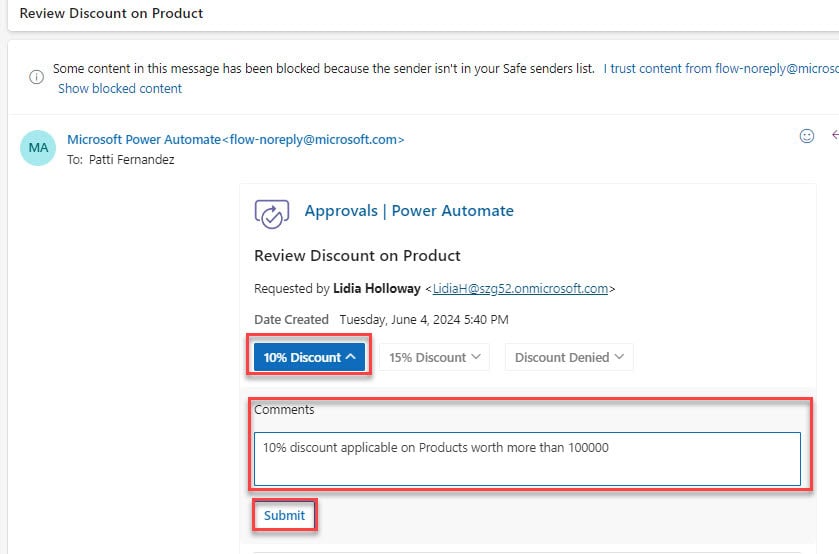
7. the output will display the outcome with the approval response comments when the flow runs successfully.
Check the image:
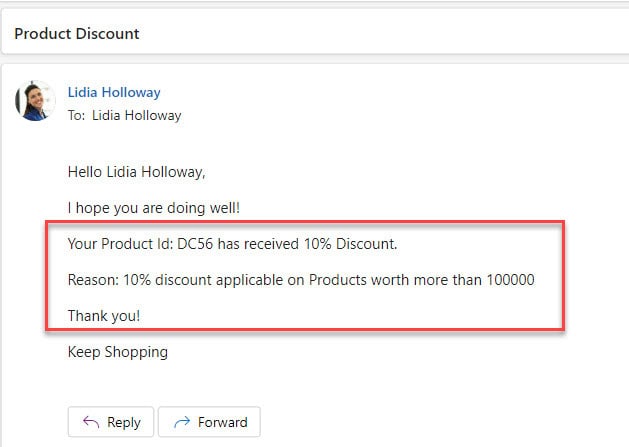
This is all about the approval response from the start and wait for an approval action of Power Automate.
Conclusion
From this tutorial post, you may know how to use start and wait for an approval action in a Power Automate flow.
You may also like:
- When an item is created in SharePoint list send approval and create item using Power Automate
- Expense Reimbursement and Approval using Power Automate [SharePoint List, Microsoft Forms, Planner]
- How to delete all files in a SharePoint folder using Power Automate?
- Power Automate save email attachment to SharePoint
- Copy List Items To Another List In SharePoint Using Power Automate
I am Bijay a Microsoft MVP (10 times – My MVP Profile) in SharePoint and have more than 17 years of expertise in SharePoint Online Office 365, SharePoint subscription edition, and SharePoint 2019/2016/2013. Currently working in my own venture TSInfo Technologies a SharePoint development, consulting, and training company. I also run the popular SharePoint website EnjoySharePoint.com
Bijay, thanks so much for this! is there any option to have a multiple selection of answers in approval process, when there are custom responses offered?
For example, in your example above, I want to choose both power Bi and power App buttons, and to leave out Power Automate, is there a way to achieve that?
Bojan, We are currently unable to choose several choices at the same time. However, we can include custom responses such as Power Apps, Power Bi, and Both (for PowerApps & Power BI) buttons.