In this Power Automate tutorial, we will see how to create a Leave request workflow in Power Automate. I will share a complete example of the Power Automate leave request approval flow.
Also, in this Power Automate flow, we have added functionalities like
- 2 levels of approvals i.e. Team lead and Manager Approvals
- half-day calculation
- It will calculate the total leave for business days without including Weekends.
- Also, it will calculate the Remaining Total leave.
You can also download the complete flow, the link is available down.
To create this flow in Power Automate, we need to create 2 SharePoint lists first. These are
- Employee Leave Request: This Sharepoint list contains all the information related to employee leave. This list contains the following columns:
- Title-Single Line of Text
- Employee Name- Person
- Department-Choice
- Email address-Single Line of Text
- Phone number-Number
- Types of leave-Choice
- Start date -Date/Time
- End date-Date Time
- Half day-Yes/No
- Number of Days-Number
- Reason for Leave-Multiple Lines of Text
- Manager-Person
- Manager Comment-Multiple Lines of Text
- Team Lead-Person
- Team Lead Comment-Multiple Lines of Text
- Approval Status-Choice

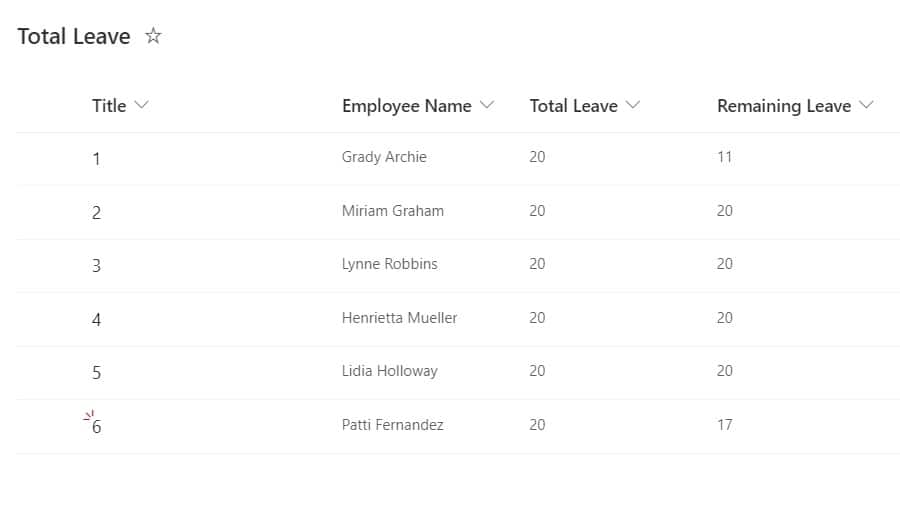
- Total Leave: This list contains the Employee’s name, the Total leave assigned by the organization, and the Remaining leave that the employee holds. This list contains the following columns:
- Title-Single line of text
- Employee Name- Person
- Total leave-Number
- Remaining Leave-Number
When an employee requests a leave ‘Employee leave request list’ then we perform the below tasks:
- First, we get the remaining leave from the Total leave list, for that particular employee.
- Then we will calculate the total leave requested by the Employee, by using the Start date and End date of Leave. Also, we will exclude the Weekends from the total leave, if it’s available.
- Then we will check whether the employee’s Total leave contains half a day or not.
- If half a day contains, we will subtract 0.5 from the Total leave(requested by the employee)
- Then we will send an Approval to Team Lead, if it is approved we will send the request to Manager. If the manager approves, then we will send an email to the Employee that the leave is Approved.
- Also, we will update the Number of days left, Manager comments, Team Lead comments, and the Approval status in the Employee Leave request list in SharePoint. Also, update the Remaining days left in the Total leave list.
- If not Approved, we will send an email to the employee, your leave request is rejected and update the Approval status.
- Let’s say the employee does not apply for half-day, in that case, we will follow the same approval process and update the items in the SharePoint list.
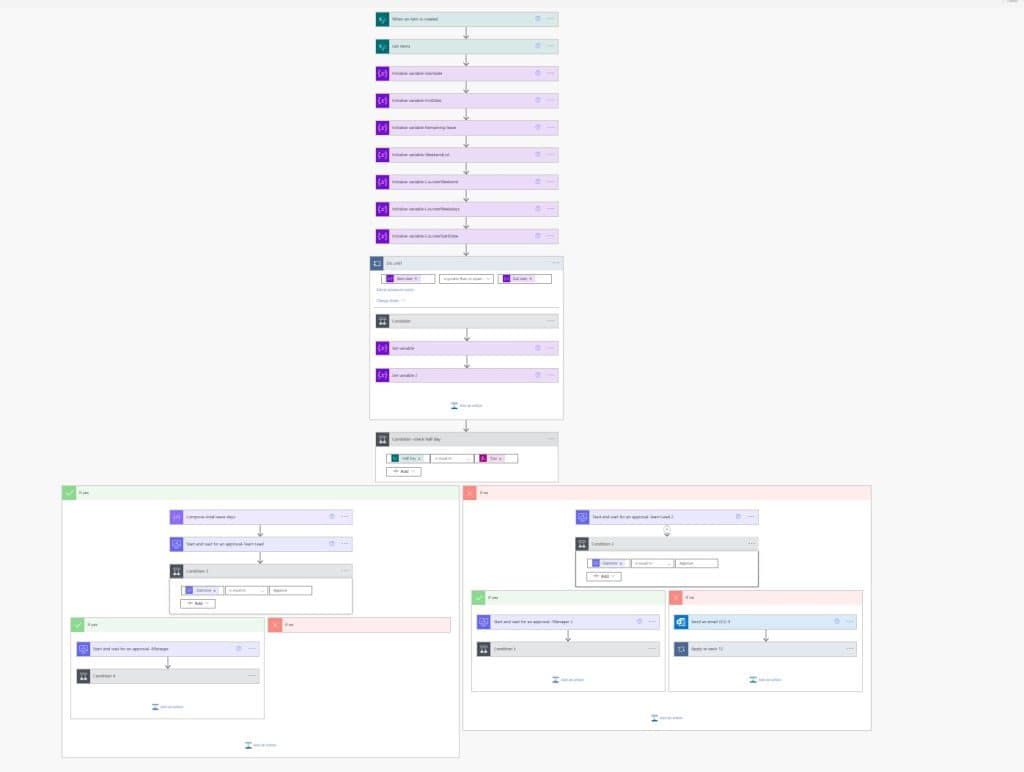
This is an overview of the flow in Power Automate
How to create Leave Request Approval in Power Automate
Here, we will see how to create a leave request approval flow in Power Automate.
Before starting to create the flow in Power Automate, make sure you have set up both the SharePoint list, as shown above
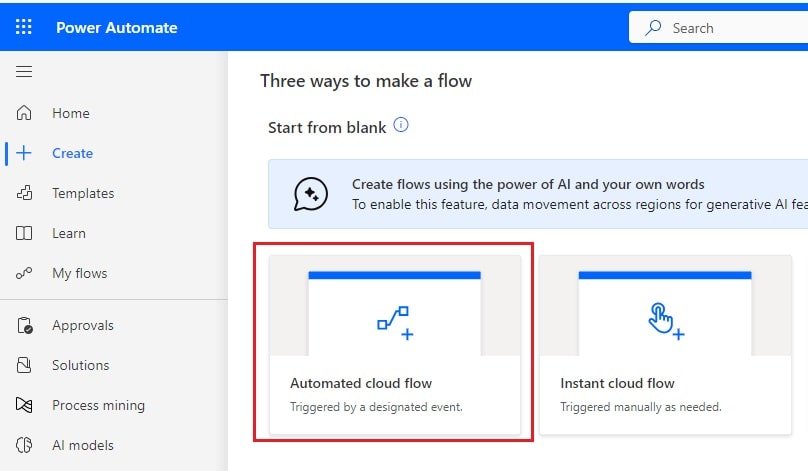
1. Open Power Automate Cloud and click on + Create -> select Automated Cloud Flow.
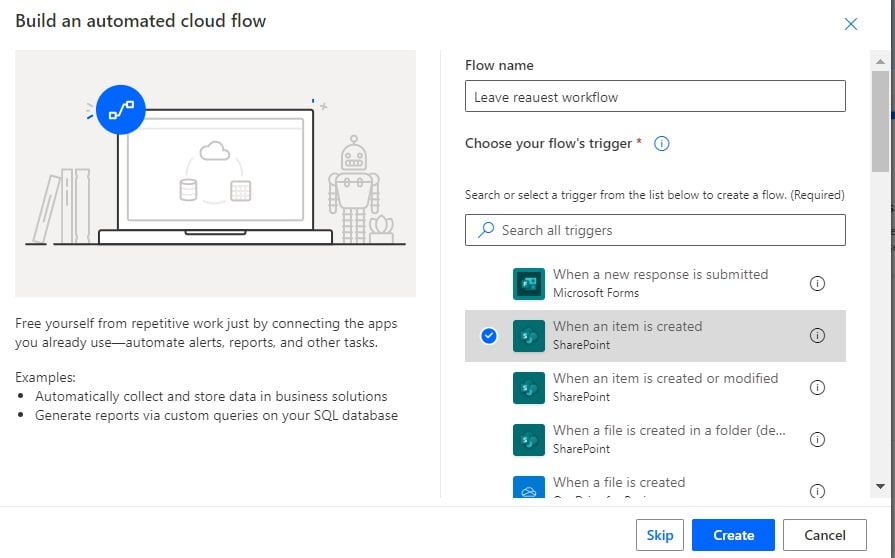
Then, provide the flow name and select When an item is created action. Then click on the Create button.
Now you can see When an item is created action is added to the flow page. Then, provide the flow information:
- Site address: Provide the SharePoint site address
- List name: provide the SharePoint list name
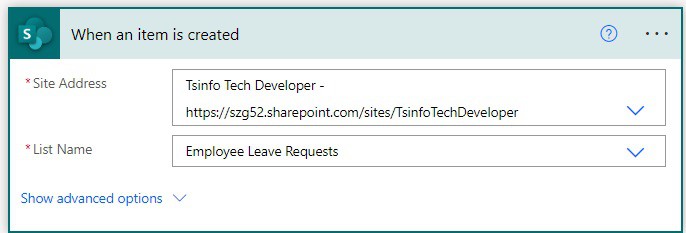
2. Next, we will get the remaining leave; for this, click on Add an action -> select Get items action. Then provide the information below
- Site address: Provide the SharePoint site address
- List name: provide the SharePoint list name
- Filter query: Provide the below query.
EmployeeName/EMail eq '@{triggerOutputs()?['body/EmployeeName/Email']}'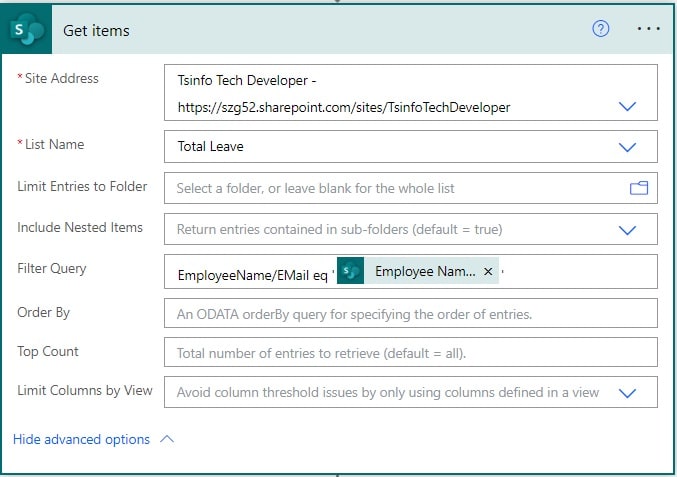
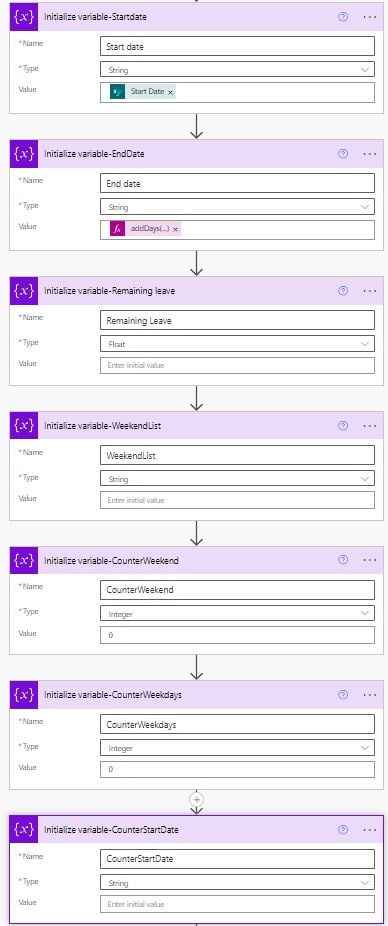
3. We need to initialize the variable like below, for this, select the initialize variable action.
| Name | Type | Value |
|---|---|---|
| Start date | String | @{triggerOutputs()?[‘body/StartDate’]} |
| End date | String | addDays(triggerOutputs()?[‘body/EndDate’],1) |
| Remaining Leave | Float | |
| Weekend List | String | |
| CounterWeekend | Integer | |
| CounterWeekdays | Integer | |
| CounterStartDate | String |
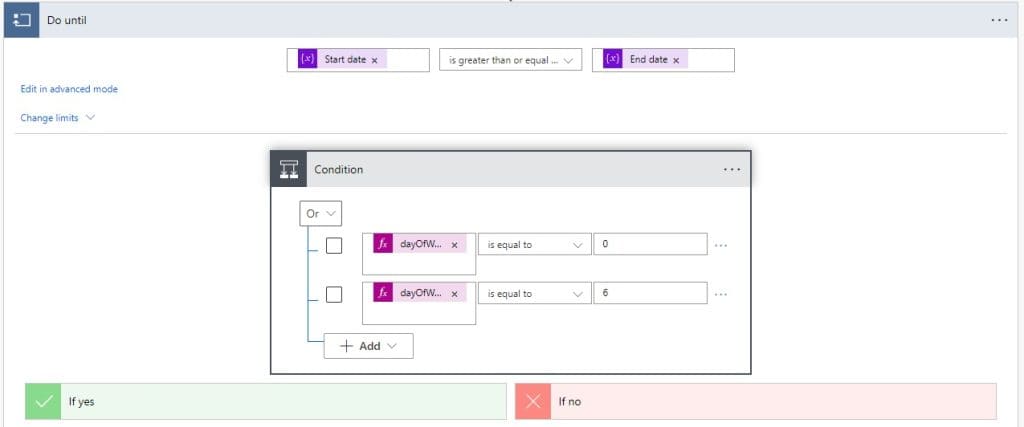
4. Next, we will calculate the Business days from the Start date and End date; for this, click on +New step -> select Do until action. Then provide the below information:
- Choose a value: Select the Start date variable
- Operator: is greater than or equal to
- Choose a value: Select the End date variable

5. Now we will check if the date is Saturday or Sunday; click on Add an action, inside Do until action. then provide the information below:
- Choose a value: Provide the expression
dayOfWeek(variables('Start date'))- Operator: is equal to
- Choose a value: Write 6
Then click on +Add -> select Add row -> Change the operator And to Or
- Choose a value: provide the expression
dayOfWeek(variables('Start date'))- Operator: is equal to
- Choose a value: Write 0
6. Now, in the If yes part of the condition, we will Append the date as are weekends and count the weekend. For this, click on Add an action, and select Append to String variable action. Then, provide the below information.
- Name: Select Increment
- Value: Select the Start date variable
Now we will increment the variable; for this, click on Add an action, and select Increment variable action. Provide the information below:
- Name: Select the CountWeekend variable
- Value: Provide 1.
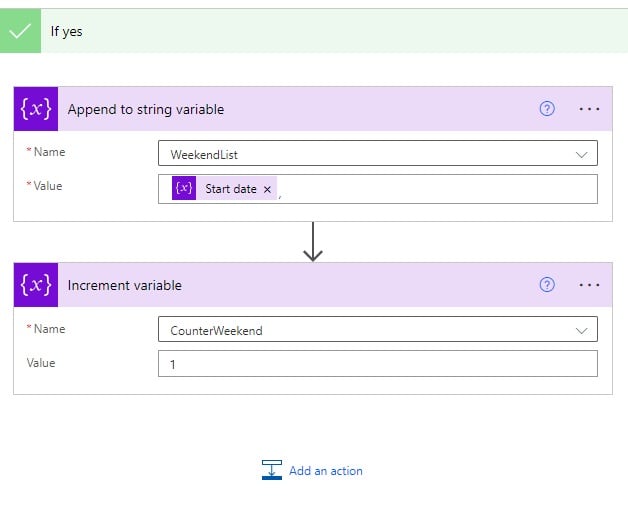
7. In the If no part of the condition, click on Add an action -> select Increment variable action. Provide the following:
- Name: Select CountWeekdays variable
- Value: Provide value as 1.
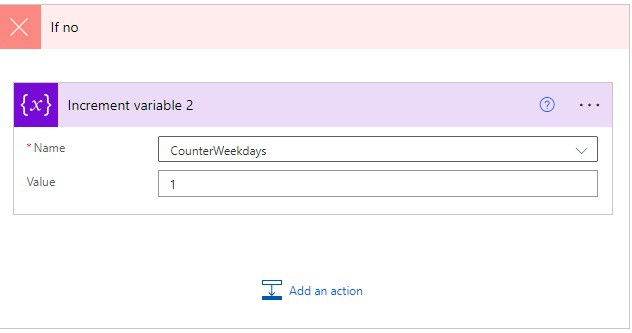
8. Outside the Condition Control, we will set the start date; for this, click on Add an action and select Set variable action. Provide the below information:
- Name: Select the CounterStartDate variable.
- Value: Provide the below expression:
addDays(variables('Start date'), 1)Next, we will assign the above variable to the start date variable; for this, click on Add an action -> select Set variable action. Then provide the below information:
- Name: Select the name as StartDate
- Value: Select the value as CounterStartDate.
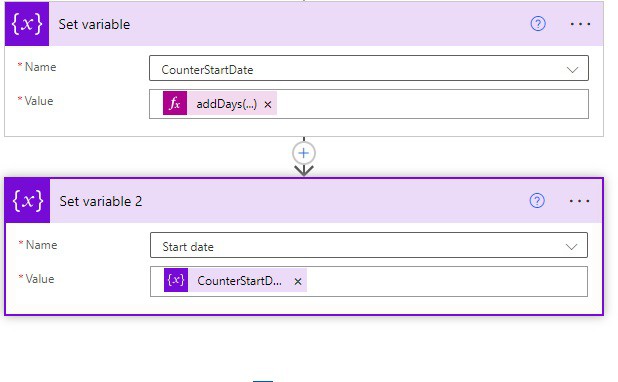
9. Now we will check whether the user selected half day or not; for this, click on +New step -> select Condition action. Then provide the below information:
- Choose a value: Select Half day from dynamic content
- Operator: is equal to
- Choose a value: Provide the expression:
True()
10. Now, if the condition is true, then we will calculate the total leave days by subtracting the half day. For this, in If yes part of the condition -> click on Add an action -> select Compose action.
Provide the below information:
- Inputs: Provide the below expression:
sub(variables('CounterWeekdays'),0.5)
11. Next, we will send an approval to the Team lead; for this, click on + New step -> select Start and Wait for an Approval action. Then Provide the information below:
- Approval type: Select Approval type as Approve/Reject -First to respond
- Title-Provide the title
- Assigned to – Provide the Team Lead email from dynamic content
- Details-Provide the details
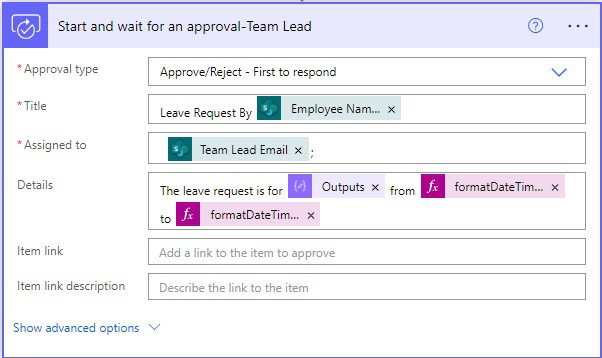
12: Next, we will check the Outcome of Approval; for this, click on Add an action and select Condition action. Provide the below information:
- Choose a value: Select Outcome from dynamic content
- Operator: is equal to
- Choose a value: Provide the value as Approve

13: Once the team lead approves the leave request, we will send the Approval request to the Manager; click on Add an action. Select Start and Wait for an Approval Action. Then Provide the information below:
- Approval type: Select Approval type as Approve/Reject -First to respond
- Title-Provide the title
- Assigned to – Provide the Manger email from dynamic content
- Details-Provide the details
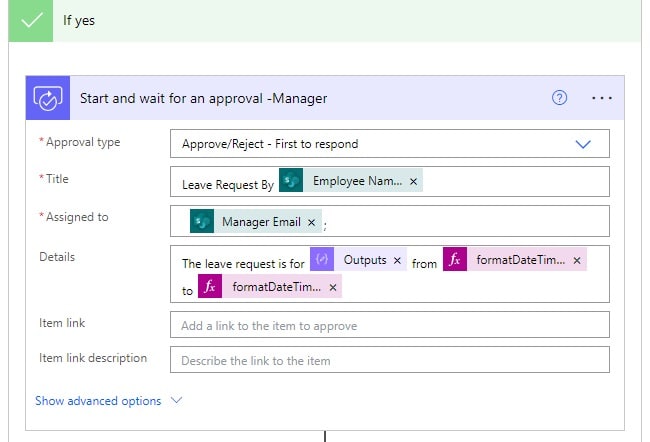
14. Next, we will check the outcome of manager approval, for this, click on Add an action -> select Condition action, then provide the below information.
- Choose a value: Select Outcome from dynamic content
- Operator: is equal to
- Choose a value: Write Approve

15. If the condition is true, then we will send an email to the Employee that your leave request is approved. For this, in the IF yes part, click on Add an action -> select Send an email(V2) action. Provide the information below:
- To: Provide the Employee email
- Subject: provide the Subject of an email
- Body: Provide the body of an email
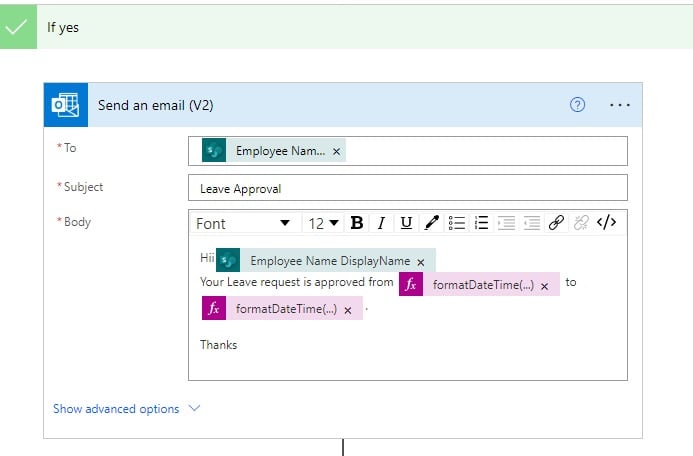
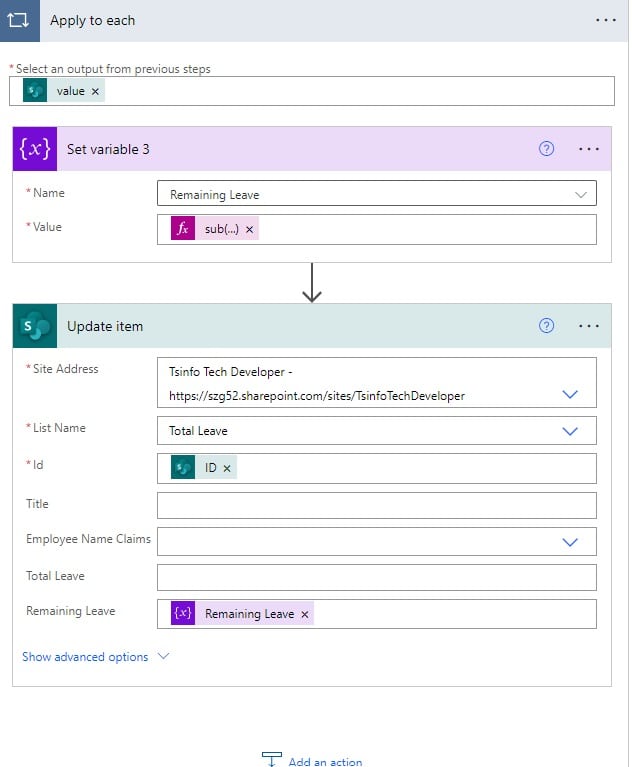
16. Next, we will update the remaining leave to the Total leave list in Sharepoint. For this, click on Add an action -> select Set variable action. Provide the information below
- Name: Select the Remaining leave variable.
- Value: Provide the below expression
sub(items('Apply_to_each')?['RemainingLeave'],outputs('Compose-total_leave_days'))After that, click on Add an action -> select Update item action. Provide the below information:
- Site address: Provide the Sharepoint site address
- List name: Provide the SharePoint list name
- Id: Provide the ID. This will automatically add Apply to each Action.
- Remaining Leave: Select the Remaining Leave variable
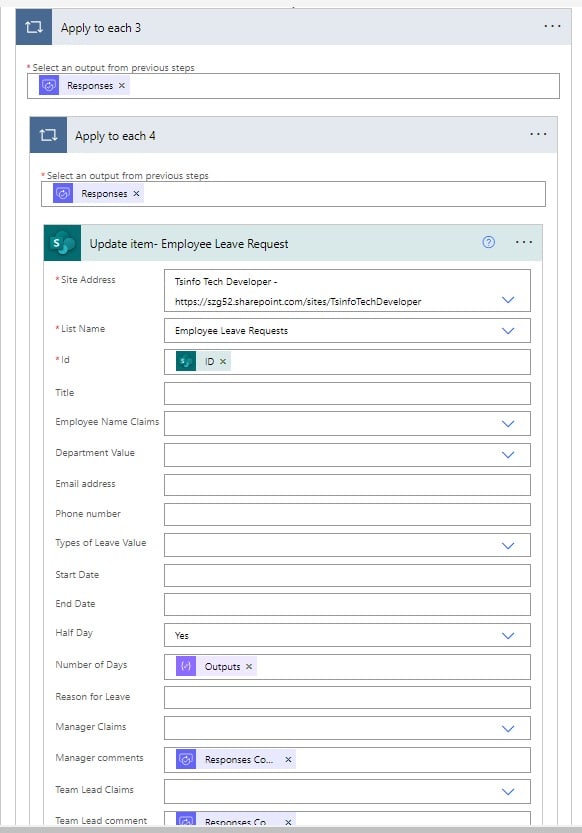
17. Then we will update the No of days leave and Team lead and Manager comments; for this, click on Add an action -> select Update item action.
Provide the below information:
- Site address: Provide the Sharepoint site address
- List name: provide the Sharepoint list name
- Id: Provide the Id
- Number of Days: Select the output of the compose
- Manager comments: Select Response comments from dynamic content. This will add Apply to each action automatically.
- Team Lead Comment: Select Response comments. This will add Apply to each action automatically.
- Approval Status: Select Approve
18. If the Team Lead Approved and the Manager doesn’t approve the Leave request, we will update the Approval status as Rejected. Also, we will send an email to employees if the leave request is rejected.
For this, in the If no part of the condition [Check Manager Approval] click on Add an action -> select Update item action. Then, provide the below information.
- Site address: Provide the Sharepoint site address
- List name: provide the Sharepoint list name
- Id: Provide the Id
- Number of Days: Select the output of the compose
- Manager comments: Select Response comments from dynamic content. This will add Apply to each action automatically
- Team Lead Comment: Select Response comments. This will add Apply to each action Automatically.
- Approval Status: Select Approve
Now we will send an email; for this, click on Add an action -> select Send an email (V2) action. Then provide the below information:
- To: Provide the employee email
- Subject: provide the Subject of an email
- Body: Provide the body of an email
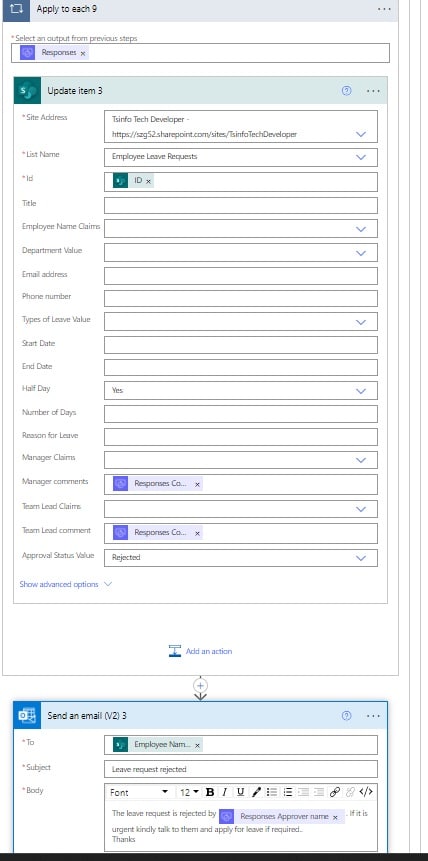
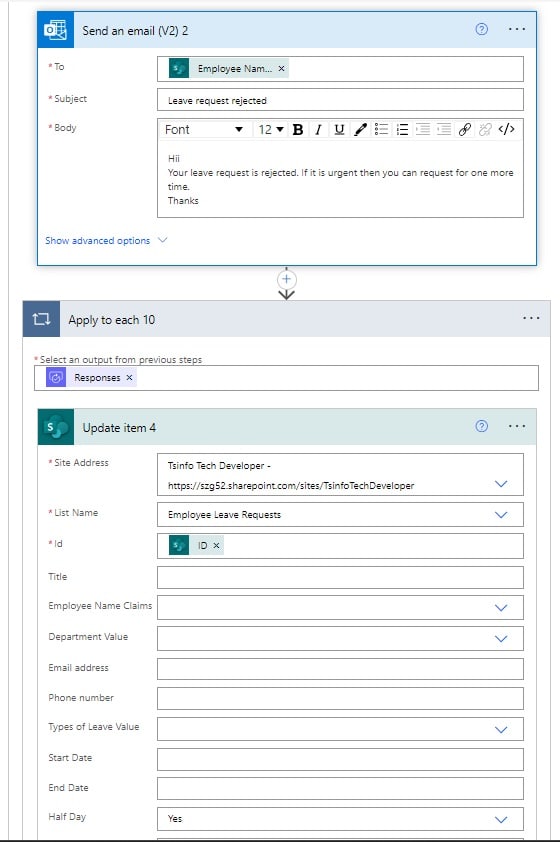
19. Similarly, if the Team lead doesn’t approve the request we will send a rejected email to the employee. Also, we will update the Approval status in the list as rejected.
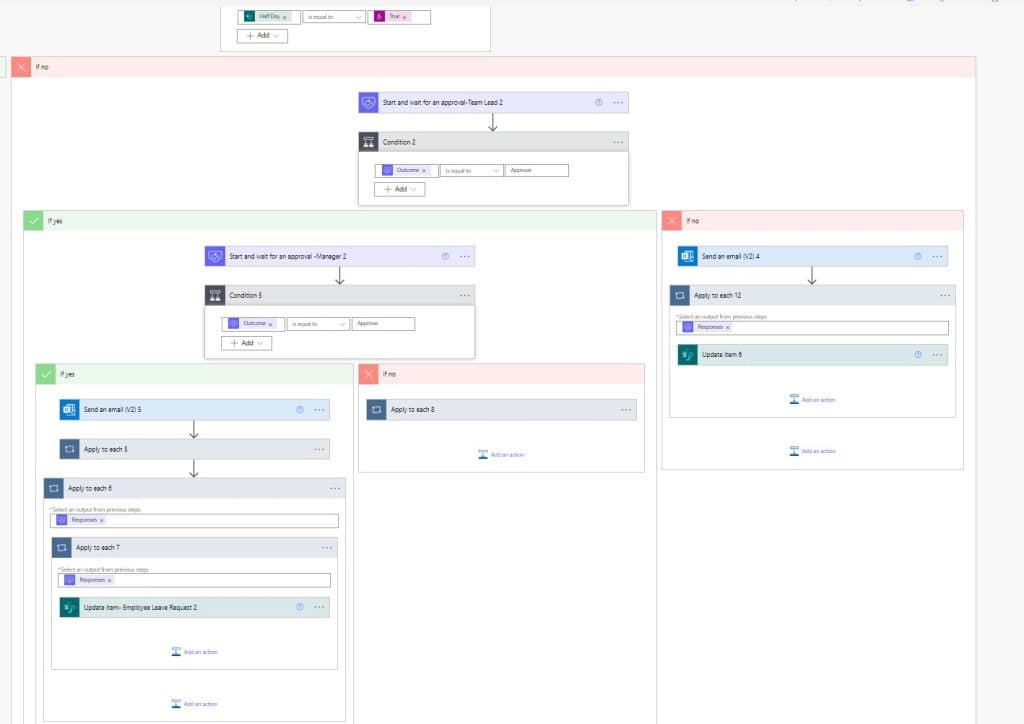
20. If the employee doesn’t select half day, then in Step 9, the condition becomes false. We will follow the same steps from 11 to 19. While updating the Number of days in the Employee Leave request list, we will choose the CountWeekdays variable.
21. Once you have added all the steps, click on Save and run the flow manually. Apply for leave request in the Employee leave request list.

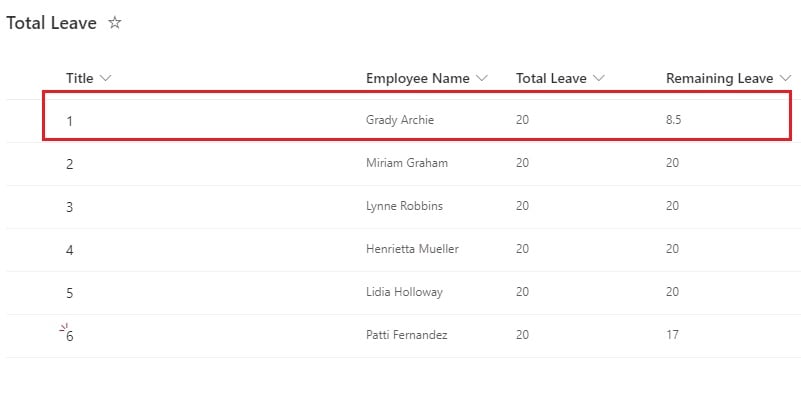
Once all the processes are completed and based on the approval, the item gets updated like below.

The remaining leave field in the Total leave list gets updated in Power Automate.
Also, employees will get an email like the one below.
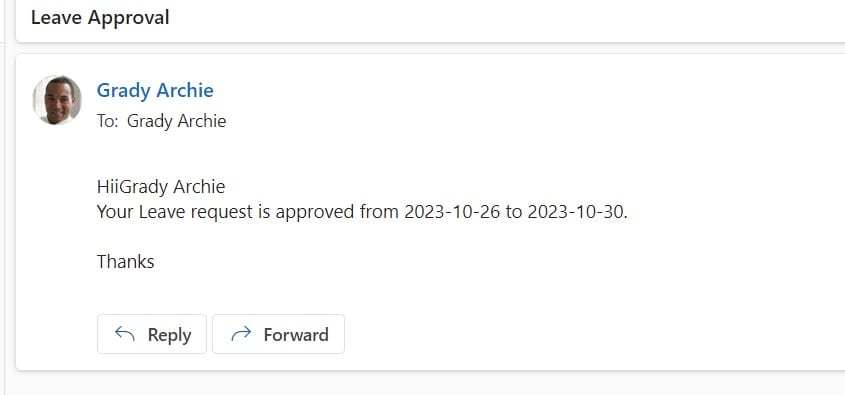
This is how we can create an Employee leave request workflow using Power Automate. Also, you can download the complete solution for the leave request approval workflow.
Conclusion
In this Power Automate tutorial, we saw how to create an approval flow for leave requests in Power Automate with the below functionalities:
- 2 levels of approvals i.e., Team lead and Manager Approvals
- half-day calculation in the flow
- We calculated the total leave for business days without including Weekends.
- Calculated balance Total leave.
You may also like the following tutorials:
- Create a Word Document from a SharePoint list item using Power Automate
- When an item is created in SharePoint list send approval and create item using Power Automate
- Move File from OneDrive to SharePoint using Power Automate
- How to delete all items from a SharePoint list using Power Automate?
I am Bijay a Microsoft MVP (10 times – My MVP Profile) in SharePoint and have more than 17 years of expertise in SharePoint Online Office 365, SharePoint subscription edition, and SharePoint 2019/2016/2013. Currently working in my own venture TSInfo Technologies a SharePoint development, consulting, and training company. I also run the popular SharePoint website EnjoySharePoint.com
Calculations is done on Total Leave while request have multiple cases like Annual, Sick, Maternity how we can add total days for each leave type and not group them in one section like total days? btw great article
hello sir,
how can we exclude holidays from applied leave ?
please advise.
how can we create a leaves app using dataverse in flows
I have imported this power automate with error:
1/ One or more resources didn’t import. See the error details to resolve the issues, and try importing again.
2/ One or more resources might have been skipped during the import. See the import details to find out which resources were created, updated or skipped.
3/ Import failed. To import this flow you’ll need to save it as a new flow first. Save as a new flow
Please assist!
Thanks you!
Hello I also want to create a flow where The leaves are automatically updated.
what I have a done is created a leave request form(Microsoft forms) and once the form is submitted it goes for approval with the manager and the approve or rejestion status is sent to employee via email.also I have created a list which conatins 3 columns employee name ,alloted leaves and balance leave.
Now what I want is if the manager approves the leave the balance leave columns should get updated .Also I have added a question in column where employee specify the exact count of leave apart from start and end date of leave
Flow is running but nothing is changing in the leave list. after get items in apply to each , I think the flow is running but not getting any output from that
Hi there, do u know why when i try to get the data from total leaves it keeps on prompting apply to each instead of just compose?
Kind regards,
Hello Andri,
I was running into the same issue as well and found this resource below very very helpful to avoid the dreaded “apply to each” container that gets put around the Total Leaves data compose connector.
source: https://pnp.github.io/blog/post/avoid-unnecessary-looping-apply-to-each-in-power-automate/
Create an expression: first(body(‘Get_items_Total_Leaves’)[‘value’])[‘TotalLeaves’]
This will allow you to compose the data without the apply to each. This expression can be used for just about all arrays that forcibly get added to the “apply to each” container
Hope this helps! I know I was struggling with this for many days and needed desperate help.
Hi, we currently have an existing leave flow. do you know how to create a flow that will calculate the monthly leave entitlement per year? eg. employee have 15 days leave annually, then calculate that 15 days to monthly and add it to the list.
Hi, Thank you for this, it’s very useful. When running the test, I am having issues with the filter query at the beginning. It’s coming back as being invalid. Not sure what I am doing wrong. Can you please help?
Column name is called Employee Name (names in the column are showing as Last name, First Name)
The Filter Query I typed:
Employee Name/EMail eq ‘varLoggedinUserEmail’
Error message:
The expression “Employee Name/EMail eq ‘there is an email address here'” is not valid. Creating query failed.
clientRequestId: fa3d8621-524a-4170-a2ed-c0d774bd2d6b
serviceRequestId: fa3d8621-524a-4170-a2ed-c0d774bd2d6b
Hi Bijay
Thanks for the article.
Please can you share the article link for how to design and integrate above in PowerApps?
Hi, This is really good. Can you help with the flow which can additionally help with the different types of leaves. Leave approval will depend on the leave balance against different types of leaves for an employee. Sick Leave, Casual Leave and Earned Leave.
I am getting the below error at do until
Unable to process template language expressions for action ‘Condition’ at line ‘0’ and column ‘0’: ‘In function ‘dayOfWeek’, the value provided for date time string ” was not valid. The datetime string must match ISO 8601 format.’.
input as below
“StartDate”: “2023-12-21”,
“EndDate”: “2023-12-22”,
“HalfDayLeave”: true,
“NumberofDays”: 1,
“Modified”: “2023-12-16T19:14:13Z”,
“Created”: “2023-12-16T19:14:13Z”,
Hi if there are a lot of employees means how… I mean like I’m developing this factory or hotel site means for internal use there are a lot of users will be here so in that case… For the total leave list in sharepoint i could not include all the employees name so how is there any suggestion like if the user first time using this create a new row with the user name and set default remaining leave balances… If already have name means no need to create a list just continue deduct the total remaining leave only after approved by 2 users.. Is it possible to do something like this