Expense reimbursement is a process where an organization repayment to employees for business-related expenses. These expenses will pay back to an employee based on expense Policies.
In this Power Automate solution, we will automate the process of expense reimbursement by using applications such as SharePoint List, Planner, and Microsoft Forms in Power Automate. In detail, we will see a complete guide on expense reimbursement and approval using Power Automate.
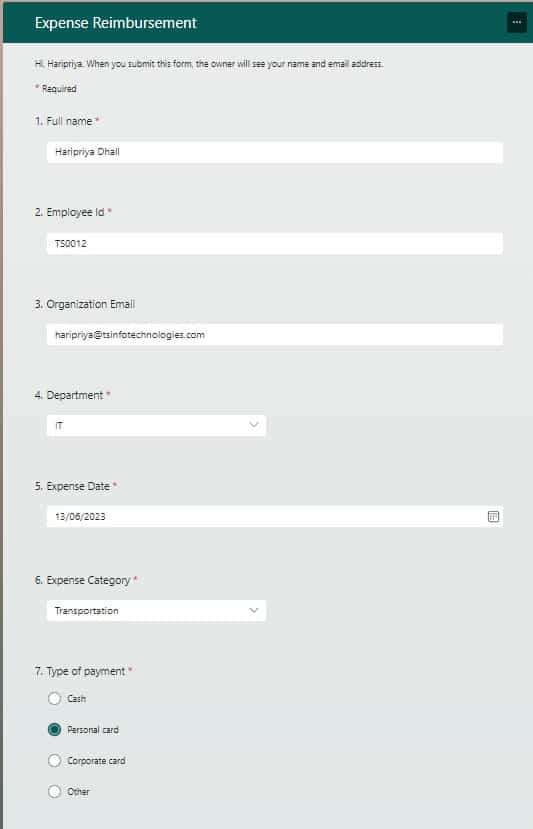
In Microsoft Form, the user will request the expense reimbursement. Whereas, Microsoft Form contains the below columns
| Field name | Type |
|---|---|
| Full name | Text |
| Employee Id | Text |
| Organizational email | Text |
| Department | Choice |
| Expense Date | Date |
| Expense Category | Choice |
| Type of payment | Choice |
| Amount of reimbursement | Number |
| Description | Text |
| Reciept | Upload File |
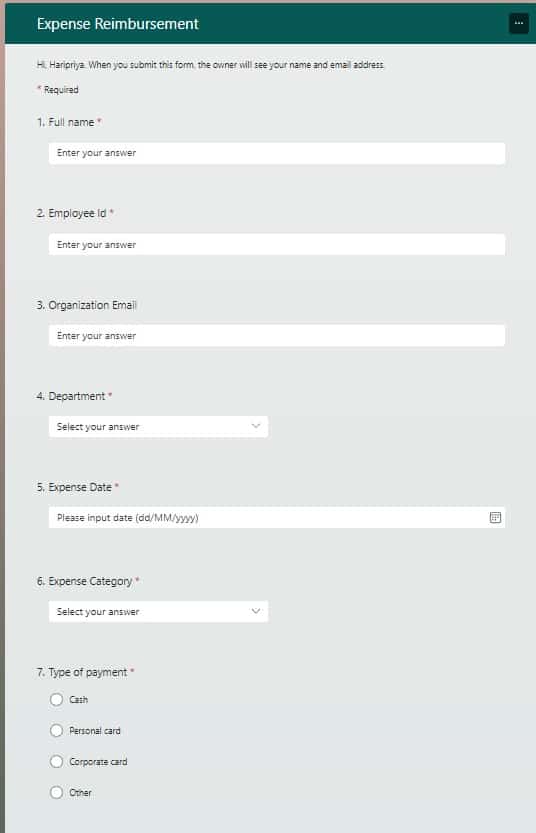
When a user submits the Form, the response gets stored in the SharePoint list, and the manager gets a request for approval. If the manager will approved it will go to the finance team else the rejected email go to the requestor/employee.
So the SharePoint list contains the below columns:
| Column name | Data type |
|---|---|
| Title (Employee Id) | Single line of text |
| Full name | Single line of text |
| Department | Choice |
| Expense Date | Date/time |
| Expense category | Choice |
| Payment mode | Choice |
| Amount requested | Currenncy |
| Description | Multiple line of text |
| Attachments | Attachments |
| Status | Choice |

If the manager approved and requests reimbursement go to the Finance team. They will get an email, and the reimbursement is added to the Planner as a task for the finance team. Based on the Progress status of the task in the planner, we will update the status of items in the SharePoint list, also we will send an email to request for updating about the request.
Also, you can refer to the flow diagram of the Power Automate flow.
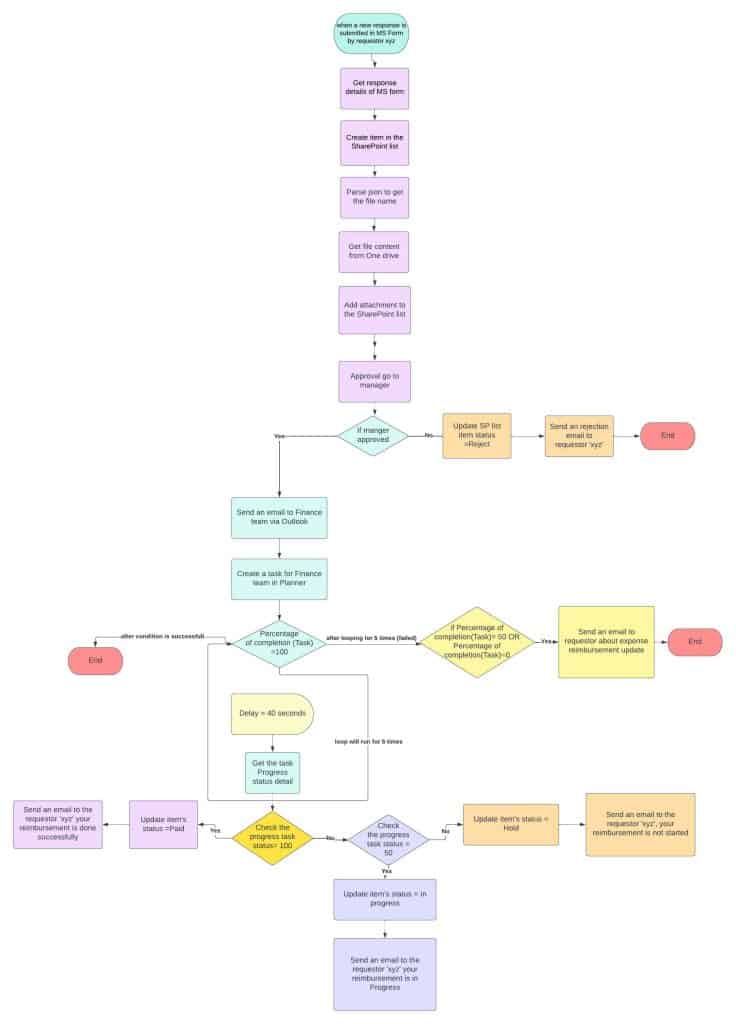
Now let’s see how to create a flow step by step to automate the expense reimbursement using Power Automate.
Expense Reimbursement and Approval using Power Automate
To create this expense reimbursement automation process, you must need to set up the Microsoft form and SharePoint list, as shown above.
Once you set up MS Form and SharePoint list, now we can create flow in Power Automate. So, we will divide this flow into 3 parts
- Get response data from Microsoft form
- Save request data to the SharePoint list
- Manager Approval process
- Workflow of the Finance team using a Planner
Get response data from Microsoft form
Logged in to Power Automate, and click on +Create -> select Automated Cloud Flow.
Then provide the flow name, and select the trigger action ‘When a new response is submitted’. Click on Create.
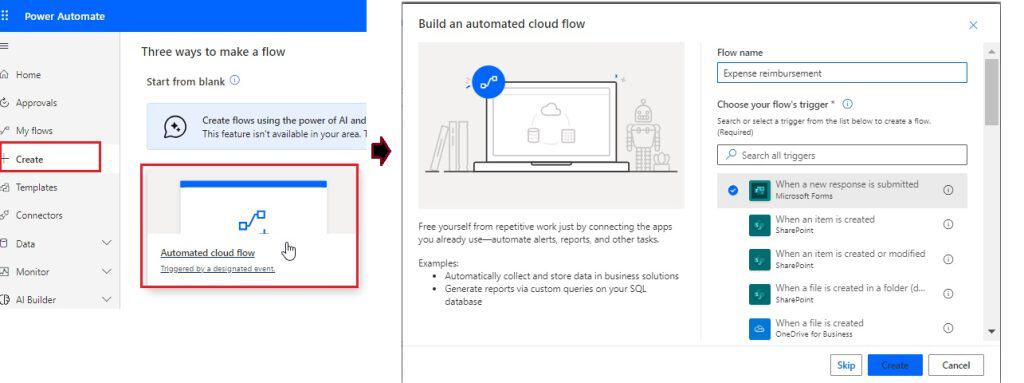
You can see the trigger action is added to the flow, now you can provide the below information.
- Form id: Select the Form id from the dropdown.

Now we will get the response details, so, click on the +New step -> Get response details action. Then provide the below information.
- Form id: Choose the Form id from the dropdown
- Response id: Select the response id from the dynamic content

Save request data to a SharePoint list
Here we will save the response from the Form to the SharePoint list. So, click on +New step -> select Create item action. Then provide the below information:
- Site address: Select the site address where list is created
- List name: Select the list name
- Title: Select the Employee Id from the dynamic content
- Full name claims: Select the Responder email from the dynamic content
- Department value: Select the department value from the dynamic content
- Expense Date: Select the expense date from the dynamic content
- Expense Category value: Select the expense category value from the dynamic content
- Payment mode value: Select the Types of payment from the dynamic content
- Amount requested: Select the Amount requested from the dynamic content
- Description: Select the Description from the dynamic content
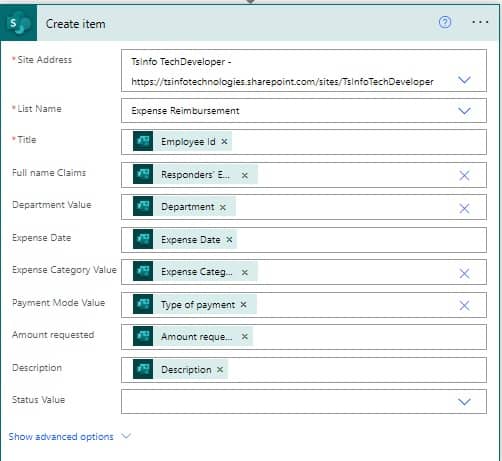
As if now we have created an item in the SharePoint list, but we didn’t add the Attachments i.e. Receipt to the SharePoint list. So, next, we will add an attachment to the SharePoint list.
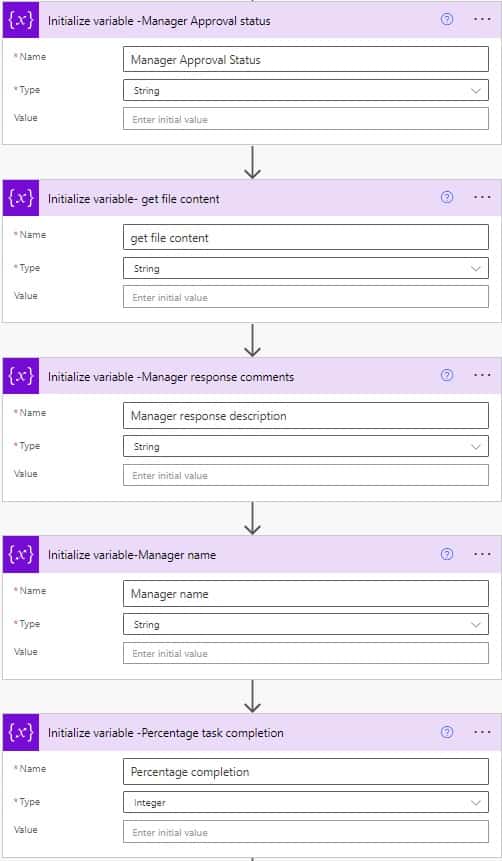
Before that add a +New step -> Select Initialize variable action, and initialize the below variable, with their data type. These variables are later required to store values like Manager Approval status, get file content, manager response comment, manager name, and percentage of task completion
| Variable name | Data type |
|---|---|
| Manager Approval status | String |
| get file content | String |
| manager response comment | String |
| manager name | String |
| percentage of task completion | Integer |
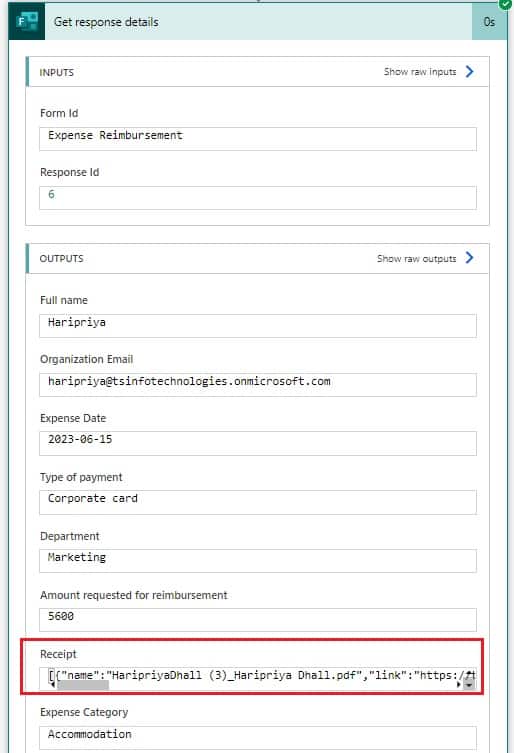
To get the file name of the Attachment (receipt), we will parse the output (Receipt) json code of Get response details.
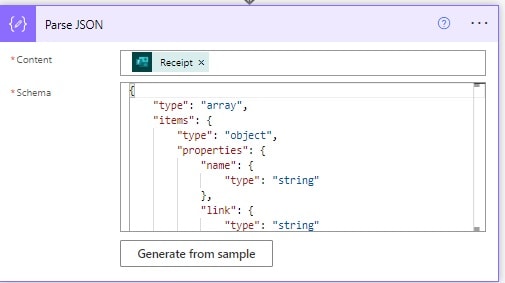
So, click on +New step -> select Parse json action, then provide the below information:
- Content: Select the Receipt from the dynamic content.
- Schema: To add schema click on Generate from the sample, and add the below json code. Click on Done.
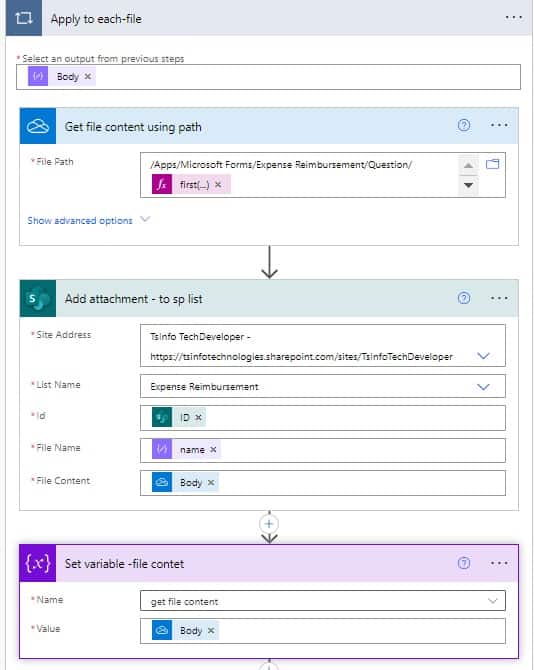
When we create a Microsoft form and want to upload a file, it will directly get saved in One Drive. To get the file content, click on the +New step -> select the ‘Get file content using path‘ action. Then write the below content:
- File path: Provide the file path like below and then get the first file name and add the below expression.
first(body('Parse_JSON'))?['name']Now we have the file name and file content, we will add the attachment file to the SharePoint list. So, click on +new step -> select Add attachment action. Then Provide the below information:
- Site Address: Select the site address from the drop-down
- List name: Select the list name from the dropdown
- Id: Select the id from the dynamic content
- File name: select the name from the dynamic content
- File content: select the file content from the dynamic content
Next, click on +new step -> select the Set variable action, then provide the below information:
- Name: Select Get file content from the dropdown
- Value: Select the body from the dynamic content
Manager Approval process
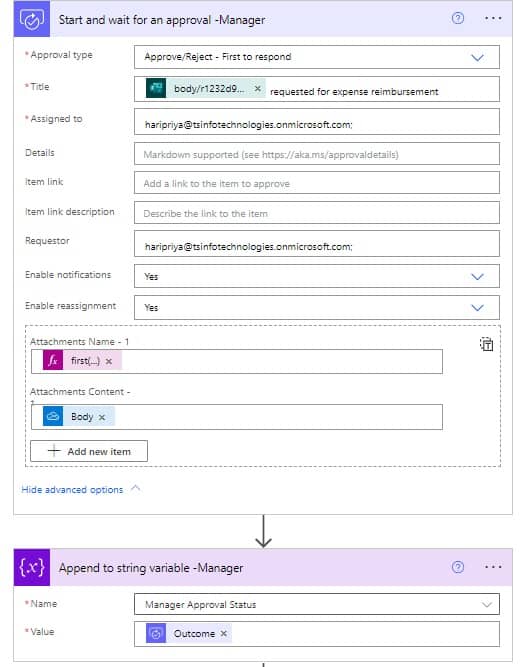
Now we have added the responses to the SharePoint list, next we will send an approval to the manager. So, click on the +New step -> select Start and Wait for an approval action. Then provide the below information:
- Approval type: Select the Approval type as ‘Approve/Reject – First to respond’ from the dropdown
- Title: Provide the title like below.
- Assigned to: Provide the manager’s email address.
Then click on Show Advanced options:
- Requestor: provide the requestor’s email (not mandatory)
- Attachment name: Provide the file name from the dynamic content
- Attachment content: Select the variable ‘get file content’ from the dynamic content.
Then click on the +New step, select Append to String variable action -> then provide the below information:
- Name: Select the Manager approval status from the dropdown
- Value: Select an outcome from the dynamic content.
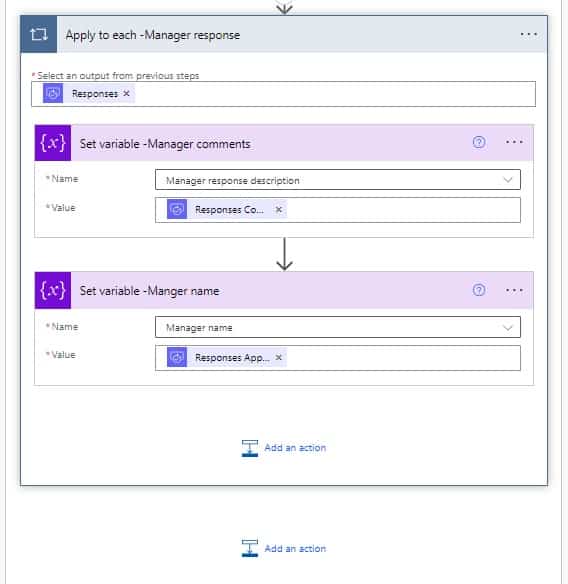
Next, click on the +New step -> select Set variable action to set the Manager comments. So, provide the below information:
- Name: Select the Manage response description from the dropdown.
- Value: Select the Response comments from the dynamic content. After adding a response comment it will add Apply to each action automatically.
Then click on + Add an action -> select Set variable action -> then provide the below information:
- Name: Select the Manager name from the dropdown.
- Value: Select the Responses Approval Name from the dynamic content.
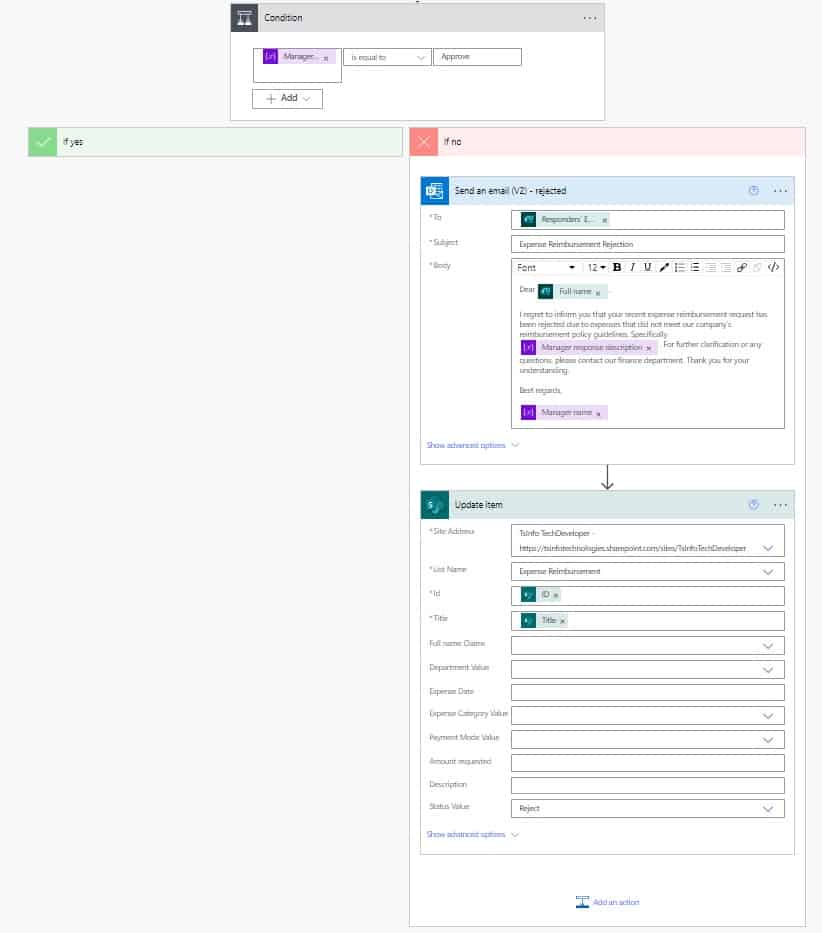
Next, we will check the Approval status, so, click on Condition action, then provide the below information:
- Choose a value: Select the Manager Approval status variable from the dynamic content.
- Operator: Choose is equal to from the dropdown
- Choose a value: Write ‘Approve’ as a value
If the condition is true, i.e. manager approved, it will go to the Finance team. Else the rejection email will go to the requestor and the item is updated to a reject.
In the if No part of the condition, click on Add an action – select ‘Send an email (V2)‘. And provide the below information:
- To: Provide the requestor email from the dynamic content.
- Subject: Provide the subject of an email
- Body: provide the body of an email like below.
Then click on Add an action and select ‘Update item‘ and provide the below information:
- Site address: Select the site address from the dropdown
- List name: Select the list name from the dropdown
- Id: Provide the id from the dynamic content
- Title: Select the title from the dynamic content
- Status value: Select the status as Reject from the dynamic content.
Workflow of the Finance team using a Planner
Once the manager is approved, we will send an email to the Finance team and create a task for the finance team. Based on the task progress by the finance team we will update the status in the SharePoint list, and also update the status to the requestor by sending an email.
So, in the If yes part of the condition, click on Add an action -> select Send an email(V2) action. Then provide the below information:
- To: Provide the requestor email from the dynamic content.
- Subject: Provide the subject of an email
- Body: provide the body of an email like below.
Next, we will create a task in the planner for the finance team, so click on Add an action -> select ‘Create a task‘ -Planner action. Then provide the below information:
- Group id: Select the task from the dropdown
- Plan id: select the plan id from the dropdown
- Title: Select the Full name from the dynamic content
- Bucket id: Select To do from the drop-down
- Start Date Time: Provide the below expression:
formatDateTime(utcNow(),'yyyy-MM-dd') - Due Date Time: provide the below expression:
addDays(utcNow(),6,'yyyy-MM-dd')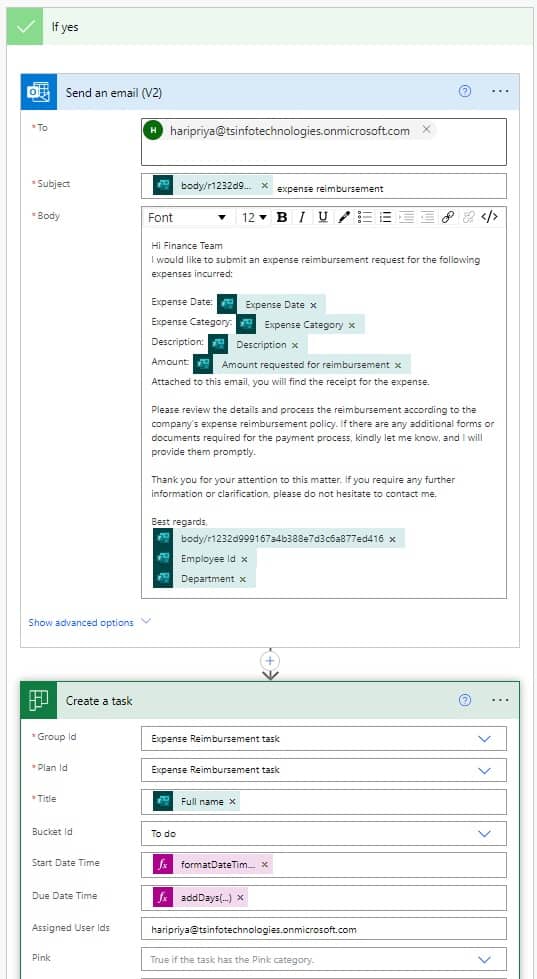
Next, we will loop through the task to get the progress status. In Planner progress status is completed(100%), In progress(50%), and Not started (0%).
So, click on the +Add an action -> select Do until action Then provide the below information:
- Choose a value: Select the Percentage completion variable from the dynamic content.
- Operator: Choose is equal to from the dropdown
- Choose a value: Write ‘100’ as a value
Then click on the Change limits link, and set the count as 10 else you can set the timer.
- Count: Set the count as 15
After that click on Add an action in Do-until-control action -> select Delay action and provide the below information:
- Count: Set count for 2
- Unit: Set unit as days
Then click on Add an action inside Do until action, and select ‘Get a task‘ action. Then provide the below information:
Task id: Select id from the dynamic content.
Next, click on Add an action (Do until) -> Set variable action. Provide the below information:
- Name: Select Percentage of completion from the dropdown
- Value: Select Percentage-Get task from the dynamic content
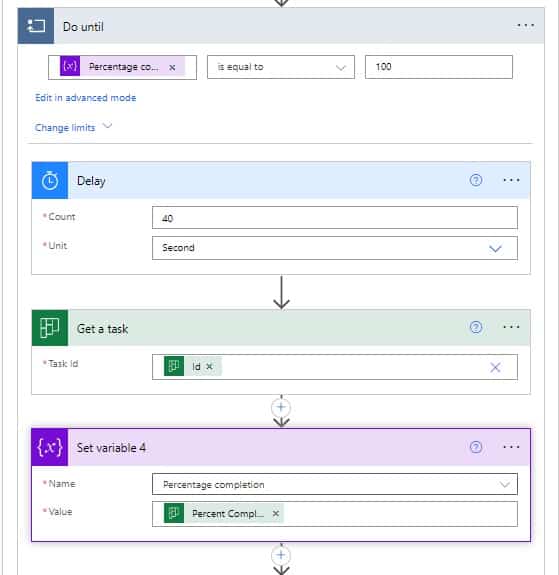
Next, we will check the task status based on that we will Update item in SP List as well as the requestor. So, click on Add an action, and select Condition action. Then provide the below information:
- Choose a value: Select the Percentage completion variable from the dynamic content.
- Operator: Choose is equal to from the dropdown
- Choose a value: Write ‘100’ as a value
In the if yes part of the condition, click on add an action -> select Update item action. Then provide the below information:
- Site address: Select or provide the Site address
- List name: Select Expense reimbursement from the dropdown
- Id: Select Id from the dynamic content
- Title: Select the title from the dynamic content.
- Status Value: Select the status value as Paid.
Then click on Add an action -> select Send an Email (V2) action. Then provide the below information:
- To: Provide the form responder email from the dynamic content
- Subject: Provide the subject of the email like below.
- Body: Provide the body of the email like below.
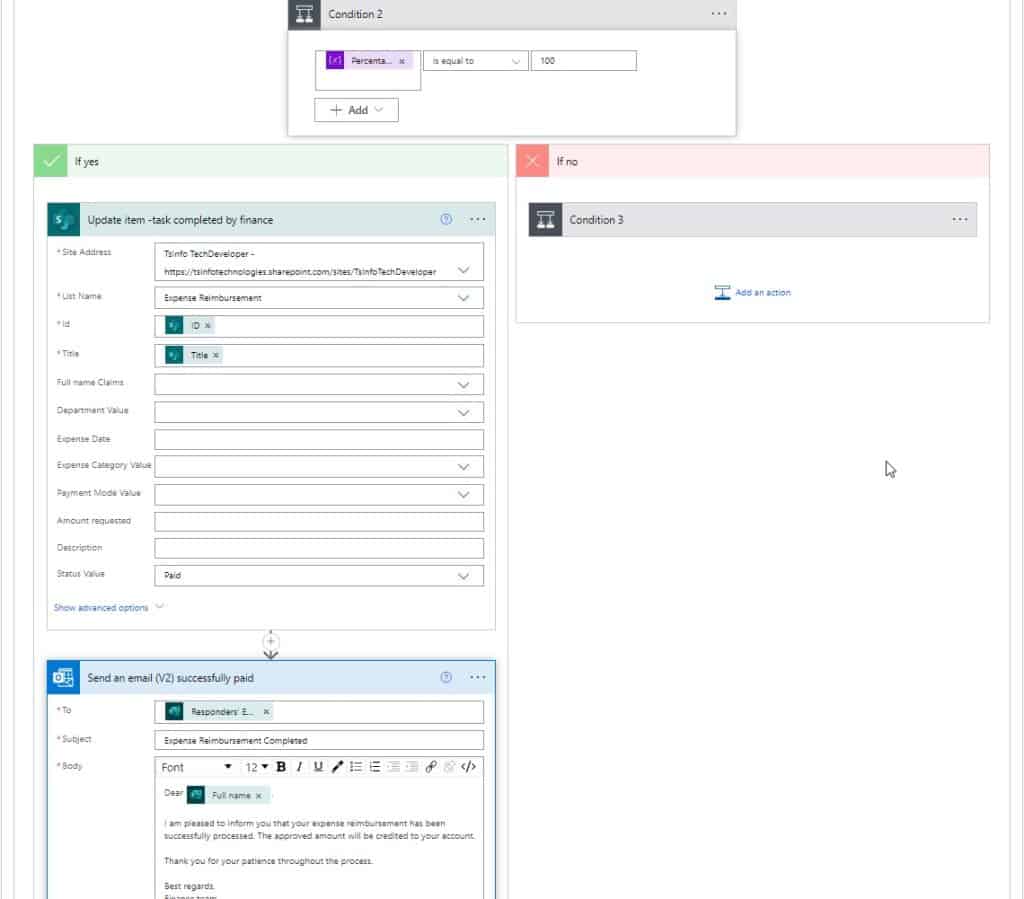
Next, in the If No part of the condition, click on Add an action -> select Condition action. Then provide the below information:
- Choose a value: Select the Percentage completion variable from the dynamic content.
- Operator: Choose is equal to from the dropdown
- Choose a value: Write ’50’ as a value
Then in the If yes part of the condition, click on add an action -> select Update item action. Then provide the below information:
- Site address: Select or provide the Site address
- List name: Select Expense reimbursement from the dropdown
- Id: Select Id from the dynamic content
- Title: Select the title from the dynamic content.
- Status Value: Select the status value as In Progress.
Then click on Add an action -> select Send an Email (V2) action. Then provide the below information:
- To: Provide the form responder email from the dynamic content
- Subject: Provide the subject of the email like below.
- Body: Provide the body of the email like below.
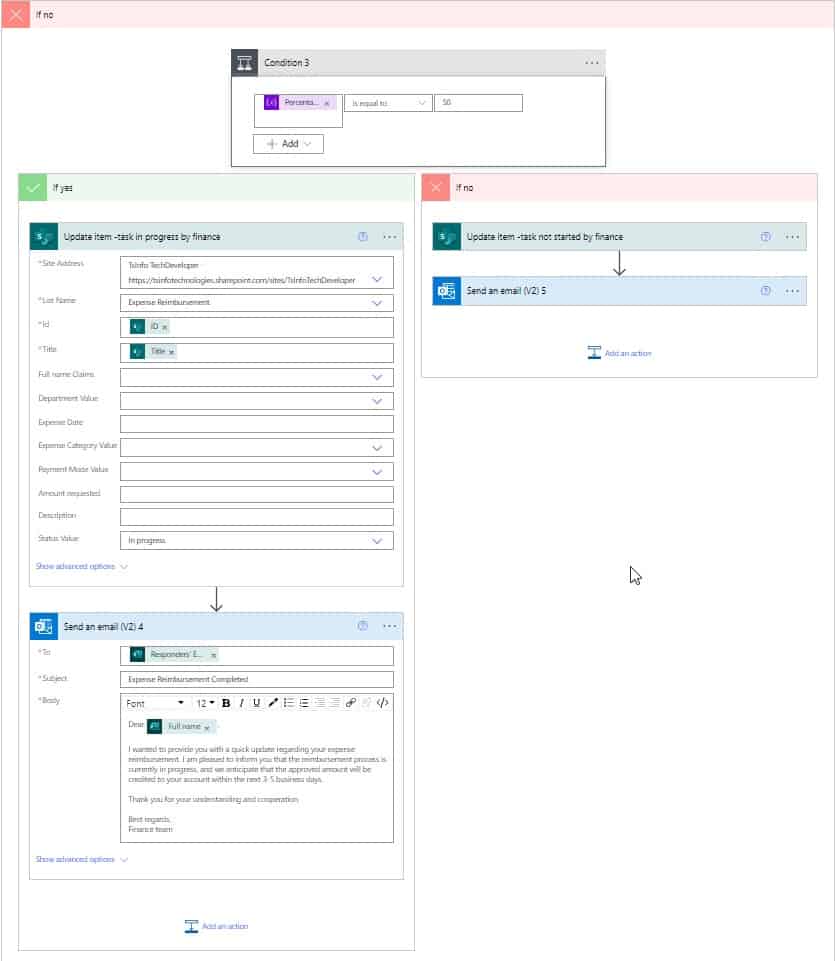
And in the If No part of the condition, click on Add an action -> select Update item action. Then provide the below information:
- Site address: Select or provide the Site address
- List name: Select Expense reimbursement from the dropdown
- Id: Select Id from the dynamic content
- Title: Select the title from the dynamic content.
- Status Value: Select the status value as Hold.
Then click on Add an action -> select Send an Email (V2) action. Then provide the below information:
- To: Provide the form responder email from the dynamic content
- Subject: Provide the subject of the email like below.
- Body: Provide the body of the email like below.
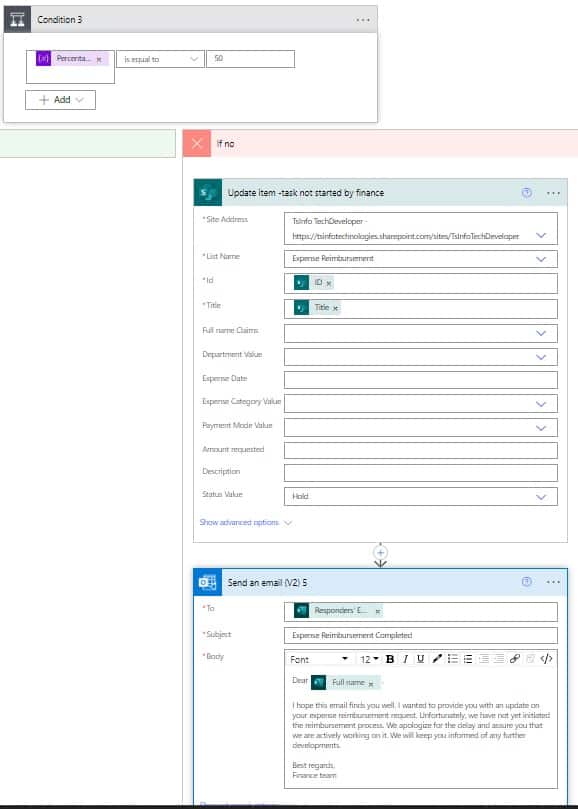
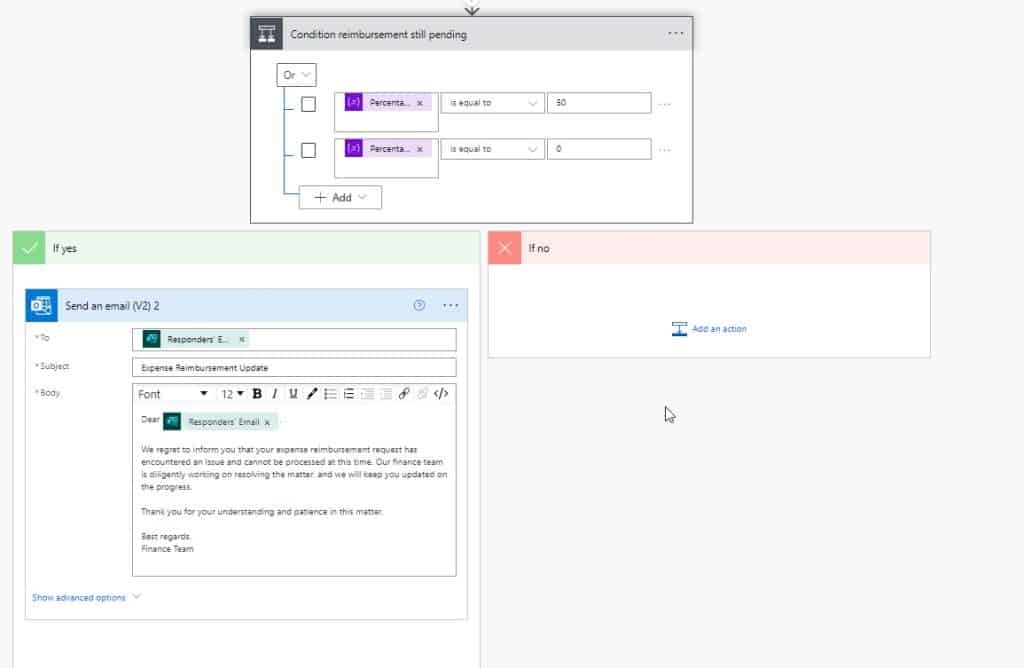
If the reimbursement is still pending, then we will send an updation email to the requestor. So click on the +New step -> select Condition action. Then provide the below information:
- Choose a value: Select the Percentage completion variable from the dynamic content.
- Operator: Choose is equal to from the dropdown
- Choose a value: Write ’50’ as a value
Then click on Add button -> select Add row button -> Change And operator to Or operator. Then provide the below information:
- Choose a value: Select the Percentage completion variable from the dynamic content.
- Operator: Choose is equal to from the dropdown
- Choose a value: Write ‘0’ as a value
In the If yes part of the condition, click on Add an action -> Send an email V2 action. Then provide the below information.
- To: Provide the form responder email from the dynamic content
- Subject: Provide the subject of the email like below.
- Body: Provide the body of the email like below.
Now our flow is ready, we can test the flow by submitting the request in the Microsoft form.
Run the Flow
To test the Flow click on the Test icon -> Select Manually -> click on Test. Next, fill out the Microsoft form and submit it.
Next, the manager will get an approval request in Teams as well as Outlook. Once you approved the finance team gets an email. Also in the planner, the task gets added like the below screenshot, then change the progress status to check the flow. Here I have set the Progress as Completed.

You can see your Flow ran successfully and the status of the item changed to Paid.

This is how we can create an automated cloud flow that will automate the expense reimbursement using Power Automate.
Conclusion
In this Power Automate solution, we saw expense reimbursement and approval using Power Automate.
You may also like:
- How to Create SharePoint Group using Power Automate?
- Power Automate Exception handling using Try Catch Block
- Get Dataverse Created by in Power Automate
- Update a Row in Dataverse Using Power Automate
I am Bijay a Microsoft MVP (10 times – My MVP Profile) in SharePoint and have more than 17 years of expertise in SharePoint Online Office 365, SharePoint subscription edition, and SharePoint 2019/2016/2013. Currently working in my own venture TSInfo Technologies a SharePoint development, consulting, and training company. I also run the popular SharePoint website EnjoySharePoint.com