In this Power Automate tutorial, we will see how to handle exceptions using Try Catch Block in Power Automate or Microsoft Flow. We will see Power Automate Exception handling using Try Catch.
To see how to handle errors in Power Automate, we will take an example, where we will create a Microsoft Flow, that will get the data from Excel and create items in the SharePoint list.
After running the flow, if there will be any error, in any action used in a flow, to track the error we will create a try-catch block by using the ‘Scope‘ action and functionality ‘Configure run after‘.
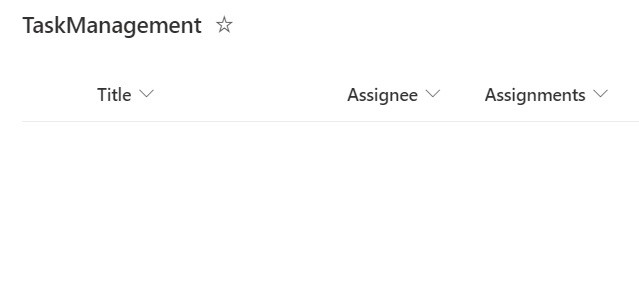
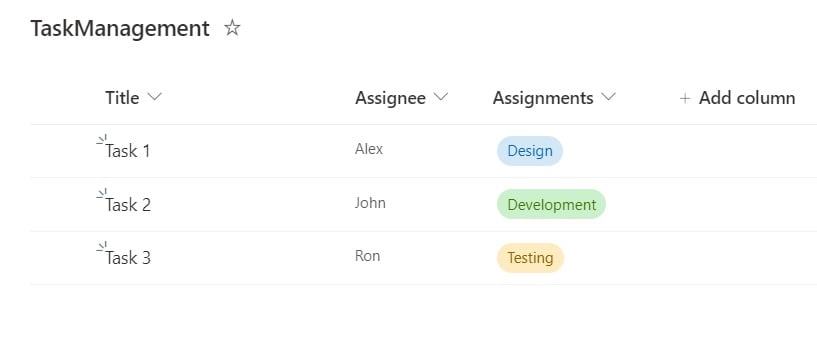
In this example, we are going to use Task Management as a SharePoint list, which contains three columns:
- Title- Single line of text.
- Assignee: Single line of text
- Assignments: Choice
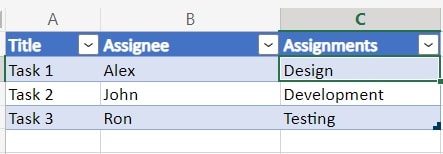
We will use the below Excel workbook which contains the same 3 columns as the SharePoint list.
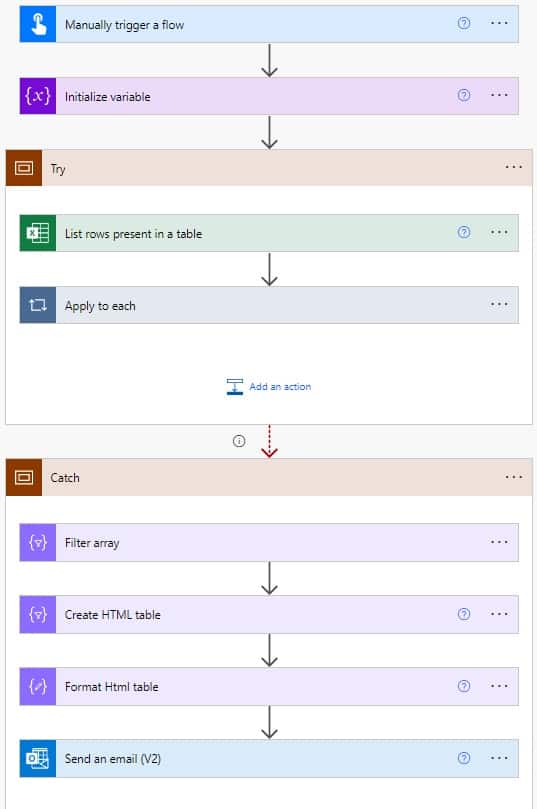
And we are going to create the below flow where we can handle the exception when the error occurred using the try-catch block.
Let’s see how we can create flow in Power Automate.
Power Automate Exception handling using Try Catch Block
Here we will create a flow that will handle exceptions using the Try Catch block and notify us in Outlook using Power Automate.
To create the flow in Power Automate, follow the below steps:
Step 1: Now we will create a flow that will manually trigger, with a button click in Power Automate, and it will create an item in the SharePoint list from Excel.
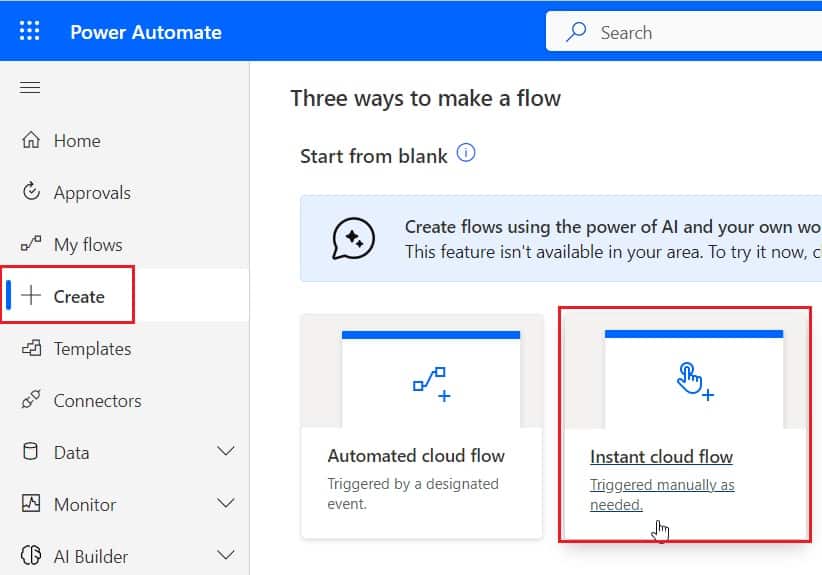
So, Login to Power Automate, click on the +Create icon, from the navigation menu, and then select ‘Instant cloud flow‘.
Next, provide the Flow name and then select the trigger as Manually trigger a flow. Click on Create button
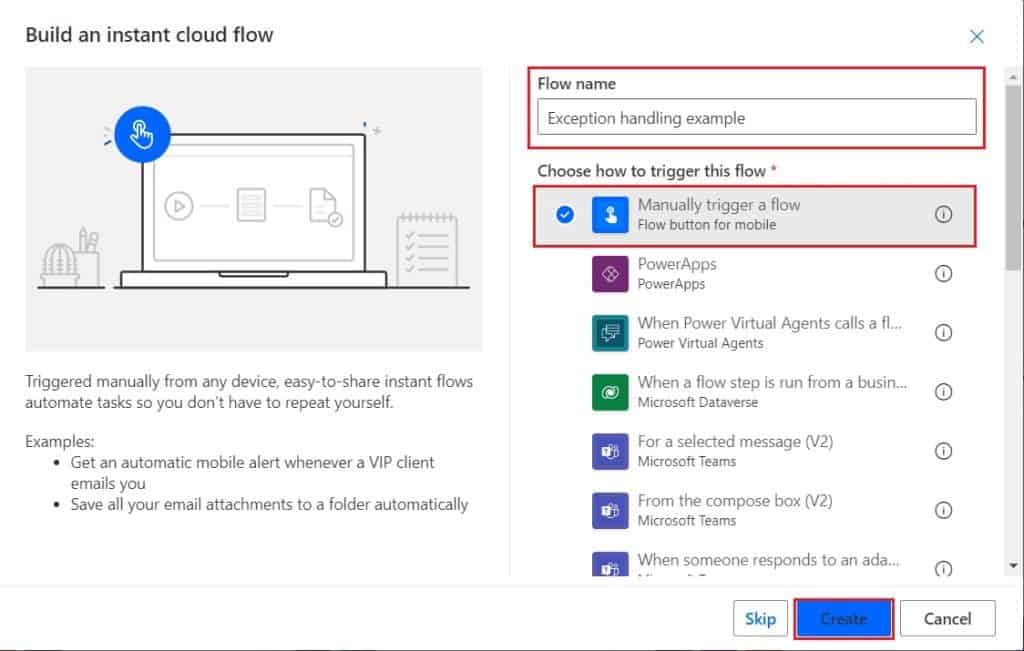
Now you can see Flow get created with the triggered action ‘Manually trigger flow‘.

Step 2: We will initialize the string variable, which will use later to store the Assignments value. So click on the +Next step. Select Initialize Variable action and then provide the below information.
- Name: provide the variable name.
- Type: select type as String

Step 3: Now we add the Scope action, inside that we will add all the actions that will read the data and create items in the SharePoint list.
So, click on the +Next step and select Scope action and you can see the Scope action is added to the flow.
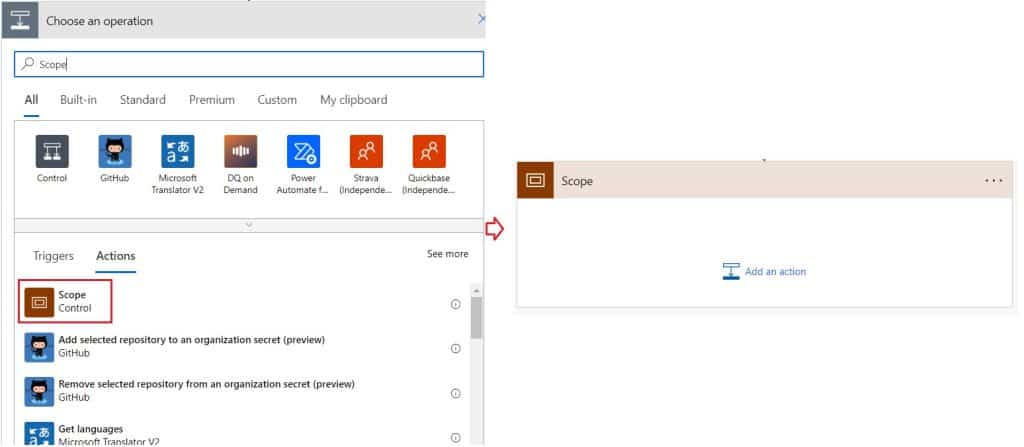
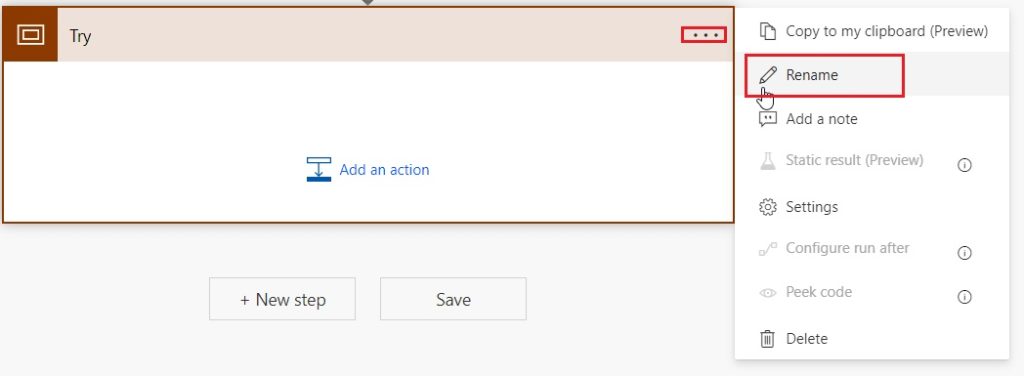
Now we will rename the Scope action to Try, so, click on the More icon(…) and then click on Rename.
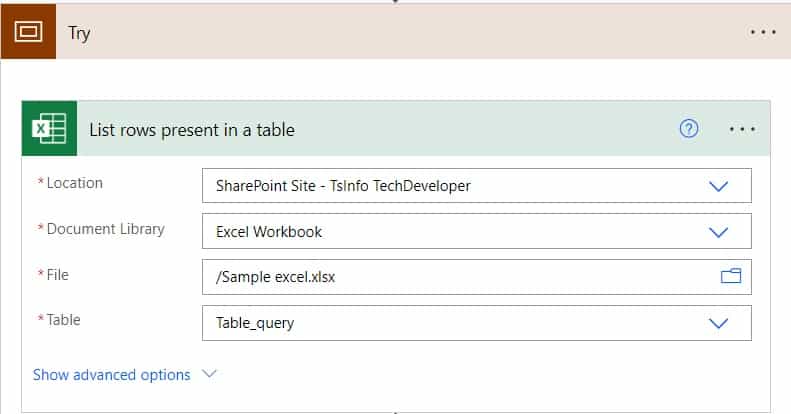
Step 4: Now we will get the data from Excel, so for this, we will add the action ‘List rows present in a table’.
So click on ‘Add an action‘ inside the Scope block (Try), and then select the action ‘List rows present in a table’. Then provide the below information:
- Location: Provide the location where the Excel file is located.
- Document Library: Provide the library where the Excel file is located.
- File: Select the Excel file from which you want to create the item in the SharePoint list
- Table: Select the table from the Excel workbook.
Step 5: To read each row in Excel, we are going to use the ‘Apply to each’ action.
So, click on the ‘+Add an action‘ and then select ‘Apply to each‘. Then provide the below information:
- Select an output from previous steps: select ‘ value'(List rows present in a table) from the dynamic content.
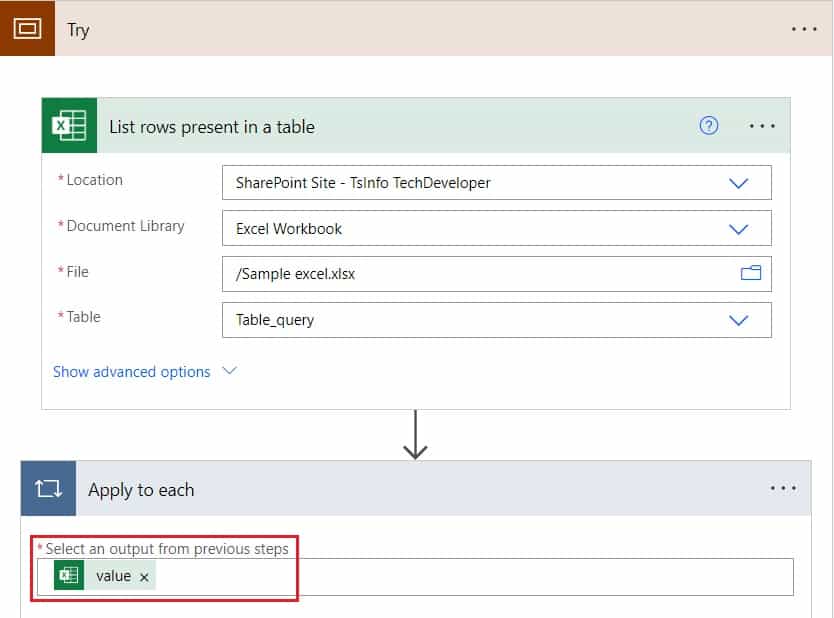
Step 6: Next we will set the variable with the value of assignments, so this value we will use while creating items in the SharePoint list.
So, click on Add an action, inside the ‘Apply to each’ action and then select the Set variable action. then provide the below information.
- Name: Select the name of the variable(Assignments).
- Value: Select the Assignments(List rows present in a table) from the Dynamic content.
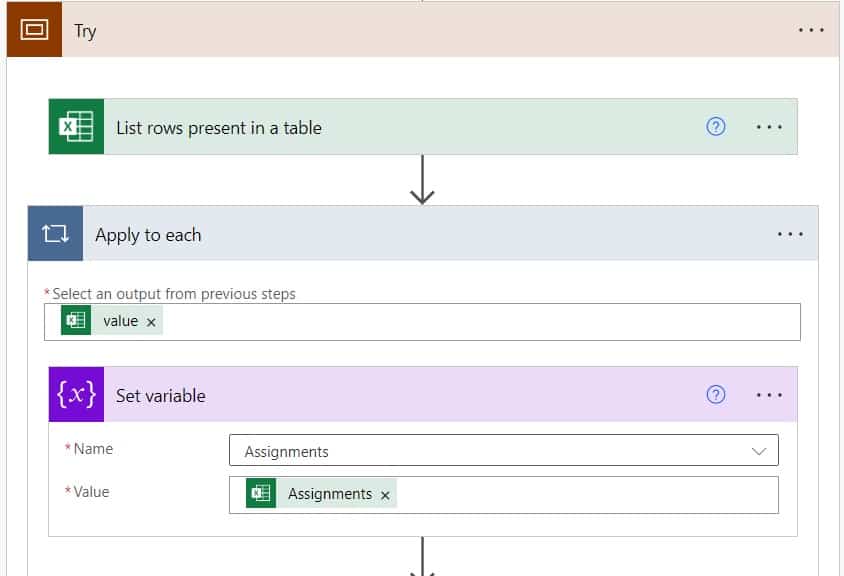
Step 7: Now we will create an item in the SharePoint list, for this we will select the action as ‘Create item’. For this, click on ‘Add an action‘, and then select ‘Create item‘. Then provide the below information:
- Site address: Select the site address of the List
- List name: Select the list where you want to create an item
- Title: Select Title(List rows present in a table) from the dynamic content
- Assignee: Select Assignee(List rows present in a table) from the dynamic content
- Assignments: In this click on the dropdown -> select custom value -> select Assignments(variable) from the dynamic content.
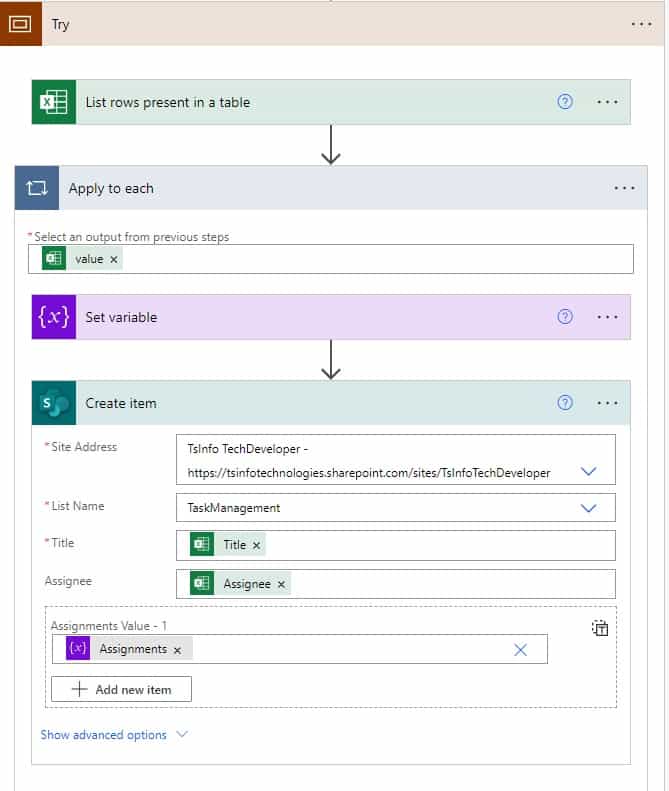
Now our Try block is ready, to handle and get the error message, if any error occurs in the Try block, for this we need to create a catch block.
Step 8: Now we will create a Catch block to handle the error, by using the functionality ‘Configure run after’.
So click on the +Next step, then select the ‘Scope‘ action and rename it to ‘Catch‘ block.
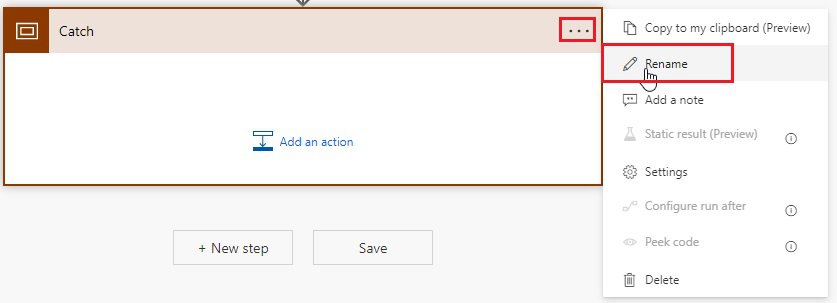
Now we will use the functionality ‘ Configure run after’, to handle exceptions in the Try block.
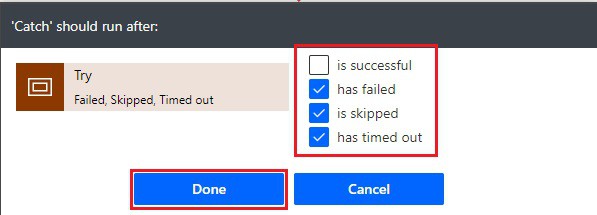
Configure run after in Power Automate is a functionality, which allows you to do certain tasks after the action is successful or failed. In this case, if the Try block action is failed, skipped, and timeout then only the Catch block action will run and notify which action is failed.
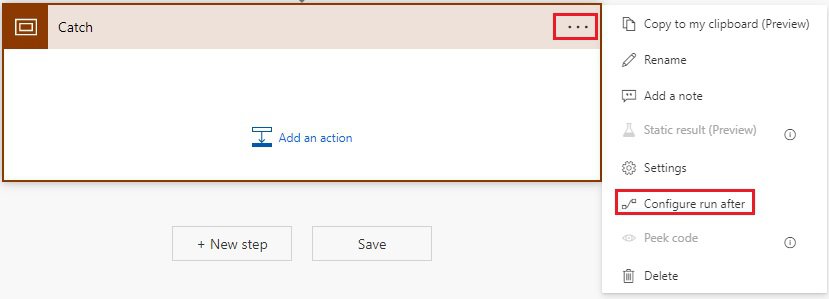
So click on the More icon(…) -> click on ‘Configure run after‘, as you can see in the below image.
Now you can see the below window ‘Catch’ should run after, here select ‘ has failed, is skipped, and has timed out‘. Then click on Done.
Step 9: To get the details of what happened to the action inside the Try block, for this we will use the ‘Filter array’ action.
So, click on the Add an action -> select Filter array action. Then provide the below information:
- From: In this provide the below expression:
result('Try')- To add the condition, click on ‘Edit in advance mode‘ and then provide the below expression:
@or(equals(item()?['Status'], 'Failed'), or(equals(item()?['Status'], 'Skipped'), equals(item()?['Status'], 'TimedOut')))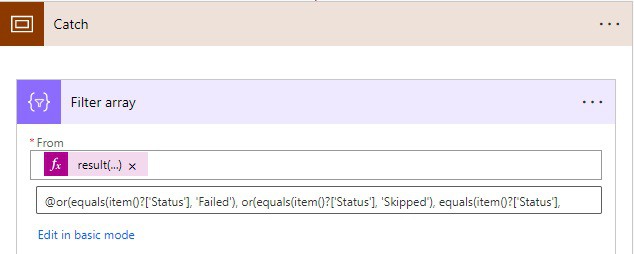
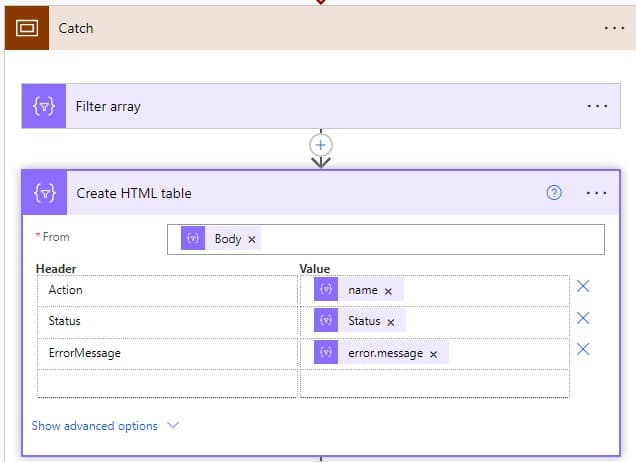
Step 10: Now we will create HTML table to get the error message, for the action that is failed or skipped or timed out, then the status of the action and error message if the action failed.
So here click on Add an action, -> select Create HTML Table -> then provide the below information:
- From: select the Body(Filter array) from the dynamic content
- Header: In this, provide the below information:
| Action | @item()?[‘name’] |
| Status | @item()?[‘Status’] |
| ErrorMessage | @item()?[‘error’]?[‘message’] |
Step 11: Now we will format the HTML table, so for this click on Add an action -> select compose action -> rename it to Format Html table.
Then provide the below information:
- Inputs: provide the below expression to apply CSS to the HTML table.
replace(body('Create_HTML_table'), '<table>', '<table border="3">')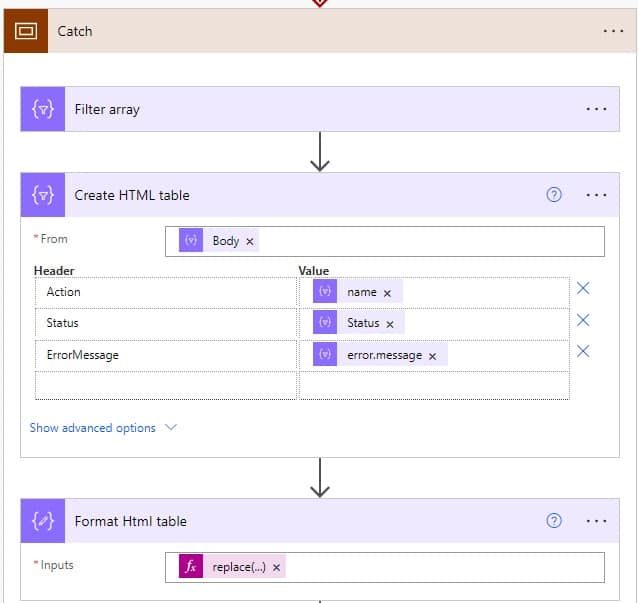
Step 12: Now we will send an email of error details to the flow owner, so, for this, click on Add an action -> select Send an email(V2). Then provide the below information:
- To: Provide the email of the receiver, who will receive the error details.
- Subject: Provide the subject of the email
- Body: In the body we will add the Html table, as well we will provide the URL of the flow, so the user can come back to the flow directly from email, to check the error. So click on this’ </>’ to enable the HTML table, and provide the below information: replace’expression’ with the below expression.
<p>@{outputs('Format_Html_table')}<br>
<br>
</p>
<a href='expression'>Check Flow Run </a>

//expression =concat('https://make.powerautomate.com/environments/Default-f0e4273f-10c1-4551-a494-977ebeb5b5fa/flows/764a1599-3405-4323-a6e8-c3df7ec44858?backUrl=%2Fenvironments%2FDefault-f0e4273f-10c1-4551-a494-977ebeb5b5fa%2Fflows%2F764a1599-3405-4323-a6e8-c3df7ec44858%2Fdetails', workflow()?['tags']['environmentName'], '/flows/', workflow()?['name'], '/runs/', workflow()?['run']['name'])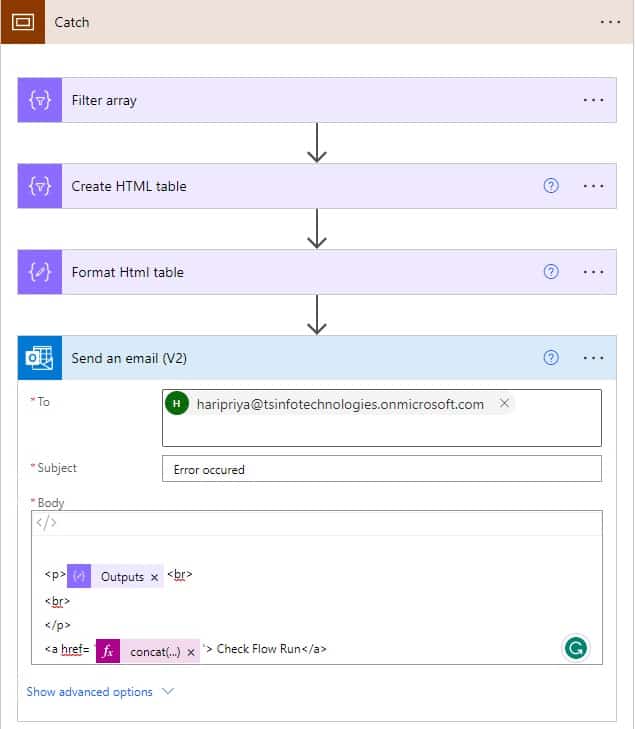
Now our catch block is ready, so it’s time to test the flow, whether it is working perfectly or not.
Step 13: Now our flow is ready, we will run the flow and will check the flow in two scenarios:
- When flow runs successfully
- When flow get failed
When flow runs successfully
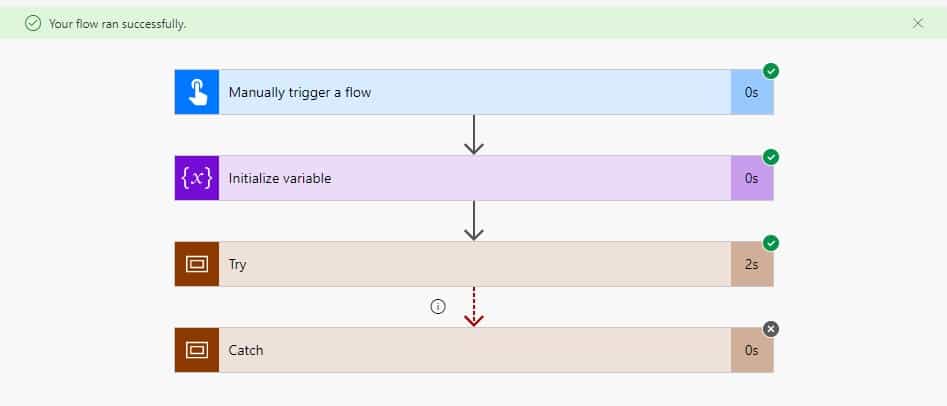
Here to run the flow and click on the Test icon -> Manually -> click on Save and test button -> In the Run Flow window, click on the Run flow button -> click on the Done button.
You can see your flow run successfully, and it doesn’t come to the catch block, because there is no error.
As our flow ran successfully, we can see in SharePoint list items get created.
When flow get failed
Here we will change the Assignments variable type string to integer, as the value is of string type, so it will throw an error.

Here to run the flow and click on the Test icon -> Manually -> click on Save and test button-> in the Run Flow window, click on the Run flow button -> click on the Done button.
Now you can see Try block failed due to an error, and the catch block is run successfully.
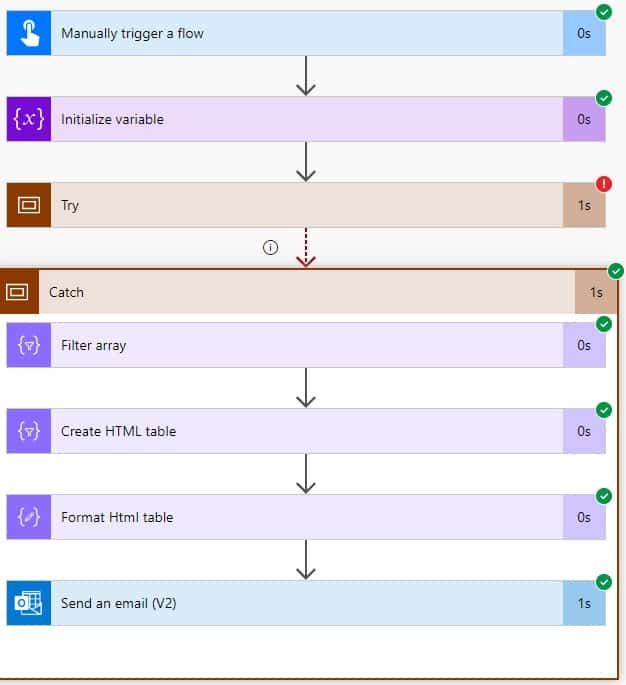
Now you can check the outlook, you will get an email having the error details.

Conclusion
In this Power Automate tutorial, we saw exception handling in Power Automate using the try-catch block.
Also, we saw how we can create a try-catch block in Power Automate, that will notify when an error occurred in Power Automate Flow.
You may also like the following tutorials:
- How to Create a SharePoint Online Site Using Power Automate [Download Complete Flow]
- attempted to perform an unauthorized operation. power automate error
- Create SharePoint Online List and Columns from Excel Using Power Automate
- Get Dataverse List Rows Count Using Power Automate
- How to export SharePoint List items to excel using Power Automate and send email
- append multiple values to an array in Power Automate
- Create SharePoint Group using Power Automate
- Update SharePoint List Field with today’s date in Power Automate
I am Bijay a Microsoft MVP (10 times – My MVP Profile) in SharePoint and have more than 17 years of expertise in SharePoint Online Office 365, SharePoint subscription edition, and SharePoint 2019/2016/2013. Currently working in my own venture TSInfo Technologies a SharePoint development, consulting, and training company. I also run the popular SharePoint website EnjoySharePoint.com