In this Power Automate tutorial, we will be learning step by step how to export SharePoint List items dynamically to an Excel/CSV file and send an email with the CSV file as an attachment using Power Automate Flow.
Many times, we are required to send and export SharePoint list items as a CSV file attachment in an email to the clients, vendors, or internal management. It can be a tedious task if we do it manually. However, using Power Automate Flow, we can achieve the above requirements easily without writing any code.
Export SharePoint list to excel using power automate
Suppose, we have a SharePoint list called “Employee Details“(as shown in the below image) and we are required to export all the employees whose Department is equal to ‘HR‘ in a CSV file and we are also required to send that same file as an email attachment to a client.
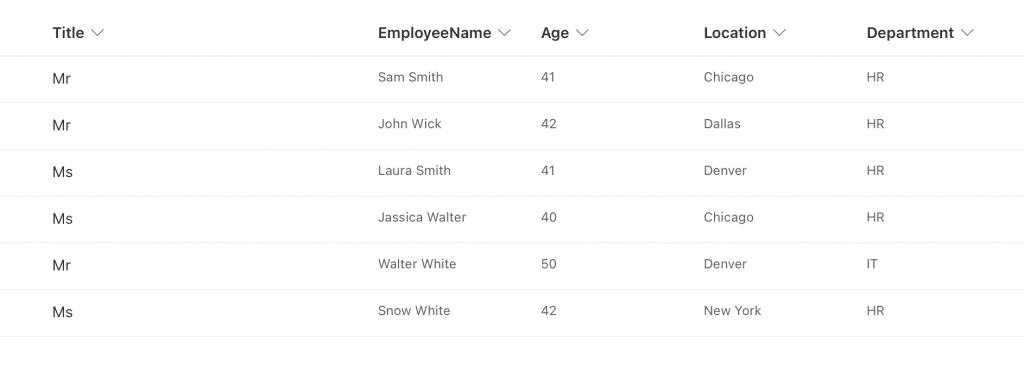
We will try to achieve all the above requirements using Power Automate. Let’s start this step-by-step tutorial.
Step 1: Create a SharePoint library with a folder
We will start by creating a SharePoint document library to store the exported items in CSV file format on our SharePoint Site. We will then create a folder inside this library to store these CSV files.
Here we have used the Shared document library and we have created a folder named “Exported SP list excel“. Please refer to the below image.

We will be using this folder of the shared document library in our Power Automate flow as a location to host all the CSV files.
Now we will move forward on creating a Power Automate Flow.
Step 2: Create a Flow using Power Automate
To create an MS Flow, login to your Power Automate and click create. We will create an instant cloud flow for this tutorial that will trigger manually. We will provide a name for the flow and click on the “create” button.
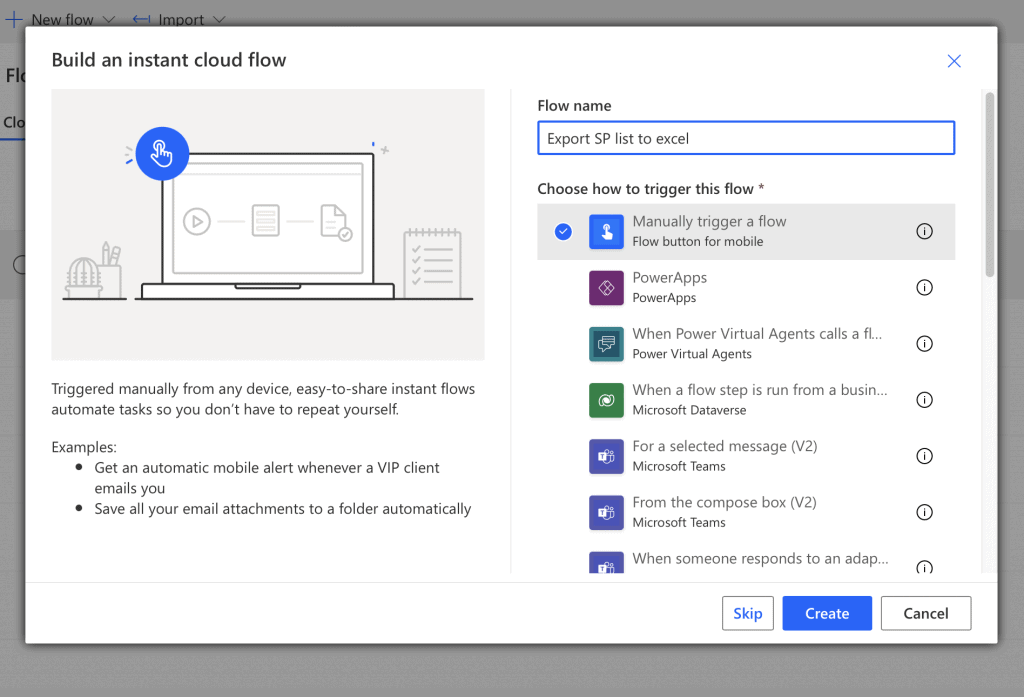
Let’s move forward and add the next step in this Power Automate flow.
Step 3: Get the items of the SharePoint List
Next, we will add the ‘Get Items‘ of SharePoint action from the operators of Power Automate.
Get Items operation will fetch all the items from the given SharePoint list to the Power Automate flow.
We will provide the Get Items action’s parameters like the site and list detail with the Sharepoint site and list name from where we want to get all the items.
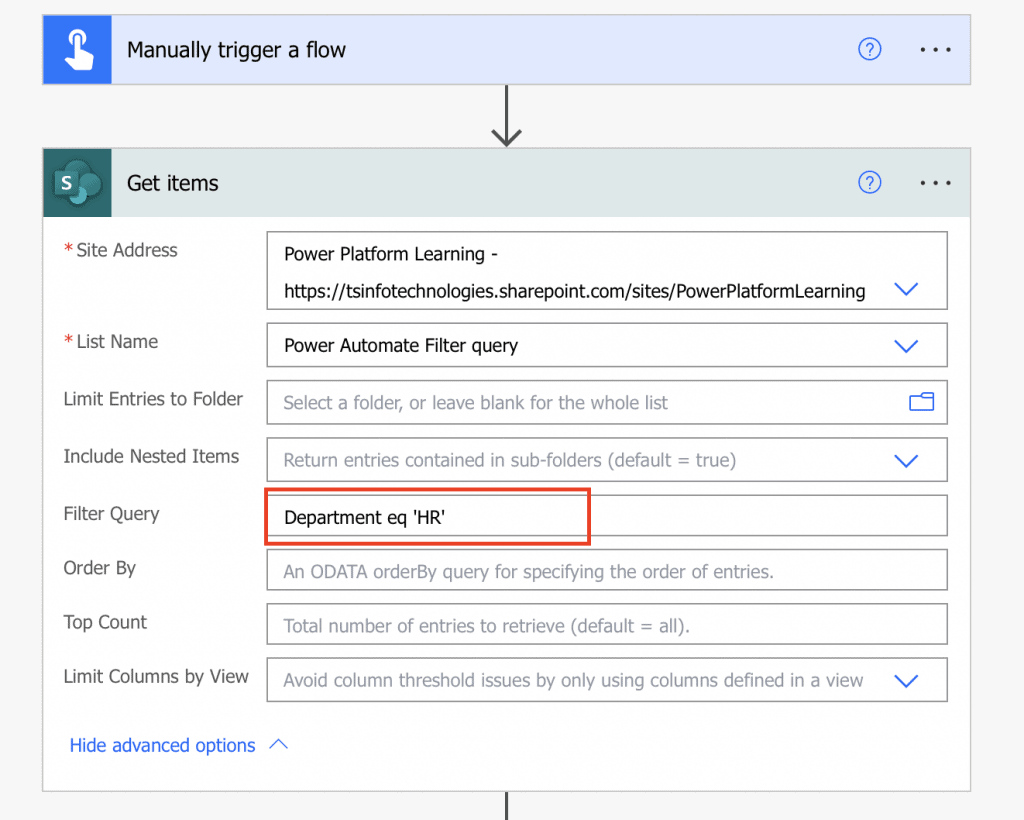
Here, we are also providing the OData filter query to filter the list items based on the Department column. We are only getting the employee details for those employees whose Department is equal to ‘HR’.
Here is the expression:
Department eq 'HR'To learn some about the OData filter query of Power Automate, you can follow this Power Automate tutorial.
Step 4: Add Select data operation
In this step, we will add the ‘Select‘ data operation to map the array of the Sharepoint list items as shown in the below image.
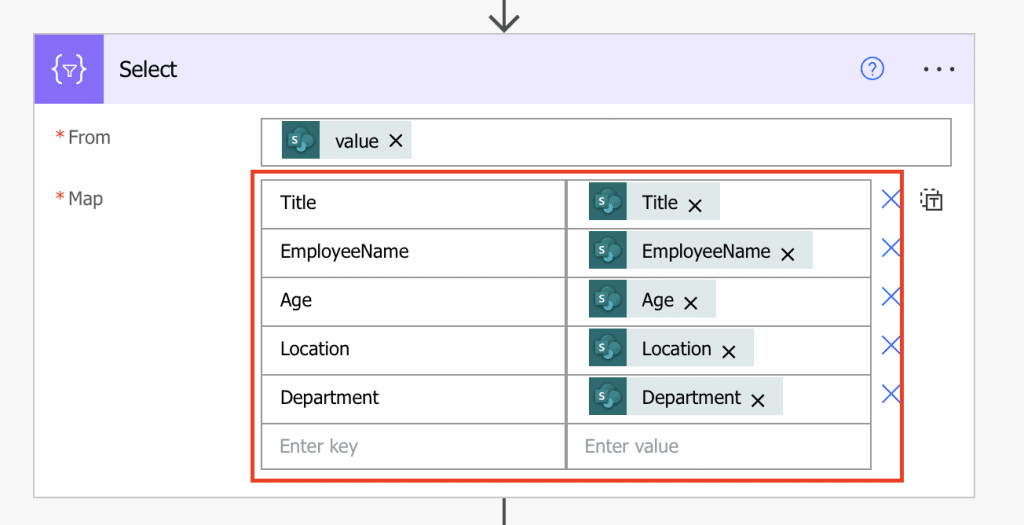
To map the array of items, in the ‘From‘ field of the Select action, we will provide the value of the Get items action from the dynamic content, and then next we will provide the key-value pair. Here, we are mapping the columns for the CSV file with the columns of our SharePoint list as the value.
Step 5: Create the CSV table
In the next step, we will add the “Create CSV table” data operation of Power Automate. In the ‘From‘ field, we will provide the output of the previous action which is the select data operation.

Here, this action will create dynamic CSV columns from the array of the columns of the output of the select action.
Step 6: Create the CSV file
It is now time to create the CSV file as we have all the required things for the same. In this step, we will add the “Create file” SharePoint operation of Power Automate.
Here, we will provide the Sharepoint site address of the library. We also need to provide the folder path by clicking the small folder image on the right side of the action. We have given the path of our ‘Exported SP list excel‘ folder.
We also have to provide the name of the file with .csv file extension. Here, we have given ‘EmployeeDetails.csv‘ as the name of the file.
Now the file content is the actual data for the CSV file, which is the table that we created in the previous step “Create the CSV table”.
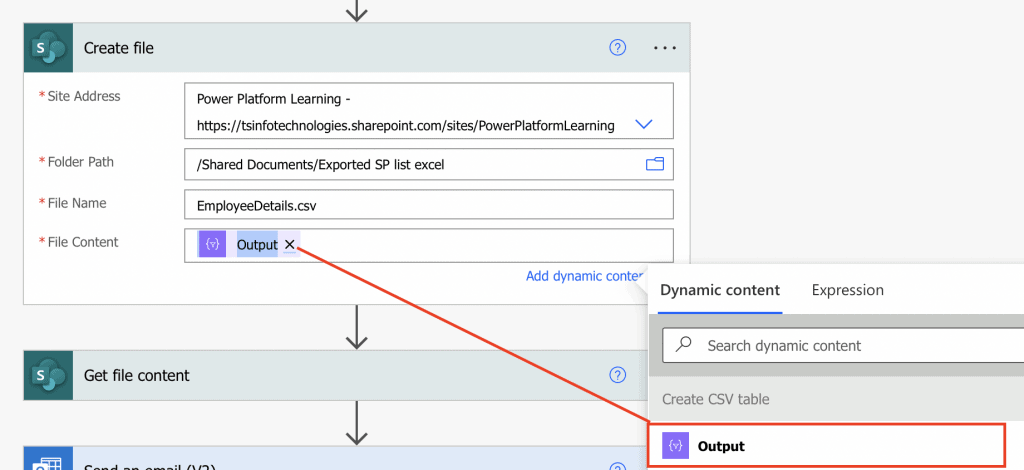
After providing the output of the table as file content, this flow is now ready to export the Sharepoint Employee Details list to ‘EmployeeDetails.csv‘ CSV file.
Let’s now save and run this flow manually, we will have a CSV file named ‘EmployeeDetails.csv‘ created in the mentioned folder ‘Exported SP list excel‘ in our SharePoint library as shown in the below image.

This is how we can export a Sharepoint list to a CSV file using Power Automate. But, we have one more requirement to send this CSV file as an attachment in an email.
Step 7: Get the file content
In these last 2 steps, we will learn how to send a CSV file as an attachment in an email.
To achieve this requirement, we first need to get the content of the file from the Sharepoint library. We will now add the “Get file content” Sharepoint action in our Power Automate Flow.
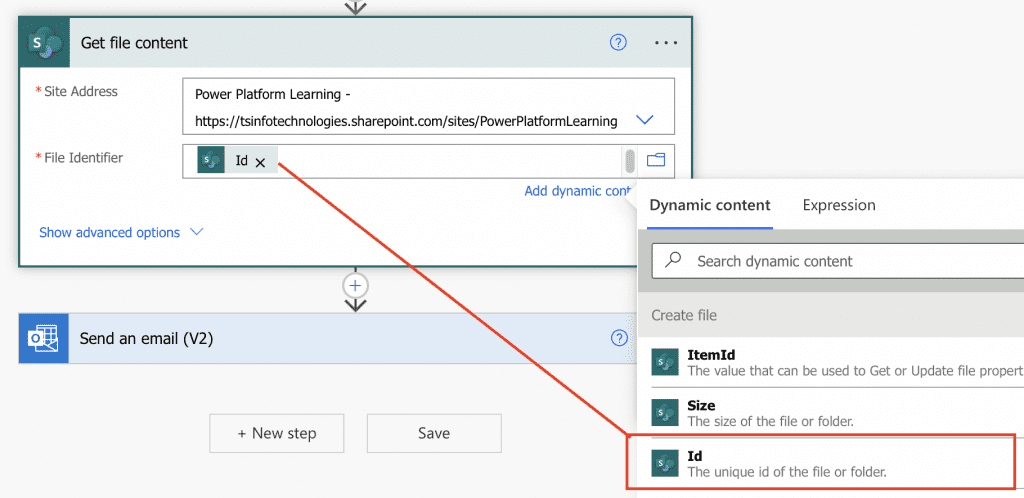
Here we are fetching the CSV file content that we create from the SharePoint site. We are providing the unique ID of the desired file or folder to get the content of the file from the SharePoint document library.
Step 8: Send an email with CSV file attachment
In this last step, we will learn how to send a CSV file as an attachment in an email using Power Automate Flow.
In our Power Automate flow, we will add the “Send an email” outlook action and we will provide the email ID of the client or vendor, or internal management. We will also provide a subject line of the email.
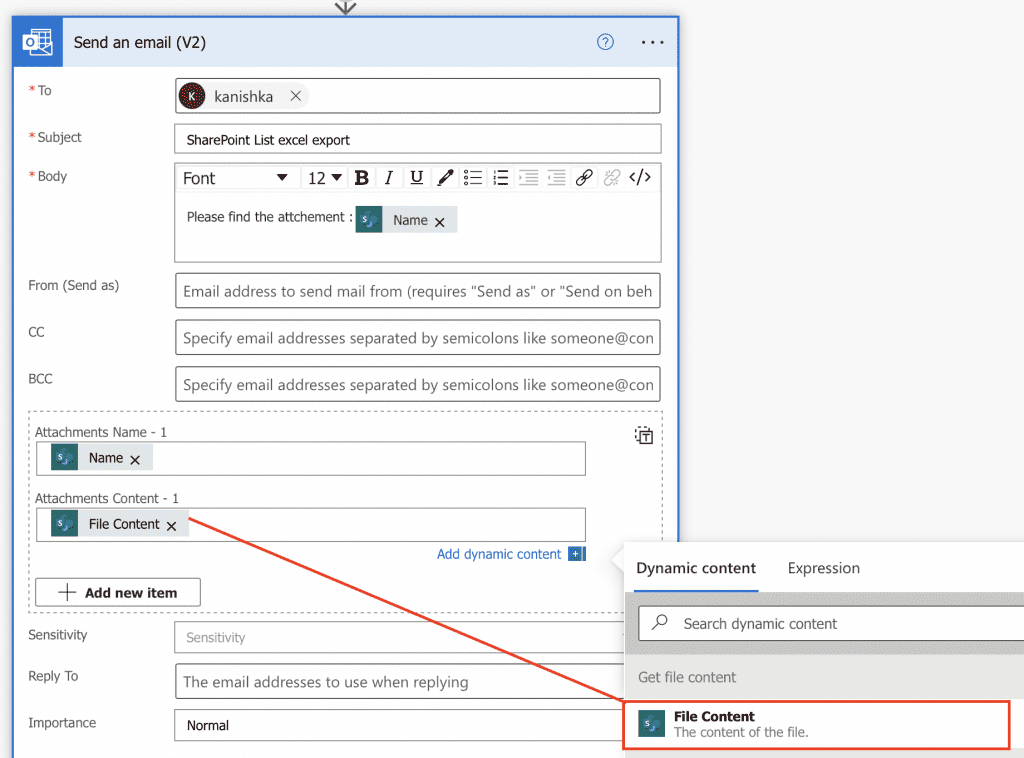
We have to expand the advance options to see the attachments field of Send an email action. In the name of the attachment we can provide the dynamic value of the file property ‘Name‘.
Under Attachment content, we will provide the dynamic file content of the ‘Get file content‘ action.

After saving and running the Power Automate flow, we will receive the above email with a .csv file as an attachment and this is how easily we can send CSV file as an attachment in an email using Power Automate.
Conclusion
In this Power Automate tutorial, we have learned step by step how to export a SharePoint list in Excel and send an email as a file attachment using Power Automate. I hope you got an idea on how to export sharepoint list to excel using power automate.
You may like the following power automate tutorials:
- How to remove characters from string in Power Automate?
- How to split a string into an array in Power Automate?
- Power Automate formatdatetime
- How to use Rest API in Power Automate
- Power Automate Trigger Conditions
I am Bijay a Microsoft MVP (10 times – My MVP Profile) in SharePoint and have more than 17 years of expertise in SharePoint Online Office 365, SharePoint subscription edition, and SharePoint 2019/2016/2013. Currently working in my own venture TSInfo Technologies a SharePoint development, consulting, and training company. I also run the popular SharePoint website EnjoySharePoint.com