Do you want to add trigger conditions in Power Automate? In this Power Automate tutorial, I will explain everything about “Power Automate trigger conditions”, Power Automate trigger conditions syntax, and various Power Automate trigger conditions examples, etc.
Trigger Conditions in Power Automate are like rules that you set for your automated tasks. They make sure your task only runs if certain conditions are met.
Prior to this functionality, you had to monitor the tasks as they progressed to make sure they were doing well. This sometimes led to tasks running without doing anything useful, using up your resources. Trigger conditions prevent that from happening by stopping tasks if the conditions aren’t right.
In this Power Automate tutorial, we will see what a trigger condition is and how to add a trigger condition to a flow in Power Automate.
Also, we will cover some examples better to understand the usage of trigger conditions in Power Automate.
Here are the topics we will cover
- What is the trigger condition in Power Automate?
- How to add a trigger condition in Power Automate?
- Power Automate trigger condition list
- Power Automate trigger condition example
- Power Automate trigger conditions not equal
- Power Automate trigger conditions equal
- Power Automate trigger conditions AND
- Power Automate trigger conditions OR
- Power Automate trigger conditions contains
- Power Automate trigger conditions AND OR
- Power Automate trigger conditions choice
- Power Automate SharePoint trigger conditions
- Power Automate when an item is created trigger conditions
Trigger condition in Power Automate
In Power Automate, a trigger condition is a feature that allows us to specify particular conditions that must be met before an automated flow can run/ trigger. These conditions work as filters to control when your flow starts.
If the conditions are not satisfied, the flow won’t proceed, which helps prevent unnecessary or incorrect executions of your workflow.
So, the trigger conditions ensure that your flow runs only when specific requirements are satisfied, enhancing the efficiency of your automated processes in Power Automate.
For example, you have created a flow that will trigger when a new email arrives in Outlook. So, this flow will trigger whenever a new email arrives in Outlook. But you want when a subject contains ‘Need Help’ only the flow will trigger. In this situation, we can use a trigger condition that will prevent the trigger from firing until the trigger condition is satisfied.
How to add trigger condition in Power Automate
Let’s see how to add a trigger condition in Power Automate.
For example, I have a Product List in SharePoint, which contains the following columns:
- Title: Single line of text
- Name: Single line of text
- Price: Currency
- Quantity: Number
- Status: Choice [ In stock, Out of stock, Low stock]
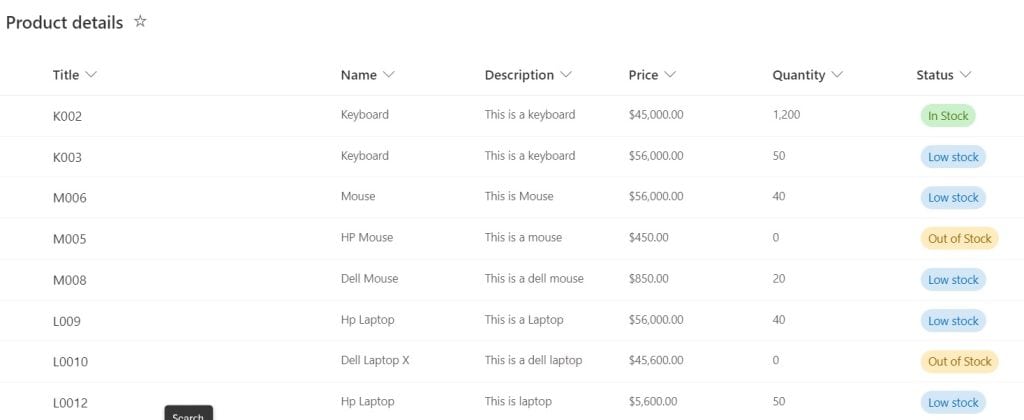
When an item is modified, and the Status is changed to Low stock, then only the flow will trigger in Power Automate.
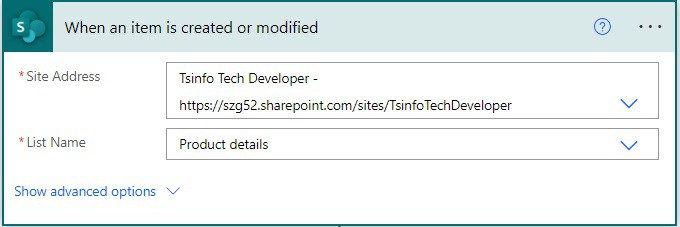
1. Open Power Automate Cloud, create an Automated Cloud flow, and then select the trigger action as ‘When an item is created or modified‘. Then provide the below information:
- Site address: Provide the SharePoint site address.
- List name: Provide the Sharepoint list name.
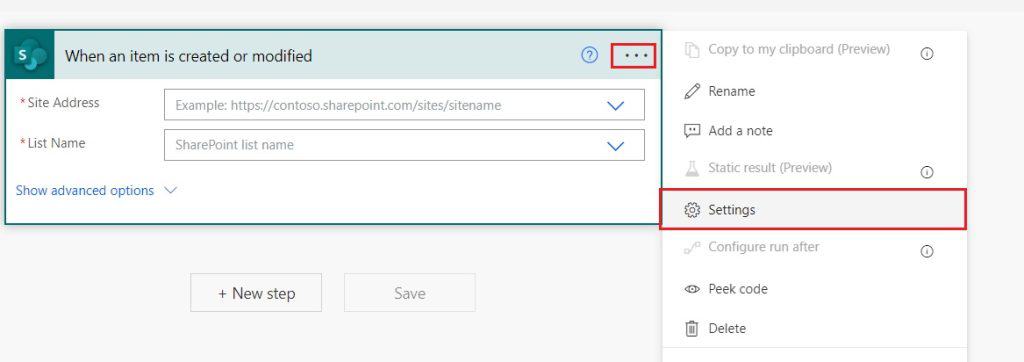
2. To add the trigger condition, we will click on the More button(…), then click on Settings like the below screenshot.
3. If you scroll down, you can see an option for the Trigger condition. Here by clicking on the +Add button, you can add the trigger condition.
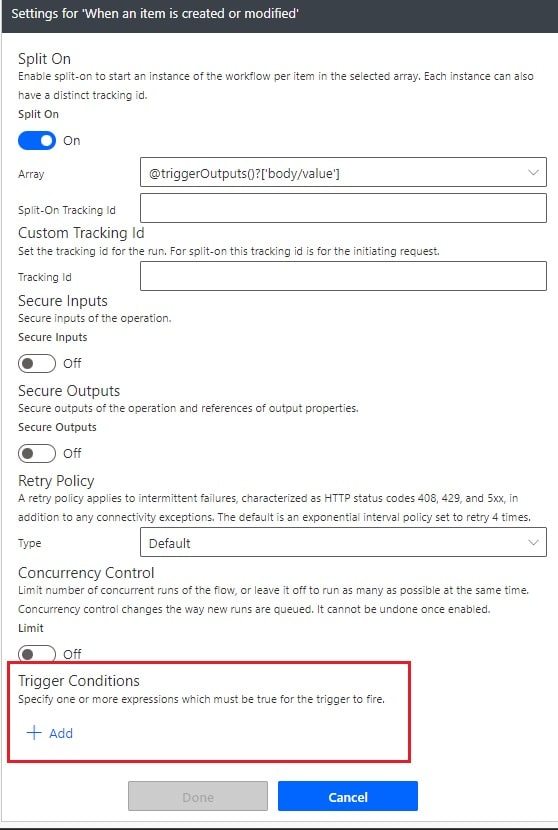
4. Once you click on the +Add button, the formula box will open, where we will add the trigger condition. So the trigger condition we are going to use is below:
@equals(triggerOutputs()?['body/Status/Value'], 'Low stock')
Now save the flow and run the flow manually; modify an item from the SharePoint list, but make sure that the Status is equal to Low stock. Else, flow will not trigger.
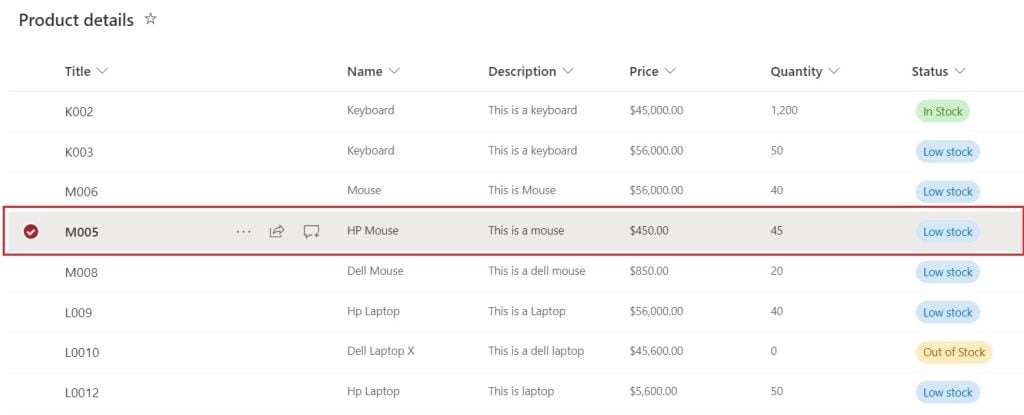
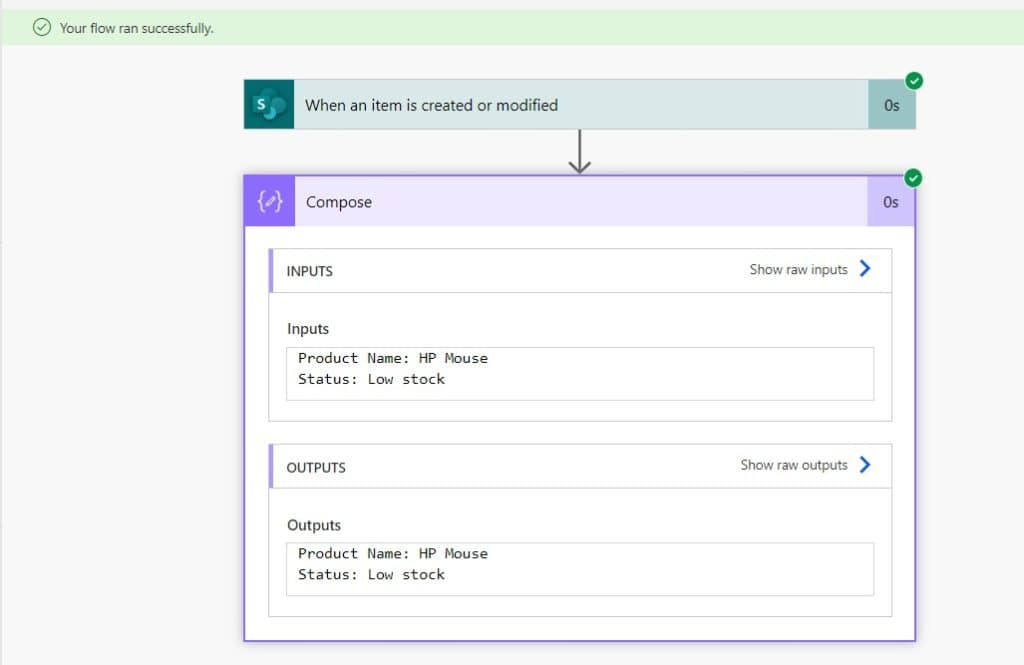
As I have modified the Quantity and Status of the Product, you can see our flow runs successfully because the status is equal to Low stock.
Power Automate trigger conditions list
Here, we will see a list of trigger conditions in Power Automate.
List of trigger conditions in Power Automate.
| Expression | Description | Example |
|---|---|---|
| and | This accepts two Boolean arguments and returns true only if both values are true. | This expression returns true:and(greater(10,1),equals(0,0)) |
| or | It accepts two Boolean arguments, the function returns true if either of the arguments is true. It is essential that both arguments provided are of Boolean data type. | This expression returns true:or(greater(1,10),equals(2,2)) |
| equals | It will returns if both the are equals | This expression returns true: equals(2,2) |
| less | It accepts two arguments and returns true if the first argument is numerically less than the second argument. It’s important to note that the supported data types for these arguments are integer, float, and string. | This expression retuns false: less(10, 1) |
| lessOrEquals | It accepts two arguments and returns true if the first argument is numerically less than or equal to the second argument. It’s important to note that the supported data types for these arguments are integer, float, and string. | This expression returns true lessOrEquals(9,9) |
| greater | It accepts two arguments and returns true if the first argument is numerically greater than the second argument. Please be aware that the supported data types for these arguments are integer, float, and string. | This expression returns false:greater(14,14) |
| greaterOrEquals | It accepts two arguments and returns true if the first argument is numerically greater than or equal to the second argument. It’s important to note that the supported data types for these arguments are integer, float, and string. | This expression returns true:greaterOrEquals(100,100) |
| empty | Returns true if the object, array, or string lacks content or is empty. | This expression returns false:empty('To') |
| not | It returns the opposite of a boolean value. | This expression returns true not(contains(‘200 Success’, ‘400’)) |
| if | It accepts value based on whether the expression evaluates to true or false. | if(equals(10, 10), ‘true’, ‘false’) |
Power Automate trigger conditions examples
Now, let us check out a few Power Automate trigger conditions examples.
1. Power Automate trigger conditions not equal
Here, we will see how to use not equal trigger condition in Power Automate
For example, we will take the above SharePoint Product List, and take the trigger action as ‘When an item is created or modified’ in Power Automate. This action will only trigger when Status is not equal to Out of Stock.
For this, we will use the below expression when an item is created or modified trigger conditions:
@not(equals(triggerOutputs()?['body/Status/Value'], 'Out of Stock'))
Next, we will add a compose action to check the output of the trigger action. For this, click on +New step -> select Compose action. Then provide the below information:
- Inputs: Provide the value below to see the name and Status of the modified product.
Product Name: @{triggerOutputs()?['body/Name']}
Status: @{triggerOutputs()?['body/Status/Value']}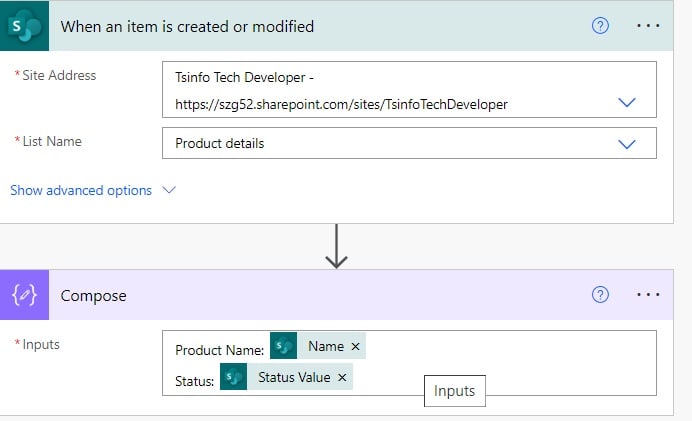
To run the flow manually, you can modify the item or create a new item in the SharePoint list.
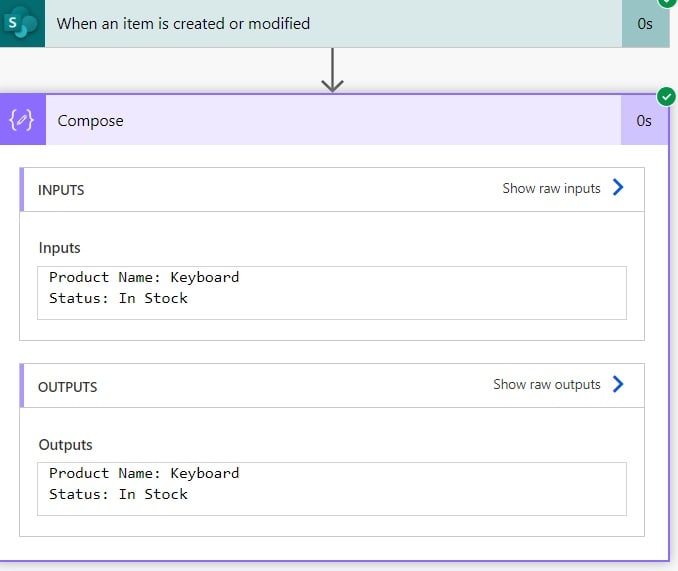
For example, I have modified the quantity of the Keyboard from 1200 to 2000 and the status is In stock.

Now you can see our flow runs successfully as Status is not equal to Out of stock.
2. Power Automate trigger condition equal
Here, we will see how to use an equal operator in the Power Automate trigger condition.
For example, we will use the same SharePoint Product details list explained above and the trigger action When an item is created or modified.
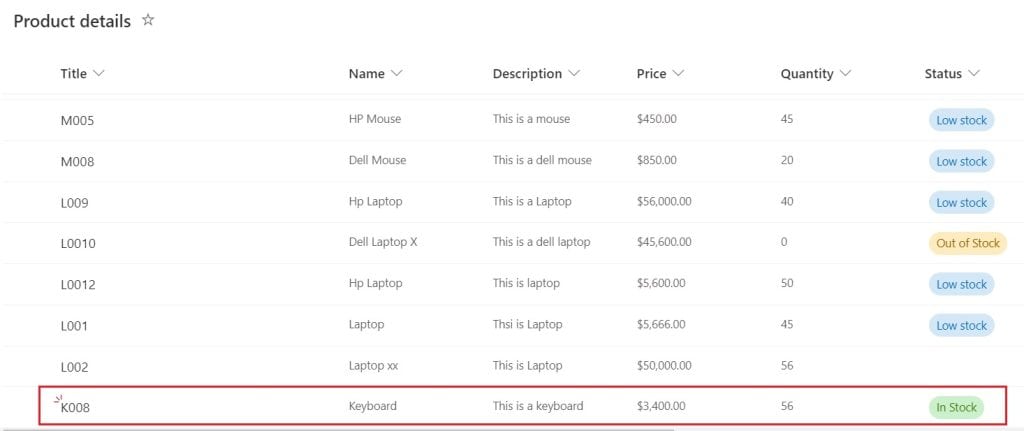
When a new item is created in the SharePoint list with the product name Keyboard, only the flow will trigger.
For this, we will use the below expression ‘When an item is created or modified trigger condition:
@equals(triggerOutputs()?['body/Name'], 'Keyboard')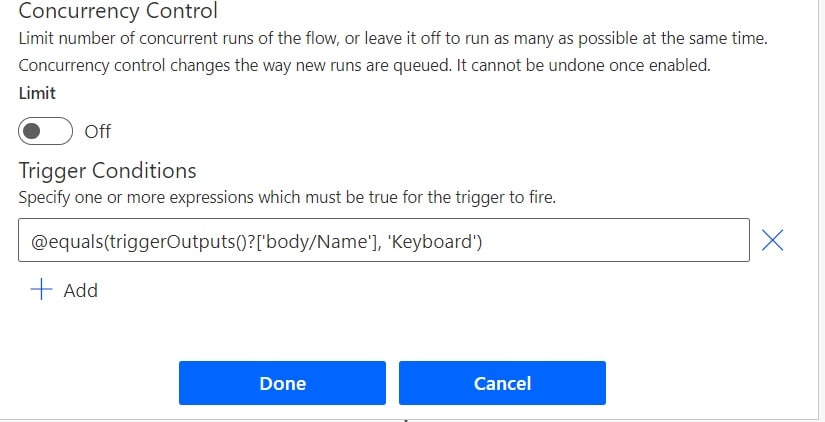
Next, we will add a compose action, to show the output of the trigger action. So, click on the +New step, select Compose action, then provide the below information:
- Inputs: Provide the below expression:
Product Name: @{triggerOutputs()?['body/Name']}
Status: @{triggerOutputs()?['body/Status/Value']}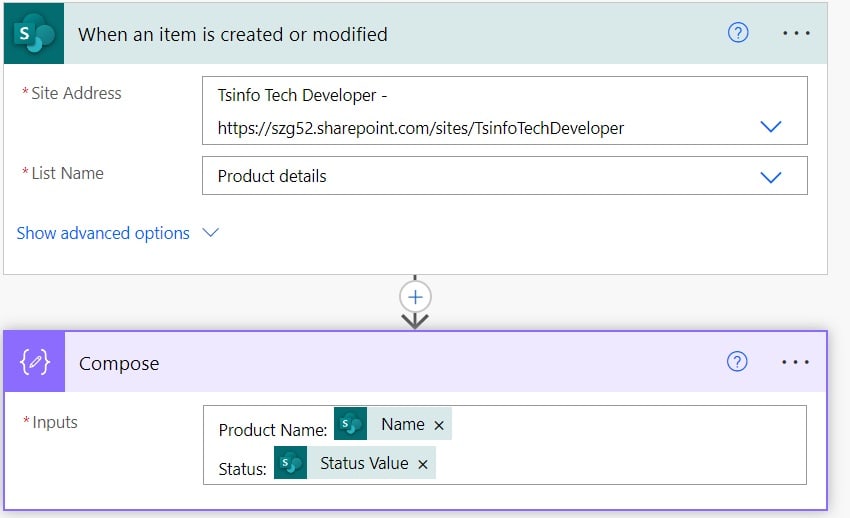
Now save the flow and run the flow manually. Then create an item in the SharePoint list to trigger the flow.
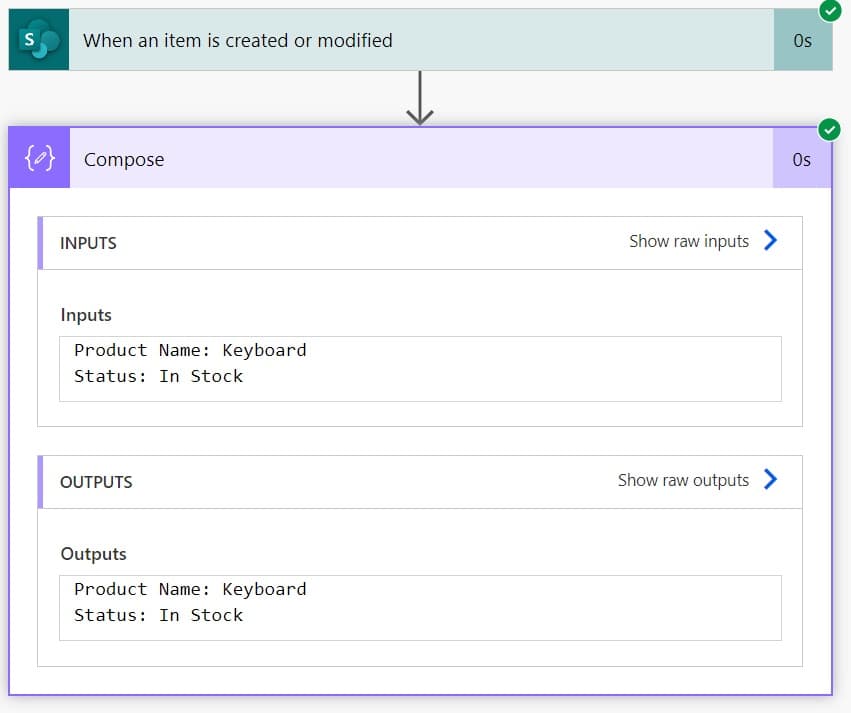
You can see the flow run successfully, as the trigger condition in the Power Automate flow is satisfied.
3. Power Automate trigger condition AND
Here, we will see how to use the AND operator in the Power Automate trigger condition.
For example, we will use the above SharePoint Product list, and we will use the trigger action When an item is created or modified. This action will only trigger when an item is modified or created with the product name equal to the Keyboard and the Status is equal to Out of stock.
For this, we will use the below expression in the ” When an item is created or modified trigger condition.
@and(equals(triggerOutputs()?['body/Title'], 'Keyboard'),equals(triggerOutputs()?['body/Status/Value'], 'Out of Stock'))
Next, we will add a compose action to show the output of the trigger action. So, click on the +New step, select Compose action, then provide the below information:
- Inputs: Provide the below expression:
Product Name: @{triggerOutputs()?['body/Name']}
Status: @{triggerOutputs()?['body/Status/Value']}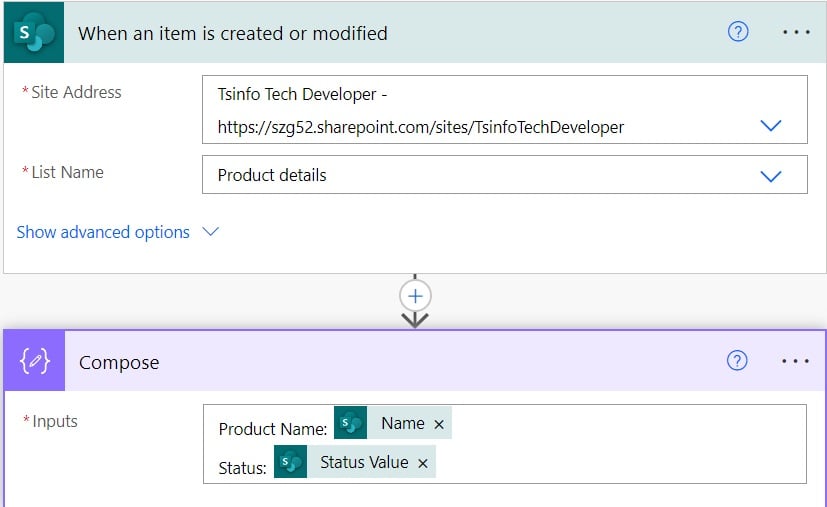
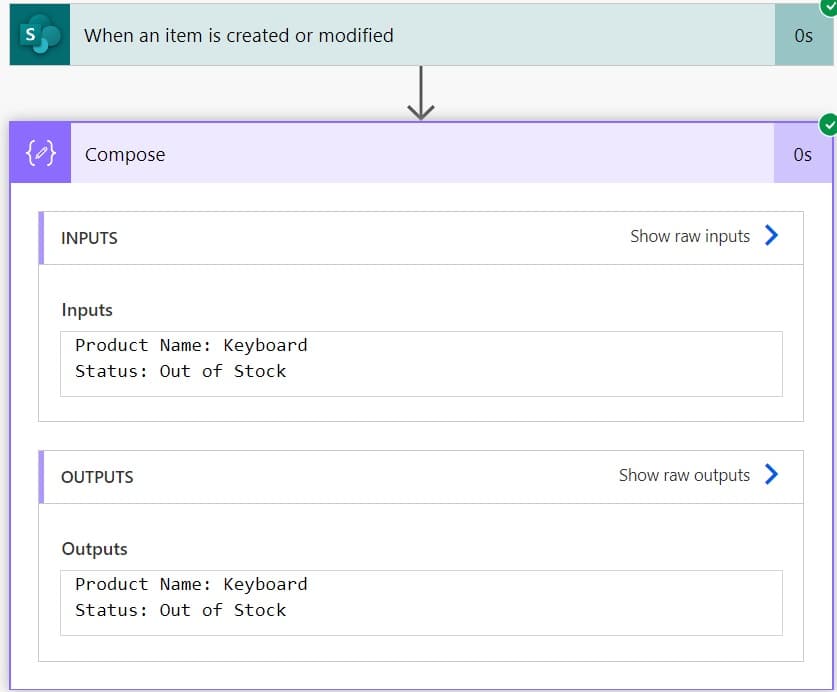
Now save the flow and run the flow manually. Then modify a SharePoint list item status column from In stock to out of stock like the screenshot below.

You can see the flow run successfully, and you can see trigger outputs in Power Automate
4. Power Automate trigger conditions OR
Here, we will see how to use the OR operator in the Power Automate trigger condition.
For example, we will use the above SharePoint Product list and use the trigger action as When an item is created or modified. This action will only trigger when an item is modified or created with the product name equal to the Keyboard or Mouse.
For this, we will use the below expression in the ” When an item is created or modified trigger condition.
@or(equals(triggerOutputs()?['body/Name'], 'Keyboard'), equals(triggerOutputs()?['body/Name'], 'Mouse'))
Next, we will add a compose action, to show the output of the trigger action. So, click on the +New step, select Compose action, then provide the below information:
- Inputs: Provide the below expression:
Product Name: @{triggerOutputs()?['body/Name']}
Status: @{triggerOutputs()?['body/Status/Value']}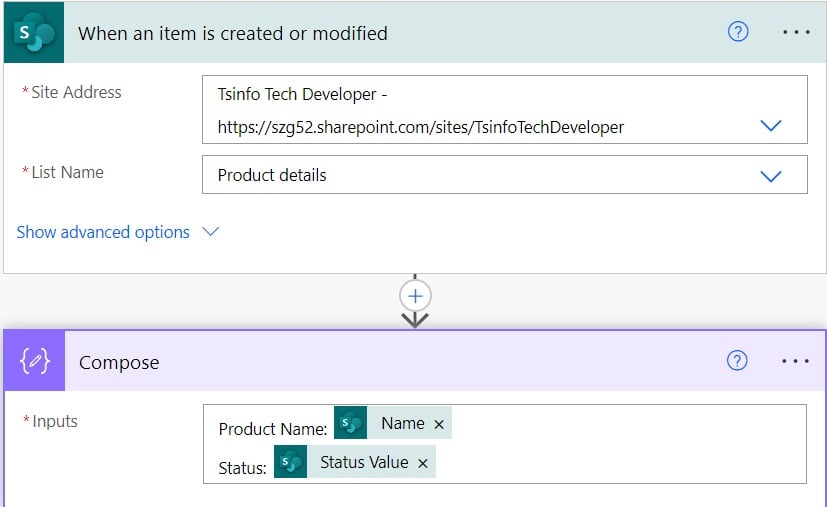
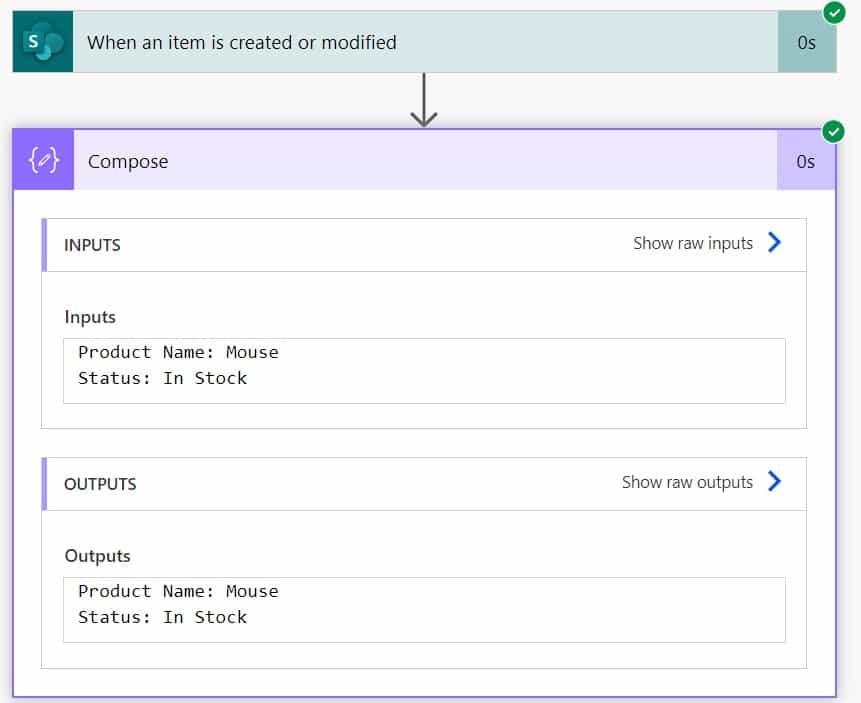
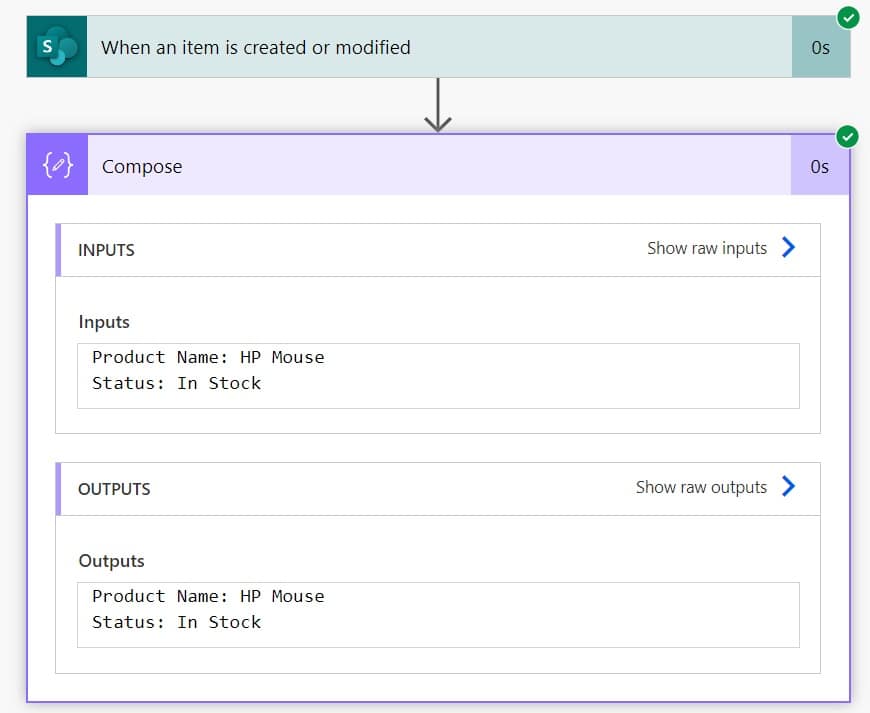
Now save the flow and run the flow manually. Modify an item in the SharePoint list. You can see in the screenshot below that I have changed the Status of the Mouse from Low Stock to In Stock.

You can see the flow run successfully and you can see trigger outputs in Power Automate.
5. Power Automate trigger condition contains
Here, we will see how to use the contains operator in the Power Automate trigger condition.
For example, we will use the above SharePoint Product list, and use the trigger action as When an item is created or modified. This action will only trigger when an item is modified or created if the name contains Mouse.
For this, we will use the below expression in When an item is created or modified trigger condition.
@contains(triggerOutputs()?['body/Name'], 'Mouse')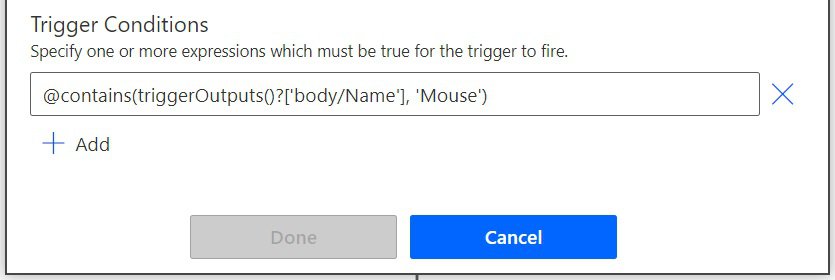
We will add a compose action, to show the output of the trigger action. So, click on the +New step, select Compose action, then provide the below information:
- Inputs: Provide the below expression:
Product Name: @{triggerOutputs()?['body/Name']}
Status: @{triggerOutputs()?['body/Status/Value']}
Now save the flow and run the flow manually. Modify an item in the SharePoint list. You can check the below screenshot here. I have changed the status from Low Stock to In Stock.

You can see the flow run successfully, and you can see trigger outputs in Power Automate.
6. Power Automate trigger condition AND OR
Here we will see how to use the AND OR operator in the Power Automate trigger condition.
For example, we will use the above SharePoint Product list and trigger action When an item is created or modified. This action will only trigger when an item is modified or created if the name equals the keyboard or it contains a Mouse, and the quantity of these 2 products must be greater than 60.
For this, we will use the below expression in When an item is created or modified trigger condition.
@and(or(equals(triggerOutputs()?['body/Name'], 'Keyboard'), contains(triggerOutputs()?['body/Name'], 'Mouse')),greater(triggerOutputs()?['body/Quantity'], 60)

Now, to show the output of the above trigger action, we will use the Compose action. For this, click on the +New step -> select Compose action. Then provide the below information:
- Inputs: Provide the below expression:
Product Name: @{triggerOutputs()?['body/Name']}

Status: @{triggerOutputs()?['body/Status/Value']}
Quantity: @{triggerOutputs()?['body/Quantity']}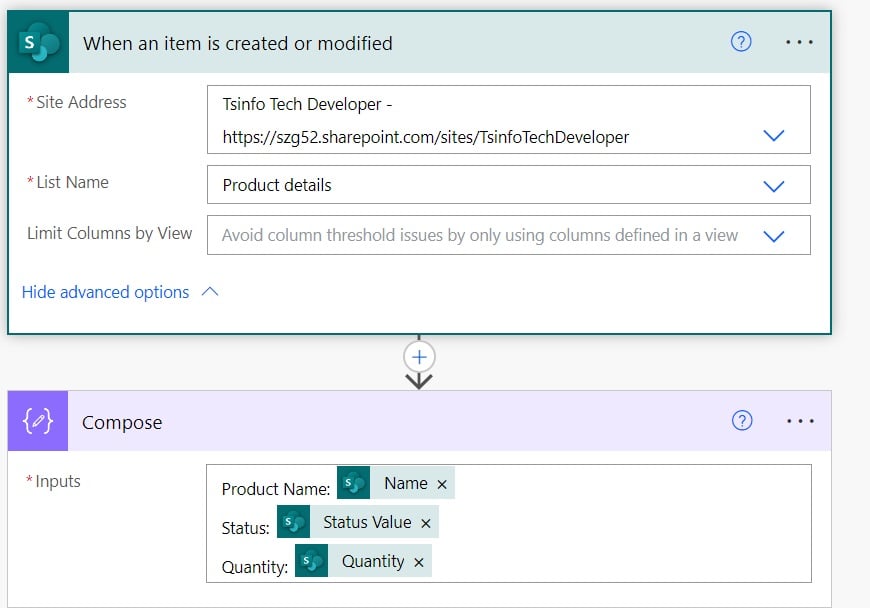
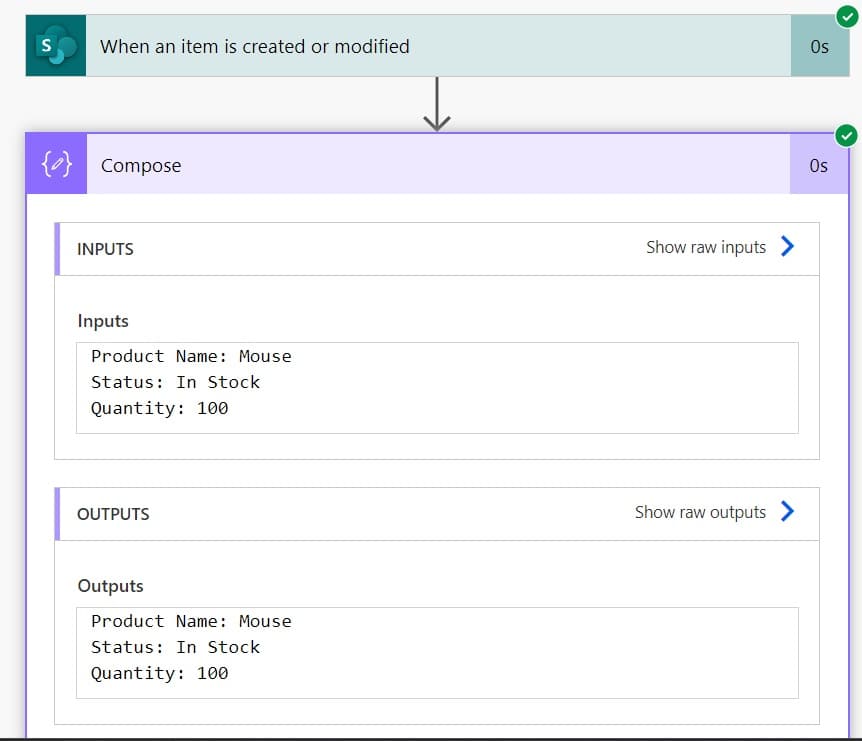
Now save the flow and run the flow manually. Modify an item in the SharePoint list, e.g., here, I have modified the price.

You can see flow runs successfully and the trigger output in Power Automate.
7. Power Automate trigger condition choice column
Here, we will see how to apply the Power Automate trigger condition on the SharePoint Choice column.
For example, in the above SharePoint Product list, the Status column is a choice type column. We will use trigger action When an item is created or modified. This action will only trigger when the status is Low Stock or In Stock.
For this, we will use the below expression in When an item is created or modified trigger condition.
@or(equals(triggerOutputs()?['body/Status/Value'], 'Out of Stock'), equals(triggerOutputs()?['body/Status/Value'], 'In Stock'))
We will add a compose action, to show the output of the trigger action. So, click on the +New step, select Compose action, then provide the below information:
- Inputs: Provide the below expression:
Product Name: @{triggerOutputs()?['body/Name']}
Status: @{triggerOutputs()?['body/Status/Value']}
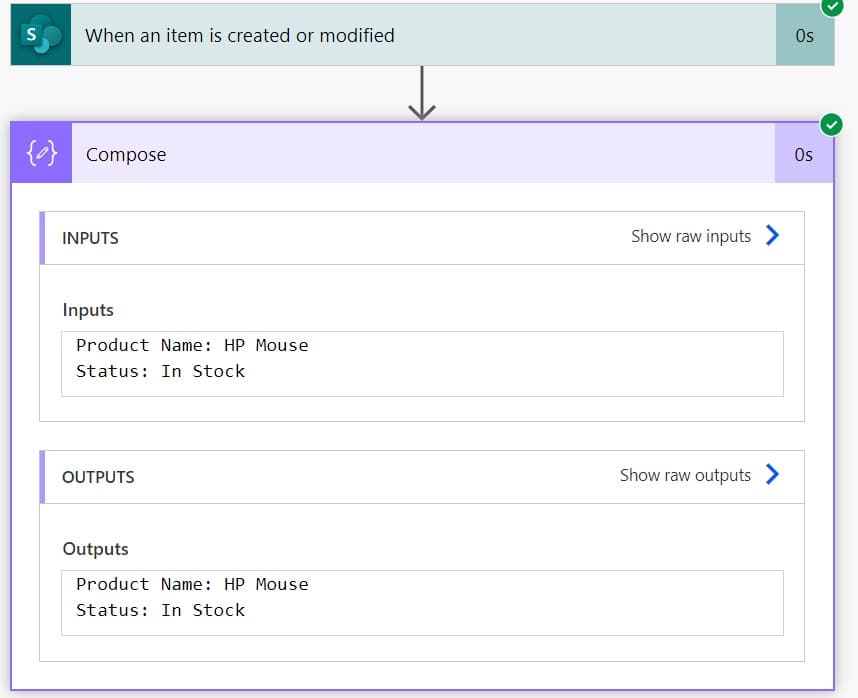
Now save and run the flow manually. Modify an item in the Sharepoint list to trigger the flow, e.g. I have modified the quantity 45 to 60 in the SharePoint list.

You can see your flow runs successfully and trigger output in Power Automate.
Power Automate SharePoint trigger conditions
Here, we will see how to use SharePoint columns in Power Automate trigger conditions.
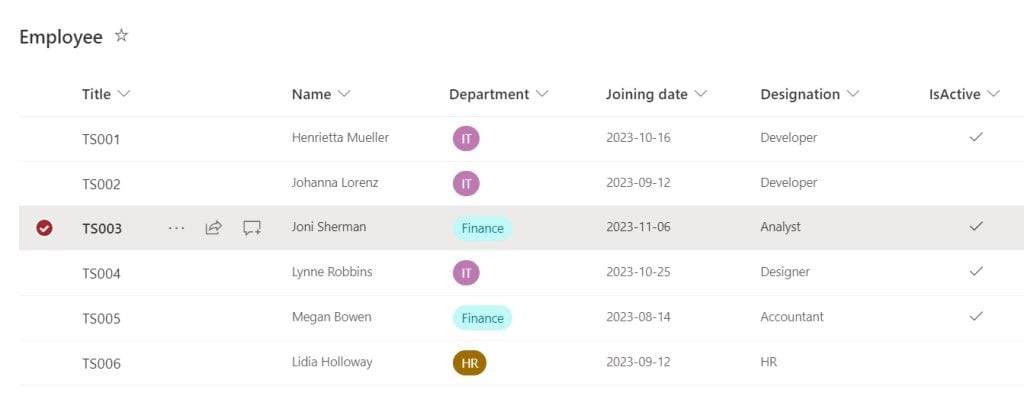
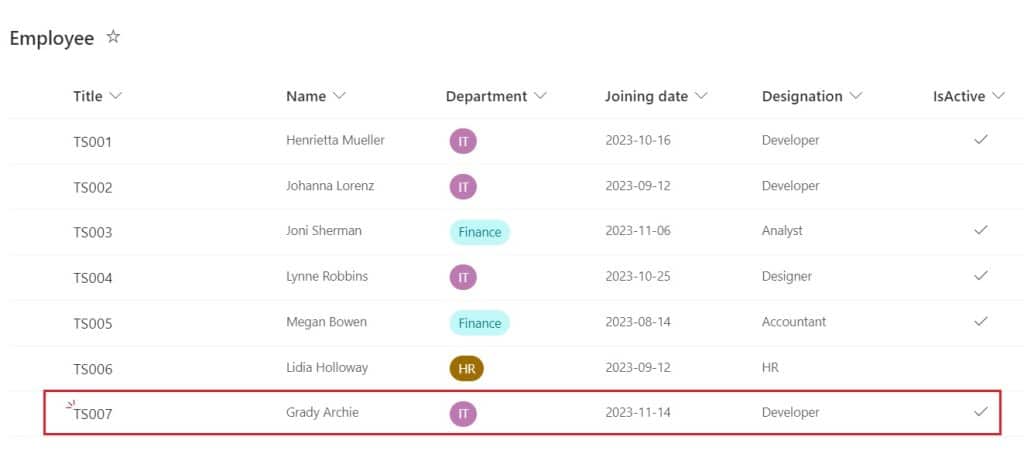
For example, I have a SharePoint list, called Employee, which contains the below columns:
- Title: Single line of text
- Name: Single line of text
- Department: Choice
- Joining Date: Date and time
- Designation: Single line of text
- IsActive: Yes/No
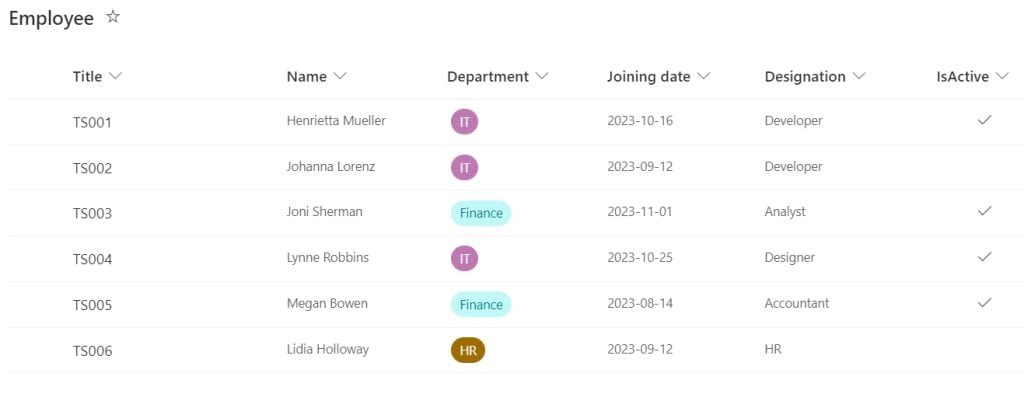
When an item is created or modified in the SharePoint list, the flow will trigger if the created or modified item IsActive column is true. Otherwise, it will not trigger. If it is true, we will send an email with the Employee details.
In Power Automat Cloud, create an Automated cloud flow, that will trigger when an item is created or modified. Provide the below information:
- Site address: Provide the SharePoint site address
- List name: Provide the SharePoint list name
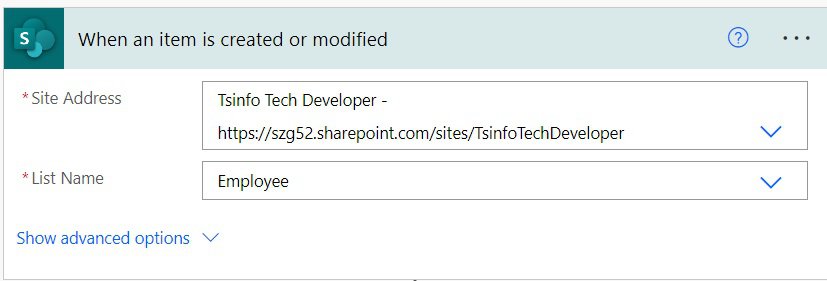
Next, we will add a trigger condition, so the flow will only trigger when the item is created or modified if the isActive column is equal to true.
For this, I have used the below expression in the trigger condition in Power Automate.
@equals(outputs('Get_item')?['body/IsActive'], true)
To send an email with employee information. For this, click on the +New step -> select Send an email(v2) action. Then Provide the below information:
- To: Provide recipient email
- Subject: Provide the subject of an email
- Body: Provide the body of an email like below.
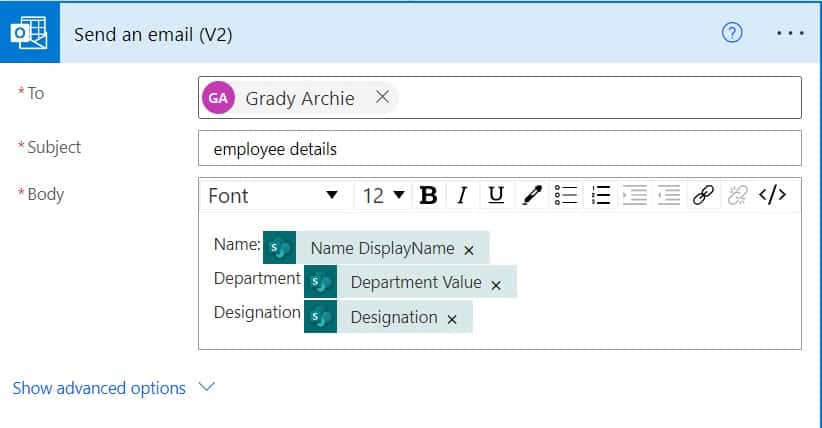
Now save and run the flow manually. You can modify the item in the Sharepoint list or create an item. For example, here I have modified the joining date of ‘Joni Sherman’ who is an active employee.
Once the flow runs successfully, you will get an email like the one below.
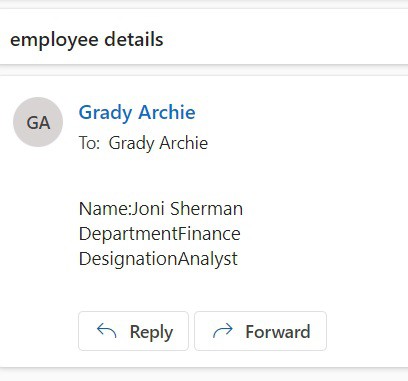
This is an example of Power Automate SharePoint trigger conditions.
Power Automate when an item is created trigger condition
Here, we will see how to use the Power Automate trigger condition in When an item is created action.
For example, we will use the above SharePoint Employee list, and we will create a flow that will trigger when an item gets created in this list having the Department value equal to IT. If the Department is not equal to IT, then the flow will not trigger.
In Power Automate Cloud, create an Automated Cloud flow, and then select the trigger action as ‘When an item is created‘. Then provide the information below
- Site address: Provide the SharePoint site address
- List name: Provide the SharePoint list name
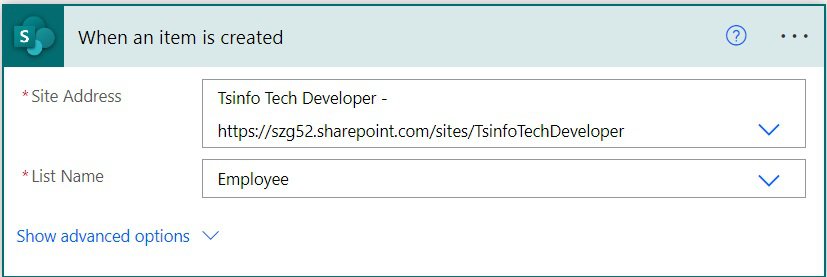
Next, we will add a trigger condition, so the flow will only trigger when the item is created with Department equals to IT.
For this, I have used the below expression in the trigger condition in Power Automate.
@equals(triggerOutputs()?['body/Department/Value'], 'IT')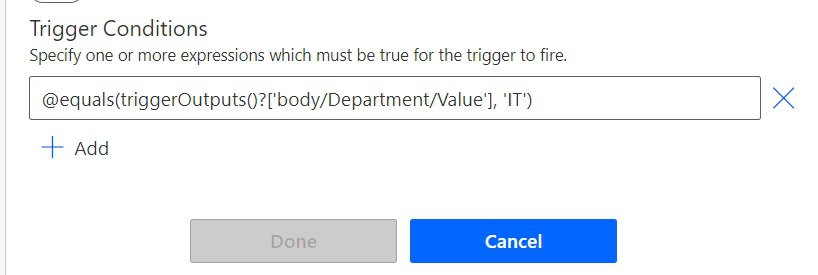
2. We will send a Welcome email to that employee; for this, click on the +New step -> select Send an email(V2) action. Then provide the below information:
- To: Select the Employee email from dynamic content
- Subject: Provide the subject of an email
- Body: Provide the body like below
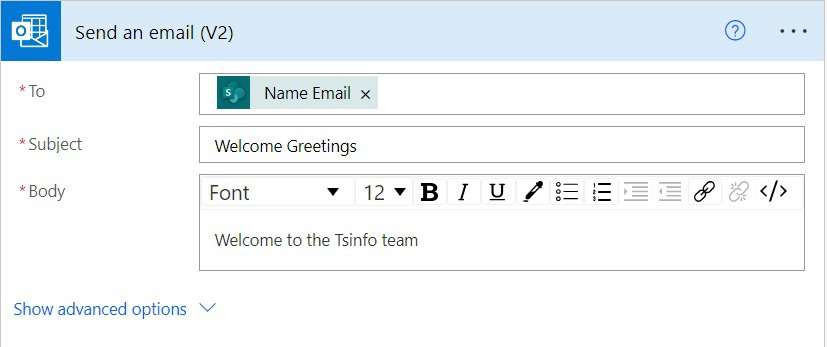
Now save and run the flow manually. To trigger the action, create an item in the SharePoint list.
Once the flow runs successfully, you can see the email below.
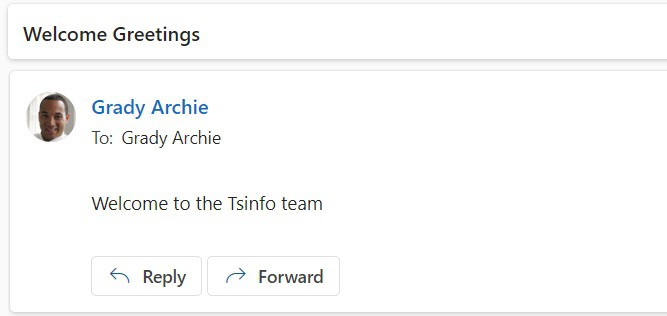
This is an example of Power Automate when an item is created trigger condition.
Conclusion
In this Power Automate tutorial, we saw the trigger condition in Power Automate. Also, we saw how to add trigger conditions in Power Automate and a list of trigger conditions.
Finally, we covered some of the trigger conditions example
- Power Automate trigger conditions examples
- Power Automate trigger conditions not equal
- Power Automate trigger conditions equal
- Power Automate trigger conditions AND
- Power Automate trigger conditions OR
- Power Automate trigger conditions contains
- Power Automate trigger conditions AND OR
- Power Automate trigger conditions choice
- Power Automate SharePoint trigger conditions
- Power Automate when an item is created trigger conditions
You may like the following tutorials:
- Power Automate delete all files in SharePoint folder
- Auto Populate SharePoint List Columns Based on Value in One Column using Power Automate
- Create a Word Document from a SharePoint list item using Power Automate
- When an item is created in SharePoint list send approval and create item using Power Automate
I am Bijay a Microsoft MVP (10 times – My MVP Profile) in SharePoint and have more than 17 years of expertise in SharePoint Online Office 365, SharePoint subscription edition, and SharePoint 2019/2016/2013. Currently working in my own venture TSInfo Technologies a SharePoint development, consulting, and training company. I also run the popular SharePoint website EnjoySharePoint.com
Whenever I search something for power platform or SharePoint or PowerShell. I always found this site in top 10 links at first page.
And I am very happy to say that 90% I found the stuff what I look for. Thank you Bijay!
Dear Bijay,
How can i trigger a flow in Power Automate only when, let’s say, the column “Analyst” of a List is modified, regardless it’s value?
I’ve been searching this for hours now.
Thanks in advance!
trying to find this too – Sharepoint has built in Status columns and drop downs but no one has an example for a simple Status change, if Status changed to Closed, send email to Joe
Dear Bijay, I am new to Power Automate and this is a great article about adding filter conditions to flow triggers. I have a choice column where I’ve enabled multiple selections. Using your code above it doesn’t seem to ‘fire’ the trigger – even if I specify the value (presumably because it’s an array?)
An example of a trigger condition I tried is as follows= @equals(triggerBody()?[‘Rejection Criteria’]?[‘Value’],’Other’).
I have also tried @not(empty(triggerBody()?[Rejection Criteria’]))
Any ideas how I can get the filter to activate if one or more choices are selected?? If I can get this to work I might have to add multiple conditions (one for each ‘choice’ available). Is there any way to simply set the filter so that it triggers when not empty (i.e. I’d only have to have one filter rather than multiple ones. Many thanks is advance.
Hi, I want to know that we can use calculated columns in trigger condition of when an item is created or modified of Power Automate trigger ?
Hi Bijay, i found out that the trigger action “When an existing item is modified” is not available when searching for a trigger actions but it is available through the template “Send a push notification when a column is changed in a SharePoint list”. Do you have any idea why ? By using this template and adding a filter