Creating a SharePoint Online list helps us store and track information, such as [Issues, Assets, Contacts, etc…]. In this SharePoint tutorial, I will explain all about the SharePoint list and how to add or create a list in SharePoint Online.
Also, we will see SharePoint Online list examples with simple scenarios.
SharePoint Online List
- We can use these SharePoint lists to store information in a table format [with columns and Rows], and Microsoft provides several columns with various data types.
- Organizations commonly utilize lists such as links, announcements, contacts, issue tracking, and surveys.
- SharePoint lists provide a flexible and customizable way to organize data, similar to a database table and integration with other Microsoft tools [Power Apps, Power Automate, Excel, etc…].
How to Create or Add SharePoint Online List
Here, we will see how to create a list in SharePoint Online. To achieve it, follow the below steps. Such as:
1. Open SharePoint with your respective Microsoft credentials -> Select your Team site or Communication site where you want to create a list.
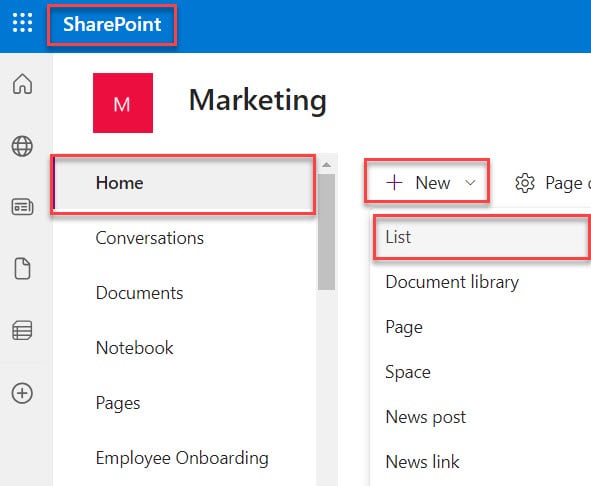
2. On the SharePoint Site Home Page or Site Contents Page -> Expand the + New Dropdown -> Select the List option like below.
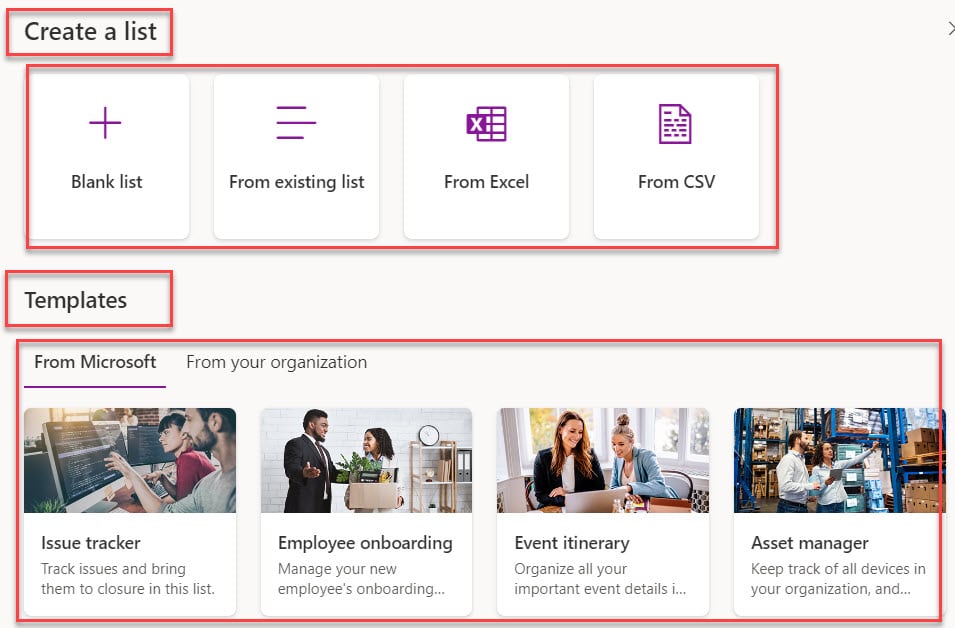
3. Once you click on the List option, it will give five options to create a SharePoint Online list. Such as:
Create a SharePoint Online Blank List
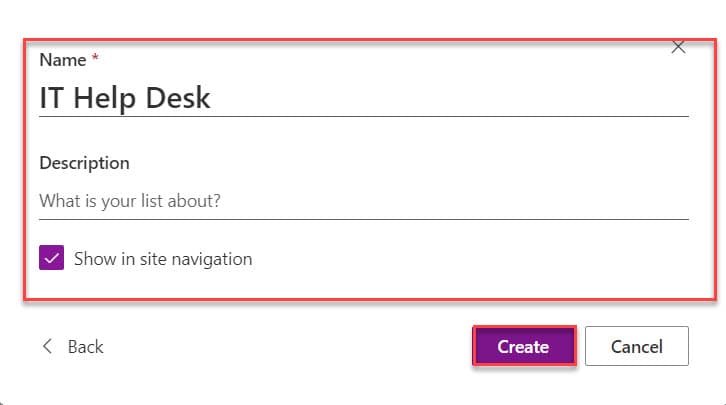
You can create a SharePoint list from scratch. Add a list name and description (optional), and choose whether you want the list to appear in the left site navigation. Once you have selected the options, click on the Create button.
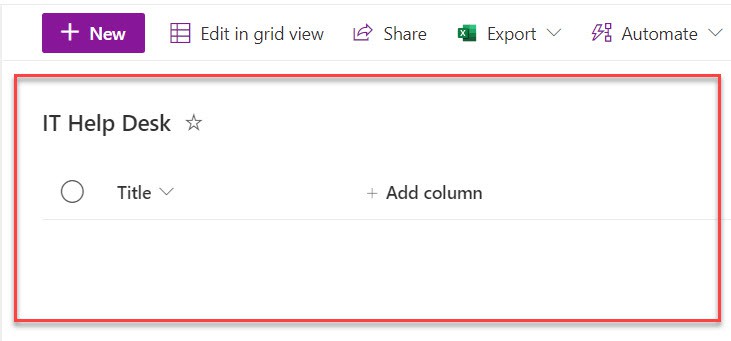
- Once you create the SharePoint list [IT Help Desk], it will display only the default Title column, as shown below.
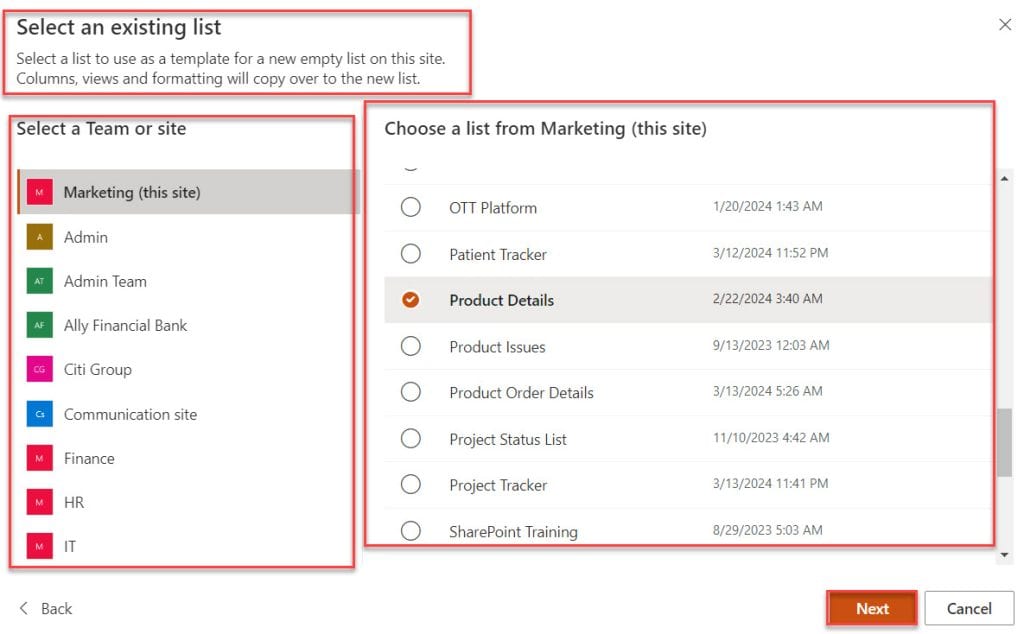
Create a SharePoint Online List from an Existing List
If you want to save time and create a new list based on the columns in another list, then you can use this option. The new list will start with the same columns, but it won’t include any of the data from the original list
Whenever you click on the “From existing list” option, it will ask you to choose a list from this site or other sites from your organization.
NOTE:
You should remember that when you use existing SharePoint list, it will give the warning message [“List already exists”]. That’s why you need to change the name of the list.

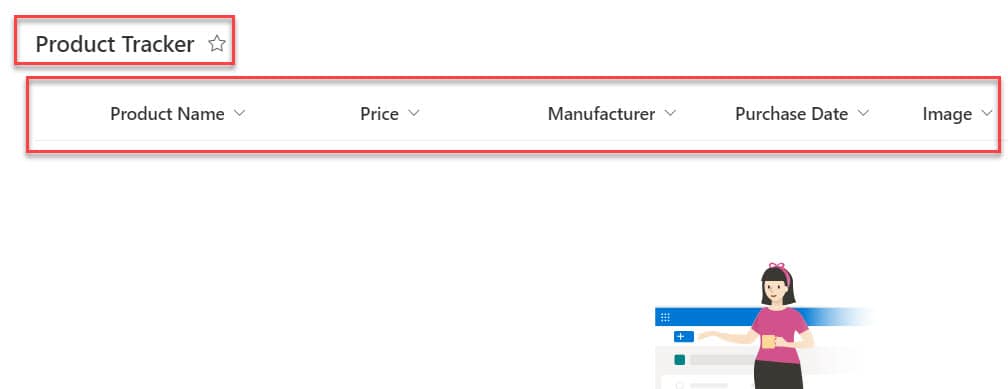
- As I said, the new list will start with the same columns but won’t include any of the data from the original list as shown below.
Create a SharePoint Online List From Excel
You can follow this article below to create a SharePoint Online list from Excel: Create a SharePoint list based on an Excel spreadsheet
Create a SharePoint Online List From CSV
You can also create a SharePoint list based on the CSV file.
Create a SharePoint Online List From Templates
There are some prebuilt templates, such as an Issue tracker, Employee Onboarding, Event itinerary, etc. Select any template as per your business needs and create the SharePoint list.
Create a SharePoint Online List From Your Organization
If your organization has any created or custom templates, then you can use them to create a SharePoint Online list.
SharePoint Online List Examples
Let’s discuss how to use the SharePoint Online list with simple examples.
Example-1: [IT Help Desk]
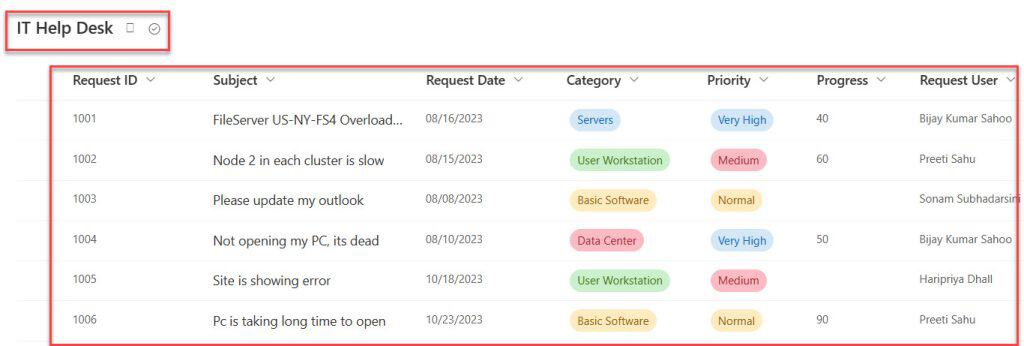
I created a SharePoint list named “IT Help Desk” to store information about users’ requests related to various issues. For that, I added different columns with various data types to this list.
Have a look at the below table:
| Column Name | Data Type |
| Request ID | It is a default single line of text |
| Subject | A single line of text |
| Request Date | Date and time |
| Category | It is a Choice column having the values are; “Servers“, “User Workstation”, “Basic Software”, “Data Center“, and None |
| Priority | It is a Choice column having the values are; “High”, “Medium”, and “Low“ |
| Progress | Number |
| Request User | Person or Group |
Example-2: [Project Tracker]
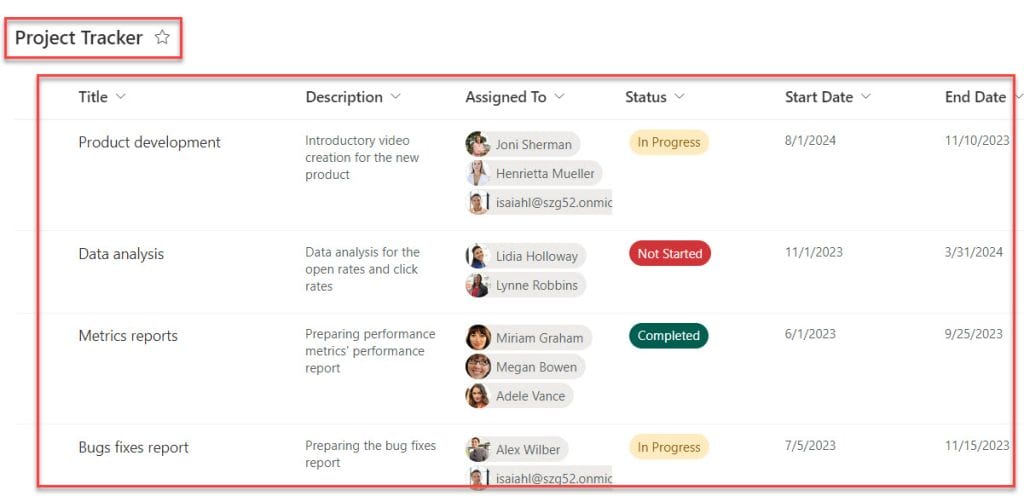
Suppose you want to store all the information about the company’s Projects, then you can use the “Project Tracker” list, which has different fields like the one below.
| Column Name | Data Type |
| Title | It is a default single line of text |
| Description | Multiple lines of text |
| Assigned To | This Person or Group field using “Allow multiple selections“ |
| Status | It is a Choice column having the values are; “Not Started“, “In Progress” and “Completed“ |
| Start Date | Date and time |
| End Date | Date and time |
Example-3: [Travel Requests]
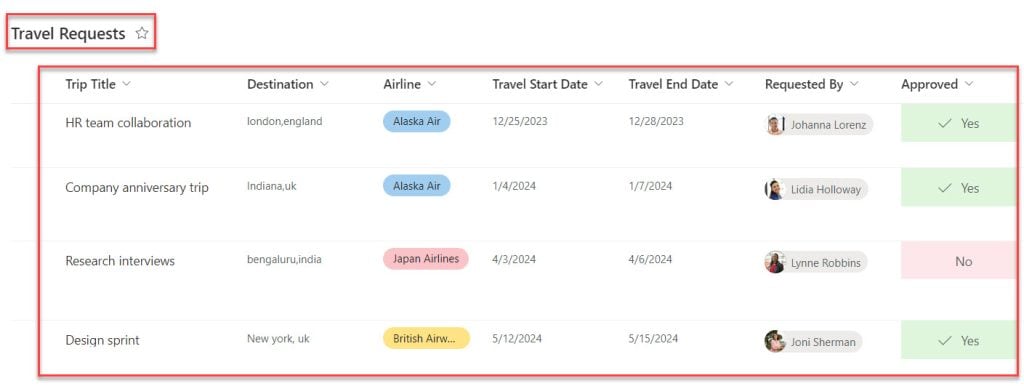
In this example, I would like to store all the travel request information to track the start and end dates of the trips, destination places, names of the airlines, etc.
For that, I have added different columns with various data types, as in the table below.
| Column Name | Data Type |
| Trip Title | It is a default single line of text |
| Destination | Location |
| Airline | it is a Choice field having the values are; “Alaska Air”, “Japan Airlines”, British Airways, Emirates, and Southwest |
| Travel Start Date | Date and time |
| Travel End Date | Date and time |
| Requested By | Person or Group |
| Approved | Yes/No |
Example-4: [Client Details]
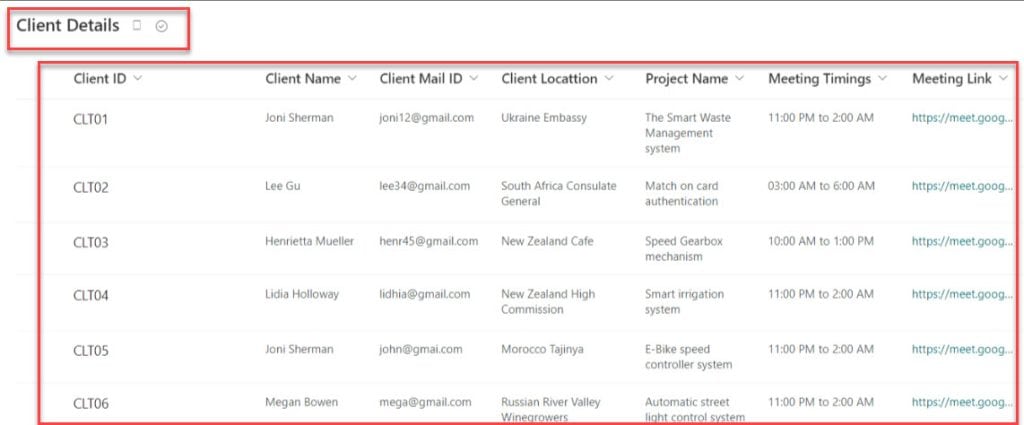
Suppose you want to store all the information about your clients in the organization; you need to create a list with the fields below.
| Column Name | Data Type |
| Client ID | It is a default single line of text |
| Client Name | A single line of text |
| Client Mail ID | A single line of text |
| Client Location | Location |
| Project Name | A single line of text |
| Meeting Timings | Date and time [Including time] |
| Meeting Link | Hyperlink |
Example-5: [Furniture Information]
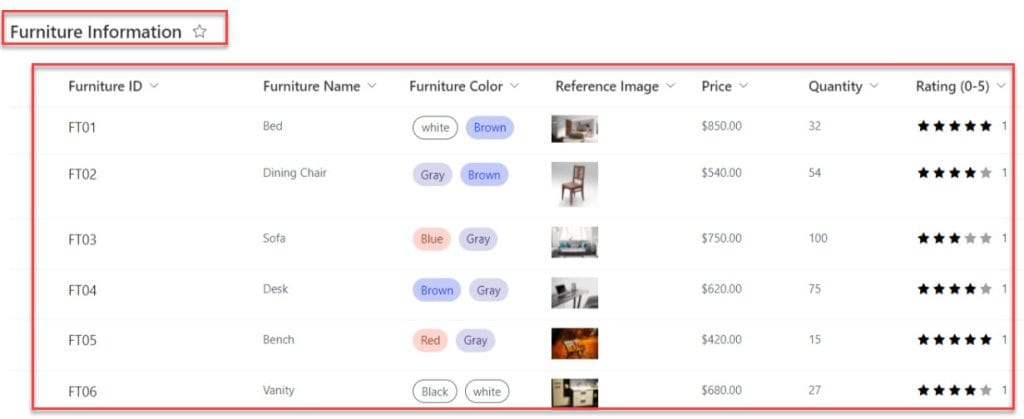
If you work in a Furniture company and want to store and display all the information about the furniture outside of the organization, you can create a list [Furniture Information] with the fields below.
| Column Name | Data Type |
| Furniture ID | It is a default single line of text |
| Furniture Name | A single line of text |
| Furniture Color | It is a choice column with multiple selections |
| Reference Image | Image |
| Price | Currency |
| Quantity | Number |
| Rating | Rating(0-5) |
Example-6: [Budget list]
Suppose you want to know your budget information and calculate it based on the month or year; you should create a Budget list and store the information using the fields below.
| Column Name | Data Type |
| Budget Purpose | It is a default single line of text |
| Budget Type | It is a Choice field having the values are; “Deficit Budget”, “Balanced Budget”, “Surplus Budget” and “Gender Budget“ |
| Budget Amount | Currency |
| Used Amount | Currency |
| Budget approver | People or Group |
| Budget Manager | People or Group |
| Capacity – Budget | Calculated calumn |
| Budget Status | It is a Choice column having the values are; “Approved”, “Pending”, and “Rejected“ |

These are the different examples of the SharePoint Online lists.
I hope you will find this article useful. If you need to create a SharePoint Online list, this post will provide all the information you need, along with various real-time examples.
Additionally, you may like some more articles:
- Create a Board View in a SharePoint Online List
- SharePoint Online List Forms JSON Formatting
- How to Save Excel File to SharePoint?
- SharePoint Group Calendar Web Part
I am Bijay a Microsoft MVP (10 times – My MVP Profile) in SharePoint and have more than 17 years of expertise in SharePoint Online Office 365, SharePoint subscription edition, and SharePoint 2019/2016/2013. Currently working in my own venture TSInfo Technologies a SharePoint development, consulting, and training company. I also run the popular SharePoint website EnjoySharePoint.com