In this Power Automate Desktop tutorial, we will see how to update items in a SharePoint list in Power Automate Desktop flow.
For example, I have created a product list in SharePoint Online, which contains the below columns:
- Title-Single line of text
- Name- Single line of text
- Description-Multiple lines of text
- Price- Currency
- Quantity- Number
- Status-Choice[In stock, Low stock, and Out of Stock]
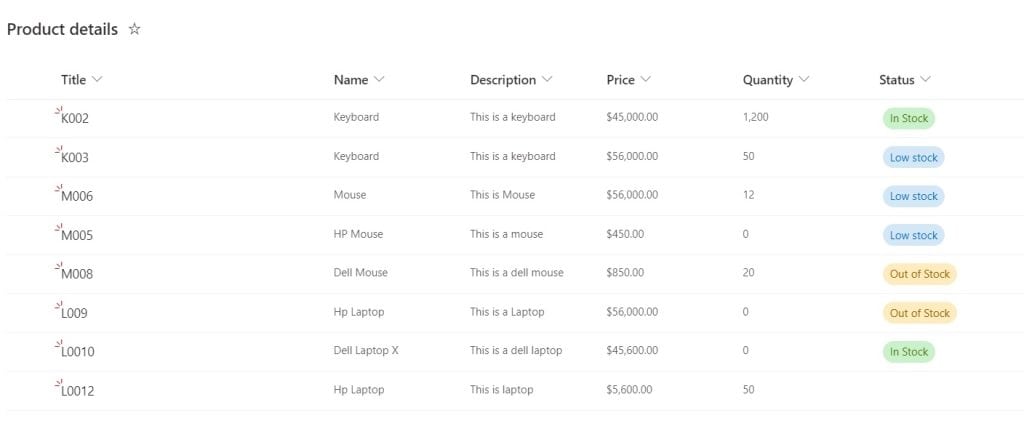
We will create a desktop flow, that will run and get all items from the List and check the Quantity of Products; based on that Status gets updated.
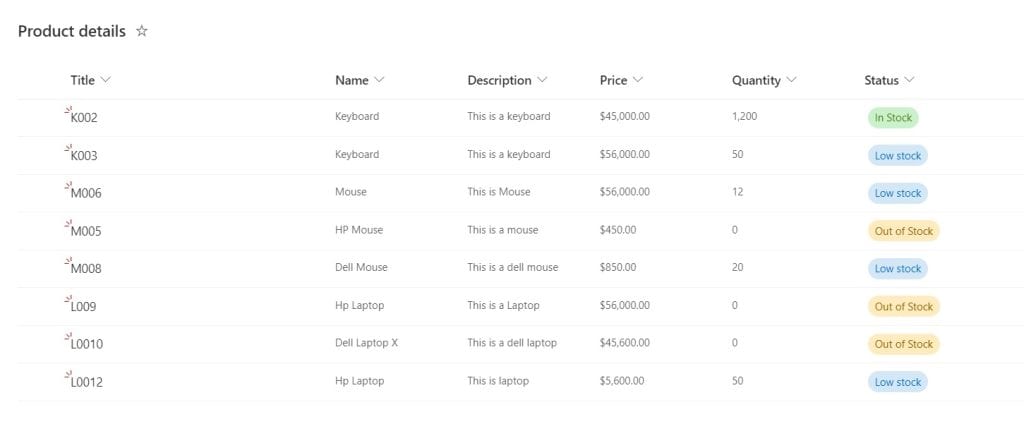
If the quantity is greater than 50, then the status is In stock; if the quantity is equal to 0 then the status is updated as Out of stock. Else, the status is updated as Low stock.
Now let’s create a desktop flow based on this scenario in Power Automate Desktop.
Update items in a SharePoint list using Power Automate Desktop
Here, we will see how to update items in the SharePoint list using Power Automate Desktop with an example.
Before we start creating the desktop flow, just set up the SharePoint list with the above columns and some of the data.
Step 1: Open Power Automate Desktop and click on the +New flow. Then, provide the flow name and click on the Create button.

Step 2: Now we will get items from the Sharepoint list, for this, expand the SharePoint section and drag and drop the Get items action to canvas. Then provide the below information:
- Site address: Provide the Site address from the dropdown.
- List name: Select the List name from the dropdown.
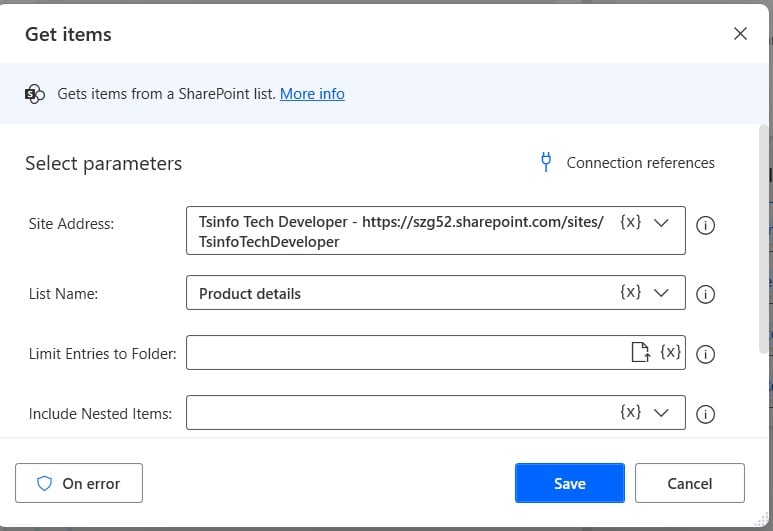
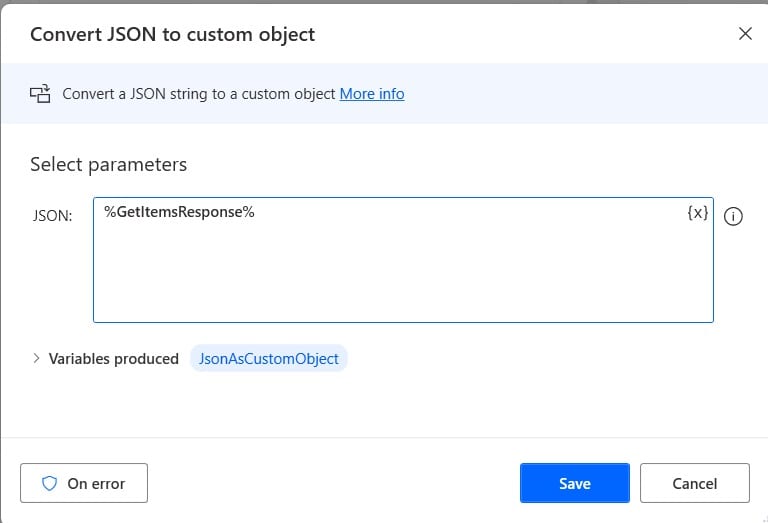
Step 3: Next, we will convert the above JSON output to a custom object. Drag and drop the Convert JSON to custom object action to canvas for this. Then provide the below information:
- JSON: click on variable icon {x}, then select ‘%GetItemsResponse%’ and click on Save.
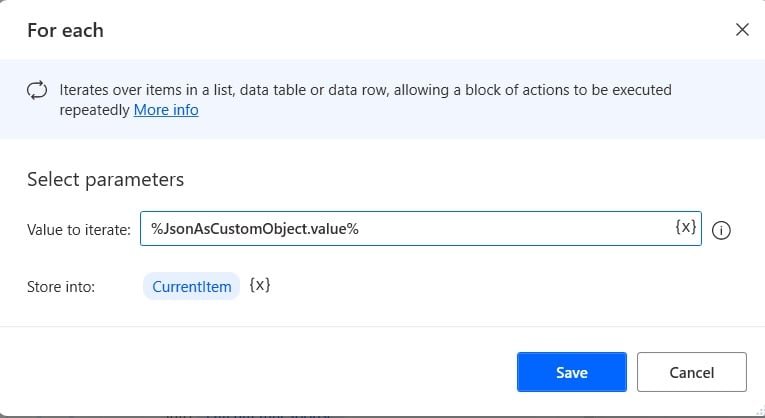
Step 4: Now, we will loop through each item; for this, drag and drop the ‘For each’ action to canvas. Then provide the below information:
- Value to iterate: Provide the below argument:
%JsonAsCustomObject.value%- The output value will be stored in the ‘CurrentItem’ variable.
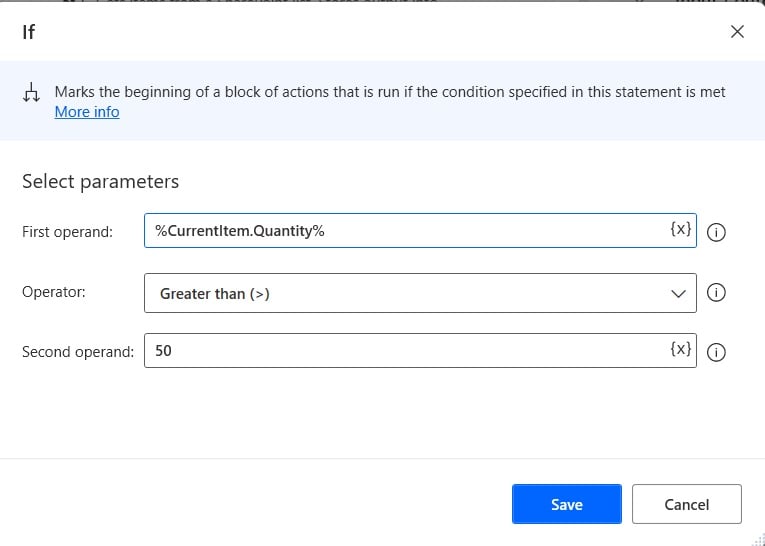
Step 5: Now we will check the item; the Quantity is greater than 50, then it will update an item in the SharePoint list. For this, drag and drop the IF action to the canvas. Then provide the below information:
- First Operand: Provide the first operand as below:
%CurrentItem.Quantity%- Operator: Provide the Operator as Greater than
- Second Operand: Provide the second operand as 50
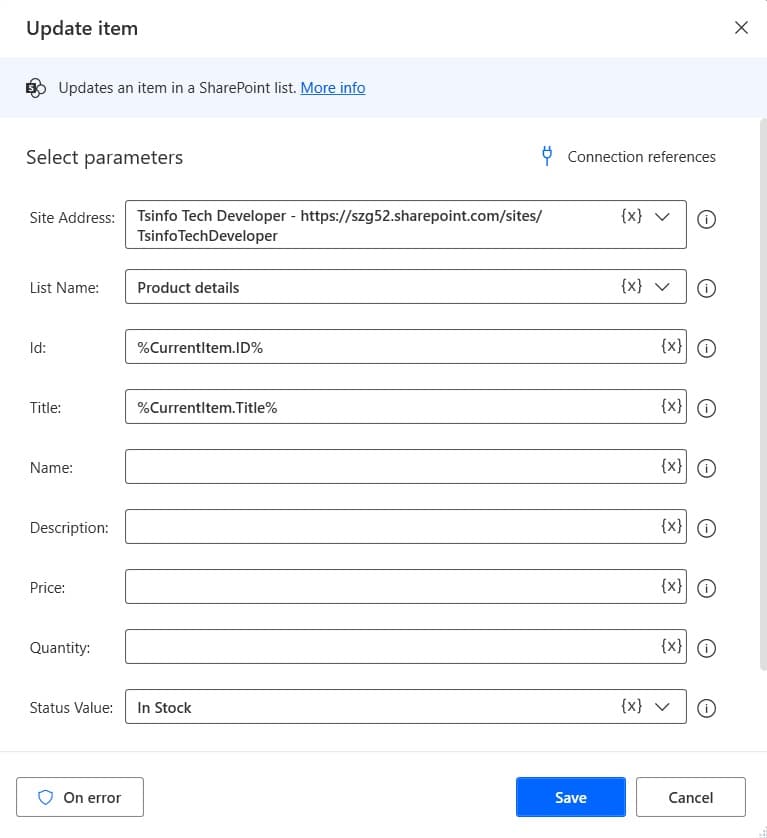
We will update the status of the item; for this, drag and drop the Update item action to Canvas. Then provide the below information:
- Site address: Select the SharePoint site address
- List name: Select the List name
- Id: Provide the id like below:
%CurrentItem.ID%- Title: provide the title like below:
%CurrentItem.Title%- Status value: Select the “In stock” option.
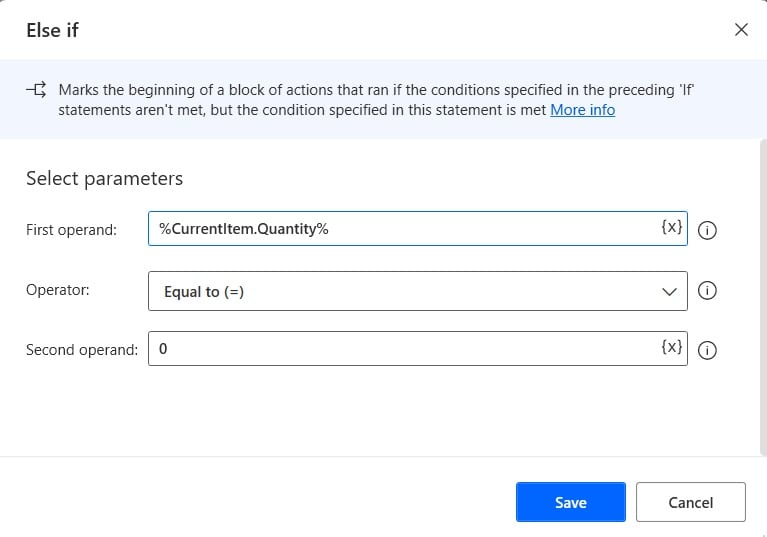
Step 6: Next, we will check the item Quantity = and update the status as Out of stock. For this, drag and drop the Else if action after the Update item action in Canvas. Then provide the below information:
- First Operand: Provide the first operand as below:
%CurrentItem.Quantity%- Operator: Provide the Operator as Greater than
- Second Operand: Provide the second operand as 0
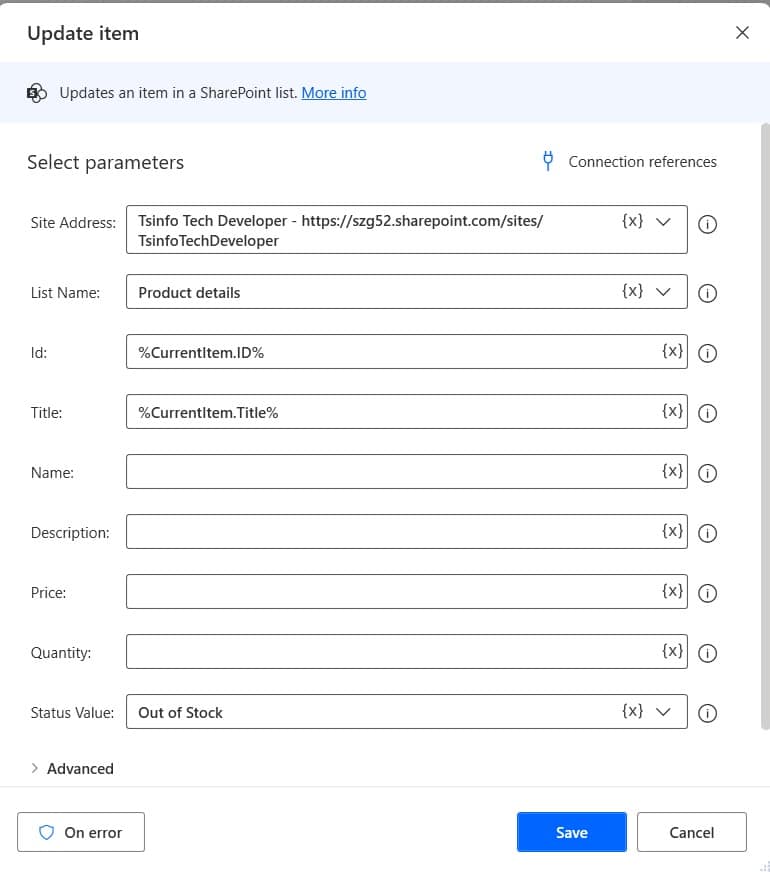
We will update the status of the item as Out of stock, for this, drag and drop the Update item action to Canvas. Then provide the below information:
- Site address: Select the SharePoint site address
- List name: Select the List name
- Id: Provide the id like below:
%CurrentItem.ID%- Title: provide the title like below:
%CurrentItem.Title%- Status value: Select the Out of Stock option.
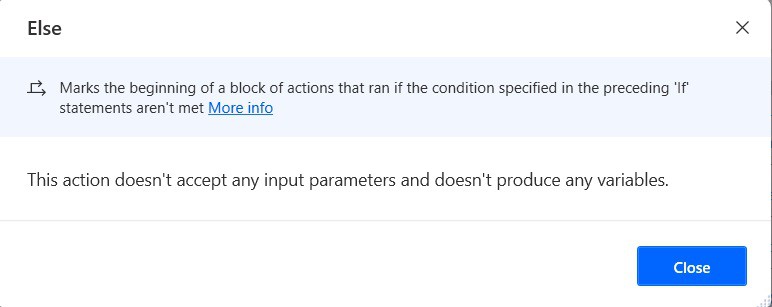
Step 7: Next, we will add the else part and update the status as Low stock. For this, drag and drop the Else action after the last Update item action in Canvas.
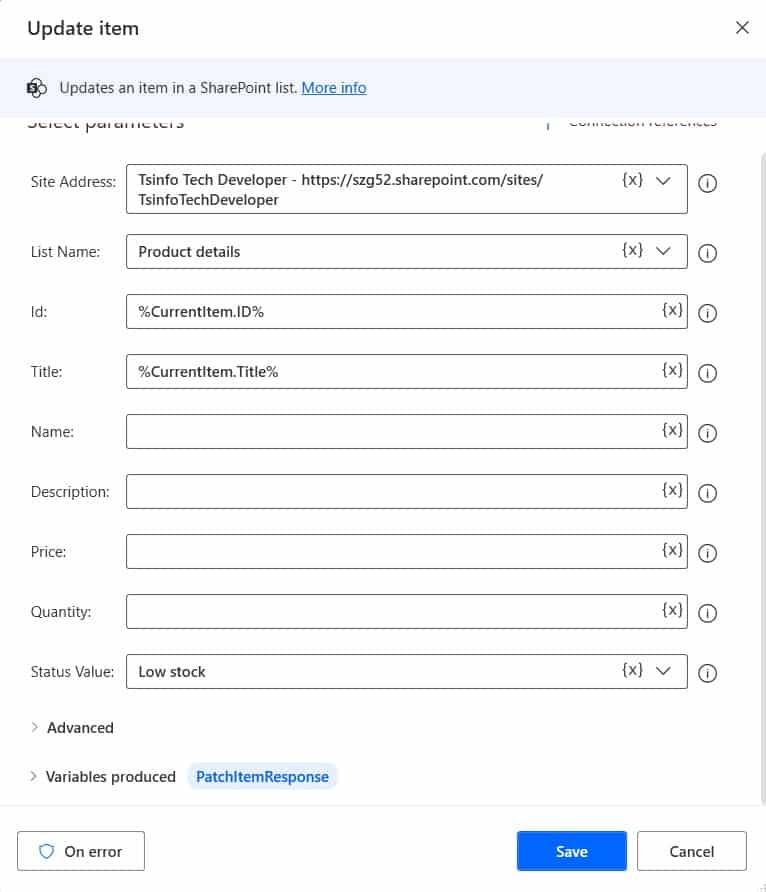
We will update the status as Low stock, for this, drag and drop the update item action in between the else action in Canvas. Then provide the below information:
- Site address: Select the SharePoint site address
- List name: Select the List name
- Id: Provide the ID like below:
%CurrentItem.ID%- Title: provide the title like below:
%CurrentItem.Title%- Status value: Select the Low stock option.
Step 8: Now run the flow by clicking on the run button. You can see the result: the status is updated based on the quantity of products.
This is how to update items in a SharePoint list using Power Automate Desktop.
Conclusion
In this Power Automate Desktop tutorial, we saw how to update items in the SharePoint list using Power Automate Desktop.
You may also like the following tutorials:
- Create and Delete an Item from a SharePoint List using Power Automate Desktop
- How to Get items from SharePoint List using Power Automate Desktop?
- Convert Data Table Columns to List in Power Automate Desktop
- Create a Word Document from a SharePoint list item using Power Automate
I am Bijay a Microsoft MVP (10 times – My MVP Profile) in SharePoint and have more than 17 years of expertise in SharePoint Online Office 365, SharePoint subscription edition, and SharePoint 2019/2016/2013. Currently working in my own venture TSInfo Technologies a SharePoint development, consulting, and training company. I also run the popular SharePoint website EnjoySharePoint.com