In this SharePoint tutorial, we will discuss how to open a SharePoint list in Excel or export a SharePoint list to Excel. I will also show how to update Excel from a SharePoint list automatically.
Whenever integrating data sources like Excel sheets and SharePoint, you may want to update the newly added data in Excel to the existing SharePoint list.
In this Power Automate tutorial, I will explain how to create a new item in the SharePoint list from Excel data and how to update the SharePoint list from Excel using Power Automate.
Open SharePoint list in Excel
Now, let’s see how to Open the SharePoint list in Excel. We will connect with the SharePoint Online site using Excel.
I have created a custom list of Employees on my SharePoint Online site. The list looks like the one below, with some data.
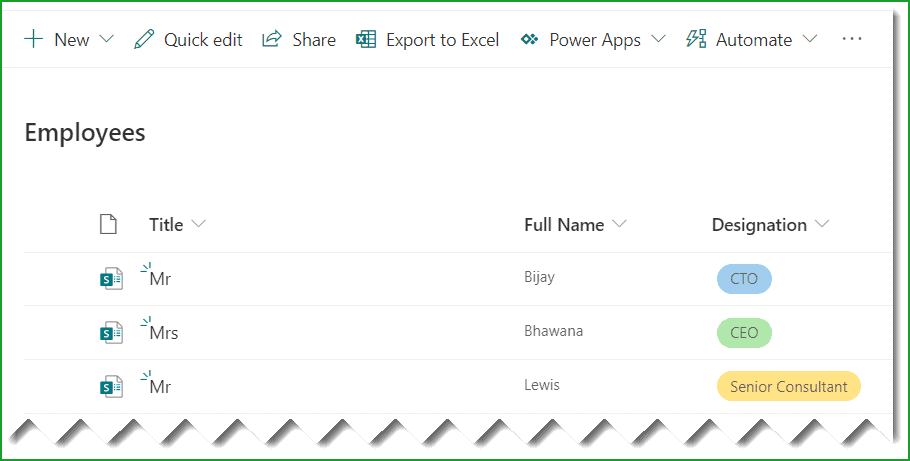
Now, let us see how to open this SharePoint Online list in Excel.
First of all, Open an Excel file on your desktop.
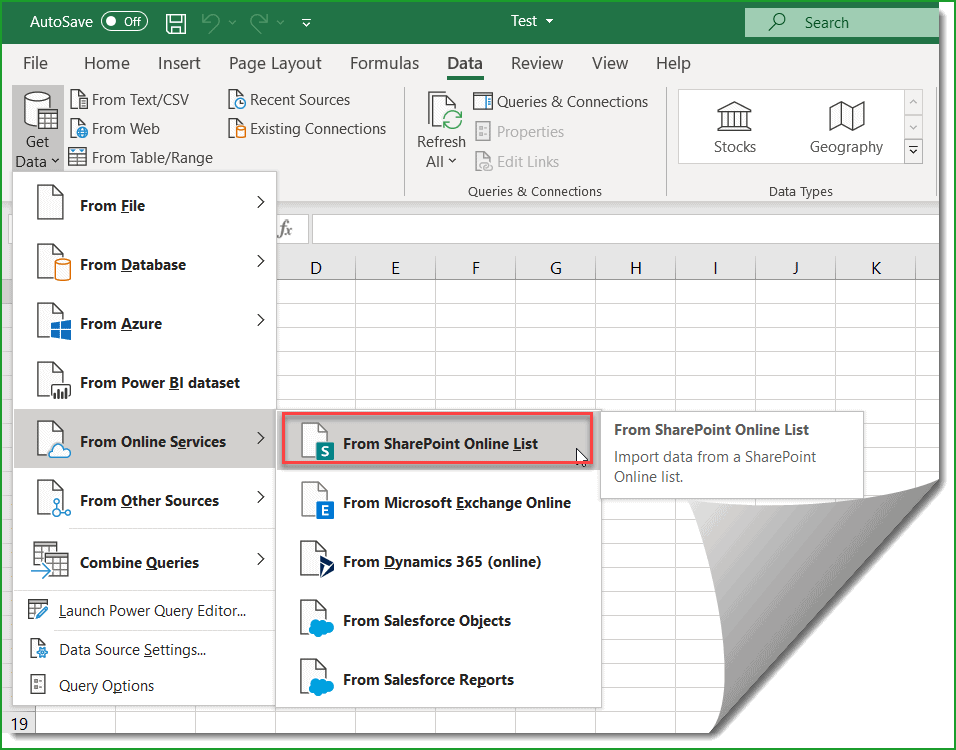
Then click on Data -> Get Data -> From Online Services -> From SharePoint Online List like below:
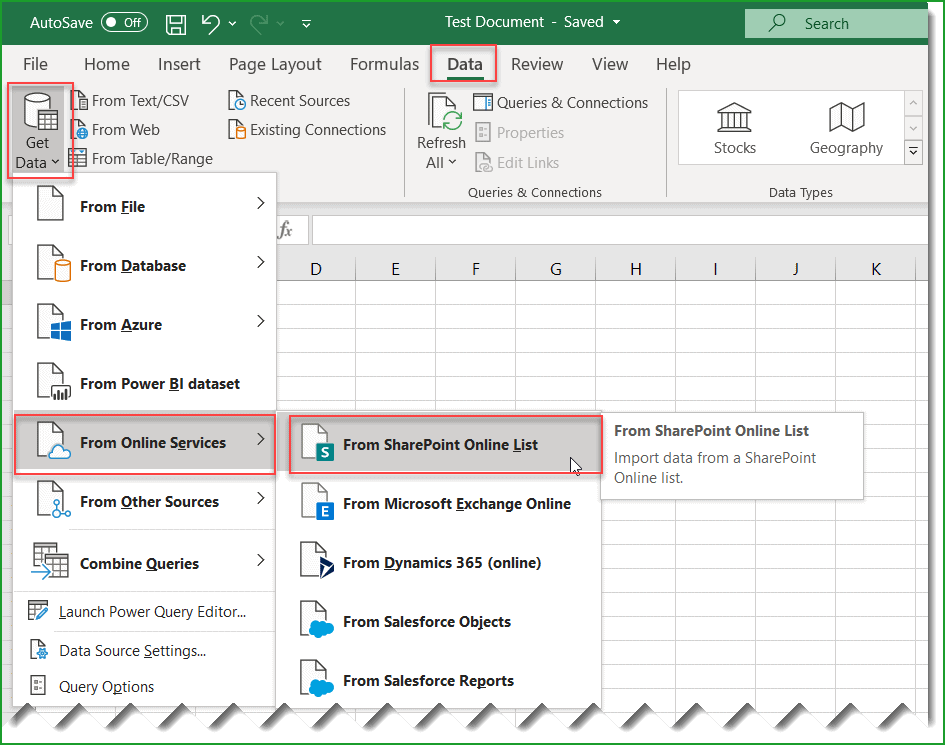
Then, it will ask you to provide the SharePoint Online Site URL, as shown below. You can also provide the list URL, but you might get an error.

Once you click on OK, it will ask you to enter the Credentials. Here, first select Microsoft account.
It will show the Sign-in button if you have not already signed in with a Microsoft 365 account.
Click on the Sign-in button, and then it will ask you to enter the username and password.
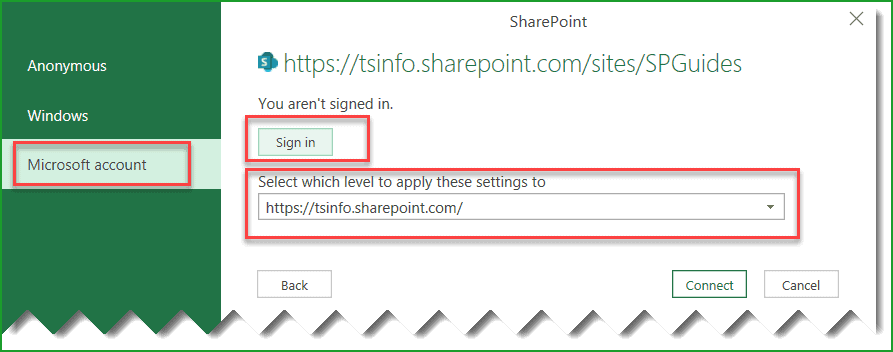
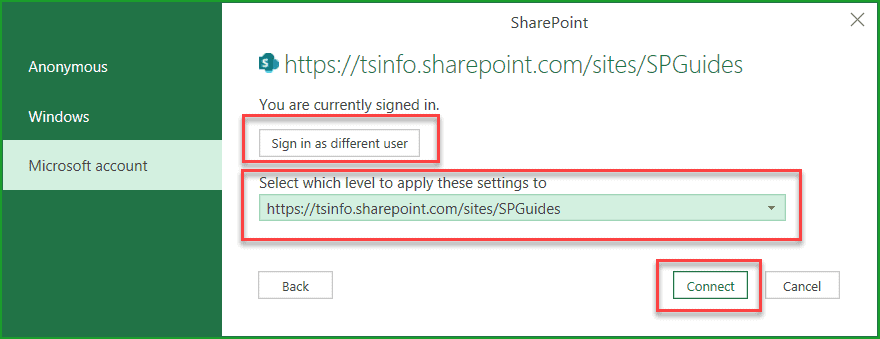
Then, it will show you Signing in as a different user. Then select the SharePoint site where your list exists.
Then click on the Connect button.
Then it will display all the lists and libraries on the SharePoint Online site.
Select the particular list. In this case, I selected the Employees list. The right site will display all the columns, including all the out-of-the-box hidden columns.
If you want to load all the columns, click the Load button.
But if you want to load the select columns, then click on the Transform Data button like below:
Here, I want to select a few specific columns from the SharePoint Online list.
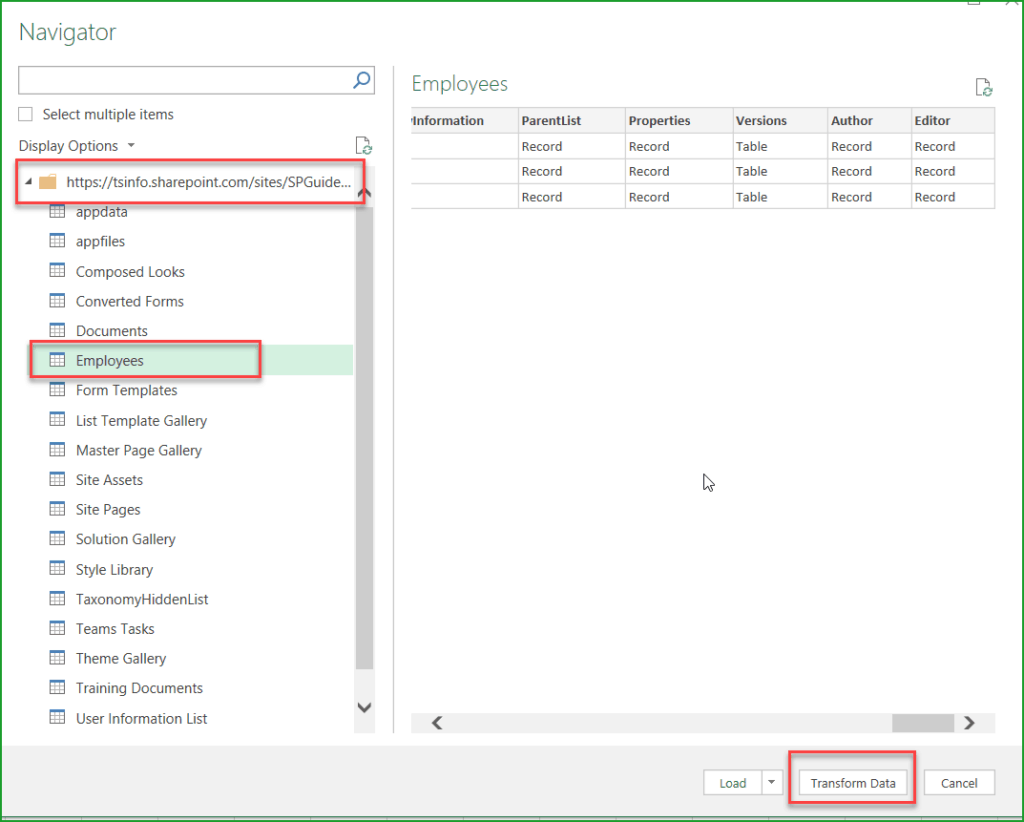
Once you click on the Transform Data button, the Excel Power Query Editor opens, from where you can select the columns that you want to display from the list.
Here, click on Home -> Choose Columns -> Choose Columns like below:
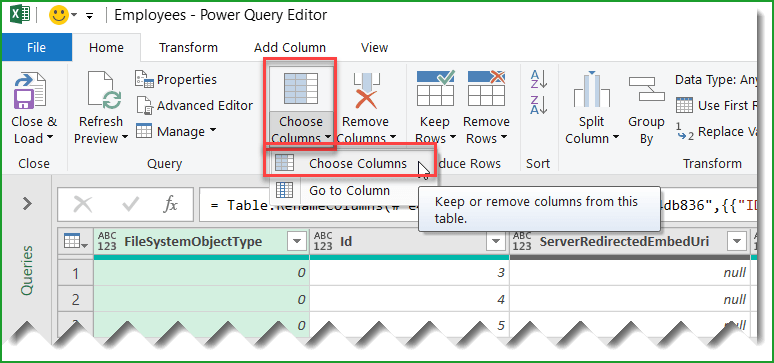
Then it will open a dialog box from where we can Choose Columns.
Here, you can uncheck every column and select only the required columns.
Here, I wanted to show the below SharePoint list columns:
- ID
- Title
- FullName
- Designation
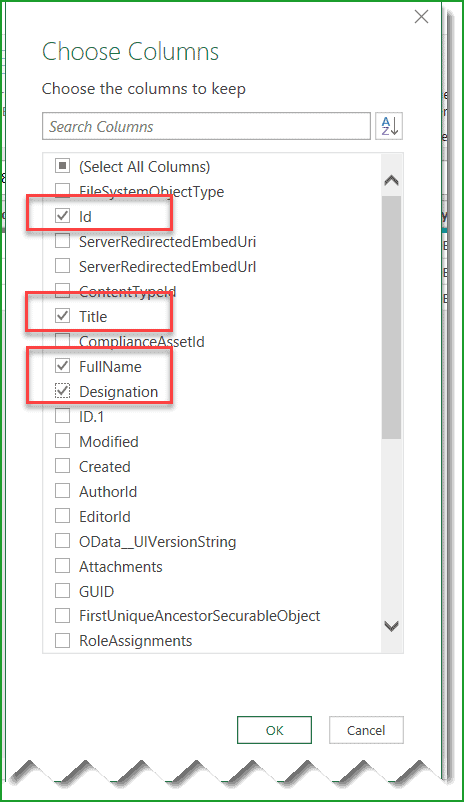
Once you click on Choose columns, then click on OK. Then Close & Load button from the ribbon, like below:
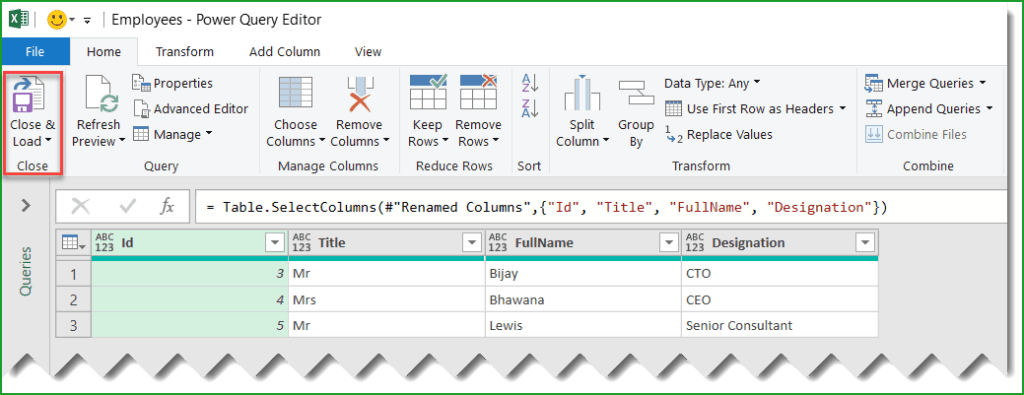
Now, you can see your SharePoint List data or items will be there in Excel.

This is how to open a SharePoint list in Excel.
Update Excel from a SharePoint list automatically
Once your SharePoint Online list data is in Excel, the next question is how to update Excel from the SharePoint list automatically.
This means that if you insert an item into a SharePoint Online list, it will automatically update the Excel spreadsheet from the SharePoint list.
From the Excel spreadsheet, click on Data -> Queries & Connections like below:

Then click on the Refresh icon like below:
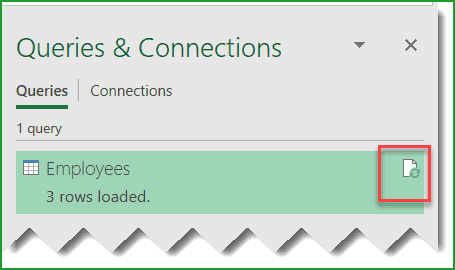
This will open the Query Properties dialog box, from which we can enable the auto-update Excel from the SharePoint list option.
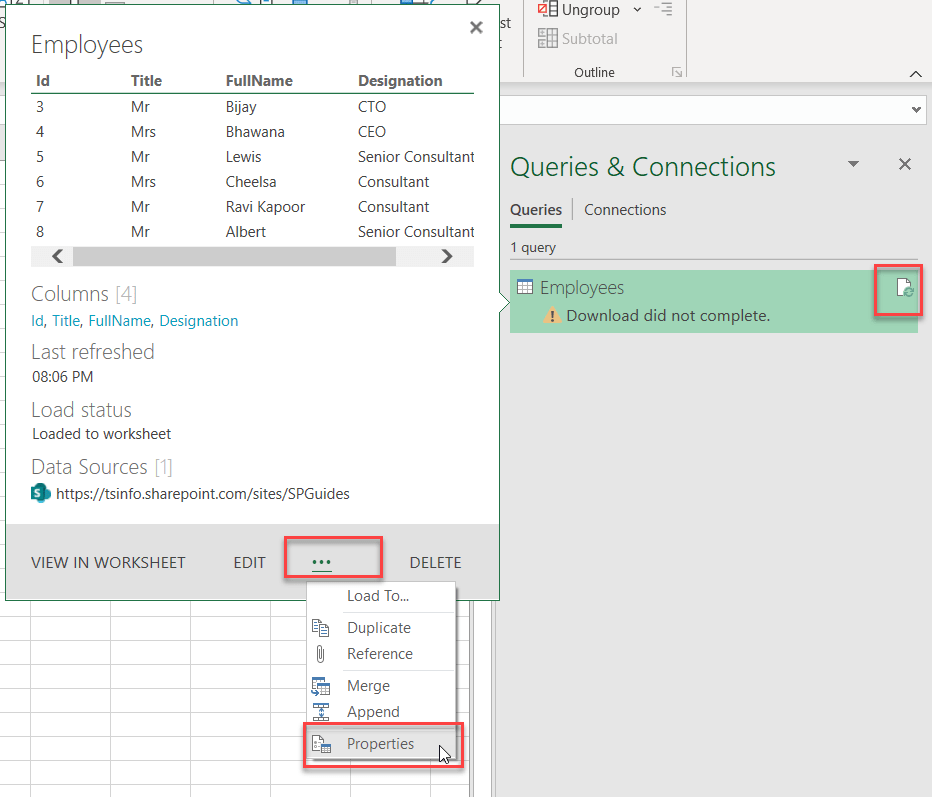
If the properties window did not open, then click on the Refresh icon, then click on …, and then click on Properties like below:
Here in the Query Properties dialog box, check the below checkboxes:
- Enable background refresh: Once you enable background refresh, list data will be refreshed and synced to Excel in the background.
- Refresh every minutes: Here, you can set the interval when you want the refresh to happen. I have set it for 2 minutes. So in every 2 minutes, the refresh will happen and if any new records are there in the SharePoint list, the list item will be synced with Excel.
- Refresh data when opening the file: If you enable Refresh data when opening the file, then when you open Excel, it will refresh the data.
- Refresh this connection on Refresh All: Once you enable this option, a refresh will happen when you click on the Refresh All button from the ribbon.
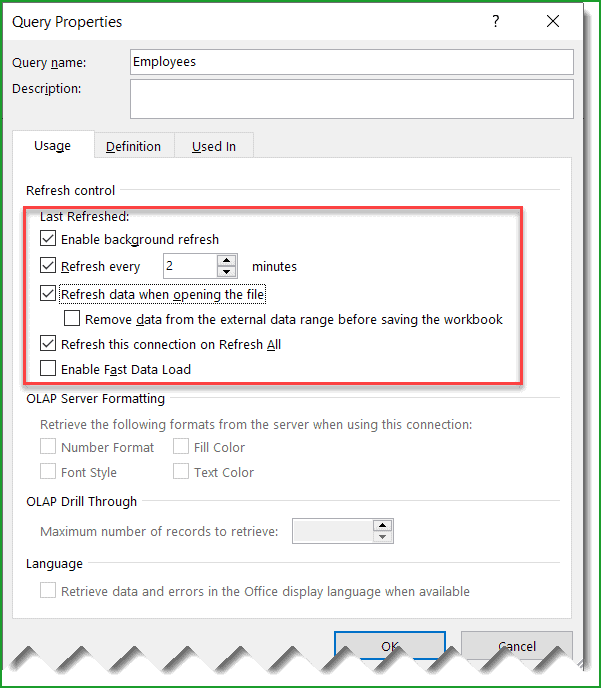
Click on OK.
Enter a few items to the SharePoint list, and wait for 2 minutes, it will update excel from SharePoint list automatically.
You can see here I have added 3 items to the SharePoint Online list.
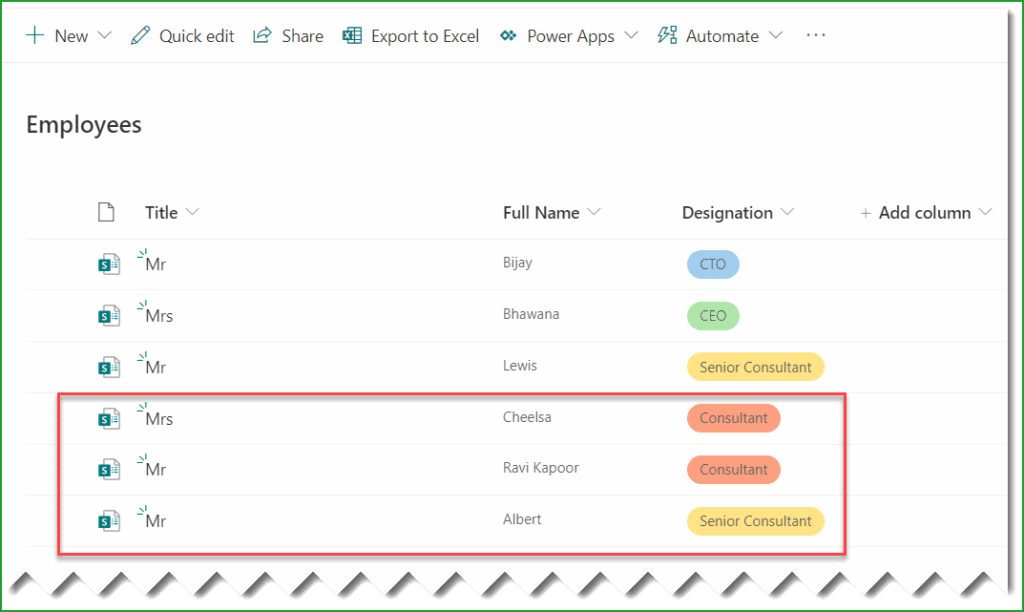
Once the automatic refresh happens, you can see the SharePoint list items have been automatically updated in Excel.
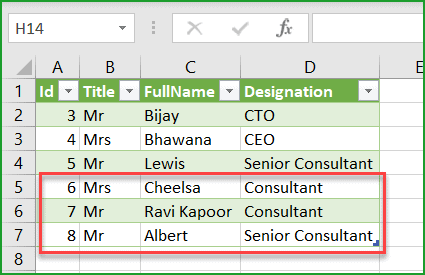
This is how we can update excel from SharePoint list automatically without using flow.
Update SharePoint List from Excel using Power Automate
I will show you an example of how to update the SharePoint list from the Excel data using Power Automate.
Example:
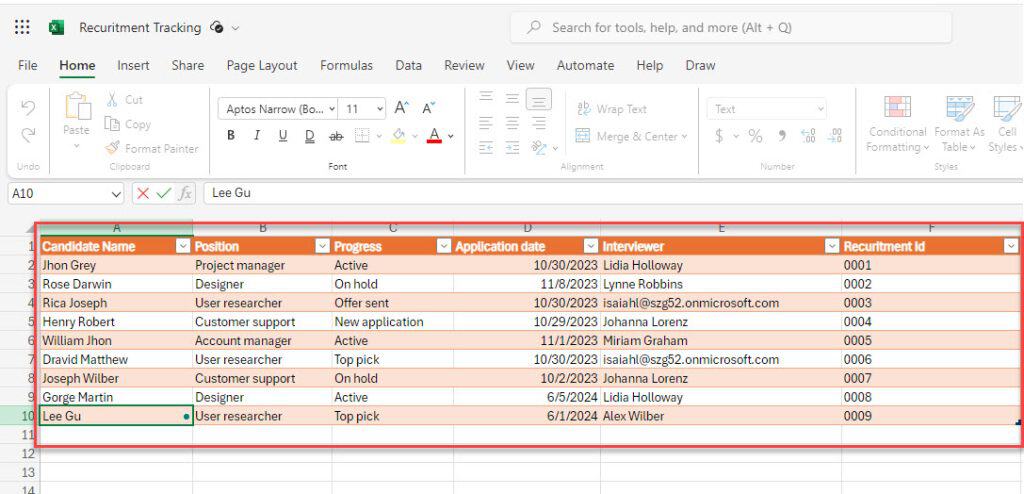
I have an Excel worksheet named ‘Recruitment Tracking‘ with a few columns, as shown in the figure below:
I also have a SharePoint list with the same name and with similar columns; check out the below image:
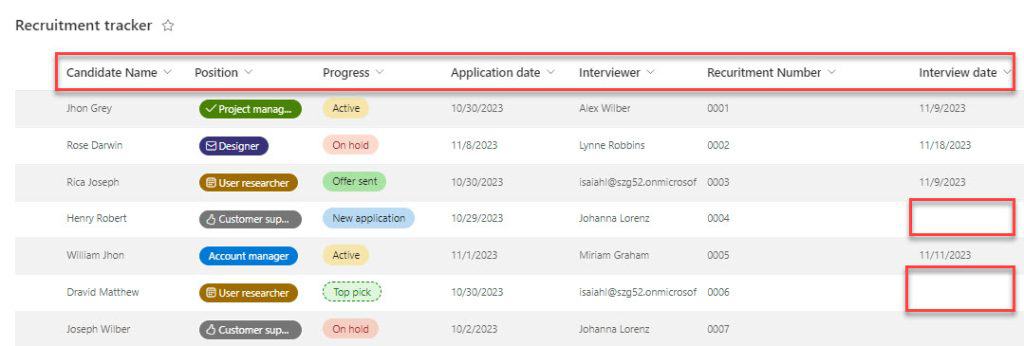
My requirement is to update the SharePoint list items automatically from an Excel spreadsheet that did not exist in the SharePoint list. After that, I need to update the Interview date column based on the Application date column.
To achieve this, follow the steps below:
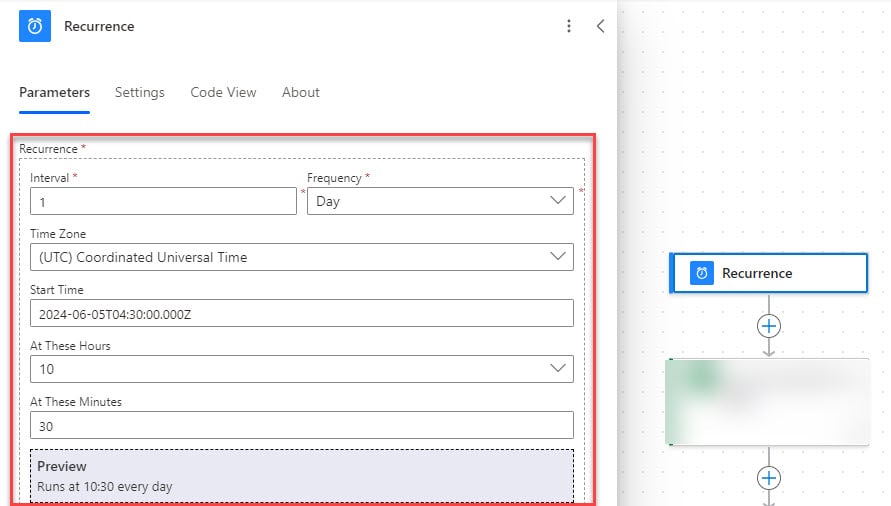
1. Log in to Power Automate, click on Create, select Scheduled cloud flow, and click on the Create button.
Provide the parameters below:
- Interval: Select the number of intervals.
- Frequency: Choose the frequency according to your requirements.
- Time zone: Select the Timezone the flow should run.
- At these Hours: Choose the Hours when the flow should run.
2. Below the trigger, Select and choose the List rows present in a table action. Provide the required parameters:
- Location – Choose the location where the Excel file is present.
- Document library – Select the document library where the Excel file exists.
- File – Select the file from which data needs to be extracted.
- Table – choose the table name of the Excel sheet from the drop-down options.
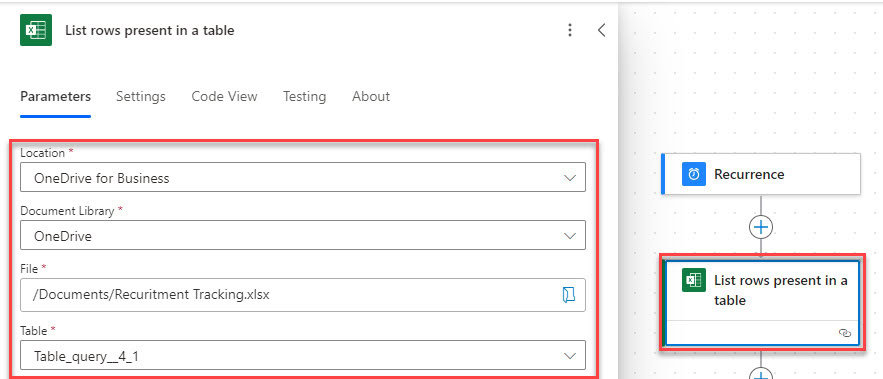
3. Then, add the Get items flow action to retrieve the list items and values from the SharePoint list. Provide parameters like Site Address and List Name.
- Filter Query: Insert the below-given expression that is placed inside the code.
Then, For each loop will be added automatically by taking boy/values from the list rows present in a table.
RecuritmentNumber eq '@{item()?['Recuritment Id']}'This filter query retrieves only the items that are present in both the Excel sheet and a SharePoint list.
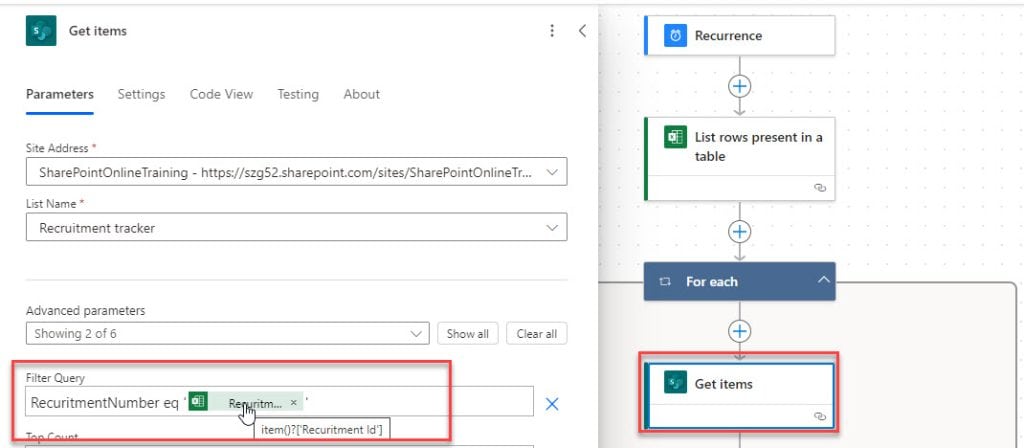
4. Under the Get items flow action, add Compose action to take Recruitment ID to update the Recruitment number in the SharePoint list.

5. After that, add a Condition control to add and update the list of items in SharePoint. If the list item is present, update it; otherwise, create a new item.
Condition:
- If the length of the body/value of get items is equal to ‘0’ -> Create a SharePoint Item; otherwise, update the item.
| Choose Value | Operator | Choose Value |
| length(outputs(‘Get_items’)?[‘body/value’]) | is equal to | 0 |

6. Under the True condition, take the Create item flow action. Set the following details, such as the Site Address and List Name.
Click on Showall to display the advanced parameters.
- Candidate Name: Choose a candidate name from dynamic content.
- Position Value: Select the Position value from the list rows in a table.
- Progress Value: Add Progress value under Excel list rows from dynamic content.
- Application Date: Add the expression below because Excel will give the date in ISO format.
- Interviewer: Select the interviewer column from the dynamic content.
- Recruitment Number: Add the compose outputs here.
Application Date: addDays('1899-12-30',int(item()?['Application date']),'yyyy-MM-dd')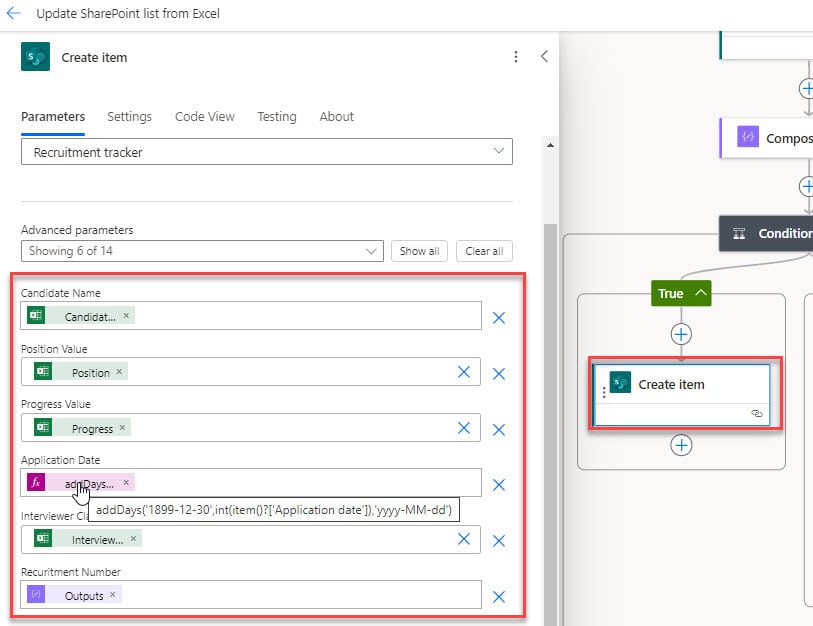
7. Under the False condition, I wanted to update the Interview Date value in the SharePoint list. Take the Update item action from the SharePoint connector.
Provide the site address and list name along with the below parameters:
- Id: Take the list item ID column of Get Items from the dynamic content.
- Interview Date: Insert the below expression that will add 10 days to the application date.
Then, For each loop will be applied automatically.
Interview Date: addDays(item()?['ApplicationDate'],10,'MM-dd-yyyy')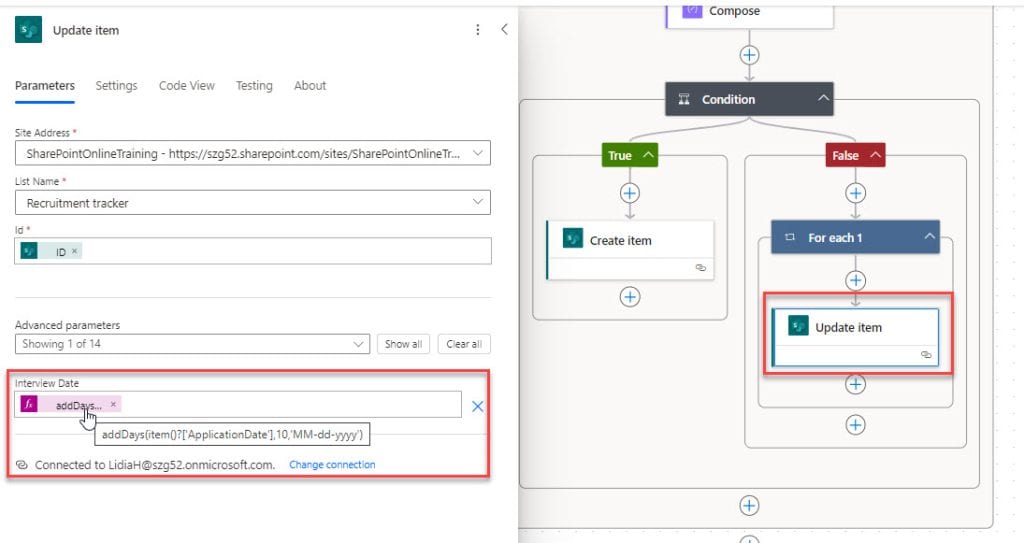
8. Once the flow is ready, click Save and run it manually by clicking the Runflow button.
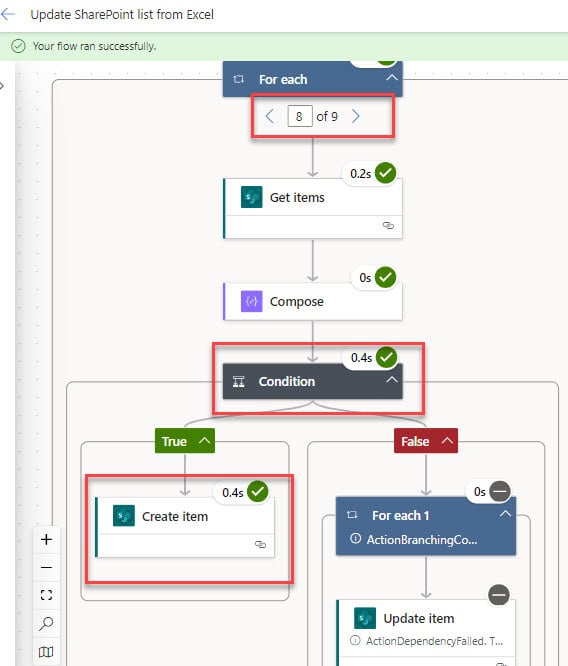
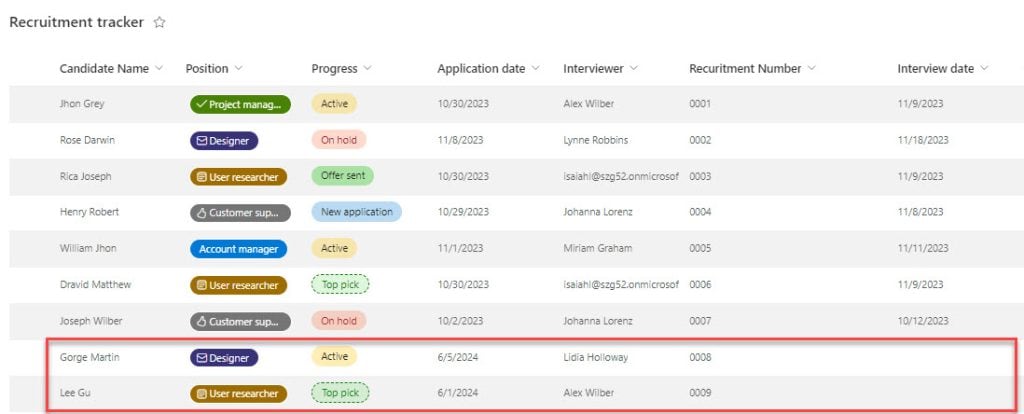
9. When the flow runs successfully, you can see that it will update the new list items that do not exist in the SharePoint list.
Refer to the image below:
10. If it meets the False condition, then it will update the SharePoint list item value [Interview Date] as shown in the below figure:
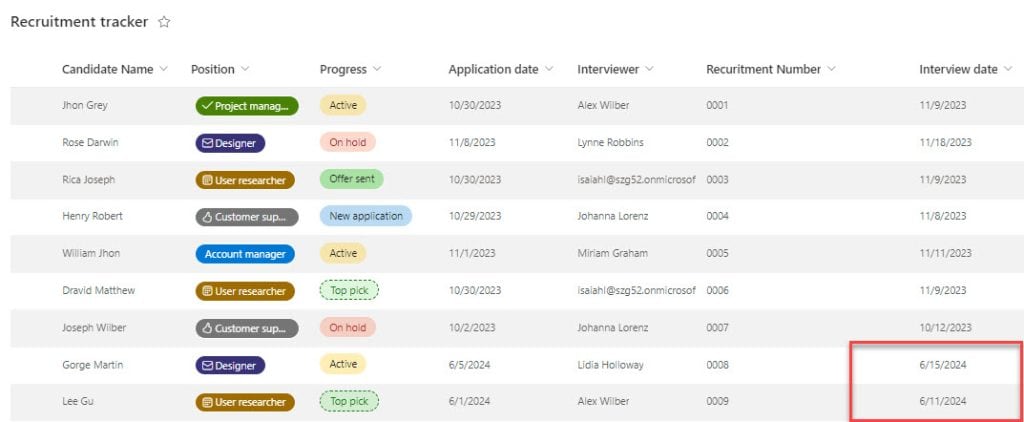
This is how to update the SharePoint list from the Excel spreadsheet using Power Automate.
Access to the resource is forbidden. Excel SharePoint
In the beginning, when I was trying to Open SharePoint list in excel, I got an error as access to the resource is forbidden excel SharePoint.
The error looks like below:
Unable to connect. We encountered an error while trying to connect. Details: “Access to the resource is forbidden“.

The error comes because I tried to get data by using the below method,
Data -> From Web, and then I enter the SharePoint site URL to connect.
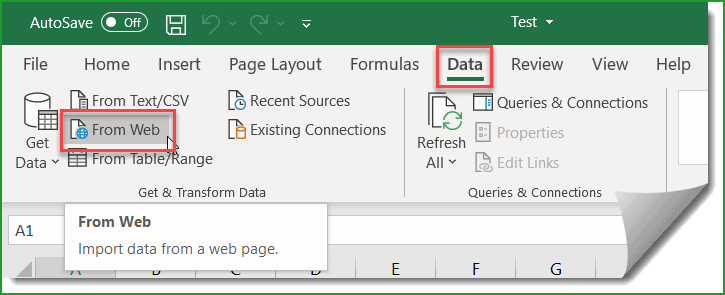
To fix excel sharepoint connection access to the resource is forbidden issue, the ideal way is to connect from Data -> Get Data -> From Online Services -> From SharePoint Online List.
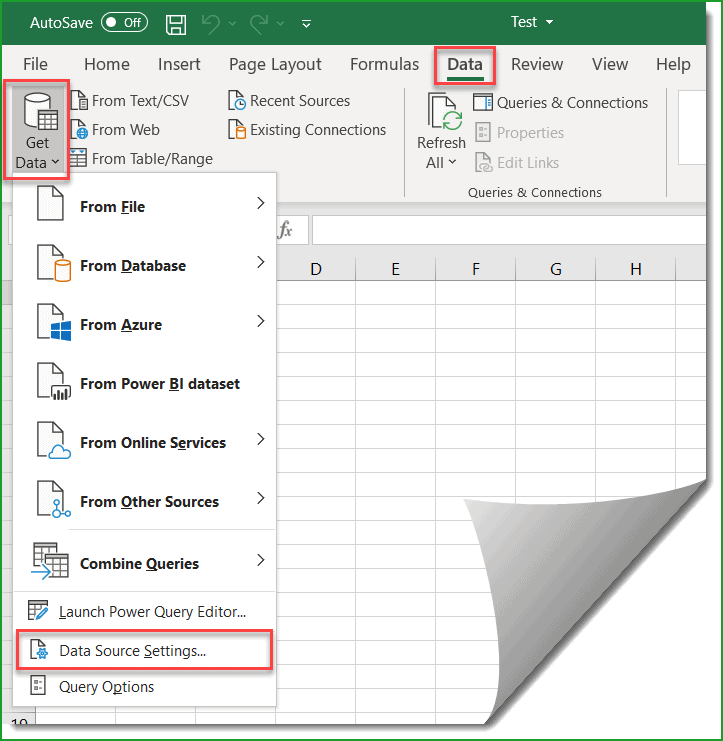
In case you want to check out all the SharePoint connections, then you can go to Data -> Get Data -> Data Souce Settings.
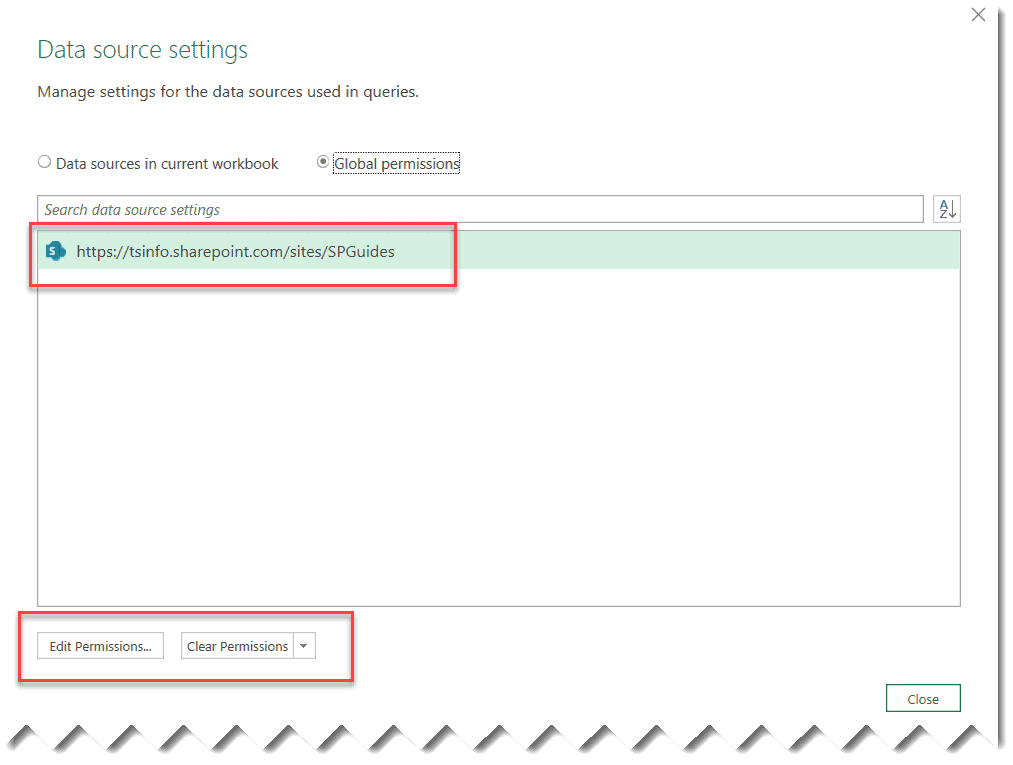
This will open the Data source settings page from where you can see all your data connections.
There, you can edit permissions, or you can also clear permissions and make the connection again.
This is how we can fix the error, access to the resource is forbidden excel SharePoint online.
In this tutorial, I have explained how to open a SharePoint list in Excel. Then I explained how to update Excel from a SharePoint list automatically. Finally, I have shown you the steps of how to update a SharePoint list from Excel using Power Automate.
You may like the following tutorials:
- How to loop through XML data and insert into Excel using Power Automate?
- How to send email from excel using Power automate?
- Copy Data from One Excel to Another Excel in Power Automate
- How to create an array from an Excel table using Power Automate?
- Create an HTML Table from Excel in Power Automate
I am Bijay a Microsoft MVP (10 times – My MVP Profile) in SharePoint and have more than 17 years of expertise in SharePoint Online Office 365, SharePoint subscription edition, and SharePoint 2019/2016/2013. Currently working in my own venture TSInfo Technologies a SharePoint development, consulting, and training company. I also run the popular SharePoint website EnjoySharePoint.com
Hello.
I am regular reader of your blog especially on PowerBI and PowerAUtomate. Can you please publish a blog that how to pull multiple excel to PowerBI (all the excel has same type of columns)? Can you please publish the step by step tutorial. I am using PowerBI Oct2020 version.
Regards
Avian
Hi ! Many thanks for your tutorial !
Is there an easy way to keep in sync excel file and linked list ?
F.E. – Add a row in Excel and update the list on Sharepoint
Edit or Delete a row from Sharepoint List and update the linked Excel file
Thanks in advanced for your help
Regards
Hi Mario, write data back is not possible “out of the box”.
You could do that with a 3rd party software that you install in Excel : Synchronizer for Excel and SharePoint. It will export your existing list to Excel, let you add rows in Excel, then sync it back to SharePoint as often as you want. After the sync, Excel also gets the updates from SharePoint, so that both always stay in Sync (Disclaimer: It is developed and maintained by my company.)
Can I open Sharepoint in Excel 2013?
Yes, follow the same steps.
Good Morning
i have found that Get Data from On-Line Services is available only to some Office 365 subscription
it’s unbelievable, in this case Microsoft Sucks
I have qq. Is the excel spreadsheet should be open all the time to automatically update it. When I closed the spreadsheet and update the record or add a row in SharePoint the excel will not update until I opened it. Please help
I have added this query connection Excel in SharePoint library. How to auto refresh this excel in the library without opening the excel file.
Hi Swa,
it’s unfortunately impossible as Excel is not opened, it can’t change the file.
You could write some script that would open the file, refresh and save the file, but it’s getting more technical.
Great help thank you. But when I try to convert my list to spreadsheet, the column of peoples names on sharepoint gets turned into numbers in excel. How do I fix this?
Hi Kathleen,
user names are usually well exported to Excel if these users are members of the site collection hosting your SharePoint list. (sorry for the late answer)
apparently you need a 365 enterprise license to get data from online services
This is a very good tutorial. Thank you team for this and hope to see more tutorials in future about Sharepoint online, powerapps and power automate.
How can we write back data? Great tutorial.
Hi Mario, write data back is not possible “out of the box”.
You could do that with a 3rd party software that you install in Excel : Synchronizer for Excel and SharePoint. It will export your existing list to Excel, let you add rows in Excel, then sync it back to SharePoint as often as you want. After the sync, Excel also gets the updates from SharePoint, so that both always stay in Sync (Disclaimer: It is developed and maintained by my company.)
Hi I was wondering if there is a way to update the excel list once it was connected to update sharepoint list.
Hi,
Is there any way on updating excel it will automatically update the sharepoint list without using power automate?
Thank you so much, this was the most helpful website
Thank you. This post has been very helpful.
Now that the connection is established, can updates done in the Excel file automatically update in SharePoint. I understand updates done in SharePoint will reflect in Excel but would it be able to do that the other way around