Do you want to copy one list items to another list in SharePoint using Power Automate? In this Power Automate tutorial, we will see how to copy list items to another list in SharePoint using Power Automate
Also, we will cover the below topics:
- Power Automate copy list item to another list in SharePoint
- Power automate copy list item to another list with attachments
Power Automate copy list item to another list in SharePoint
Here, we will see how to copy a list item to another list in SharePoint using Power Automate.
For example, I have a Sharepoint list called ‘Employee List’ (source list) which contains the below columns:
- Title-Single line of text
- Employee Name- Person
- Joining Date-Date/Time
- Department-Choice

When an item gets created in the above list, we will copy this item to another list in SharePoint i.e. User Directory. The User Directory list contains the following columns:
- Title-Single line of text
- Employee Name- Person
- Joining Date-Date/Time
- Department-Choice
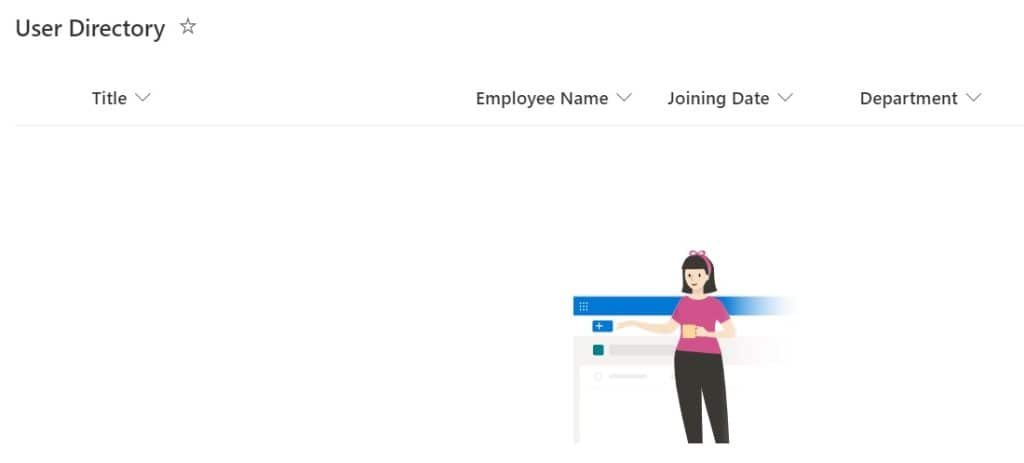
Let’s see how to copy list item to another list in SharePoint using Power Automate.
1. Open Power Automate Cloud, create an Automate Cloud Flow, and select the trigger action as ‘When an item is created’. Then provide the below information:
- Site address: Provide the SharePoint site address
- List name: Provide the SharePoint list name
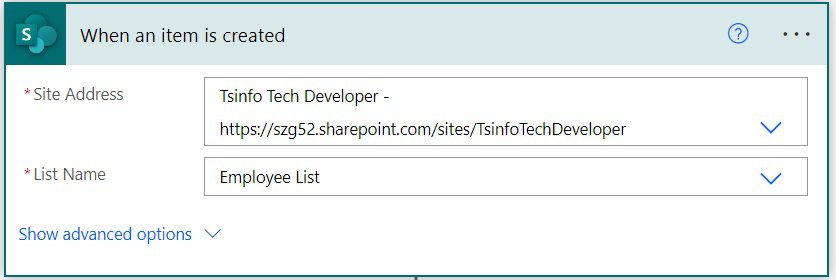
2. As copy item action is not available in Power Automate, so, we will create an item in the Destination SharePoint list. Later, we will delete items from the Source List in SharePoint.
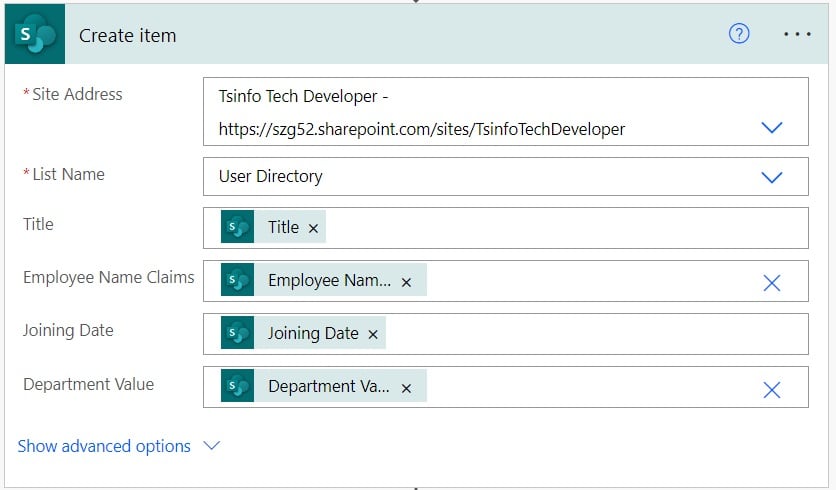
For this, click on the +New step -> select Create item action. Then provide the below information:
- Site address: Provide the SharePoint site address
- List name: Provide the SharePoint list name
- Title: Select Title from dynamic content.
- Employee Name Claims: Select Employee name Claims from dynamic content
- Joining Date: Select Joining Date from dynamic content
- Department: Select Department Value from dynamic content.
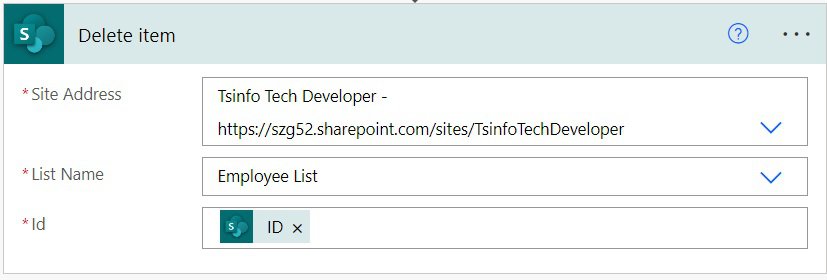
3. Now, we will delete an item from the Source list in SharePoint; for this, click on the +New step -> select Delete item action. Then provide the below information:
- Site address: Provide the SharePoint site address
- List name: Provide the SharePoint list name
- Id: Select ID from dynamic content.
4. Now save and run the flow manually. Then, create an item in the SharePoint Employee list

You can see the item get copied to the destination SharePoint list in Power Automate

This is how to copy items from one list to another list using Power Automate.
Power Automate copy list item to another list
Here, we will see how to copy list items to another list in SharePoint using Power Automate.
For example, I have a Sharepoint list called ‘Employee List’ (source list) which contains the below columns:
- Title-Single line of text
- Employee Name- Person
- Joining Date-Date/Time
- Department-Choice
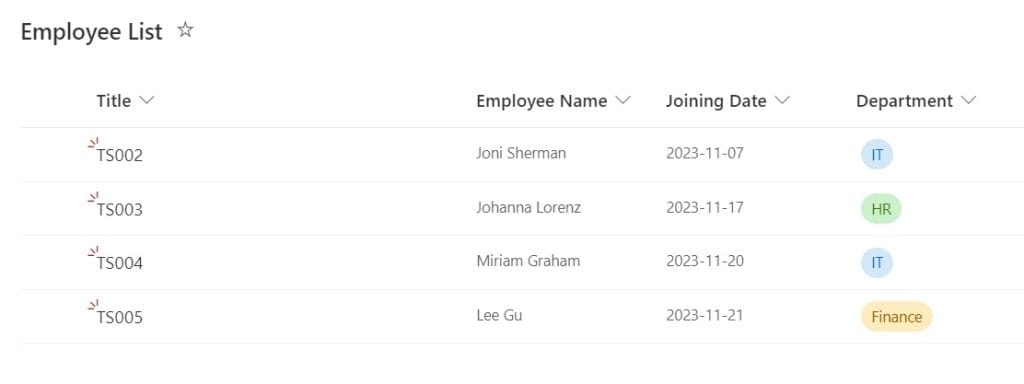
We will copy all items available in the above SharePoint list to the destination list i.e. User Directory, automatically using Power Automate. The User Directory list in SharePoint contains the below columns:
- Title-Single line of text
- Employee Name- Person
- Joining Date-Date/Time
- Department-Choice

Let’s create a flow in Power Automate that will copy list items to another list in SharePoint.
1. Open Power Automate Cloud, and create an Instant Cloud flow that will trigger manually.

2. Next, we will get items from the SharePoint list; for this, click on the +New step -> select Get items action. Then provide the below information:
- Site address: Provide the SharePoint site address
- List name: Provide the SharePoint list name
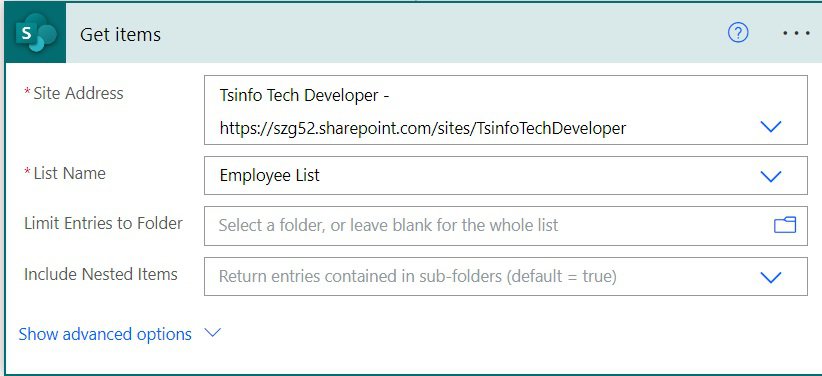
3. We will create items in the Destination SharePoint list; for this, click on the +New step -> select Create items action. Then provide the information below
- Site address: Provide the SharePoint site address
- List name: Provide the SharePoint list name
- Title: Select Title from dynamic content. Once you add the title, it will automatically add Apply to each action to the flow.
- Employee Name Claims: Select Employee name Claims from dynamic content
- Joining Date: Select Joining Date from dynamic content
- Department: Select Department Value from dynamic content.
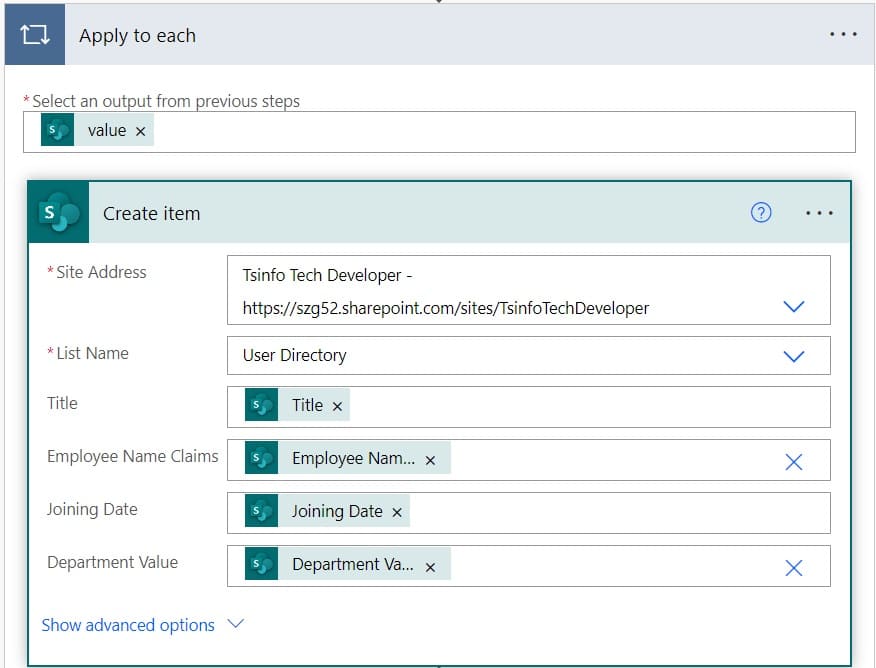
4. Next, we will delete an item from the SharePoint list; for this, click on the Add an action-> select Delete item action. Then provide the below information:
- Site address: Provide the SharePoint site address
- List name: Provide the SharePoint list name
- Id: Select ID from dynamic content.
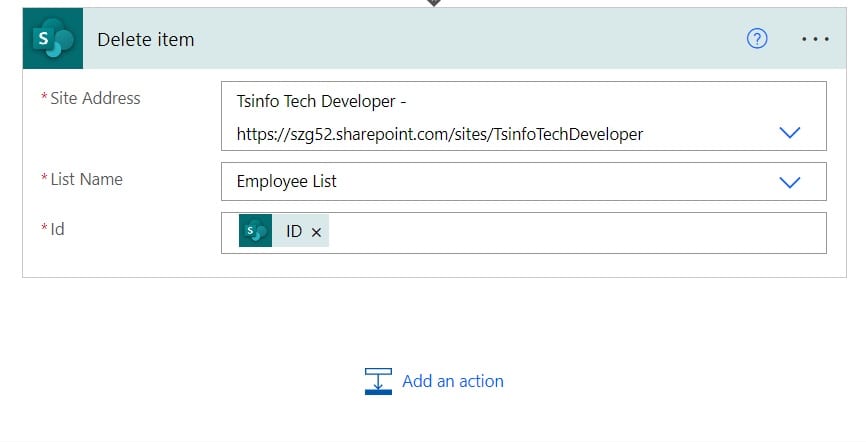
5. Now save and run the flow manually, and you can see Power Automate copy all items from one list to another list in SharePoint.
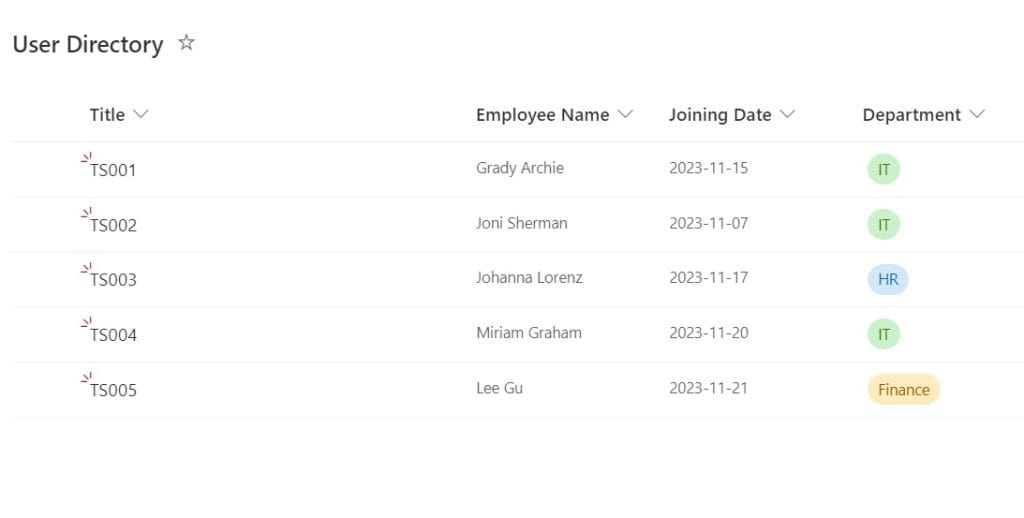
This is how to copy all items to another list in SharePoint using Power Automate.
Power Automate copy list item to another list with attachments
Here, we will see how to copy SharePoint list item to another list with attachments using Power Automate
For example, I have a SharePoint list called Projects, which contains the following columns:
- Title-Single line of text
- Assigned to – Person
- Start Date-Date and Time
- End Date-Date and Time
- Due Date-Date and time
- Task Status- Choice [ Pending, Completed, Not started]
- Description: Multiple lines of text
- Attachments- Attachment [Enable this column from the Show or Hide option]

In the above SharePoint list, whenever a project is completed, the status gets changed from Pending to Completed. Simultaneously, we will provide the end date of that project. We will copy these completed projects to another SharePoint list with attachments i.e., Projects Completed.
The Projects Completed list in SharePoint contains the following columns:
- Title-Single line of text
- Assigned to – Person
- Start Date-Date and Time
- End Date-Date and Time
- isCompleted -Yes/No
- Attachments- Attachment [Enable this column from the Show or Hide option]

Let’s see how to copy list items to another list with attachments SharePoint using Power Automate.
1. In Power Automate Cloud, create an Automate Cloud Flow and select ‘When an item or file is modified’ as the trigger action.
Now ‘When an item or file is modified‘ action is added to the flow, provide the below information:
- Site address: Provide the SharePoint site address.
- List\Library name: Select Projects List
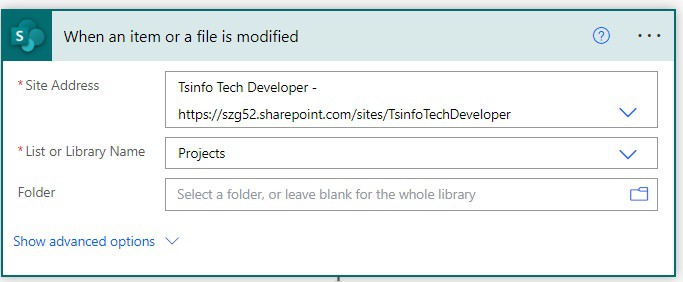
2. To check the task status is completed, click on +New step -> select Condition action. Then, provide the information below.
- Choose a value: Select a Status value from dynamic content.
- Operator: Select is equal to
- Choose a value: Write Completed from dynamic content

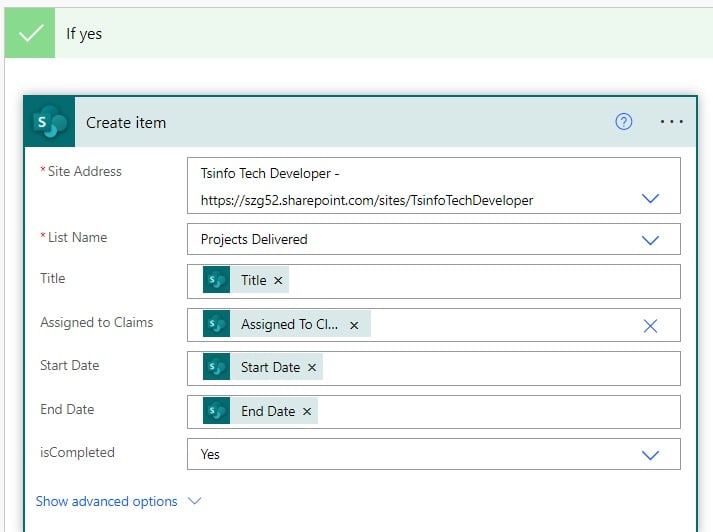
3. If the condition is true, then we will copy items to the Project Delivery list in SharePoint. For this, click on Add an action and select Create item action. Then provide the below information:
- Site address: Provide the Destination site address.
- List name: Provide the destination List name
- Title: Select Title from dynamic content
- Assigned to Claims: Select Assigned to Claims from dynamic content.
- Start Date: Select Start date from dynamic content
- End Date: Select the End date from the dynamic content
- isCompleted: Select Yes
4. Also, we will copy attachments from one list to another in Power Automate. To do this, we will get the attachment from the list, so click on Add an action and select “Get attachments” action. Then, provide the information below.
- Site address: Select the source SharePoint site address
- List name: Select the source List name.
- Id: Select Id from dynamic content

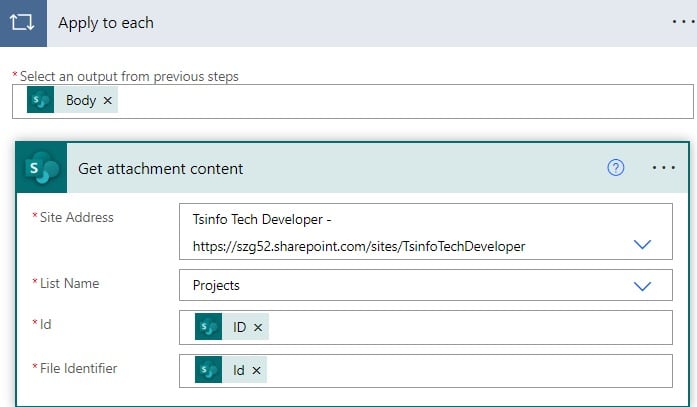
5. Now we will get the attachment content, for this, click on Add an action and select ‘Get attachment content’ action. Then provide the below information:
- Site address: Select the SharePoint site address.
- List name: Select the list from the dropdown.
- Id: Select ID from dynamic content. This will automatically add Apply to each action to the flow.
- File identifier: Select Id from dynamic content
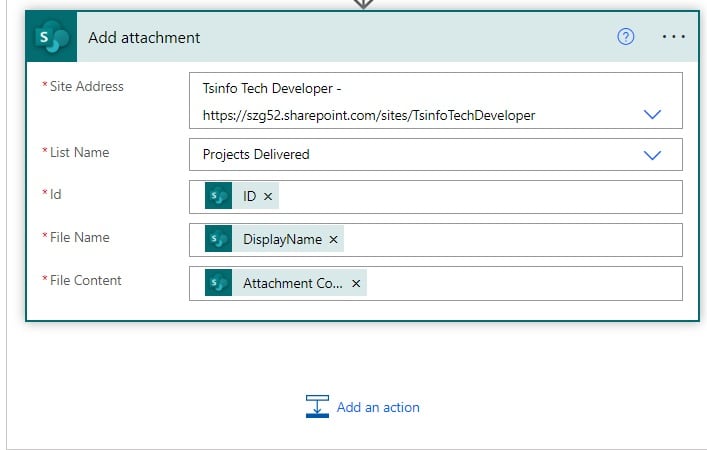
6. To add the attachment to the Project Delivered List; for this, click on Add an action and select “Add attachment” action. Then provide the below information:
- Site address: Select the SharePoint site address.
- List name: Select the list from the dropdown.
- Id: Select the Id from dynamic content.
- File name: Select Display name from dynamic content.
- File Content: Select Attachment Content from dynamic content.
7. Finally, we will delete the items from the SharePoint list. For this, outside the condition action, click on +New step -> select Delete item action. Then provide the below information:
- Site address: Provide the SharePoint site address.
- List name: Provide the source list name
- Id: Select the id from dynamic content.

8. Now save and run the flow manually, go to the source list in SharePoint, modify the status to Completed, and provide the End date.

Once your flow runs successfully, you can see that item get copy to another list in SharePoint using Power Automate.

This is how to copy items and attachments from one SharePoint list to another using Power Automate.
Conclusion
In this Power Automate tutorial, we saw how to copy SharePoint list items to another using Power Automate. Also, we saw how to copy a list item to another using Power Automate. Finally, we saw how to copy items and attachments from one SharePoint list to another using Power Automate.
You may also like:
- Power Automate save email attachment to SharePoint
- Power Automate delete all files in SharePoint folder
- Power Automate Leave Request Approval Example
- Auto Populate SharePoint List Columns Based on Value in One Column using Power Automate
I am Bijay a Microsoft MVP (10 times – My MVP Profile) in SharePoint and have more than 17 years of expertise in SharePoint Online Office 365, SharePoint subscription edition, and SharePoint 2019/2016/2013. Currently working in my own venture TSInfo Technologies a SharePoint development, consulting, and training company. I also run the popular SharePoint website EnjoySharePoint.com
I am having issues as my column is called Region Name with a space between. The flow keeps failing on this as it may be considering this to be two different columns. I noticed that you stated above “2. For example, if you have columns for the First Name and Last Name in the source list, and a column for Full name in the destination list, you could type: FullName eq ‘[First name] [Last name]’.”
You have a column for Full name but in the statement you put FullName with no space. I tried this and it also failed. If there is a space in the column name, how do I specify this? The space is in both the source and destination and I’m not sure if the first part of the statement is referring to the source which I cannot change.