Do you want to create a Microsoft Teams meeting using Power Automate? This Power Automate tutorial will show us how to create a Microsoft Teams meeting using Power Automate.
Here, we will cover the topics below:
- What is Power Automate in Microsoft Teams?
- Create Teams meeting Power Automate
- Power Automate send teams message to individual user
- Microsoft Teams send message to multiple users Power Automate
- Power Automate gets team members
- Power Automate gets teams’ message content
- Power Automate schedule teams’ message
What is Power Automate in Microsoft Teams?
Power Automate in Microsoft Teams is a tool that helps automate tasks and processes within the Teams platform. It allows users to create workflows that can trigger actions based on various events in Teams, like receiving a message, adding a file, or updating a channel.
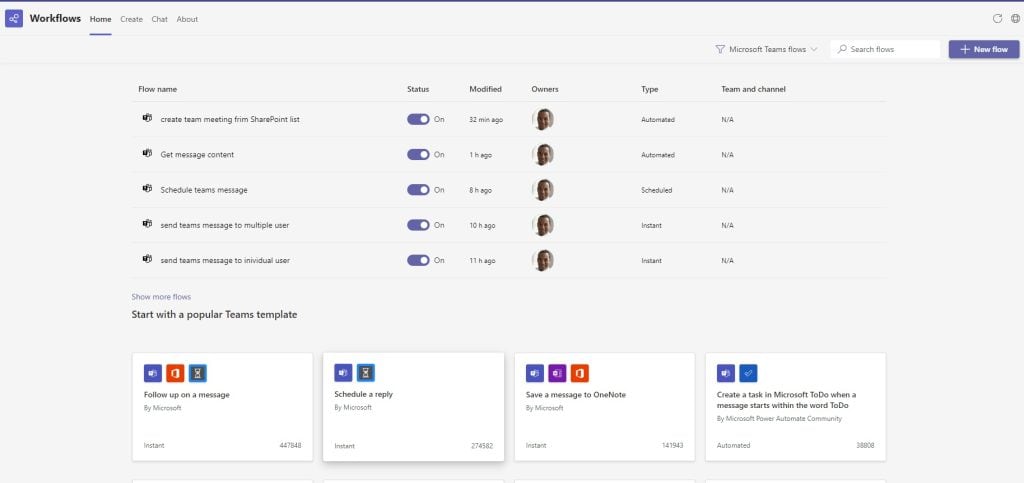
To access Power Automate in Microsoft Teams, you can search for Workflows in the Apps section. Once it opens, you can see the flow you have created in Power Automate and the templates in the Home tab. If you want to create the flow in Microsoft Teams,, you can click on the +New flow button in the Workflow home tab.
Create teams meeting Power Automate
Here, we will see how to create Teams Meeting using Power Automate with different examples.
Example 1: How to create Teams meeting using Power Automate
With Power Automate, we can create Teams meetings and invite people to attend them. Let’s follow the steps below to create a team meeting in Power Automate.
1. Open Power Automate Cloud and create an Instant cloud flow that will trigger Manually.

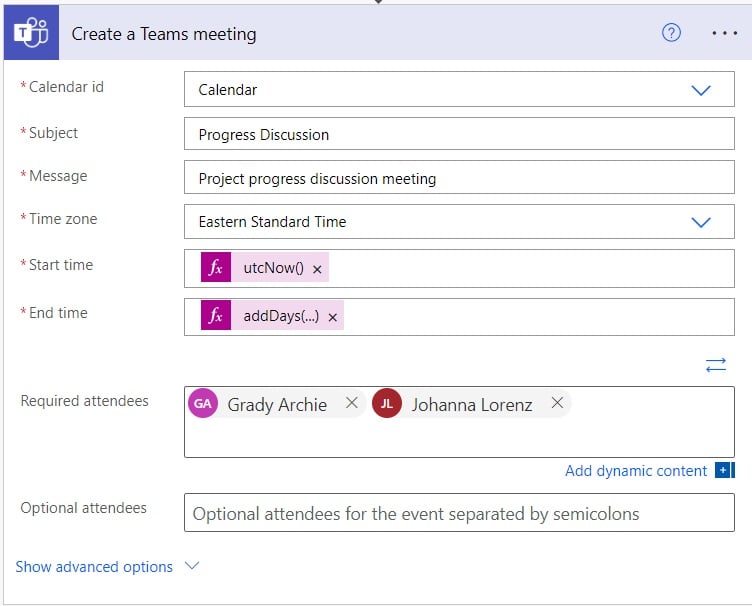
2. Next, we will create a Teams meeting in Power Automate; for this, click on the +New step -> select Create a Teams meeting action. Then provide the below information:
- Calendar Id: Select the Calendar Id
- Subject: Provide the subject of teams
- Message: Provide the message like below
- Time zone: Select the time zone
- Start time: Provide the start time of the team meeting. I have used the below expression:
utcNow()- End time: Please provide the end time of the team meeting. I have used the expression below, which will add 1 hour to the start time.
addDays(utcNow(),1)- Required Attendees: Provide the required attendees who will definitely attend the meeting.
- Optional Attendees: Provide the optional attendees.
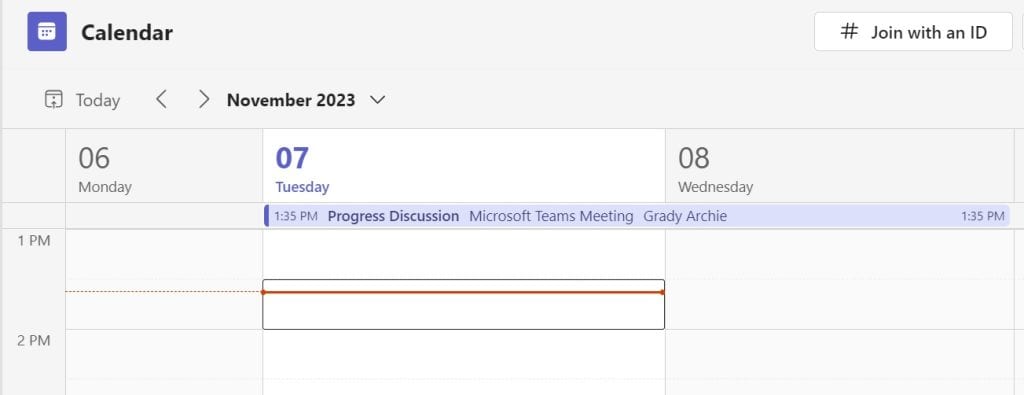
3. Now runs the flow manually, and you can see teams meeting is created in Microsoft Teams.
Example 2: How to create Teams meeting from SharePoint list using Power Automate
For example, I have a SharePoint list called Meeting, which contains the following column.
- Title: Single line of text
- Start Date: Date and Time
- End Date: Date and Time
- Message: Multiple line of text
- Attendees: Person [Enable multiple selection]

When we create a new meeting in the SharePoint meeting list, meetings will automatically get created in the Microsoft Teams calendar. To do this using Power Automate, I have followed the below steps.
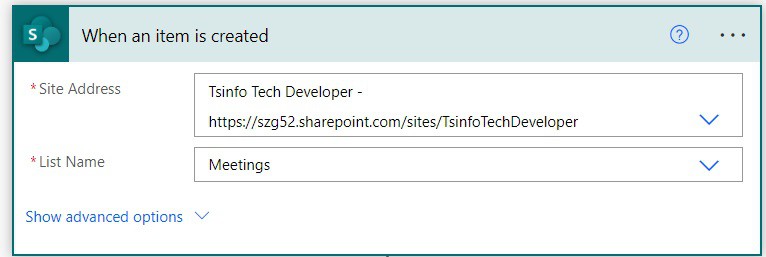
1. Open Power Automate Cloud, and select Automated Cloud Flow. Then select the trigger action as ‘When an item is created.’ Then, provide the information below.
- Site address: Provide the SharePoint site address.
- List name: Select the List name from the dropdown.
2. We will now initialize a string variable to collect the attendees’ emails. So click on the +New step -> select Initialize variable action. Then provide the information below
- Name: Provide the variable name
- Type: Select the type as String.

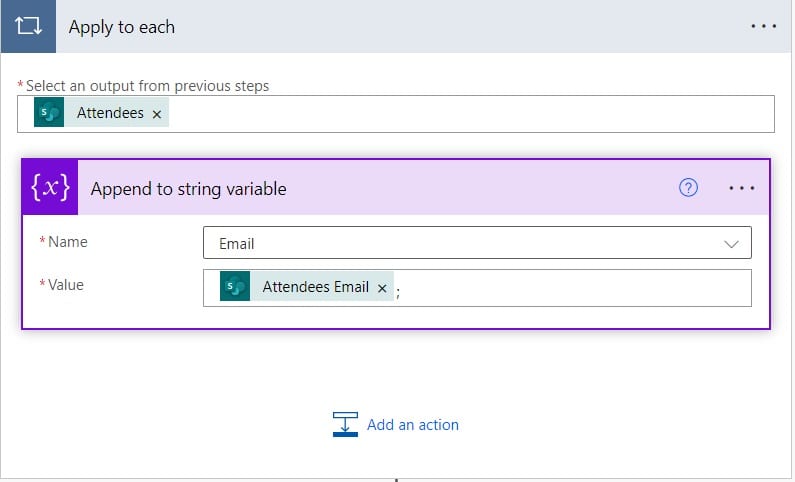
3. To add the attendees to the meeting, we first need to collect the email. For this, click on the +New step, -> select Append to String variable action. Then provide the below information:
- Name: Select the Name of the variable.
- Value: Select the Attendees Email from dynamic content and then provide the semicolon ‘;’. This will automatically add Apply to each action to Power Automate flow.
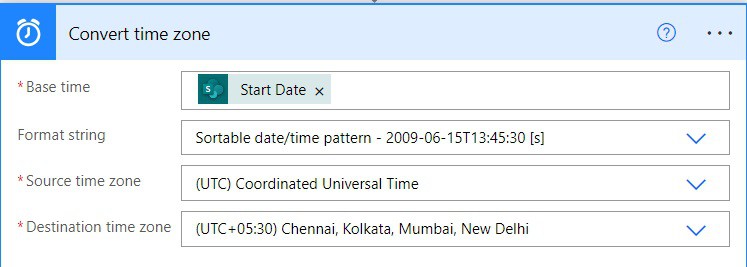
4. Now, we will convert the start date time, which is in UTC, to the destination time zone. For this, click on the +New step -> select Convert time zone action. Then provide the below information:
- Base Time: Select the Base time.
- Format string: Select date time format from the option.
- Source time zone: Provide the Source time as UTC
- Destination time zone: Provide the Destination time zone.
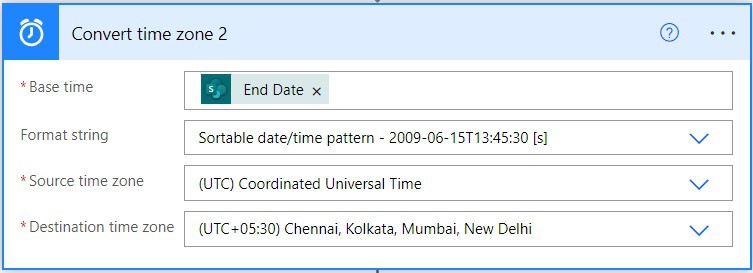
4. Now, we will convert the end date time, which is in UTC to the destination time zone. For this, click on the +New step -> select Convert time zone action. Then provide the below information:
- Base Time: Select the Base time.
- Format string: Select date time format from the option.
- Source time zone: Provide the Source time as UTC
- Destination time zone: Provide the Destination time zone.
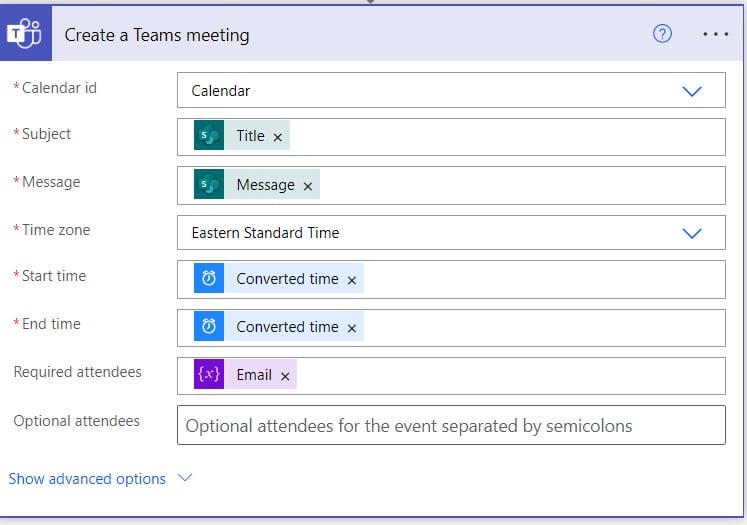
6. To create a Teams meeting, click on the +New steps -> select the ‘Create a Teams meeting‘ action. Then provide the below information:
- Calendar Id: Select the Calendar Id
- Subject: Select Title from dynamic content.
- Message: Select the Message from dynamic content
- Time zone: Select the time zone
- Start time: Select the Start date from dynamic content
- End time: Select the End date from dynamic content
- Required Attendees: Select the Attendee’s email from dynamic content.
5. Now save and run the flow manually, and create a meeting in the SharePoint list like below

It will automatically create a Teams meeting in Microsoft Teams like the one below.
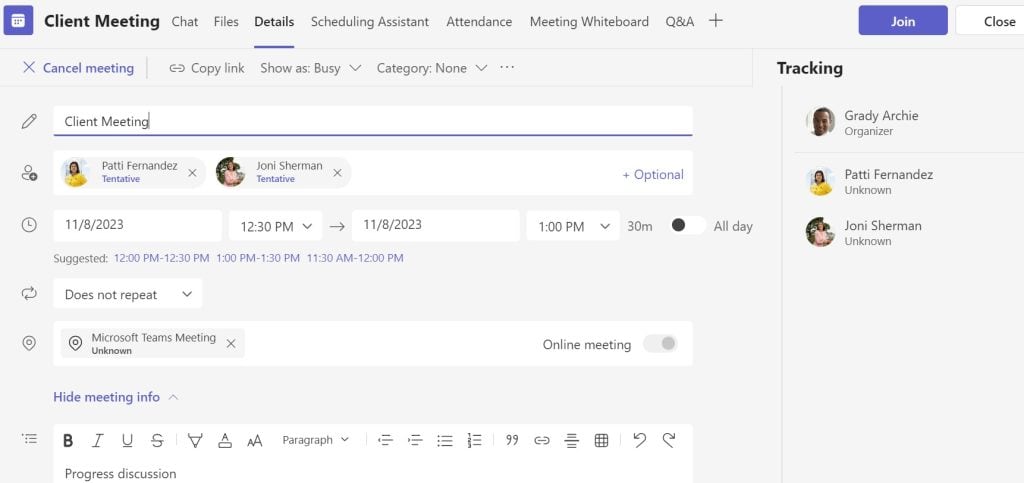
This is how to create a Teams meeting using Power Automate.
Power Automate send teams message to individual user
Here, we will see how to send Teams messages to individual users using Power Automate.
Let’s say you want to send a message to a particular user in Teams using Power Automate. To do this in Power Automate, I have followed the below steps.
1. In Power Automate Cloud, create an Instant Cloud flow that will trigger manually.

2. Next, add 2 fields (i.e. Email and Message) to trigger a flow action Manually; for this, click on +Add an input -> select the Email input type and Text input type, then rename it to Message.
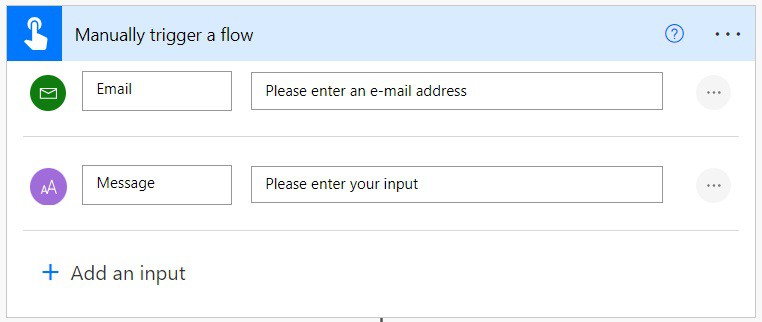
3. We will create a chat on Teams; for this, click on the +New step -> select Create a chat action. Then provide the below information:
- Members to add: Provide the Email from dynamic content.

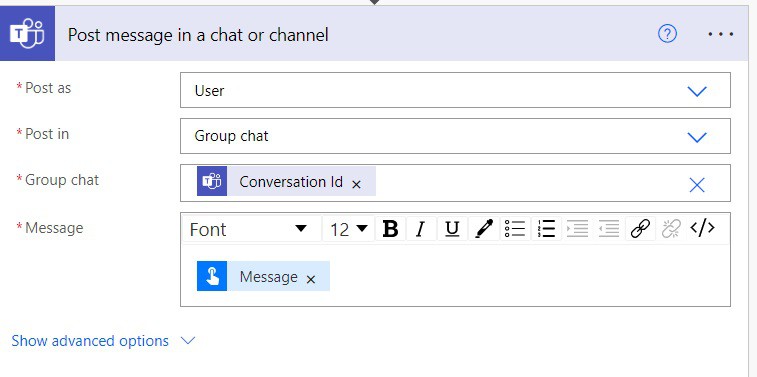
4. To post a message in the Teams chat, click on +New step -> select Post a message in a chat or channel action. Then provide the below information:
- Post as: Select the User option
- Post in: Select Group chat options from dropdown
- Group chat: Select the ‘Enter custom value’ option and then select ‘Conversation Id’ from dynamic content.
- Message: Select Message from dynamic content.
5. Now, run the flow manually. You can see the message posted to individual users in Microsoft Teams.
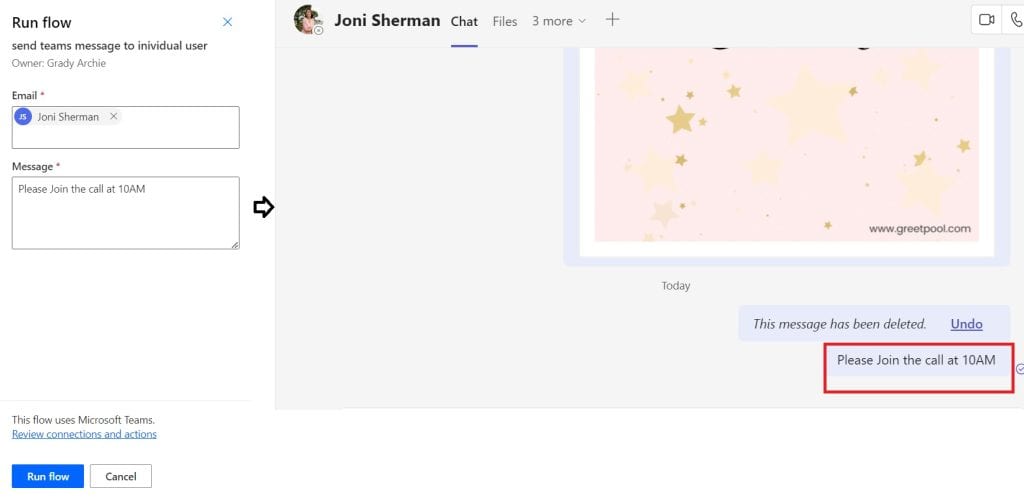
This is how to send Teams messages to individual users in Power Automate.
Microsoft Teams send message to multiple users in Power Automate
Here, we will see how to send messages to multiple users in Microsoft Teams using Power Automate.
Let’s say we want to send a message to multiple users in Microsoft Teams using Power Automate. To do this, I have followed the below steps.
1. Open Power Automate Cloud -> create an Instant Cloud flow that will trigger manually.

2. Next, we will add 3 fields (Email, Group name, and Message) to Manually trigger a flow action. So, click on +Add an input -> select Email field, then select 2 Text type field and rename it to ‘Group name’ and Message.
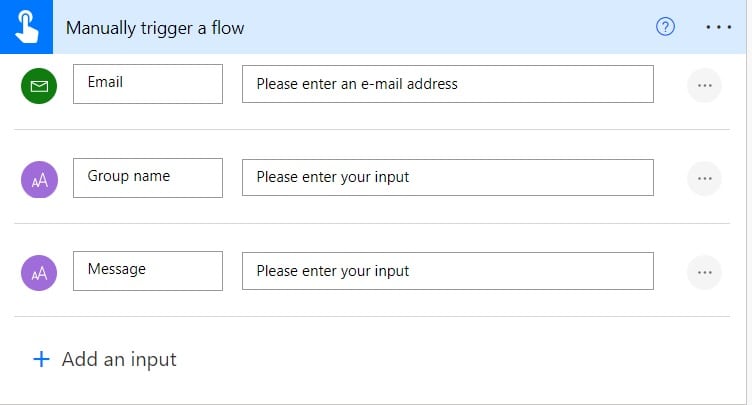
3. We will create a chat on Teams; for this, click on the +New step -> select Create a chat action. Then provide the below information:
- Members to add: Provide the Email from dynamic content.
- Title: Select the Group name from dynamic content.

4. To post a message in the group chat in Teams, click on +New step -> select Post a message in a chat or channel action. Then provide the below information:
- Post as: Select the User option
- Post in: Select Group chat options from dropdown
- Group chat: Select the ‘Enter custom value’ option and then select ‘Conversation Id’ from dynamic content.
- Message: Select Message from dynamic content.
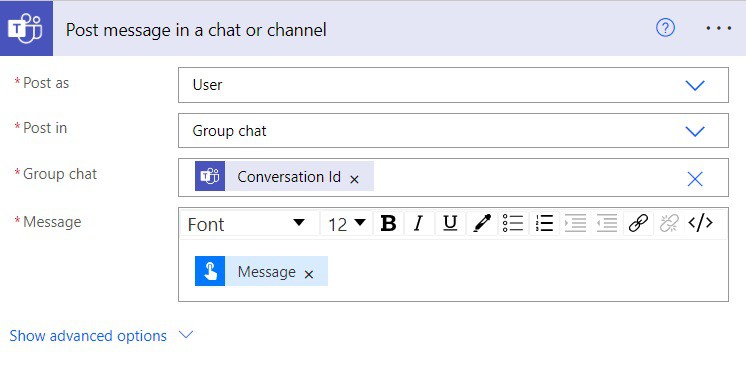
5. Now run the flow manually, and see the messages are sent to multiple users in a single group.
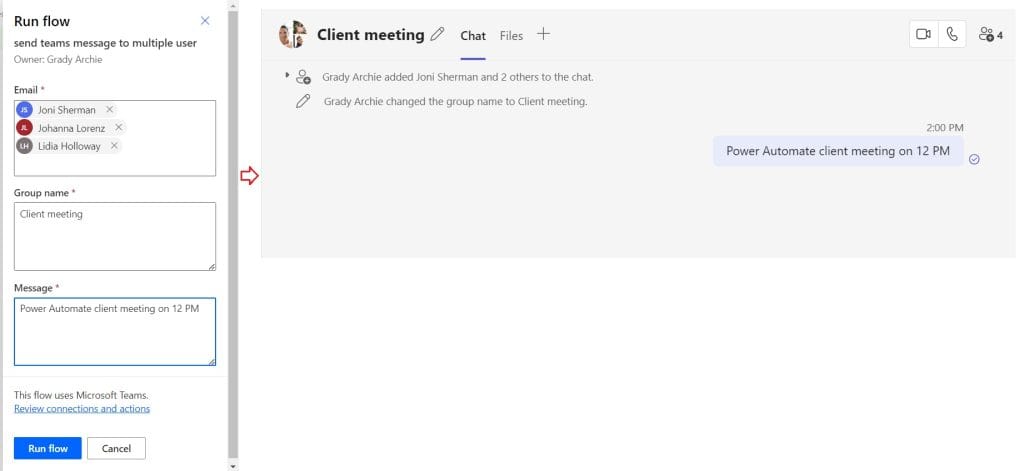
This is how to send Microsoft Teams messages to multiple users using Power Automate.
Power Automate gets teams’ message content
Here, we will see how to get the team’s message content using Power Automate.
Let’s say you want the message as a notification in the Power Automate Mobile App whenever your name is mentioned or tagged in a particular group. To do this in Power Automate, follow the below steps:
1. Open Power Automate Cloud and then create an Automate Cloud Flow. Select a trigger action as ‘When I’m @mentioned‘.
Then provide the below information:
- Message type: Select Group chat
- Chat 1: (optional) Select the chat from the dropdown
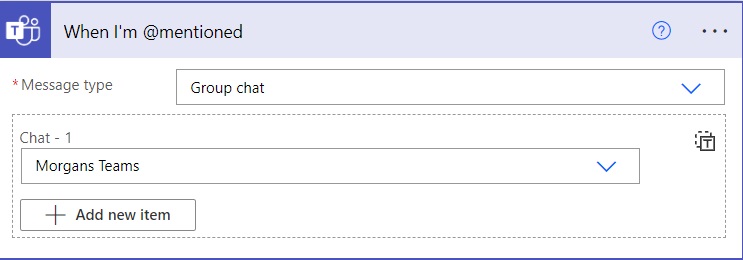
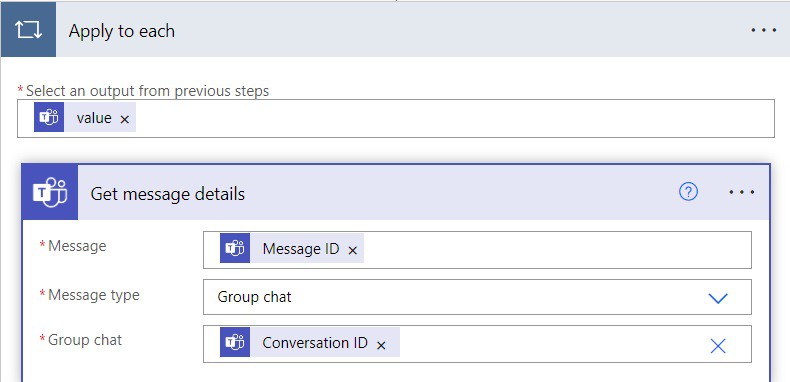
2. Next, to get message details from Microsoft Teams, we will click on the +New step -> select ‘Get message details action. Then provide the below information:
- Message: Select Message ID from dynamic content.
- Message type: Select Group chat from dynamic content
- Group chat: Select Conversation ID from dynamic content
3. We will convert the message, we get from the last step to plain text; for this, click on the +New step -> select ‘HTML to text‘ action. Then provide the below information:
- Content: Select Body PlainTextContent from dynamic content.

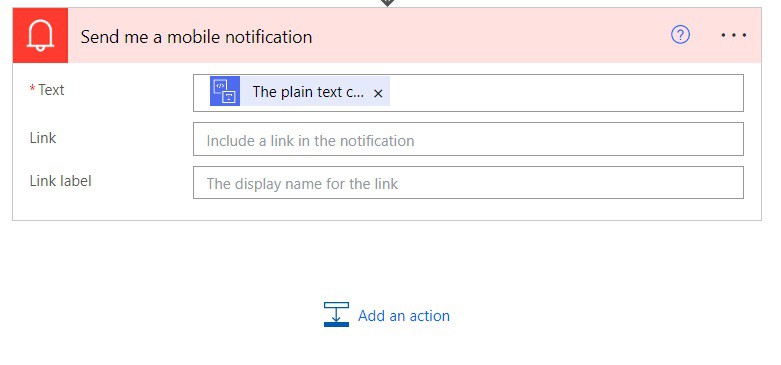
4. To send a mobile notification to the Power Automate mobile app. We will click on the +New step -> select the ‘Send me a mobile notification‘ action. Then provide the below information:
- Text: Select the ‘The plain text content’ from dynamic content
5. Now save and run the flow manually, and whenever a member in that group chat mentions you, you will get a notification like below
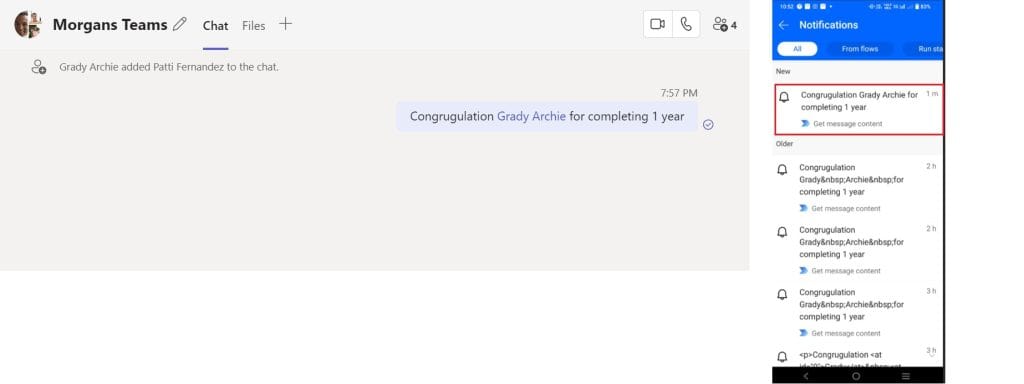
This is how to get team’s message content using Power Automate.
Power Automate schedule teams’ message
Here, we will see how to Schedule Microsoft Teams messages using Power Automate.
I want to post a message every morning at 10 AM when I log in on Teams on business days. To do this, follow the below steps.
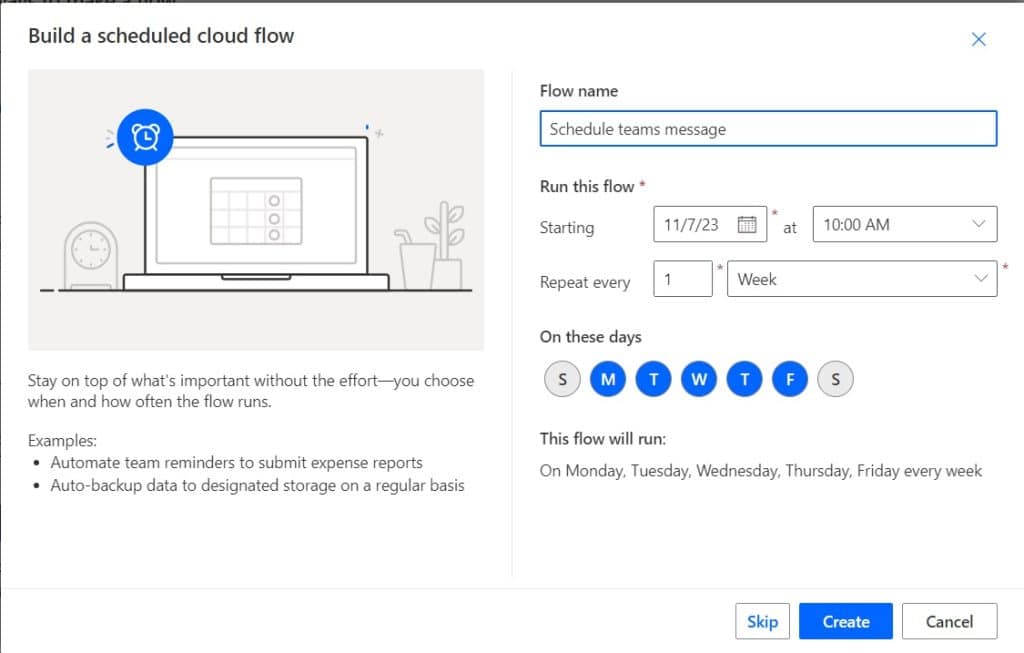
1. Open Power Automate Cloud, then create a Schedule cloud flow. Provide the below information:
- Flow name: Provide the flow name
- Starting: Provide the start date
- at: Provide the time
- Repeat every: Provide 1 and select Week.
- Then, unselect Saturday and Sunday. Click on Create.
2. Next, we will post messages on teams. For this, click on the +New step -> select Post Message in a Chat or Channel action. Then provide the below information:
- Post as: Select the User option from dynamic content.
- Post in: Select group chat from dynamic content
- Group chat: Select chat from dropdown
- Message: Provide the Message you want to post.
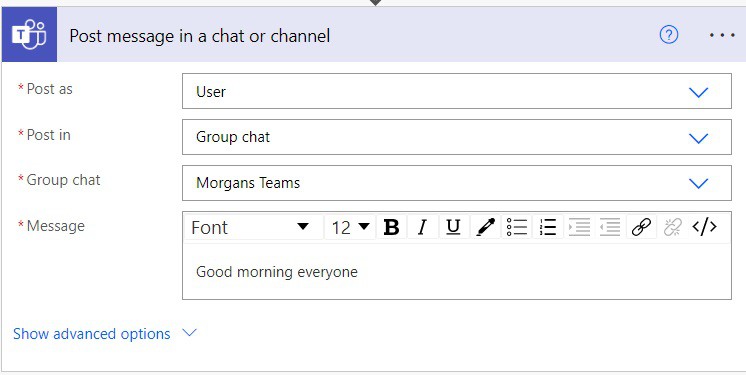
3. Now save and run the flow manually; you can see the message is posted on Teams Chat or channel.

This is how to schedule the team’s message in Power Automate.
Conclusion
This Power Automate tutorial teaches us how to create Team meetings using Power Automate. Also, we covered the below topics:
- What is Power Automate in Microsoft Teams?
- Create Teams meeting Power Automate
- Power Automate send teams message to individual user
- Microsoft Teams send message to multiple users Power Automate
- Power Automate gets team members
- Power Automate gets teams’ message content
- Power Automate schedule teams’ message
You may like the following tutorials:
- Microsoft Teams Tips and Tricks
- How to create a private channel in Microsoft Teams
- Power Automate Trigger Conditions
- When a New Email Arrives Subject Filter in Power Automate
- Power Automate delete all files in SharePoint folder
I am Bijay a Microsoft MVP (10 times – My MVP Profile) in SharePoint and have more than 17 years of expertise in SharePoint Online Office 365, SharePoint subscription edition, and SharePoint 2019/2016/2013. Currently working in my own venture TSInfo Technologies a SharePoint development, consulting, and training company. I also run the popular SharePoint website EnjoySharePoint.com