In this Power Automate Tutorial, we will discuss how to use multiple conditions on a flow in Power Automate. Apart from this, we will discuss below topics such as:
- Power Automate multiple conditions
- Power Automate multiple trigger conditions
- Power Automate multiple if conditions
- Power Automate OData filter multiple conditions
- Filter array multiple conditions power automate
- Microsoft flow condition if yes continue
- power automate switch case multiple values
- power automate multiple conditions and or
- power automate multiple condition person field
- Power Automate desktop multiple conditions
- Power Automate subject filter multiple conditions
- power automate condition multiple values
- power automate nested conditions limit
- power automate condition contains multiple values
- power automate multiple conditions email recipients
- power automate multiple condition HTML table
- power automate multiple condition parallel branch
- power automate multiple condition person field is empty
- Power Automate multiple conditions email attachments
In our previous topic, we discussed how to use a condition in Power Automate. But now in this topic, we will discuss how to use multiple conditions in Power Automate.
Power Automate multiple conditions
In a flow, we can insert conditions in 2 ways. One is by inserting a ‘condition control’ action and another is by using an expression in a ‘compose’ action. Before creating a flow make sure to log in the Power Automate with your Microsoft 365 user ID or Office tenant address.
Let us create a simple flow where we will use multiple conditions within a ‘condition control’ action. For example, we are going to compare 2 dynamic numbers using multiple conditions. If the first number is greater than or equal to the second number then the conditions got satisfied; otherwise, it will show the text that the condition did not satisfy.
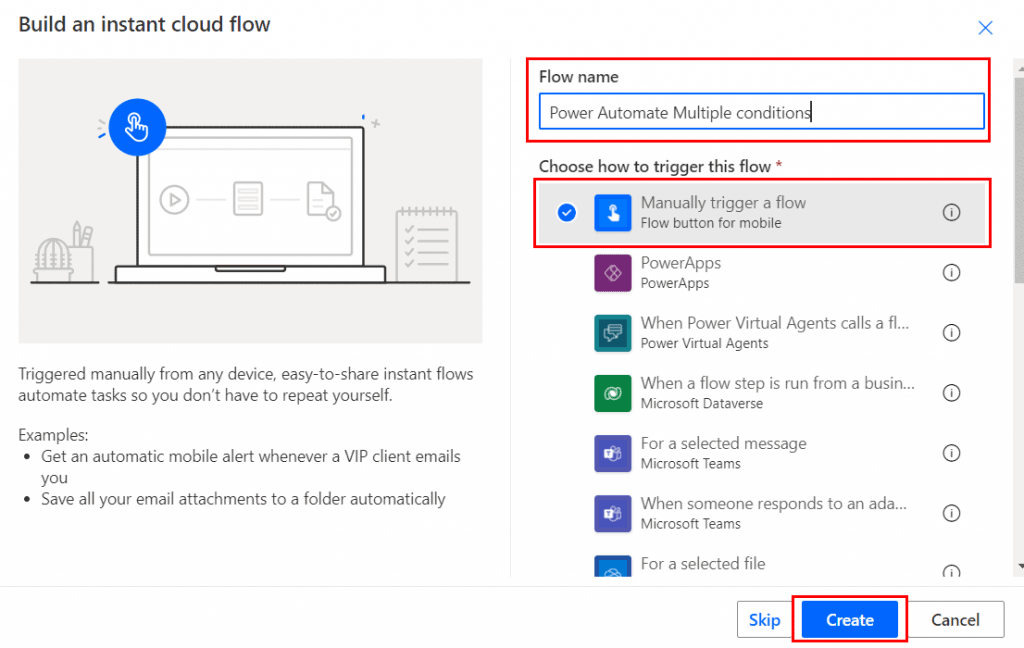
On Power Automate, click on + Create > Instant Cloud Flow > select the trigger ‘Manually trigger a flow‘ > Create. Give a name to the flow.
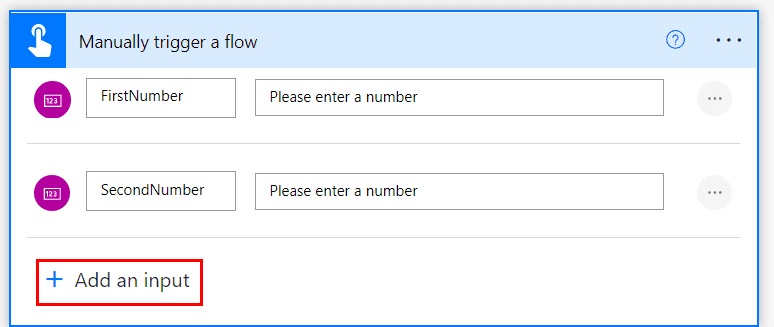
It will start the flow. Next, we will add 2 number inputs by clicking on +Add an input (inside the trigger) > Number.
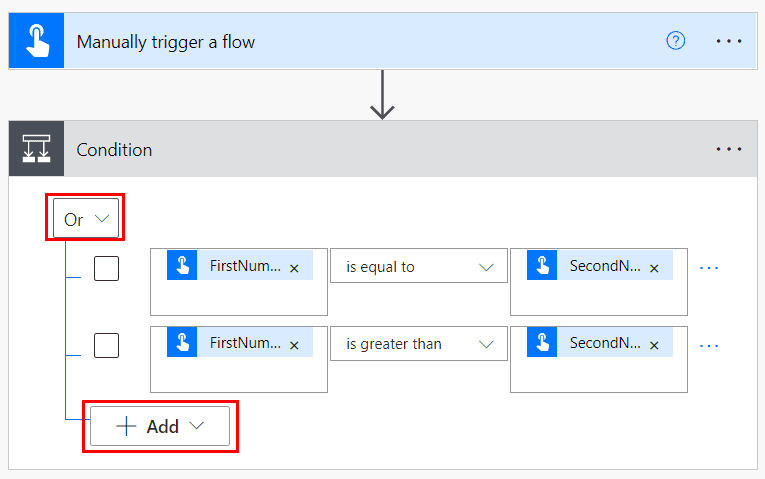
Under this trigger, we will add a ‘condition control’ action that will check the multiple conditions that we will apply. Here, we will insert 2 conditions, these are:
- The first number is equal to the second number ‘or’
- The first number is greater than the second number
To add these conditions, under the trigger click on + New step > Search and select ‘condition‘ control action. Select the value from the dynamic content. You can change the operator to ‘And‘, ‘or‘. To add more conditions click on + Add.
If the condition satisfies then it will go to the ‘If yes’ section; otherwise, it will move to the ‘If no’ section. Inside the ‘If yes’ section, click on +Add an action > Compose. Add the below expression or you can insert the true value.
Conditions satisfied.
@{triggerBody()['number']} is greater or equal to @{triggerBody()['number_1']}
similarly, we will add the false value inside the ‘If no‘ section.
Conditions did not satisfy.
@{triggerBody()['number']} is neither greater nor equal to @{triggerBody()['number_1']}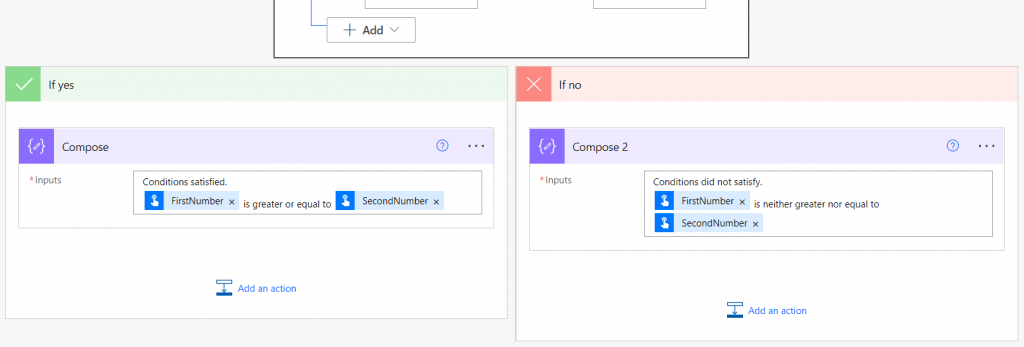
Now, the flow is ready to run. Click on save > test > Manually > Give two numbers > Runflow. For example, we will give two numbers such as 20,30.
We can see it will execute the false value according to conditions:
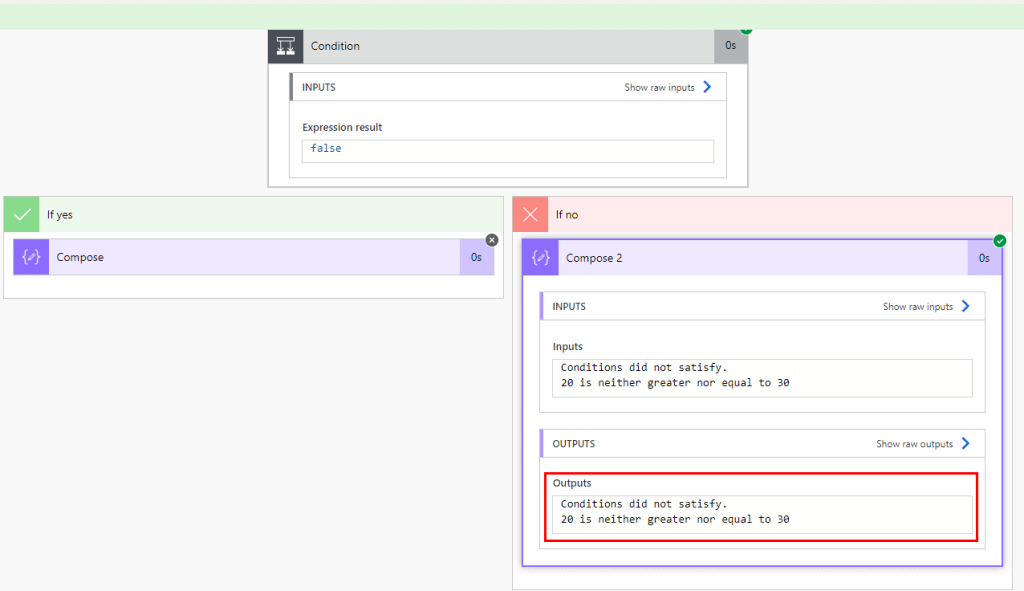
Similarly, we can add multiple conditions within an expression via composing. Remove the if condition, under the trigger click on + New step > search and select ‘Compose’ > expression > Insert the below expression.
if(or(equals(triggerBody()['number'],triggerBody()['number_1']),greater(triggerBody()['number'],triggerBody()['number_1'])),'Condition satisfied','Condition did not satisfy')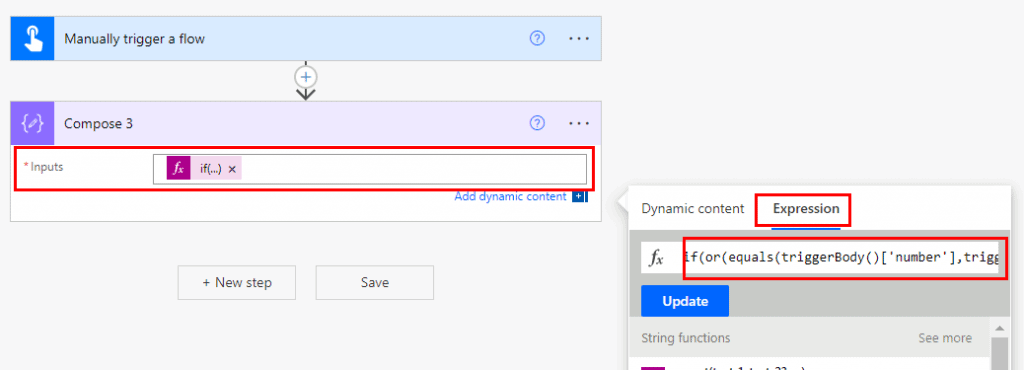
Now, save the flow and test it. We can see the flow will run successfully. This is how to add multiple conditions within a flow.
Read Power Automate Parallel Branch with Examples
Power Automate multiple trigger conditions
A trigger condition specifies one or more expressions that must be true for the trigger to fire. If the condition executes true then it will trigger the flow to run; otherwise, it will ignore the trigger’s event.
The trigger condition is mostly used to control the infinite loop. For example, there is a flow that will trigger when an item is created or modified. In this case, the flow will update the item each time, but this is not the actual thing that we want. To avoid such a thing, we need to add trigger conditions.
There is a specific location to add the trigger conditions to the flow. On a trigger, go to ellipses (…) > settings.
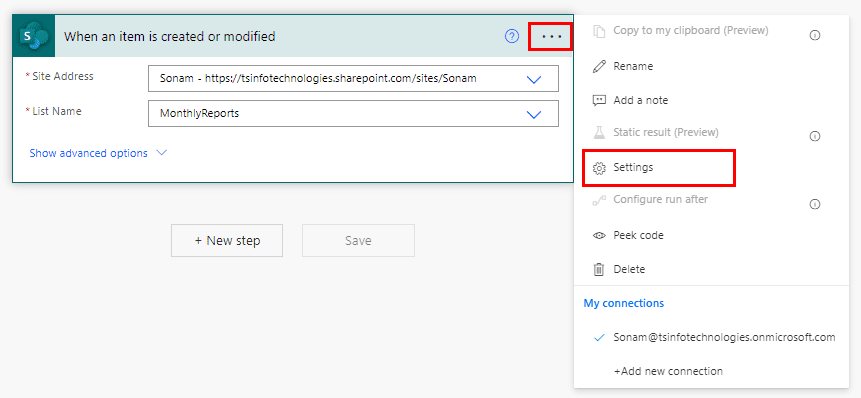
Then you can find the place, where it allows you to insert the conditions.
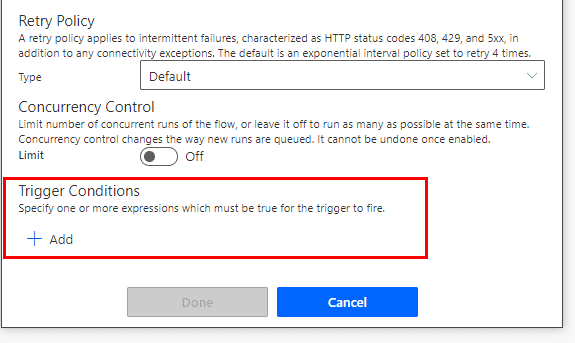
To work with the trigger conditions, we have created a SharePoint list having columns such as:
| Columns Name | Type |
| Technology | choice |
| Topic name | A single line of text |
| Employee | Person or Group |
| Start Date | Date and Time |
| End Date | Date and Time |
| Status | Choice |
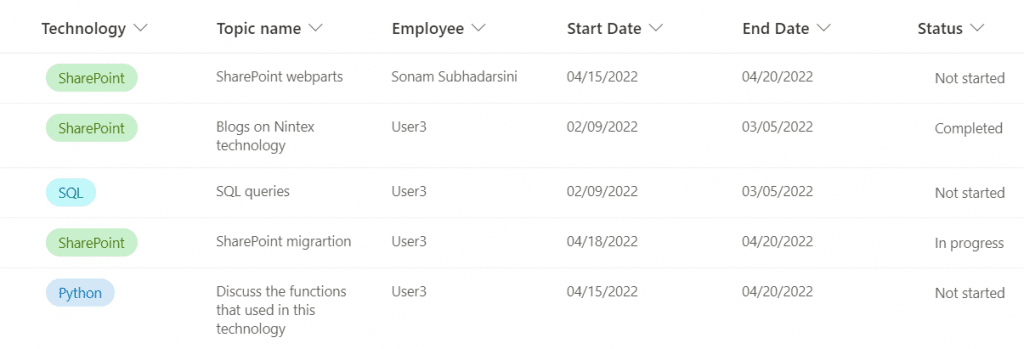
Now, we will create a flow that will trigger when an item is created or modified, as per the condition the flow will trigger only when the technology is equal to SharePoint, and the status is equal to ‘Not started’. Then it will send an email notification to that employee to complete the task.
On Power Automate, go to + Create > Automated Cloud Flow > select the trigger ‘When an item is created or modified‘ > create. Set the SharePoint site address and the list name.

To add the trigger conditions, click on the ellipses (…) > Settings > trigger conditions. Insert the below expressions:
@equals(triggerBody()?['Status']?['Value'], 'Not started')@contains(triggerBody()?['Technology']?['Value'], 'SharePoint')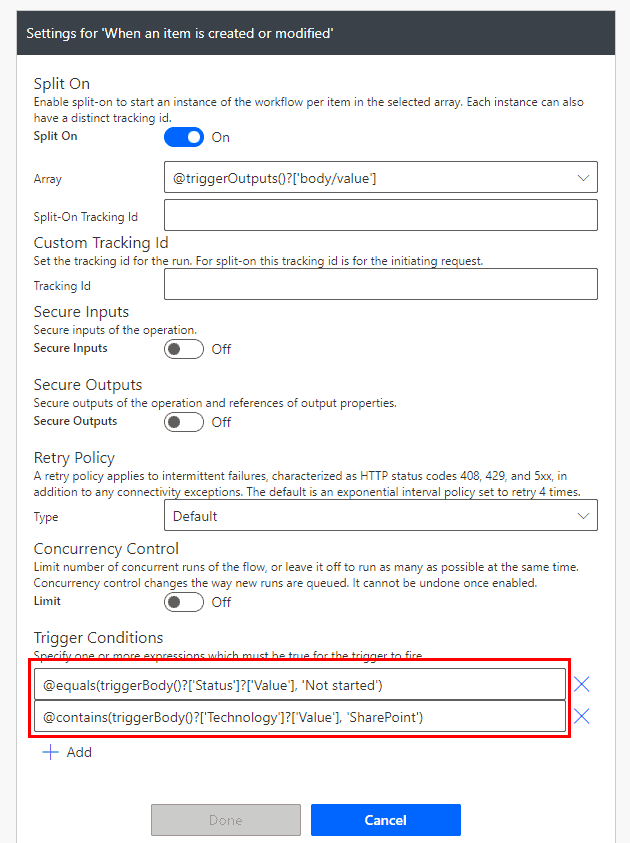
Also, we can merge these conditions using ‘or’ & ‘and’ operators. If we use the ‘or’ operator, then the flow will trigger when one of the conditions is true. But, in the case of the ‘and’ operator, the flow will trigger when both the conditions are true.
Let’s merge these conditions using ‘and’, then the expression will look like the below:
@and(contains(triggerBody()?['Technology']?['Value'], 'SharePoint'), equals(triggerBody()?['Status']?['Value'], 'Not started'))
Then click on ‘Done‘. Next, add an action that will send an email notification to that employee. Click on + New step > search and select the action ‘Send an email‘.
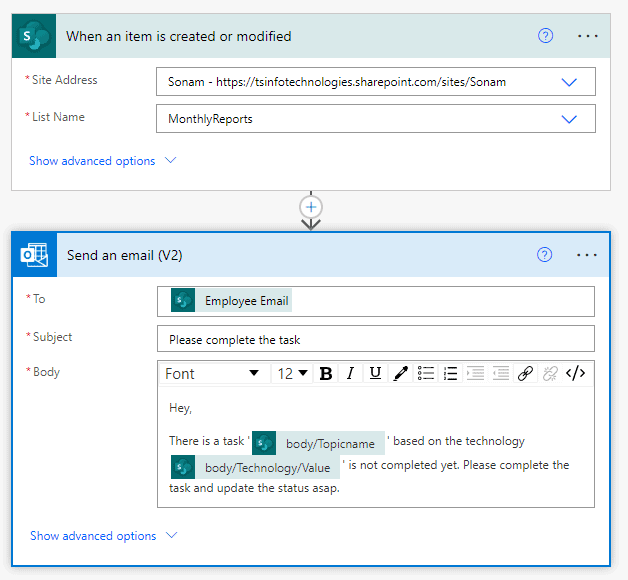
Now save the flow. Click on the test > manually. Let’s modify an item in that SharePoint list.

As per our conditions, the flow will trigger when a new item is created or modified and when the conditions are satisfied. So it will send an email notification to that employee i.e. User3.
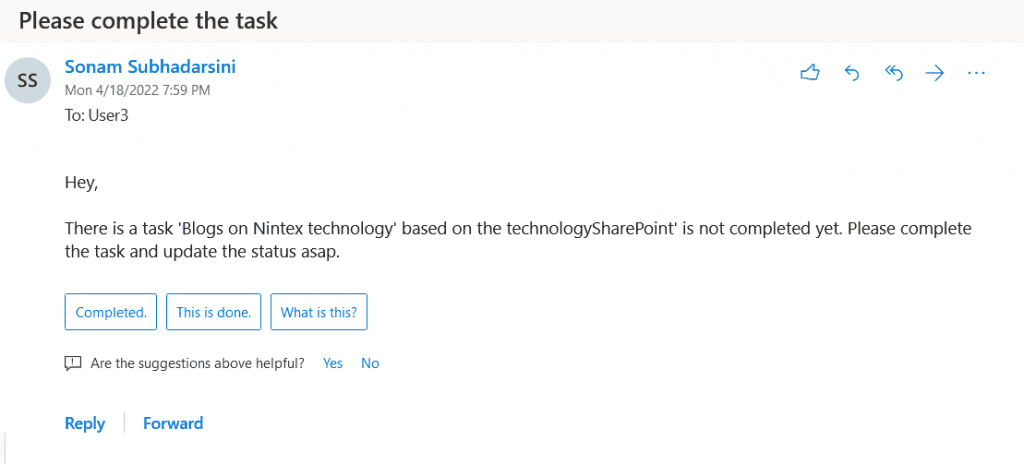
This is how to work with Power Automate multiple trigger conditions.
Read Power Automate email body formatting
Power Automate multiple if conditions
In this example, we will see how to use multiple if conditions within a flow. For example, we have a Sharepoint list named ‘Office expenses’ having columns such as:
| Columns | Types |
| Expenses | Choice(Laptop, Desktop, Tablet, Paper, Keyboard, Mouse) |
| Units | Number |
| Apply Date | Date and Time |
| Delivery Status | Single Line of Text |
Now we will create a flow that will trigger when an employee inserts data in the ‘Office expenses’ list. Then it will automatically update the delivery status according to expenses and notify the employee about the delivery status via outlook.
To create the automated flow, the following steps are:
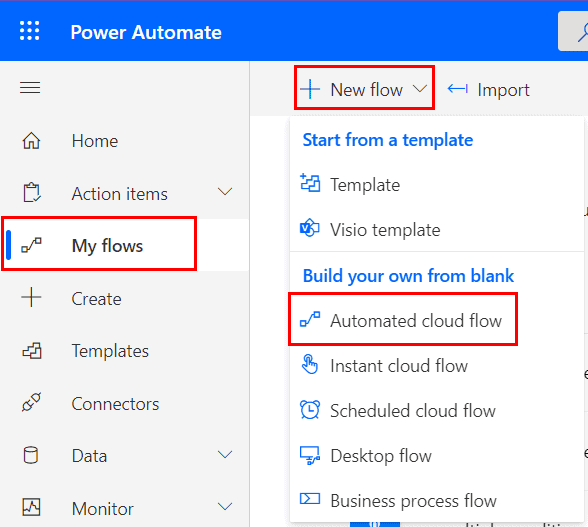
- On Power Automate, go to My flows > +New flow > Automated Cloud Flow.
- Select the trigger ‘When an item is created’ > Create. Provide the SharePoint site address and the list name to fetch the data. Now the flow is started.

- Under the trigger, add an action to get the user profile. Click on +New step > Get user profile. Set the user as ‘Created by email’.
- Next, add a compose action to insert the below expression that will update the delivery status according to the expenses.
if(equals(triggerOutputs()?['body/Expenses/Value'],'Laptop'),'With in 15 days',if(equals(triggerOutputs()?['body/Expenses/Value'],'Desktop'),'With in 20-25 days',if(equals(triggerOutputs()?['body/Expenses/Value'],'Tablet'),'With in 7 days','by Next 1-2 working days')))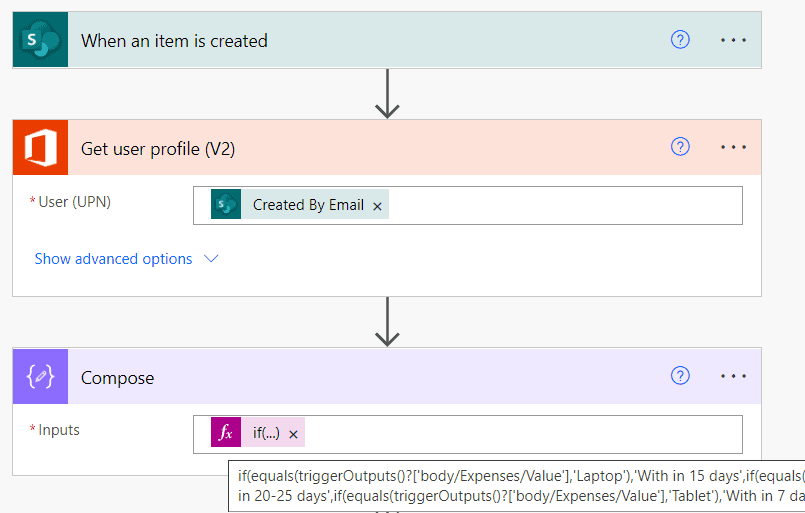
- Next, add an action to send an email notification to the employee who created that item. Click on +New step > Send an email. Set the properties such as:
- To- select ‘mail’ from the dynamic content.
- Subject- Give a subject to the email.
- Body- Specify the body of the email with the output.
- Finally, we will add another action that will update the delver status in the Sharepoint list. Click on +New step > Update Item. Provide the SharePoint site address, list name, and ID, and set the compose’s output in the delivery status.
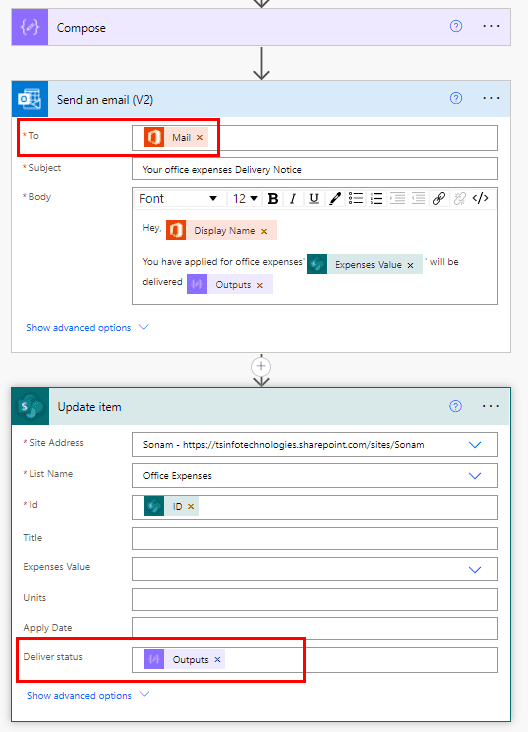
Now the flow is ready. To test the flow, click on Save > Test > Manually > Runflow. Insert data inside the list and we can see it will automatically update the delivery status.

Also, we can see it will notify the applicant via outlook:
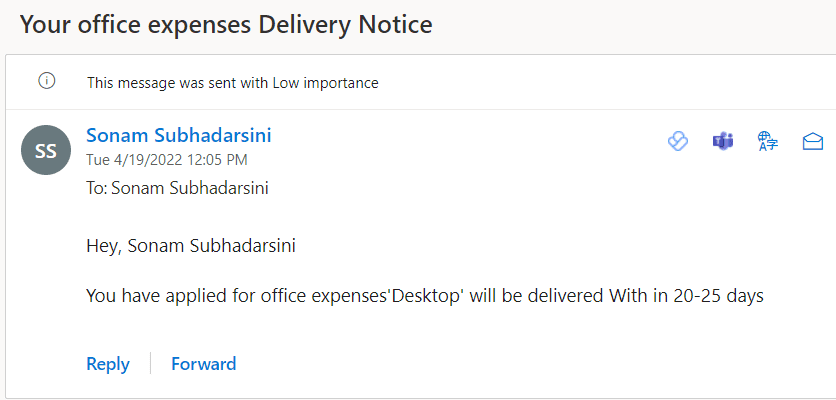
Similarly, if we insert the expenses as ‘Keyboard’ then it will update the deliver status as ‘Next 1-2 working days.’ This is how to work with multiple if statements in Power Automate.
Power Automate filter array multiple conditions
In this section, we will see how to apply multiple conditions within the ‘filter array’ action in Power Automate. For example, we have a SharePoint list based on ‘Products’ having some sample data such as:
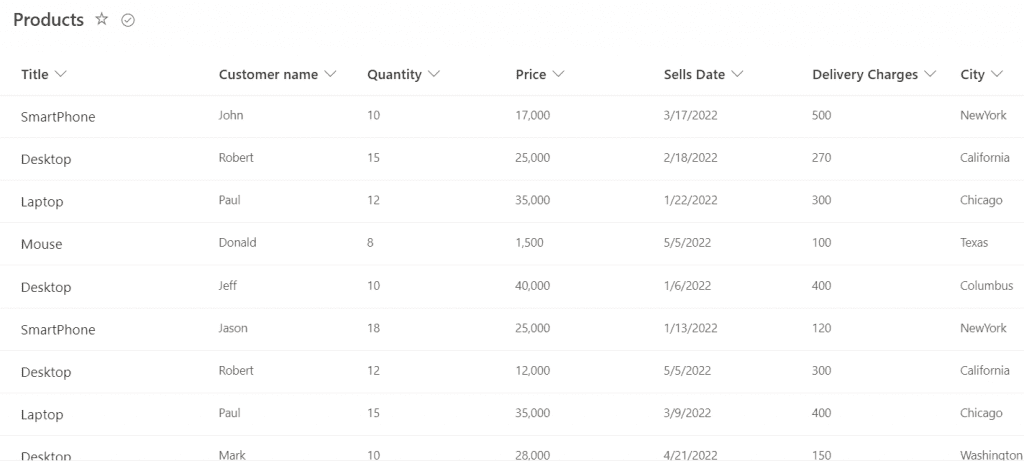
Now we will create a flow that will filter the data for those having title as ‘Desktop’ and city as ‘California’. To create the flow, the following steps are:
- On Power Automate, create an instant cloud flow that triggers the flow manually. (We have mentioned in the upper example how to create an instant cloud flow).
- Next, add an action that will get all the items from the specified Sharepoint list. Under the trigger, click on +New step > Search and select the action ‘Get items‘. Provide the SharePoint site address and the list name.
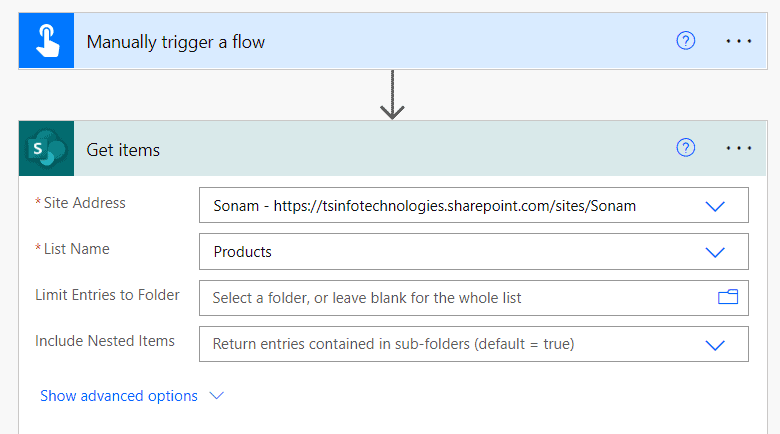
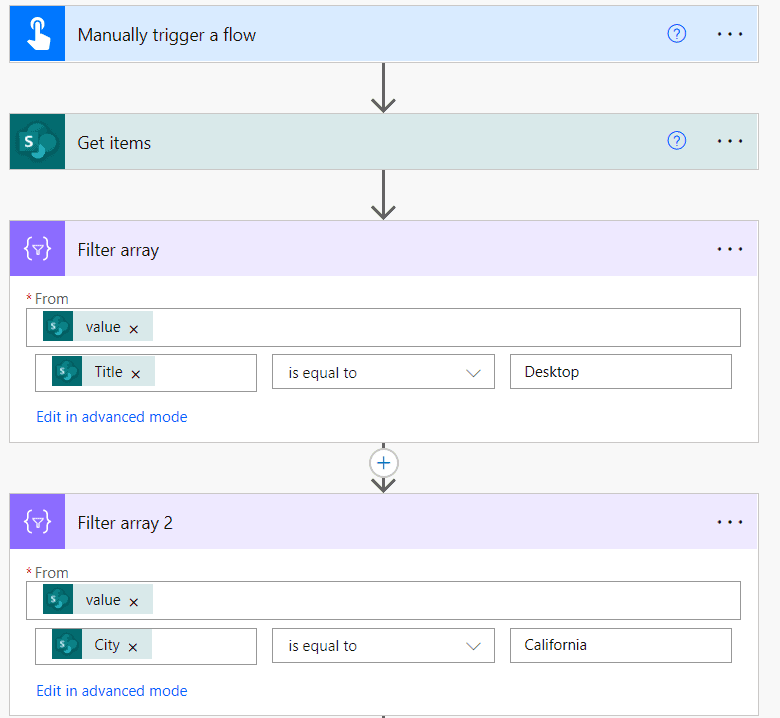
- Next, add a ‘Filter array’ action that will filter the data according to the condition i.e. only filter the item those having title ‘Desktop’. Click on + New step > Select the ‘Filter array’ action. Set the value as:
- From– Value
- Set the conditional value as Title (from dynamic content) is equal to Desktop
- Similarly, add another ‘Filter array’ action that will again filter and extract the data from those having the city ‘California’.
Note- As a filter array has the fields only a single condition, we can not insert multiple conditions in a single filter array action. So for multiple conditions, we need to add multiple filter array actions.
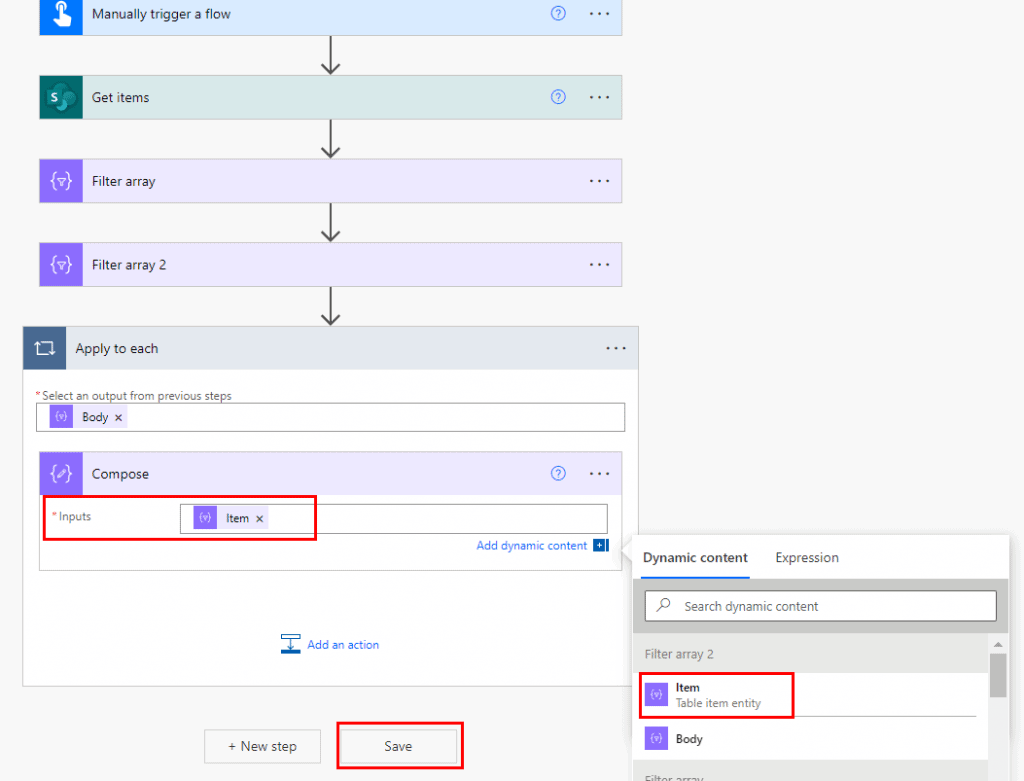
- Next, add a compose action and insert the ‘items’ as inputs to see the outputs. Click on +New step > Compose.
Now the flow is ready. Click on Save > test > Manually > Runflow. We can see it will extract only those data having the title as ‘Desktop’ and the city as ‘California’. As there are only 2 data that satisfy both the conditions, it will show those data.
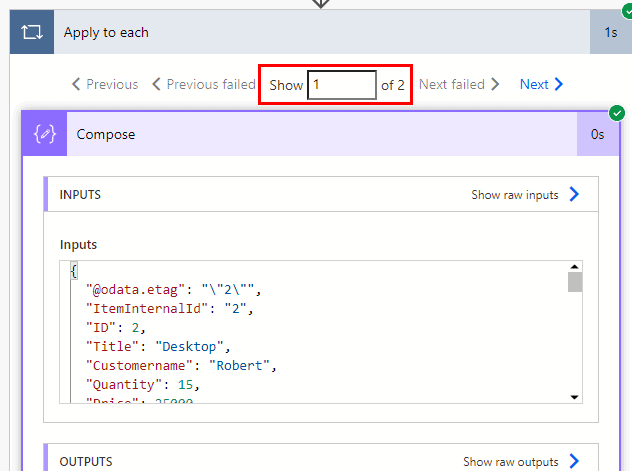
Instead of using multiple filter array actions, we can merge both the condition and insert them into a single filter array action. For this, click on the first filter array and go to ‘edit in advanced mode’. Then insert the below expression:
@and(equals(item()?['Title'], 'Desktop'),equals(item()?['City'], 'California'))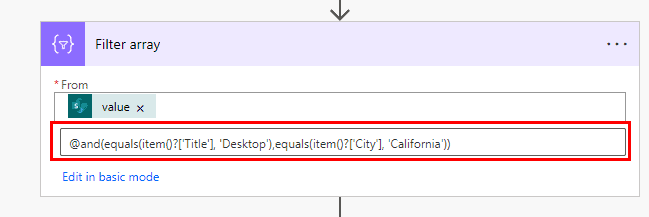
Note- You need to insert a @ at the beginning of the expression. Similarly, we can use the ‘or‘ operator instead of the ‘and‘.
Read Power Automate create a task in Microsoft Planner
Power Automate OData filter multiple conditions
Now we will another example where we will use multiple OData filter conditions. To implement this, we are going to use the previous SharePoint list as the sample data.
Let’s create the flow where we will insert multiple OData filter queries to filter the data that will extract the data those having the title ‘Desktop’ or the city ‘Chicago’.
- To create the flow, create an instant cloud flow that triggers the flow manually. Then add an action that will get all the items from the SharePoint list.
- Under the trigger, click on + New step > Get items. Provide the site address and the list name. In the Filter query, insert the below expression:
Title eq 'Desktop' or City eq 'Chicago' - Next, add a compose action to see the filter data. Click on + New step > Compose. In the Input, add the title and the city from the dynamic contents.
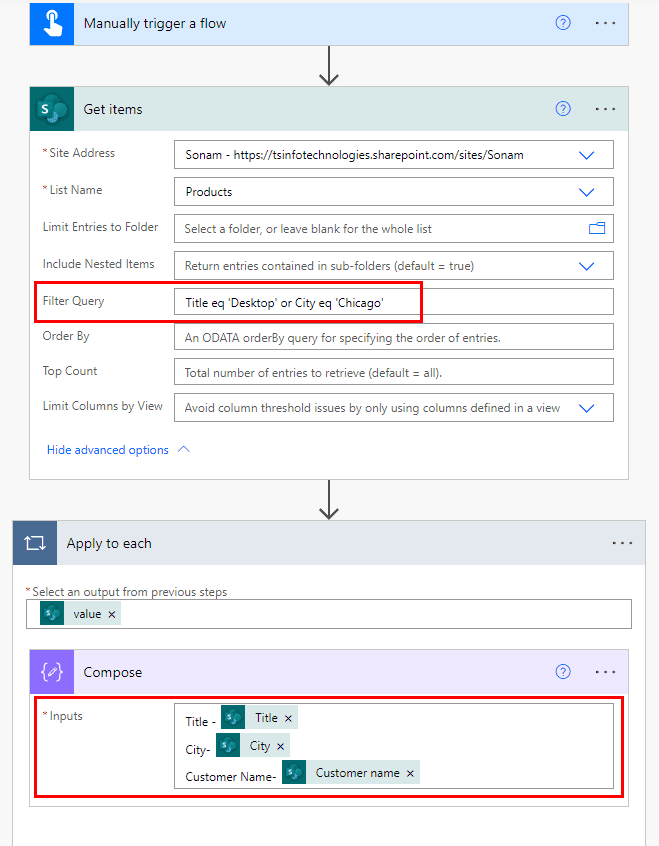
Now save the flow and test it manually. We can see it will retrieve only those items whose Title and City are equal to Desktop and Chicago respectively.
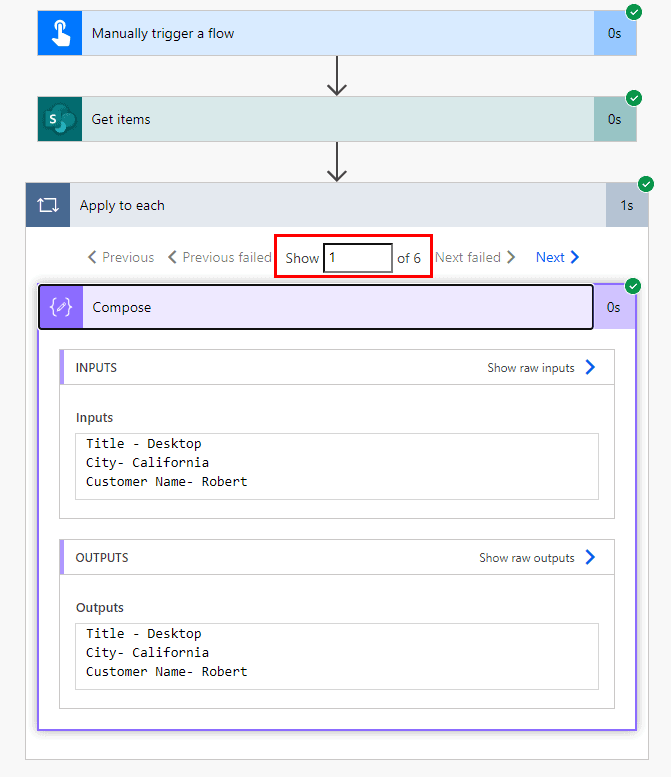
As 6 items satisfied the conditions so it is showing 6. This is how to use multiple OData filter queries in the Power Automate.
Read Power Automate Copy Folders
Microsoft flow condition if yes continue
Here we will see how to work with multiple conditions and if the conditions satisfy then it will continue the if yes part. To implement this, we are going to use the previous SharePoint list.
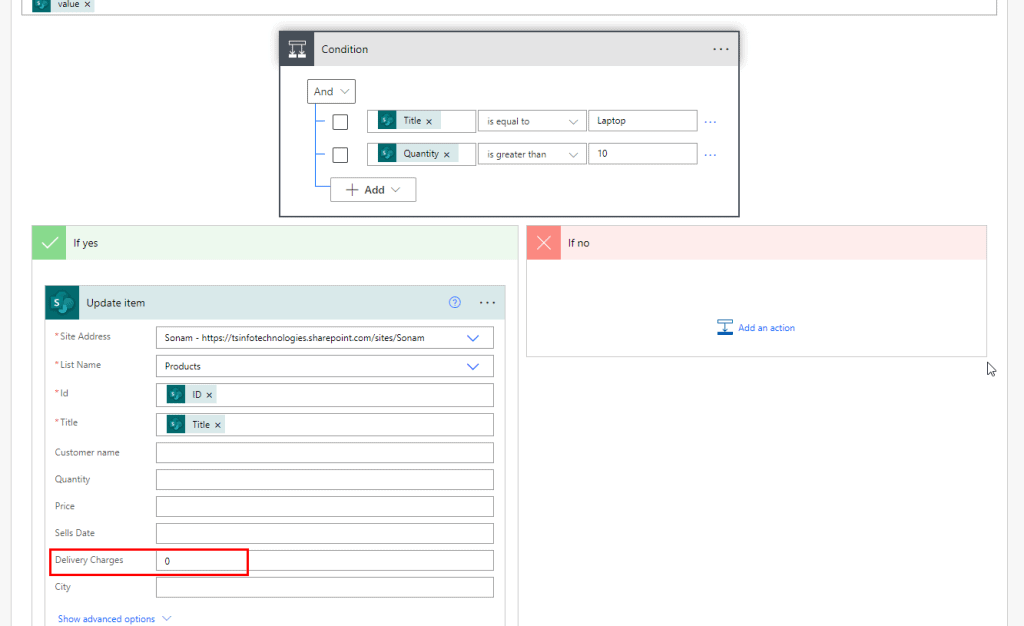
For example, we will create a flow that will check if the title is ‘Laptop’ and the quantity is greater than 10 then it will remove the delivery charges. Also, update that delivery charges to 0.
To create the flow, the following steps are:
- On Power Automate, create an instant cloud flow. Then add the get items action to retrieve all the items from the SharePoint list.
- Then add a condition control action where we will add the multiple conditions. Such as:
- The title is equal to Laptop
- Quantity is greater than 10
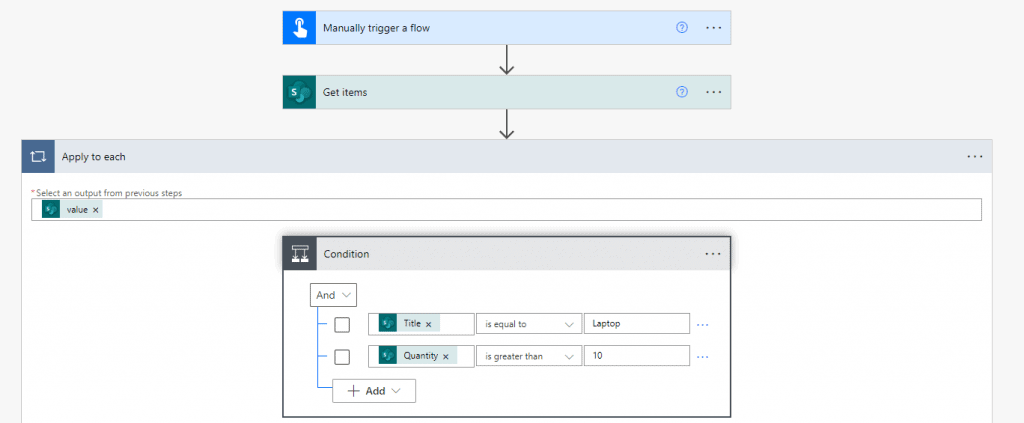
- If the conditions satisfy, then the flow will continue. That means the delivery charges will be updated to 0. Go to the If yes, click on +Add an action > update item. Provide the SharePoint Site address and the list name. In the delivery charges, type 0.
Let’s save the flow. Test it manually and run the flow. We can see the flow will run successfully and the list is updated where the conditions are satisfied.
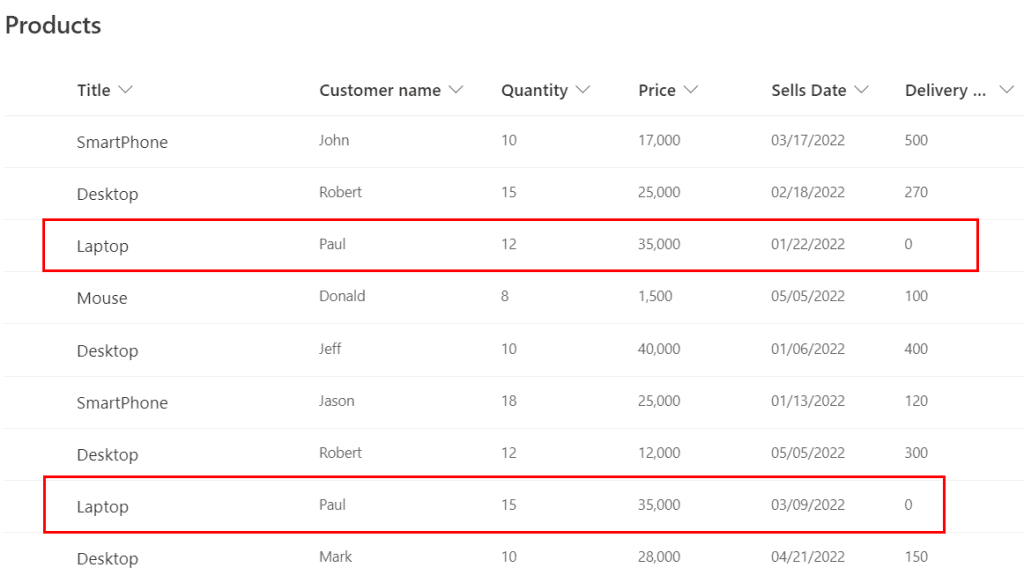
This is how to use multiple conditions if yes continue in the Power Automate.
Read Power Automate Copy Files
Power Automate switch case multiple values
In this example, we will see how to work with multiple values using switch cases in Power Automate. For example, we have a SharePoint list named ‘Faculties’ having columns such as:
| Columns | Types |
| Title | Default |
| Department | Choice(IT, Finance, Management, Marketing) |
| Date | Date and Time |
| Faculty Incharge | People or group |
When we select a department, it will automatically update the faculty in charge in the SharePoint list as per the multiple conditions. To create the flow, the following steps are:
- On Power Automate, click on + Create > Automated cloud flow > Select the trigger ‘When an item is created > Create. Provide the SharePoint site address and the list name.
- Next, add the switch control to update the item (i.e. Faculty Incharge) for each department. Under the trigger, click on + New step > Switch control > Select it. Select the ‘Department values’ for ‘On’.

- Now we will add cases for each department’s value. In case 1, set a department value (i.e. IT) in equals. Then add an action inside case 1 to update the ‘faculty in charge in the SharePoint list.
- Click on + Add an action > Update item. Provide the SharePoint site address, list name, ID, and Title. In the ‘Faculty Incharge’ set a user’s email.
Note- Make sure to set the email id as hardcoded. It will convert that email id into that user name in the list.
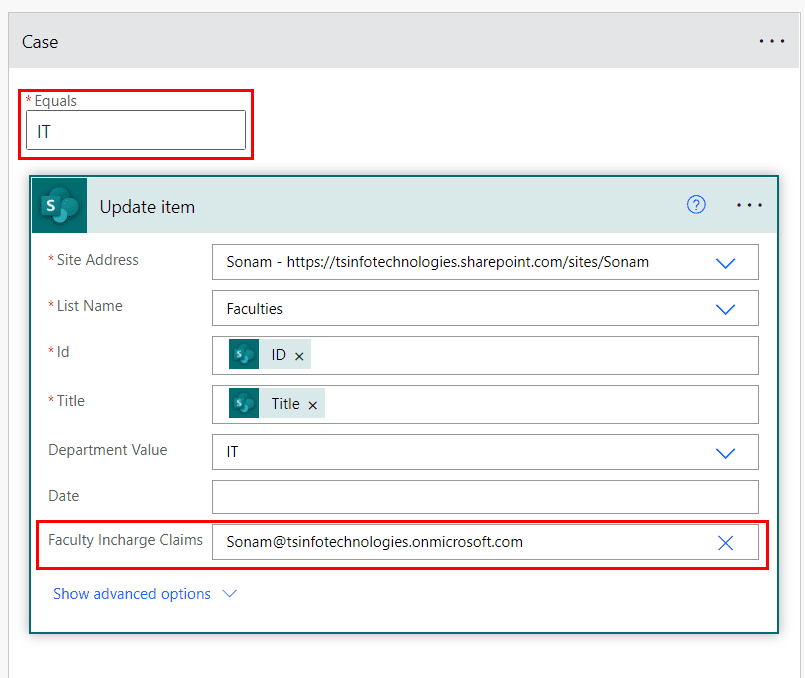
- Similarly, add another case for Management. Also, add an action to update the item in the SharePoint list. For Management, let’s set another faculty in charge.
- If we select other departments’ values (except IT and Management), then it will go with the default case where we will set the default faculty in charge.
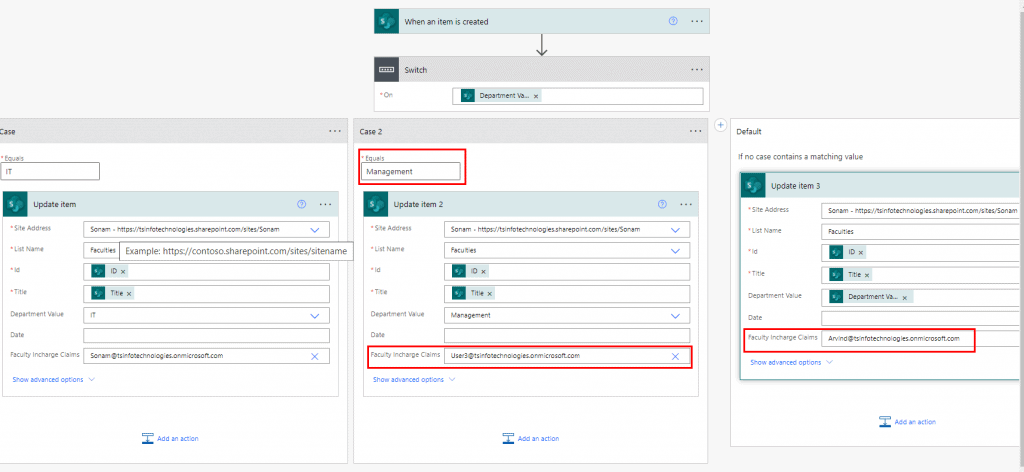
Now save the flow. Click on test > Manually > Run flow. For a sample test, insert data inside the specified SharePoint list.
We can see it will automatically set the specified email in the ‘Faculty in charge’ column:

This is how to use multiple cases of Switch case in a Flow.
Read Power Automate Create PDF
Power Automate multiple condition person field
Here, we will see how to use multiple conditions in the person field. For example, we have a SharePoint list based on ‘Task list’ having some columns such as:
| Columns | Types |
| Title | Default |
| Description | Single line of text |
| Assigned To | Person or group |
| Start Date | Date and time |
| End Date | Date and time |
| Status | Choice (Blog post, YouTube) |
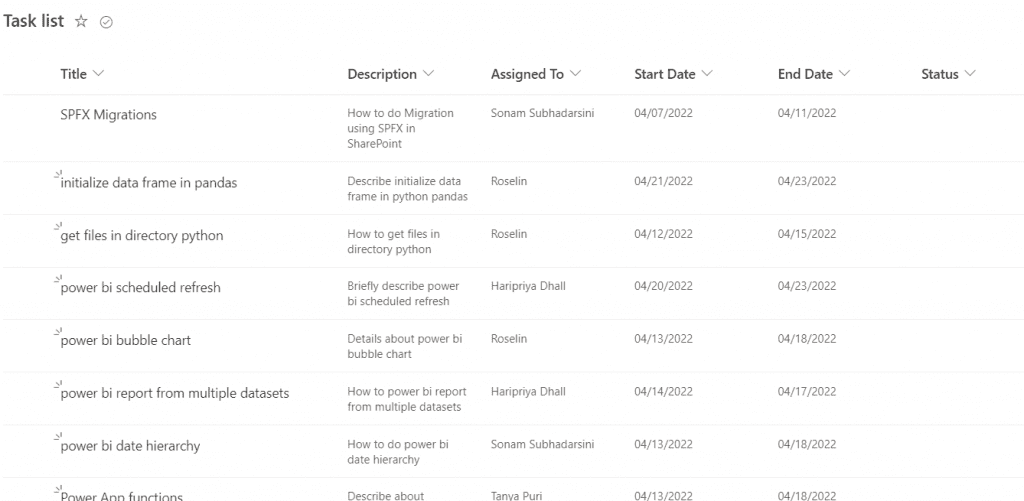
Now we will create a flow using multiple conditions for the people column that will set the status column whether the assignee works for a blog post or youTube videos. To create the flow, the following steps are:
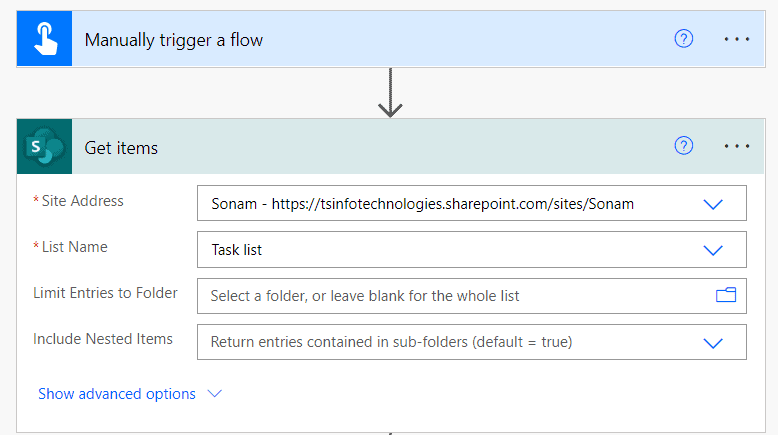
- On Power Automate, create an instant cloud flow. Under that flow, add an action to get all the data from the SharePoint list.
- Click on + New step > Get items. Give the Sharepoint Site address and the list name.
- Now, add a condition control, that will check if the ‘assigned to’ field is equal to ‘Roselin’ or ‘Sonam subhadarsini’, then it will update their status to ‘Blog Post’; otherwise it will update the status as ‘YouTube’ for rest assignee.
- Click on + New step > Condition control. Set the values, compare values and the operator such as:
- ‘Assigned To display name’ is equal to ‘Roselin’
- ‘Assigned To display name’ is equal to ‘Sonam Subhadarsini’
- Inside both the ‘If yes’ and ‘If no’ sections, click on +Add an action > Update Item. Set the status as per the scenario. Such as:
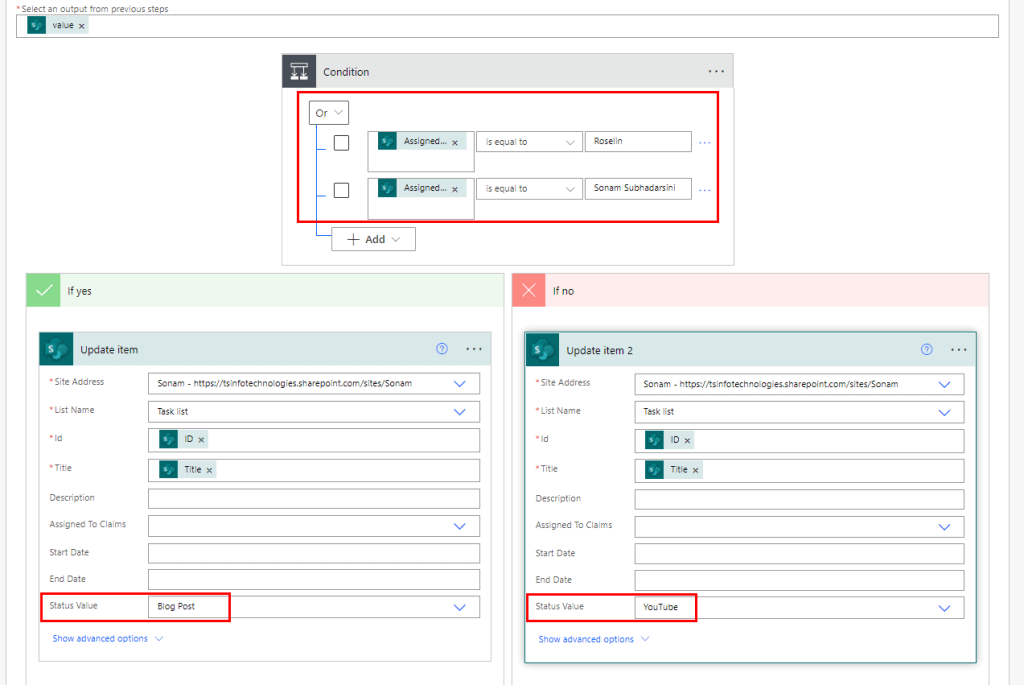
Now save the flow and test it manually. Then click on the run flow. It will update the status according to conditions like below:
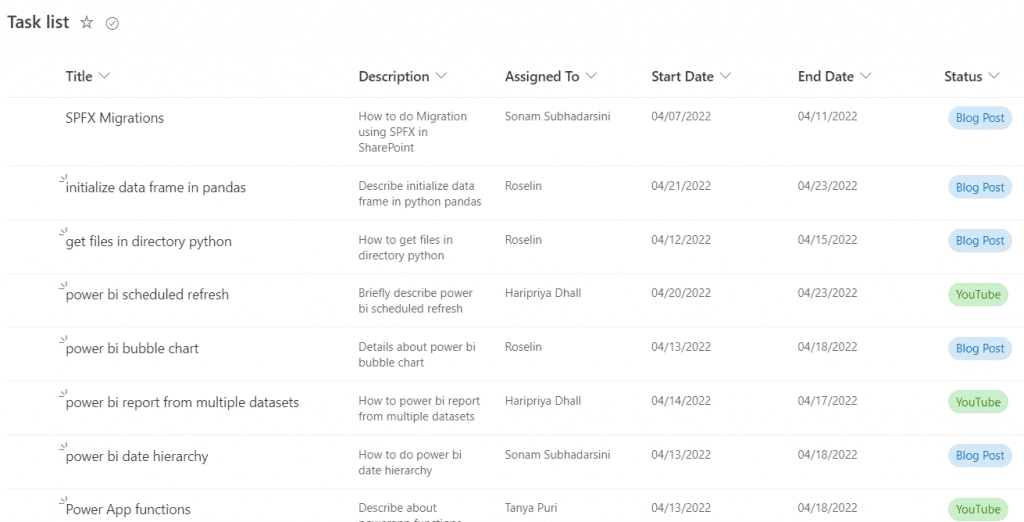
This is how to use multiple flow conditions on the SharePoint people column.
Read Power Automate dynamic content
Power Automate multiple conditions and or
Here we will see how to work with multiple conditions using both the ‘And’ and ‘Or’ operators in a flow.
For example, we have a Sharepoint list based on ‘Bike sales’ having columns such as Title, quantity (number), color (Choice), payment mode (Choice), Applicable for discount(yes/no column), and having some sample data as below:
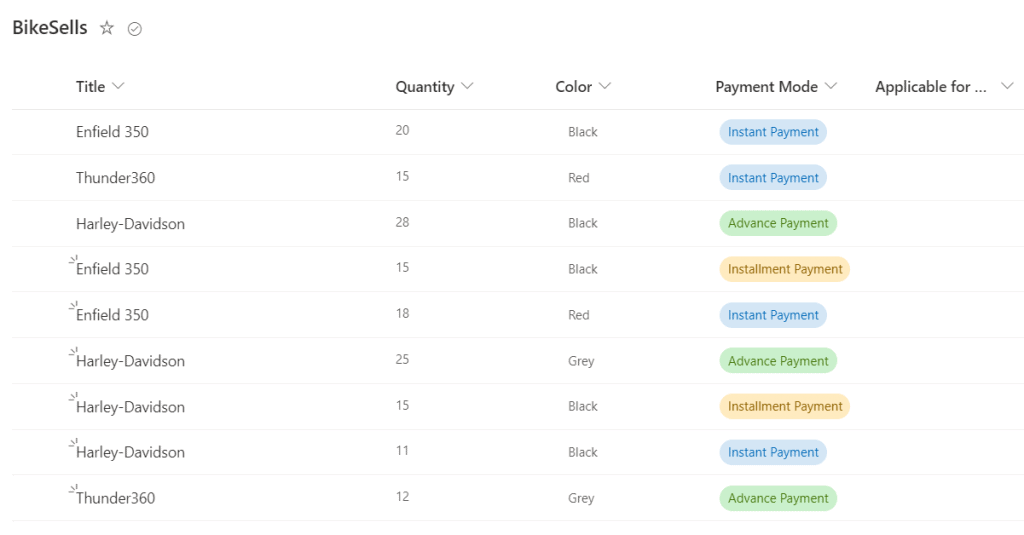
Let us create a flow using multiple conditions that will check if the title is equal to ‘Harley-Davidson’ and the quantity is greater than 15 or the payment mode is equal to ‘Instant Payment’, then the bike is applied for the discount.
Note– As per the scenario, first, it will check both the title and the quantity, if both the conditions satisfy, it will move to the payment mode options.
To create the flow, the following steps are:
- On Power Automate, create an instant cloud flow that triggers the flow manually. Then add the ‘Get items’ action to retrieve all the items from the Sharepoint list.
- Under the trigger, click on +New step > Get items. Supply the Sharepoint site address and the list name.
- Next, add a condition control where we will apply the multiple conditions. Click on the + New step > Condition. Set the values, operators, and the compare value like below:
- ‘Title‘ is equal to ‘Harley-Davidson‘
- Click on +Add > Add row.
- And (change the operator from the dropdown)
- ‘Quantity‘ is greater than 15.
- Click on +Add > Add group.
- Or (change the operator from the dropdown)
- ‘Payment method values’ is equal to ‘Advance Payment’
Now the whole condition block will look like the below:
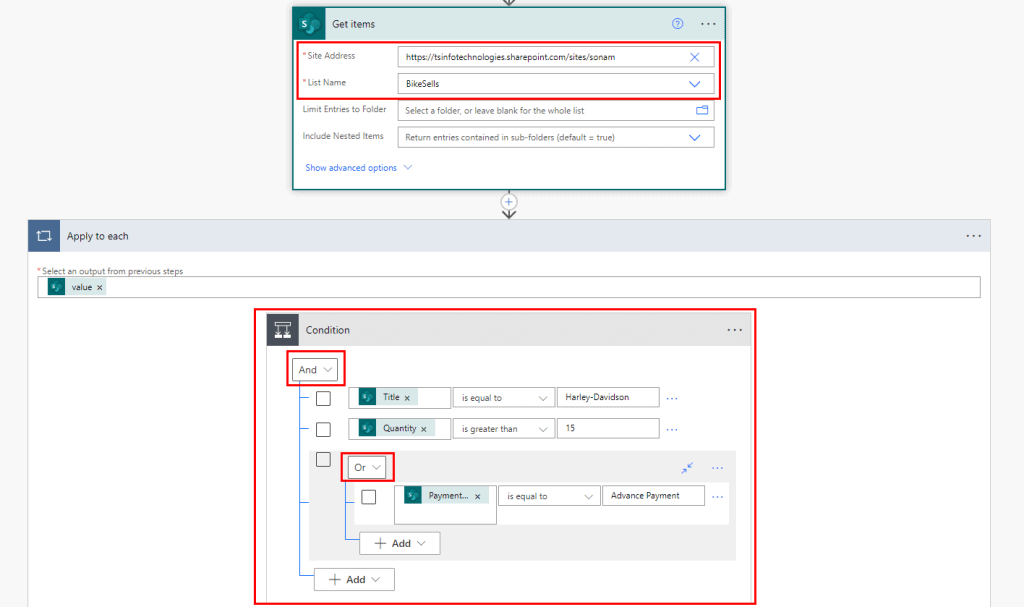
- If the condition satisfies then it will allow it to apply for a discount and update the data in the SharePoint list. Inside the ‘If yes’ section, click on + Add an action > Update item. Provide the SharePoint site address, list name, and ID. In the ‘Applicable for discount’ column set the value as yes.
- Similarly, repeat this in the ‘If no’ section, and in the ‘Applicable for discount’ column set the value as no like below:
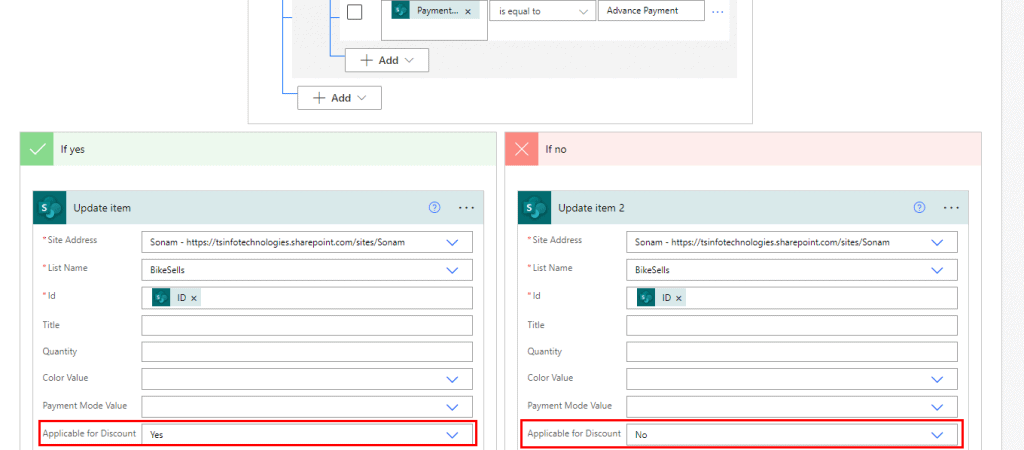
Now our flow is ready. Just ‘Save‘ it and click on test > Manually > Runflow. We can see it will update the list where the conditions are satisfied:
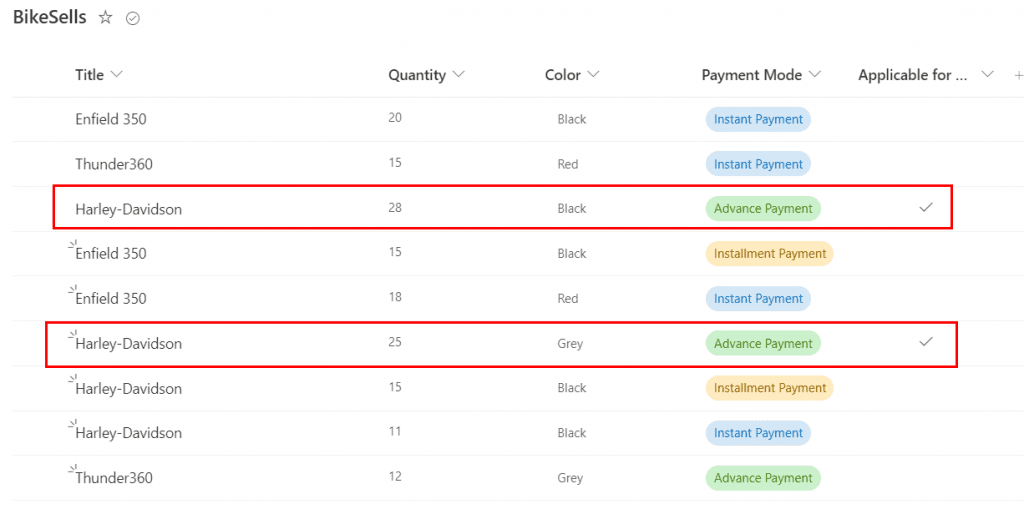
This is how to use Power Automate multiple conditions with ‘and’, ‘or’ operators.
Power Automate subject filter multiple conditions
In Power Automate, there is a trigger ‘When a new email arrives’ that contains a field called ‘Subject filter’. When we enter a string in that field and if the string is a part of the email subject then the flow will trigger; otherwise, it won’t.
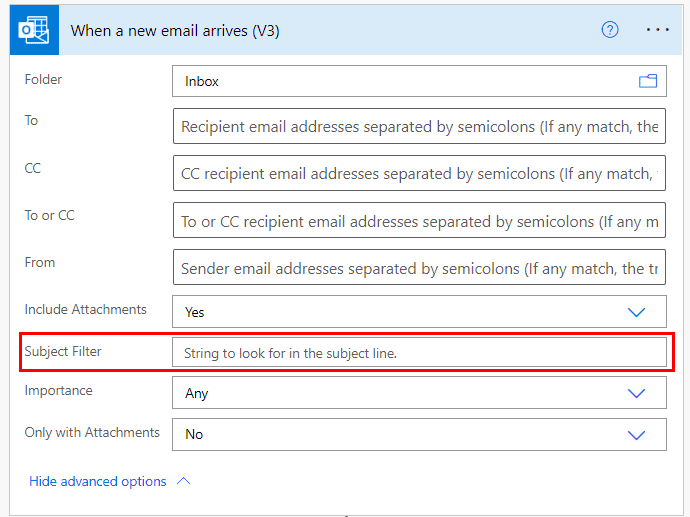
But it takes a single string, if there is no subject then it will not trigger the flow. As the field does not allow multiple strings to filter, we are going to use the trigger conditions. Where the subject will filter according to multiple conditions.
In this example, we will create a flow using multiple conditions on the subject that will filter it as per the conditions. According to the flow, it will trigger when the condition is met and if there is any attachment then it will store in a specific SharePoint library. To create the flow, the steps are:
- On Power Automate, go to + Create > Automated Cloud Flow > select the trigger ‘When an email arrives’ > Create.
- Select the folder for incoming mails i.e. Inbox.
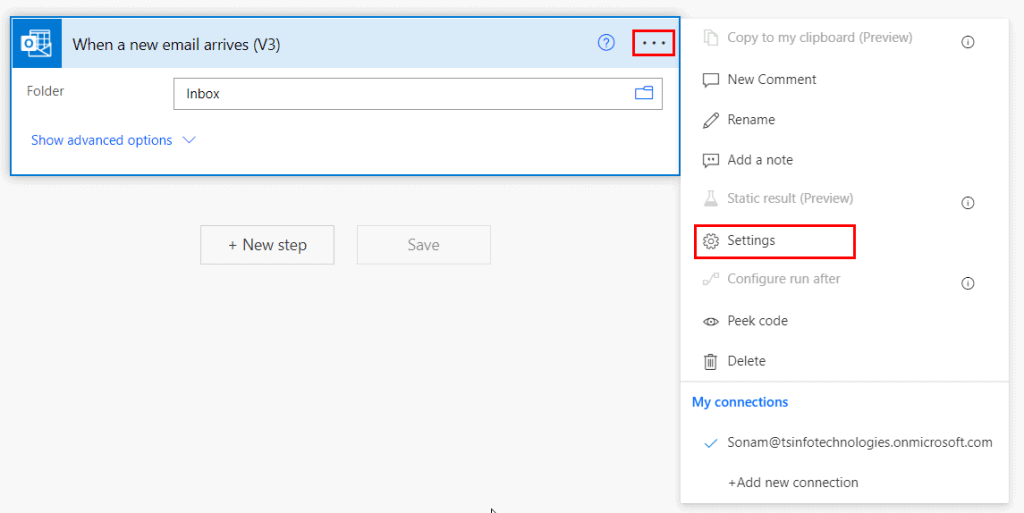
- To apply the conditions, click on the ellipses(…) > Setting.
- Then click on the trigger condition > Insert the below expression.
@or(contains(triggerOutputs()?['body/subject'], 'SharePoint'),contains(triggerOutputs()?['body/subject'], 'Developer'), contains(triggerOutputs()?['body/subject'], 'Power Platform'))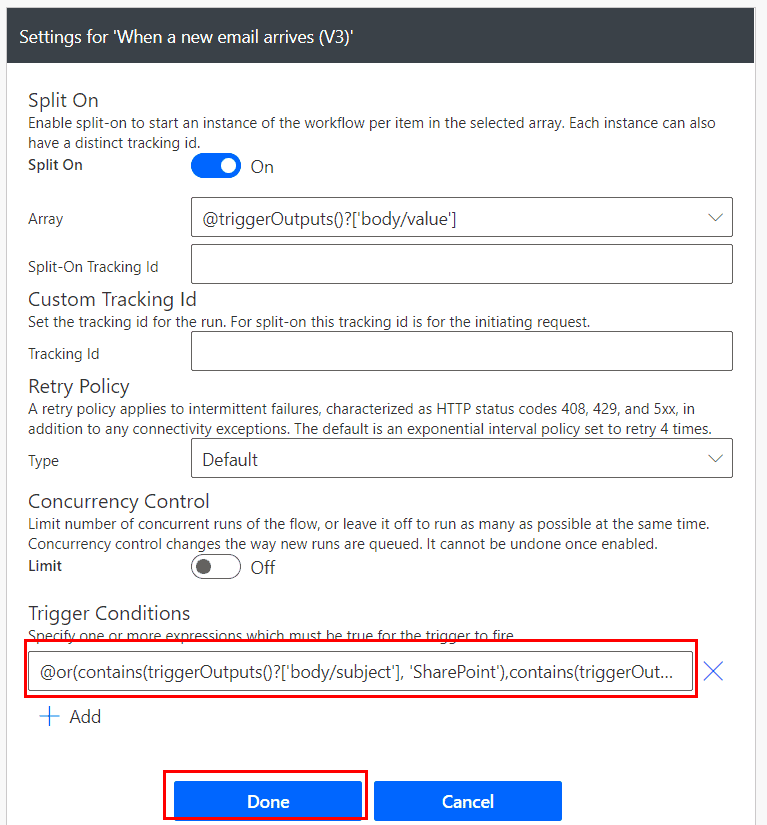
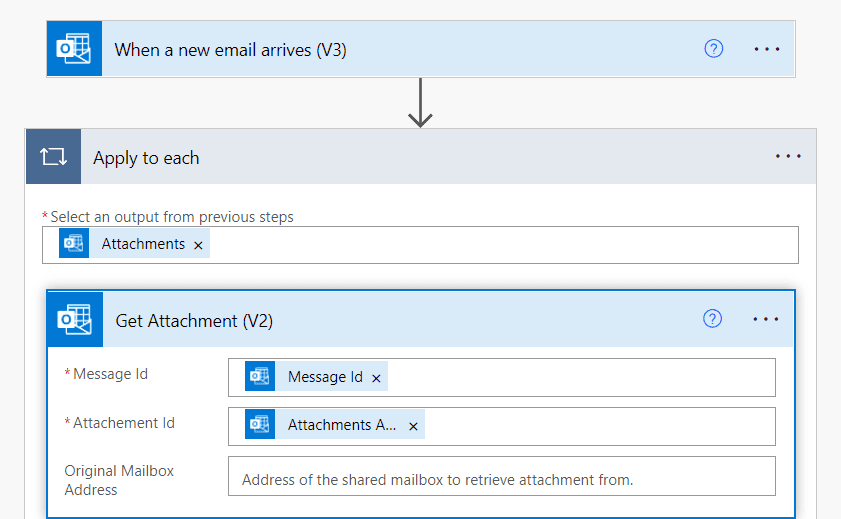
- Next, add an action to get the attachment from the email. Click on the + New step > Get attachment. Set the message Id and attachment Id from the dynamic content. It will create an ‘apply to each loop.
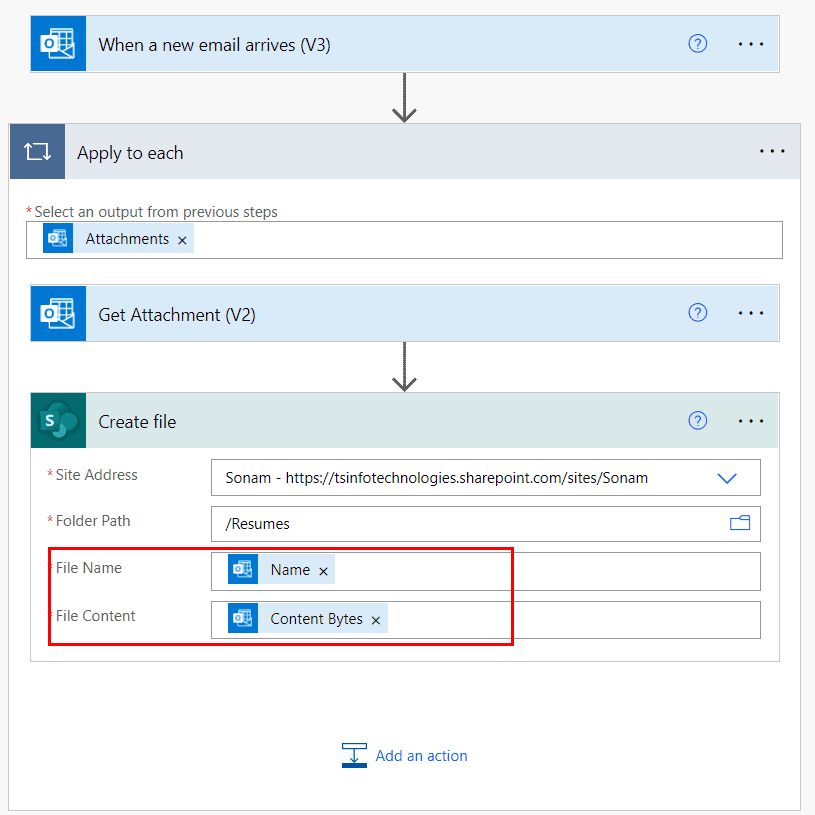
- After getting the attachment, it will upload the file to the specified document library. Click on +Add an action > Create file. Specify the site address and folder path of the document library. set the file name as ‘name‘ and file content as ‘content byte‘ from the dynamic content.
Now the flow is ready. Click on Save > Test > Manually > Run flow. For testing purposes, send an email to yourself from another user account.
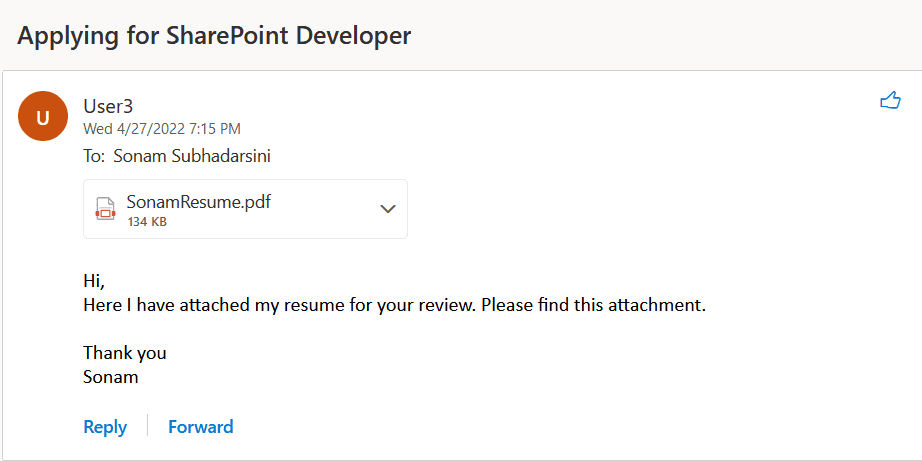
As the subject has that specified string, it will save the attachments in the Sharepoint document library.

This is how to do a subject filter with multiple conditions using Power Automate.
Power Automate condition contains multiple values
In this example, we will see how to use conditions that contain multiple values. To implement this, we have prepared a SharePoint list based on Vehicles having columns such as Title, Regd Number, Wheels, Color, country, state, owner, and date.
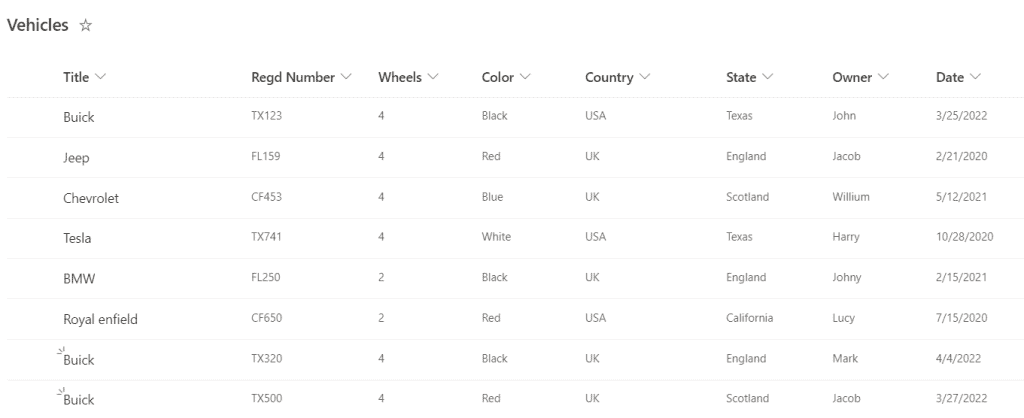
Now we will create a flow that will filter the data according to some specific string. For example, we will filter data whose title contains ‘B’ and the regd number contains ‘TX’. To create the flow, the steps are:
- On Power Automate, go to + Create > Instant cloud flow > Select the trigger ‘Manually trigger a flow‘ > Create.
- Next, add an action to get the items from the list. Click on +New step > Get items. Specify the site address and the list name.
- To add the multiple conditions, add a condition control. Click on +New step > Condition. In this condition control, add the values, operators, and the compare values such as:
- Title (select the field from the dynamic content) contains B
- To add another condition, click on +Add > +Add row > change the main operator to ‘And‘.
- Then add the next condition, Regd number contains TX
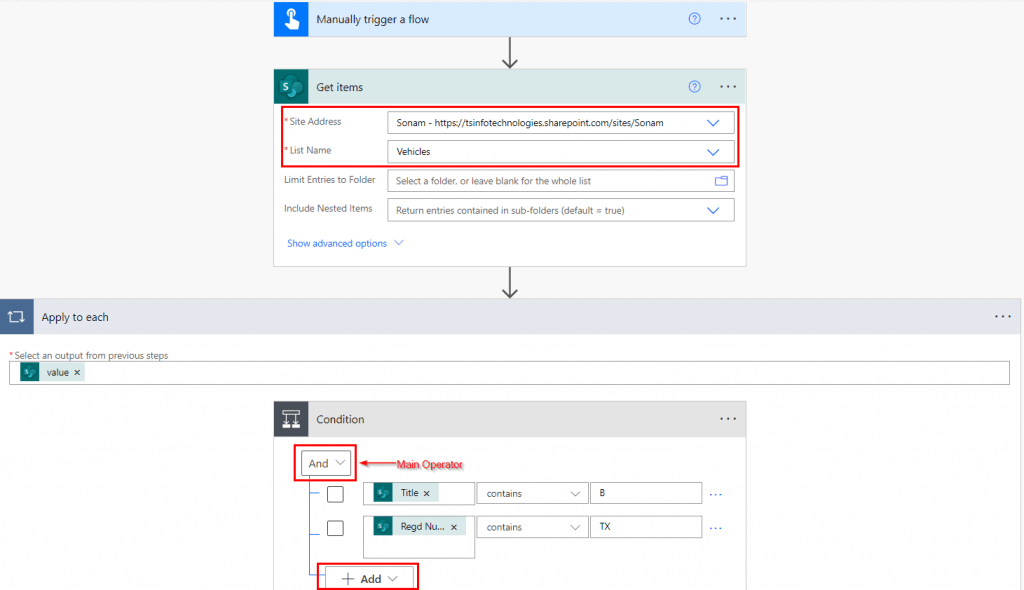
If the condition is met, then it will move to the ‘If yes‘ section. Where we will add a compose action to see the retrieve values. In the ‘If yes‘ section, click on +Add an action > Compose. Add title and the regd number from the dynamic content of the get items.
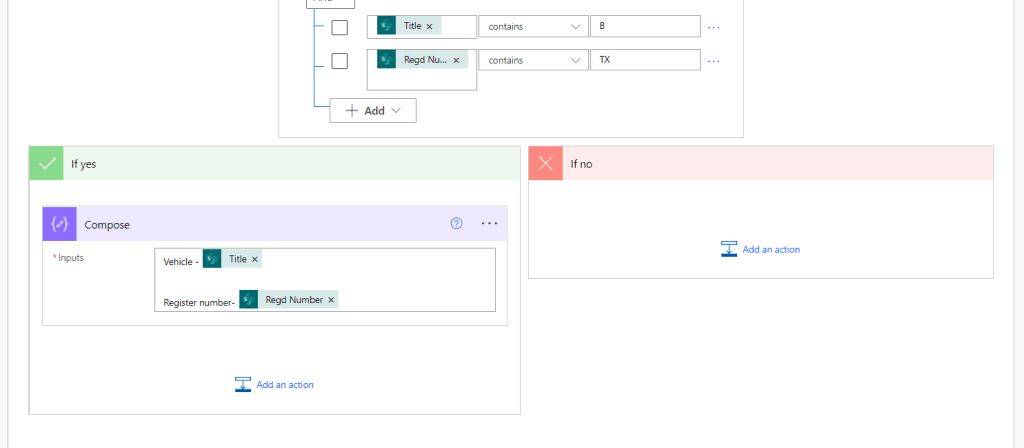
Now save the flow and test it manually. We can see it will filter data that satisfies both the conditions. As there are 8 data, it will check all those data but show only those data that satisfied the conditions.
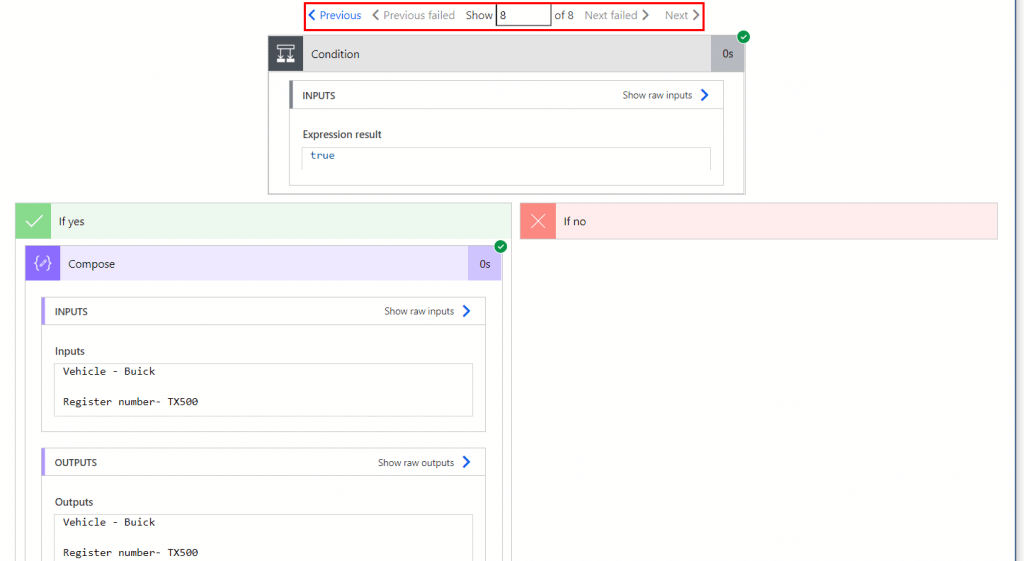
This is how the multiple conditions work with the ‘contains’ operator in Power Automate.
Power Automate multiple conditions email recipients
In this example, we will see how to use multiple conditions with email recipients in Power Automate. For example, we have a SharePoint list based on ‘Product’ having columns such as Title, Vendor (single line of text), Types (choice i.e. Software, hardware, including blank).
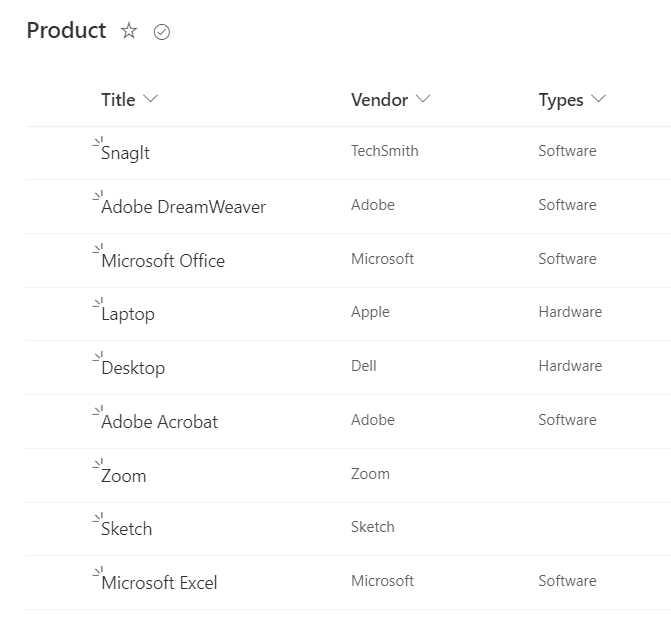
Next, we will create a flow that will send an email based on multiple conditions. If the product’s type is equal to software then it will send an email to a specific user, if the product’s type is equal to hardware then it will send an email to another user, similarly, if the type is blank then it will send an email to another user. To create the flow, the following steps are:
- On Power Automate, go to My flows > + New flow > Instant cloud flow > Select the trigger ‘Manually trigger a flow‘.
- Next, add an action that will get all the items from the SharePoint list. Click on +New step > Get items. Specify the site address and the list name.
- After getting all the items, now we will add a condition control. Click on +New step > Condition control. Where we will use the values for the condition such as:
- Types value is equal to Software.
If the condition is satisfied, then it will send an email to a specific user or HR. In the ‘If yes’ section, click on + Add an action > Send an email. Set the properties such as To, subject, and body of the email.
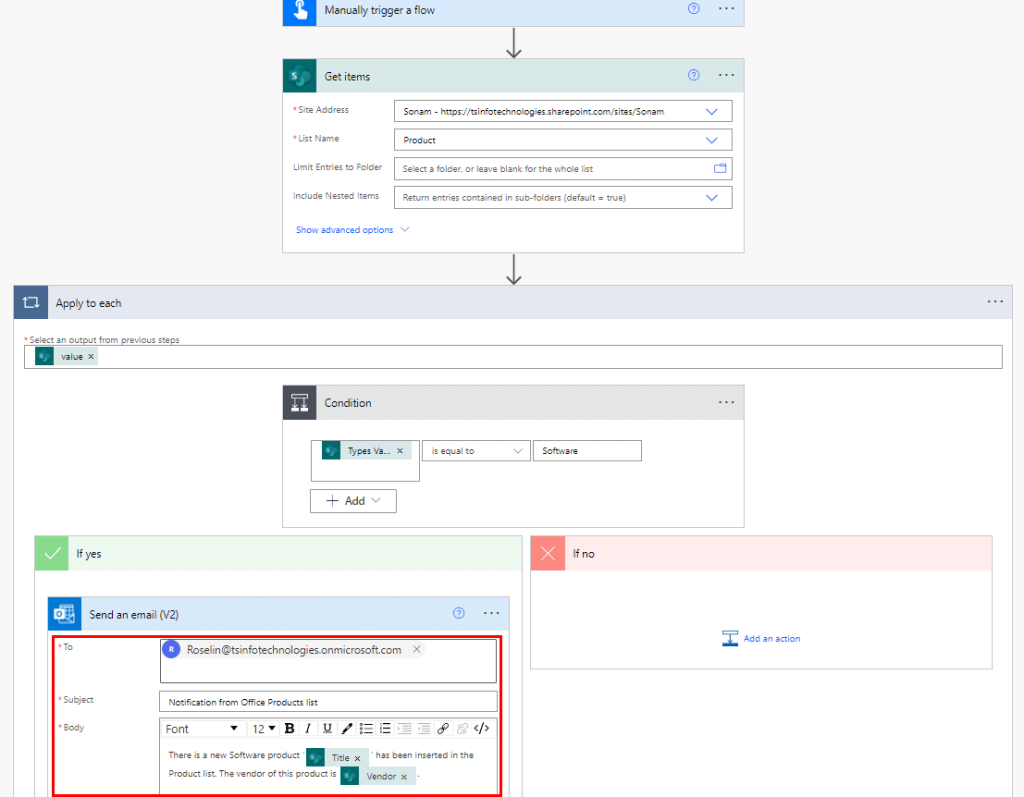
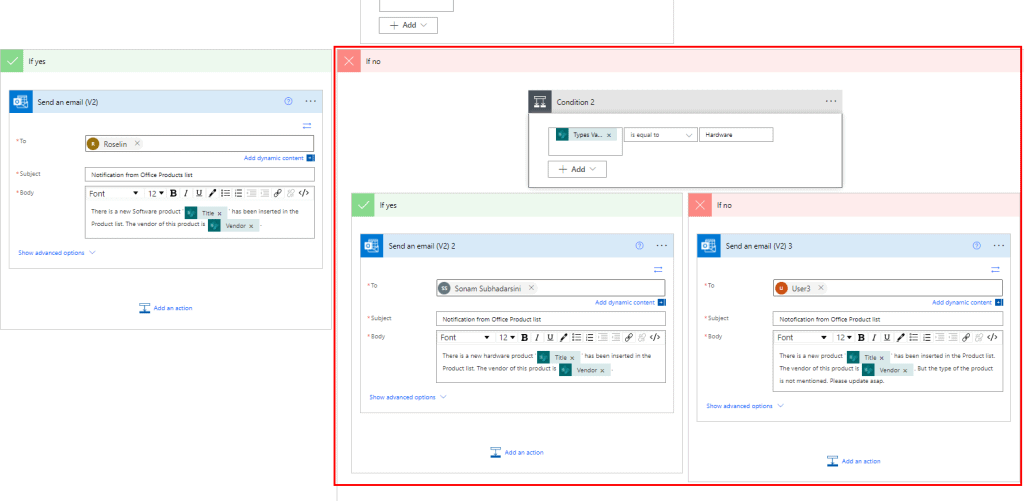
- In the ‘If no’ section, add another condition control. Where we will insert a condition. According to the condition, whether the types are equal to hardware is not. Click on +Add an action > Condition. Set the values such as:
- Types value is equal to Hardware
- If the condition satisfies, then it will send an email to a specific user; Otherwise, it will notify another user to update the types of the product. In both the ‘, If yes’ and ‘If no’ sections, click on +Add an action > Send an email and send the properties to activate this action.
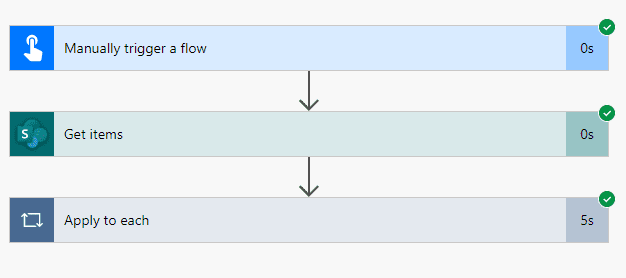
Now save the flow, click on test > manually > Runflow. We can see the flow ran successfully.
Also, it will notify the recipients via outlook as per the conditions. This is how to do send an email with multiple conditions using Power Automate.
Power Automate multiple condition person field is empty
For example, in a company, an HR has prepared a list in SharePoint but unfortunately, he forgot to insert data in some person’s fields. Here we will see how to work with an empty person field using multiple conditions in Power Automate.
Let’s take an example of a SharePoint list based on some columns such as the Project’s title, Start date, delivery date, manager (person field), and team lead (person field). These person fields have some empty fields.
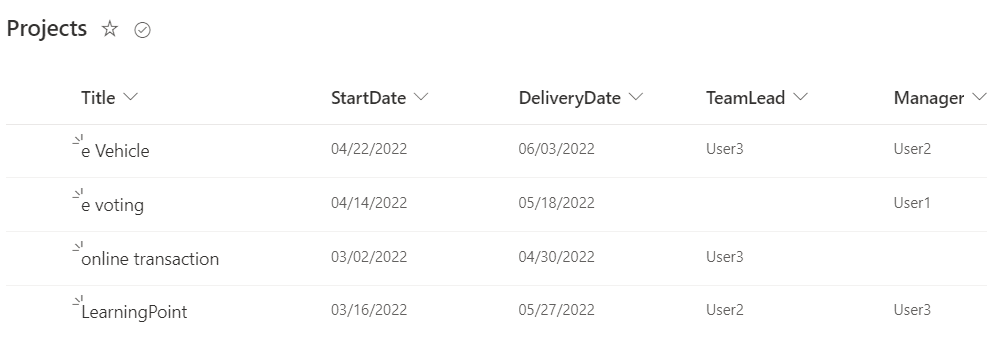
Now, we will create a flow that will check if any of the people’s fields is empty then it will send an email to HR via Outlook. So that he can update the field. To create the flow, the steps are:
- On Power Automate, create an instant cloud flow that will trigger the flow manually.
- Next, add the ‘Get items‘ action to retrieve all the items from the list. Provide the site address and the list name.
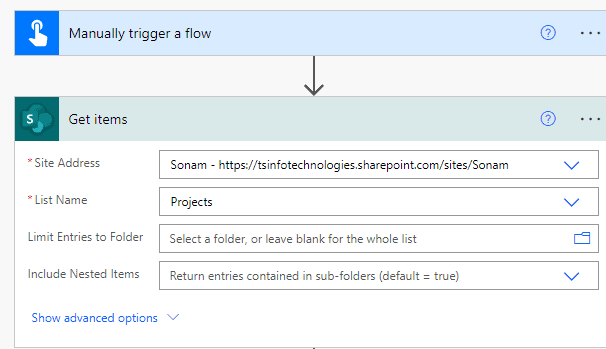
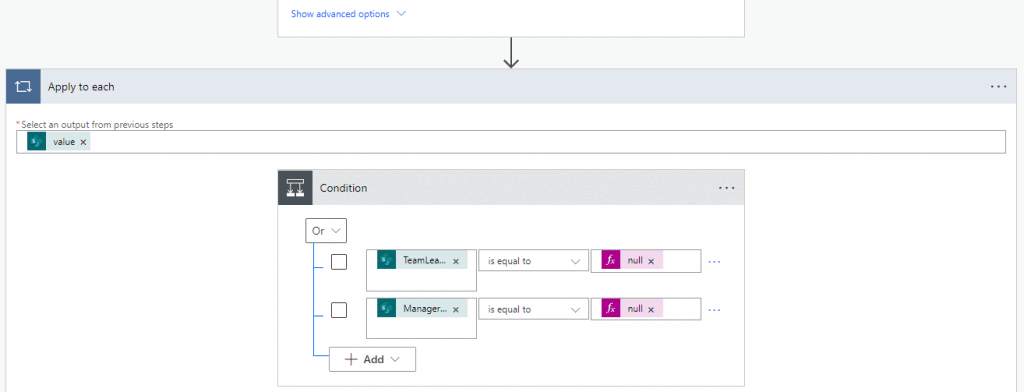
- To check the empty fields in both columns, we will add a condition control. Click on the +New step > ‘Condition’ control. Set the fields, operators, and the compare values such as:
- TeamLead display name is equal to null
- Manager display name is equal to null
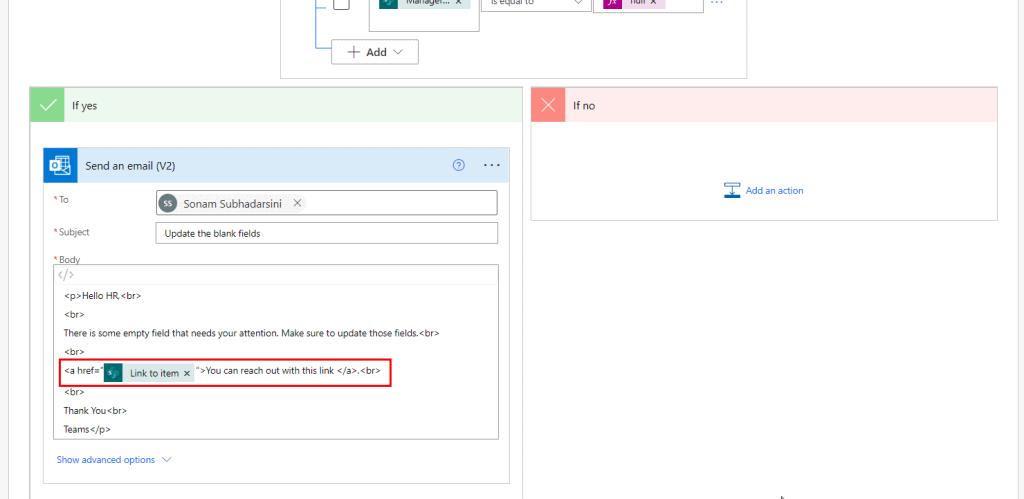
- If conditions got matched then it will send an email notification to HR to update the list with the respective item link. In the ‘If yes‘ section, click on +Add an action > Send an email. Set a user ID in the To, give a subject to the email notification, and specify the body of the email.
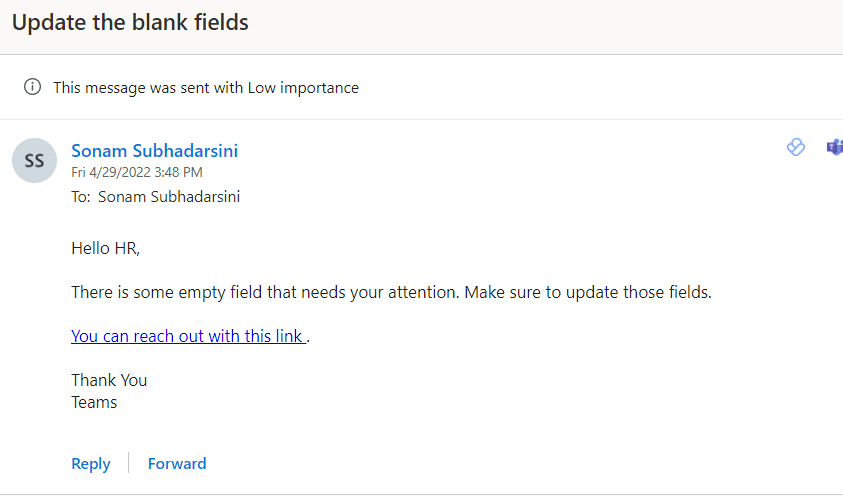
That’s it. Now save the flow, click on test > manually > run flow. We can see it will notify the specified user or HR via outlook to update the people field in the SharePoint list with a link.
This is how to deal with empty Person fields in Flow.
Power Automate multiple condition parallel branch
There is an article where we have described some examples of how to work with a parallel branch in Power Automate under multiple conditions.
Power Automate multiple conditions email attachments
We have a blog where you can find the solution on how to save the email attachments in the SharePoint library based on multiple conditions.
Power Automate multiple conditions has attachment
Here we will see how to work with multiple conditions if the email has attachments. Also, we will see how to save those attachments to another location.
For example, when an email arrives the flow will check whether the email has attachments or not. If it has attachments then it will retrieve the attachments and store them in another Sharepoint folder.
To create the flow, the following steps are:
- On Power Automate, create an automated cloud flow that triggers ‘When a new email arrives. Select a folder location for the arrival message i.e. Inbox.
- Add a condition control to check whether the email has an attachment or not. Click on +New step > Condition. Set the values such as:
- Has attachment is equal to true (expression)
- And
- Has attachment is not equal to null
Note- select ‘Has attachment’ from the dynamic content of the trigger.
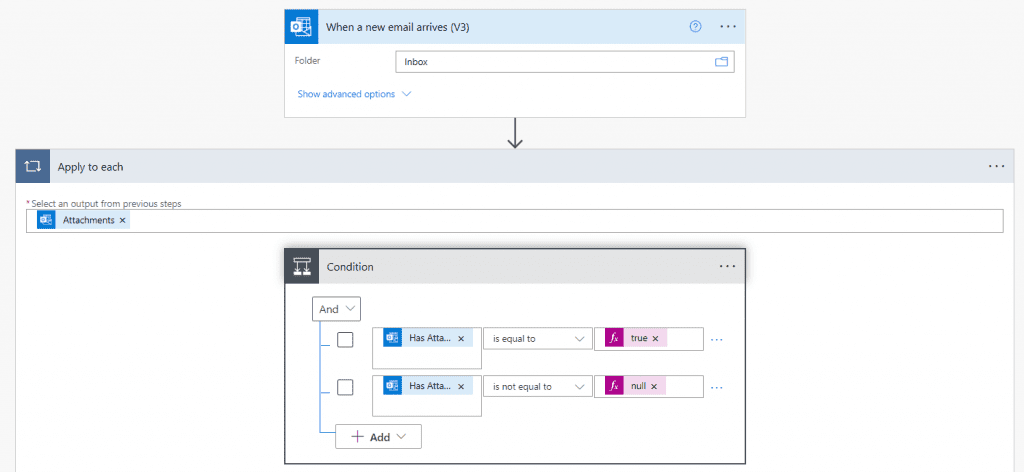
- If there are any attachments, then it will get the attachments. In the ‘If yes‘ section, click on + Add an action > Get attachment. Provide the message Id and attachment Id from the dynamic content of the previous action.

- Next, add an action that will store the attachments in a specific SharePoint folder. Under ‘Get Attachment‘ action, click on + Add an action > Create file (under SharePoint connector). Provide the site address and the folder path. Set the ‘File name‘ and ‘File content‘ as ‘Name‘ and ‘Content Byte‘ from the dynamic content.
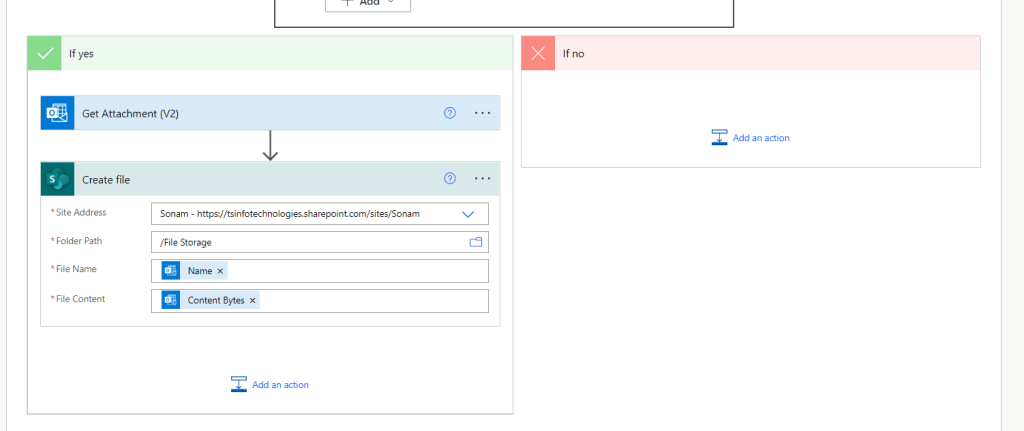
Now the flow is ready to run. Let’s save the flow and test it manually. For testing purposes, send an email to your outlook.
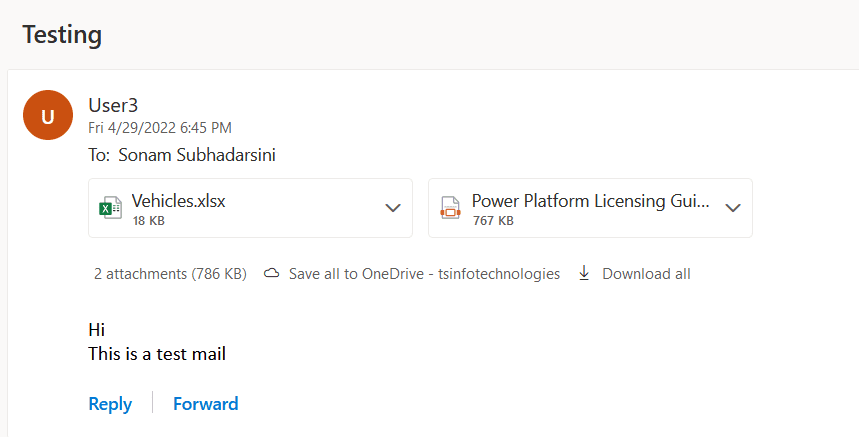
As the email has attachments, it will retrieve and store them in the specified folder like below:
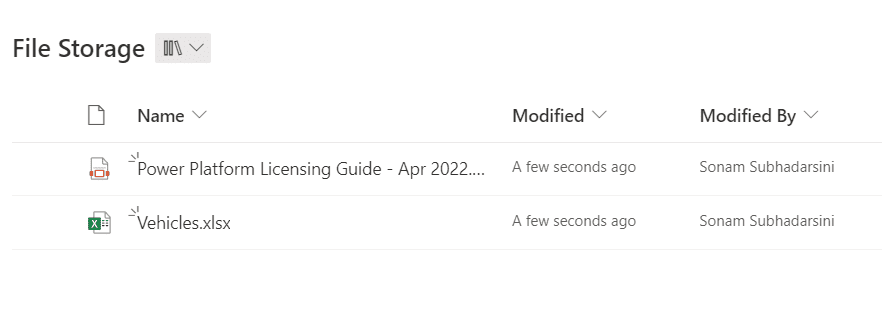
This is how to do power automate multiple conditions has attachment.
Power Automate nested conditions limit
In Power Automate, there is a limitation of nesting a flow. It allows up to 8 nestings. If you use nestings more than 8 i.e. 9 or more then it will through an error message like below:
Items are nested at level '9' which exceeds the maximum nesting limit of '8'But we can handle this error by combining the conditions. That means instead of using condition actions we can merge them into an expression.
Read Power Automate IF Expression
Power Automate multiple condition HTML table
Now, we will see how to create an HTML table from a SharePoint list using multiple conditions. To implement this, we are going to use a SharePoint list based on tasks having columns such as Title, Description, Assigned To, Start Date, End Date, Status(choices i.e. Blog Post, Content, YouTube).
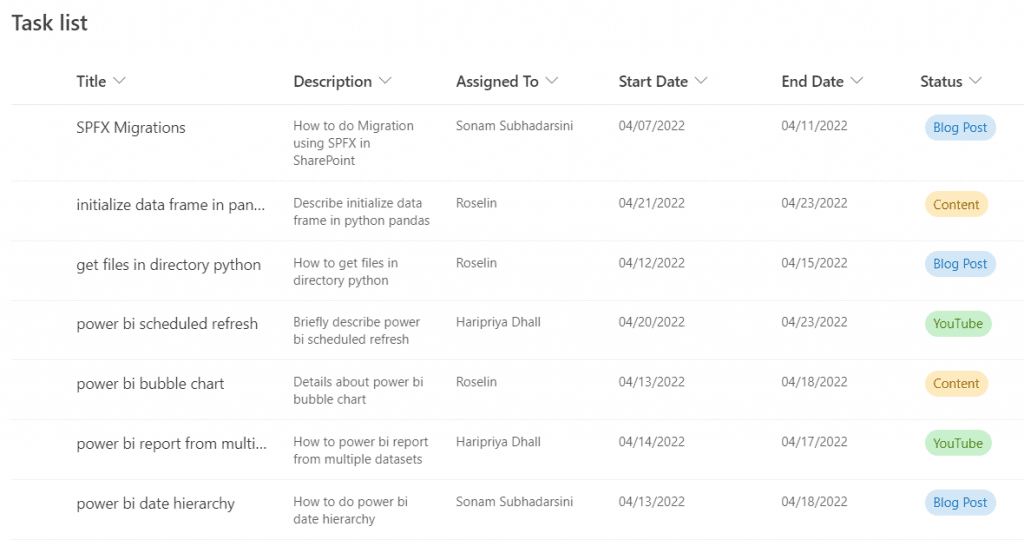
Let’s create a flow that will build an HTML table from this SharePoint list whose task’s status is equal to ‘Blog Post’ and ‘Content’. Then it will send this table within the email. To create the flow, the following steps are:
- On Power Automate, create an instant cloud flow that will trigger the flow manually. (We described in the previous flow to create an instant cloud flow).
- Add an action ‘Get Items‘, to get the all items from the SharePoint list. Click on +New step > Get items. Provide the site address and the list name. In the ‘Filter Query‘, add the below expression that will retrieve only those data whose status is equal to ‘Blog Post‘ or ‘Content‘.
Status eq 'Blog Post' or Status eq 'Content'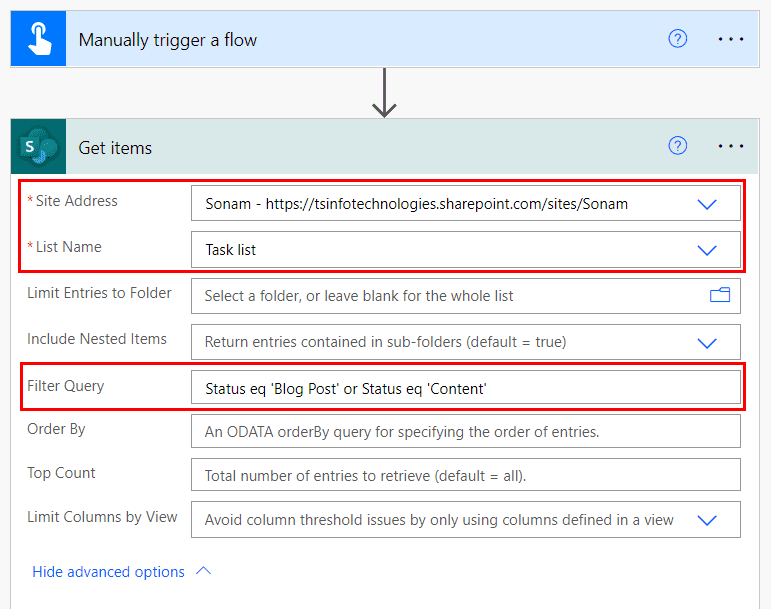
- Add a ‘Select’ action that will select the specified properties from all elements of the ‘From’ array into a new array. Click on + New step > Select.
- In the ‘From‘, select ‘value‘ from the dynamic content.
- In the ‘Map‘, add the column name and insert the field from the dynamic content.
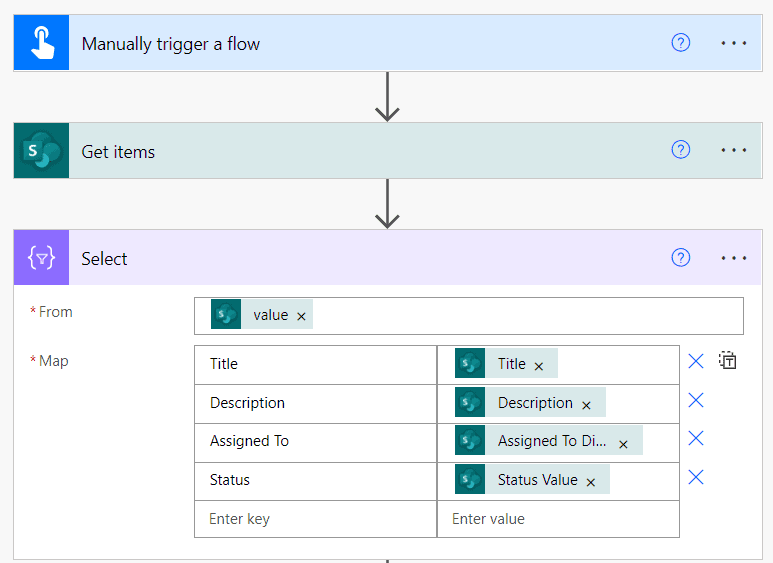
- Next, add the action ‘Create HTML table‘ it will create an HTML table using the retrieved data. Click on +New step > Create HTML table. Set the ‘From‘ as ‘OutPut‘ and ‘Columns‘ as ‘Automatic‘.
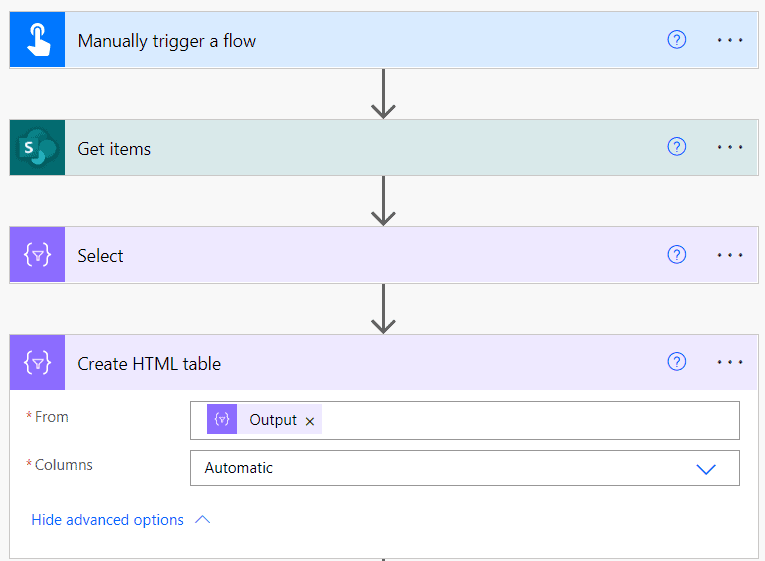
- Now the table is created but not formatted. To format the created HTML table, add the below expression within a compose action. Click on +New step > Compose.
replace(body('Create_HTML_table'),'<table>', '<table border = "2">')- Send this output via email to a user. Click on +New step > Send an email.
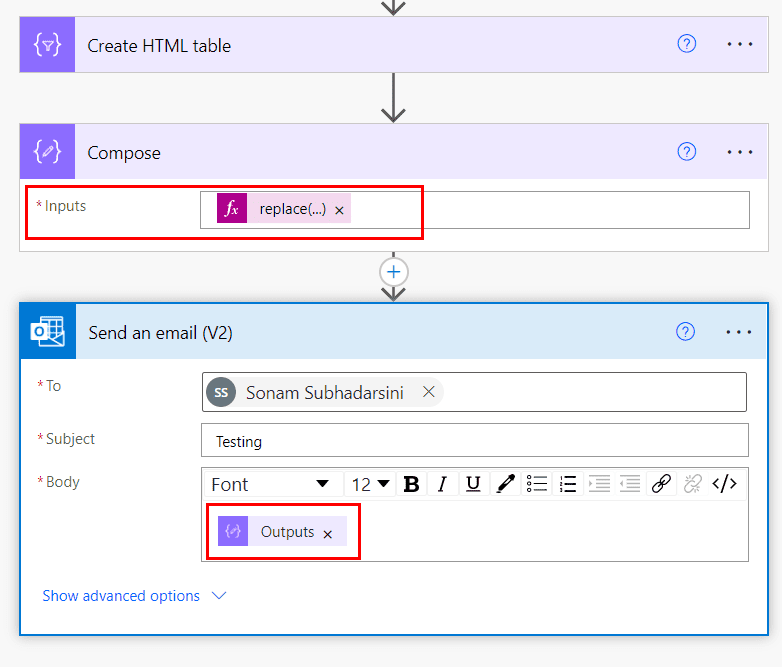
Now, save the flow. Click on Test > Manually > Run flow. We can see the flow will run successfully as well as it will send the email with converted the retrieved data into a table.
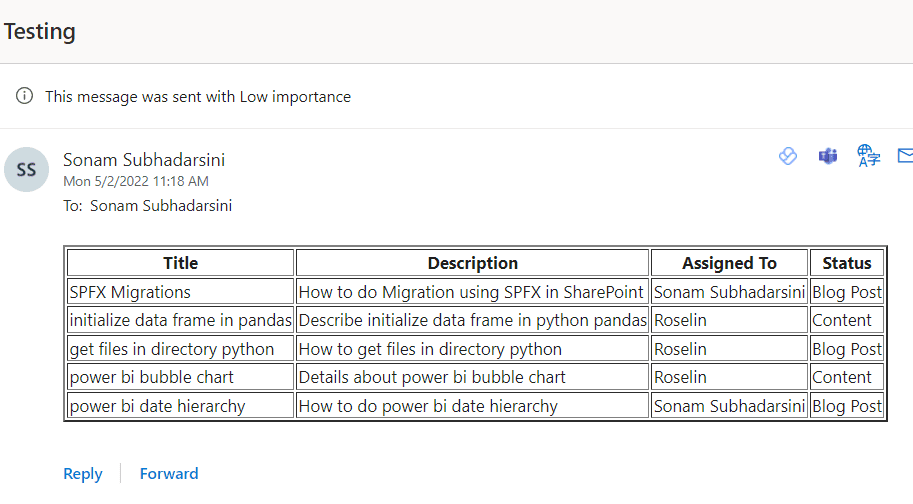
This is how to do multiple condition HTML table using power automate.
Power Automate desktop multiple conditions
Here we will see how to use the multiple conditions within the Power Automate Desktop where the if action checks whether the given statement is true or not. If the statement is valid then it executes the logic between the If and end steps.
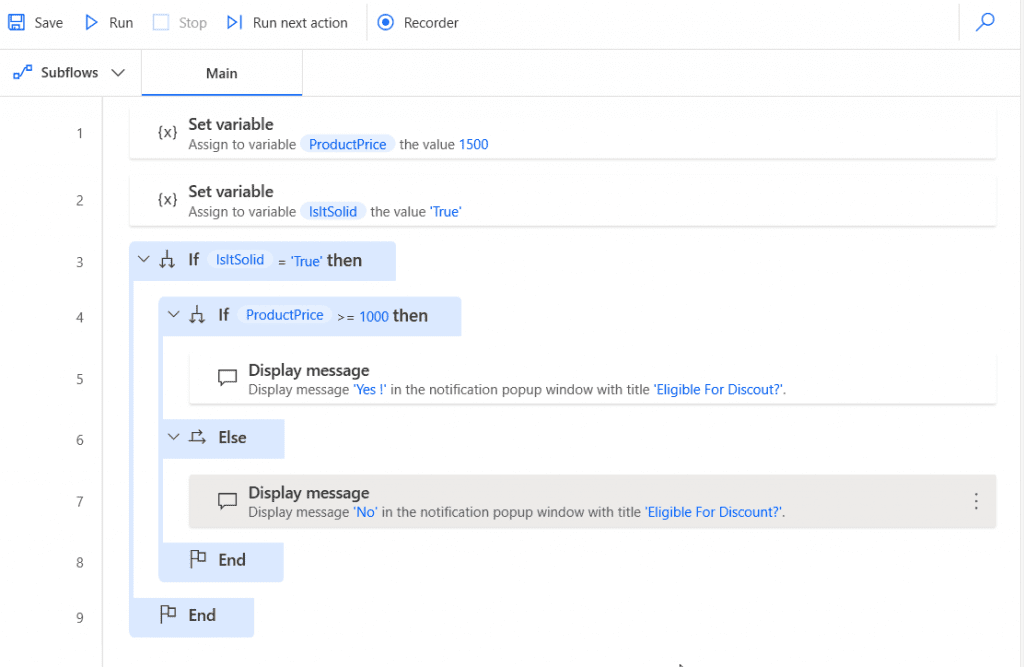
Let’s take an example of a desktop flow, where it will check if the product material is equal to solid then it checks the next condition whether the product’s price is greater than or equal to 1000. If both the conditions are valid then the product is eligible for a discount; otherwise, the product is not eligible for a discount.
To create the flow, the following steps are:
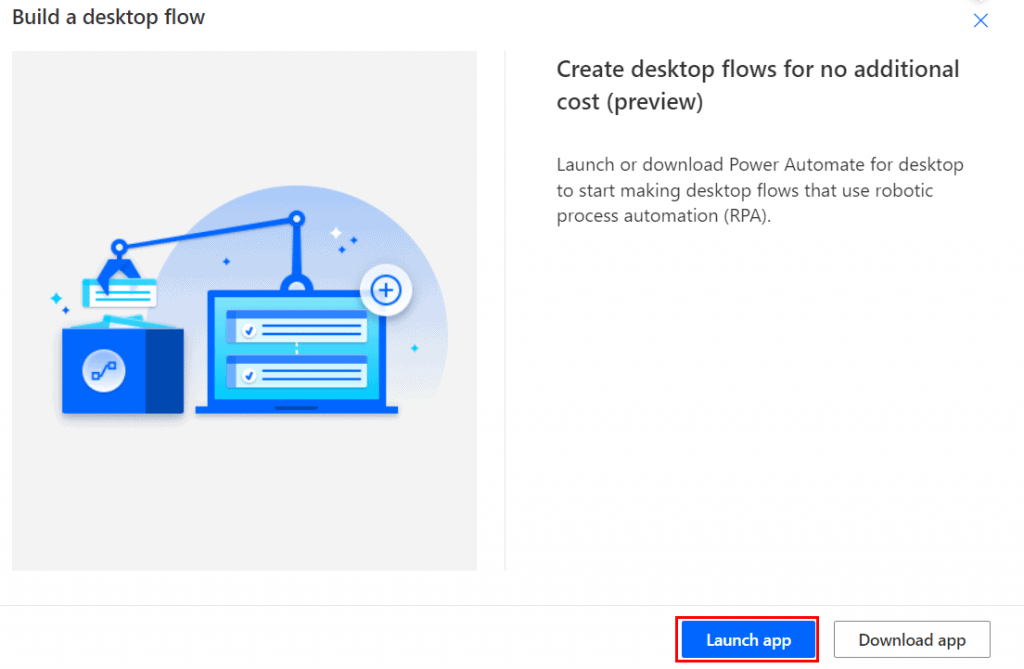
- On Power Automate, go to + Create > click on ‘Desktop Flow’ > launch app. (If you have installed the desktop flow on your local system; otherwise, first download then click on launch app).
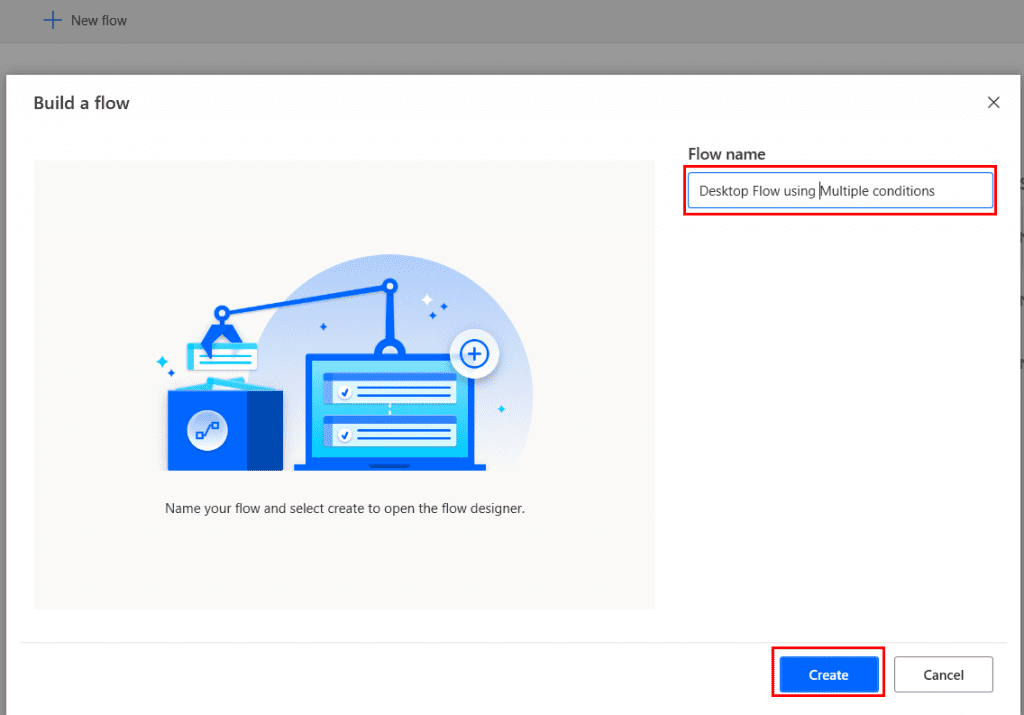
- Click on + New flow. Give a name to the flow and then click on ‘Create‘.
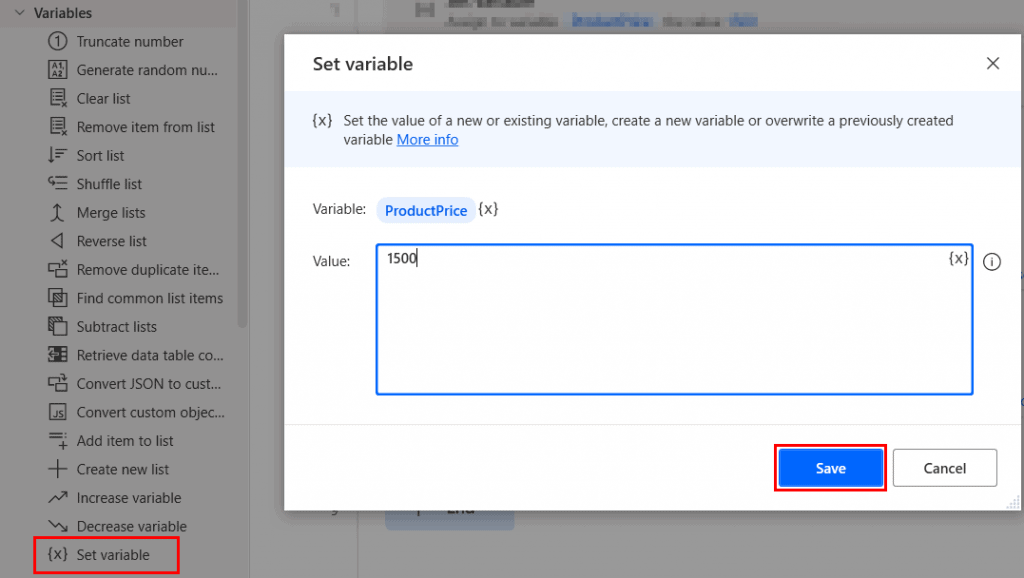
- From the left ‘Action’ panel, drag the ‘Set variable’ to the workspace. Set the variable name (ex- ProductPrice) and the value (i.e. 1500). Click on save.
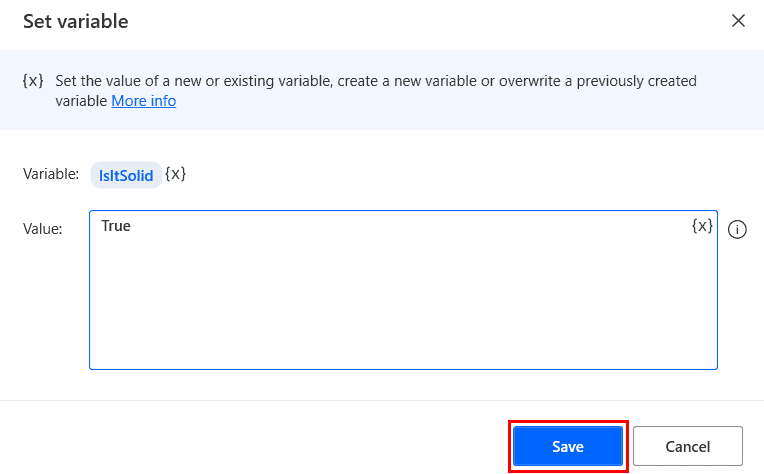
- Again, drag the ‘Set variable‘ to the workspace and drop it under the first variable. Give the variable name (i.e. IsItSolid) and set the value as ‘True’.
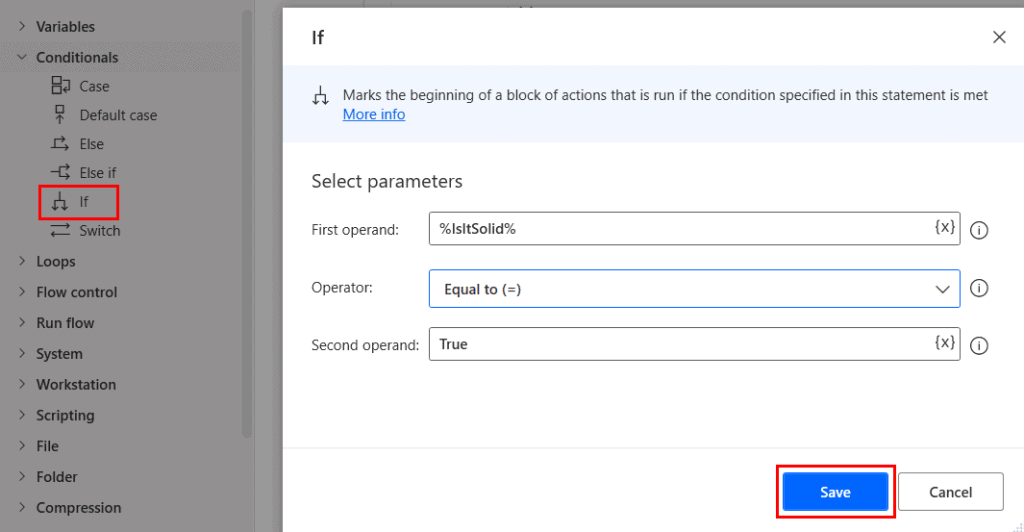
- Next, drag the if action under the ‘conditionals‘ and drop it in the workplace. Set the properties such as:
- First operand: IsItSolid
- Operator: Equal to (=)
- Second operand: True
Click on the Create.
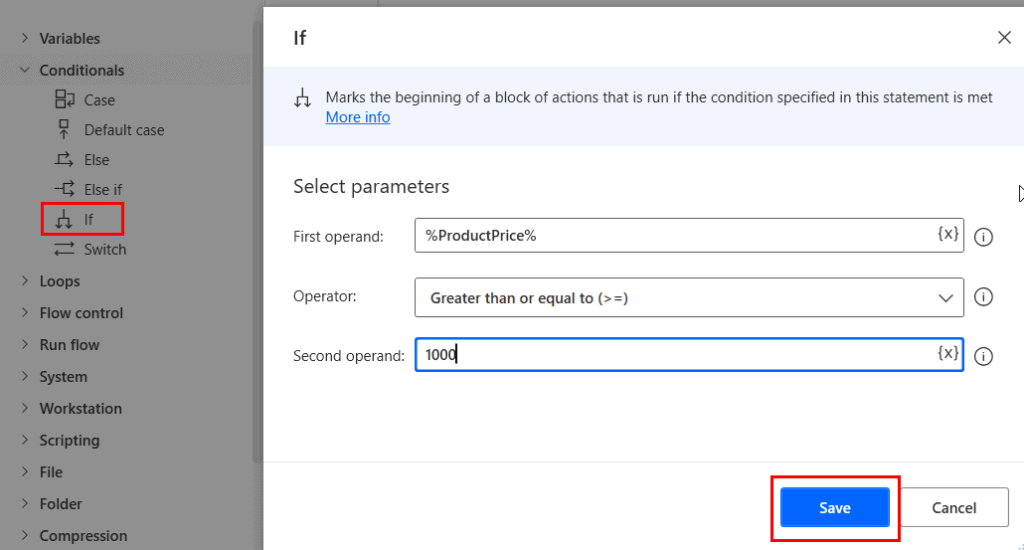
- To add another condition, drag the if condition and drop it under the previous ‘if’ action. Similarly, set the properties such as:
- First operand: ProductPrice
- Operator: Greater than or equal to
- Second operand: 1000
Then click on the ‘Create‘.
- If the statements are valid then it will show a message via message box. Drag and drop the Display message from the ‘Message boxes’ action. Give e title to the message box and the message to display. Then click on ‘Create‘.
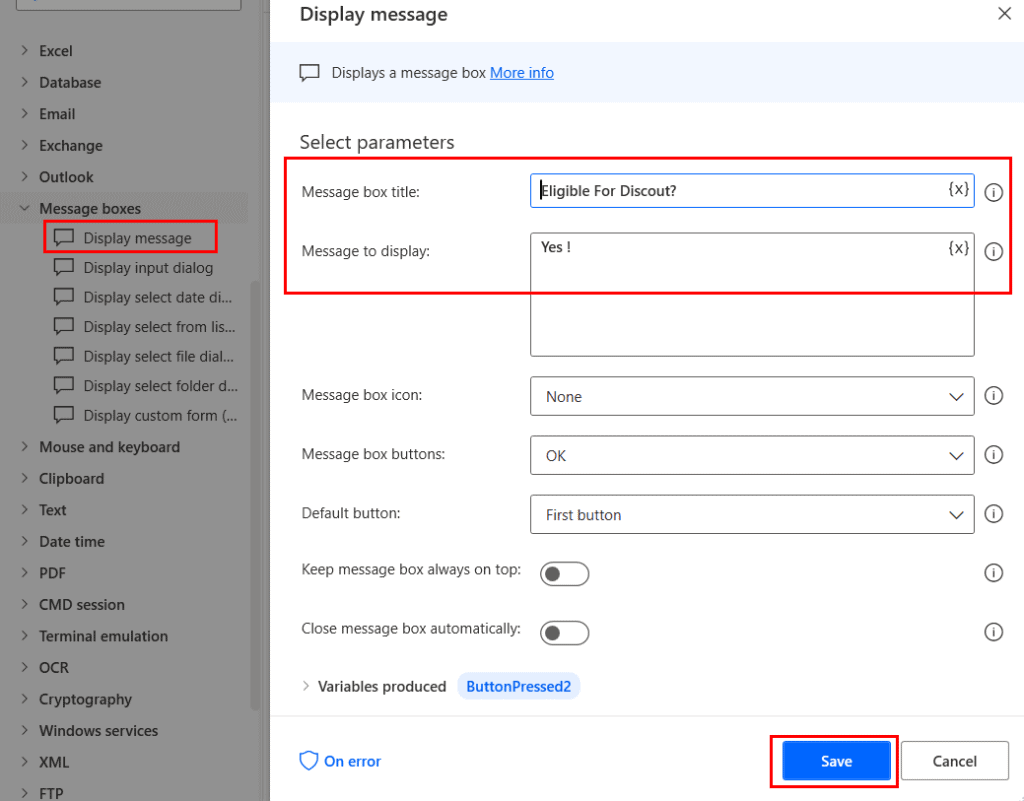
- If the conditions are not valid then it will move to the else part. Drag the ‘Else‘ action and drop it between the if and end statements.
- Then add a message that will display when the conditions are not valid. Drag the display message action and drop it between the else and end statements.
- Set the message box title and the display message.
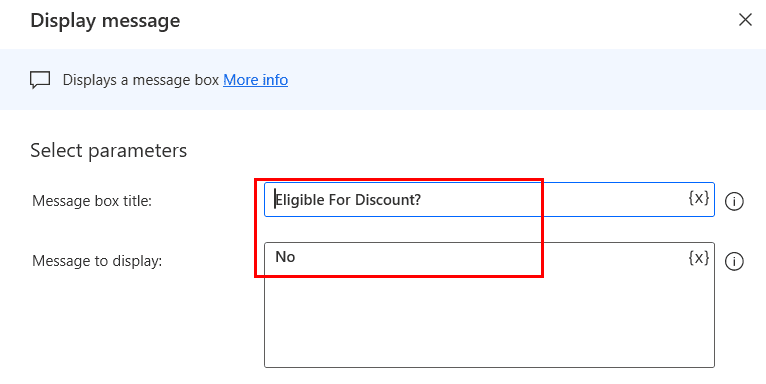
Now, the entire flow will look like the below:
To see the result, click on save > Run. We can see the output will come as ‘Yes‘ as we have set the variable value as ‘1500‘.
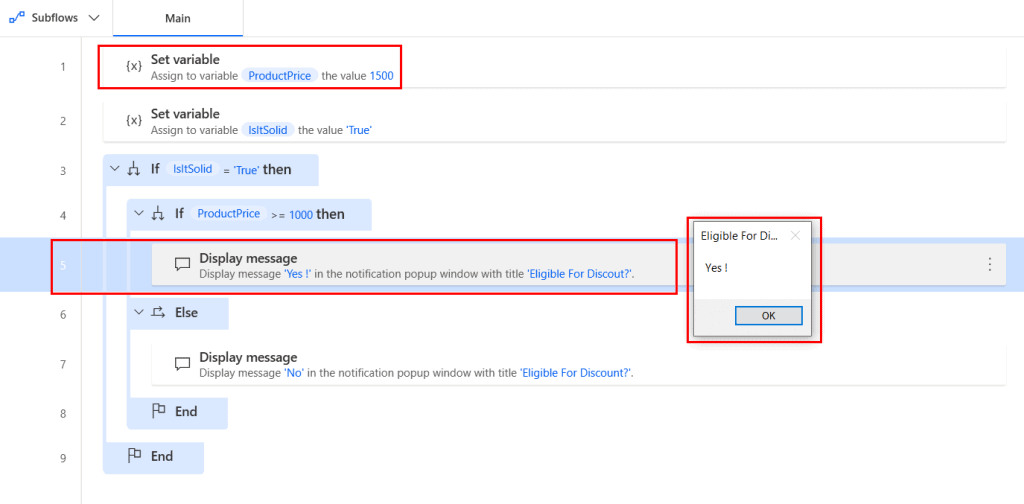
We can see, that the flow will stop and show the output where the conditions are met. Similarly, if we set the variable value as below 1000 (suppose 500), then it will come as ‘No’.
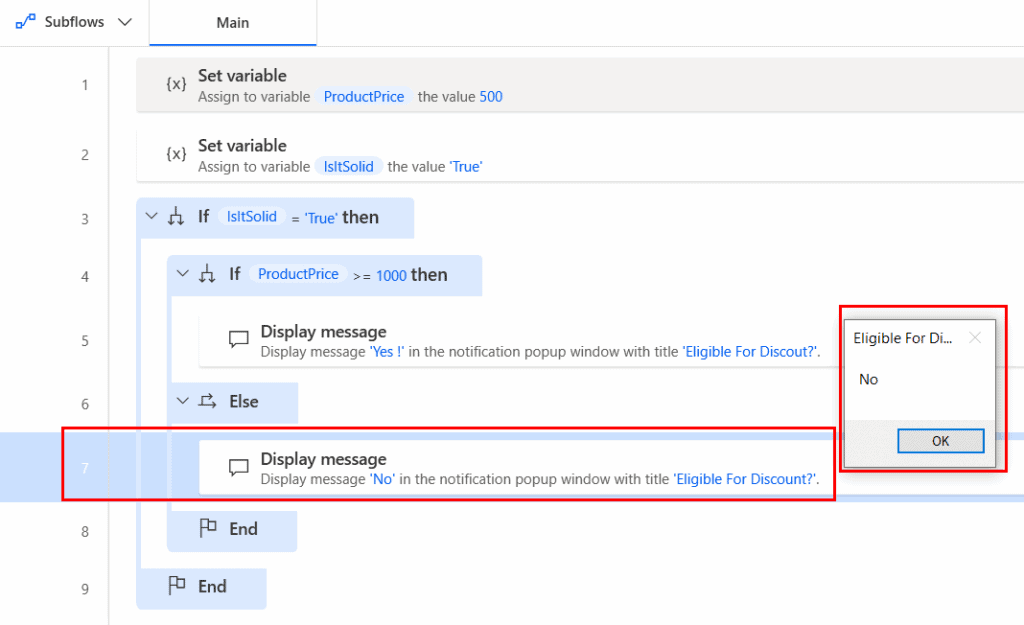
This is how the multiple conditions work on Power Automate Desktop.
You may like the following Power Automate tutorials:
- Power Automate IF Expression [With 51 Examples]
- Power Automate flow with Microsoft teams
- Start and wait for an approval Power Automate
- Power Automate shared mailbox
- Upload PowerApps Attachments to SharePoint Library Folder
- Power Automate or Microsoft Flow delete all files in a folder
- Create a table using Power Query in Power BI
Conclusion
From this Power Automate Tutorial, we learned all about multiple conditions in Power Automate or Microsoft Flow. Also, we have discussed the below topics:
- How to use multiple conditions in Power Automate with examples?
- How to insert multiple trigger conditions in Power Automate?
- How to use multiple if conditions in Power Automate?
- Work with OData filters using multiple conditions in Power Automate.
- How to use a Filter array with multiple conditions in Power Automate?
- How to work with Microsoft flow conditions if yes continue?
- How to use switch case multiple values in Power Automate?
- Work with multiple conditions using both the ‘And’, ‘or’ Operator?
- How to use multiple conditions in a SharePoint person field in Microsoft Power Automate?
I am Bijay a Microsoft MVP (10 times – My MVP Profile) in SharePoint and have more than 17 years of expertise in SharePoint Online Office 365, SharePoint subscription edition, and SharePoint 2019/2016/2013. Currently working in my own venture TSInfo Technologies a SharePoint development, consulting, and training company. I also run the popular SharePoint website EnjoySharePoint.com