Recently, one of our clients asked us to create a Power Automate flow so that he can extract the information about invoice details from the Shared mailbox. So, I thought of explaining the Power Automate shared mailbox in detail along with the below-mentioned topics:
- Power Automate introduction to Shared mailbox
- How to Create Outlook Shared Mailbox in Power Automate
- Power Automate Shared mailbox trigger
- When a new email arrives in the Shared mailbox(v2), send a teams message
- When a new email arrives in a shared mailbox (v2), save attachments to the SharePoint document library
- Power Automate send a push notification when a new email arrives in a shared mailbox
- Power Automate move email to a shared mailbox folder
Power Automate Shared Mailbox
Power Automate shared mailbox is a separate folder we can create in Outlook. It makes it easy for multiple people to monitor and access the same mailbox, where users can receive and send emails from the same email address.
When a person present in the group replies to an email sent in a shared mailbox, the email address will be displayed as a shared address, not as an individual user’s email.
Important:
Microsoft 365 admin can only create and add users to the Shared Mailboxes in Microsoft 365 admin center.
Power Automate Connect to Shared Mailbox
Here, I will show how to connect to the shared mailbox in Outlook and create a new shared mailbox from the Microsoft 365 admin center.
Check out the steps below:
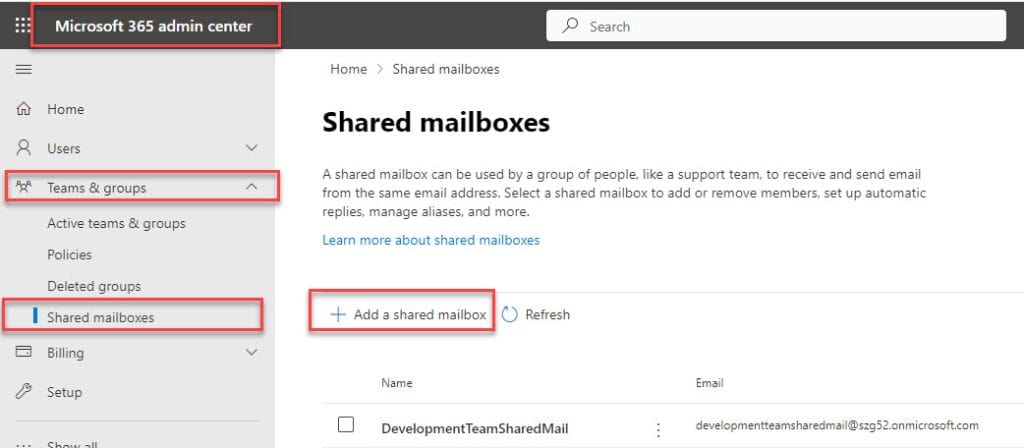
1. If you are an admin to the Microsoft 365 admin center, click https://admin.microsoft.com
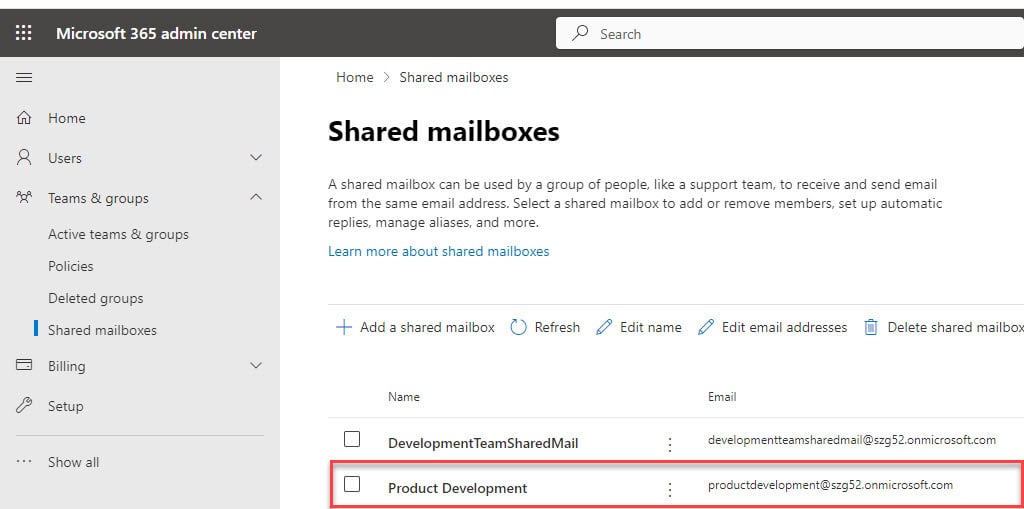
2. On the left navigation, expand Teams & groups -> Select Shared mailboxes.
3. On the Shared mailboxes page -> click on +Add a shared mailbox option.
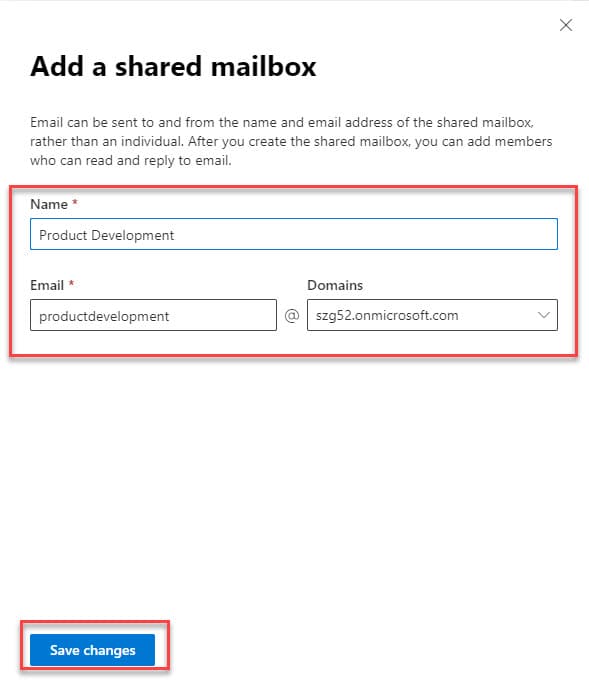
4. In the Add a Shared Mailbox window, provide a Name for the folder, and it will take Email automatically. Click the Save changes button.
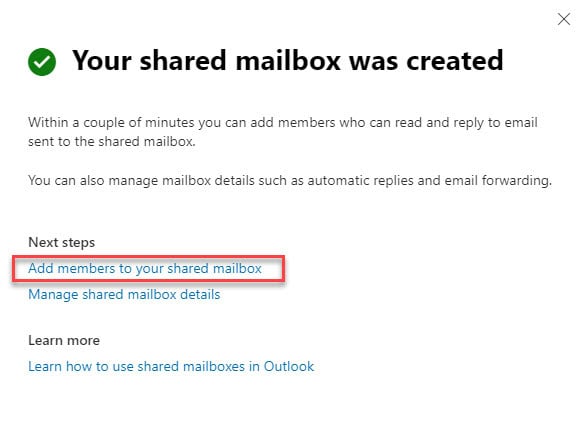
5. Within a few minutes, it will display the message, Your shared mailbox was created. Then, click Add members to your shared mailbox link to add members to the created shared mailbox.
6. Then, click on +Add members -> Select the members to whom you want to add -> Click on Add.
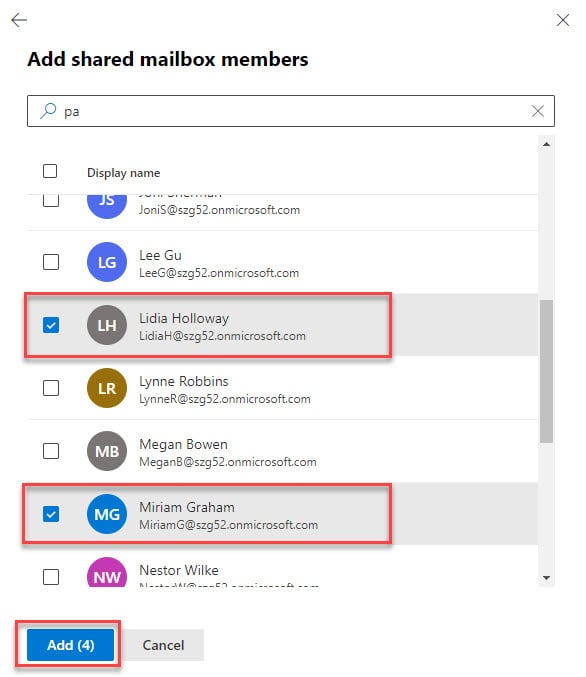
The shared mailbox can be created as shown in the below image:
Note:
After your admin has added you as a member of a shared mailbox, close and then restart new Outlook. The shared mailbox should automatically display in your Folder pane of Outlook.
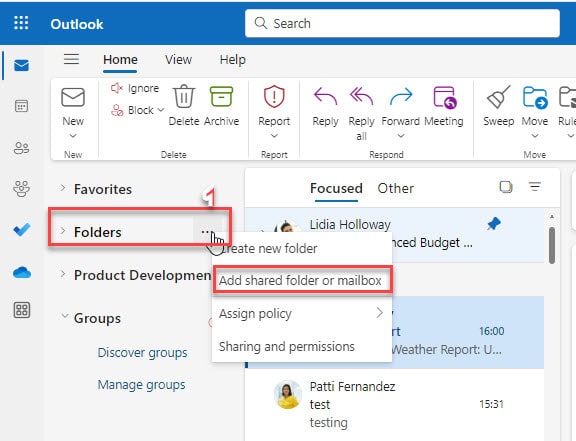
7. To add the created shared mailbox to Outlook, click on the folders icon and select Add a shared folder or a mailbox.
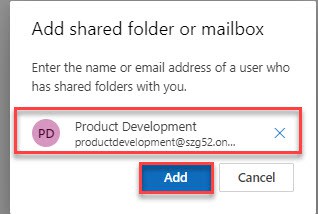
8. In the next dialogue box, search for the created shared mailbox name and click Add.
9. Then, the shared mailbox will be visible in the Outlook navigation, as shown in the figure below:
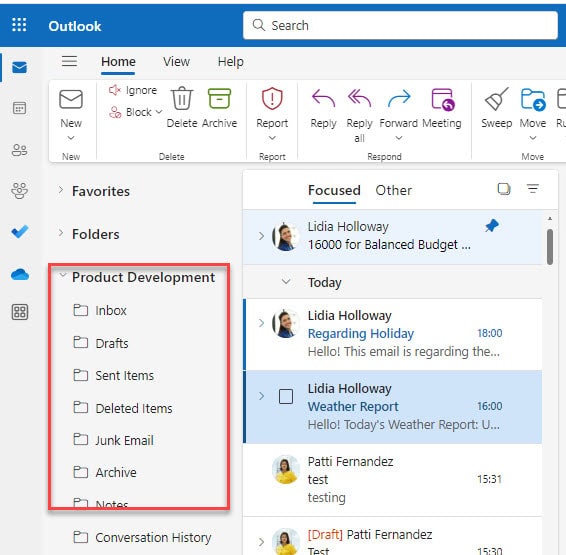
This is how to create a Shared mailbox in the Microsoft 365 admin center and connect it to Outlook.
Power Automate Shared Mailbox Trigger
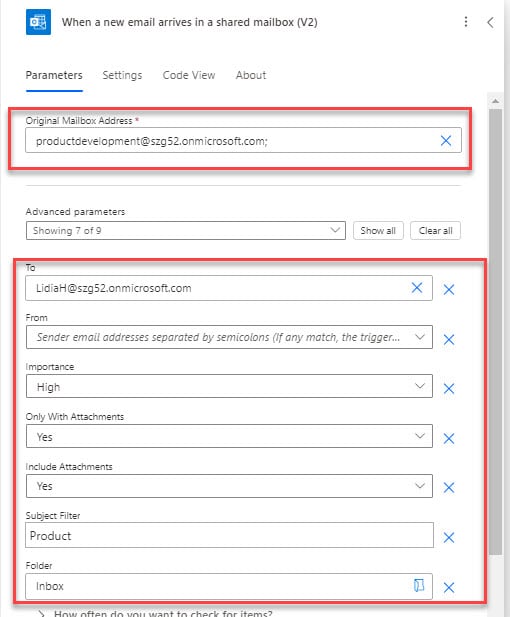
If you are unaware of the shared mailbox trigger, i.e., When a new email arrives in the shared mailbox(V2), look at the explanation and parameters below.
It will ask to set the parameters such as:
- Original Mailbox Address – This allows you to select the shared mailbox address manually or from the drop-down.
- Folder– Specify the mail folder to check the new mail.
- To– Provide recipient email address separated by semicolon.
- CC- CC recipient email address separated by a semicolon.
- To or CC– Use this parameter to email the recipient.
- From- It will display the sender’s email address separated by a semi-colon.
- Importance– It specifies the importance of the email(Any, low, Normal, high).
- Only with Attachments— Set yes to retrieve only the emails with attachments and skip the emails without attachments. Similarly, if we set it to no, the emails without attachments will be retrieved.
- Include Attachments– The trigger’s response includes the attachment’s content.
- Subject Filter– String for the subject line, which is used to filter the emails.
When a New Email Arrives in a Shared Mailbox (v2)
Here, we’ll see how to send messages to Microsoft Teams chat, when a new email arrives in a shared mailbox of Outlook using Power Automate.
Scenario: When a new email arrives in the shared mailbox, it will notify the sender in Microsoft Teams the mail has been delivered successfully. This helps to respond quickly to messages.
Follow the steps below to achieve this.
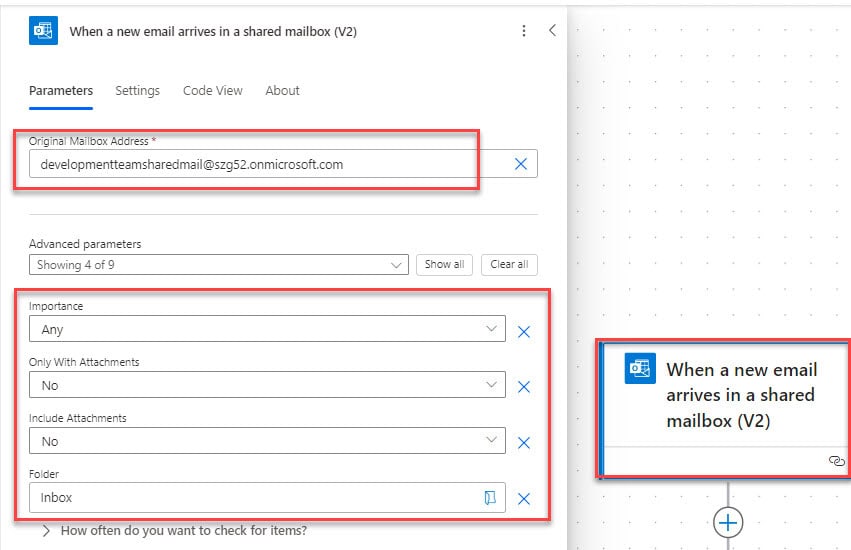
1. Create one Automated cloud flow with the trigger “When a new email arrives in a shared mailbox (V2)“. Provide the values for the parameters in the trigger as below.
- Original Mailbox Address– Provide shared mail address.
- In the Advanced parameters
- Subject Filter– Provide the subject.
- Folder– Provide folder name.
Look at the image below for the reference.
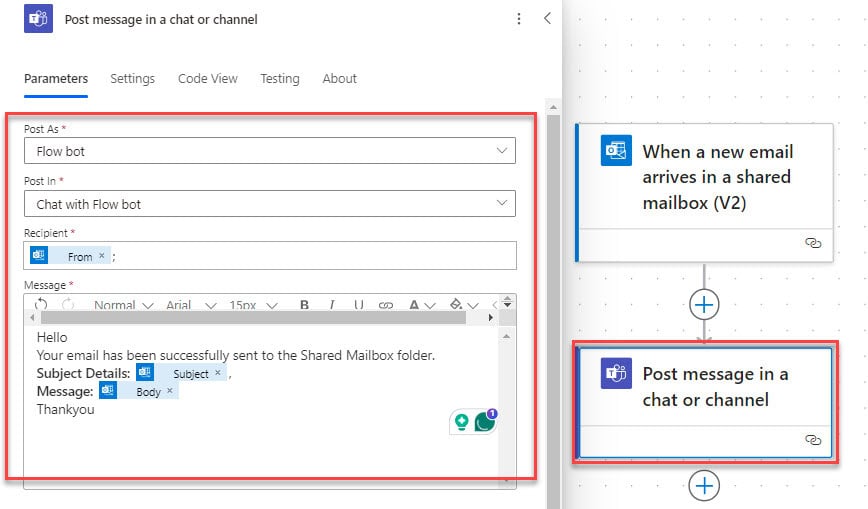
3. Add an action Post message in a chat or channel. Then, provide the values for the parameters as shown below.
- Post As– Select Flow bot from drop-down options
- Post In– Choose Chat with Flow bot option
- Recipient– Dynamically add From, which is the output of the previous trigger.
- Message-Provide the body of the message as for your requirements.
Now, save the flow. When the new email arrives in the Shared mailbox, the flow will trigger.
5. When the flow runs successfully. The message will be sent to the sender in Microsoft Teams.
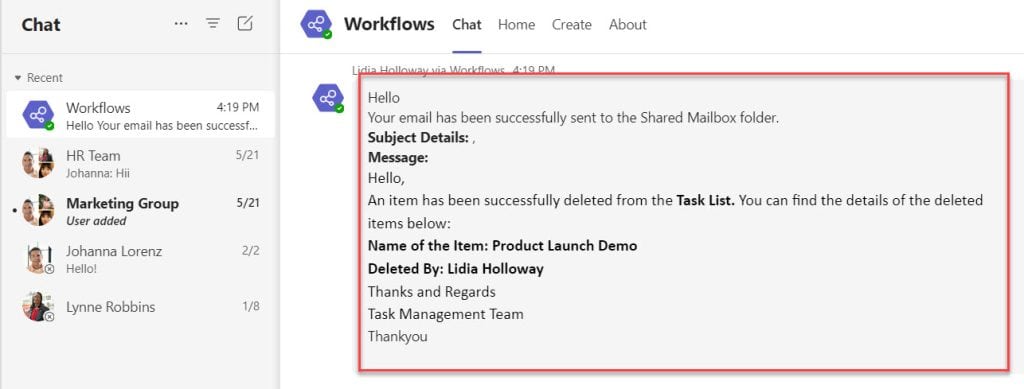
This way, we can notify the message teams when a new message arrives in the shared mailbox using Power Automate.
Power Automate Save Attachments When a New Email Arrives in a Shared Mailbox (V2)
Now, I will show another example of saving the attachments from the shared mailbox to the SharePoint document library.
Example:
Here, I have a shared mailbox in my Outlook named ‘Product Development‘ as shown in the below figure:
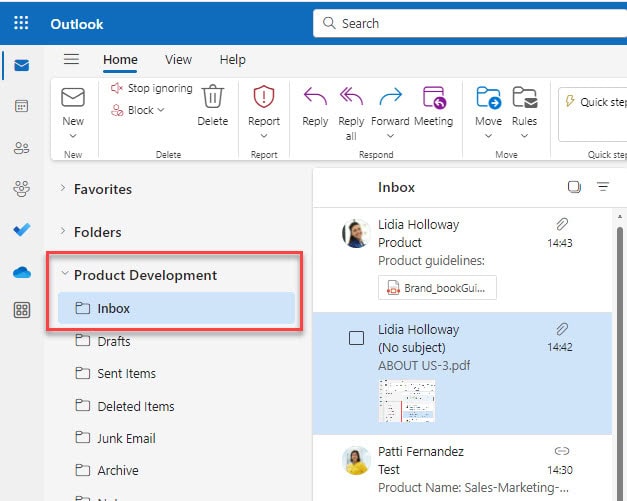
I have created a SharePoint document library as ‘Product Development’ to store the attachments from the Shared mailbox.

I require to save the email attachments that arrive in Outlook’s shared mailbox to the SharePoint document library.
Go through the below steps:
1. In a Power Automate Automated cloud flow, take a trigger ‘ When a new email arrives in a shared mailbox (V2)‘ trigger.
Inside the trigger, set the parameters like:
- Original Mailbox Addresses: Take the email address of the Shared mailbox of outlook.
Click on Showall to display all the advanced parameters:
- Include Attachments: Choose Yes from the drop-down.
- Folder: Select the Inbox folder from the open folder icon.
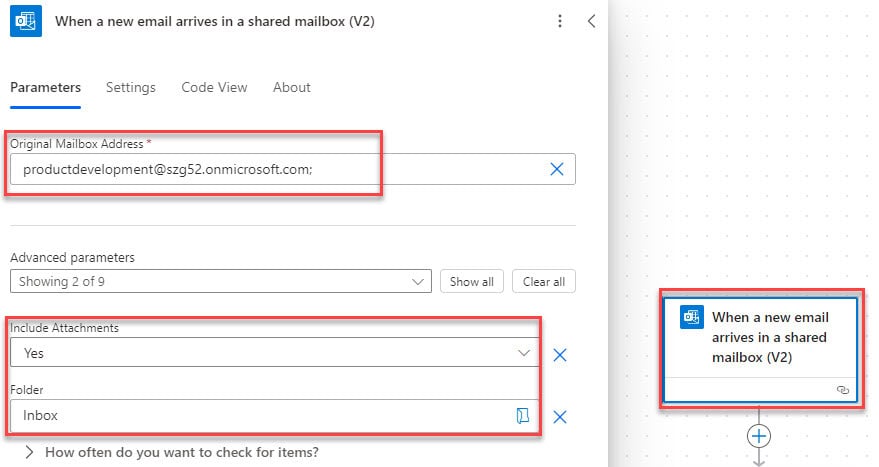
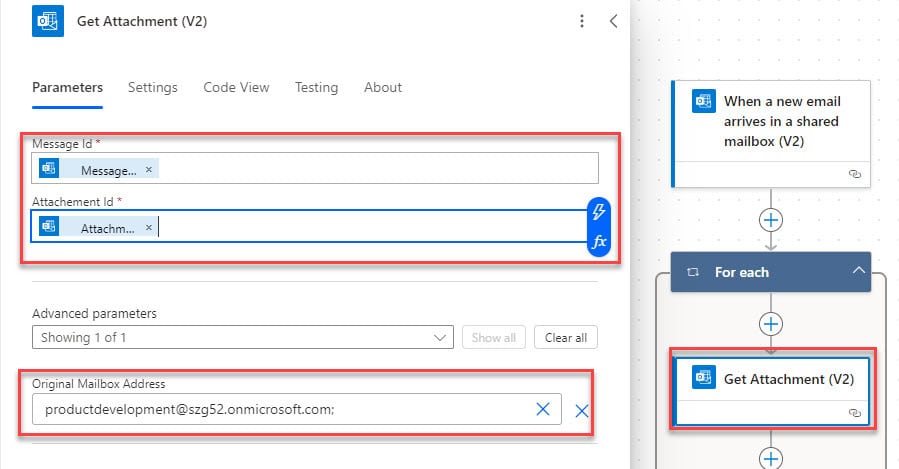
2. After that, add Get Attachment(V2) flow action from the office 365 Outlook. Configure the parameters:
- Message-Id: Take Message Id from dynamic content.
- Attachments Id: Add Attachments attachment id from the dynamic content.
- Original Mailbox Addresses: Take the email address of the Shared mailbox of outlook.
Then, For each loop will be added automatically by taking the value of attachments.
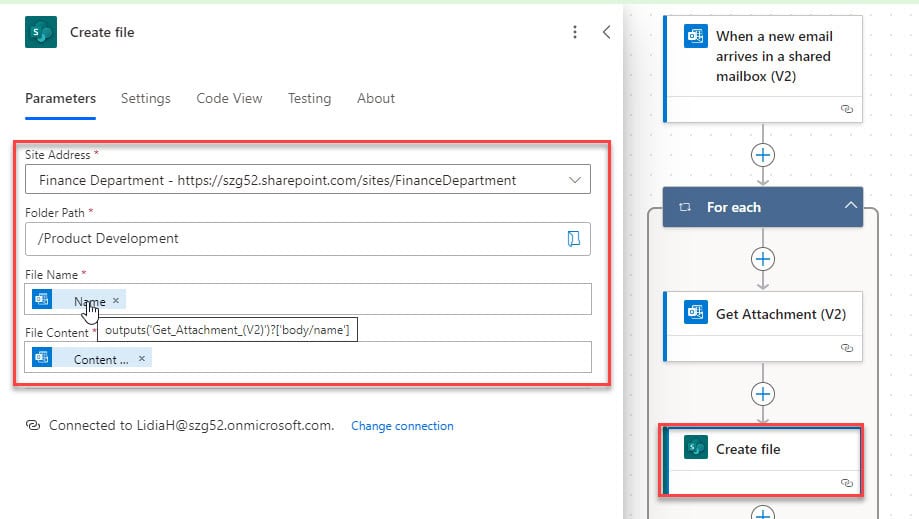
3. To save the attachments to the SharePoint document library, take the Create file action from the SharePoint connector.
Provide Site Address and Folder Path.
- File name: Take the Attachment name from the dynamic content.
- File Content: Insert Content Bytes from the dynamic content.
4. Now, the flow is ready. To test the flow, send an email with an attachment to the Shared mailbox folder, as shown in the figure below:
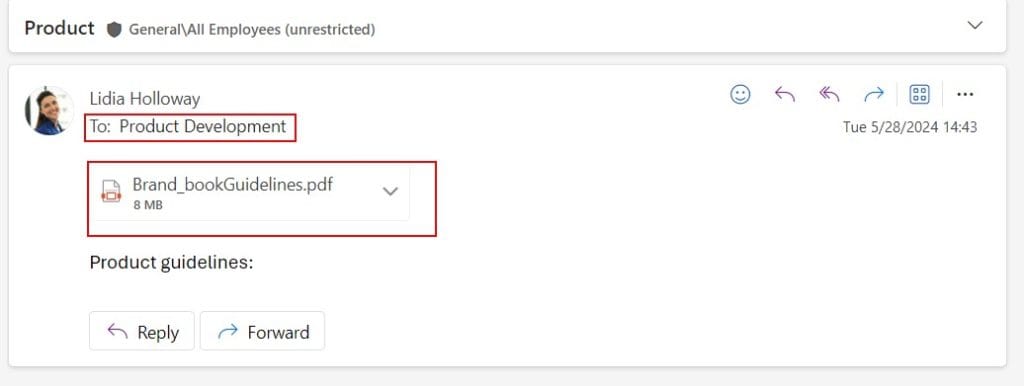
5. The flow will trigger and save the attachment present in the email to the SharePoint document library.
Refer to the image below:
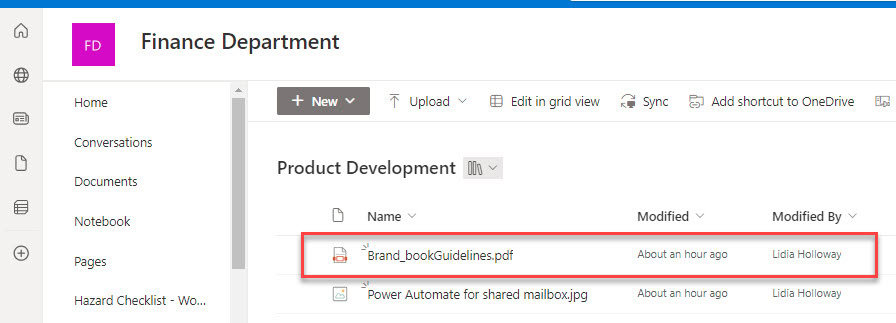
This way, you can save when email arrives in the Shared mailbox with attachments to the SharePoint library using Power Automate.
Power Automate Send a Push Notification When a New Email Arrives in Shared Mailbox
To send a push notification on mobile when a new email arrives in the Shared mailbox of Outlook, see the below steps:
Note:
First, we need to download the mobile application of Power Automate with the Microsoft 365 credentials.
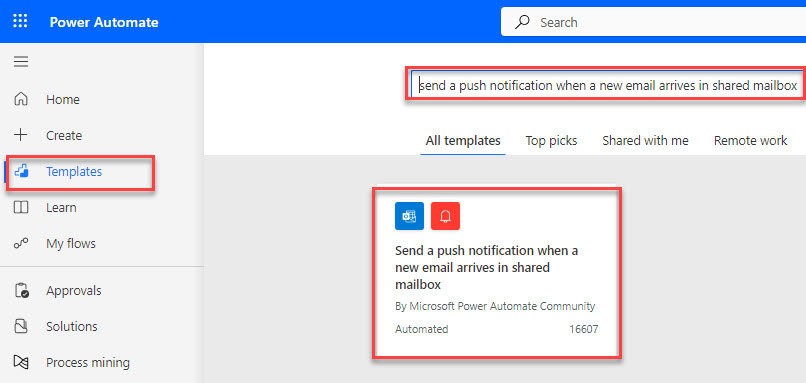
1. On the Power Automate Home page, click on the Templates option and select ‘Send a push notification when a new email arrives in shared mailbox‘.
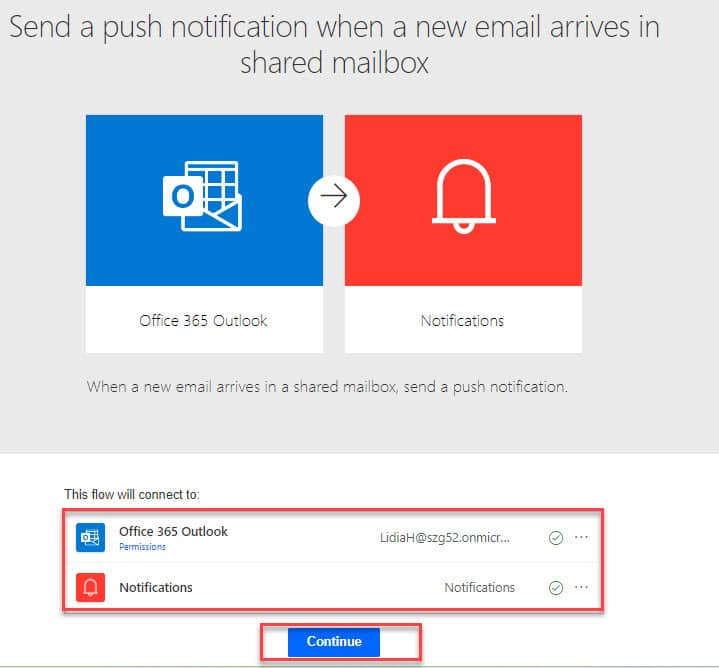
2. The next window will check the connection to Office 365 Outlook and Notifications. Click on Continue.
3. The Power Automate template flow will be added to the Power Automate canvas. Inside ‘When a new email arrives in a shared mailbox (V2)‘ trigger, set the required parameters:
- Original Mailbox Addresses: Take the email address of the Shared mailbox of outlook.
- Importance: Select the level of email importance from the drop-down.
- Subject Filter: Provide the subject filter to fetch only certain emails.
- Folder: Select Inbox from the drop-down.
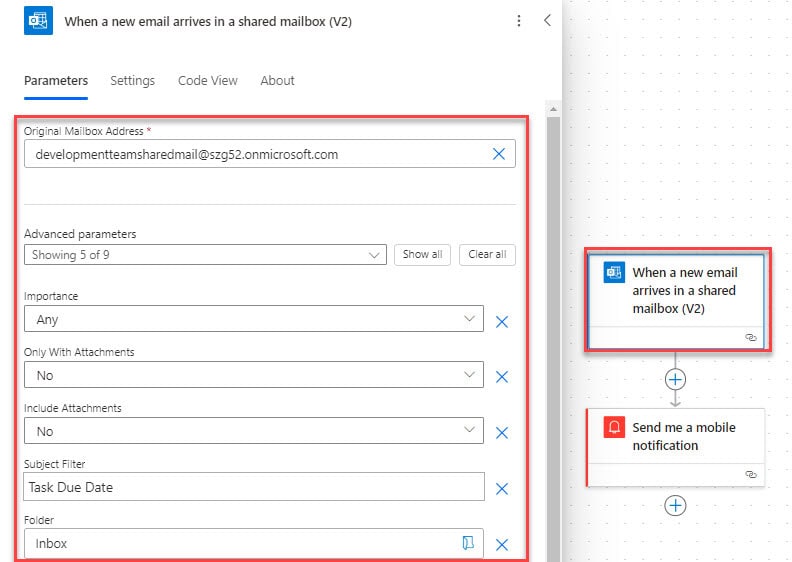
Now, the flow is ready; there is nothing to change in the Send Me a Mobile notification flow action.
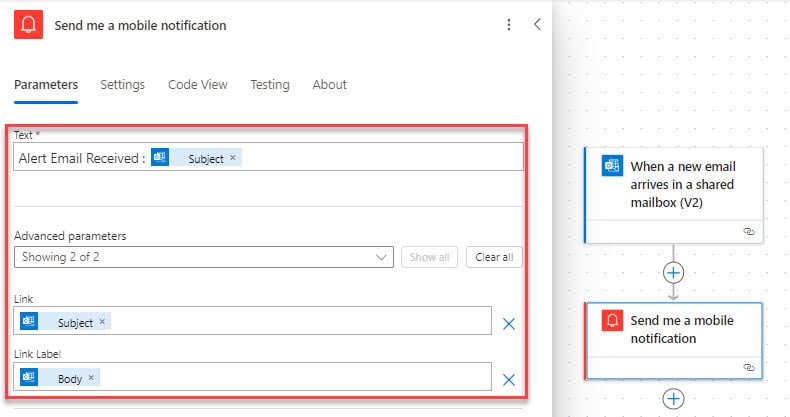
Important:
The Power Automate flow will generate the error, if the notification link label has more than 2048 characters.
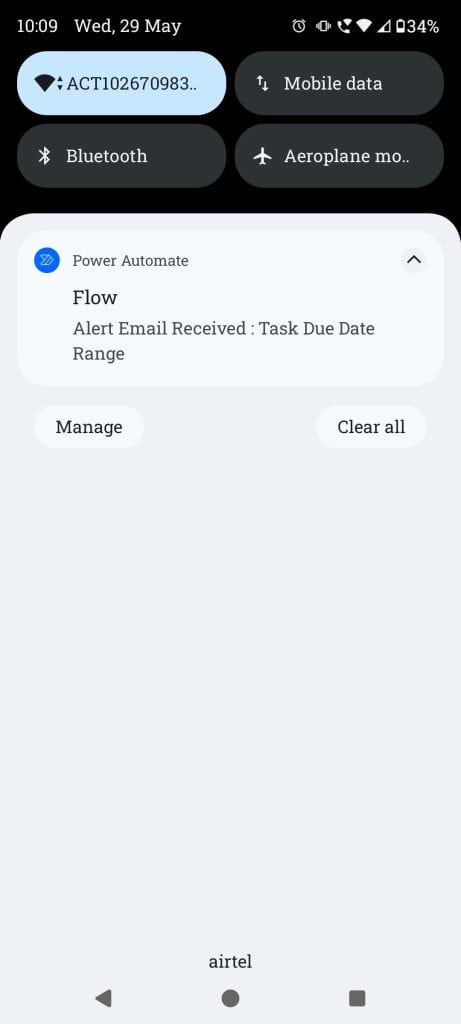
4. When a new email arrives with the subject Task Due Date, the flow will trigger and send a mobile notification, as shown in the screenshot below:
This is how to send a push notification to mobile when a new email arrives in the Shared mailbox folder of Outlook using Power Automate.
Power Automate Move Email in Shared Mailbox Folder
Consider a scenario to move emails to a Shared mailbox folder using Power Automate.
Check the screenshot below, which has the emails I received in my Shared mailbox box folder.
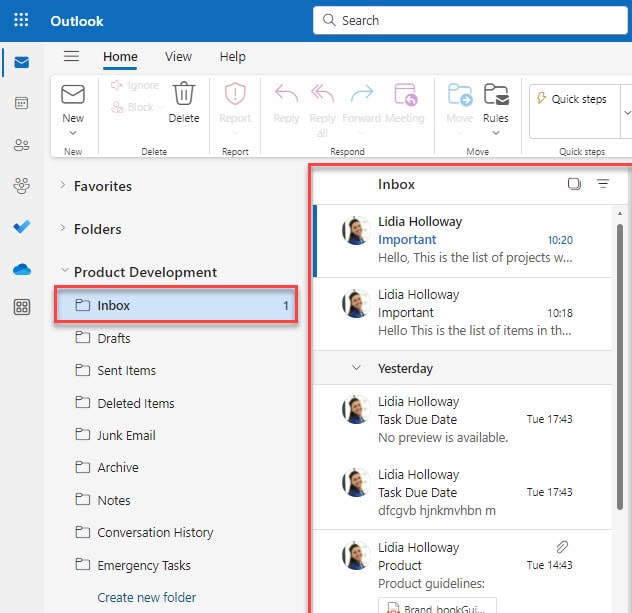
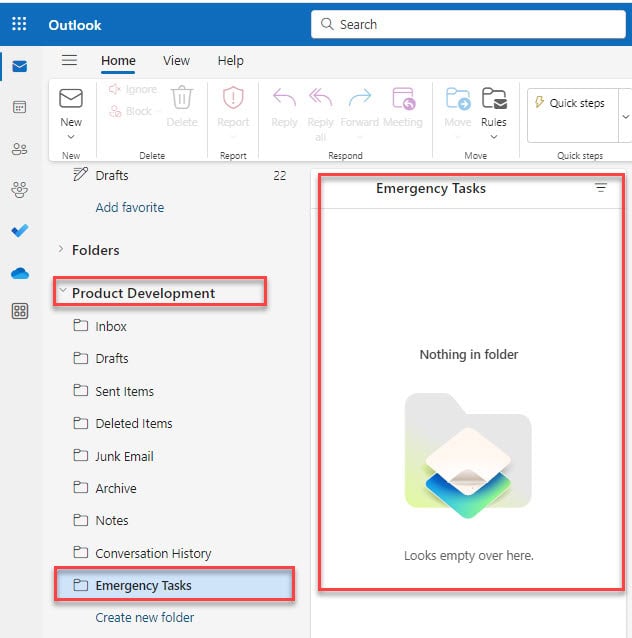
I have created a new Outlook folder [Emergency Tasks] to move the emails with the subject as Important. The screenshot below shows empty emails.
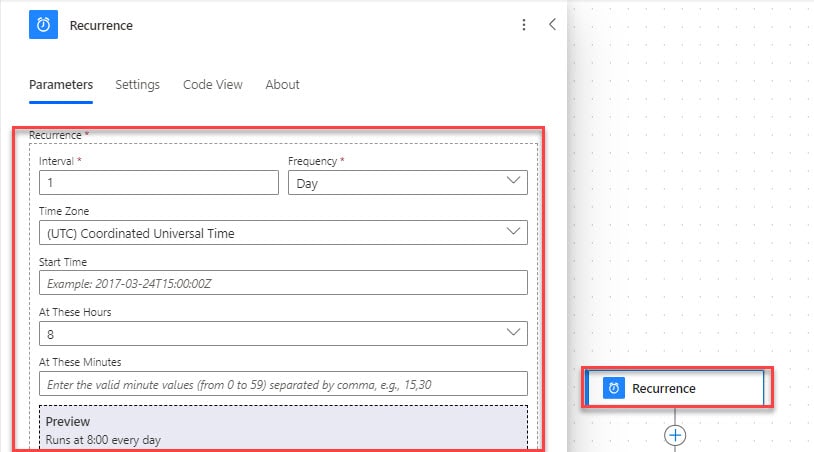
I will create a scheduled cloud flow that triggers automatically at a specific time. The flow will trigger every day and move emails that have the Subject as Important.
Let us create the flow:
1. Log in to Power Automate, click Create, select Scheduled Cloud Flow, and click the Create button.
Provide the parameters below:
- Interval: Select the number of intervals.
- Frequency: Choose the frequency according to your requirements.
- Time zone: Select the Timezone the flow should run.
- At these Hours: Choose the Hours when the flow should run.
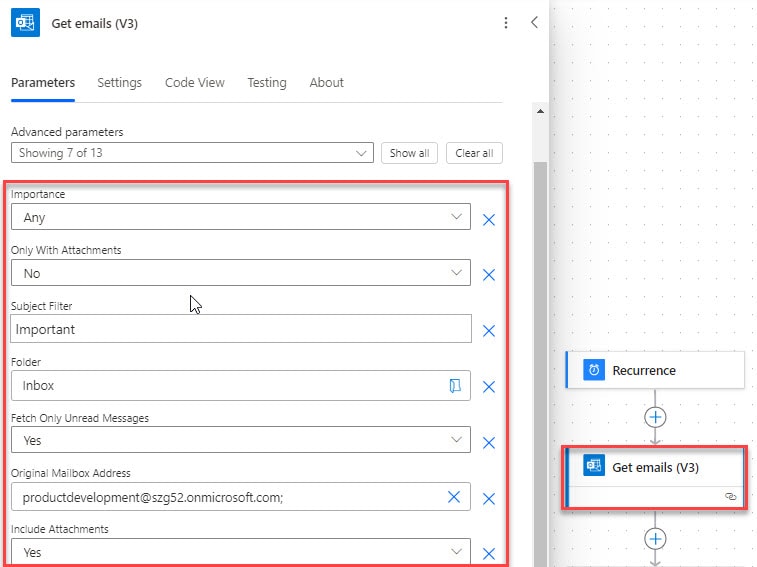
2. Now, to retrieve the emails from Outlook, select and choose ‘Get emails(V3)’. Set the required parameters:
- Folder: Select the folder from where you want to move the emails.
- Fetch only Unread Messages: Select Yes from the drop-down.
- Include Attachments: Choose Yes from the drop-down if you want to include attachments.
- Subject Filter: Provide the subject filter as Important to fetch only emails with the subject as important.
- Original Mailbox Address: Enter the email address of the Shared mailbox separated by a semi-colon.
Important:
Here, we can only retrieve 25 emails from the Outlook, because there is a known limitation that getting more than 25 emails is impossible since it’s the max value in action.
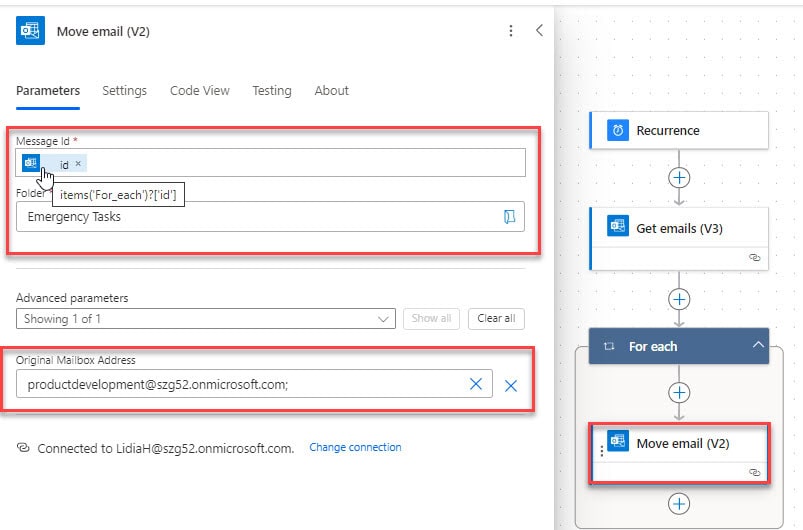
3. To move the emails to a different folder, choose and add the Move email(V2) action.
Provide the below details:
- Message-Id: Take Message Id from get emails of dynamic content.
- Folder: Select an Emergency Tasks folder from the open folder icon.
- Original Mailbox Address: Enter the email address of the Shared mailbox separated by a semi-colon.
Then, For each loop will be added automatically by taking the body/values of the Get emails(V3) flow action.
4. Now, click on save and run the flow manually.
5. Once the flow runs successfully, you can check the Outlook folder [Emergency Tasks] for the moved emails.
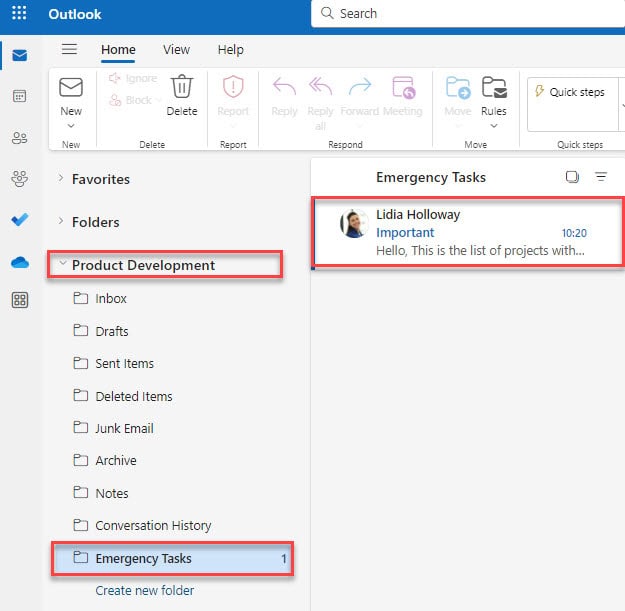
This is how to move emails in a Shared mailbox folder using Microsoft Power Automate.
Some more Power Automate articles you may also like:
- Create a Task in Microsoft Planner using Power Automate
- Power Automate Copy Folder
- adddays() in Power Automate + Examples
- Copy New Files from Your PC to SharePoint using Power Automate
- Power Automate Concatenate Strings
Conclusion
From this Power Automate tutorial, I hope you learn how to create and use Shared mailboxes in Outlook, how to work with the Power Automate Shared mailbox trigger, send a teams message when a new email arrives in the Shared mailbox(v2), and much more.
I am Bijay a Microsoft MVP (10 times – My MVP Profile) in SharePoint and have more than 17 years of expertise in SharePoint Online Office 365, SharePoint subscription edition, and SharePoint 2019/2016/2013. Currently working in my own venture TSInfo Technologies a SharePoint development, consulting, and training company. I also run the popular SharePoint website EnjoySharePoint.com
Great content but the ads make it VERY difficult to read. Will be looking elsewhere.
Is it possible for the flow to create a subfolder in the shared mailbox based on month and move the email(with the attachment) to the subfolder? Eg: If i receive an email on April 1st it would create a folder inside a subfolder as 04-April and then save the email in the subfolder named 04-April, similarly it would create a new subfolder on May 1st named 05-May etc.