Do you want to schedule your flow in Power Automate? In this Power Automate tutorial, we will see What is a schedule flow in Power Automate and how to create a schedule flow in Power Automate.
Schedule cloud flow in Power Automate
Schedule Cloud Flow in Power Automate is a flow that will automate your workflow based on the given interval which can be a particular day, week month, second, minute, or hour.
Without the need for user involvement, it makes it possible to automate processes like sending emails, data processing, or reminders on a regular basis, such as daily reports, weekly updates, or monthly notifications.
Here are some of the examples you may need to Schedule Cloud flow in Power Automate.
Example 1: Power Automate recurrence monthly
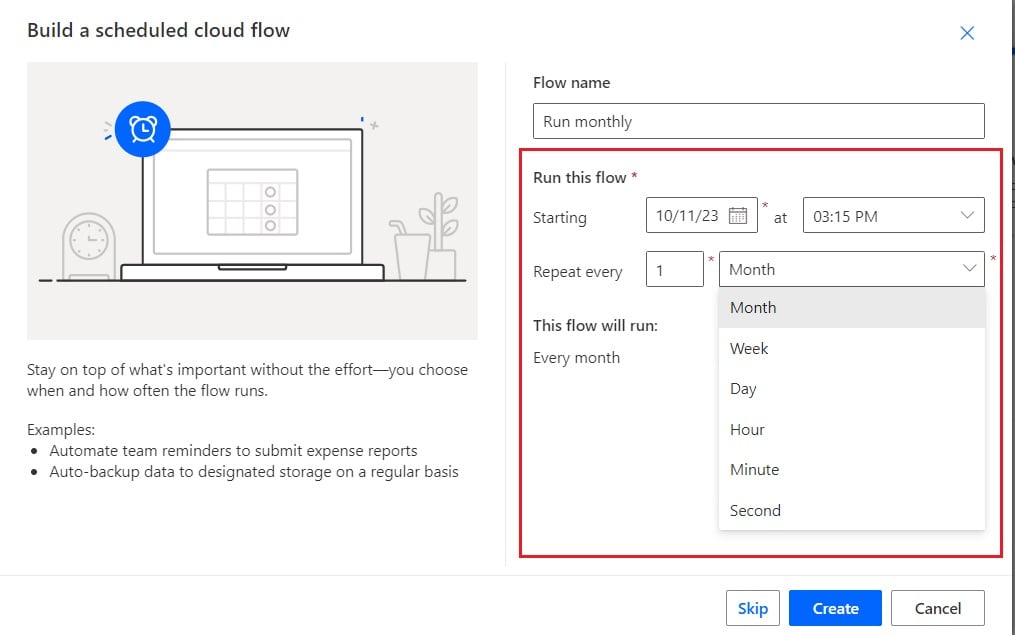
We will see how we can schedule a cloud flow that will run monthly.
To recurrence the flow in the monthly, we need to provide the information
- Starting: Provide the date, on which date of the month, you want to run your flow
- at: Provide the time you want to run the flow
- Repeat every: We want to run the flow every month, so here select 1 month.
Once you select your flow will run every month on a particular date you have provided.
Example 2: Power Automate recurrence weekday
We will see how we can schedule a flow on Weekdays i.e. from Monday to Friday on every week.
To recurrence the flow on Weekdays, we need to provide the information below:
- Starting: Provide the date, on which date, you want to run your flow
- at: Provide the time you want to run the flow
- Repeat every: We want to run the flow every weekday, so here select 1 week.
- On these days: Select the Weekdays i.e. Monday to Friday.
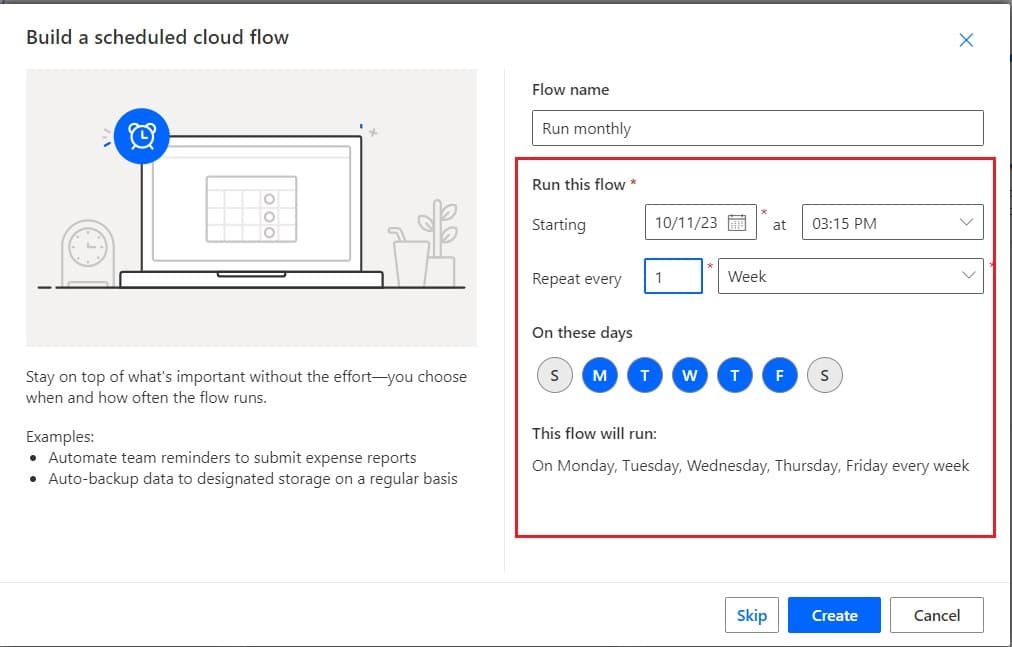
Now the flow will run every week on Weekdays i.e. Monday to Friday in Power Automate.
Example 3: Power Automate recurrence first day of month
Here we will see how we can run the flow on the first day of the Month in Power Automate.
To recurrence the flow on the first day of the month, we need to provide the information below
- Starting: Provide the first date of the month e.g. 11/1/2023
- at: Provide the time you want to run the flow
- Repeat every: We want to run the flow every month, so here select 1 month.
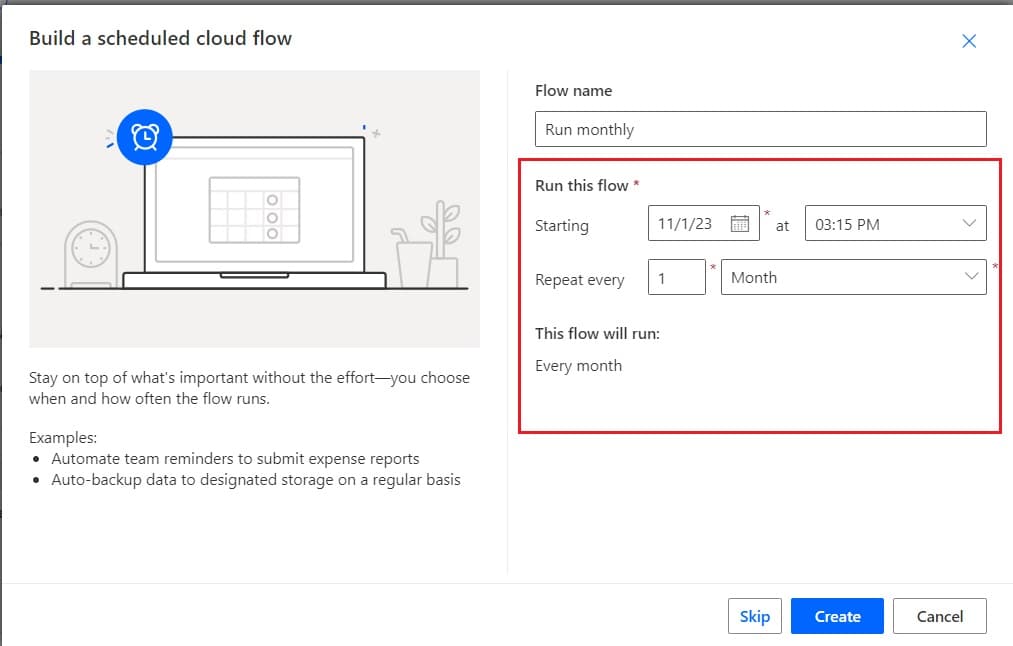
Now this flow will run on the first day of every month it will run, irrespective of how many days are available in the month 30/31.
Example 4: Power Automate recurrence first monday of month
Here we will see how we can run the flow on the first Monday of the month in Power Automate
To recurrence the flow on the first Monday of the month, first, we need to do this using weekly recurrence, then a trigger condition that checks if the dayOfMonth value is less than 8.
Setup the flow that will run every week on Monday; for this, provide the below information:
- Starting: Provide the date of the first Monday
- at: Provide the time you want to run the flow
- Repeat every: We want to set up the flow for every week, so here select 1 week.
- On these days: Select the day i.e. Monday.
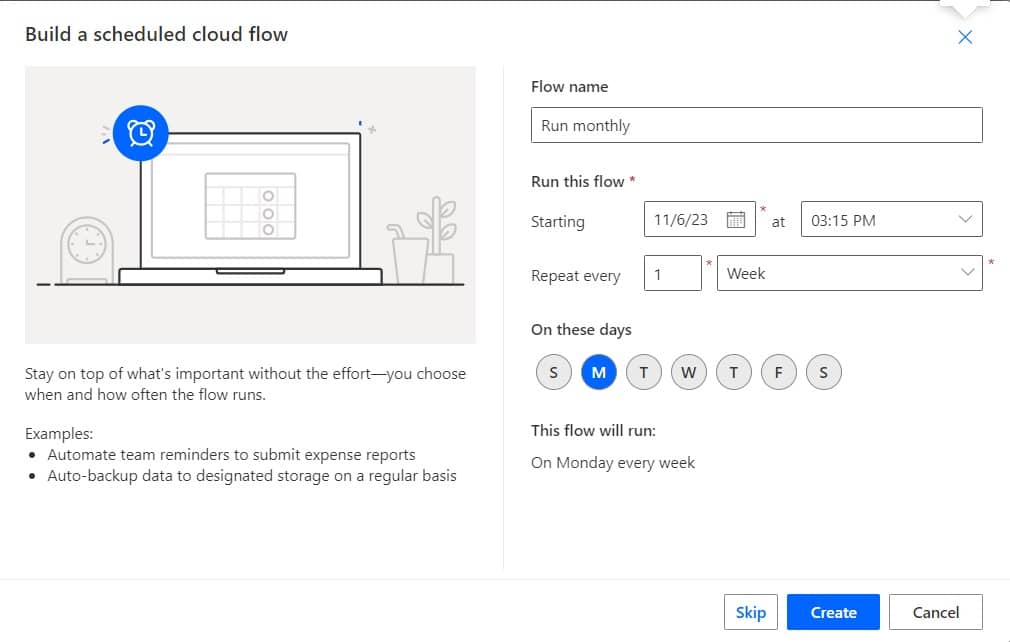
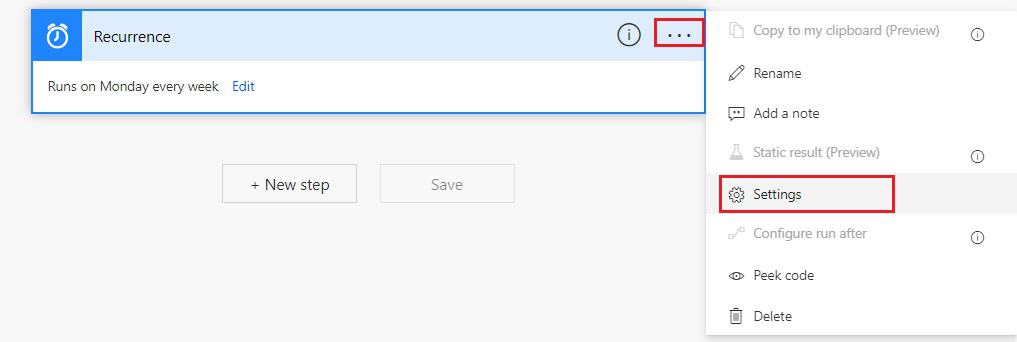
Now we will add the trigger condition, for this click on the Create button. Then you can see the Recurrence action is added to the flow.
Next click on the More button; from here select the Settings option.
Now under Trigger condition click on the +Add button and then provide the below condition:
@lessOrEquals(dayOfMonth(utcNow()),7)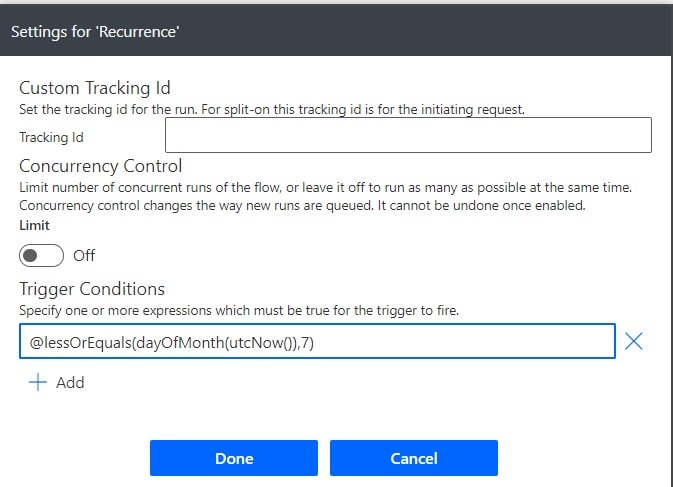
Now this flow will run on the first Monday of every month, irrespective of how many days are available in the month 30/31.
Now let’s see how we can create a Schedule cloud flow in Power Automate.
Create a Schedule flow in Power Automate
Here we will see how to create a Schedule cloud flow in Power Automate.
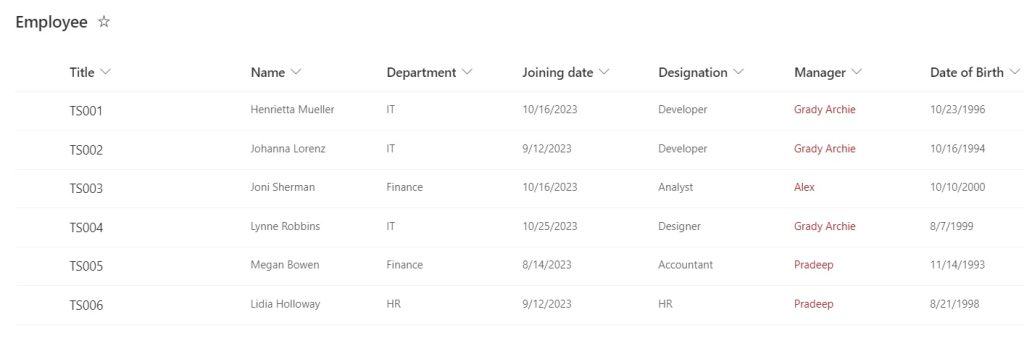
For example, we have a SharePoint list called Employee, which contains all information related to Employee. This list contains the following columns:
- Employee Id [Title]- Single line of text
- Name- Person
- Department-Choice
- Joining Date- Date/Time
- Designation-Single Line of text
- Manager- Lookup column [of manager List]
- Date of Birth -Date/time.
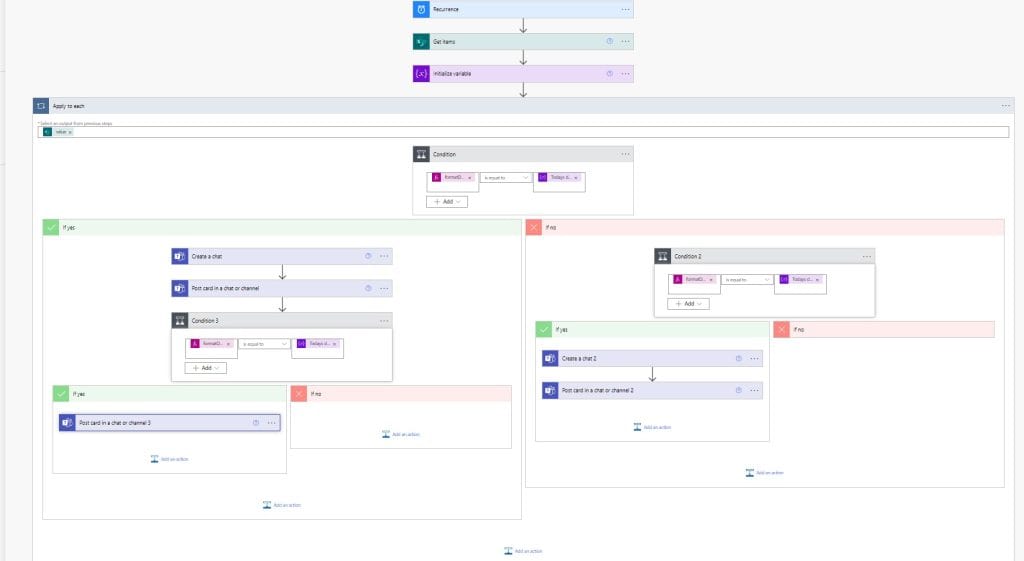
We will create a scheduled cloud flow that runs daily. It checks if someone’s work anniversary matches today’s date (day and month) and posts work anniversary greetings on Microsoft Teams. If not, it checks for Date of birth and posts “Happy Birthday” messages.
This is how the flow looks like in Power Automate.
Let’s create a flow to send work anniversary and birthday greetings to employees.
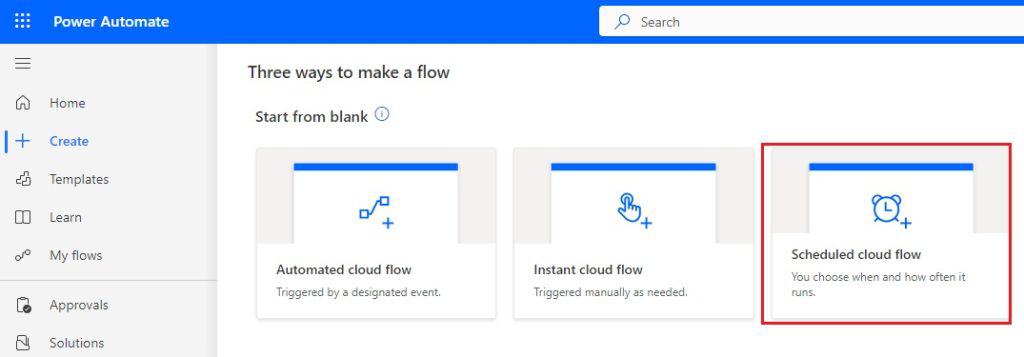
1. Open Power Automate Cloud, then click on the +Create icon -> select Schedule cloud flow.
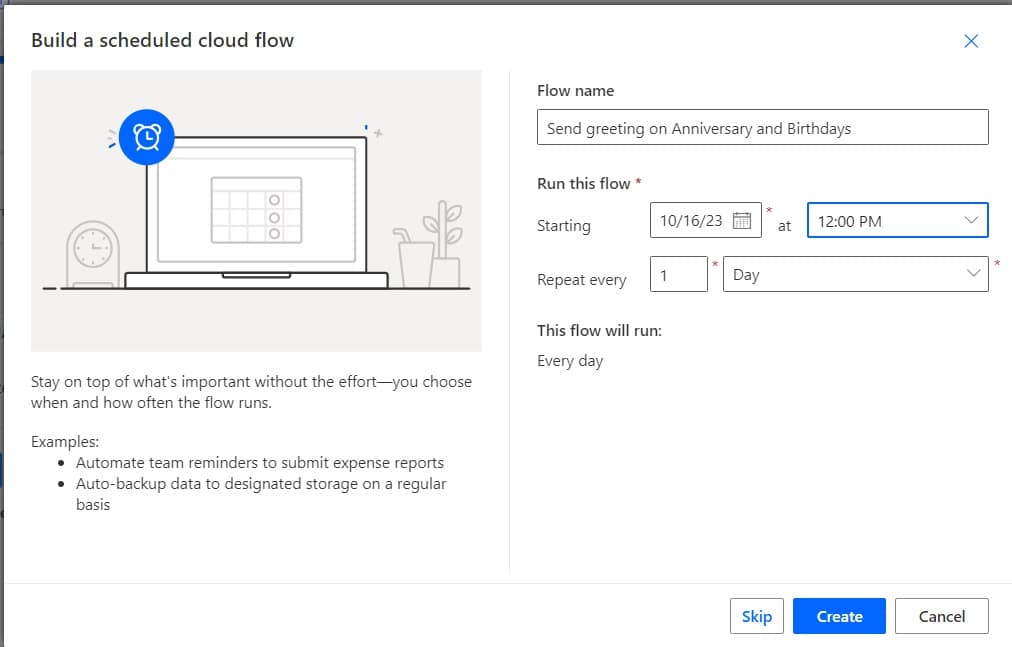
2. Then provide the flow name and under Run this flow provide the below information.
- Starting: Select the date. From which date the flow will start?
- at: Provide the time the flow will run.
- Repeat every: Provide the interval. In my case every day I want my flow to run, so I select 1 Day.
Then click on Create.
Now you can see the Reccurance action is added to the flow. If you expand it you can see the time you have provided.

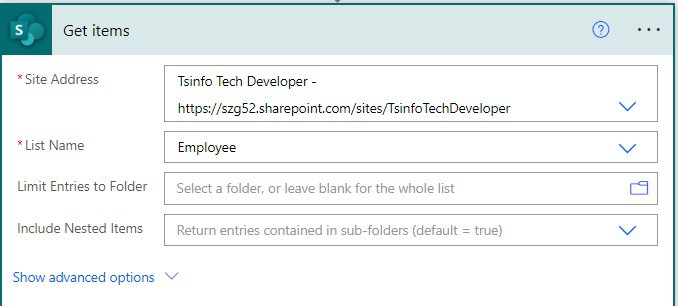
3. Next we will get items from the SharePoint list, for this click on the +New step -> select Get items action. Then provide the below information:
- Site address: Provide the SharePoint site address.
- List name: provide the SharePoint list name.
4. We will initialize a string variable that contains Today’s day and month, for this click on the +New step -> select InItialize variable action. Then provide the below information:
- Name: Provide the variable name.
- Type: Select type as string
- Value: Provide the below expression:
formatDateTime(utcNow(),'MM-dd')
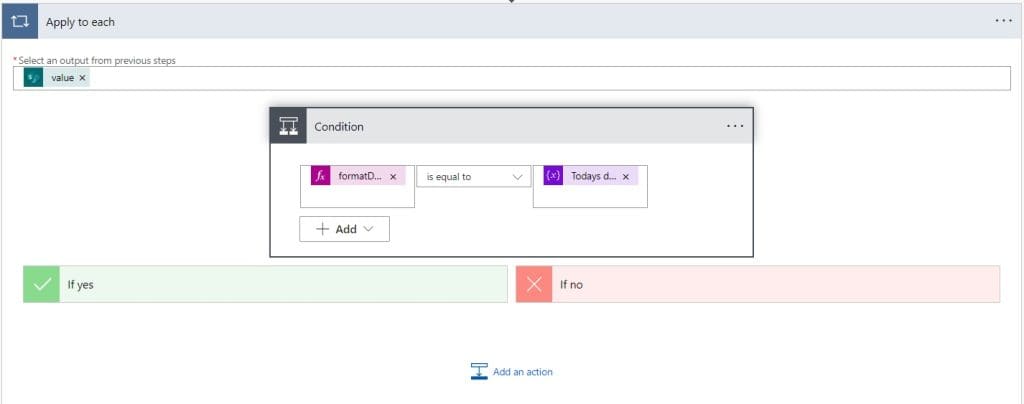
5. We will check the joining date is equal to today’s day and month, for this click on Add an action -> select Condition action. Then provide the below information:
- Choose a value: Provide the below expression. it will automatically add Apply to each action to the flow.
formatDateTime(items('Apply_to_each')?['Joiningdate'],'MM-dd')- Operator: Select the operator as is equal to.
- Choose a value: Select today’s date variable from dynamic content.
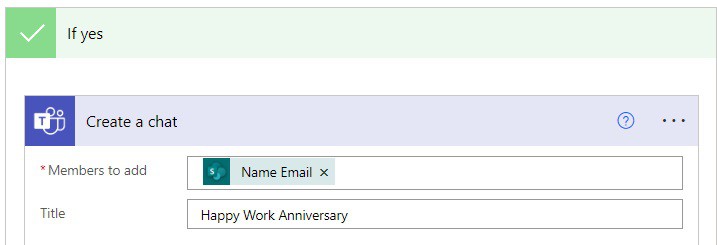
6. In the If yes part of the condition we will create a chat and post a card to greet the Work anniversary to the employee. For this, click on Add an action -> select Create a chat action. Then provide the below information:
- Members to add: Select the Name email from dynamic content.
- Title: Provide the title.
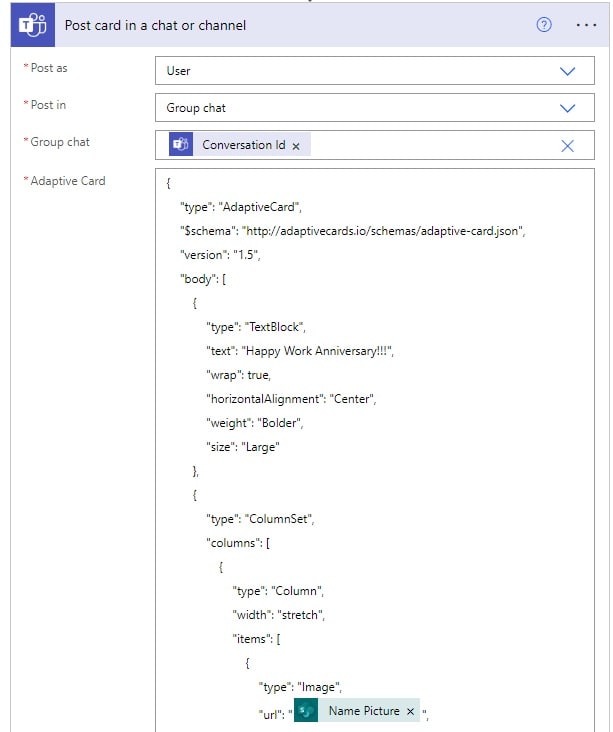
Now we will post a greeting card; for this, click on Add an action, and select Postcard in a chat or channel action. Then provide the below information:
- Post as: Select the Post as User.
- Post in: Select the Post in the Group chat
- Group chat: Select the conversation id from dynamic content
- Adaptive card: I have created my own customized Adaptive card so here is the JSON code for this. You can create your own adaptive card.
{
    "type": "AdaptiveCard",
    "$schema": "http://adaptivecards.io/schemas/adaptive-card.json",
    "version": "1.5",
    "body": [
        {
            "type": "TextBlock",
            "text": "Happy Work Anniversary!!!",
            "wrap": true,
            "horizontalAlignment": "Center",
            "weight": "Bolder",
            "size": "Large"
        },
        {
            "type": "ColumnSet",
            "columns": [
                {
                    "type": "Column",
                    "width": "stretch",
                    "items": [
                        {
                            "type": "Image",
                            "url": "@{items('Apply_to_each')?['Name/Picture']}",
                            "style": "Person",
                            "selectAction": {
                                "type": "Action.OpenUrl"
                            }
                        }
                    ]
                },
                {
                    "type": "Column",
                    "width": "stretch",
                    "items": [
                        {
                            "type": "TextBlock",
                            "text": "@{items('Apply_to_each')?['Name/DisplayName']}",
                            "wrap": true,
"size": "Large"

                        }
                    ]
                }
            ]
        },
        {
            "type": "TextBlock",
            "text": "Have a wonderful day!!",
            "wrap": true
        },
        {
            "type": "Image",
            "url": "https://media.giphy.com/media/AKlZLMsCmQr35WpYIJ/giphy.gif"
        }
    ]
}
7. If the same employee also has a birthday, click on Add an action -> select Condition action. Then provide the below information:
- Choose a value: Provide the below expression:
formatDateTime(items('Apply_to_each')?['DateofBirth'], 'MM-dd')- Operator: Select the operator as is equal to.
- Choose a value: Select today’s date variable from dynamic content.

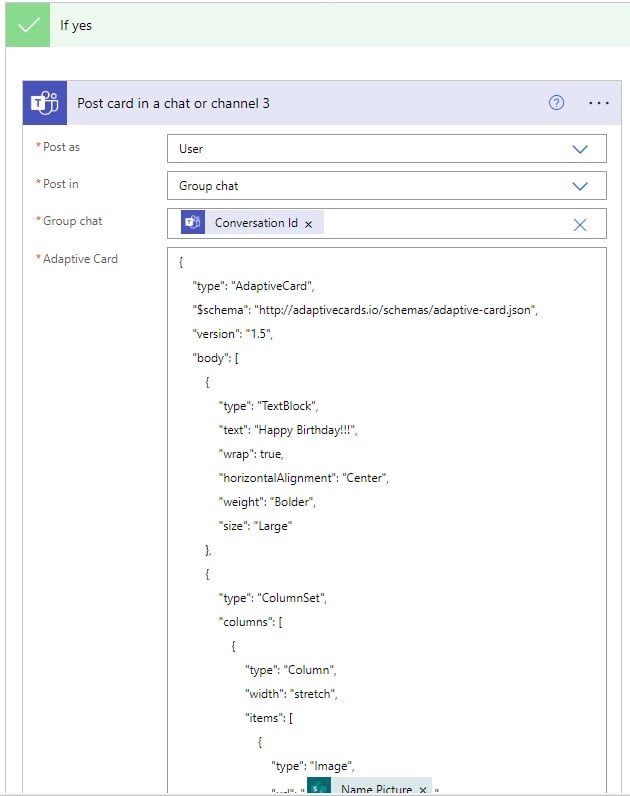
In the If yes part, click on add an action, select Post card in a chat or channel action. Then provide the below information:
- Post as: Select the Post as User.
- Post in: Select the Post in the Group chat
- Group chat: Select the conversation id from dynamic content
- Adaptive card: I have created my own customized Adaptive card so here is the JSON code for this. You can create your own adaptive card.
{
    "type": "AdaptiveCard",
    "$schema": "http://adaptivecards.io/schemas/adaptive-card.json",
    "version": "1.5",
    "body": [
        {
            "type": "TextBlock",
            "text": "Happy Birthday!!!",
            "wrap": true,
            "horizontalAlignment": "Center",
            "weight": "Bolder",
            "size": "Large"
        },
        {
            "type": "ColumnSet",
            "columns": [
                {
                    "type": "Column",
                    "width": "stretch",
                    "items": [
                        {
                            "type": "Image",
                            "url": "@{items('Apply_to_each')?['Name/Picture']}",
                            "style": "Person",
                            "selectAction": {
                                "type": "Action.OpenUrl"
                            }
                        }
                    ]
                },
                {
                    "type": "Column",
                    "width": "stretch",
                    "items": [
                        {
                            "type": "TextBlock",
                            "text": "@{items('Apply_to_each')?['Name/DisplayName']}",
                            "wrap": true,
"size": "Large"
                        }
                    ]
                }
            ]
        },
        {
            "type": "TextBlock",
            "text": "Have a wonderful day!!",
            "wrap": true
        },
        {
            "type": "Image",
            "url": "https://media.giphy.com/media/XrETndTYBvPrqdrJWy/giphy.gif"
        }
    ]
}
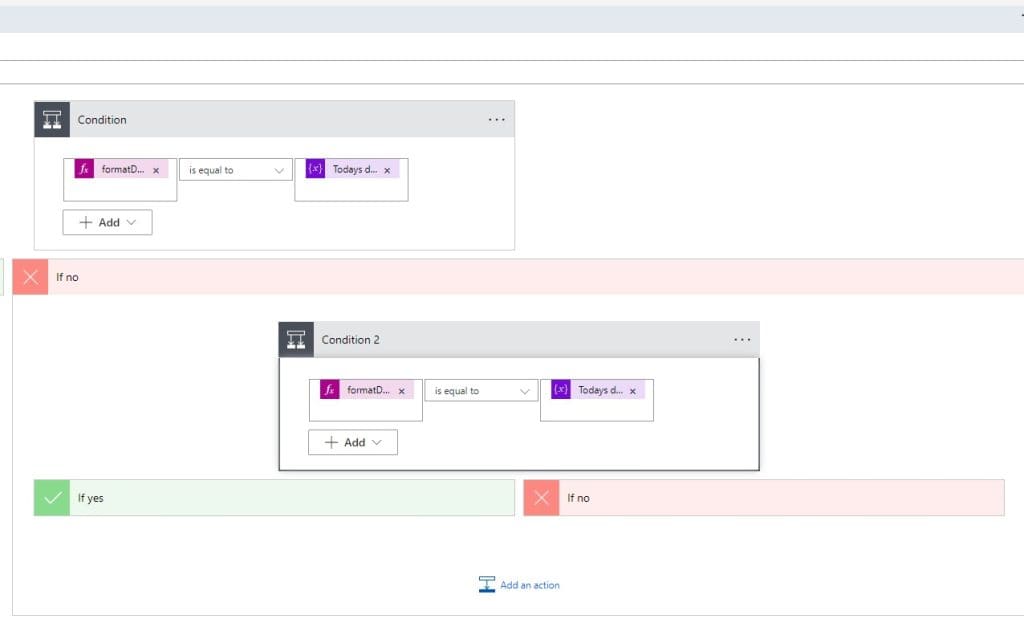
8. Now in if no part of the condition (checks the joining date is today), we will check date of birth of the employee is today or not.
For this, click on Add an action -> select condition action, then provide the below information:
- Choose a value: Provide the below expression:
formatDateTime(items('Apply_to_each')?['DateofBirth'], 'MM-dd')- Operator: Select the operator as is equal to.
- Choose a value: Select today’s date variable from dynamic content.
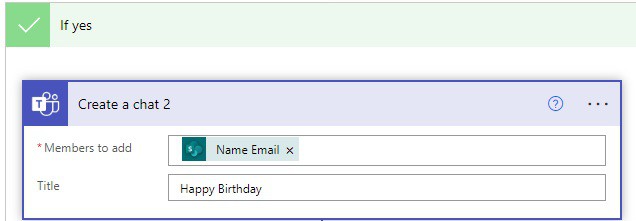
Then in the if yes part click on Add an action -> select Create chat action. Then provide the below information:
- Members to add: Select the Name email from dynamic content.
- Title: Provide the title.
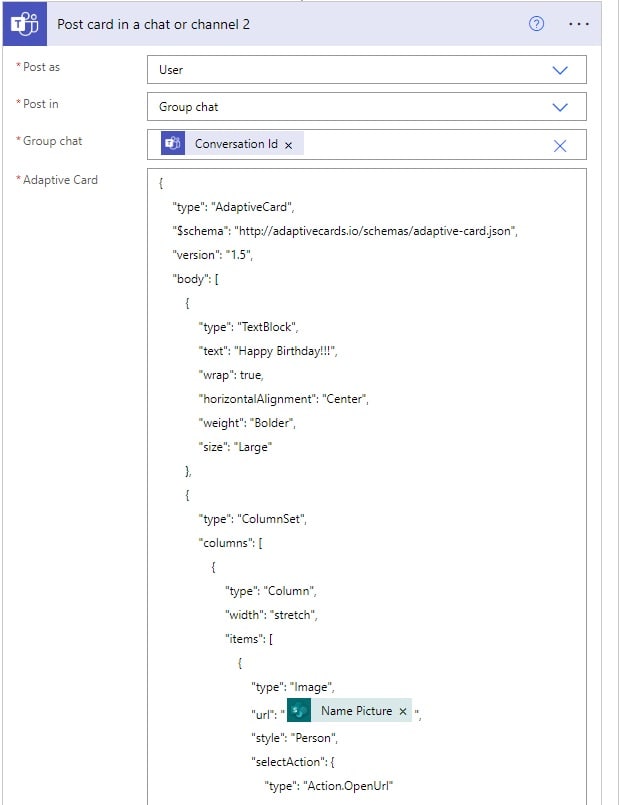
Now we will post a greeting card; for this, click on Add an action, and select Post card in a chat or channel action. Then provide the below information:
- Post as: Select the Post as User.
- Post in: Select the Post in the Group chat
- Group chat: Select the conversation id from dynamic content
- Adaptive card: I have created my own customized Adaptive card so here is the JSON code for this. You can create your own adaptive card.
{
    "type": "AdaptiveCard",
    "$schema": "http://adaptivecards.io/schemas/adaptive-card.json",
    "version": "1.5",
    "body": [
        {
            "type": "TextBlock",
            "text": "Happy Birthday!!!",
            "wrap": true,
            "horizontalAlignment": "Center",
            "weight": "Bolder",
            "size": "Large"
        },
        {
            "type": "ColumnSet",
            "columns": [
                {
                    "type": "Column",
                    "width": "stretch",
                    "items": [
                        {
                            "type": "Image",
                            "url": "@{items('Apply_to_each')?['Name/Picture']}",
                            "style": "Person",
                            "selectAction": {
                                "type": "Action.OpenUrl"
                            }
                        }
                    ]
                },
                {
                    "type": "Column",
                    "width": "stretch",
                    "items": [
                        {
                            "type": "TextBlock",
                            "text": "@{items('Apply_to_each')?['Name/DisplayName']}",
                            "wrap": true,
"size": "Large"
                        }
                    ]
                }
            ]
        },
        {
            "type": "TextBlock",
            "text": "Have a wonderful day!!",
            "wrap": true
        },
        {
            "type": "Image",
            "url": "https://media.giphy.com/media/XrETndTYBvPrqdrJWy/giphy.gif"
        }
    ]
}
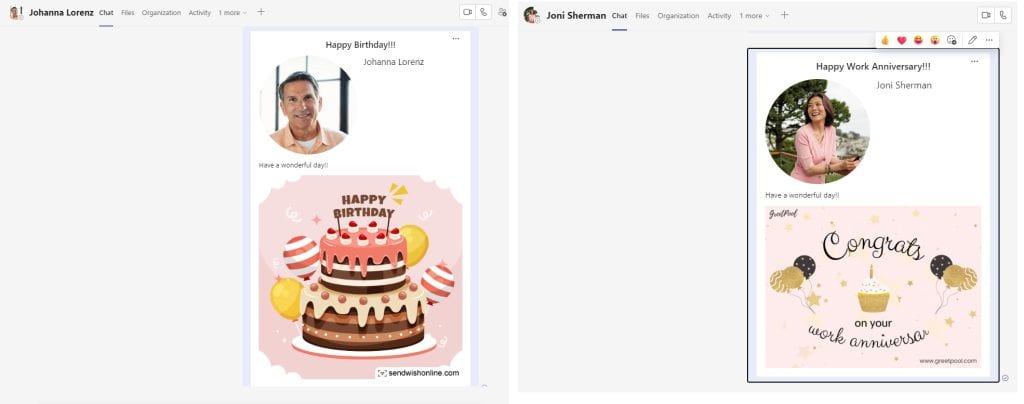
Step 9: Now run the flow manually and you can see based on the joining date and birth date of an employee get a greetings message on Teams.
This is how to create a schedule cloud flow in Power Automate.
Also, you can check out a video tutorial on the Scheduled cloud flow in Power Automate.
Conclusion
In this Power Automate tutorial, we saw what is Schedule Cloud flow in Power Automate and how to create a Schedule Cloud flow in Power Automate.
You may also like:
- Power Automate wrong time zone
- Convert an Integer to an Array in Power Automate
- Create a Word Document from a SharePoint list item using Power Automate
- When an item is created in SharePoint list send approval and create item using Power Automate
I am Bijay a Microsoft MVP (10 times – My MVP Profile) in SharePoint and have more than 17 years of expertise in SharePoint Online Office 365, SharePoint subscription edition, and SharePoint 2019/2016/2013. Currently working in my own venture TSInfo Technologies a SharePoint development, consulting, and training company. I also run the popular SharePoint website EnjoySharePoint.com