In this Microsoft Power Automate Tutorial, we will learn how to use the Copy File action in Power Automate, how to copy files between SharePoint folders.
Also, we will see how to copy the SharePoint file with a new name, Copy files from one SharePoint site to another, Copy files from the SharePoint library to another in Microsoft flow, etc.
Also, by taking some different scenarios, we will cover these below topics:
- Power Automate copy file OneDrive to sharepoint
- Power Automate copy file sharepoint to OneDrive
- Power Automate copy file from OneDrive folder to onedrive
- Power Automate copy file from OneDrive to network drive
- Power Automate copy file from SharePoint to local drive
- Power Automate copy file from file system to SharePoint
- Power Automate copy files and rename
- Power Automate copy file and rename with date
- Power Automate copy file attchment
- Power Automate create copy of excel file
- Power Automate copy file from email to SharePoint
- Power automate copy file from onedrive to teams
- Power Automate copy file size limit
- Power Automate copy all files in folder
- Power Automate copy file when modified
- Power Automate copy file with metadata
- Power Automate copy file if another file is already there
- Power Automate sharepoint copy file identifier Integer type
- Power Automate SharePoint copy file identifier as string type
- Power Automate copy file to another tenant
- Power Automate copy file deprecated
Power Automate copy file action
In Power Automate, there are 2 types of Copy files actions are available that used to copy the files from one location to another. These are:
- Copy Files: under SharePoint
- Copy Files: under OneDrive
- Copy Files (SharePoint)
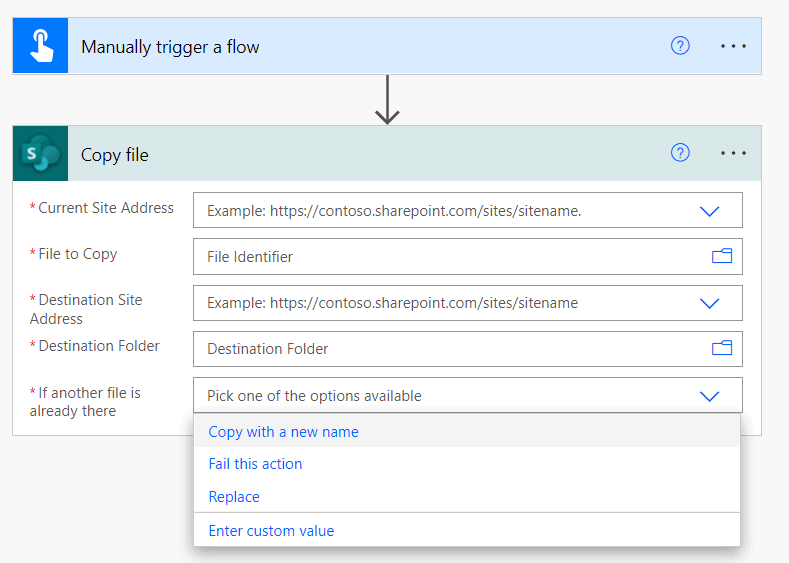
The Copy files action under the SharePoint works in a similar way to the “Copy to” command in SharePoint libraries. It returns information about the new file after copy.
To activate this action, it will ask you to set the below properties such as:
- Current Site Address– Set the source SharePoint site address.
- File to Copy– Select file identifier or choose the files that you want to copy.
- Destination Site Address– Set the destination SharePoint site address.
- Destination Folder-Select the destination folder.
- If another file is already there– Select the option from the drodown.
- Copy with a new name
- Fail this action
- Replace
2. Copy Files (OneDrive)
Similarly, the Copy files is an action under the OneDrive that copies a file within OneDrive. In this action, it will ask to set the parameters:
- File– Select the unique identifier of the file.
- Destination File Path– Select the destination file path, including target filename.
- Overwrite– Select an option between Yes or No.

In the next step, we will see how to use these actions to copy files in SharePoint.
Read Power Automate Compose + 15 Examples
Copy files between sharepoint folders with Microsoft Flow
Now, we will see how to copy files between the SharePoint folders i.e. one folder to another folder using Microsoft Flow. Before creating a flow, we have to log in the Power Automate with the Microsoft ID.
Next in the Power Automate, click on +Create > Instant cloud flow.
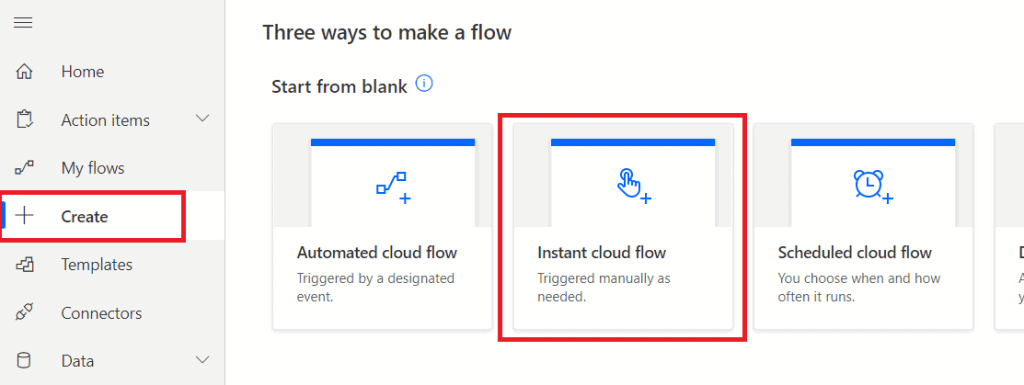
Then select ‘Manually trigger a flow‘ to trigger the flow manually. Press Create to start the flow.
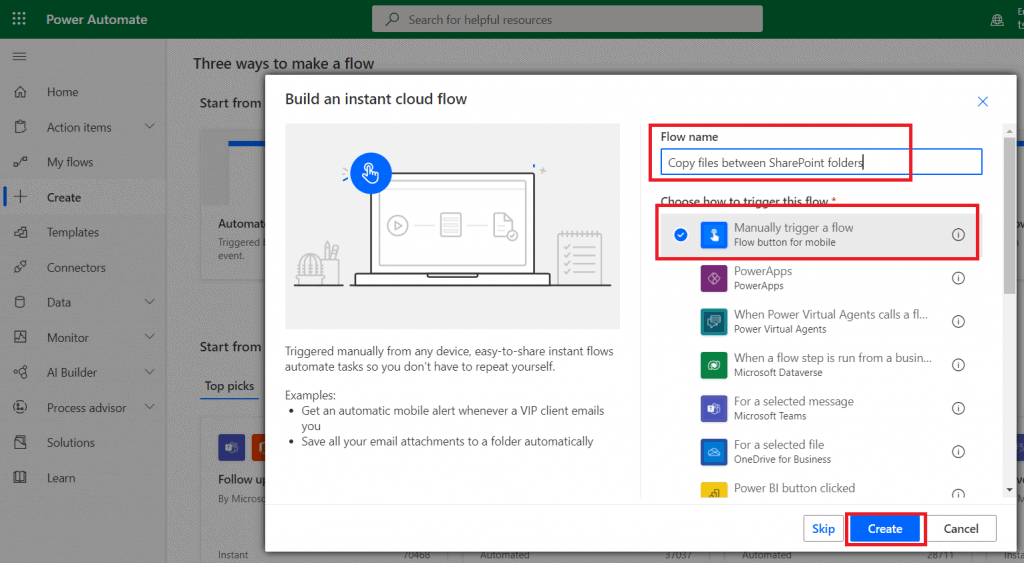
We can see it will start the flow. Now we will add the logical actions in the flow.

Step-2: Get the file properties
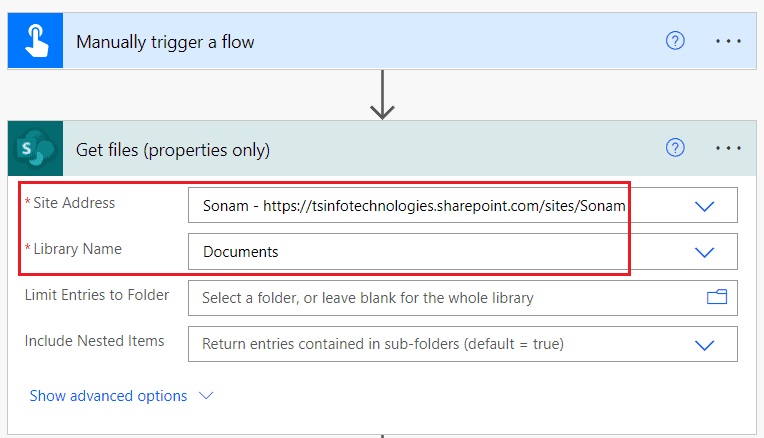
Next, we will add an action that will get the file’s properties from the SharePoint document library. To add this action, click on +New step > Get files(properties only).
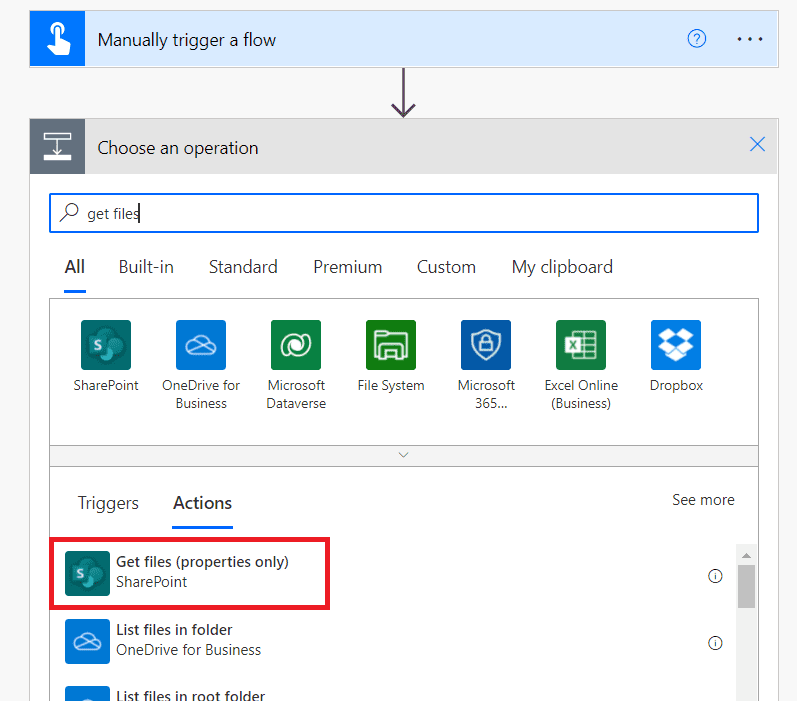
Then it will ask to set the SharePoint site address and the library name.
- Site Address- Specify th SharePoint site address.
- Library Name– Selec the Document library name.
Step-3: Copy the files
In this final step, we will add an action that will copy the files from one folder to another folder in SharePoint.
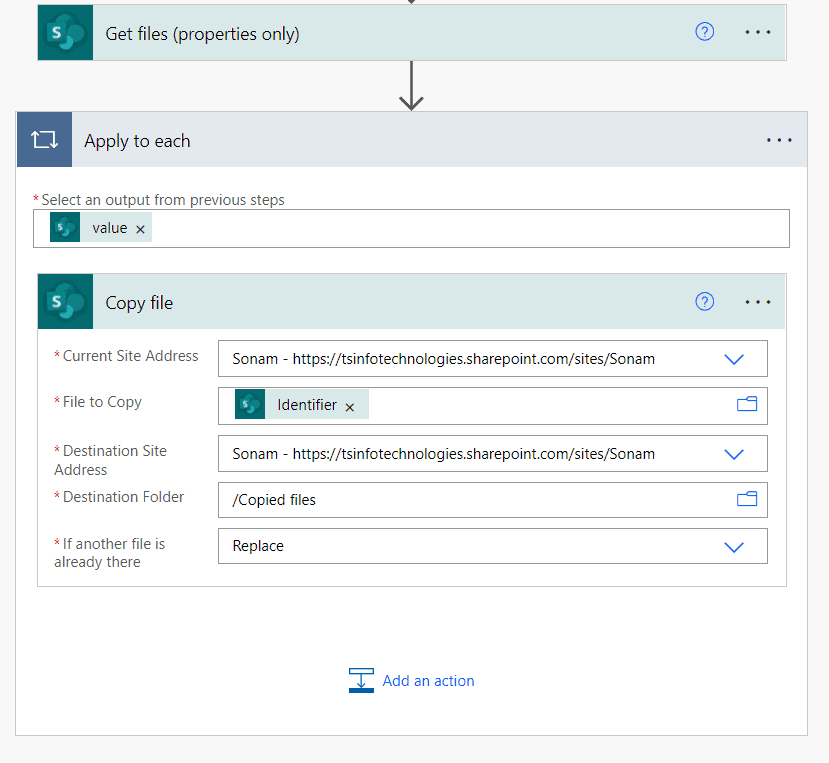
Click on +New step > Copy files. Here, we will set the below parameters to activate this action:
- Current Site Address– Set the source SharePoint site address.
- File to Copy– Select Identifier from the dynamic content of the Get files(Properties only). We can see it will create an apply to each loop i.e. it will check and copy each files from the source folder to the destination folder.
- Destination Site Address– Set the destination site address.
- Destination Folder– Select the folder where we will store the copied files.
- If another file is already there– Select the Replace option from the dropdown i.e. it will replace the copied files if the files already exist.
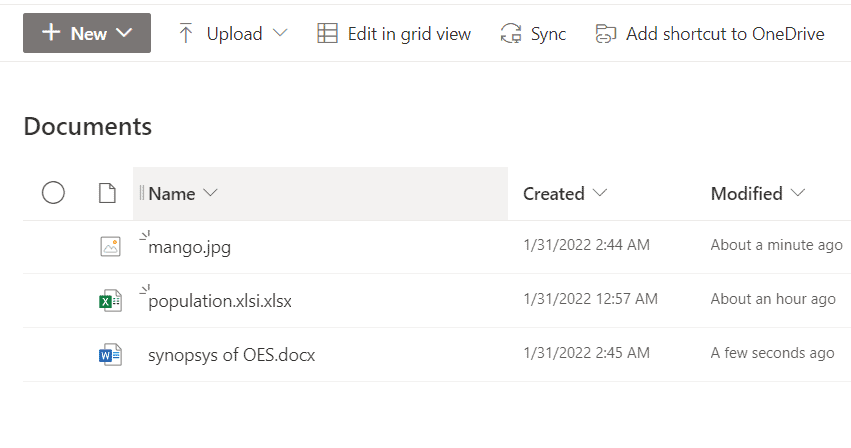
Now our flow is ready to run. Let’s save the flow and test it manually. Already we have stored some files in the source folder.
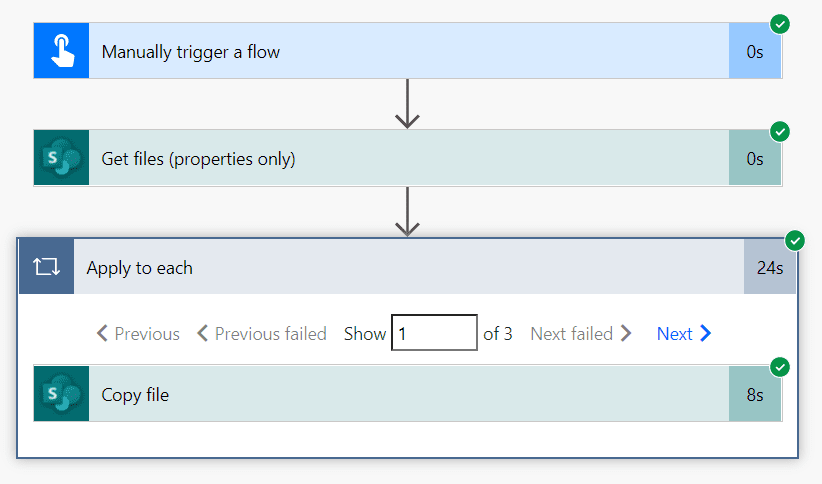
We can see the flow ran successfully without showing any errors.
Also, we can see the copied files are stored in the destination folder.
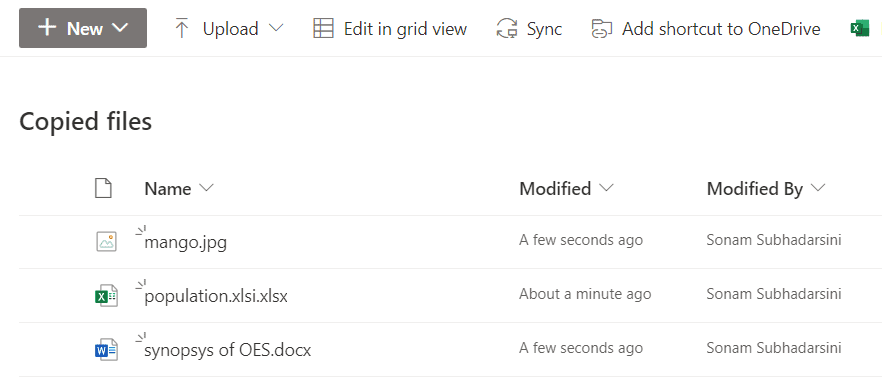
This is how to copy files between SharePoint folders using Power Automate.
Read Power Automate export SharePoint list to excel and send an email
Power Automate copy sharePoint file with new name
Here, we will see how to copy the files from the SharePoint folder to another folder with a new name. In the SharePoint copy file action, there is an option where it allows to copy the file with a new name.
To implement this, we are going to use the previous flow that we have created to copy files between the SharePoint folders.
In that flow, go to the Copy file action and expand it. Click on the dropdown of the last option i.e. If another file is already there. Then select Copy with a new name.
Also, we will set the Destination Folder as the same as the source folder. So that we can easily compare the old name and new name of the copied files.
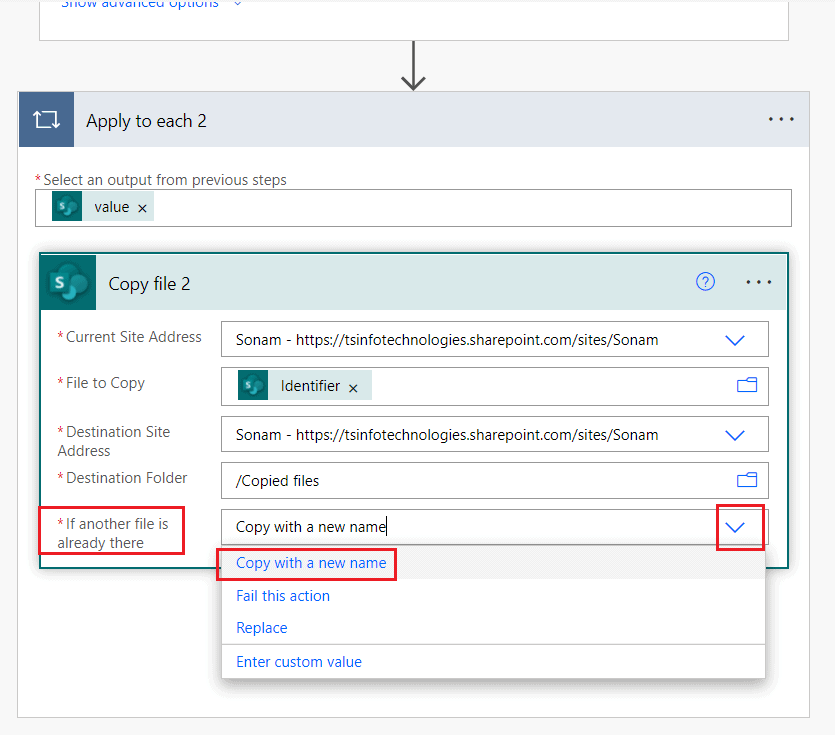
Let’s save the flow and test it manually. We can see the files are copied successfully and stored with a new name in the specified folder.
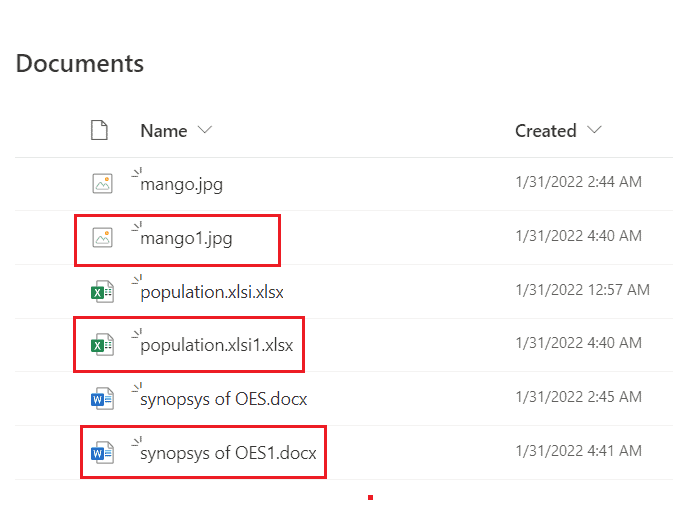
This is how to copy the SharePoint file with the new name Power Automate.
Read Power Automate Create PDF
Power Automate copy files from one SharePoint site to another
Now we will see how to copy files from one SharePoint site(i.e. Source Site) to another SharePoint site(i.e. Destination Site) using Power Automate.
For example, we have some files in a document library of the source site.
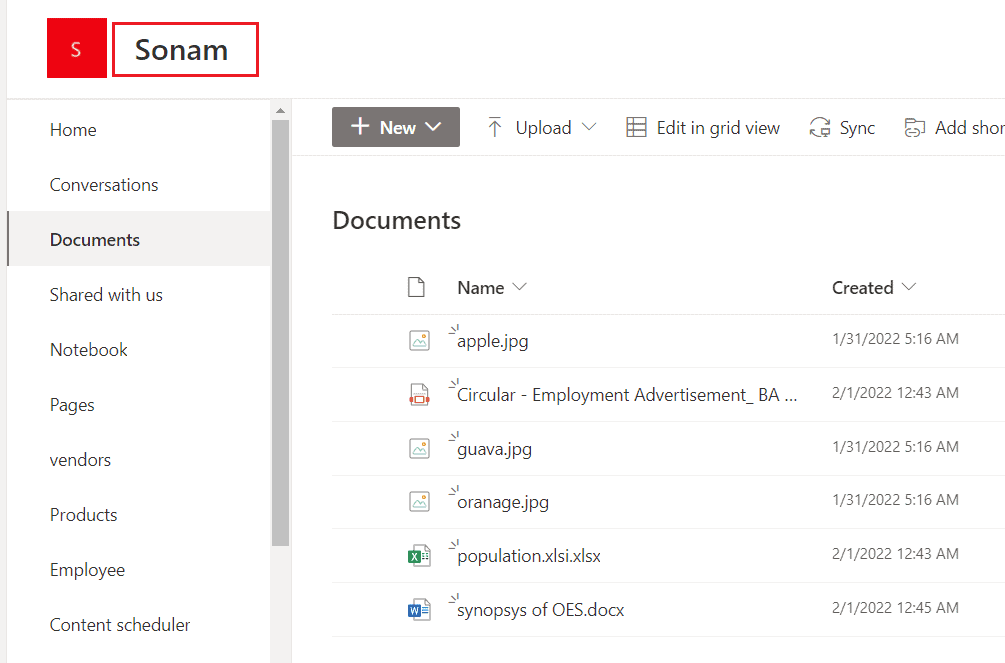
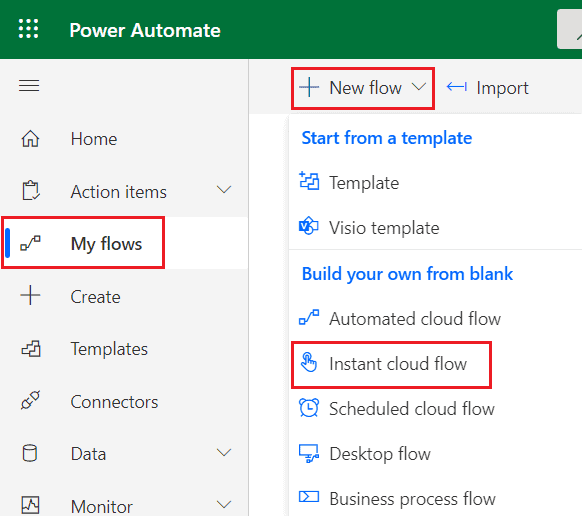
Let’s create an instant flow to see how to implement this. On PowerAutomate, click on My flows > + New flow > Instant cloud flow.
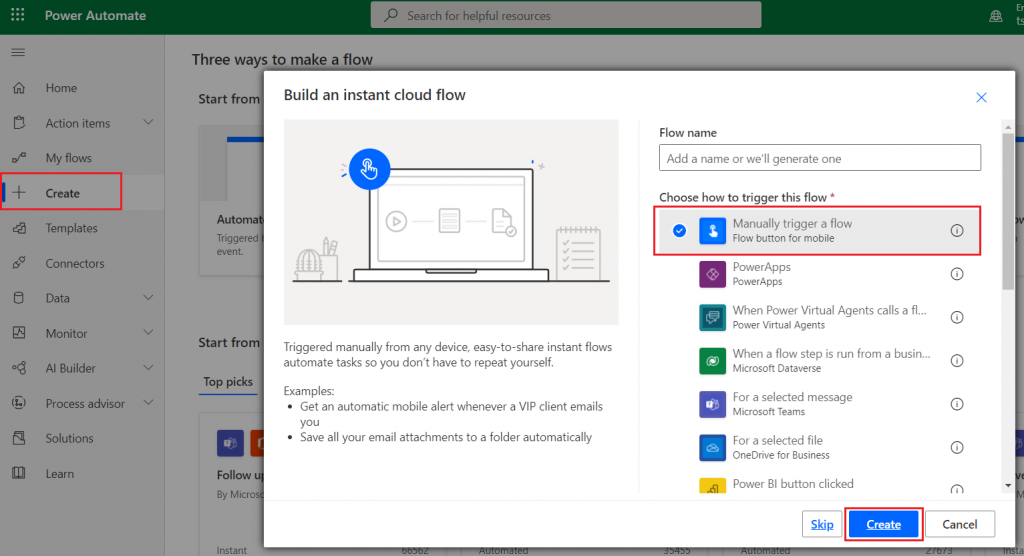
Then select the trigger i.e. ‘Manually trigger a flow‘ > Create.
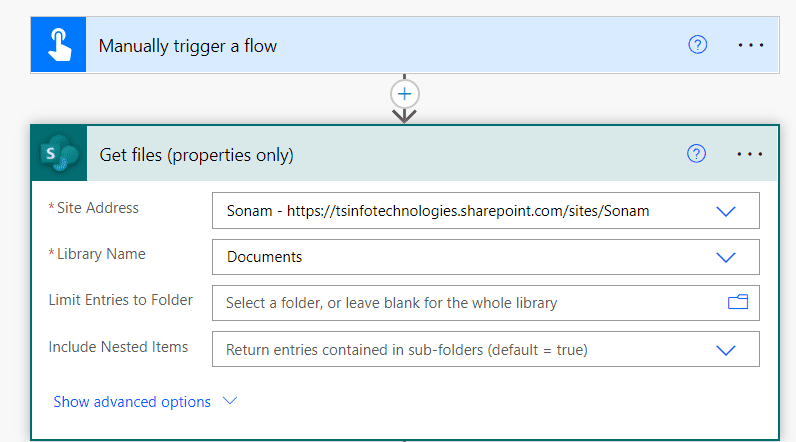
Next, we will add an action that will get all the files and folders from the specified SharePoint document library. Click on +New step > Get files (properties only). Here we will set the SharePoint site address and the library name.
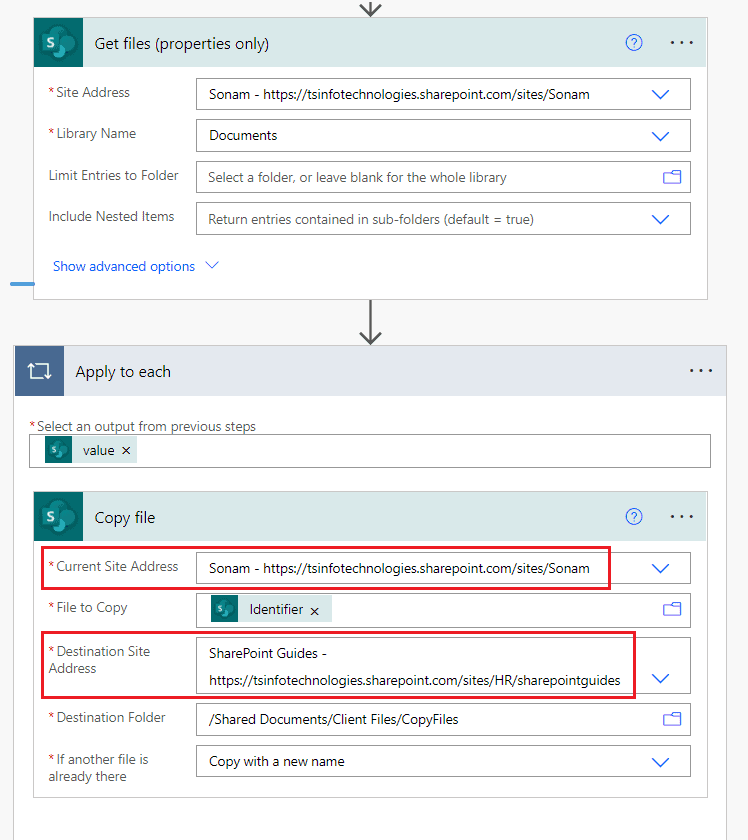
Then we will add a Sharepoint Copy file action that will copy files from the source site to the destination site. Click on +New step > Copy file. Similarly, here we will set the below parameters:
- Current Site Address– Set the source site address.
- File to Copy– Set the Identifier from the dynamic content of the Get file(properties only).
- Destination Site Address– Set the destination site address.
- Destination Folder– Set the folder path where you want to strore the copied file.
- If another file is already there– Set it as copy with a new name.
Let’s save the flow and test it manually. We can see the copied files are stored at another site address.
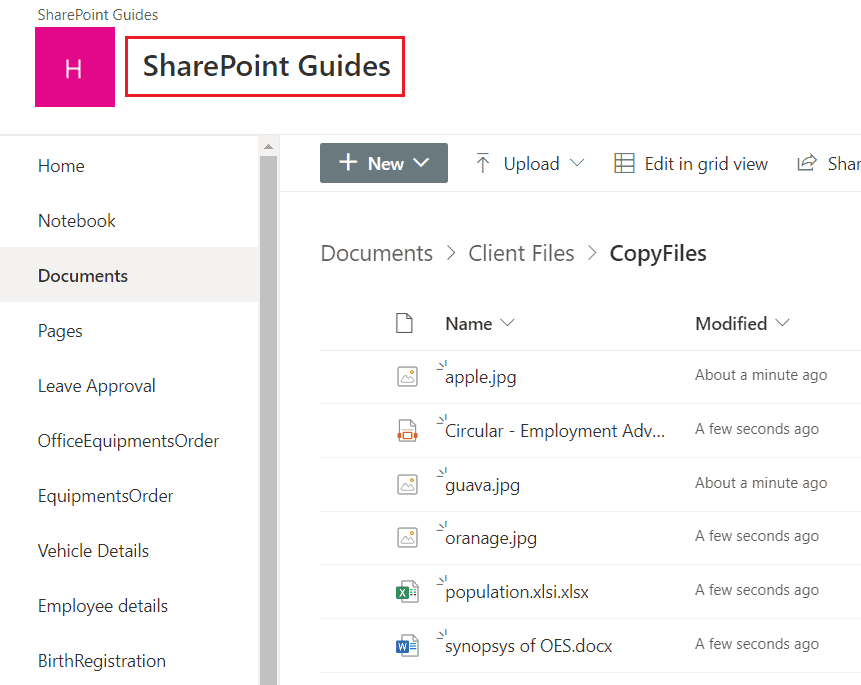
This is how to Copy files from one SharePoint site to another using Microsoft flow.
Read Power Automate dynamic content
Power Automate copy file from sharePoint to sharepoint
Similarly, we will see how to copy files from SharePoint to SharePoint using an automated flow on the Power platform.
For example, when a file is created in a source SharePoint site it will automatically copy that file to the destination SharePoint site. To implement this, we will create an automated flow and the following steps are:
Step-1: Trigger the flow when a file is created in a source folder.
On Power Automate, Click on + Create > Automated cloud flow > Select the trigger When a file is created in a folder > Create. Also, give a name to the flow.
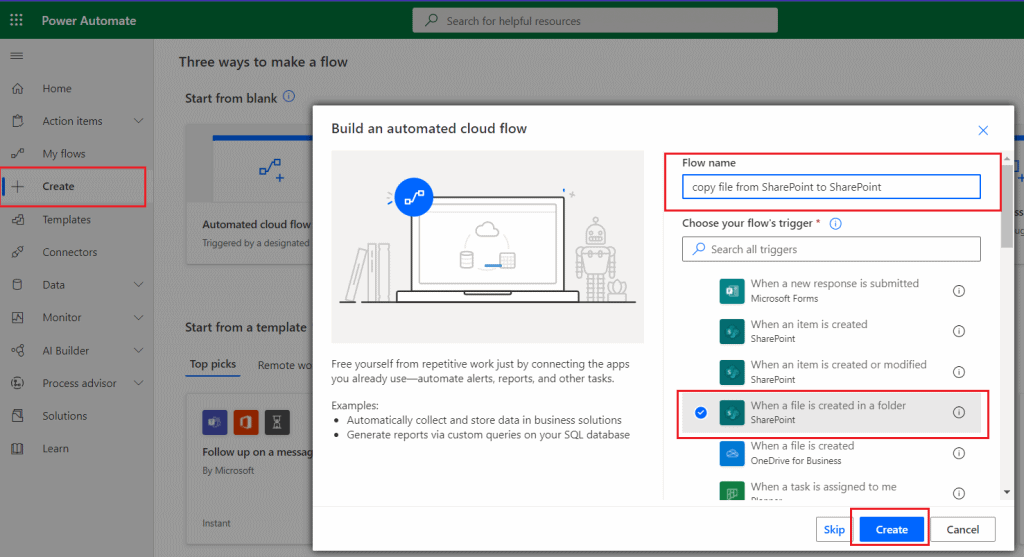
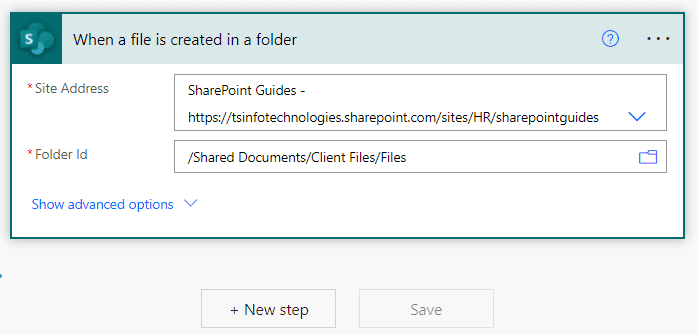
Here we will configure the trigger with the site address and folder ID to get the data from the specified Sharepoint site.
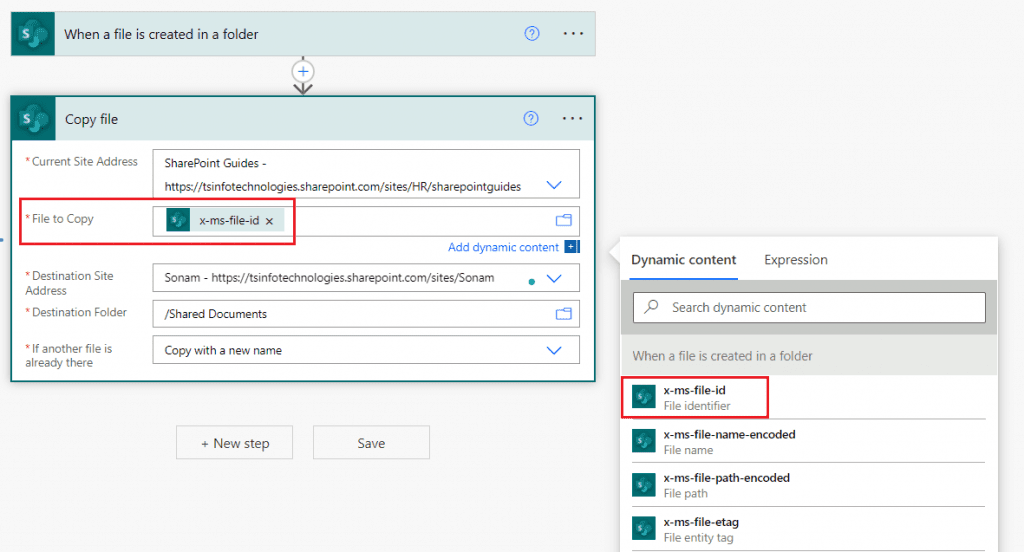
Next, we will add an action that will copy the files from the source SharePoint site to the destination SharePoint site. Click on +New step > Copy file. Here we will provide the below properties to activate the action.
- Current Site Address– Set the source site address
- File to Copy– choose the x-ms-file-id from the dynamic contnet of the trigger
- Destination Site Address– Set the destination site address
- Destination Folder– Specify a folder path where you want to store the copy files
- If another file is already there– Set it as copy with a new name.
Let’s save the flow and test it manually. Then we will insert a file inside the source SharePoint site i.e. SharePointGuide.
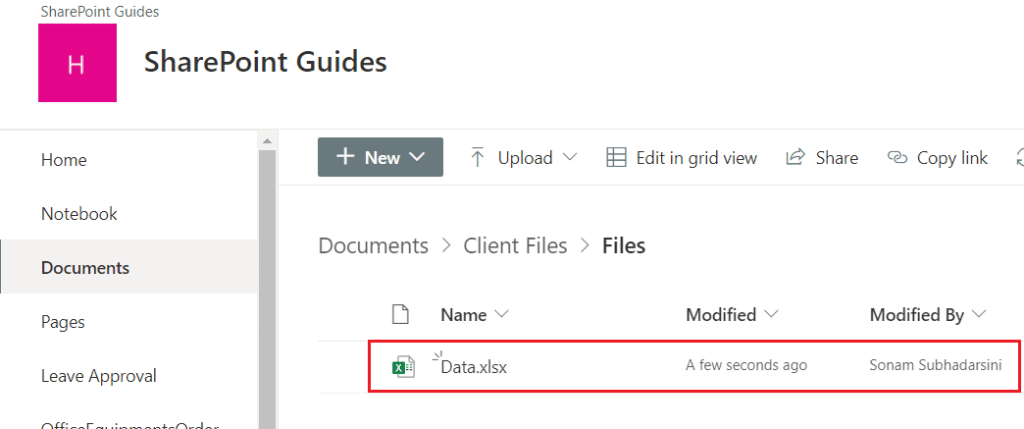
Now we can see the copied file in the destination SharePoint.
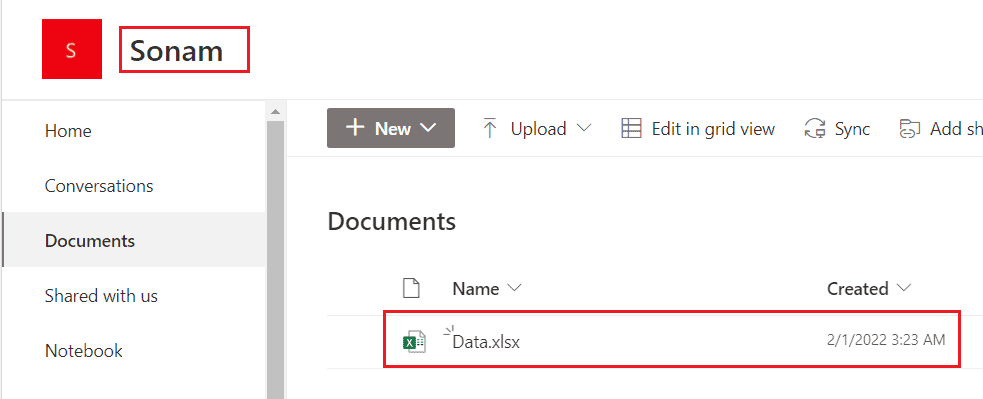
This is how to automatically copy files to another SharePoint site using Power Automate.
Read Start and wait for an approval Power Automate
Power Automate copy file OneDrive to sharepoint
Here, we will see how to copy files from OneDrive to the SharePoint document library. For example, we have some files in a specific folder of the OneDrive.
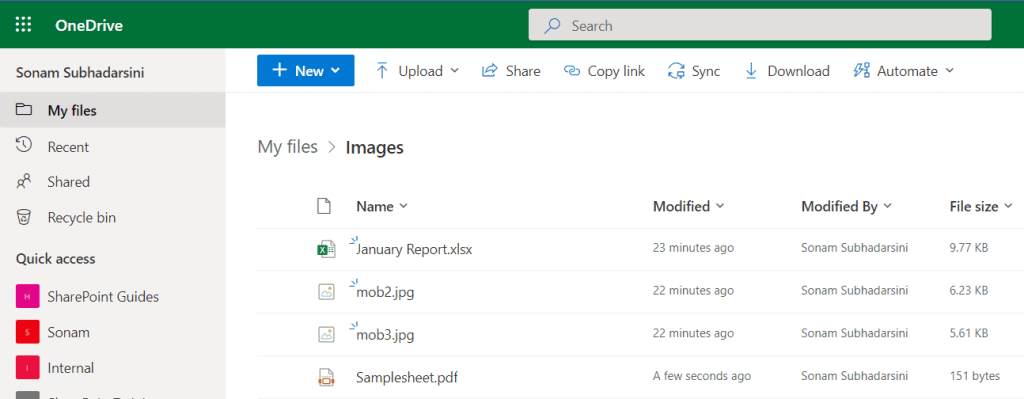
Now, we will create an instant cloud flow that will copy files from the OneDrive to the Sharepoint and the following steps are:
Step-1: Trigger the flow manually
On Power Automate, Go to + Create > Instant cloud flow > Trigger the flow manually.
Step-2: Get all the files and subfolders
After triggering the flow manually, we will add the next step. Here, we will add an action that will get all the files and the subfolders in a folder of the OneDrive.
Click on +New step > List files in folder. Here we will provide the folder that contains the files(in our case i.e. image folder)

Step-3: Get the file content
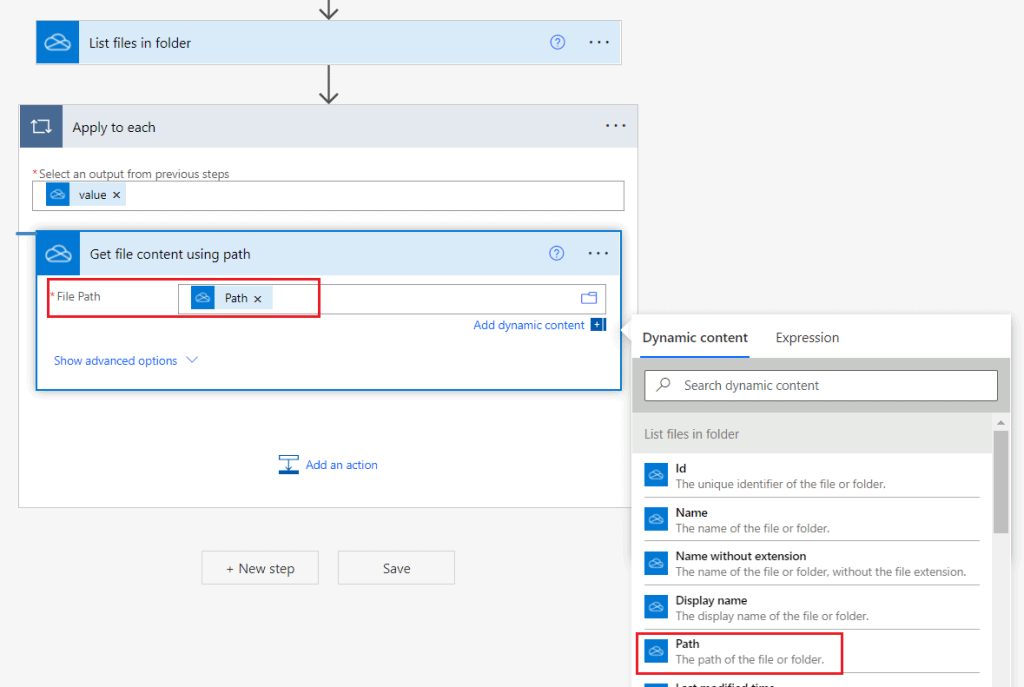
Then, we will add an action that will get the content of a file using the path. Here we will set the File Path as a path from the dynamic content of the previous action i.e. list files in folder.
We can see it will create an ‘apply to each’ loop where it will check each file.
Step-4: Create files in the SharePoint document library
In this final step, we will add an action that will create the copied file in the SharePoint folder.
Click on + Add an action > Select the action Create file(under SharePoint). Here we will provide the below properties:
- SharePoint site address– Specify the SharePoint site adress.
- Folder Path– Set the folder path of the document library.
- File Name– Select Name from the dynamic content.
- File Content– Select the File content from the dynamic content.
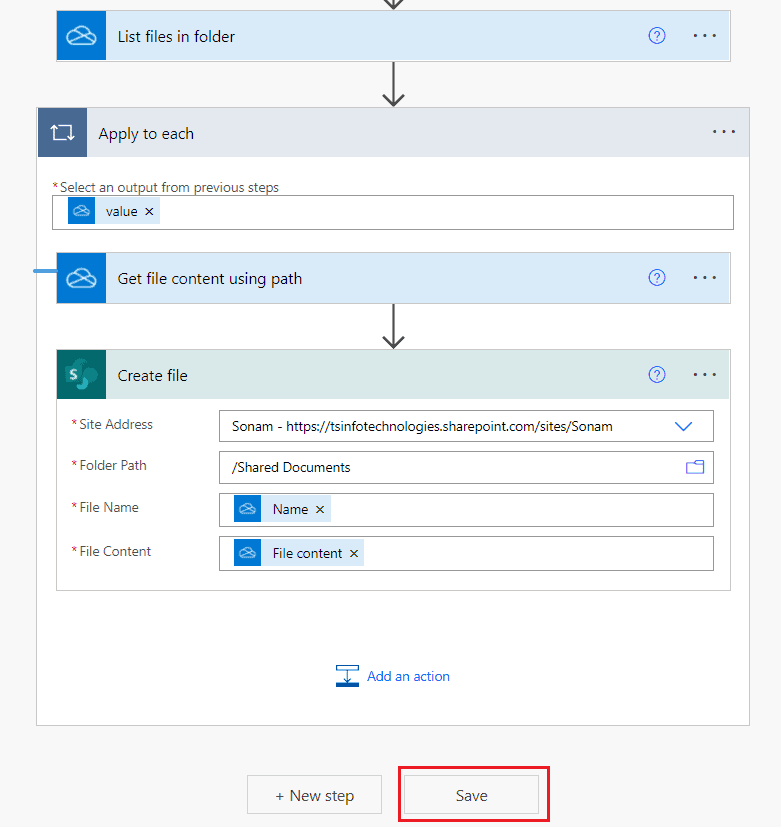
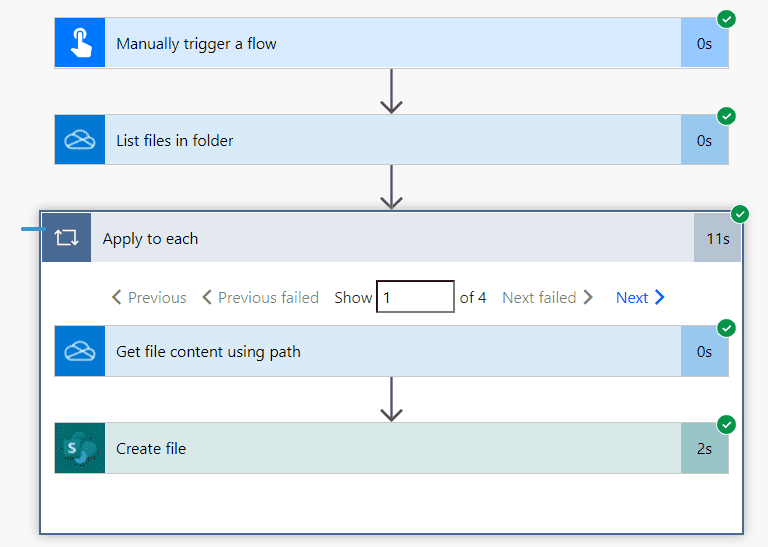
Let’s save the flow and test it manually. We can see the flow ran successfully.
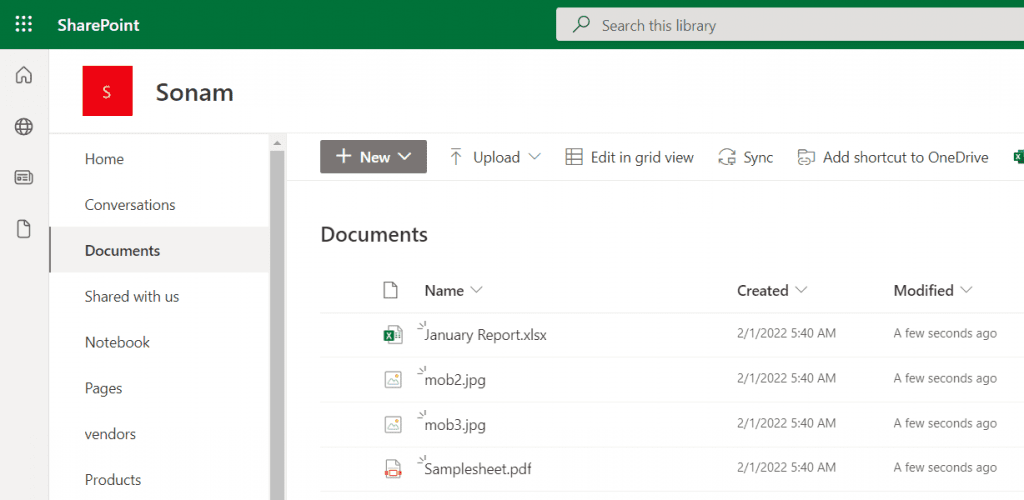
We can see the copied files are stored in the SharePoint document library.
This is how to copy files from OneDrive to SharePoint using Power Automate.
Read Power Automate shared mailbox
Power Automate copy file sharepoint to OneDrive
Similarly, here we will see how to copy files from the SharePoint folder to OneDrive using Power Automate. For example, we have some random files in a Sharepoint folder.
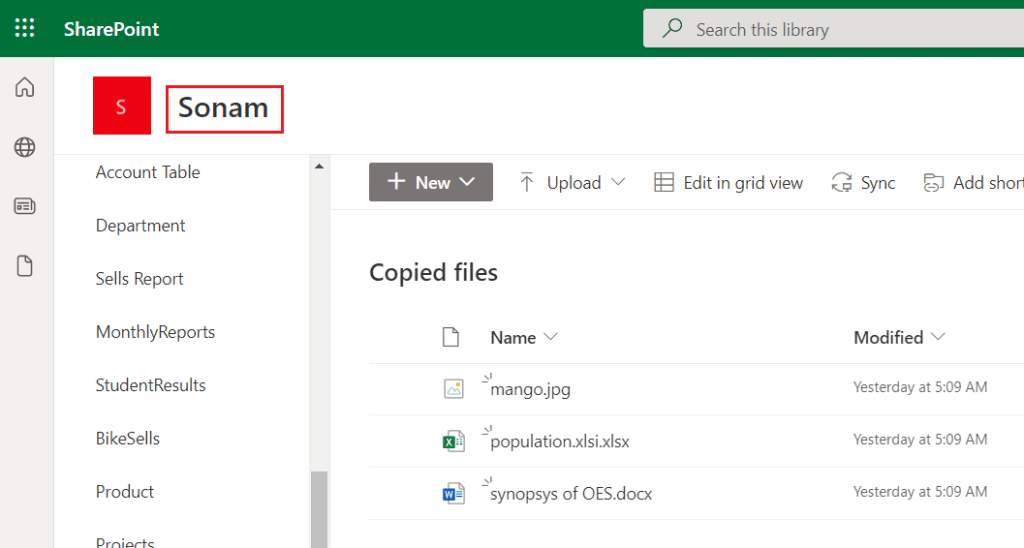
Now, we will create an instant cloud flow that will copy the files from SharePoint to OneDrive. Let’s have a look at the below steps:
Step-1: Trigger the flow manually
First, we will create a flow that will trigger it manually. On Power Automate, click on +Create > Instant cloud flow > Trigger the flow manually > Create.
Step-2: Get the file properties from the SharePoint
Next, we will add an action that will get all the properties of the files stored in the SharePoint folder. Click on +New step > Get files(properties only). Here, we will set the SharePoint site address and the document library name.
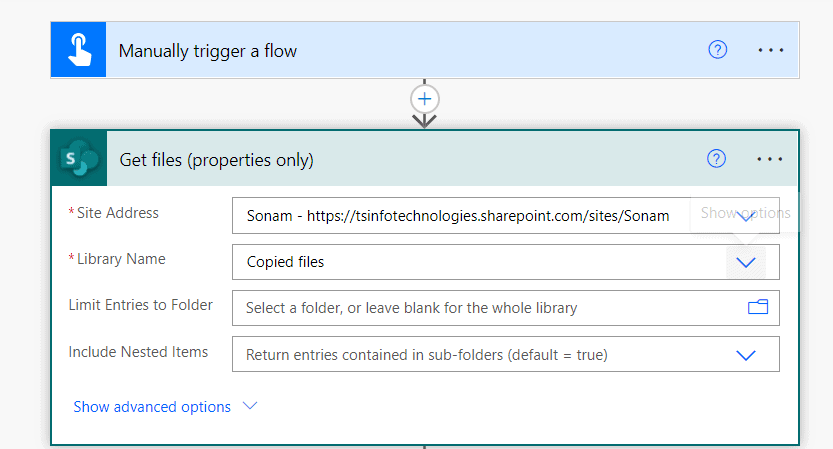
Step-3: Get the file contents using the path
Next, we will add an action that will get file contents using the file path. To add this action, click on +New step > Get file content using path. Similarly, here we will provide the SharePoint site address and the File path using the dynamic content(file name with extension from the Get files action)
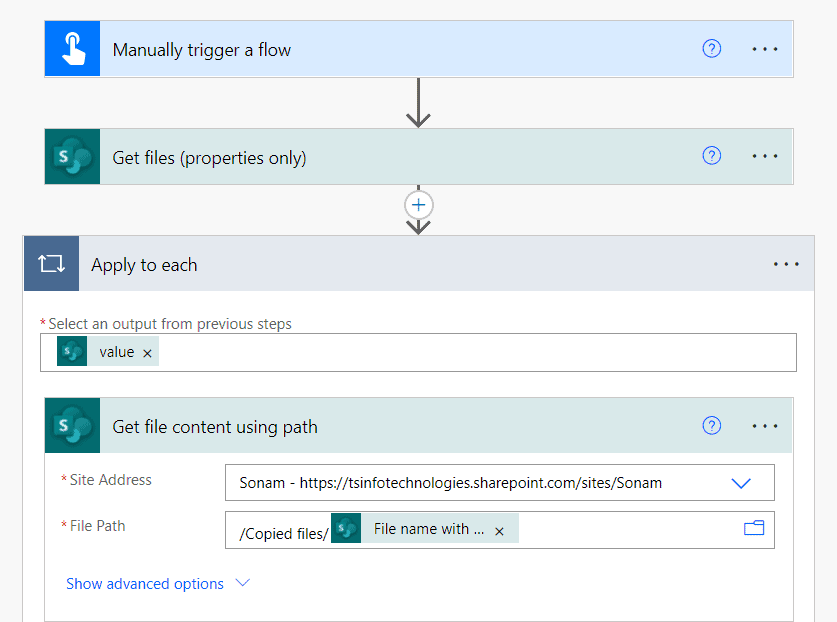
Step-4: Create copied files in the OneDrive
In this final step, we will add an action that will create the copied files in the OneDrive. For this, click on +New step > Create file(Under OneDrive). Here we will provide the below Properties:
- Folder Path– Set the folder path where you want to store the copied files inside the OneDrive.
- File Name– Select File name with extension from the dynamic content.
- File Content– Select File contnet with extension from the dynamic content.
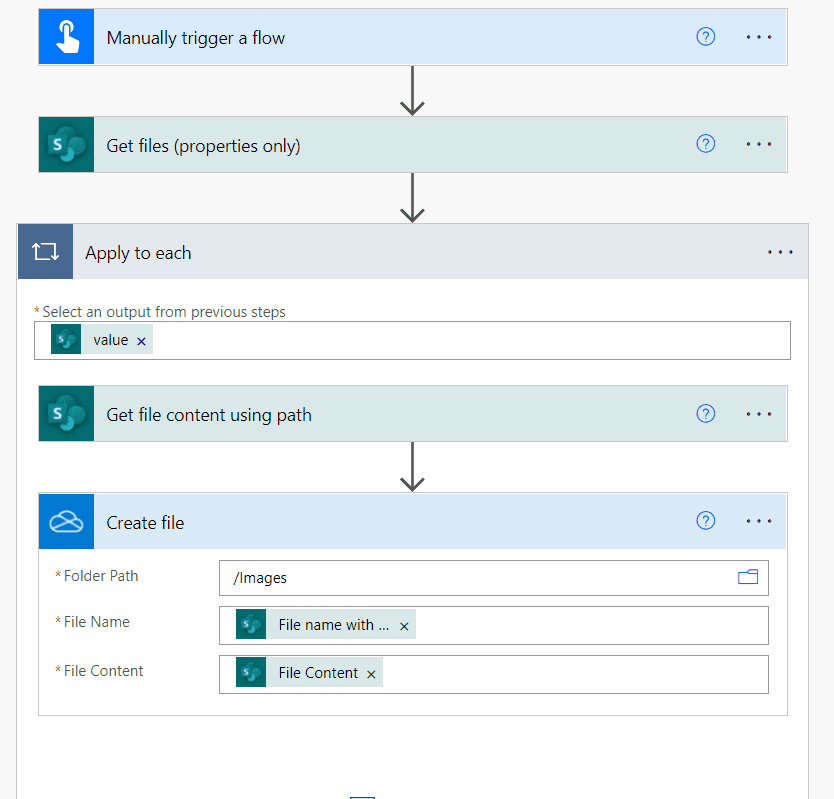
Now our flow is ready to run. Let’s save the flow and test it manually. Click on the Run flow.
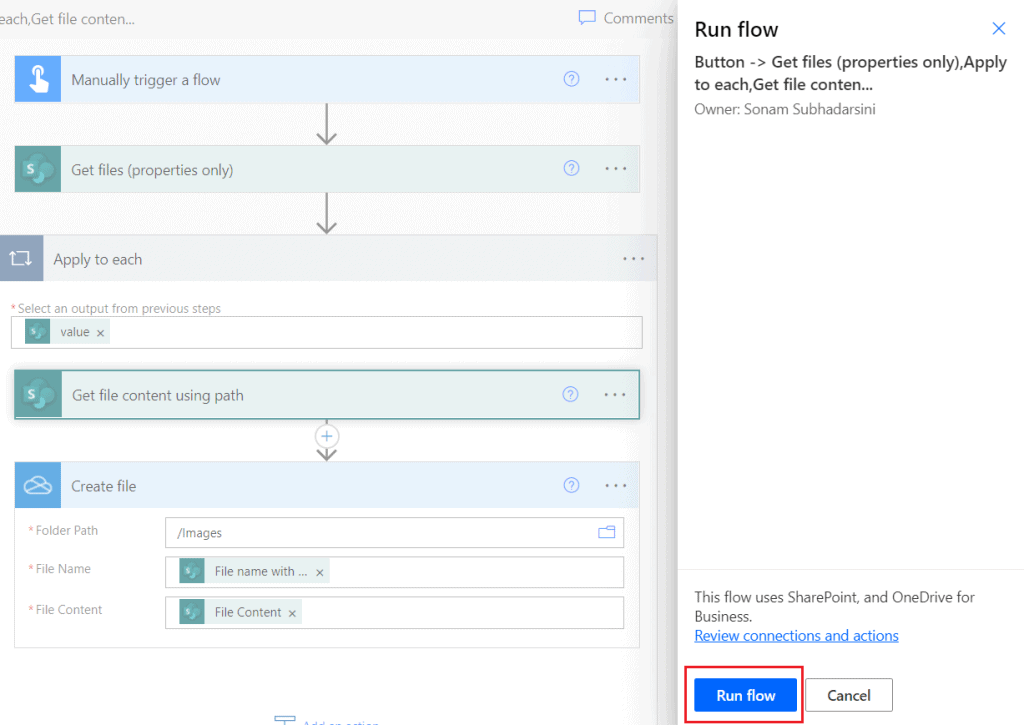
We can see the flow ran successfully. Now we can see the copied files in the OneDrive.
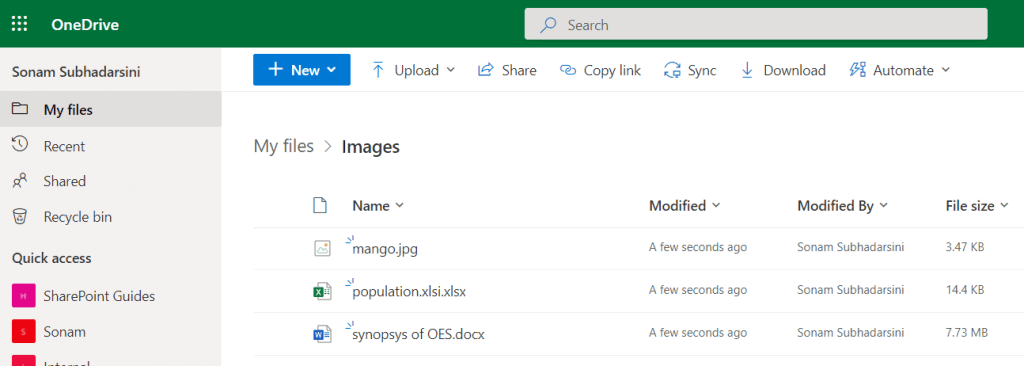
This is how to copy files from OneDrive to SharePoint using Microsoft flow.
Read Power Automate flow with Microsoft teams
Power Automate copy file from onedrive folder to another
Here, we will see how to copy files from the OneDrive folder to another OneDrive folder using Power Automate. For this, we are going to use a prebuilt template that will copy the files from one folder to another.
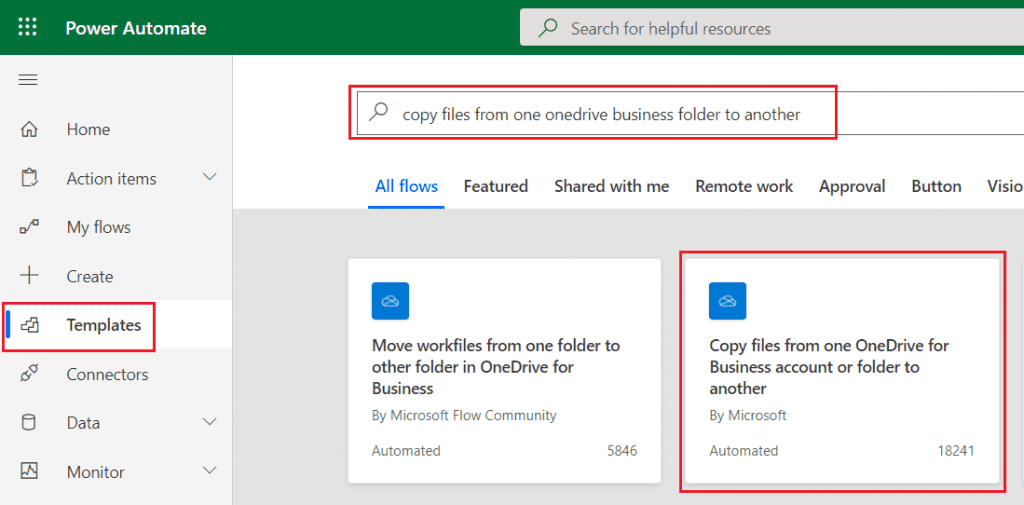
On Power Automate, Click on Templates > search for copy files from one onedrive business folder to another > Select the template.
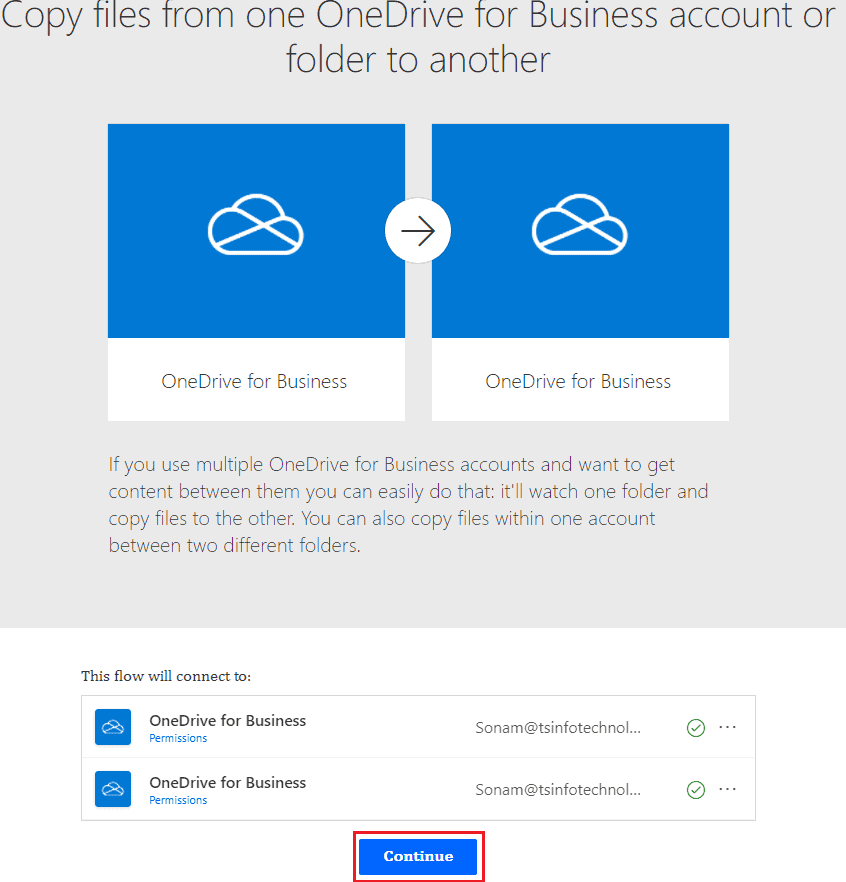
Next, it will show us all the connectors that connect to the flow. Then click on Continue.
Next, we can see what the flow looks like below:
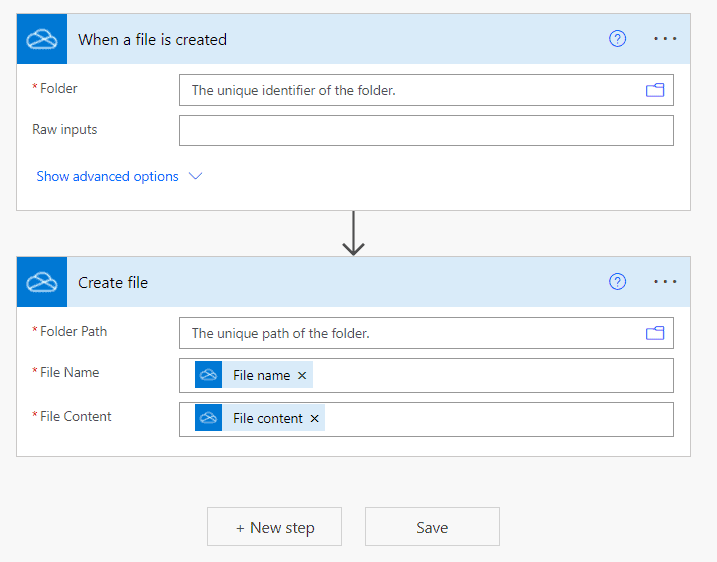
Next, we will provide the Folder(source folder) and Folder Path(destination folder). It will trigger the flow when a file is created in the source folder. Then it will copy the file from the source folder to the destination folder.
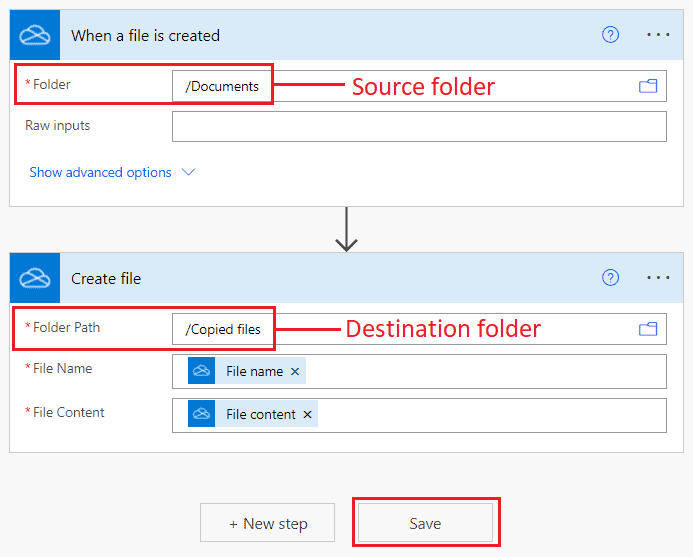
Then click on save. Test the flow manually. Let’s upload some random files in the source folder.

We can see the flow ran successfully and also, the files were copied to the destination folder.

This is how to copy files and folders between two OneDrive folders using Power Automate Flow.
Power Automate copy file from OneDrive to local drive
Here we will see how to copy files automatically from OneDrive to local drive using Power Automate.
For example, we have a folder named Image having some random files in the OneDrive. Let’s create an instant flow that will move all the files from the OneDrive to the local drive or network drive/Shared drive.
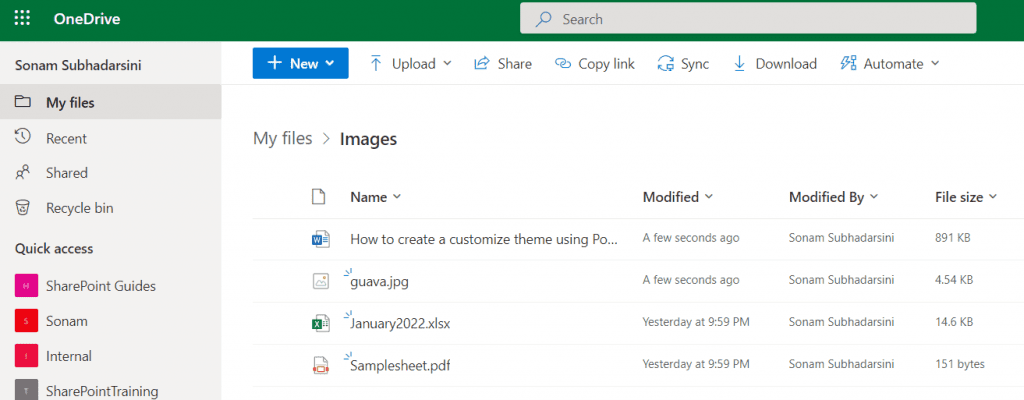
On Power Automate, click on +Create > Instant cloud flow > select the trigger ‘Manually trigger a flow. Then select the +New step to add the logical steps.

Next, we will add an action that will get the list of files in a folder. Click on +New step > List files in folder.
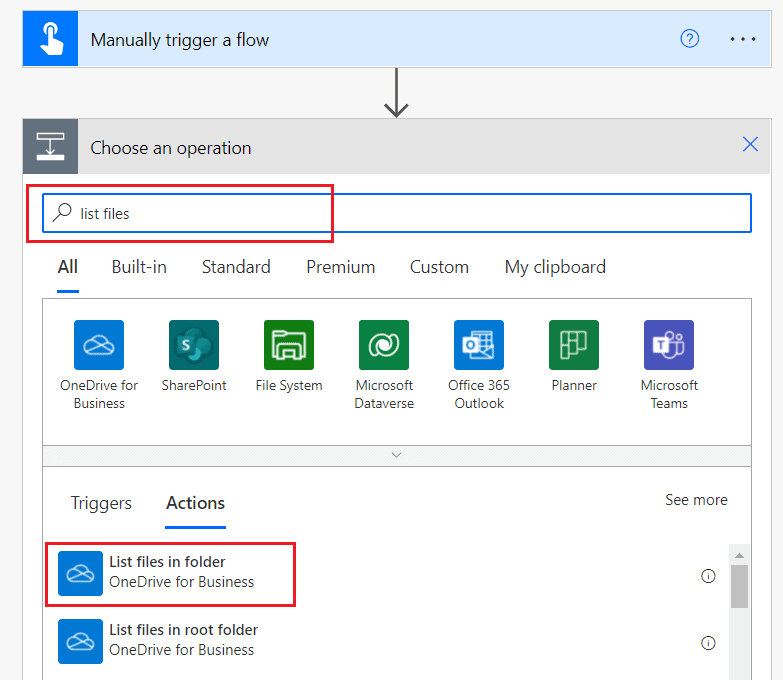
Here we will set a folder from where you want to copy files to the local drive i.e. Image.

Next, we will add an action that will get the content of a file using the path. Click on + New step > Get file content using path. Here we will set the path from the dynamic content.
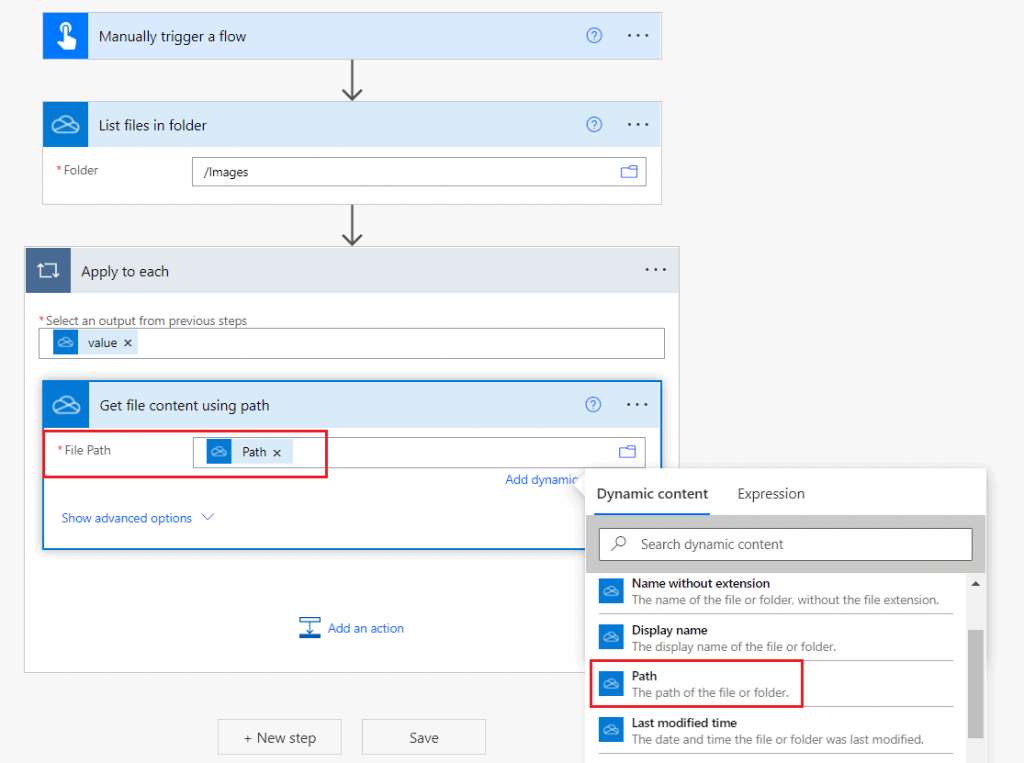
Next, in the file step, we will an action that will create the files inside the local drive. For this, click on + New step > Create file(under the file system).
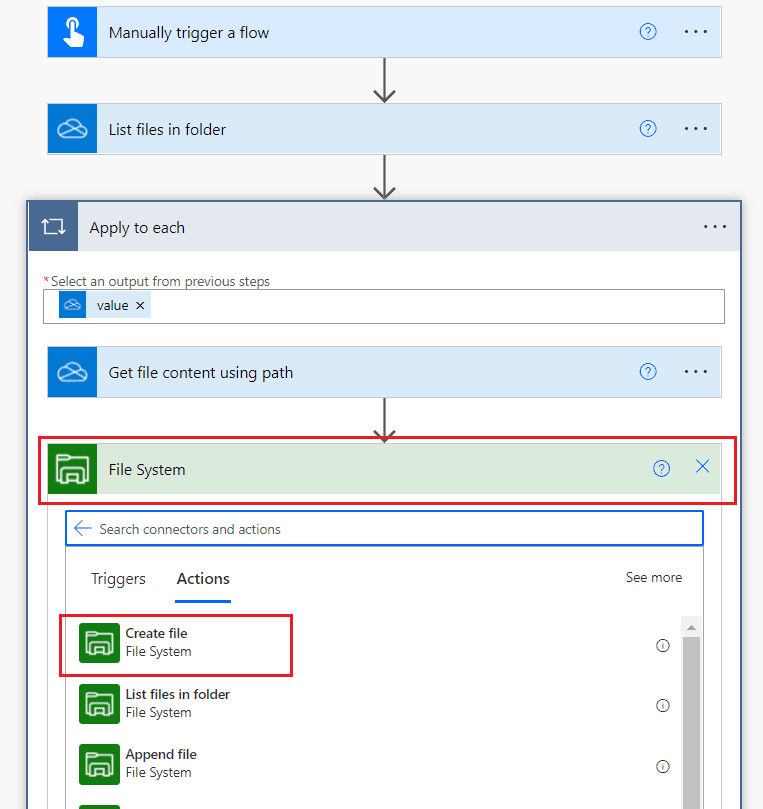
Here it will ask to set the below properties:
- Folder path– Set the folder path as Root
- File name– Select file name from the dynamic content.
- File content– Select File content from the dynamic content.
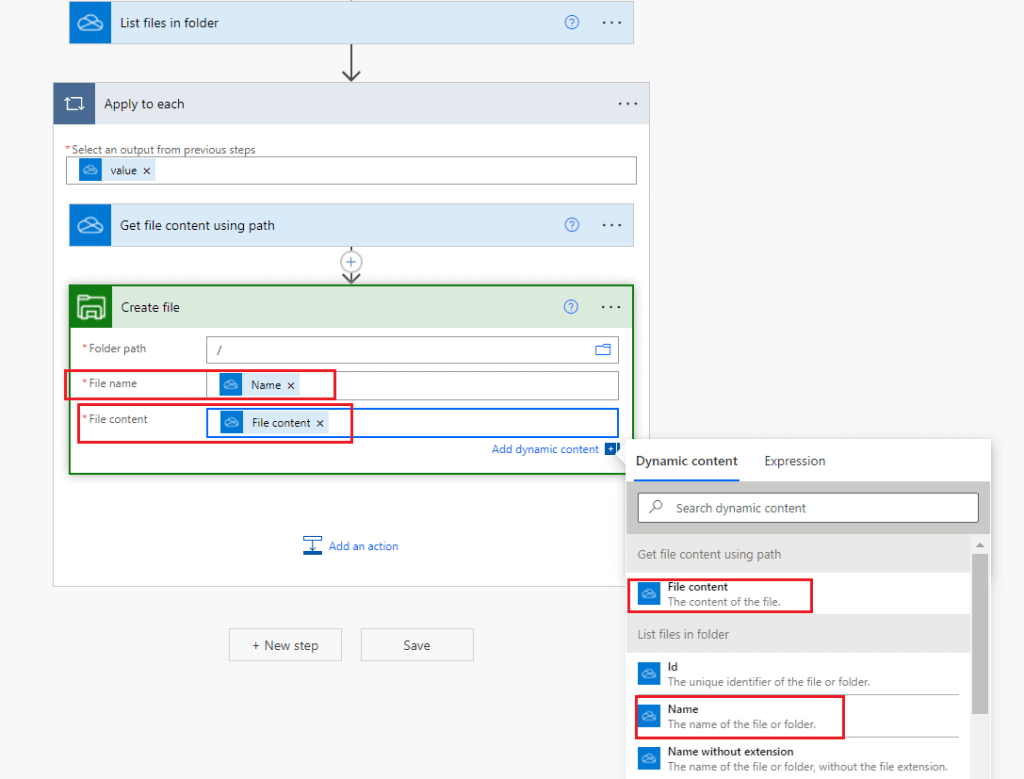
Let’s save the flow and test it manually. We can see the files in the local drive folder.

This is how to copy files from onedrive business to Local drive using Power Automate.
Power Automate copy file from sharepoint to local drive
For this, we have already an article. Check out Microsoft Flow Example: Copy Files from SharePoint to PC.
Power Automate copy file from file system to SharePoint
If you want to copy the file from the file system to SharePoint, then there is already a flow tutorial that you can refer to copy files from the file system to SharePoint in Microsoft flow.
Power Automate copy file and rename with date
In this example, we will how to copy and rename a file in the SharePoint folder. For example, when we insert a file in the SharePoint folder and if it is a PDF then it will copy and rename the PDF with the current date.
Let’s create a flow to implement this. And the following steps are:
Step-1: Trigger the flow when a file is created
First, trigger the flow when a file is created in the SharePoint folder. On Power Automate, click on +create > Automated cloud flow > Select the trigger ‘When a file is created in a folder. Also, configure the trigger with the SharePoint site address and the Folder ID.

Step-2: Add action to get the files
Next, we will add an action that will get the properties of the file from the document library. Click on +New step > Get files (properties only). Again, provide the SharePoint site address and the library name.
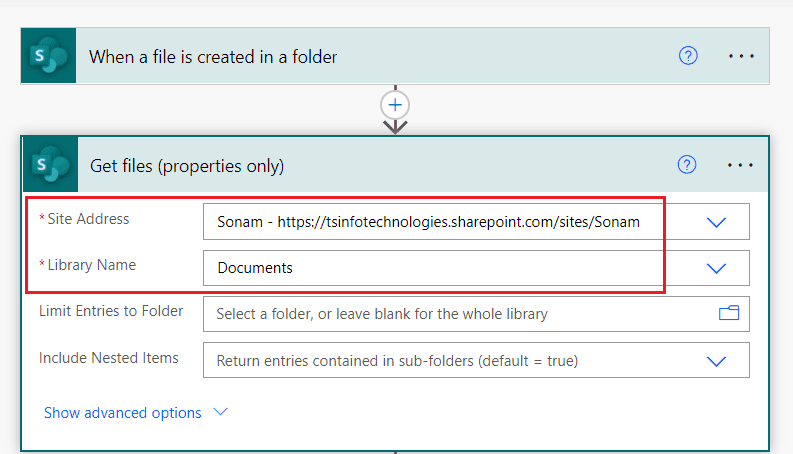
Step-3: Extract the current date
Next, we will add a Compose action that will extract the current date dynamically. Click on +New step > Compose > Add the below expression.
formatDateTime(utcNow(),'dd-MM-yyyy')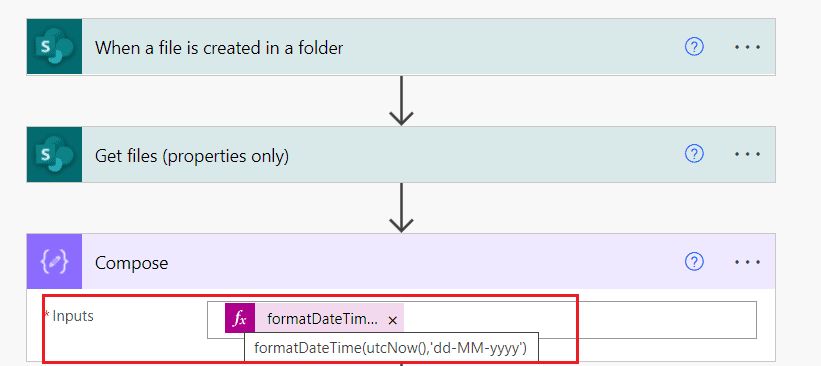
Step-4: Add a Condition action
Next, we will add a condition control that will check whether the file is a PDF or not. Click on +New step > Condition. Set the below properties:
- Select the first value- File name with extenstion. We can see it will create an apply to each loop i.e. it will check all the files when multiple files will upload in the folder.
- Operator- Contains
- Select the second value- .pdf
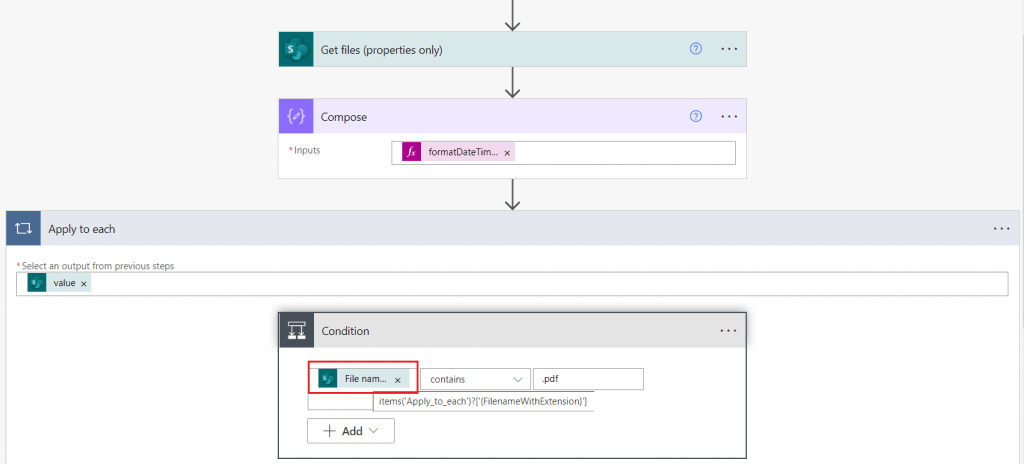
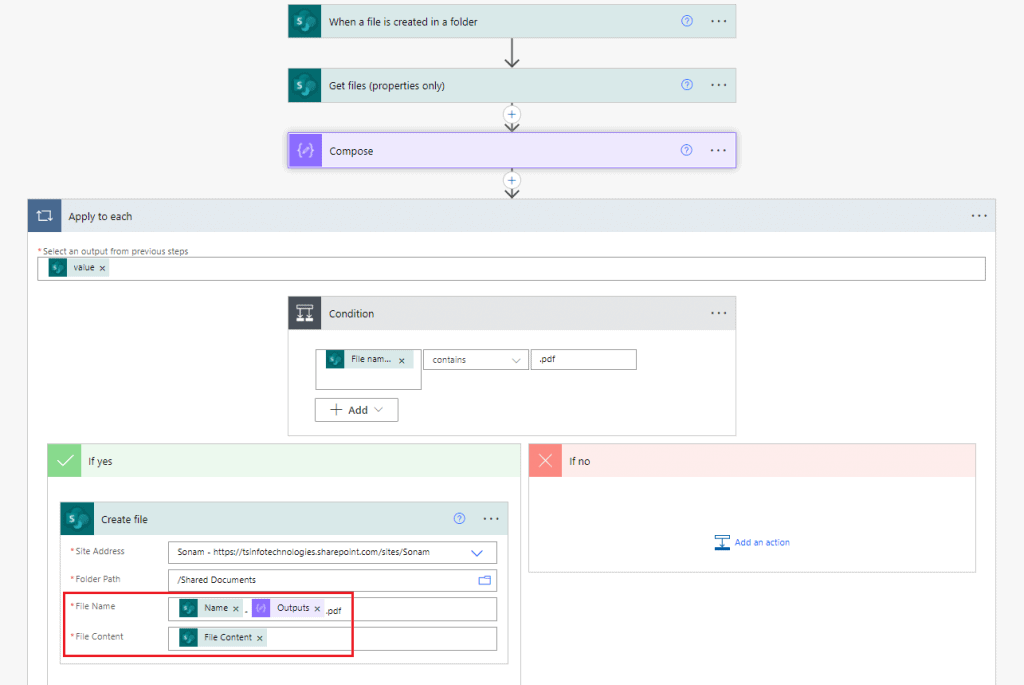
If the condition got satisfied, then it will move to the ‘If yes’ part and create a new file with renaming it. Click on +Add an action > Create file. Set the properties like below:
- Site Address– Set the SharePoint site address.
- Folder Path– Set the document library.
- File Name– Select Name with Output of the compose as file name using ‘.pdf‘ extension.
- File Content– Select file content from the dynamic content.
Now we will save the flow and upload the files in the specified document library.
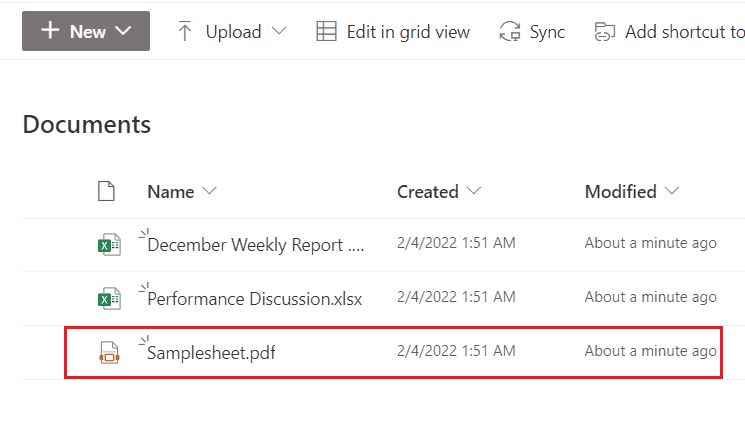
We can see our flow ran successfully and only the pdf file will copy and rename with the current date:
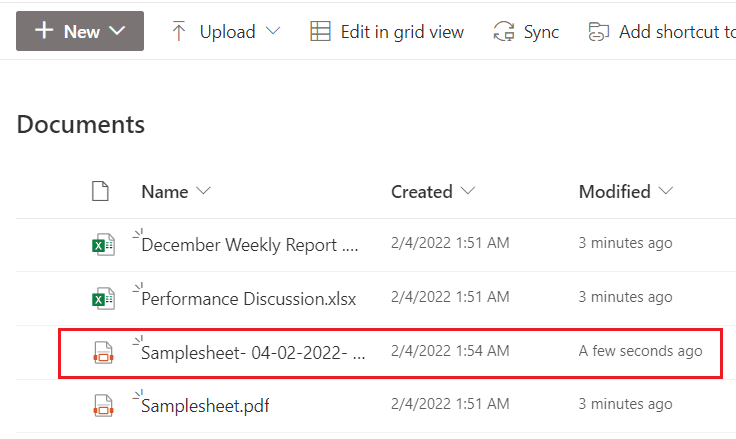
This is how to copy and rename file using Power Automate.
Read Power Automate or Microsoft Flow delete all files in a folder
Power Automate copy file attachment
Now we will see how to copy the attachment(s) of an item using Power Automate. To implement this, we will create an automated flow that will copy all the attachments when an item is created in the SharePoint list.
For this, we have created a sharepoint list based on the ‘bike sells’. When we insert a data in that list with an attachment, it will copy that file attachment to a specified folder of the document library.
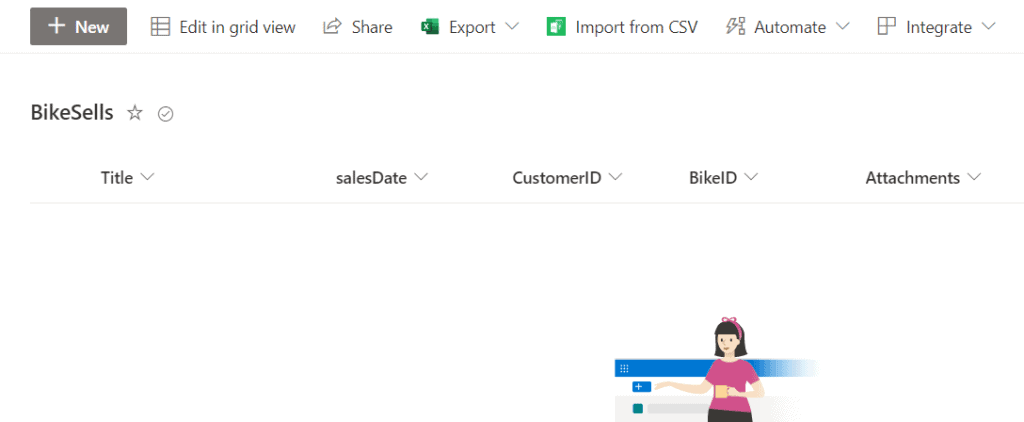
On Power Automate, click on +Create > Automated cloud flow > select the trigger ‘When an item is created’. Then configure the SharePoint site address and the List name.

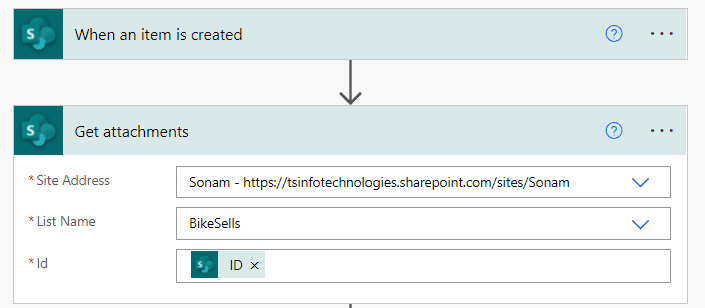
Next, we will add an action that will get attachments for the specified list item. Click on +New step > Get attachments. Then set the Site address, List name, Id(From the dynamic content of the trigger).
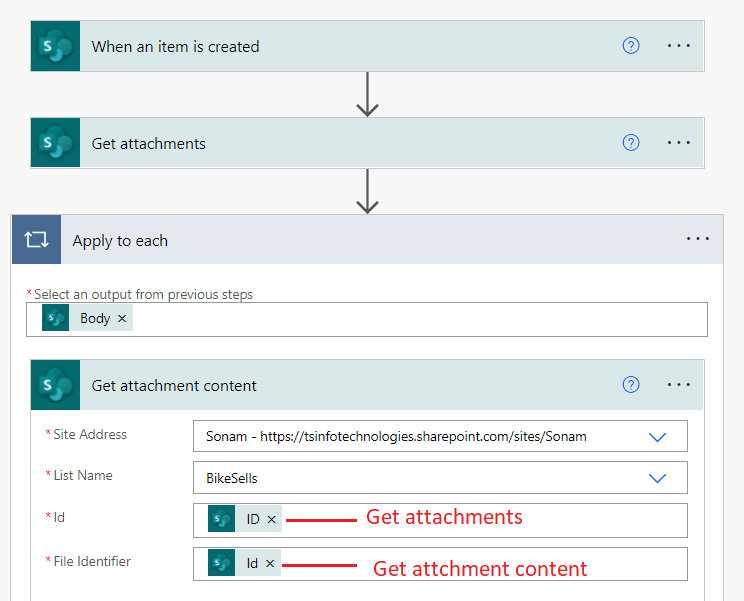
Next, we will add an action that will get the attachment content using a file identifier. Click on + New step > Get attachment content.
Similarly, here we will set the SharePoint site address, site address, Id(select the ID from the dynamic content of the trigger), File identifier(select id from the Get attachments). We can see it will create an apply to each loop.
Next, in the final step, we will add an action that will create the files(copied files) in the SharePoint folder. Click on +Add an action > Create file. Set the Site address, Folder path, File name, File content from the dynamic content.
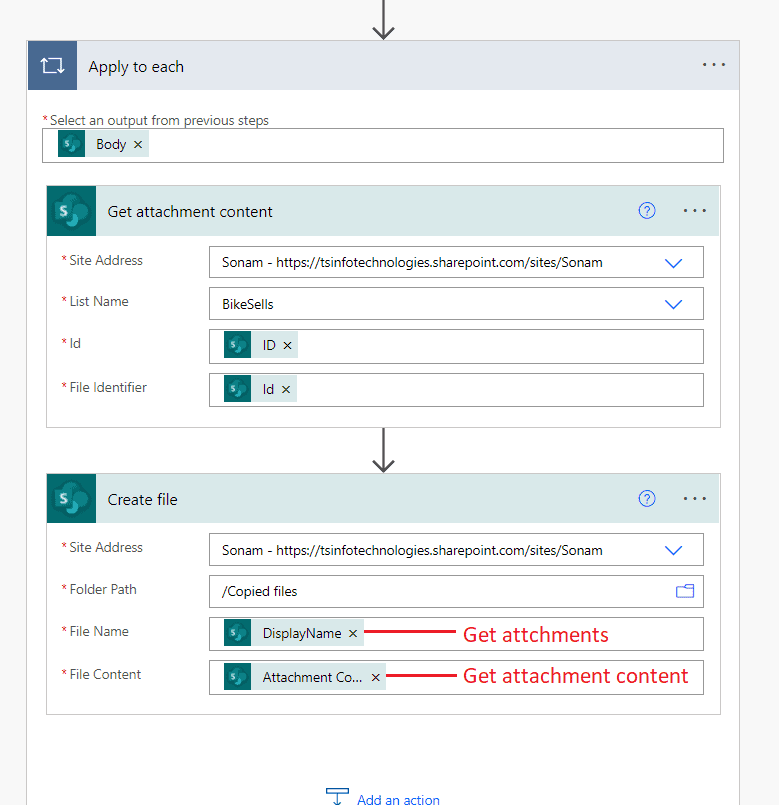
Now we can see our entire flow look like below:
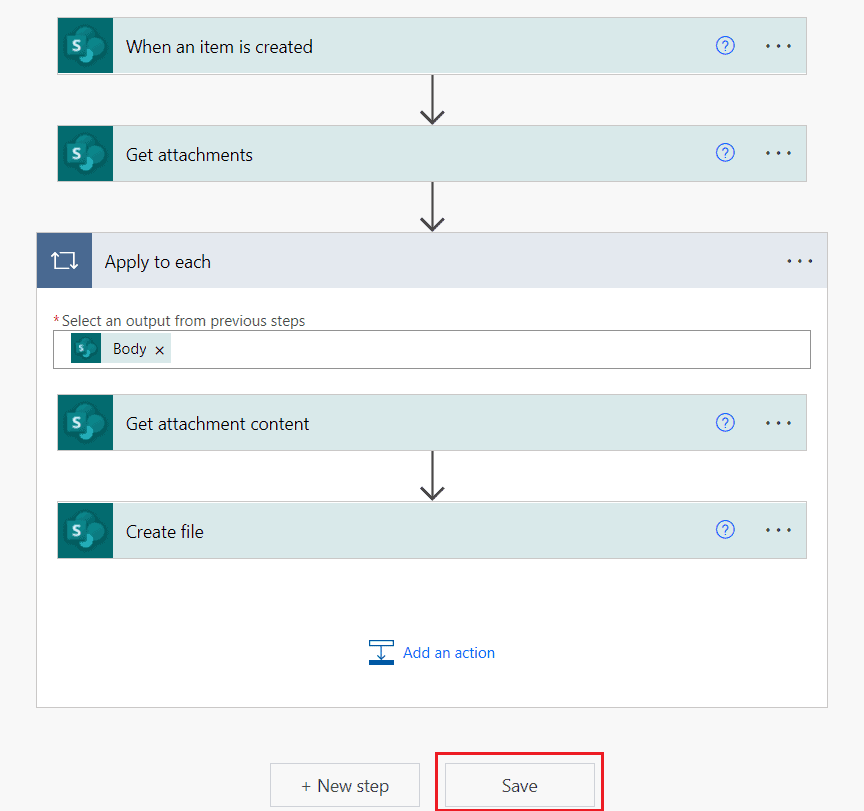
Let’s save the flow and select to test it manually. Then insert some data inside the SharePoint list with an attachment.

We can see the attachment has been saved inside the specified SharePoint document library.

This is how to copy file attachments to a SharePoint Library using Power Automate.
Note- If you want to copy all the attachments of all items in the SharePoint list to the document library, you can use trigger ‘Manually trigger a flow’ and the use ‘Get attachments and so on.
Read Upload PowerApps Attachments to SharePoint Library Folder
Power Automate create copy of excel file
Here we will see how to create a copy of only excel files in a document library folder using Power Automate. For example, when an email arrives with an attachment it will check whether the file is in excel format or not. If it is an excel format then it will automatically save in the specified document library.
Let’s create an automated flow to implement this requirement. On Power Automate, click on + Create > Automated cloud flow > Select the trigger ‘When a new email arrives (V3)‘.

Next, we will add a condition action that will check whether the attachment is excel or not. Click on +New step > Condition. Set the properties like below:
- Set the first value: Attachment name
- Operator: Contains
- Set the second value: .xlsx
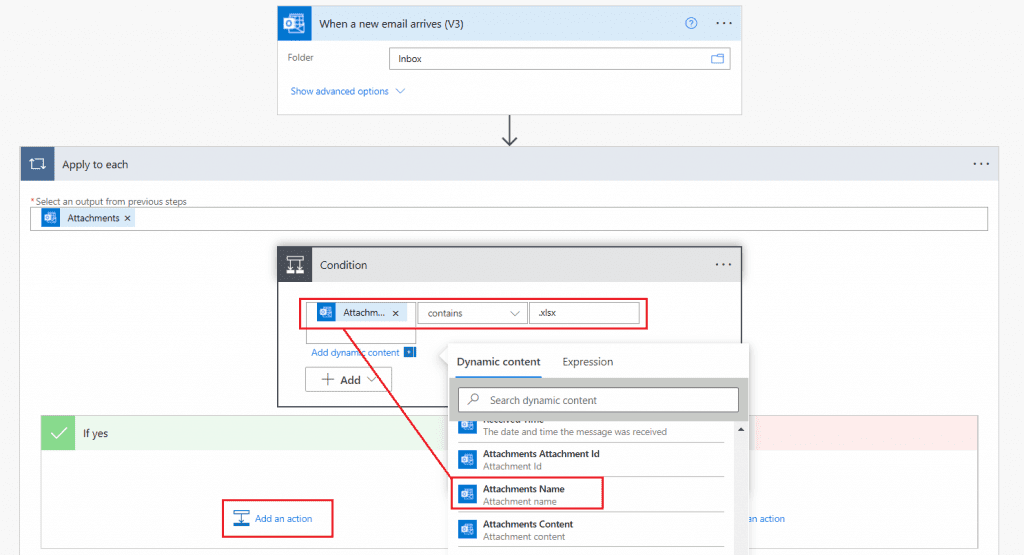
If the condition matched then it will move to the If yes section where it will create the copy of only excel file inside the folder of document library.
In If yes section, click on +Add an action > Create file. Set the Site Address, Folder Path, File Name, File Content from the dynamic content.
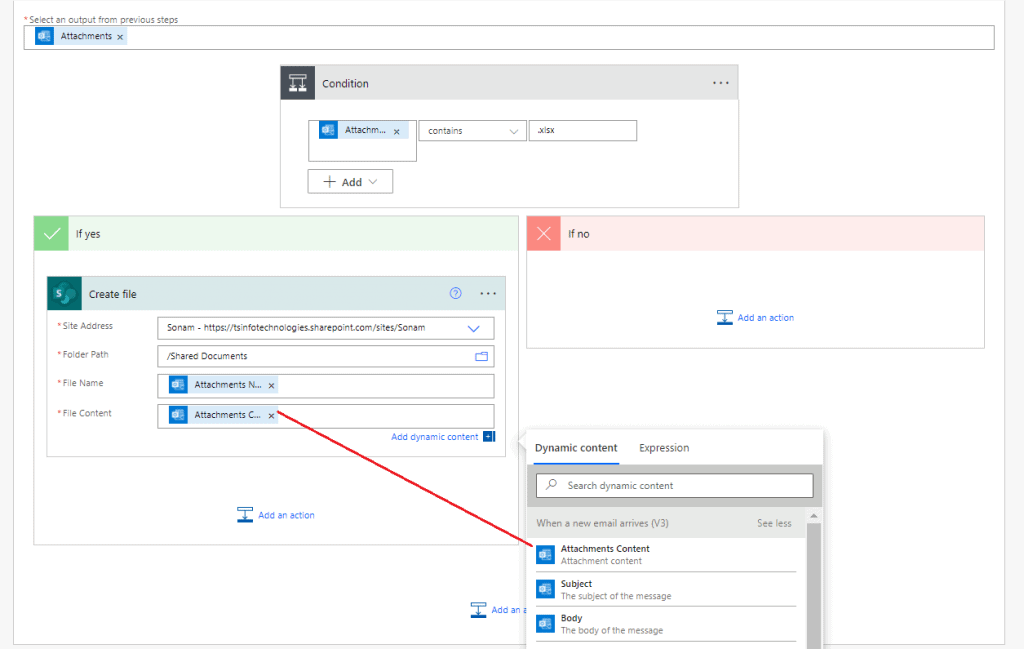
Let’s save the flow and test it manually. Then send an email to yourself including attachments.
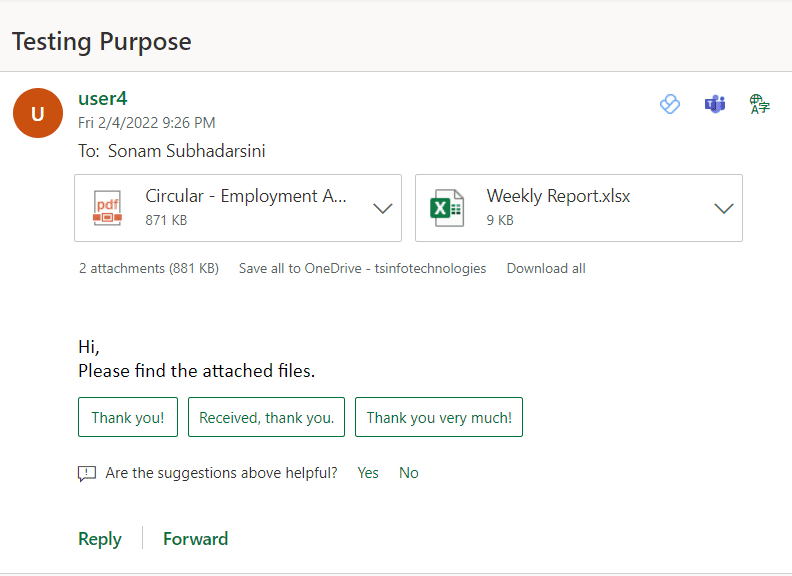
But we can see it only save the excel attachment in the specified SharePoint folder.
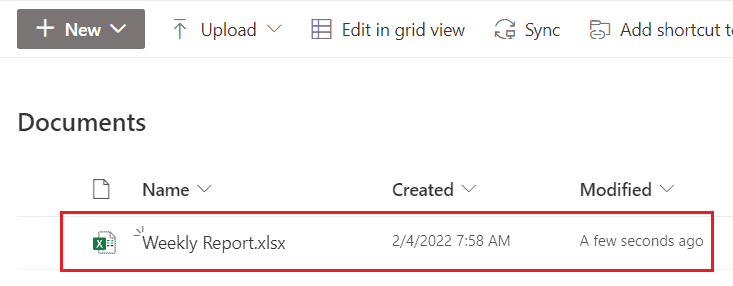
This is how to create the copy of only an excel file using Power Automate or copy an excel file to SharePoint power automate.
Read Power Automate add days to date
Power Automate copy file from email to sharepoint
Here we will see how to copy the files from the email to the SharePoint folder using Power Automate. To implement this, we will create an automated flow that will trigger the flow when an email arrives.
On Power Automate, click on My flow > Automated cloud flow > When a new email arrives(V3).
Next, we will add an action that will create the file in the SharePoint folder. Click on +New step > Create file. Set the Site address, Folder path, File name, Attachments content from the dynamic content.
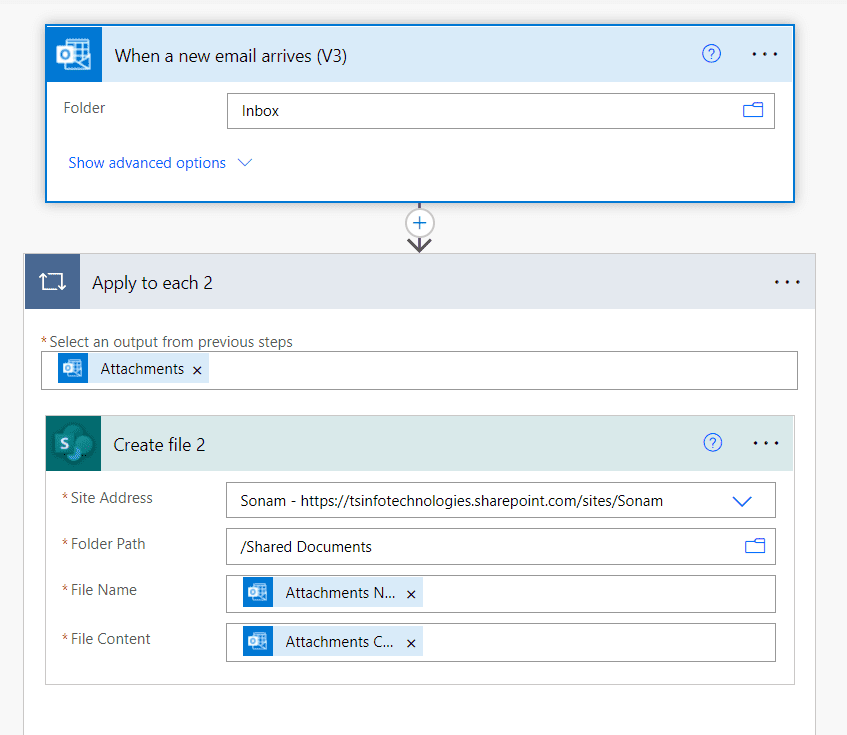
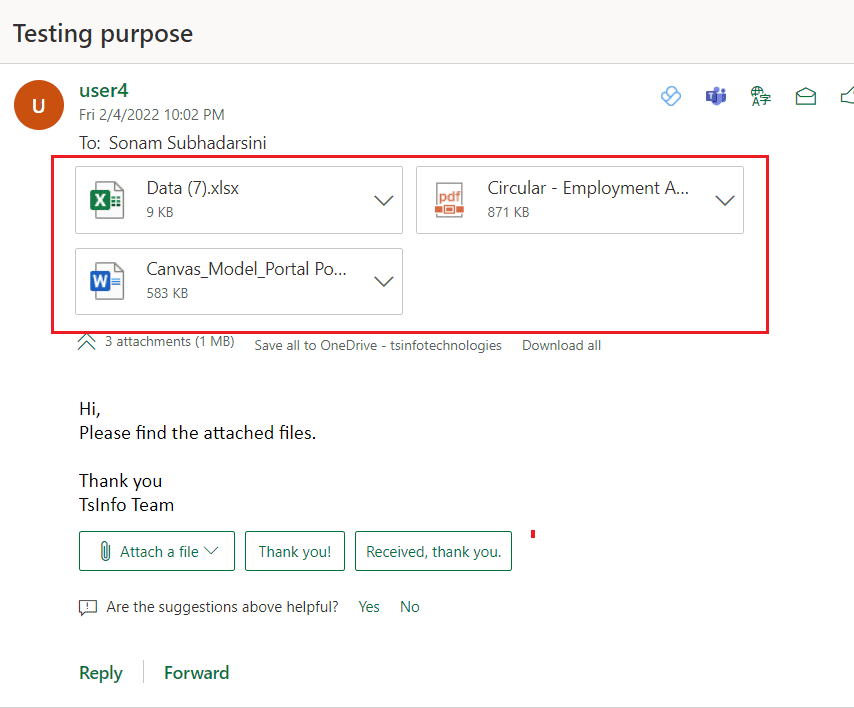
Next, Save the flow and test it manually. For testing purposes, send an email with attachments to yourself.
Now we can see all the files got stored from email to the specified Sharepoint folder like below:
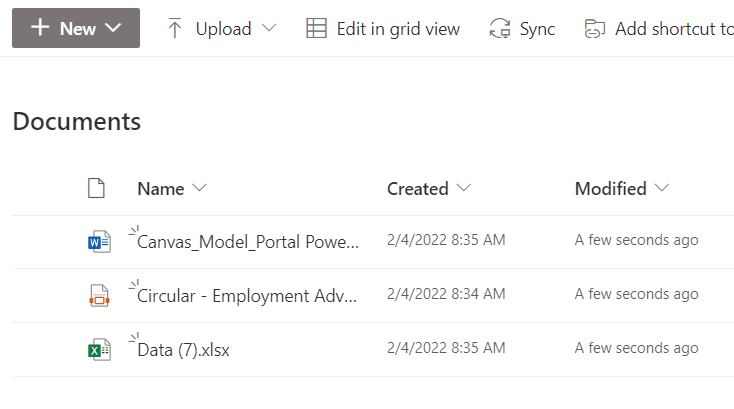
This is how to copy files from email to SharePoint using Microsoft flow.
Read Power Automate Increment Variable
Power automate copy file from onedrive to teams
Here are some steps by following these we can move/copy files from OneDrive to the Microsoft team.
Step-1:
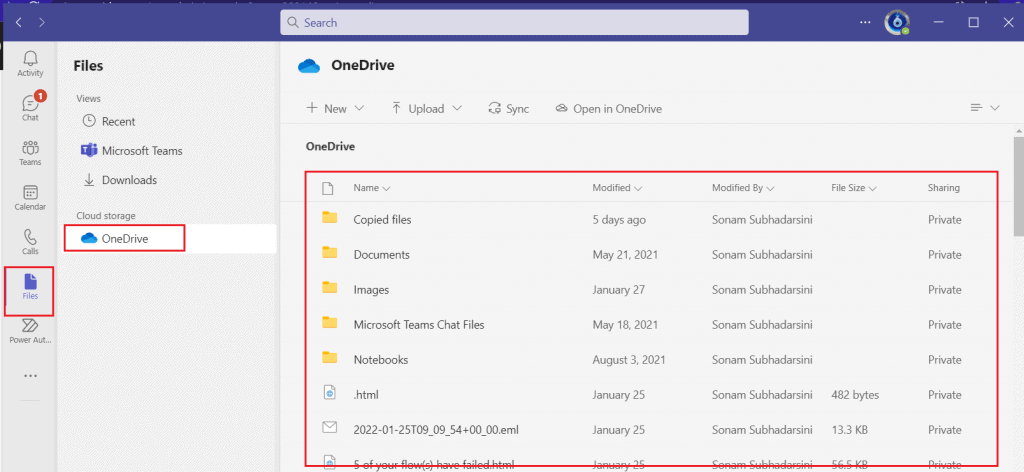
Sign in to the Microsoft Team with your Office 365 account. In the left navigation, go to Files > OneDrive.
Step-2:
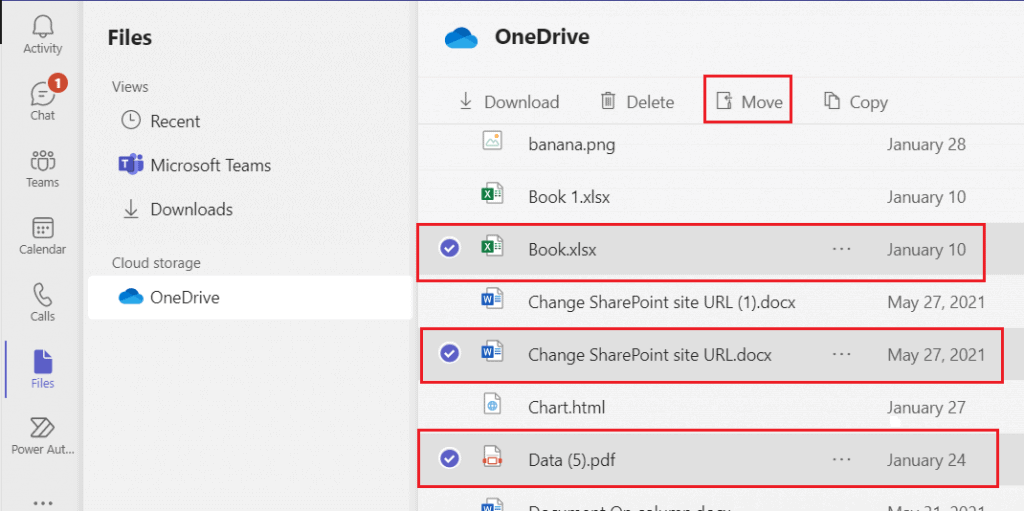
Select the files that you want to move to the Microsoft team. Then click on Move. For example, here we have selected 3 files excel, word, and pdf.
Step-3:
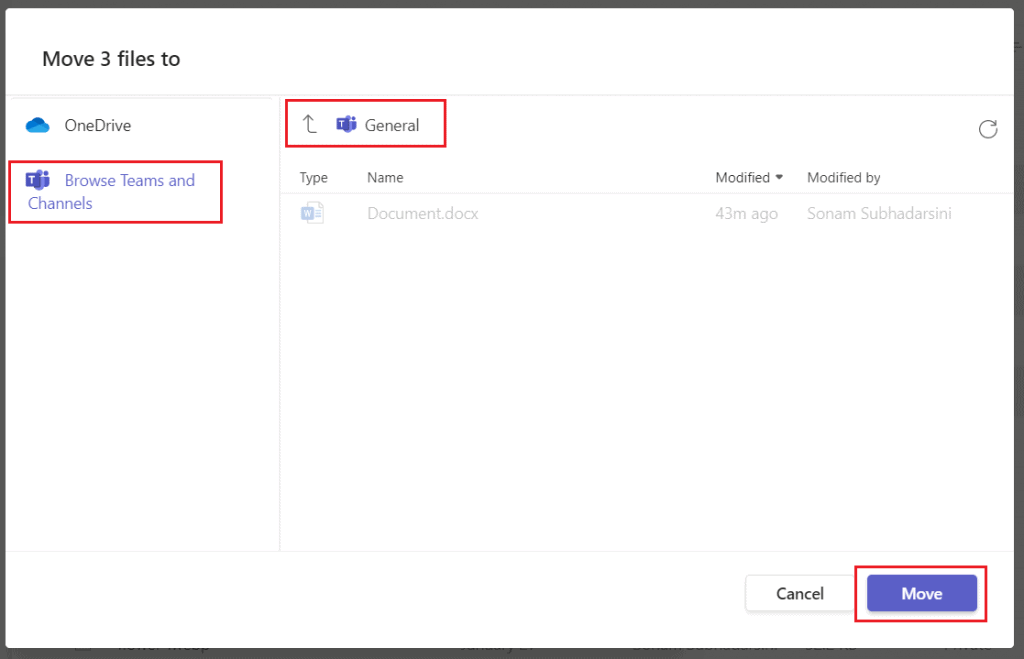
Then go to Browse teams and Channels and select a team or channel. Then click Move.
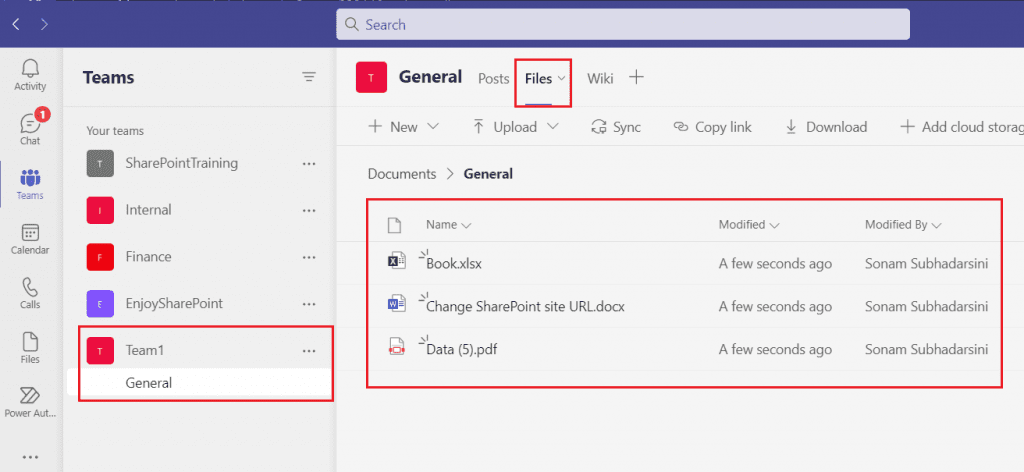
We can see the files move to the team in the Microsoft team.
This is how to move/copy files from OneDrive to the Microsoft team.
Read Power Automate SharePoint Get items filter query contains is not valid
Power Automate copy file size limit
Currently, the maximum file size is 50MB in Power Automate. We can work with the file whose size is up to 50MB.
Power Automate copy all files in folder
Here, we will see how to copy all the files in a specific folder using Power Automate. For example, we have a folder having some random files in OneDrive and we want to move all the files from that folder to another specified folder using Power Automate flow.
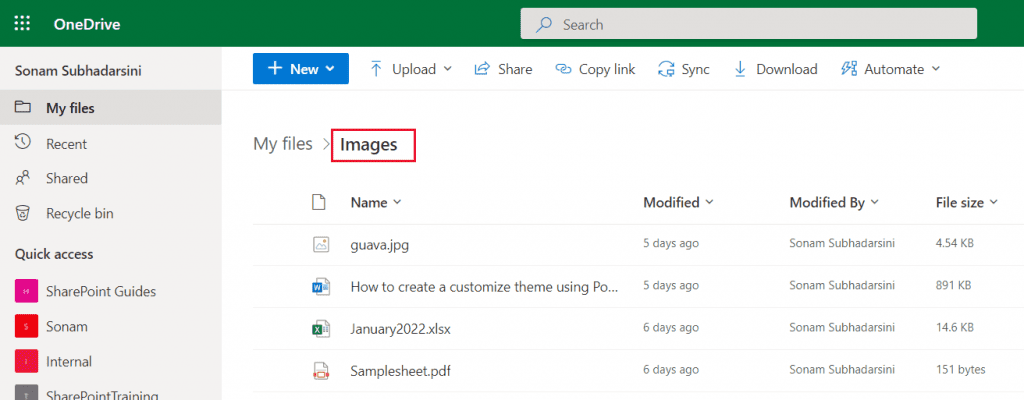
Let’s create a button flow that will move all files from one folder to another folder and the following steps are:
Step-1: Trigger the flow
On Power Automate, click on +Create > Instant cloud flow > select the trigger ‘Manually trigger the flow’.

Step-2: Get the files in the folder
Next, we will add an action that will get all the list of files and subfolders in a folder. For this, click on + New step > List files in the folder under OneDrive. Select the folder on which you want to copy all the files.

Step-3: Copy all the files
Next, we will add an action that will copy all the files from the source folder to the destination folder in the OneDrive.
Click on + New step > Copy file. Here we will set the file as id from the dynamic content and the destination file path.
We can see it will create an apply to each loop like below:
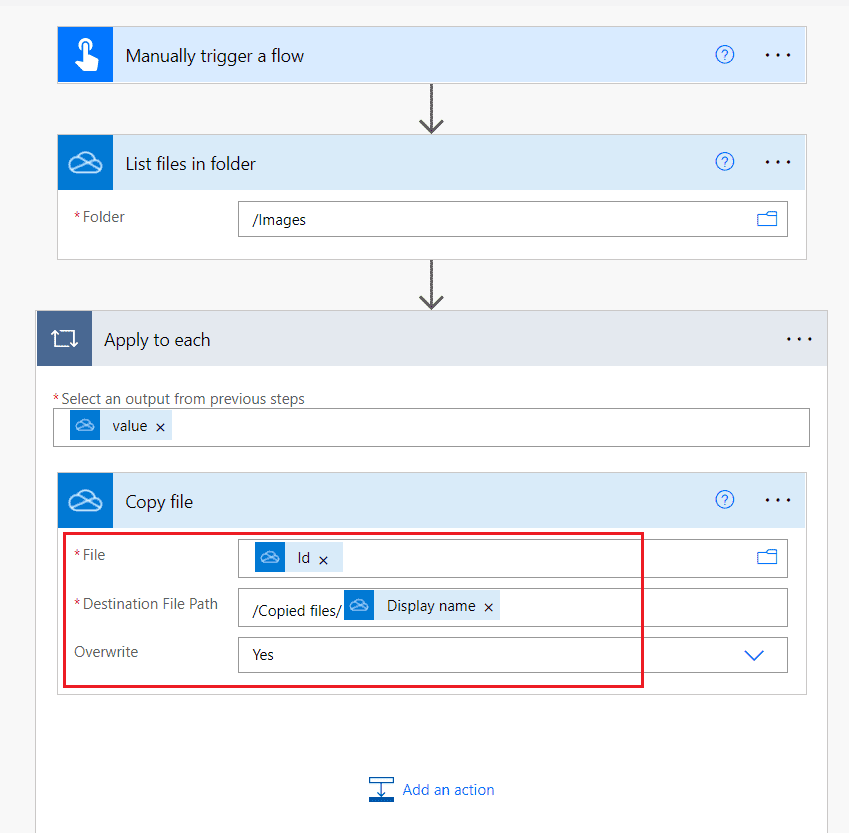
Let’s save the flow. Select the option to test it manually. Then click on Run flow. We can see the files have been copied from one folder to another folder.
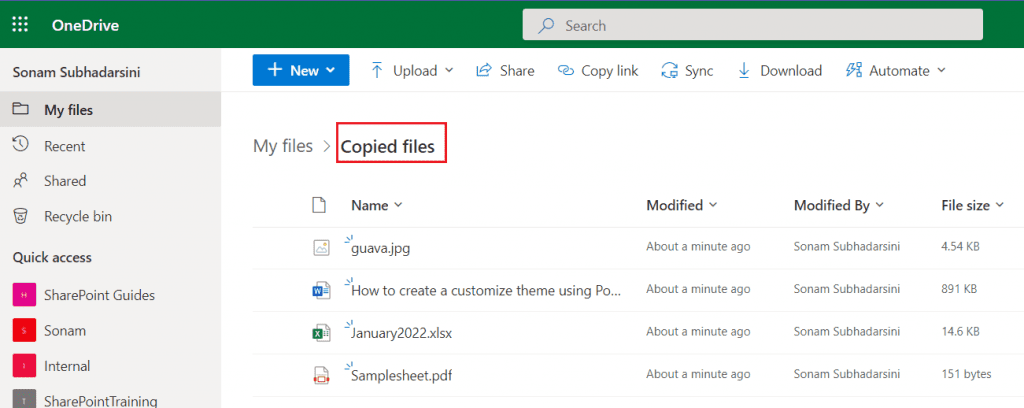
This is how to copy all files in a folder using Microsoft flow.
Read Power Automate copy list item to another list with attachments
Power Automate copy file when modified
In this example, we will see how to copy a file when it is modified in the SharePoint folder using Power Automate.
For example, we have uploaded a file in a SharePoint folder. When we will modify the file, it will copy that to another folder.
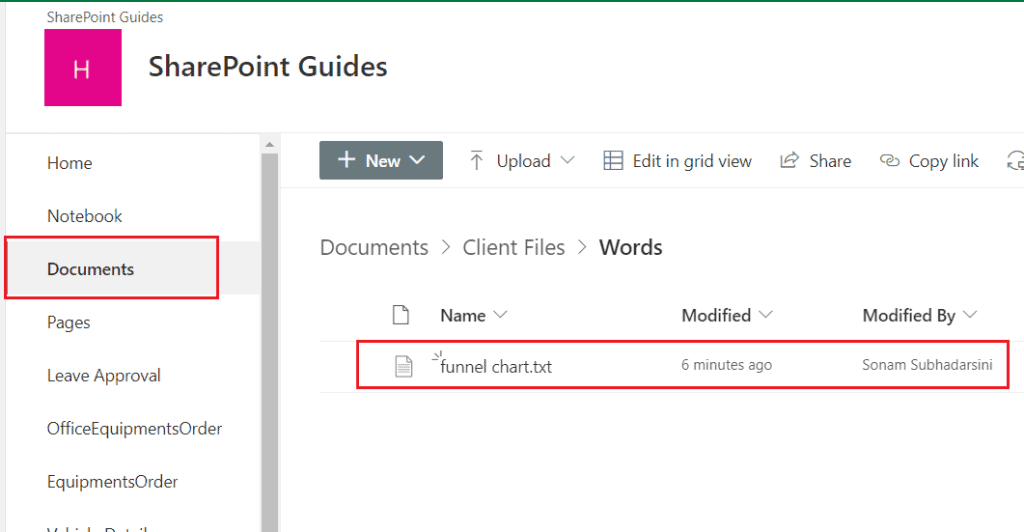
Let’s create a flow and here are step-by-step guides to implementing this.
Step-1: Create an automated flow
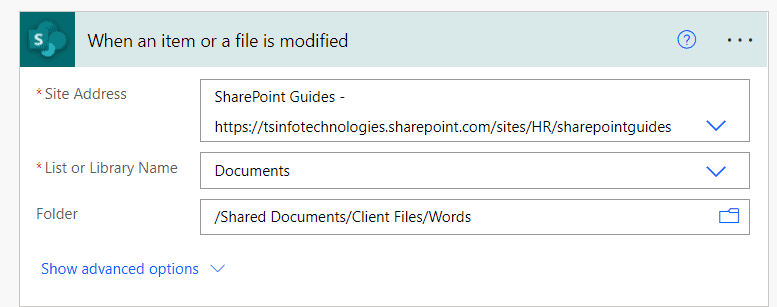
We are going to create an automated cloud flow that will trigger the flow when an item or file is modified. Click on + Create > Automated cloud flow > select the trigger ‘When an item or a file is modified. Set the SharePoint Site Address, List or Library Name, specify the Folder.
Step-2: Add an action to get the information about the column that has changed
Next, we will add an action that will return the information about columns that have changed within a given time window. Make sure the list must have Versioning turned on.
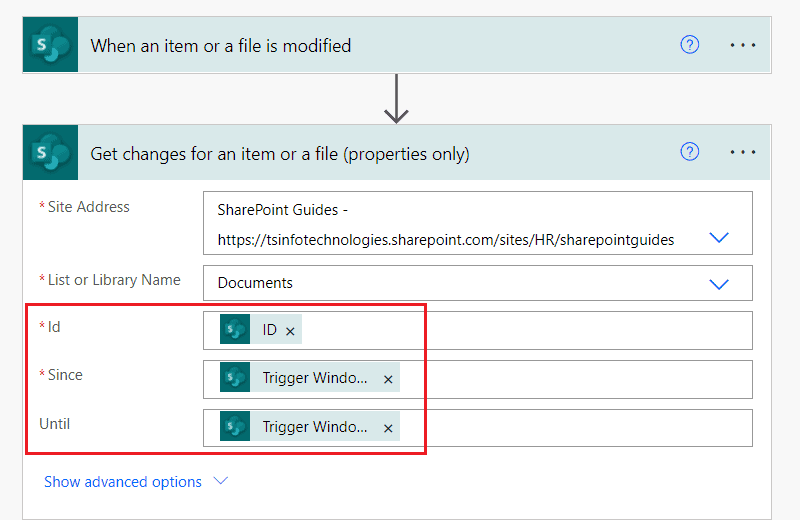
Click on +New step > Get changes for an item or a file (properties only). Set the Site Address, List, or Library Name. Also, set the below parameters from the dynamic contents:
- Id– ID
- Since– TriggerWindowStartToken
- Until– TriggerWindowStartToken
Step-3: Add a condition
Next, we will add a condition that will check whether the file is modified or not. Click on + New step > Condition. Set the values and operator such as:
- Choose a first value: Select Has column chaged: Modified form the dynamic content.
- Operator: is equal to
- Choose another value(to compare): set the below expression.
true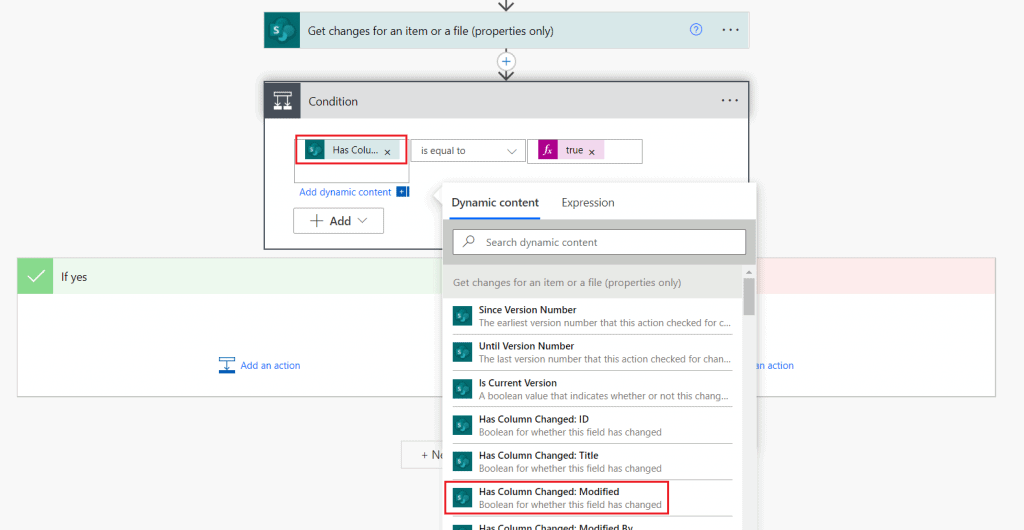
Step-4: Copy the modified file
Next, in the final step, we will add action if the condition got matched. In the If yes section, click on +Add an action > Create file. Set the Current Site Address, File to Copy, Destination Site Address, Destination Folder, If another file is already there.
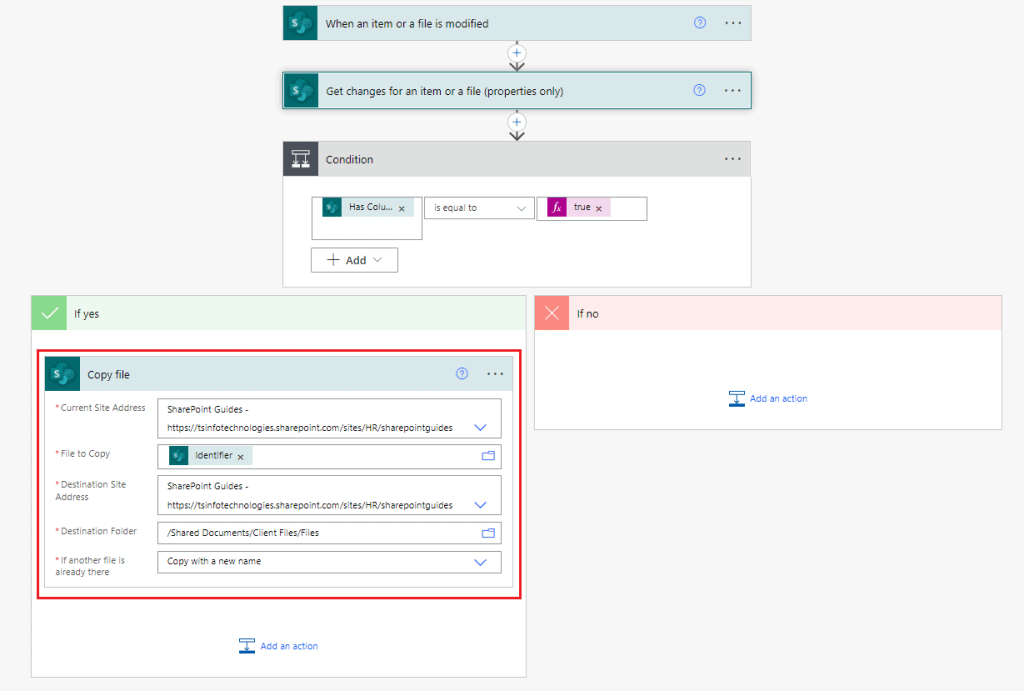
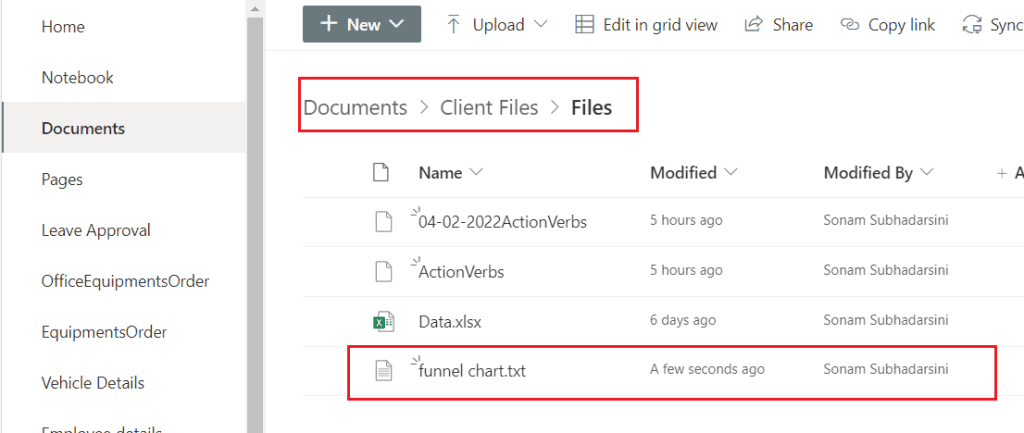
Let’s Save the flow and test it manually. Then click on Run flow. Let’s modify the file that we have uploaded i.e. Funnel chart.txt(inside the Words folder )and we can see it will automatically copy the file in the specified folder i.e. Files folder.
This is how to copy the files when it is modified using flow.
Read Power Automate save email attachment to SharePoint
Power Automate copy file with metadata
Here we will see how to copy a file with metadata using Power Automate. For this, let’s create an automated flow and the following steps are:
Step-1: Trigger the flow when a file is created
We will create a flow that will trigger when a file is created in a SharePoint folder. For example, we have a SharePoint folder where we will upload the files.
On Power Automate, click on +Create > Automated cloud flow > Select the trigger ‘When a file is created in a folder. Set the SharePoint site address and Folder Id or select a folder.

Step-2:Add action to get the metadata
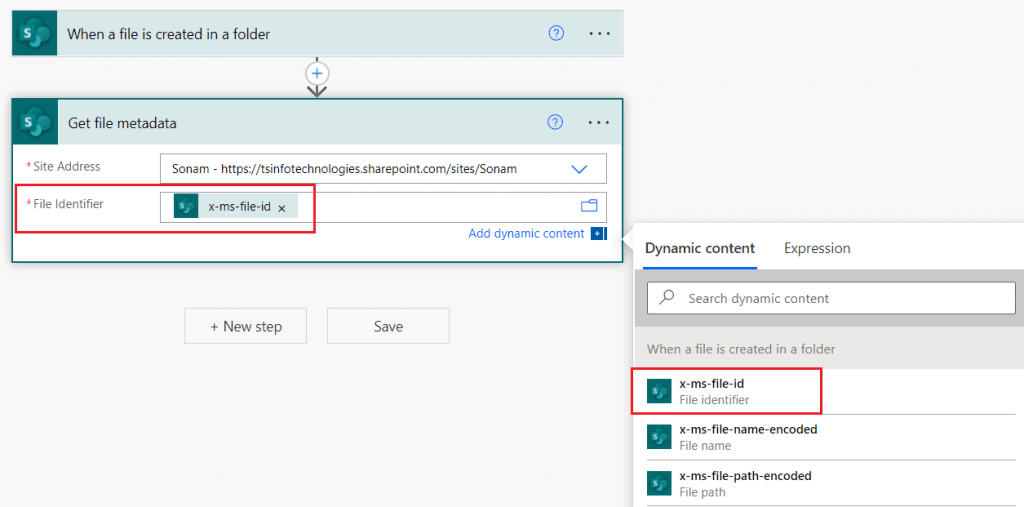
Next, we will add an action that will get the information about the file such as size, ETag, created date, etc. To add this action, click on + New step > Get file metadata. Set the Site Address and in the File Identifier, set as x-ms-file-id from the dynamic content.
Step-3: Copy files from one folder to another
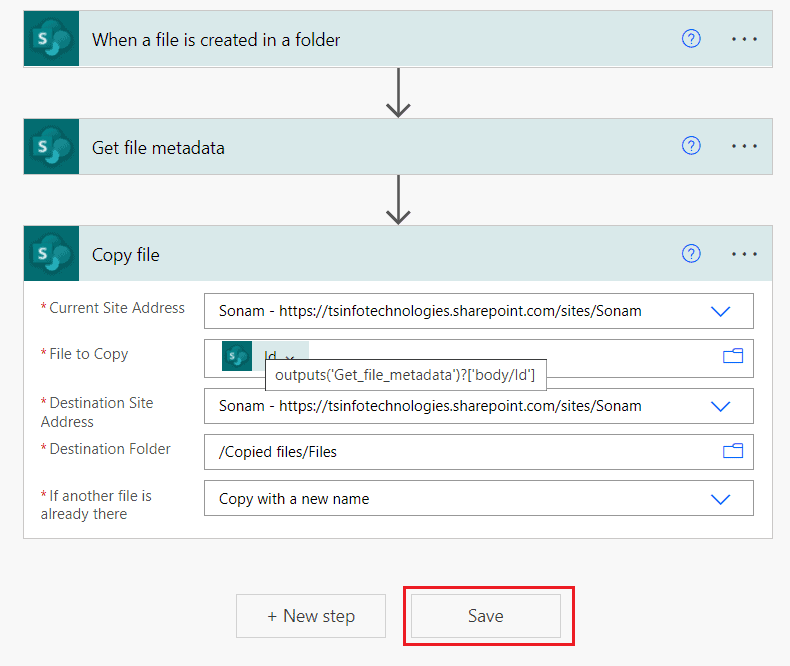
In this final step, we will add an action that will copy files from the source folder to the destination folder. Click on +New step > Copy file. Set the Current Site Address, File to Copy(set ID from the Get File Metadata), Destination Site Address, Destination Folder, If another file is already there(set it as Copy with a new name).
Now Save the flow and test it manually. Let’s upload a file in the source folder.
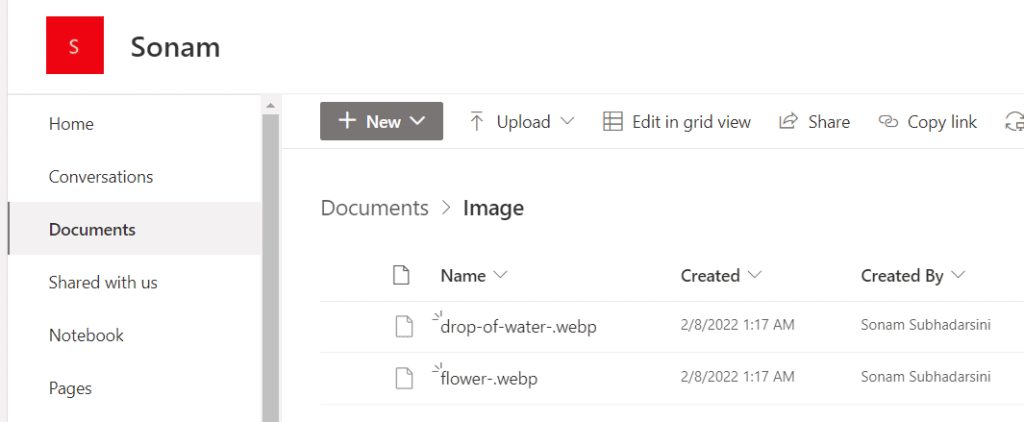
We can see it will copy these files from the source folder to the destination folder.
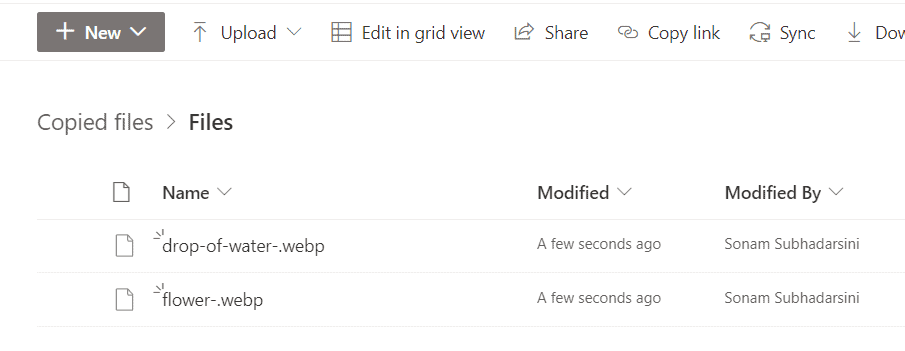
This is how to copy files with metadata using Power Automate.
Read Power Automate get items examples
Power Automate copy file if another file is already there
In Power Automate copy file action, used to copy the files from one location to another. It works as same as the “Copy to” command in SharePoint libraries and it returns information about the new file after copy. It will ask to set the below parameters to activate the action.
| Parameters | Description |
| Current Site Address | Choose the current SharePoint site address as a source site |
| File to Copy | Choose the file identifier to copy |
| Destination Site Address | Choose the destination SharePoint Site address where you want to store the copied files. |
| Destination Folder | Select the destination folder |
| If another file is already there | Here we have to choose an option if there is a file with the same name in the destination folder. |
In the ‘If another file is already there, we can see the below option by expending the dropdown.
- If another file is already there
- Copy with a new name- It will copy the file a new name if the file is already there.
- Fail this action- In this case no action will is taken if the file is already there, so the action will be fail.
- Replace- Here it will replace the existing file with the new file content.
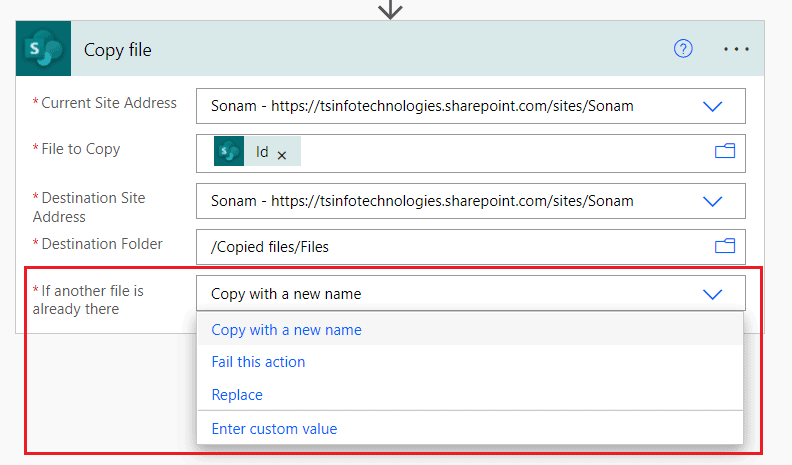
As it is mandatory, you need to choose an option according to your requirement. This is how to copy files if another file is already there in Power Automate.
Power Automate sharepoint copy file identifier
A file identifier is used to identify an item in the SharePoint list or a file in the SharePoint library. It is a string type which is a ‘Folder + file name‘.
But there is some file identifier in the SharePoint connector that allows integer type unique identifier. Such actions are:
- Get Item
- Get file properties
- Update file properties
- Delete item
- Stop sharing an item or a folder
- Grant accessto an item, etc.
But in the case of Copy file action, there is an option ‘File to Copy’. Here we can set the particular file path that you want to copy. Also, it allows setting the ID from the dynamic content as the unique ID of the file or folder.
Example1: Using file identifier as Integer type
For example, here we are going to use the previous flow that we have created a flow for ‘power automate copy file with metadata’.
In that flow, we have used the ID as a file identifier in the File to Copy parameter.
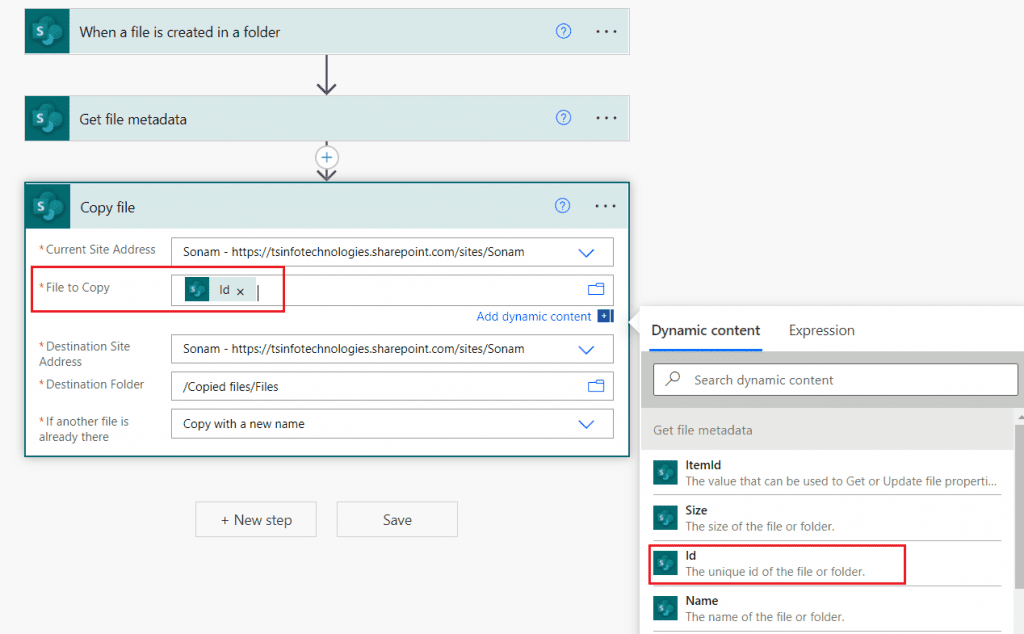
It will show the Id of the file that copies from the source file to the destination file. Here we are going to show the last run history.
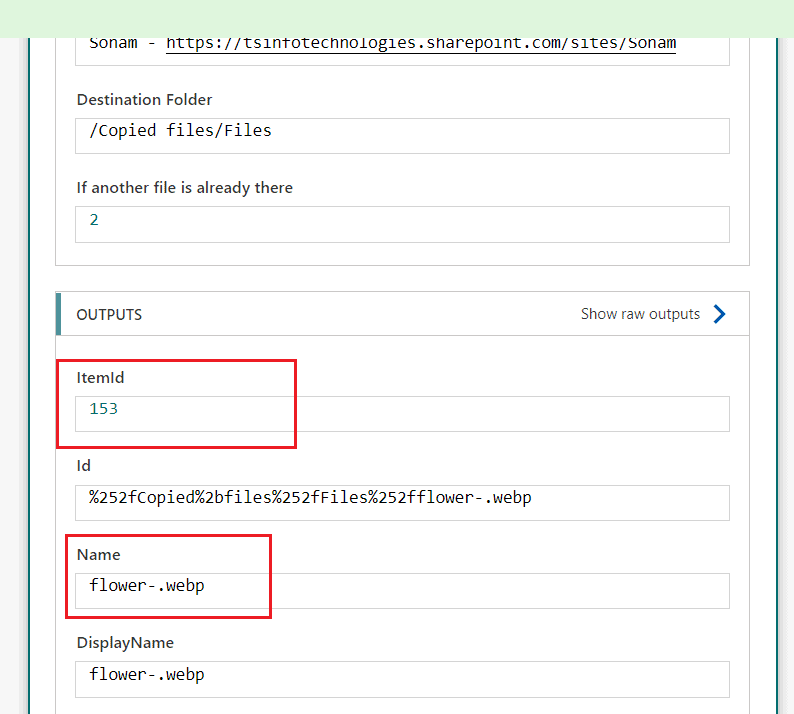
We can see the file in the SharePoint library and check the ID that was copied from the source folder to the destination folder.

This is how to use the copy file identifier in integer format using Power Automate.
Example-2: Using file identifier as string type
Here we will see how to use the file identifier as string type in the Copy file action. For example, we have a file in the source SharePoint library.
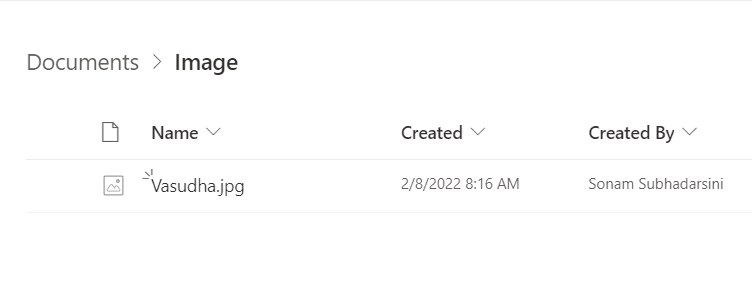
Let’s create an instant cloud flow and then add the Copy file action. Set the properties such as:
- Current Site Address– Set the source site address
- File to Copy– Choose the file path that you want to copy
- Destination Site Address– Set the destination site address
- Destination Folder– choose a destination folder where you want to store the copied files
- If another file is already there– Select an action if the file is already exist
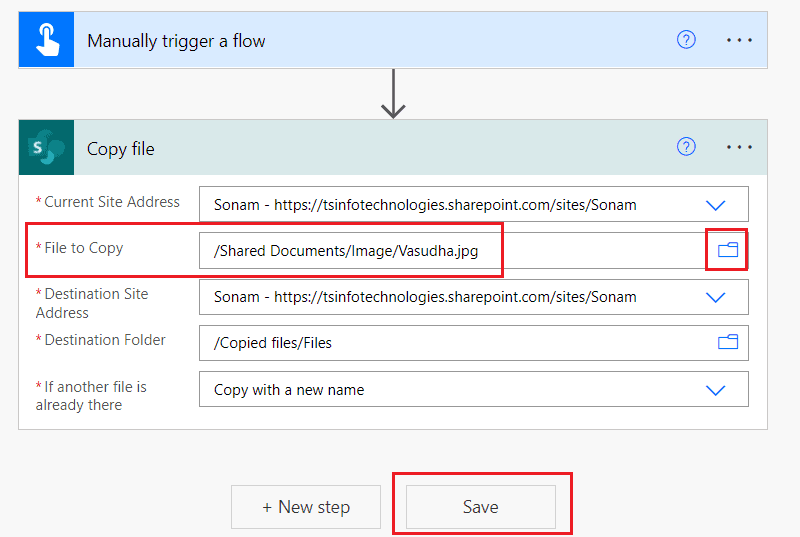
Let’s Save the flow and test the flow manually. Run the flow to see the copied file in the destination library.

This is how to use SharePoint copy file identifier using Power Automate.
Read Power Automate vs UiPath
Power Automate copy file to another tenant
Unfortunately, we can not have two different connectors from different tenants in the same flow. So it is not possible to copy files from one tenant to another tenant as the SharePoint connectors are the default to the tenant where the environment is deployed. But we can copy files from one place to another using the same tenant.
Power Automate copy file deprecated
In Power Automate, there is an action ‘Copy file (deprecated)‘ that copies a file to a SharePoint site. This action needs such parameters:
| Parameters | Explanation | Type |
| Site Address | Specify the SharePoint site address | string |
| Source File Path | Path to the source file | string |
| Destination File Path | Path to the destination file | String |
| Overwrite Flag | Set yes/no to allow overwrite the destination | Boolean |
Also, you may like the below Power Automate tutorials:
- Power Automate Do until
- Power Automate create a task in Microsoft Planner
- Power Automate Copy Folders + 10 Examples
- Power Automate conversion of string
- Power Automate Number Format
- Power Automate Initialize Variable
- Power Automate convert time zone
- Power Automate Concatenate String
Conclusion
From this Power Automate Tutorial, we learned all about copying files in the Microsoft flow or Power Automate. Also, we discussed the below topics:
- What is Power Automate copy file action?
- How to copy files between sharepoint folders with microsoft flow?
- How to copy sharePoint file with new name using Power Automate?
- How to do Power Automate copy files from one SharePoint site to another?
- How to copy file from SharePoint to Sharepoint Power Automate?
- How to copy file OneDrive to sharepoint using Microsoft flow?
- How to copy file sharepoint to OneDrive using Power Automate?
- How to copy file from OneDrive folder to onedrive Power Automate?
- How to copy file from OneDrive to network drive Power Automate?
- How to copy file from SharePoint to local drive using Microsoft flow?
- How to copy file from file system to SharePoint using Power Automate?
- Power Automate copy file and rename with date
- Power Automate copy file attchment
- Power Automate create copy of excel file
- Power Automate copy file from email to SharePoint
- Power automate copy file from onedrive to teams
- Power Automate copy file size limit
- Power Automate copy all files in folder
- Power Automate copy file when modified
- Power Automate copy file with metadata
- Power Automate copy file if another file is already there
- Power Automate sharepoint copy file identifier Integer type
- Power Automate SharePoint copy file identifier as string type
- Power Automate copy file to another tenant
- Power Automate copy file deprecated
I am Bijay a Microsoft MVP (10 times – My MVP Profile) in SharePoint and have more than 17 years of expertise in SharePoint Online Office 365, SharePoint subscription edition, and SharePoint 2019/2016/2013. Currently working in my own venture TSInfo Technologies a SharePoint development, consulting, and training company. I also run the popular SharePoint website EnjoySharePoint.com
Hi,
If the file is opened in the browser while copying flow will fail error says locked mode. can you please check and update on that case?
Thanks
What’s frustrating is its impossible to simply copy an excel file and rename. You can do it on OneDrive but useless when you need others to run the flow. Frustrating you can’t do the simplest things with automate.
Congratuilations for your work.
Would it be possible to have an example of “Power Automate copy/move file from SharePoint Online to SharePoint On-premises”?
Many thanks