In this Power Automate tutorial, I will describe how to use Do until action in Power Automate and configure the do-until parameters.
Along with this, I have also covered topics like:
- What is Do until loop in Power Automate
- Power Automate do until limits
- Power Automate do until loop example
- Power Automate Do Until Count
- Power Automate do until Timeout pt1h
- Power Automate delay until a specific time
Power Automate Do Until
Power Automate do until repeats the flow action until a specific condition is satisfied. If the provided condition is not satisfied, the actions within the do until are repeated and checked at the end of the loop.
Microsoft Power Automate Do until is like a loop condition, which can be found under the Control group connector.
Configure Do Until in Power Automate
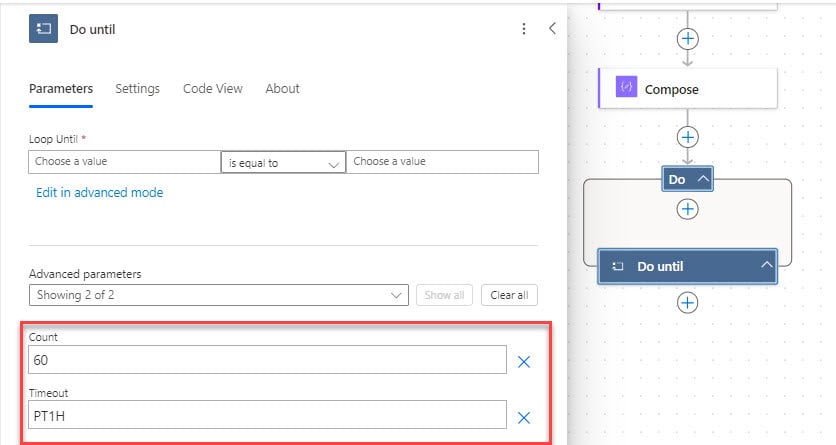
Inside the do until action, click Showall to display the advanced parameters, where we can change the limits.
- Count: This parameter accounts for how many times the loop will repeat until the condition is met. The loop will stop when it reaches the count value provided, or else it will stop when the loop condition is satisfied.
- Timeout: This is also one of the properties where we can stop the loop if the loop condition is not satisfied. In this, we will provide the specific time value in ISO 8601 format for the loop to stop.
Examples:
- P1D – 1 day, and D is the day unit
- PT1H – 1 hour, T represents time units and H for Hour
- PT4M – equals to 4 minutes
- P4DT4H4m – is 4 days, 4 hours, 4 minutes
The Do Until loop stops if the condition is satisfied to true, the count number is reached, or the time-out duration is reached.
Read Convert Time Zone in Power Automate
Power Automate Do Until Limits
By default, it will take the count value as 60, which means the loop will repeat 60 times.
Power Automate Do until Count Limit:
The maximum limit of count value, we can set is 5000.

Time Out Limit: By default, it will show time out value as PT1H, which means 1 Hour.
Power Automate Do until Time Out limit:
The maximum limit of timeout value is P30D or P1M, that represents 30 days or 1 month the Do until loop will repeat.
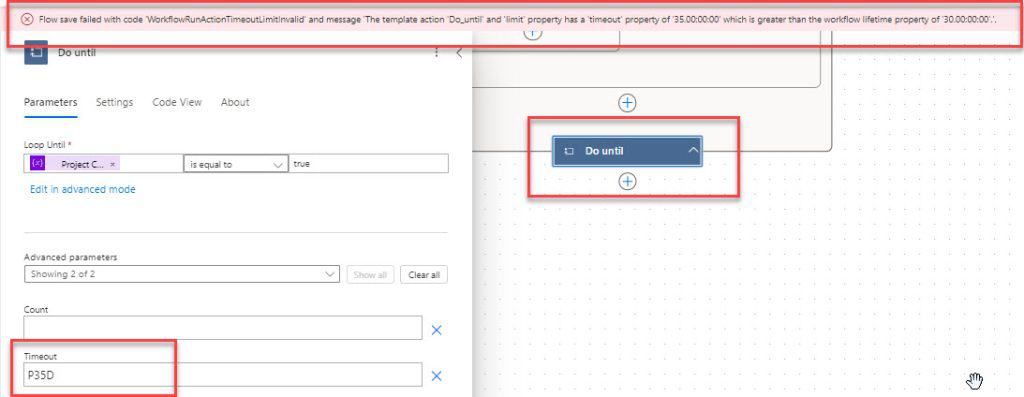
This is all about Do Until loop and how to configure and limit it in a Power Automate flow.
Do Until Loop in Power Automate Example
To check on how to work with Do until loop in Power Automate, follow the example below:
Example: Let me show you a simple example of how Do Until will work in Power Automate by building Instant cloud flow.
Suppose I will take the integer value in a variable as ‘10‘. My requirement is to increase this variable value to 100.
Follow the below steps:
1. On the Power Automate Home page, go to +Create –> Instant cloud flow to trigger a flow manually.
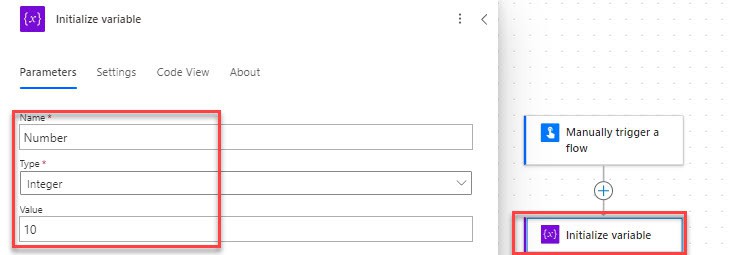
2. Now, add an action to initialize a variable. Then click on +New step > Initialize a variable.
Set the below parameters to initialize the variable:
- Name– Give a variable name
- Type– Select the type from the drop-down i.e. Integer
- Value– Set an initial value for the variable, i.e., 10
3. Next, add the do until control action to check until the condition matches the specified value [100]. Set the values such as:
- Choose a value(1st)– Number
- Operator– Is equal to
- Choose a value(2nd)– 100
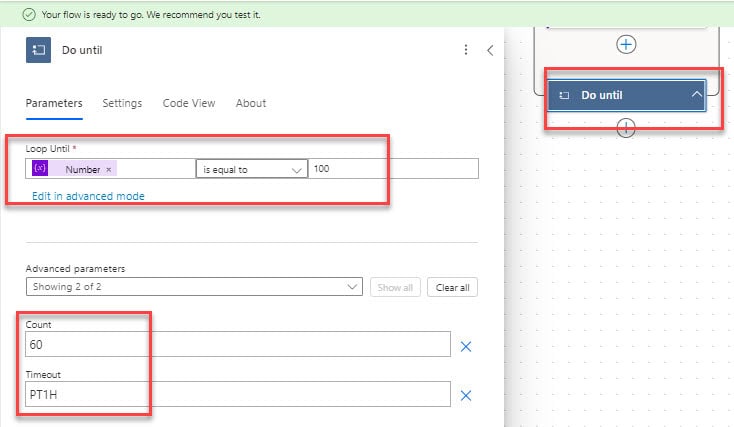
According to the condition, the flow will run until the variable equals 100.
4. Add a compose action inside the ‘do until‘ action to show the variable value. Take the initialized variable value.

5. After that, I will add an action to increase the variable with a specified value. Select the Increment variable. Set the variable name and the value that will increment.
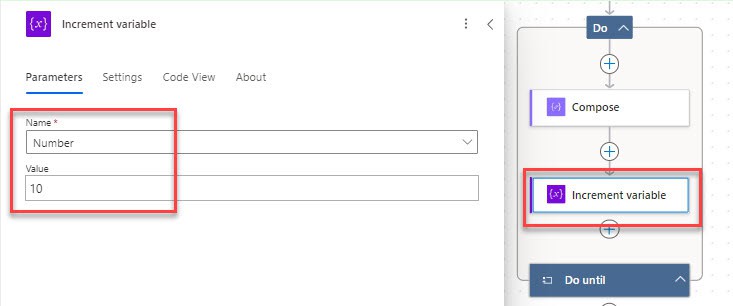
6. Let’s save the flow and test it manually. Then click on Test > Run the flow. The flow will run successfully, and the loop will stop when the provided condition is met, i.e., until the variable value equals 100.
Refer to the image below:
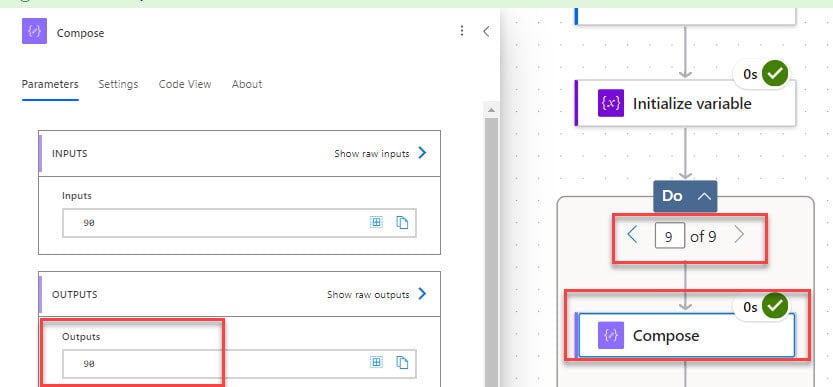
This is how to use the do-until loop in Power Automate.
Read Copy List Items To Another List In SharePoint Using Power Automate
Power Automate Do Until Count
Here, let’s check an example of how to work with do until count for the loop condition in Power Automate.
In this example, I will explain in detail how count property will function value in do until flow action.
Example:
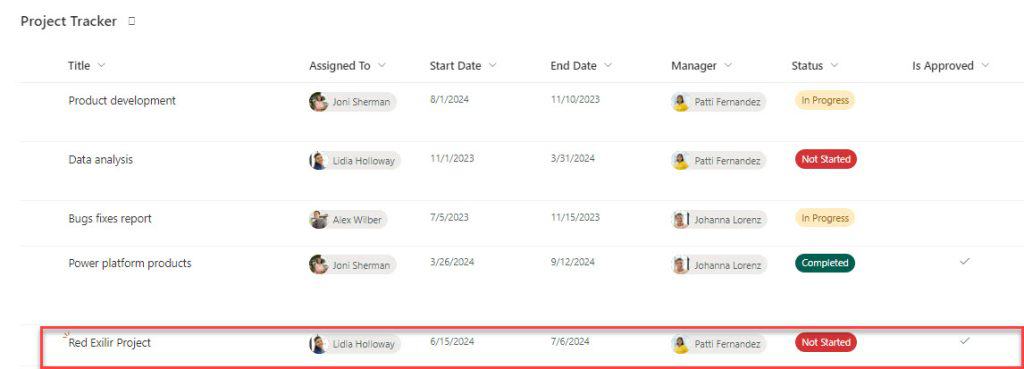
I have taken a SharePoint list named ‘Project Tracker‘ with a few columns that look like in the image below:
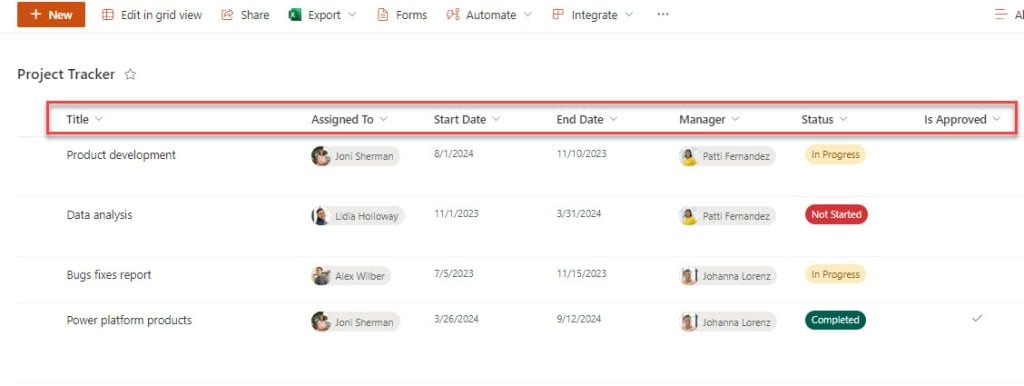
My requirement is: By default, Is Approved? The column will be set to No; the flow will repeat until the manager sets Is Approved to Yes and emails the Assigned person about project approval.
If the Is Approved column is not approved, the loop will continue to run.
Check on the steps below:
1. In the Power Automate Home page, Create an Automated cloud flow with When an item is created trigger. Set the site address and list name.
2. Next, add an Initialize Variable to set the boolean value. Provide name, type as boolean and value as false.
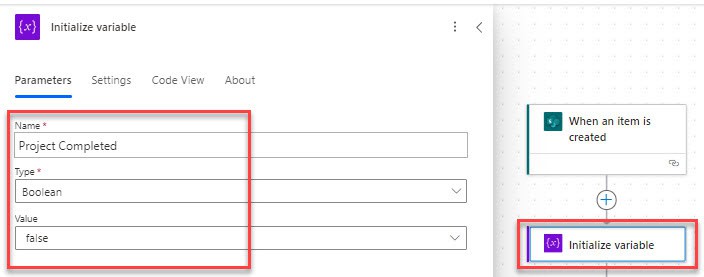
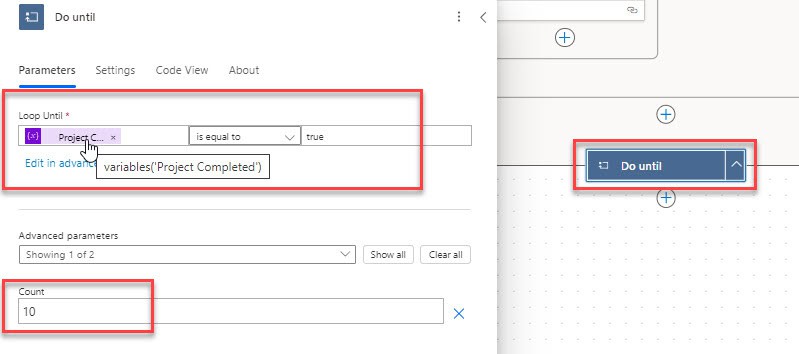
3. After that, add a Do Until action, and in the Loop Until parameter, choose the value like below:
- Count: Here, I am taking the count value as 10; you can take it according to your requirements.
The loop will repeat when the given condition is met, or the count value is reached.
| Choose Value | Operator | Choose Value |
| Project Completed (Initialize variable) | is equal to | true |
4. Under the Do Until loop, add an action to delay and continue the flow repeat for 5 seconds.
- Count: Take count according to your need.
- Unit: Select the time unit from the drop-down options.

5. After that, add the Condition control action to set the condition as below:
Condition Expression: Is Approved is equal to true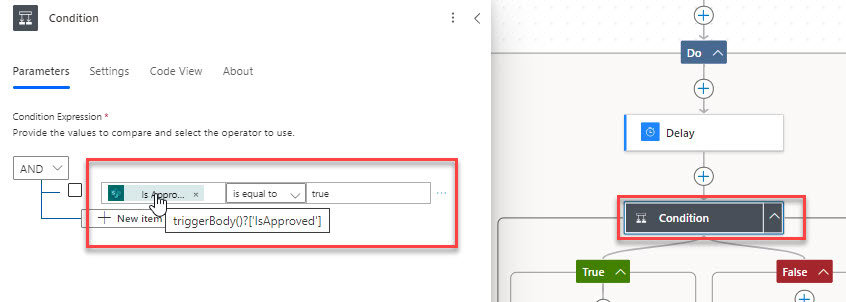
6. Then, take the Set variable under True condition and set the parameters like below:
- Name: Choose a name from the drop-down.
- Value: Enter value as true.

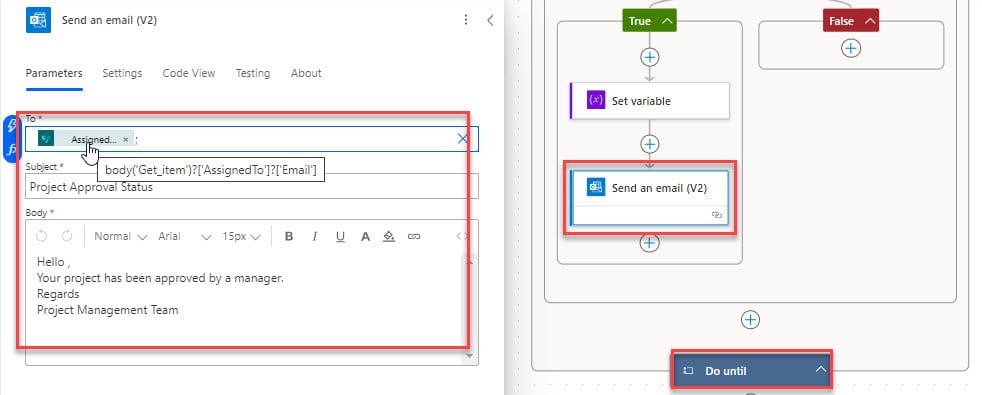
7. Then, add the Send an email(V2) flow action and fill in the details like To as assigned person email, subject, and Body.
8. Now, save and test the flow. Create an item in the SharePoint like below:
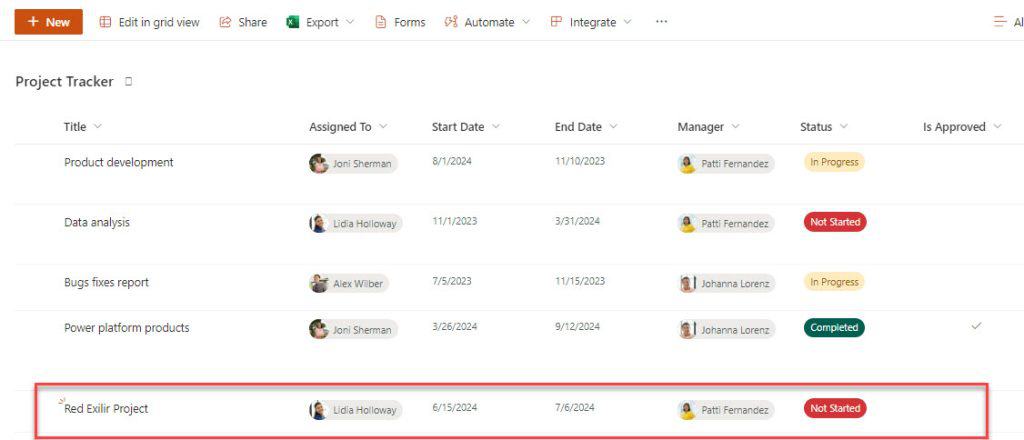
9. The flow will trigger and start running when the item is created in the SharePoint list. The Do until loop will continue to repeat in the image.
Note:
The Do until loop will repeat until the condition is met or count we provided is reached.
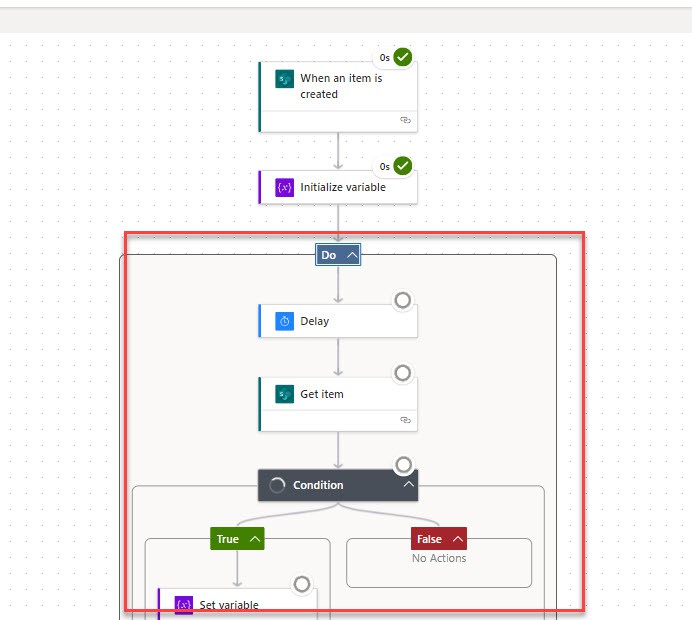
10. Now, chnage Is Approved? Column value to Yes, the condition will meet and stop the loop repetition.
11. The below image represents the number of counts the loop has repeated before the condition is satisfied.
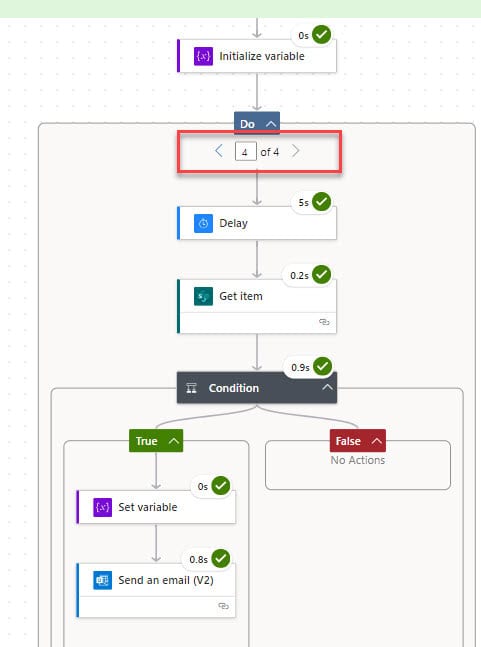
This is how to use Do Until loop count in Power Automate.
Read Power Automate Concatenate Strings
Power Automate Do Until Timeout PT1H
To work with Power Automate, do until loop timeout for 1 hour. Check out the requirements below.
Example:
I have created a SharePoint list named ‘Products Ordered Details‘ with a few columns here.
Refer to the image below:

In the above SharePoint list, when a user adds an item to the list:
- An approval request should be sent to the Review By. If the outcome of the approval request is Approved, Update Discount Approved.
- If the condition is not met, the loop will continue for 1 hour and then stop.
Go through the steps below:
1. In the Automate cloud flow, choose When an item is created trigger. Set the parameters like Site Address and List Name.

2. After that, add a Do Until loop to repeat the loop until the Approval request is approved.
| Choose Value | Operator | Choose Value |
| Outcome of approval request | is equal to | Approve |
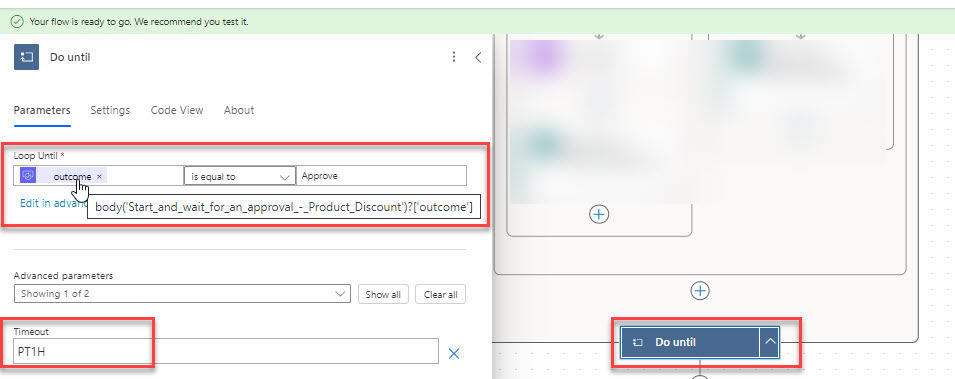
3. After that, Start and wait for an approval flow action, set the required properties:
- Approval type– Approve/Reject – First to Respond.
- Title– Select Title from dynamic content.
- Assigned to– Approver name email from dynamic content.
- Details– Set the details of the approval request.
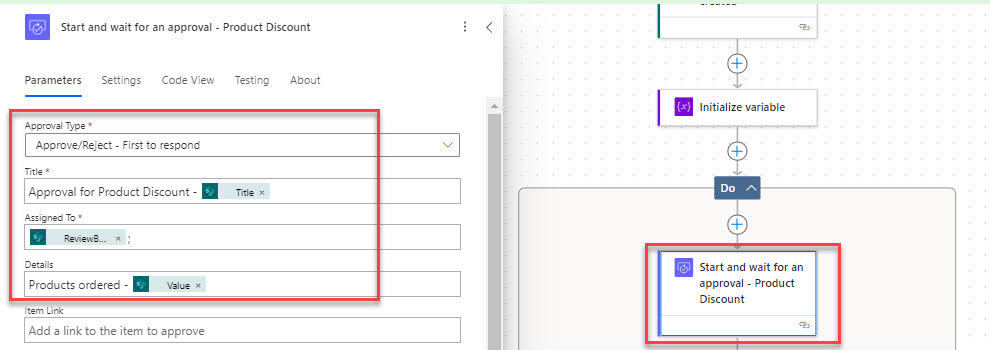
4. After that, I will take a Condition control flow action to provide a condition to check whether the outcome is Approved or rejected.
| Choose Value | Operator | Choose Value |
| Outcome | is equal to | Approve |

5. Under the True condition, add the Update item flow action to update the item with an approved discount. Configure the parameters, such as the site address and list name.
- Id: Take the Id column from the dynamic content.
- Title: Choose the Title column from the dynamic content.
- Discount Approved?: Choose the value to Yes from the drop-down.
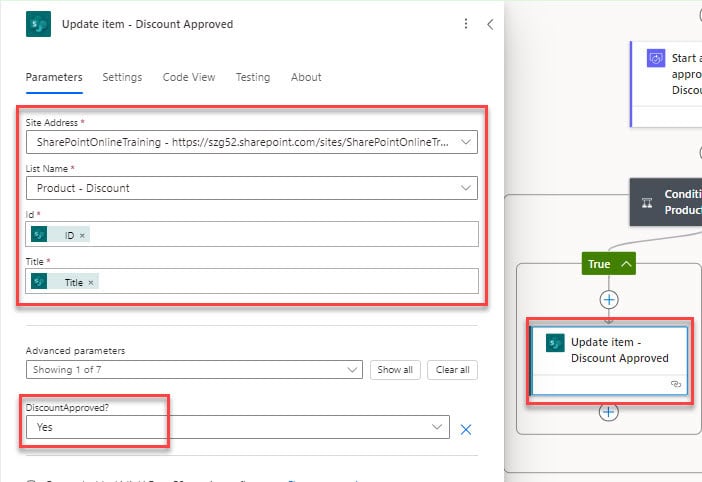
6. Under the False condition, take the Update item flow action to update the approved discount value.
Set the parameters like Site address, List name, ID, and Title from the dynamic content.
- Discount Approved? : Set the value to No from the drop-down options.
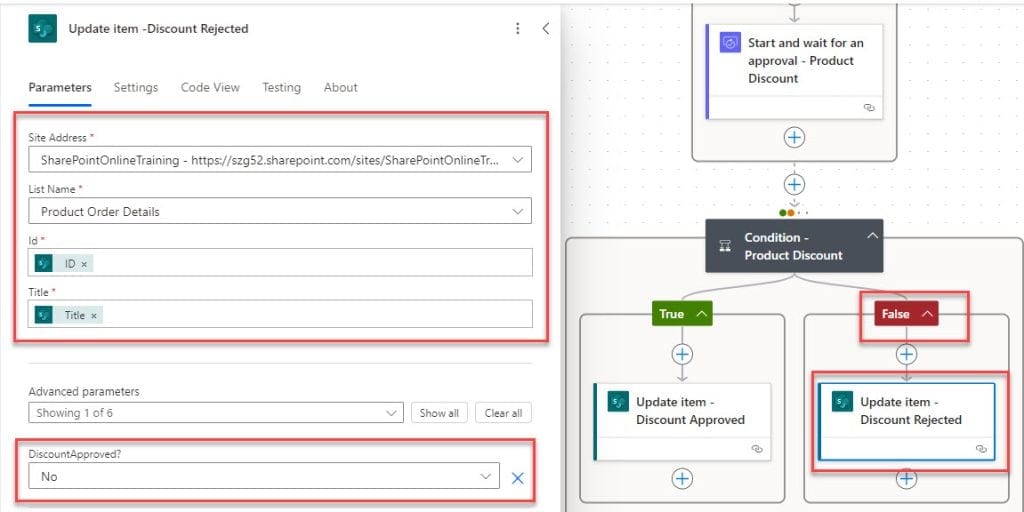
6. Now the flow is ready, save and run the flow manually once. To trigger the flow, add an item to the SharePoint list, as you can see from the below image:

7. Now, you can see that the do-until loop will continue to execute repeatedly until it meets the condition or the timeout we provided.
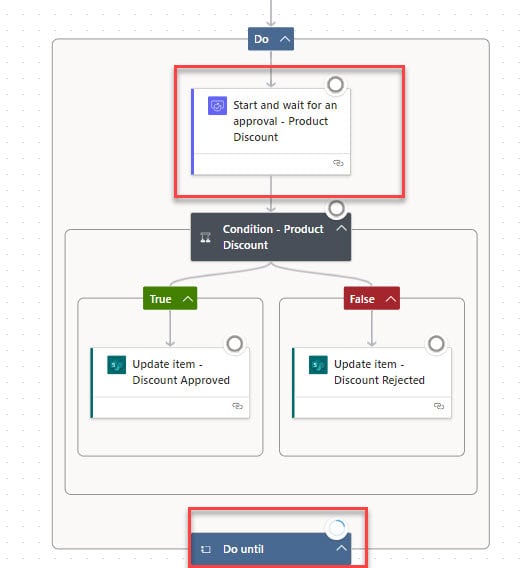
8. If the approval outcome is approved, the do-until loop will stop and execute the flow successfully.
Otherwise, the loop will repeat until the provided timeout, i.e., one hour, and then stops.
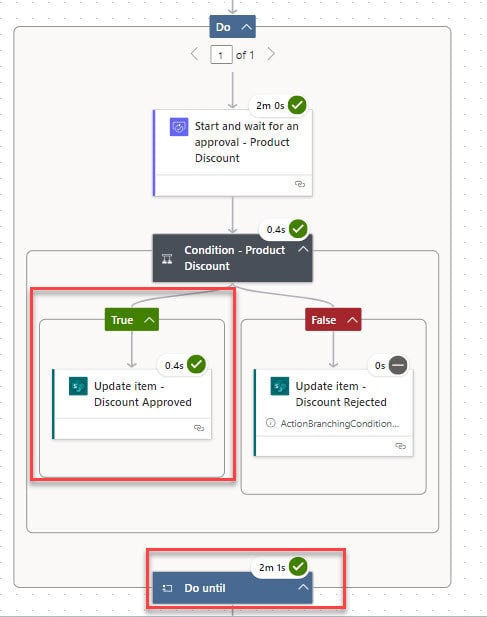
This is how to provide time out in the Do until loop using Power Automate.
To know about Power Automate delay until a specific time, check out the tutorial below.
Conclusion
I hope you understand how to use Do Until in Power Automate and Do Until limits in Count and Time Out from this tutorial.
You may like the following tutorials:
- Power Automate Copy Folder Structure
- How to Create a File in Power Automate?
- Power Automate Email Body Formatting
- Create SharePoint Online List and Columns from Excel Using Power Automate [Download Complete Flow]
I am Bijay a Microsoft MVP (10 times – My MVP Profile) in SharePoint and have more than 17 years of expertise in SharePoint Online Office 365, SharePoint subscription edition, and SharePoint 2019/2016/2013. Currently working in my own venture TSInfo Technologies a SharePoint development, consulting, and training company. I also run the popular SharePoint website EnjoySharePoint.com