Recently, I was working on a Power Platform project where I got a requirement to create a file using Power Automate. In this Power Automate tutorial, I will show you how to create a file in a folder in a SharePoint document library using Power Automate.
I will also show you how to create a file from Microsoft form responses using Power Automate. Finally, I will explain how to create a file using a SharePoint list in Power Automate.
Power Automate Create a New File in Folder
Now, let’s check how to create a new file inside a folder in a document library automatically using Power Automate; follow the example:
Example:
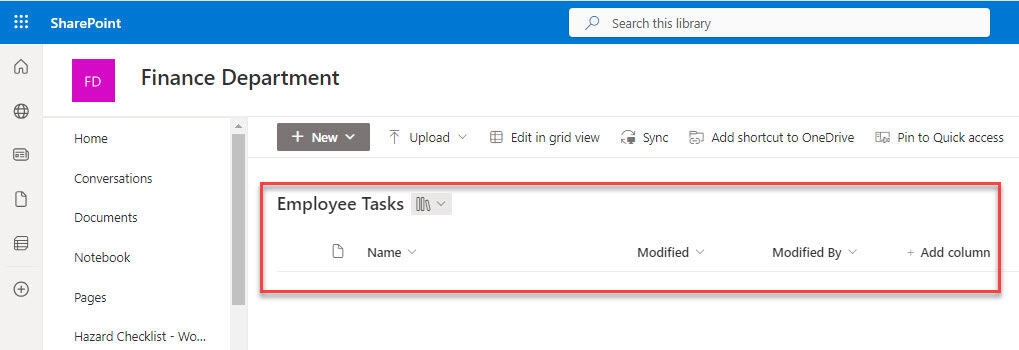
I have a SharePoint document library with the name’ Employee Tasks‘ with the default columns, as looked in the screenshot below:
Important
Folder Name and File Name can’t use these special characters: ~” # % & * : < > ? / { | } on SharePoint. You need to replace these characters for create folder or files.
Let’s create a flow:
1. In the Power Automate Home page, click on +Create and choose Instant cloud flow -> Select Manually trigger a flow -> Select Create button.
Inside the trigger, add the below-given inputs:
- Text Input: Rename it as Folder Name.
- File Content: Insert file content and rename it.

2. Then, take the Create new folder flow action. Set the required details as shown in the image below:
- Site Address: Choose the SharePoint site address from the drop-down.
- List or Library Name: Select the library where you want to create a new folder.
- Folder Path: Here, take the Folder name from dynamic content.
To create a folder structure [Sub folder& Sub-sub folder] in SharePoint document library, provide the folder path as folder1/folder2/folder3 [folder/subfolder/sub sub folder].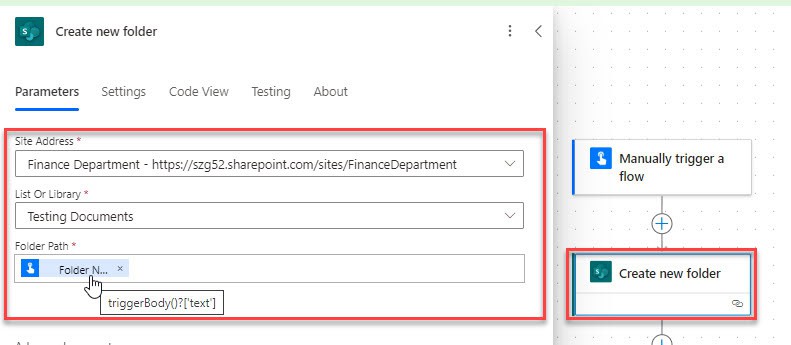
Here, it will create a new folder in the SharePoint document library with the provided details.
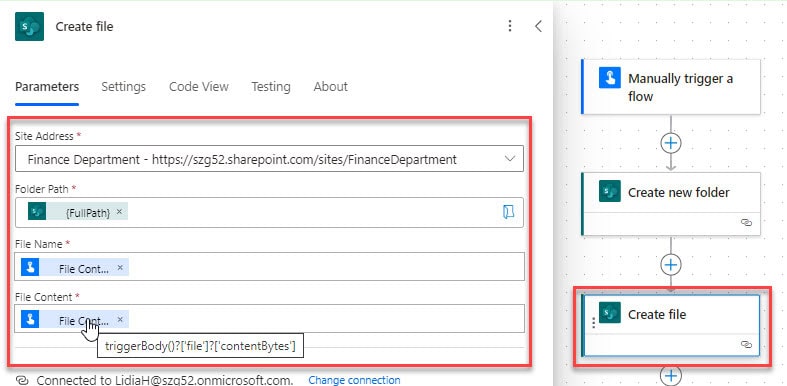
3. Next, I wanted to create a file inside the newly created folder, so I added the Create file flow action.
Fill in the details below:
- Site Address: Choose the SharePoint site address from where you want to
- Folder Path: Select the Full path from dynamic content.
- File Name: Insert the File Content name from the dynamic content of the trigger.
- File Content: Choose to add Content Bytes from the dynamic content of the trigger.
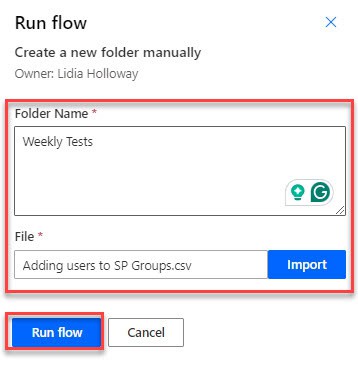
4. Now, it’s time to save the flow. Click on Test -> Select Manually -> Select Test -> In the Runflow window, provide a Folder Name and import the file you want to create inside the folder.
Click on Runflow.
5. Within a time, you can see that the folder with a file has been created in the SharePoint document library.
Look at the image for reference:

This is how you can create a new folder and file inside that folder manually using Power Automate flow.
Create a file from SharePoint using Power Automate
To create a folder/subfolder/sub-sub folder and file inside it from the SharePoint list using Power Automate, dive into the example below:
Example:
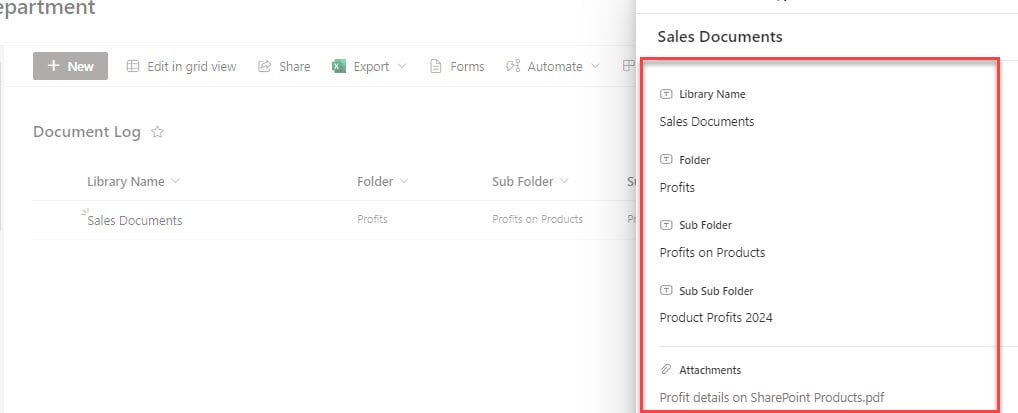
I have created a SharePoint list with a few columns to create a file from the SharePoint Online list.
Refer to the image:
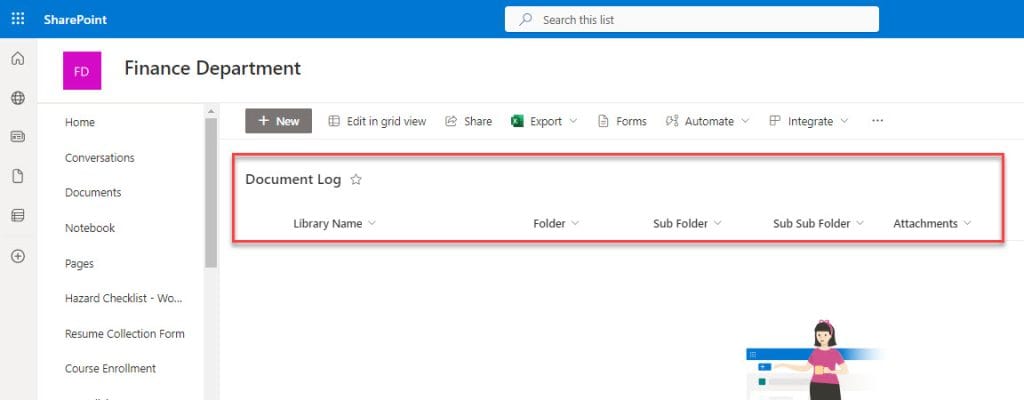
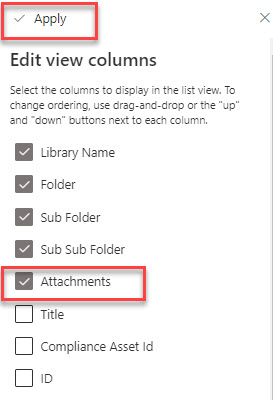
In the SharePoint list, display the Attachments column, which is a default column [Click on the column header of any column -> Column settings -> Show/hide columns -> Check the Attachments column and select Apply].
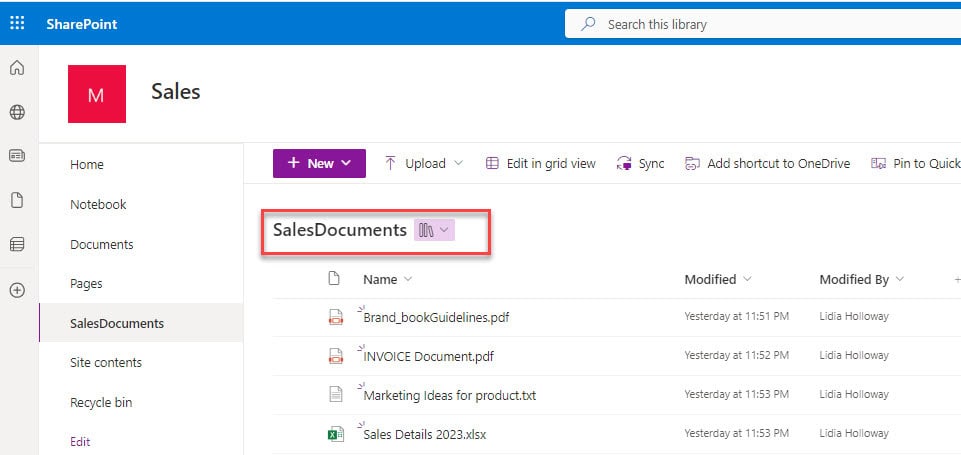
I will take a SharePoint document library [Sales Documents], where I want to create a folder structure and add a file inside it.
Steps to create a Power Automate flow:
1. In the Automated cloud flow, select When an item is created trigger and set the Site Address and List Name parameters.

2. To create the folder with the list item details, take the Create new folder flow action. Set the required details as shown in the image below:
- Site Address: Choose the SharePoint site address from the drop-down.
- List or Library Name: Select the library where you want to create a new folder.
- Folder Path: Take the folder path from dynamic content as shown in the code.
@{triggerBody()?['Folder']}/@{triggerBody()?['SubFolder']}/@{triggerBody()?['SubSubFolder']}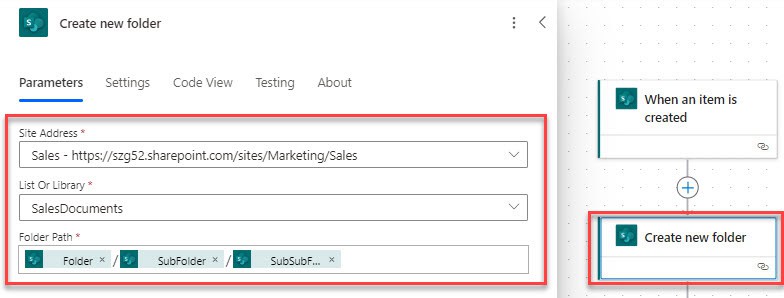
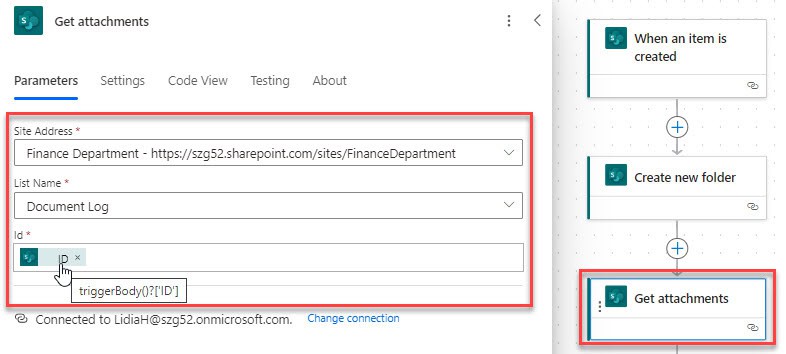
3. Now, to retrieve the attachment from the SharePoint list item, add the Get attachments action from the SharePoint connector.
Provide Site Address and List Name.
- Id: Take ID value under When an item is created from the dynamic content.
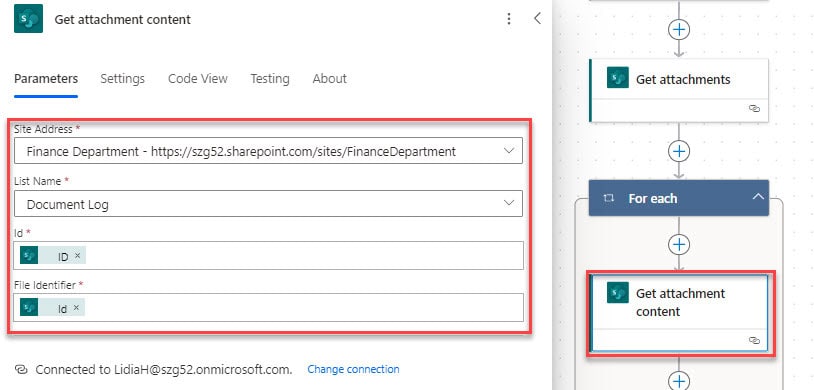
4. To retrieve the content from the attachment, add a Get attachment content flow action. Choose the required details like site address and list name:
- Id: Take Id value under when an item is created from dynamic content.
- File Identifier: Choose the ID/file identifier from Get attachments of dynamic content.
Then, For each loop will be added automatically by taking Body from the Get attachments action.
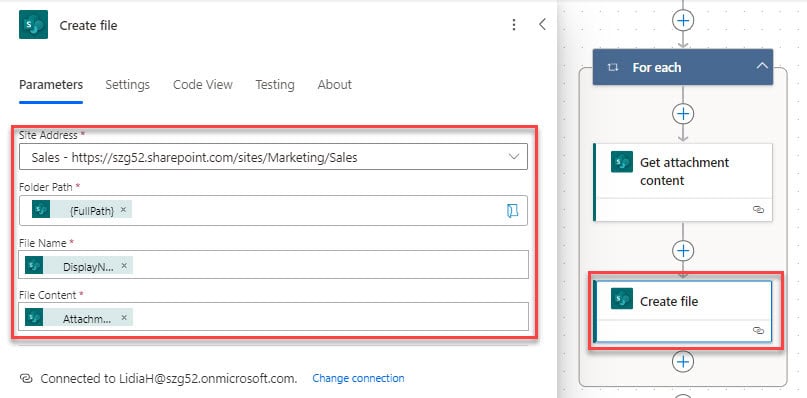
5. Inside the loop, take the Create file flow action. Configure the details to create a file inside the folder:
- Site Address: Choose the SharePoint site address.
- Folder Path: Select the Full path from dynamic content.
- File Name: Insert the File Content name from Get attachments dynamic content.
- File Content: Choose to add Attachment content from get attachment content trigger.
6. Once the flow is ready, save and run the flow. Now, go back to the SharePoint list and add a new item to the SharePoint list as shown in the below figure:
7. After a few seconds, you can see that the folder structure and file inside it have been created, as shown in the figure below:
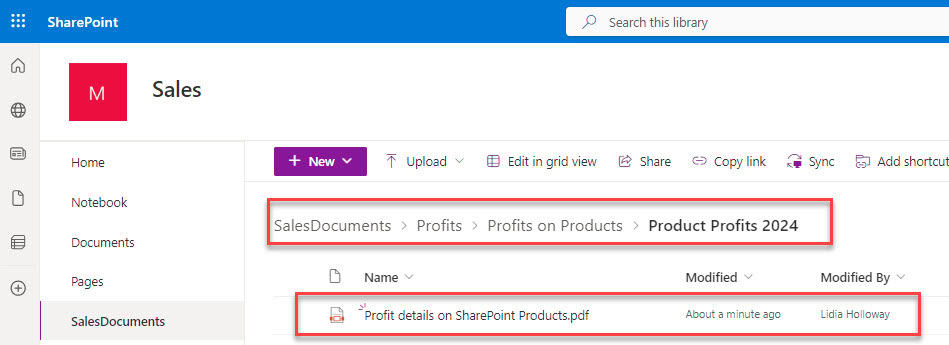
This is how to create a file from the SharePoint list using Power Automate.
Create a file from Microsoft Form Response using Power Automate
To create a file from the Microsoft Forms response in Power Automate, go through the below example:
Example:
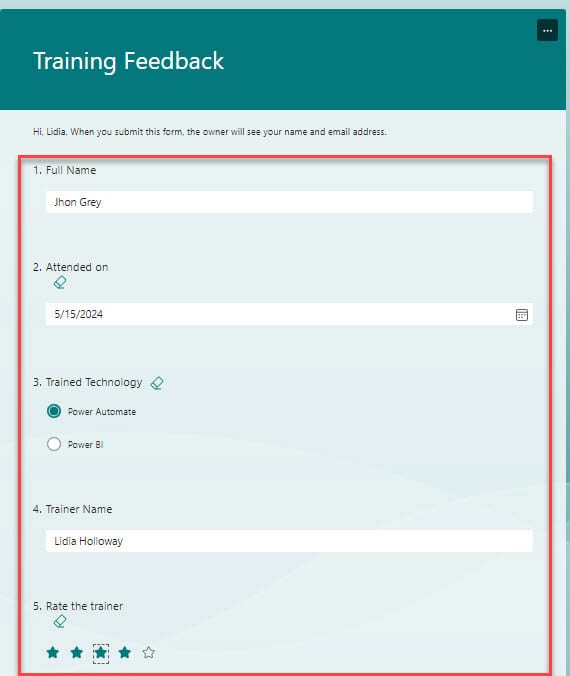
I have created a Microsoft Form named ‘Training Feedback Form‘ with the following fields, as you can see in the image below:
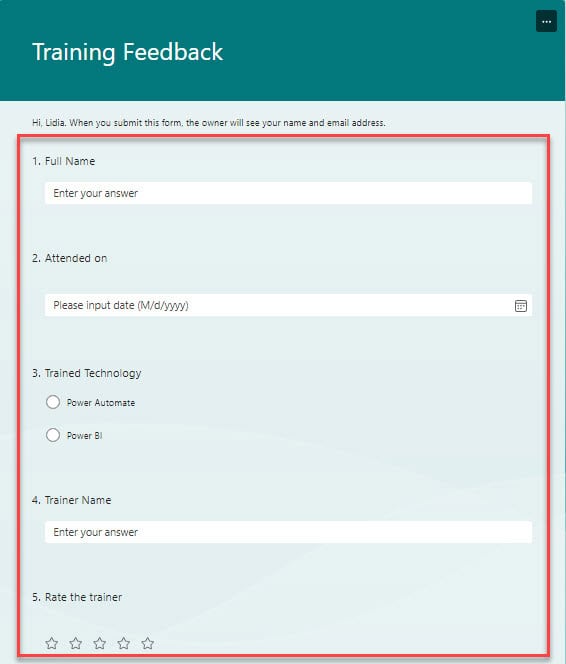
I have a SharePoint document library [Training Related Documents] with a few folders and files, as you can see from the screenshot below:
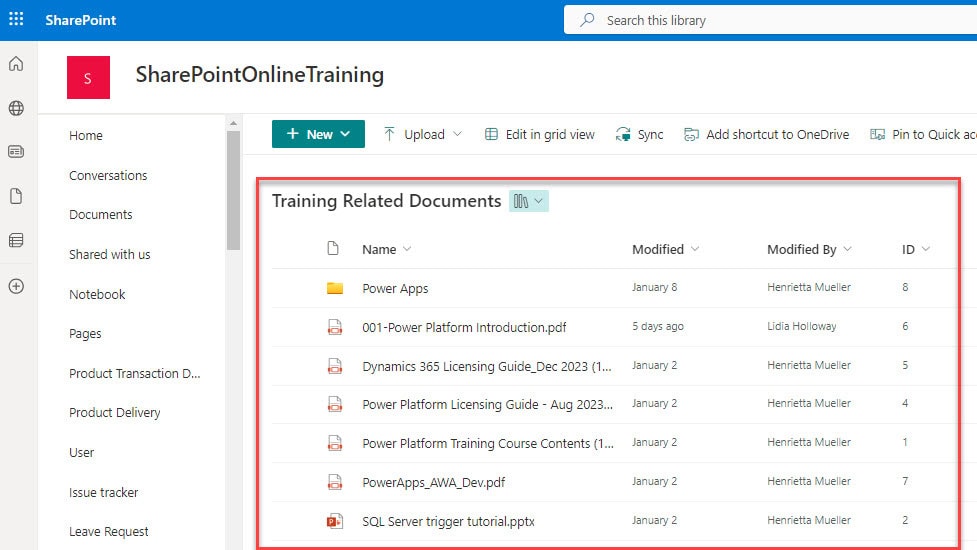
Whenever a response is submitted in the Microsoft Form, the responses should be uploaded as a file in the SharePoint document library [Training Related Documents].
Follow the below steps:
1. Navigate to https://make.powerautomate.com to open the Power Automate home page. Click on + Create -> Select the Automate cloud flow -> Set the flow name, choose the trigger’s flow (When a new response is submitted), and set the required field.
- Form Id: Choose the form Id from the drop-down.

2. Now, add the ‘Get response details’ flow action to retrieve detailed information about a specific response to a Microsoft Form and set the required fields.
- Form Id: Provide the Form Id.
- Response Id: Select the Response Id from dynamic content.
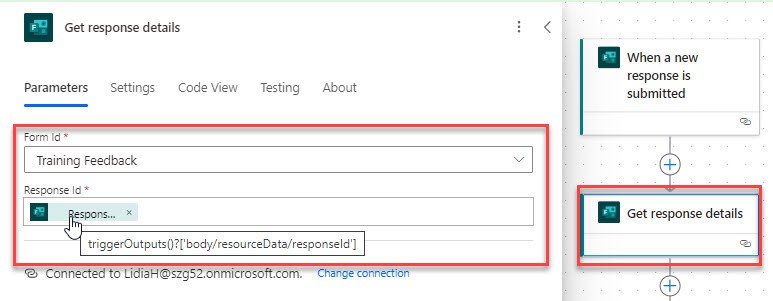
3. To create the file from the form’s response, create an HTML table. Add HTML table flow action. Set the required details:
- From: Add the below-given code to get the body of the response.
- Columns: Choose a custom table value from the dynamic content.
| Header | Value |
| Full Name Attended On Trained Technology Trainer Name Rate the trainer | Choose values under ‘When a new response is submitted‘ from dynamic content. |
createArray(triggerOutputs()?['body/resourceData/responseId'])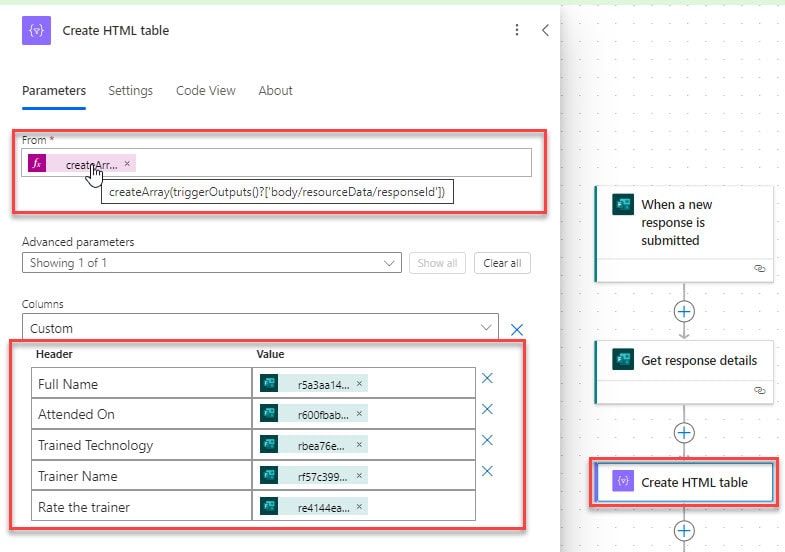
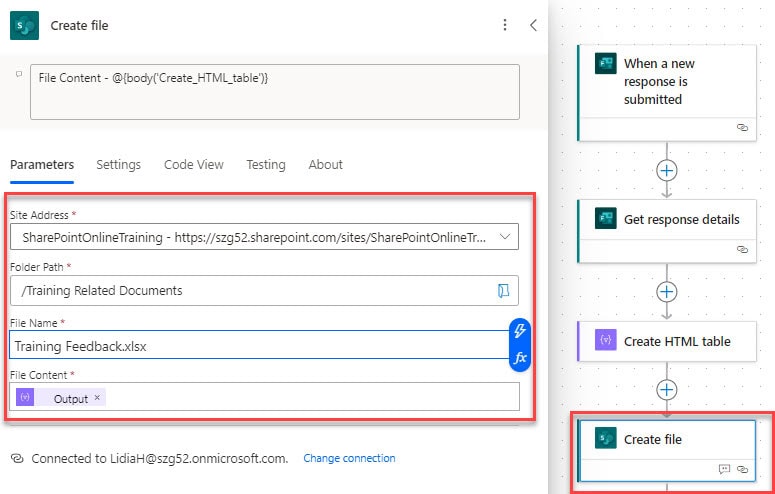
4. Now, you can create a file by adding the Create file action. Provide the parameters below:
- Site Address: Choose the SharePoint site address.
- Folder Path: Select the Full path from dynamic content.
- File Name: Enter the file name manually and provide the extension for the file.
- File Content: Choose to add output from the HTML table action.
5. After that, save and run the flow. Then, submit a response in the Microsoft Form [Training Feedback form].
6. After a few seconds, you can see that a file has been created in the SharePoint document library with the given details.
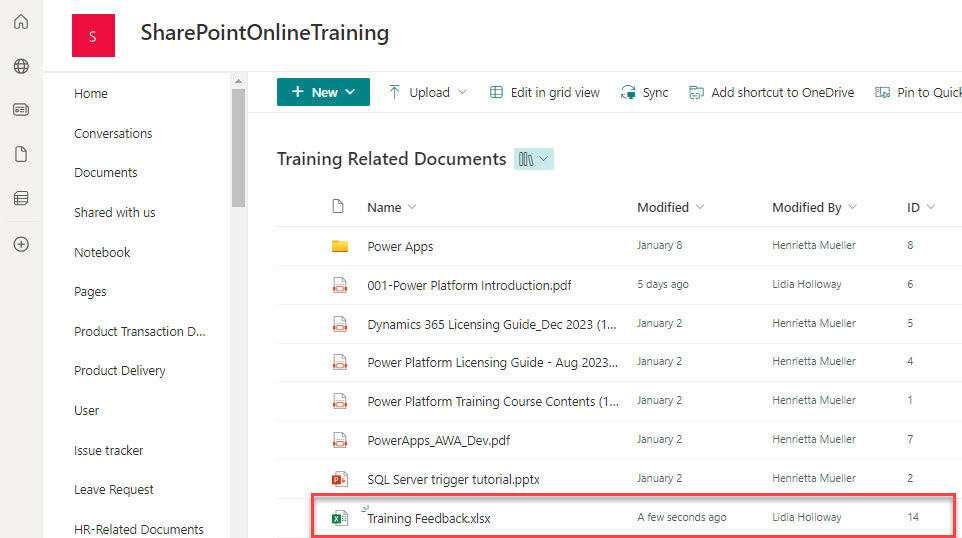
This is how to create a SharePoint file from Microsoft Form response using Power Automate.
Conclusion
I hope this tutorial has taught you how to create a SharePoint file using Power Automate in various ways. I will also show you how to create a file using Power Automate from Microsoft Forms Response.
You may also like:
- Create a Task in Microsoft Planner using Power Automate
- Copy New Files from Your PC to SharePoint using Power Automate
- Power Automate save email attachment to SharePoint
- Copy List Items To Another List In SharePoint Using Power Automate
I am Bijay a Microsoft MVP (10 times – My MVP Profile) in SharePoint and have more than 17 years of expertise in SharePoint Online Office 365, SharePoint subscription edition, and SharePoint 2019/2016/2013. Currently working in my own venture TSInfo Technologies a SharePoint development, consulting, and training company. I also run the popular SharePoint website EnjoySharePoint.com