One of my clients recently asked to generate a PDF in Power Automate. I tried different examples to create PDFs in Power Automate. In this Power Automate tutorial, I will show you different ways to create a file in PDF format. We will see the below examples:
- Create pdf from the SharePoint list in Power Automate
- Convert Word to PDF in Power Automate
- Power Automate: convert Word to PDF without Onedrive
- Convert Microsoft form into a PDF using Power Automate
- Convert HTML to PDF in Power Automate
Create PDF from SharePoint List in Power Automate
To generate a PDF file from the SharePoint list using Power Automate, follow the example below:
Example:
To create a PDF file from the SharePoint list, I used one of the SharePoint lists I have in my SharePoint site named ‘Travel Requests‘ with a few columns.
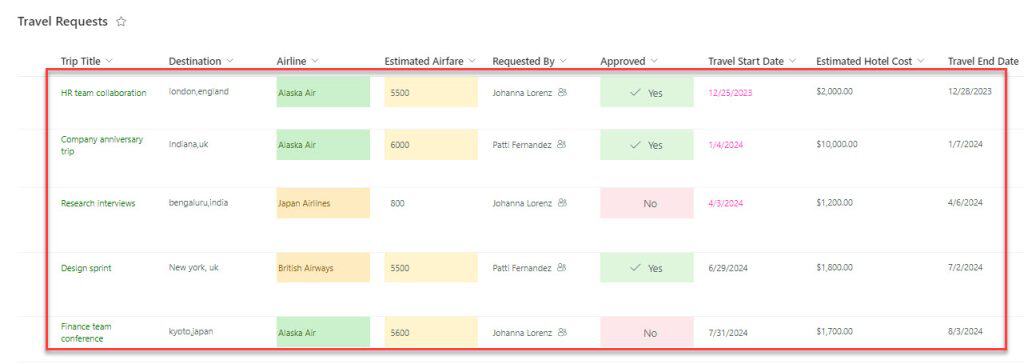
Here, I need to create a PDF file with the values of SharePoint list items in the SharePoint Document Library [Travel Records].

Let’s create a Power Automate flow:
1. Create an Automated cloud flow in Power Automate by Manually triggering a flow.
- Click +Create -> Select Instant cloud flow with trigger -> Tap on Create button.
Then, add a text input inside the trigger to provide a File Name.

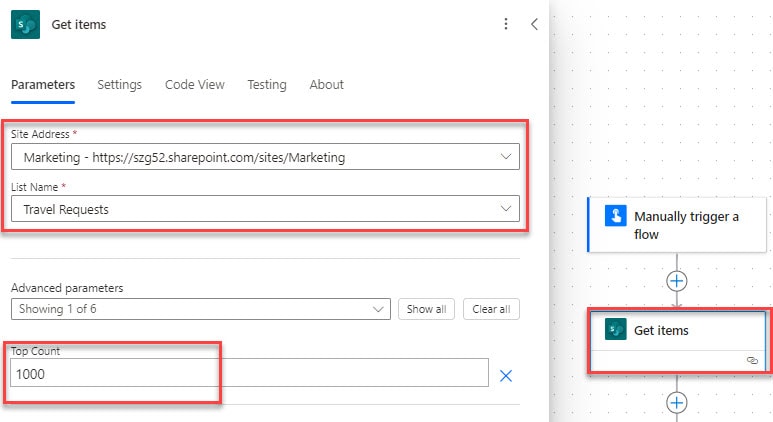
2. Now, add a Get Items flow action from the SharePoint connector to retrieve all the SharePoint list items. Choose the SharePoint site and List name from the drop-down menu.
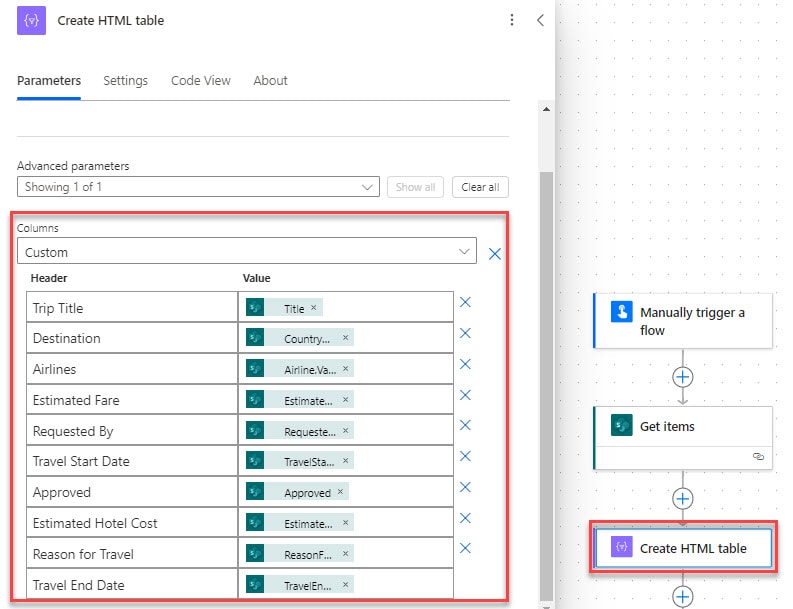
3. Create an HTML table with all the retrieved SharePoint list items. Add Create HTML table flow action.
- From: Take the body/value of get items from the dynamic content.
- Columns: Choose a Custom value from the drop-down.
| Headers | Value |
| Trip Title Destination Airlines Estimated Airfare Requested By Travel Start Date Approved Travel End Date etc | Select the values from the dynamic content under the Get items action. |
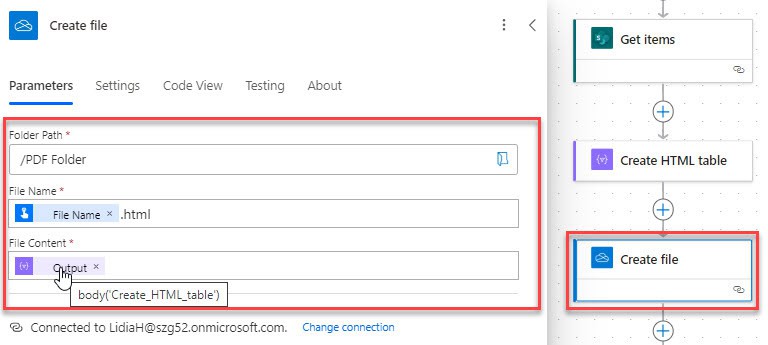
4. To create a file in Onedrive with all the list values in HTML format, select Create file action. Set the required parameters:
- Folder Path– Give a folder path where you need to create the file.
- File Name– Select the File name from the dynamic content of the trigger with an HTML extension.
- File Content– Choose output from the create HTML table.
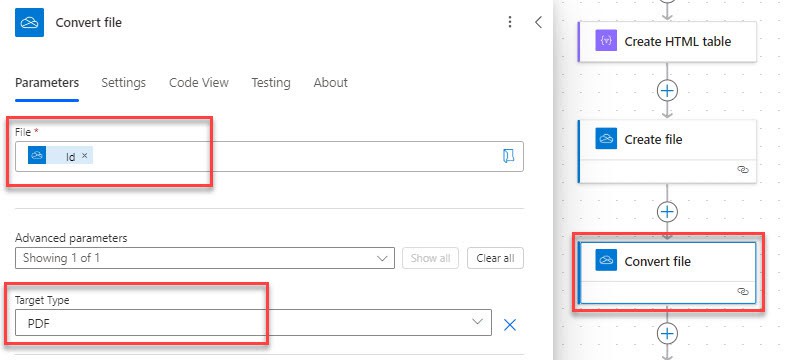
5. Next, I will add a Convert file action to convert the file content from HTML to PDF.
- File: Choose Id of a file under create file of dynamic content.
- Target Type: Select the required target type, like PDF.
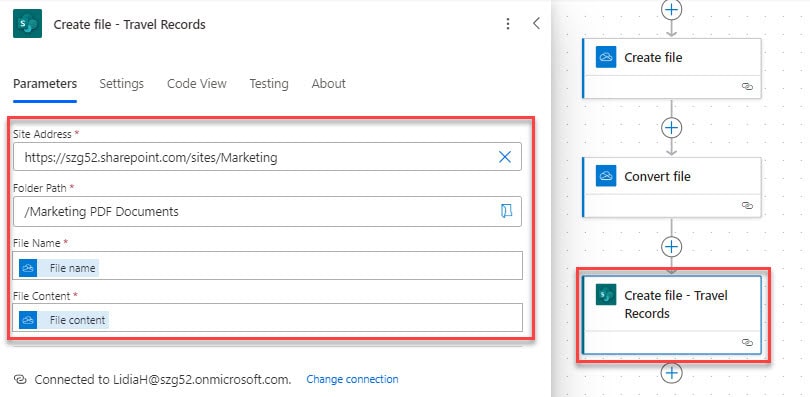
6. Now, I wanted to generate a file in the SharePoint document library with the converted format. Add Create file from SharePoint connector.
Choose the properties like Site Address and List Name.
- File Name: Select the File name from the convert file options
- File Content: Choose the File content option from the dynamic content.
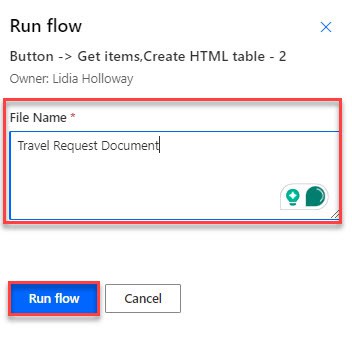
Let’s save the flow and test it manually. In the Runflow window, provide a File Name and click on Runflow.
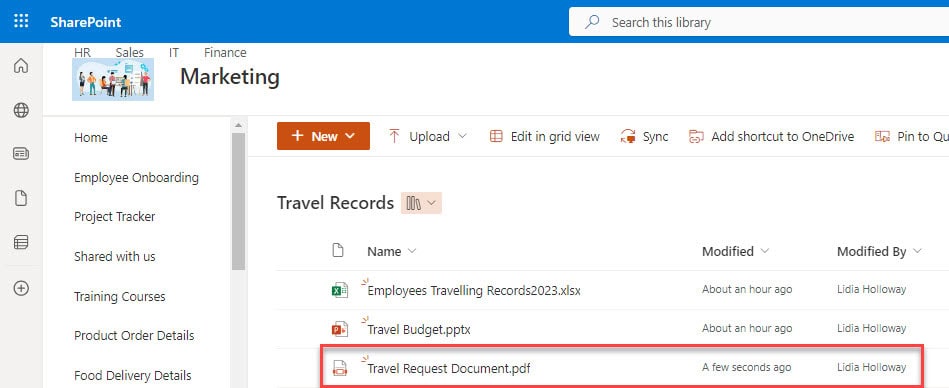
7. When the flow runs successfully, you can check that the file has been created in PDF format in the SharePoint document library.
The screenshot below represents all the SharePoint list items saved in the PDF.
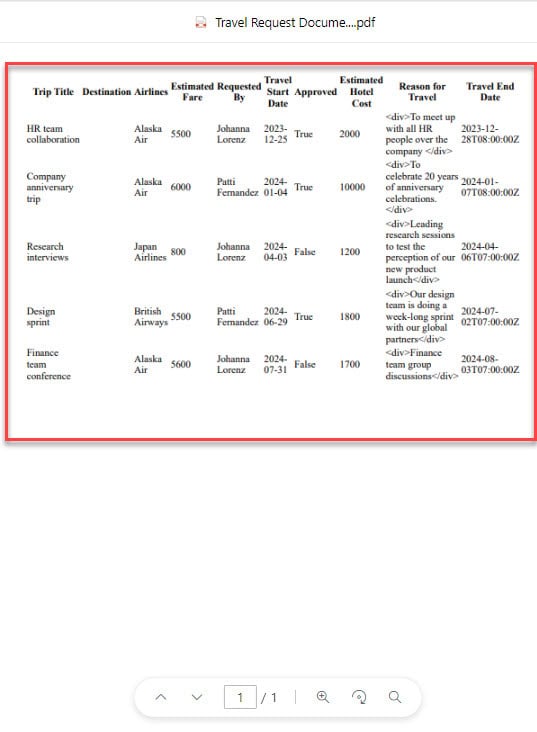
This is how to generate a PDF file from a SharePoint list using Power Automate.
Convert Word to PDF in Power Automate
Now, let’s see how to convert Word to PDF format with Onedrive source using Power Automate.
Example:
I have a SharePoint document library with a few files, as you can check in the image below:

Scenario: Whenever a Word file is created in the SharePoint document library, I need to convert it into a PDF and store it in another folder.
Follow the points below:
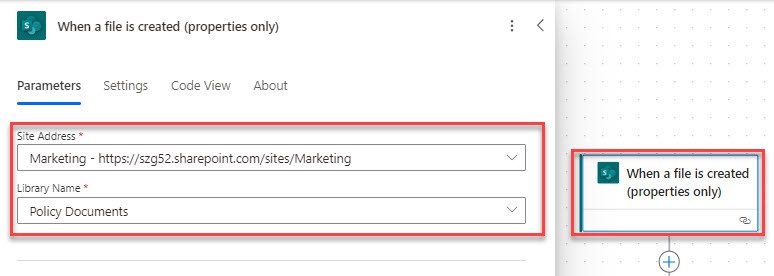
1. Add Automated cloud flow in Power Automate with trigger ‘When a file is created (Properties Only). Choose Site Address and Library Name.
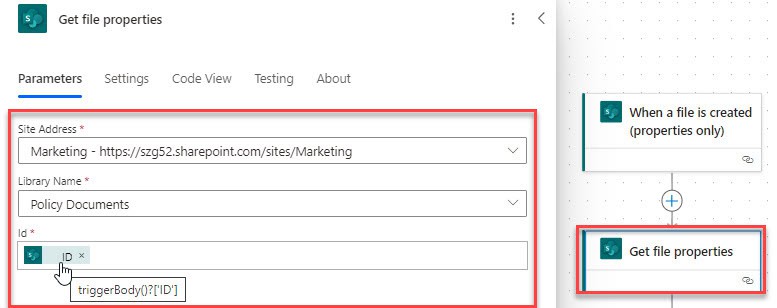
2. After that, add the Get file properties flow action to retrieve a file’s properties. Configure the site address, library name, and ID from dynamic content.
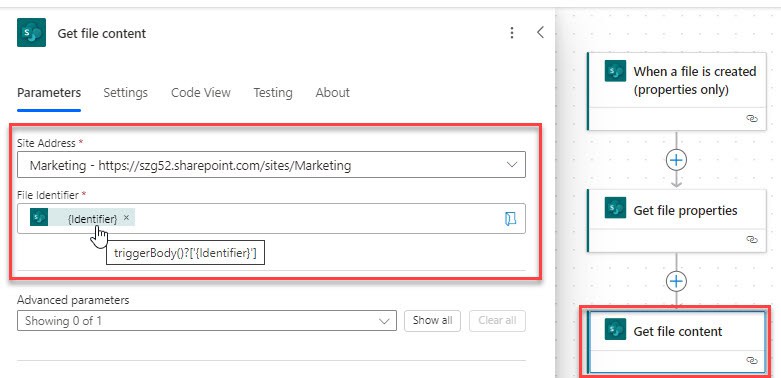
3. Next, add an action to get the file content using the file identifier.
Select Get file content action, Set the SharePoint site address, and select the identifier from the dynamic content in the file identifier.
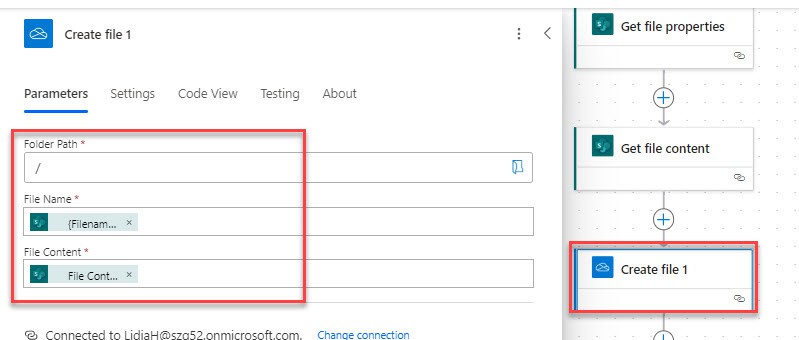
4. Now, I will add an action to create the files in the Onedrive as temporary storage. Add a Create file(under OneDrive) flow action. Set the properties like below:
- Folder Path– Select Root as the folder path.
- File Name– Select the File name with an extension from the dynamic content of ‘When a file is created.’
- File Content– Select File content from the dynamic content of ‘Get file content‘.
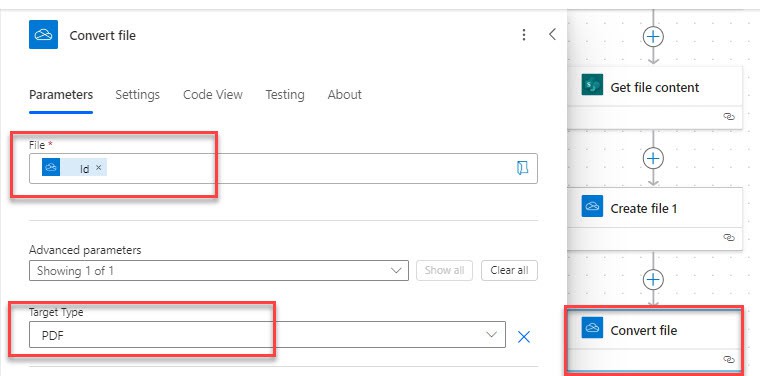
5. Now, the file is created in Onedrive to convert to PDF format; select Convert file flow action. Set the properties like below:
- File- Select Id from the dynamic content of the created file.
- Target type– Select PDF from the dropdown.
6. Add a Condition control action to satisfy if the created file equals the Word document.
Filename with extension endswith .docx
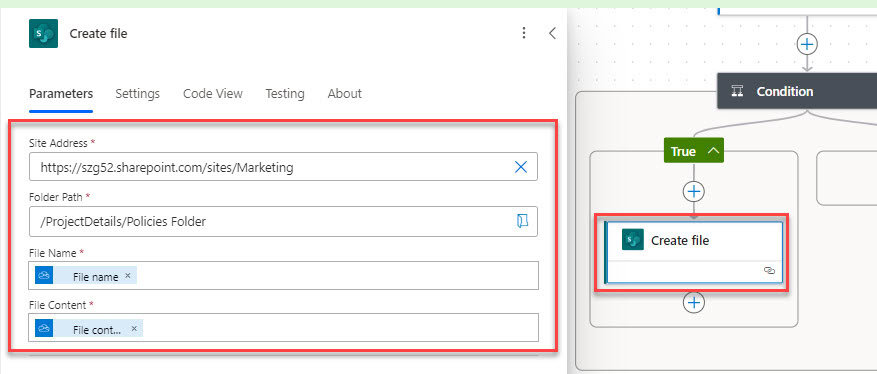
7. Under True condition, select Create file flow action from SharePoint connector. Set the following parameters:
- Site Address– Set the Sharepoint site address.
- Folder Path– Specify the folder path where we want to store the converted PDF files.
- File Name– Select the File name from the converted file of dynamic content.
- File Content– Select the File content from the dynamic content of the converted file.
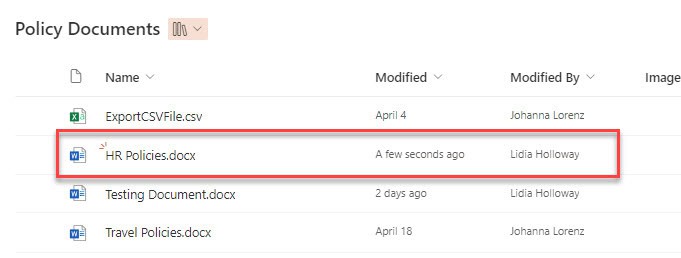
8. After that, save and test the flow manually. Then upload a Word file in the source folder of the SharePoint document library as shown below:
9. The file will be created in PDF format in another destination SharePoint document library.
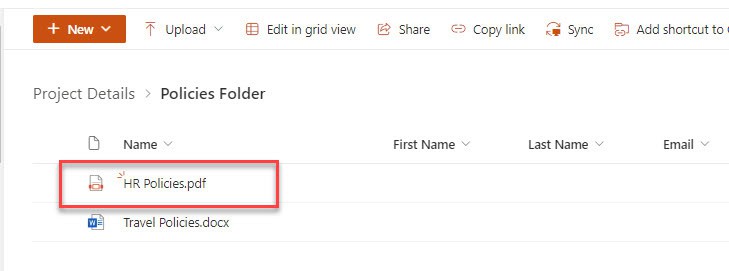
This is how to convert the Word document to a PDF format using Power Automate flow.
Convert Word to PDF without OneDrive using Power Automate
To convert the Word document to PDF, we will create a file in OneDrive connector and convert it to PDF. There are some connectors in Power Automate, where we can also create and convert the files to PDF format, which are premium connectors.
- Plumsail HTML to PDF action – Premium
- Encodian Convert Word – Standard connector, but it needs Power Automate licensing issue or premium
- Azure Function – Premium connector
Microsoft Form to PDF using Power Automate
To convert Microsoft Forms response to PDF using Power Automate, check the example below:
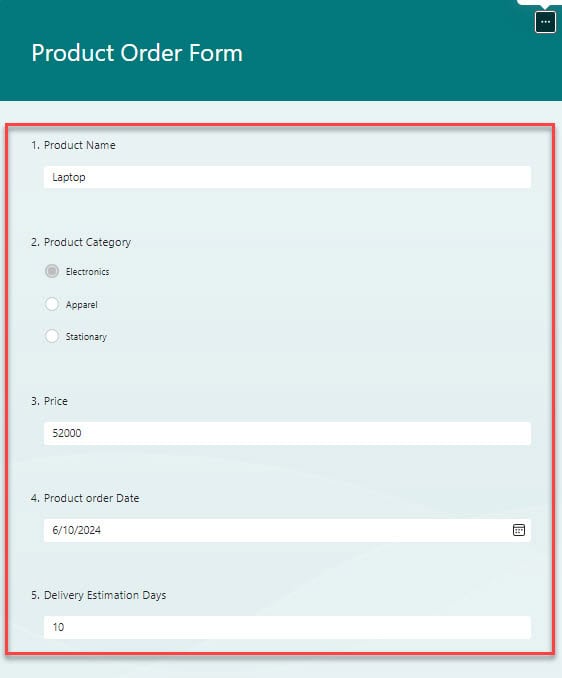
When a response is submitted in a Microsoft form [Product Order Form], create a PDF file in the SharePoint document library with product details.
If you are new to Microsoft 365, learn how to create a new Microsoft Form.
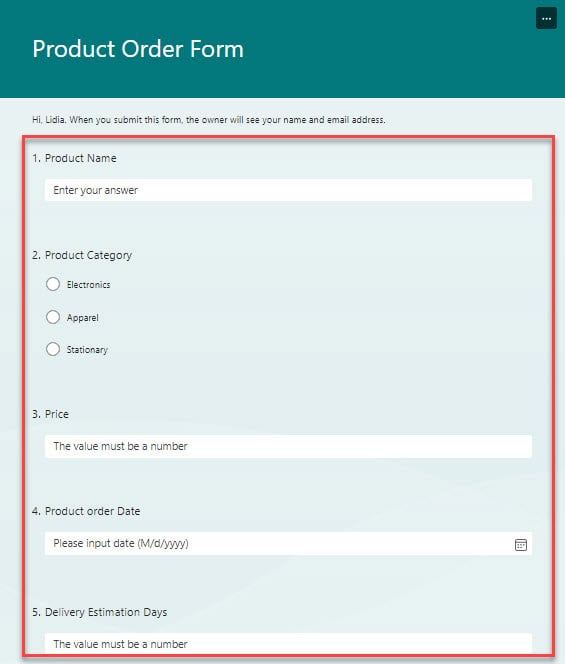
The following steps are:
1. Open Power Automate, Click on + Create -> Automate cloud flow, select the trigger ‘When a new response is submitted, ‘ and choose the Form Id.

2. Next, add an action to retrieve a form response from the Microsoft form. Select Get response details. It will ask to set the properties like below:
- Form Id– Select the form Id from the drop-down options.
- Response Id– Select Response Id from the dynamic content of the trigger.
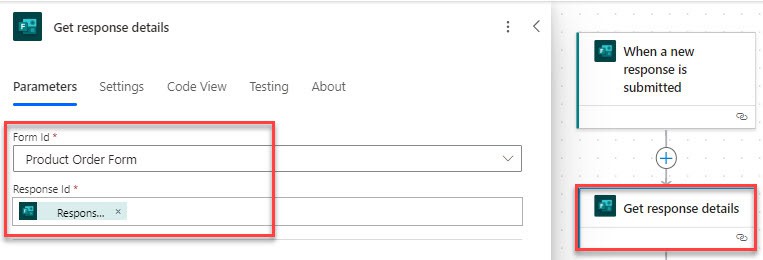
3. Then, Create an HTML table from an array of response details.
In From, we will add the below expression that will create a new array:
createArray(triggerOutputs()?['body/resourceData/responseId'])In Map, Enter the key as the questions(that are asked in the form) and set the values from the dynamic content of Get response details.
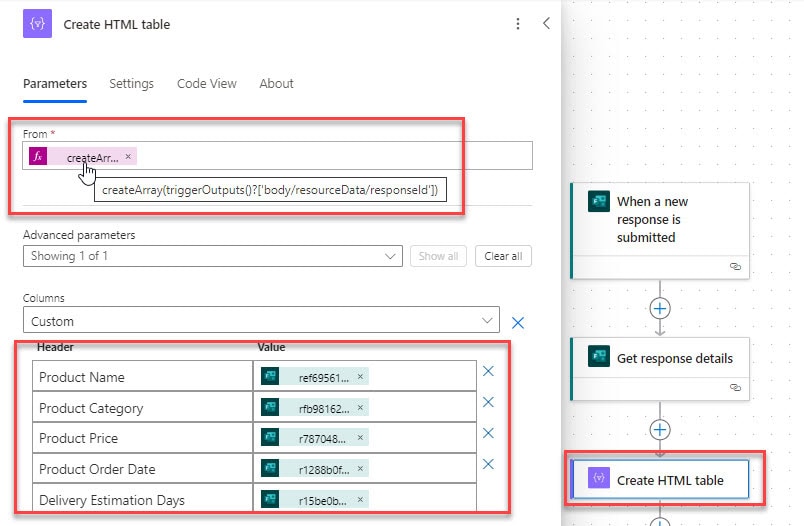
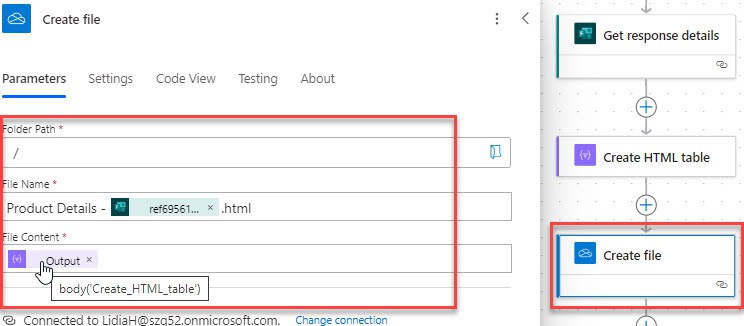
4. After that, create a file in the temporary location, e.g., OneDrive, that will help convert the file into a PDF. Choose Create file. Set the parameters below:
- Folder Path– Set Root or give a ‘/’ as folder path.
- File Name- Choose from the dynamic content as a file name with the ‘.html’ extension.
- File Content– Set the HTML table output from the dynamic content.
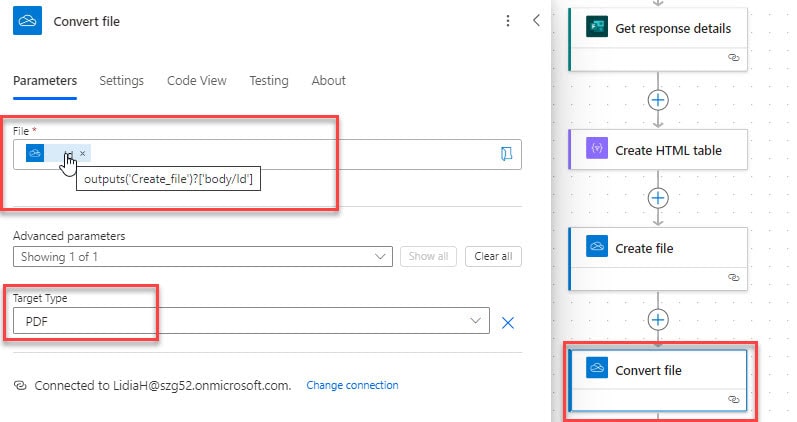
5. Now, take an action to convert the HTML file to PDF. Choose Convert file(under OneDrive). Set the properties like below:
- File– Select ID from the dynamic content of the Create file.
- Target type– Set type as PDF.
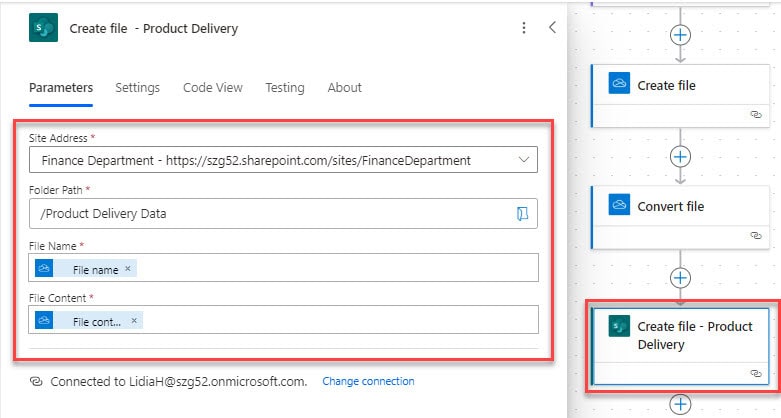
6. To store the converted file in the SharePoint document library, choose Create file(from SharePoint connector). Set the properties like below:
- Site Address– Set the SharePoint site address.
- Folder Path– Set the folder path where you want to upload the file in the SharePoint document library.
- File Name– Choose the File name from the dynamic content of the Convert file.
- File Content– Choose File content from the dynamic content of the Convert file.
7. Once the flow is ready, save and test it. Submit a response to create a PDF file with the Microsoft Forms response.
8. Within a few seconds, a PDF file will be created in the destination SharePoint document library with the response details.

This is one of the ways you can create PDF files from Microsoft Form responses using Power Automate.
Convert HTML to PDF in Power Automate
Let me show you how to convert the HTML tags to PDF file format in Power Automate.
Follow the below steps:
1. Create a Power Automate Instant cloud flow by Manually triggering a flow.

2. Next, I will add a Compose flow action to use the static HTML tag below as input. Insert the HTML code below inside the inputs.
<html>
<head>
<title></title></head>
<body>

<p>Hello,</p><br>

<h2> Product Details </h2>

<table style="border-collapse: collapse; width: 100%; border: 2px solid #4CAF50; margin: 20px;">
    <thead>
        <tr style="background-color: #4CAF50; color: white;">
            <th style="border: 2px solid #4CAF50; padding: 12px;">Product Name</th>
            <th style="border: 2px solid #4CAF50; padding: 12px;">Product Type</th>
            <th style="border: 2px solid #4CAF50; padding: 12px;">Product ordered Date</th>
        </tr>
    </thead>
    <tbody>
        <tr style="background-color: #f2f2f2;">
            <td style="border: 2px solid #4CAF50; padding: 12px;">Laptop</td>
            <td style="border: 2px solid #4CAF50; padding: 12px;">Electronics</td>
            <td style="border: 2px solid #4CAF50; padding: 12px;">10/06/2024</td>
        </tr>
    </tbody>
</table>
</body>
</html>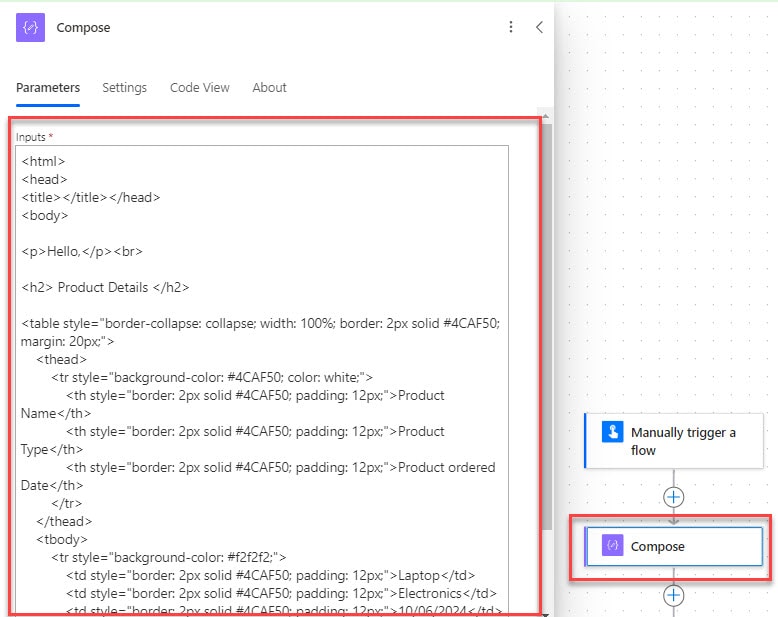
3. To create a file temporarily in OneDrive, select Create a file from the onedrive connector. Set the following properties below:
- Folder Path– Choose the folder path, where you want to store.
- File Name– Give a file name using the extension as .html.
- File Content– Select the output from the Compose action.
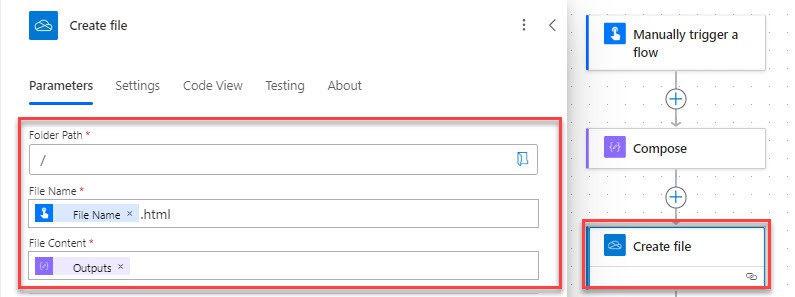
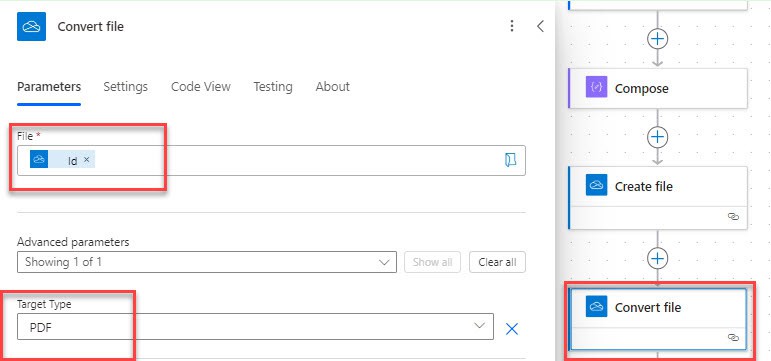
4. After creating a file with the HTML script, convert the file to PDF format. Select Convert file. Set the parameters such as:
- File- Select ID from the Create file action.
- Target type- PDF
5. After that, Create a file in the SharePoint document library and set parameters like the Site address and Folder path.
- File Name: Choose file name under convert file of dynamic content.
- File Content: Select File content under convert file.
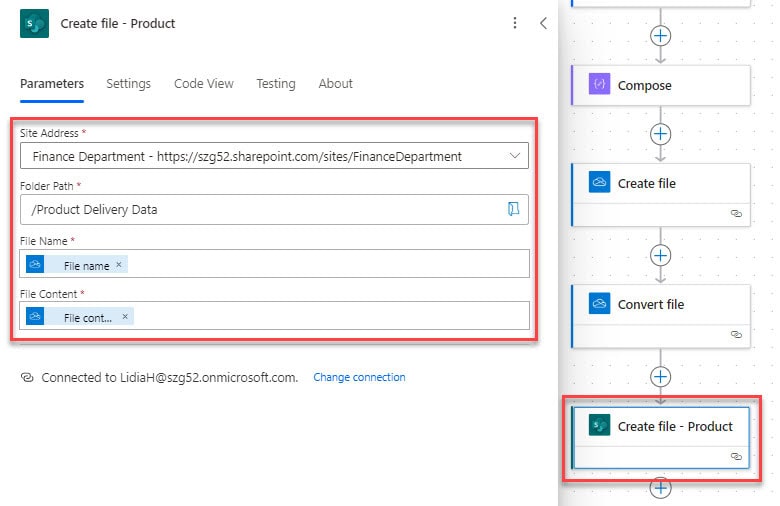
Save and run the flow.
6. Then, an HTML script will be converted into a PDF file in the SharePoint document library.
Refer to the image below:

When you click on the pdf file, you can see the information below:
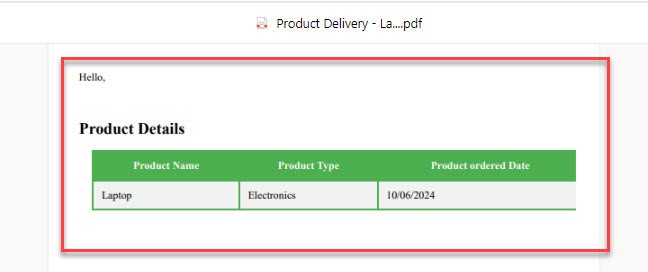
This is how to use Power Automate to convert HTML to a PDF file.
Conclusion
In this Power Automate tutorial, I have explained how to create a PDF file using Power Automate. We saw the below examples:
- Create pdf from the SharePoint list in Power Automate
- How to Convert Word to PDF in Power Automate
- Convert Word to PDF without Onedrive using Power Automate
- How to Convert Microsoft form into a PDF using Power Automate
- Convert HTML to PDF in Power Automate
You may like the following tutorials:
- Expense Reimbursement and Approval using Power Automate
- Start and Wait for an Approval in Power Automate
- Create a Task in Microsoft Planner using Power Automate
- Copy New Files from Your PC to SharePoint using Power Automate
I am Bijay a Microsoft MVP (10 times – My MVP Profile) in SharePoint and have more than 17 years of expertise in SharePoint Online Office 365, SharePoint subscription edition, and SharePoint 2019/2016/2013. Currently working in my own venture TSInfo Technologies a SharePoint development, consulting, and training company. I also run the popular SharePoint website EnjoySharePoint.com
Thanks! This is an incredible amount of useful information!
Pleasure to help u
thanks a lot for this wonderful content.. 🙏🙏
pleasure to assist you
Thank you!
My pleasure
Thank you for these guides. I’m having trouble with the Form to PDF one and keep getting this error message. Are you able to help? ‘The inputs of workflow run action ‘Select’ of type ‘Select’ are not valid. The ‘from’ property value is of type ‘String’. I entered the code as listed in the guide, but mine stays as a string of text (doesn’t show the pink function symbol like yours does).
Can you show me the flow and error?
How we can use Bootstrap?
Hello,
Is it possible to map user responses for existing PDF?
For example, I have a fillable PDF template with company logo and few other details.
When user submits the form I want to map user details to the PDF Template
Power App Form – “Full name” to Fillable PDF Template – “Full Name field”
Thanks