A web form’s validation is a “technical procedure where it is checked to see if the data entered by the user is accurate.” Either the form will notify the user that they made a mistake and must correct it before continuing, or the form will be verified and the user will be able to finish the registration process.
So let’s see how to implement form validation in react js with the below example:
- What is form validation in react js?
- How to do simple form validation in react js
- How to do react form validation on submit
- How to do react form validation after submit
- How to do react input validation without form
- How to do form validation in react js class component
- simple form validation in react js functional component
- How to do react form validation on change
- How to do react form validation disable button
- How to do custom form validation in react js
- How to do react form validation alert
- How to do form validation in react js using hooks
- How to do react form validation on blur
- How to react hook form validation date
- How to do react form validation for phone number
- How to do react form validation formik
- react hook form checkbox group validation
- react hook validate email
- react form validation multiple fields
- react hook form image validation
- react input length validation
- react hook form validation length
What is Form validation in react js?
React’s form validation feature enables error messages to be presented if the user does not successfully complete the form with the desired kind of input. Creating a validator function with validation rules is the main emphasis of this instance because there are many ways to validate forms in React.
Read Setup React js environment and Create your first react app with react js
Simple form validation in react js
Here we will see how to validate a simple form in react js.
As our form contains only two text fields such as Full name and Department. We will validate that both fields contain some values.
Let’s say the index.html contains the below code:
<div id="root"></div>The Index.js file is the starting point of the React app, so it contains the below code:
import React from 'react';
import ReactDOM from 'react-dom/client';
import './index.css';
import App from './App';
import reportWebVitals from './reportWebVitals';

const root = ReactDOM.createRoot(document.getElementById('root'));
root.render(
    <App />

);
reportWebVitals();
The App.js file contains the below code:
import './App.css';
import Form from './Form';
function App() {
  return (
    <div className="App">
      <Form></Form>
    </div>
  );
}

export default App;
The ValidateForm.js contains the below code:
import React, { useState } from 'react';

function ValidateForm(props) {
    const [validationMessages, setValidationMessages] = useState([]);
    const [formData, setFormData] = useState({});
    const handleChange = ({ target }) => {
     setFormData({ ...formData, [target.name]: target.value });
    }
    const handleClick = (evt) => {
        validateForm();
        if (validationMessages.length > 0) {
            evt.preventDefault();
        }
        console.log({"Name" : formData.fullName,"Contact": formData.contact })
    }
    const validateForm = () => {
        const { fullName, contact } = formData;
        setValidationMessages([]);
        let messages = [];
        if (!fullName) {
            messages.push("Name is required");
        }
        if (!contact) {
            messages.push("Contact is required");
        }
        setValidationMessages(messages);
    }
    return (
        <div >
            <form>
                <label>Name</label>
                <input value={formData.fullName || ''} onChange={handleChange} type="text" name="fullName" />
                <label>Contact</label>
                <input value={formData.contact || ''} onChange={handleChange} type="text" name="contact" />
                <button type="button" onClick={handleClick}>Save</button>
            </form>
            <br></br>
            <div>{validationMessages.length > 0 && <span>Validation Summary</span>}
                <ul>
                    {validationMessages.map(vm => <li key={vm}>{vm}</li>)}
                </ul>
            </div>
        </div>);
}

export default ValidateForm;
Now run the application with the npm start command, and you can see from render on the page if we will fill out the form, it will run smoothly, and see the data logged in the console.

Now, if the form field is empty, and click on the save icon we will get a message, ‘Name is required, and ‘Contact is required.
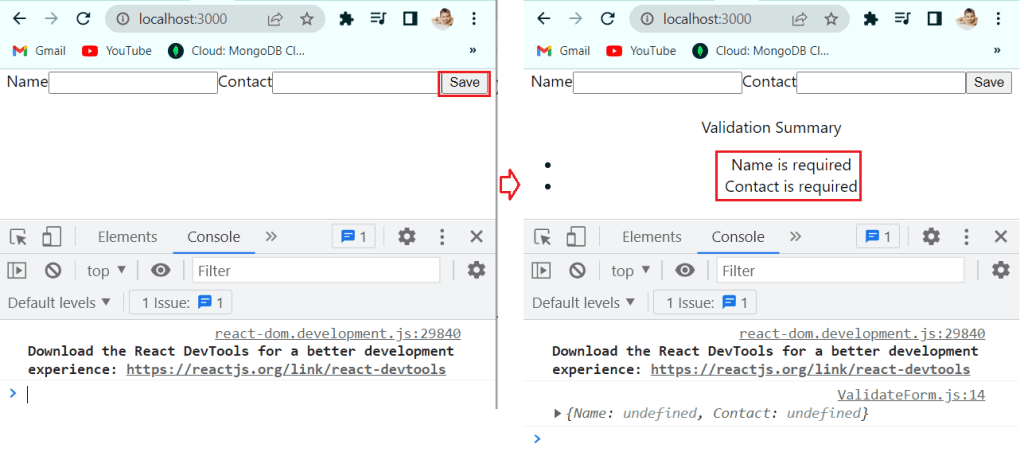
This is an example of form validation in react js.
Read Components in React js
React form validation on submit
Here we will see how to check form validation on submit in react js.
Forms and input components like “input,” “select,” and “textarea” on forms gather data from users. It takes extra work to work with forms and input fields since you have to access input values, validate the form, send the data, and handle the submission outcome.
For example, we are going to see how to access the form input values and validate and submit the form. The information form contains the below field:
- Name: Required field
- Skills: Required field
- Age: Required field
- Comment: optional
To read and set the input values through the component state, we will use the controlled component. And the validation will happen when a user clicks on submit icon.
Let’s say the index.html contains the below code:
<div id="root"></div>The Index.js file is the starting point of the React app, so it contains the below code:
import React from 'react';
import ReactDOM from 'react-dom/client';
import './index.css';
import App from './App';
import reportWebVitals from './reportWebVitals';

const root = ReactDOM.createRoot(document.getElementById('root'));
root.render(
    <App />

);
reportWebVitals();
The App.js file contains the below code:
import './App.css';
import Form from './Form';
function App() {
  return (
    <div className="App">
      <Form></Form>
    </div>
  );
}

export default App;
The ValidateForm.js contains the below code:
import React, { useState } from "react";
const Skills = ["listining", "communication", "computer", "leadership", "management"];

function ValidateForm() {
    const [values, setValues] = useState({
        name: "", skills: "", age: "", comment: ""
    });

    const set = (name) => {
        return ({ target: { value } }) => {
            setValues((oldValues) => ({ ...oldValues, [name]: value }));
        };
    };

    const saveFormValues = async () => {
        const response = JSON.stringify(values);
        console.log(response)
    }

    const handleSubmit = async (event) => {
        event.preventDefault(); // Prevent default submission
        try {
            await saveFormValues()
            alert('Your information was successfully submitted!');
            setValues({
                name: "", skills: "", age: "", comment: ""
            });
        } catch (e) {
            alert(`Registration failed! ${e.message}`);
        }
    }

    return (
        <form onSubmit={handleSubmit}>
            <h2>Fill your Info</h2>
            {/* For name */}
            <label>Name*:</label>
            <input
                type="text" required
                value={values.name} onChange={set("name")}
            />
            {/* For skills */}
            <label>Skills*:</label>
            <select
                required
                value={values.skills} onChange={set("skills")}
            >
                <option value="">Select skills</option>
                {Skills.map(c => <option key={c}>{c}</option>)}
            </select>

            {/* For age */}

            <label>Age*:</label>
            <input
                type="number" required min="18"
                value={values.age} onChange={set("age")}
            />
            {/* For comment */}
            <label>Comment:</label>
            <textarea value={values.comment} onChange={set("comment")} />

            <button type="submit">Submit</button>
        </form>
    );
}

export default ValidateForm
Now run the application with the npm start command and you can see a form, if you fill in the information and click on Submit then you can see the response in the console.
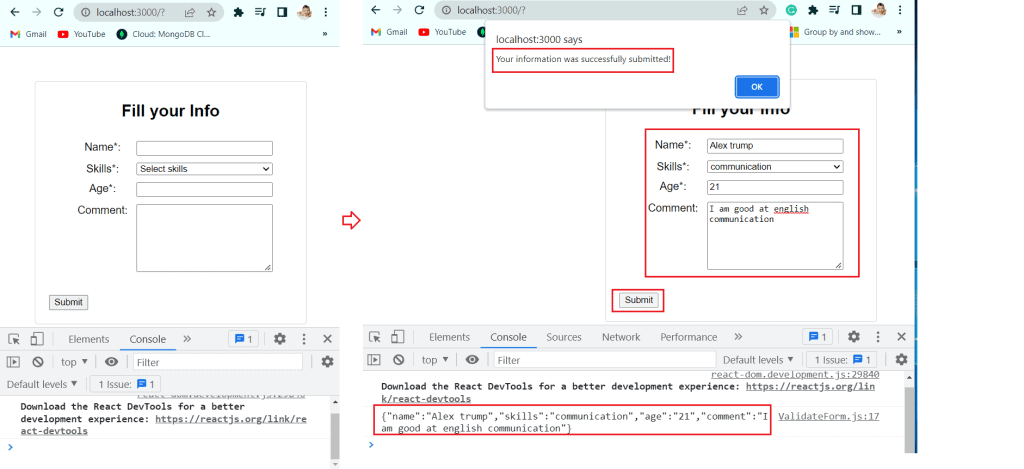
Now if I will not fill the required field then we will get an alert message based on the field.
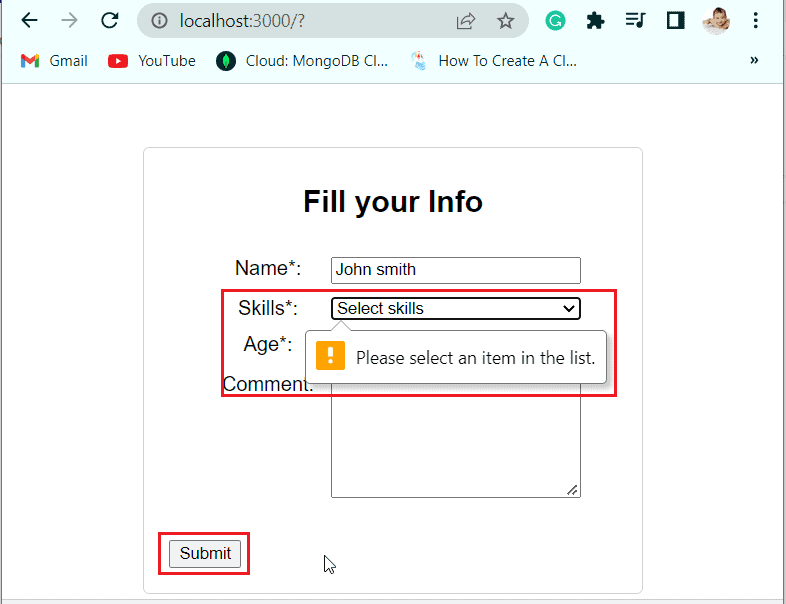
This is an example of form validation in react js on submit button.
Read What is JSX in React js
React form validation after submit
Here we will see how to validate the React form after submitting it with the react-hook-form library.
For example, we will create a simple form that will show the valid message, if the required field is incorrect.
To create a simple form we will use the semantic-UI-library. The Semantic UI is a bootstrap-like front-end programming framework created for theming. It has pre-built semantic components that make it easier to use human-friendly HTML to construct stunning and responsive layouts. To install it in your application, you can use the below command:
npm i semantic-ui-react semantic-ui-cssThe next library we are going to use is react-hook-form, to get the input values and log into the console. To install the react-hook-form, use the below command:
npm i react-hook-formNow, let’s see how to create a form, get the input and validate the form input fields.
Let’s say the index.html contains the below code:
<div id="root"></div>The Index.js file is the starting point of the React app, so it contains the below code:
import React from 'react';
import ReactDOM from 'react-dom/client';
import './index.css';
import App from './App';
import reportWebVitals from './reportWebVitals';

const root = ReactDOM.createRoot(document.getElementById('root'));
root.render(
    <App />

);
reportWebVitals();
The App.js file contains the below code:
import './App.css';
import Form from './Form';
function App() {
  return (
    <div className="App">
      <Form></Form>
    </div>
  );
}

export default App;
The ValidateForm.js contains the below code:
import React from 'react';
import { Form, Button } from 'semantic-ui-react';
import { useForm } from "react-hook-form";

export default function ValidateForm() {
    const { register, handleSubmit, formState: { errors } } = useForm();
    const onSubmit = (value) => {
        console.log(value);
    }
    return (
        <div>
            <Form onSubmit={handleSubmit(onSubmit)}>
                <Form.Field>
                    <label>Full Name</label>
                    <input
                        placeholder='Full Name'
                        type="text"
                        {...register("fullName", { required: true, maxLength: 10 })}
                    />
                </Form.Field>
                {errors.fullName && <p>Please check the Full Name</p>}
                <Form.Field>
                    <label>Company</label>
                    <input
                        placeholder='Company'
                        type="text"
                        {...register("company", { required: true, maxLength: 10 })}
                    />
                </Form.Field>
                {errors.company && <p>Please check the Company</p>}

                <Form.Field>
                    <label>Password</label>
                    <input
                        placeholder='Password'
                        type="password"
                        {...register("password", {
                            required: true,
                            pattern: /^(?=.*\d)(?=.*[a-z])(?=.*[A-Z]).{6,15}$/
                        })}
                    />
                </Form.Field>
                {errors.password && <p>Enter the  valid Password</p>}
                <Button type='submit'>Submit</Button>
            </Form>
        </div>
    )
}
Now run the application, with the npm start command, and you can see the form render on the page. Now fill out the form and you can see the information logged in the console.
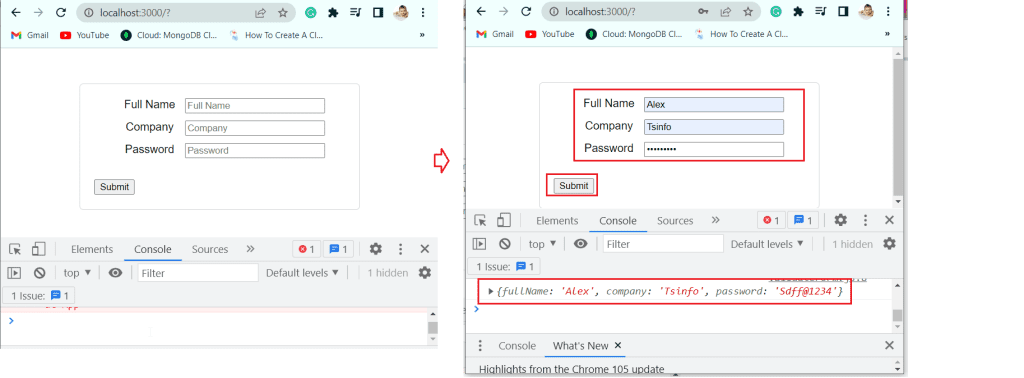
If the user will miss the field then it will show you the validation message below each field.
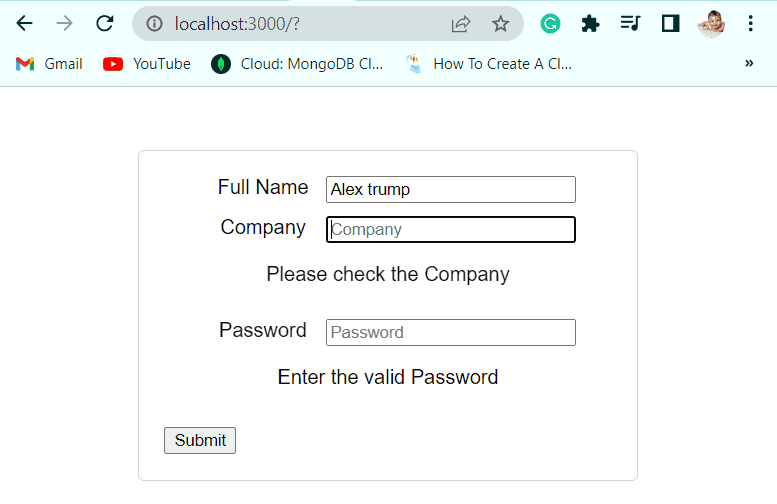
This is an example of React form validation after submit.
Read Props in React js
React input validation without form
Here we will see how to do input validation without a form tag in react js.
Let’s say the index.html contains the below code:
<div id="root"></div>The Index.js file is the starting point of the React app, so it contains the below code:
import React from 'react';
import ReactDOM from 'react-dom/client';
import './index.css';
import App from './App';
import reportWebVitals from './reportWebVitals';

const root = ReactDOM.createRoot(document.getElementById('root'));
root.render(
    <App />

);
reportWebVitals();
The App.js file contains the below code:
import './App.css';
import Form from './Form';
function App() {
  return (
    <div className="App">
      <Form></Form>
    </div>
  );
}

export default App;
The ValidateForm.js contains the below code:
import React from 'react';


const ValidateForm = () => {

    const validateForm = (e) => {

        e.preventDefault();

        const validMessage = document.querySelector('.message');

        const userInput = document.getElementById('userNameInput');

        const handleUserName = userInput.value;

        if (!handleUserName) {

          validMessage.innerHTML = 'Username Cannot be empty
';

        } else {

          validMessage.innerHTML = 'Welcome ' + handleUserName;

        }

      };

  return (

    <React.Fragment>

      <div className="form-wrapper">
        <h2>Enter your usename</h2>

          <p className="message"></p>

          <input type="text" id="userNameInput" placeholder="Enter your username" />

          <button type="submit" onClick={validateForm} >Submit</button>

      </div>

    </React.Fragment>

  );

};

export default ValidateForm
Now run the application with the npm start command, and you can see the input field render on the page. If the field is empty, the error message will occur like below.
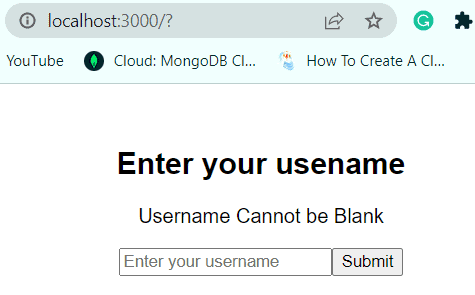
This is an example of how to do input validation without a form tag in react js.
Form validation in react js class component
Here we will see an example of form validation in react js class component.
For example, we will create an employee information form, if the employee will miss any field to fill in the form, then he/she will get an error message because in this form every field is required.
Let’s say the index.html contains the below code:
<div id="root"></div>The Index.js file is the starting point of the React app, so it contains the below code:
import React from 'react';
import ReactDOM from 'react-dom/client';
import './index.css';
import App from './App';
import reportWebVitals from './reportWebVitals';

const root = ReactDOM.createRoot(document.getElementById('root'));
root.render(
    <App />

);
reportWebVitals();
The App.js file contains the below code:
import './App.css';
import Form from './Form';
function App() {
  return (
    <div className="App">
      <Form></Form>
    </div>
  );
}

export default App;
The ValidateForm.js contains the below code:
import React, { Component } from "react";

class ValidateForm extends Component {
  constructor(props) {
    super(props);
    this.state = {
      empName: '',
      emailId: '',
      dob: '',
      gender: 'select',
      contact: '',
      country: 'select',
      formErrors: {}
    };

    this.initialState = this.state;
  }

  onFormValidation() {
    const { empName, emailId, dob, gender, contact, country } = this.state;
    let formErrors = {};
    let formIsValid = true;

    //Employee name
    if (!empName) {
      formIsValid = false;
      formErrors["empNameErr"] = "Name is required.";
    }

    //EmailId
    if (!emailId) {
      formIsValid = false;
      formErrors["emailIdErr"] = "Email id is required.";
    }
    else if (!(/^\w+([\.-]?\w+)*@\w+([\.-]?\w+)*(\.\w{2,3})+$/.test(emailId))) {

      formIsValid = false;
      formErrors["emailIdErr"] = "Invalid email id.";
    }

    //DOB
    if (!dob) {
      formIsValid = false;
      formErrors["dobErr"] = "DOB is required.";
    }
    else {
      var pattern = /^(0[1-9]|1[0-9]|2[0-9]|3[0-1])\/(0[1-9]|1[0-2])\/([0-9]{4})$/;
      if (!pattern.test(dob)) {
        formIsValid = false;
        formErrors["dobErr"] = "Invalid date of birth";
      }
    }

    //Gender
    if (gender === '' || gender === "select") {
      formIsValid = false;
      formErrors["genderErr"] = "Select gender.";
    }

    //Contact
    if (!contact) {
      formIsValid = false;
      formErrors["contactErr"] = "Conatact is required.";
    }
    else {
      var mobPattern = /^(?:(?:\\+|0{0,2})91(\s*[\\-]\s*)?|[0]?)?[789]\d{9}$/;
      if (!mobPattern.test(contact)) {
        formIsValid = false;
        formErrors["contactErr"] = "Invalid Contact number.";
      }
    }

    //country
    if (country === '' || country === "select") {
      formIsValid = false;
      formErrors["countryErr"] = "Select country.";
    }

    this.setState({ formErrors: formErrors });
    return formIsValid;
  }

  onChange = (e) => {
    const { name, value } = e.target;
    this.setState({ [name]: value });
  }

  onSubmit = (e) => {
    e.preventDefault();

    if (this.onFormValidation()) {
      alert('You have been successfully submitted.')
      this.setState(this.initialState)
    }
  }

  render() {

    const { empNameErr, emailIdErr, dobErr, genderErr, contactErr, countryErr } = this.state.formErrors;

    return (
      <div>
        <h3 style={{ textAlign: "center" }} >Employee Information Form </ h3>
        <div>
          <form onSubmit={this.onSubmit}>
            <div>
              <label htmlFor="empName">Name</label>
              <input type="text" name="empName"
                value={this.state.empName}
                onChange={this.onChange}
                placeholder="Your name.."
                className={empNameErr ? ' showError' : ''} />
              {empNameErr &&
                <div style={{ color: "red", paddingBottom: 10 }}>{empNameErr}</div>
              }

            </div>
            <div>
              <label htmlFor="emailId">Email Id</label>
              <input type="text" name="emailId"
                value={this.state.emailId}
                onChange={this.onChange}
                placeholder="Your email id.."
                className={emailIdErr ? ' showError' : ''} />
              {emailIdErr &&
                <div style={{ color: "red", paddingBottom: 10 }}>{emailIdErr}</div>
              }

            </div>
            <div>
              <label htmlFor="text">DOB</label>
              <input type="text" name="dob"
                value={this.state.dob}
                onChange={this.onChange}
                placeholder="DD/MM/YYYY.."
                className={dobErr ? ' showError' : ''} />
              {dobErr &&
                <div style={{ color: "red", paddingBottom: 10 }}>{dobErr}</div>
              }
            </div>
            <div>
              <label htmlFor="gender">Gender</label>
              <select name="gender" onChange={this.onChange}
                className={genderErr ? ' showError' : ''}
                value={this.state.gender} >
                <option value="select">--Select--</option>
                <option value="male">Male</option>
                <option value="female">Female</option>
                <option value="Other">Other</option>
              </select>
              {genderErr &&
                <div style={{ color: "red", paddingBottom: 10 }}>{genderErr}</div>
              }
            </div>
            <div>
              <label htmlFor="contact">Phone Number</label>
              <input type="text" name="contact"
                onChange={this.onChange}
                value={this.state.contact}
                placeholder="Your phone number.."
                className={contactErr ? ' showError' : ''} />
              {contactErr &&
                <div style={{ color: "red", paddingBottom: 10 }}>{contactErr}</div>
              }
            </div>
            <div>
              <label htmlFor="country">country</label>
              <select name="country"
                value={this.state.country}
                onChange={this.onChange}
                className={countryErr ? ' showError' : ''} >
                <option value="select">--Select--</option>
                <option value="India">India</option>
                <option value="USA">USA</option>
                <option value="UK">UK</option>
              </select>
              {countryErr &&
                <div style={{ color: "red", paddingBottom: 10 }}>{countryErr}</div>
              }
            </div>
            <input type="submit" value="Submit" />
          </form>
        </div>
      </div >
    )
  }
}

export default ValidateForm;
Now run the application with the npm start command and you can see the form render on the page. If the user will not fill out the form or leave any field then the user will get an error message.
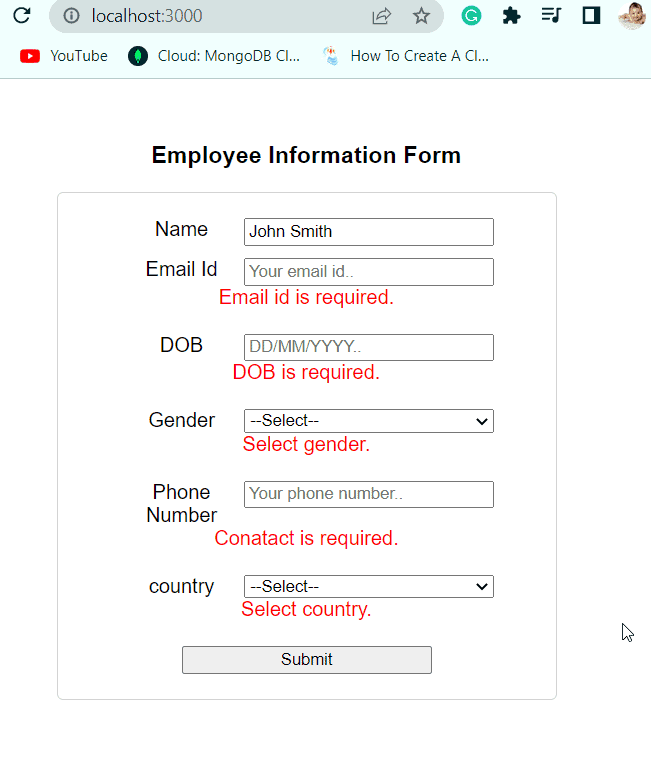
Read State in React js
React form validation on change
Here we will see how to validate the form on change in React js.
For example, we will create a Create Account form, having three fields (Name, email, password). When the value of these three fields gets changed, updated, and validated by the function called onChange. So let’s how to do it in practice.
Let’s say the index.html contains the below code:
<div id="root"></div>The Index.js file is the starting point of the React app, so it contains the below code:
import React from 'react';
import ReactDOM from 'react-dom/client';
import './index.css';
import App from './App';
import reportWebVitals from './reportWebVitals';

const root = ReactDOM.createRoot(document.getElementById('root'));
root.render(
    <App />

);
reportWebVitals();
The App.js file contains the below code:
import './App.css';
import Form from './Form';
function App() {
  return (
    <div className="App">
      <Form></Form>
    </div>
  );
}

export default App;
The ValidateForm.js contains the below code:
import React from 'react';

const validEmailIdPattern = RegExp(
  /^(([^<>()\[\]\.,;:\s@\"]+(\.[^<>()\[\]\.,;:\s@\"]+)*)|(\".+\"))@(([^<>()[\]\.,;:\s@\"]+\.)+[^<>()[\]\.,;:\s@\"]{2,})$/i
);
const handleValidateForm = errors => {
  let isValid = true;
  Object.values(errors).forEach(val => val.length > 0 && (isValid = false));
  return isValid;
};

export default class ValidateForm extends React.Component {
  constructor(props) {
    super(props);
    this.state = {
      fullName: null,
      emailId: null,
      password: null,
      errors: {
        fullName: '',
        emailId: '',
        password: '',
      }
    };
  }

  handleFieldChange = (event) => {
    event.preventDefault();
    const { name, value } = event.target;
    let errors = this.state.errors;

    switch (name) {
      case 'fullName':
        errors.fullName =
          value.length < 6
            ? 'Full Name must be at least 6 characters long!'
            : '';
        break;
      case 'emailId':
        errors.emailId =
          validEmailIdPattern.test(value)
            ? ''
            : 'EmailId is not valid!';
        break;
      case 'password':
        errors.password =
          value.length < 8
            ? 'Password must be at least 8 characters long!'
            : '';
        break;
      default:
        break;
    }

    this.setState({errors, [name]: value});
  }

  onSubmit = (event) => {
    event.preventDefault();
    if(handleValidateForm(this.state.errors)) {
      console.info('Valid Form')
    }else{
      console.error('Invalid Form')
    }
  }

  render() {
    const {errors} = this.state;
    return (
      <div className='wrapper'>
        <div className='form-wrapper'>
          <h2>Create Account</h2>
          <form onSubmit={this.onSubmit} noValidate>
            <div className='fullName'>
              <label htmlFor="fullName">Full Name</label>
              <input type='text' name='fullName' onChange={this.handleFieldChange} noValidate />
              {errors.fullName.length > 0 &&
                <span className='error'>{errors.fullName}</span>}
            </div>
            <div className='emailId'>
              <label htmlFor="emailId">EmailId</label>
              <input type='emailId' name='emailId' onChange={this.handleFieldChange} noValidate />
              {errors.emailId.length > 0 &&
                <span className='error'>{errors.emailId}</span>}
            </div>
            <div className='password'>
              <label htmlFor="password">Password</label>
              <input type='password' name='password' onChange={this.handleFieldChange} noValidate />
              {errors.password.length > 0 &&
                <span className='error'>{errors.password}</span>}
            </div>
            <div className='submit'>
              <button>Create</button>
            </div>
          </form>
        </div>
      </div>
    );
  }
}
Now run the application with the npm start command, and you can see the form render on the page. If the name is less than 6 characters, the email id is not valid, and the password is less than 8, then it will show an error message.
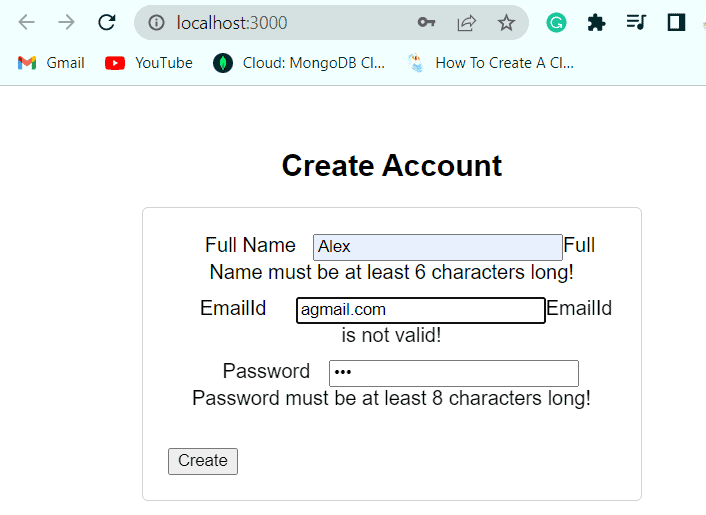
Read State in React js Hooks
React form validation disable button
Here we will see how to do React form validation on blur.
For example, we will create a form contains one one email field, until we will fill the field the submit button will remain a blur.
Let’s say the index.html contains the below code:
<div id="root"></div>The Index.js file is the starting point of the React app, so it contains the below code:
import React from 'react';
import ReactDOM from 'react-dom/client';
import './index.css';
import App from './App';
import reportWebVitals from './reportWebVitals';

const root = ReactDOM.createRoot(document.getElementById('root'));
root.render(
    <App />

);
reportWebVitals();
The App.js file contains the below code:
import './App.css';
import Form from './Form';
function App() {
  return (
    <div className="App">
      <Form></Form>
    </div>
  );
}

export default App;
The ValidateForm.js contains the below code:
import React, {useState} from 'react'
 const ValidateForm = (onSignup) => {
  const [emailId, setEmailId] = useState('');
  const isAuthentic = emailId != null && emailId.trim().length > 0;
  const handleSubmit = event => {
    event.preventDefault();
    onSignup({emailId});
  };

  return (
    <form onSubmit={handleSubmit}>
      <label>EmailId</label>
      <input
        type="email"
        required
        value={emailId}
        onChange={event => setEmailId(event.target.value)} />
      <button
        disabled={!isAuthentic}>
        Sign up
      </button>
    </form>
  );
};
export default ValidateForm;
Now run the application with the npm start command and you can see the submit button is blurred, as the field is empty.
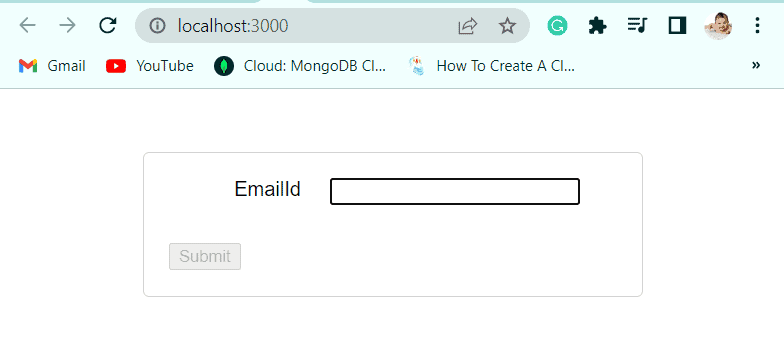
Now, if I will fill in the field, you can see the submit button is unblurred and you can click on the button.
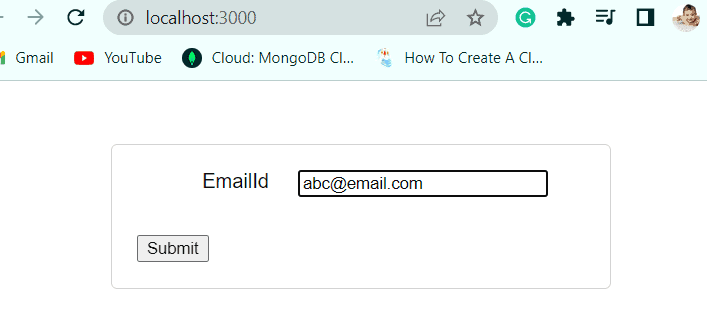
This is an example of React form validation disable button.
Custom form validation in react js
Here we will see how to do custom form validation in react js.
You will discover how to use custom validation rules with forms in ReactJS applications.
In this example, we will see how to create and validate the custom form. Also, we will see how to handle form data in react.
Let’s say the index.html contains the below code:
<div id="root"></div>The Index.js file is the starting point of the React app, so it contains the below code:
import React from 'react';
import ReactDOM from 'react-dom/client';
import './index.css';
import App from './App';
import reportWebVitals from './reportWebVitals';

const root = ReactDOM.createRoot(document.getElementById('root'));
root.render(
    <App />

);
reportWebVitals();
The App.js file contains the below code:
import './App.css';
import Form from './Form';
function App() {
  return (
    <div className="App">
      <Form></Form>
    </div>
  );
}

export default App;
The ValidateForm.js contains the below code:
import React from 'react'
const initialState = {
name:null,
emailId:null,
password:null,
nameError:null,
emaiIdError:null,
passwordError:null
}
class ValidateForm extends React.Component{
constructor(){
super();
this.state = initialState;
this.onInputChange = this.onInputChange.bind(this);
}
onInputChange(event) {
const target = event.target;
var value = target.value;
const name = target.name;
this.setState({
[name]: value
});
}
onValidate(){
let nameError = "";
let emaiIdError = "";
let passwordError = "";
if(!this.state.name){
nameError = "Name field is required";
}
const reg = /^\w+([\.-]?\w+)*@\w+([\.-]?\w+)*(\.\w{2,3})+$/;
if(!this.state.emailId || reg.test(this.state.emailId) === false){
emaiIdError = "EmailId Field is Invalid ";
}
if(!this.state.password){
passwordError = "Password field is required";
}
if(emaiIdError || nameError || passwordError){
this.setState({nameError,emaiIdError,passwordError});
return false;
}
return true;
}
handleSubmit(){
if(this.onValidate()){
console.warn(this.state);
this.setState(initialState);
}
}
render(){
return(
<div>
<div>
<div>
<h3> Custom Form Validation</h3><br />
<div>
<div >
<label>Name :</label>
<input type="text" name="name" value={this.state.name} onChange={this.onInputChange} /><br></br>
<span>{this.state.nameError}</span>
</div>
</div>
<div>
<div >
<label>EmailId :</label>
<input type="emailId" name="emailId" value={this.state.emailId} onChange={this.onInputChange} /><br></br>
<span>{this.state.emaiIdError}</span>
</div>
</div>
<div >
<div >
<label>Password :</label>
<input type="password" name="password" value={this.state.password} onChange={this.onInputChange} /><br></br>
<span>{this.state.passwordError}</span>
</div>
</div>
<div>
<div>
<button type="handleSubmit"  onClick={()=>this.handleSubmit()}>Submit</button>
</div>
</div>
</div>
</div>
</div>
)
}
}
export default ValidateForm;
Now run the application with the npm start command and you can see the form render on the page. If the field is empty, you will get an error message.
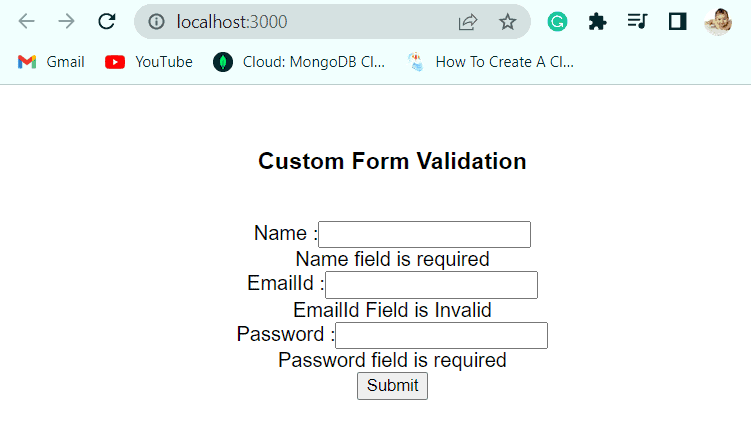
And if the email is not in the correct type also we will get the validation error like below.
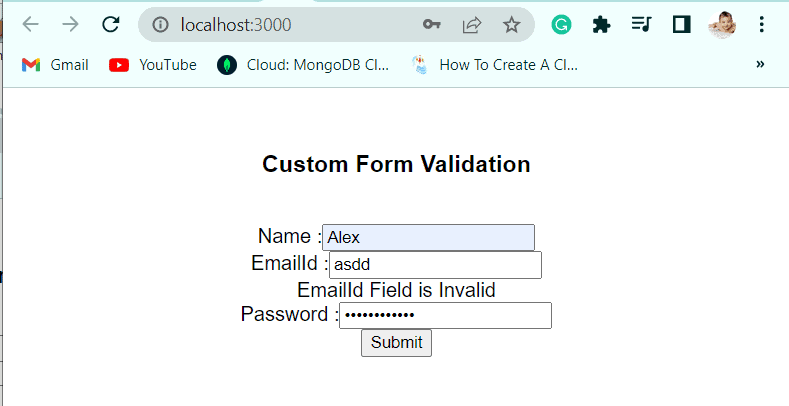
Read Handling Events in React js
React form validation alert
Here we will see how to create react form validation alert.
In this example by using the npm package react-alert, we’ll examine how to validate input data. In the event of invalid user input data, react-alert makes it simpler to send the error messages back to the user.
Let’s say the index.html contains the below code:
<div id="root"></div>The Index.js file is the starting point of the React app, so it contains the below code:
import React from 'react';

import ReactDOM from 'react-dom/client';

import './index.css';

import App from './App';

import { Provider as AlertProvider } from 'react-alert'

import AlertTemplate from 'react-alert-template-basic'

import reportWebVitals from './reportWebVitals';


const options = {

  position: 'bottom center',

  timeout: 6000,

  offset: '30px',

  transition: 'scale'

}


const root = ReactDOM.createRoot(document.getElementById('root'));

root.render(

  <AlertProvider template={AlertTemplate} {...options}>

    <App />

  </AlertProvider>

);
// If you want to start measuring performance in your app, pass a function
// to log results (for example: reportWebVitals(console.log))
// or send to an analytics endpoint. Learn more: https://bit.ly/CRA-vitals
reportWebVitals();
The App.js file contains the below code:
import './App.css';
import Form from './Form';
function App() {
  return (
    <div className="App">
      <Form></Form>
    </div>
  );
}

export default App;
The ValidateForm.js contains the below code:
import React from 'react';

import { useAlert } from 'react-alert'

 const ValidateForm = () => {

  const alert = useAlert()

    const validateForm = (e) => {

        e.preventDefault();

        const userNameInput = document.getElementById('userNameInput');

        const userName = userNameInput.value;

        if (!userName) {

          alert.error('Username Cannot be Blank');

        } else {

          alert.info('Welcome ' + userName);

        }

      };

  return (

    <React.Fragment>

      <div className="form-wrapper">

          <p className="message"></p>

          <input type="text" id="userNameInput" placeholder="Enter your username" />

          <button type="submit" onClick={validateForm} >Submit</button>

      </div>

    </React.Fragment>

  );

};

export default ValidateForm;
Now run the application with the npm start command and you can see the form with the user name field.
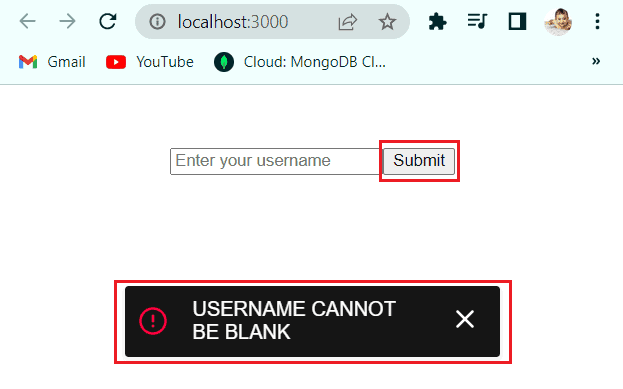
This is an example of React form validation alert.
form validation in react js using hooks
Here we will see how to validate the Form using hooks in React js.
For example, here we will see how to validate the simple form using hooks in react js.
Let’s say the index.html contains the below code:
<div id="root"></div>The Index.js file is the starting point of the React app, so it contains the below code:
import React from 'react';
import ReactDOM from 'react-dom/client';
import './index.css';
import App from './App';
import reportWebVitals from './reportWebVitals';

const root = ReactDOM.createRoot(document.getElementById('root'));
root.render(
    <App />

);
reportWebVitals();
The App.js file contains the below code:
// import logo from './logo.svg';
import './App.css';
import Form from './Form';

function App() {
  return (
    <div className="App">
      <Form></Form>
    </div>
  );
}

export default App;
The Form.js contains the below code:
import {useState} from 'react';

const ValidateForm = (initialValues,validate) => {
	const [inputs,setInputs] = useState(initialValues);
	const [errors,setErrors] = useState({});

	const handleSubmit = (event) => {
		event.preventDefault();
		const validationErrors = validate(inputs);
		const noErrors = Object.keys(validationErrors).length === 0;
		setErrors(validationErrors);
		if(noErrors){
			console.log("Authenticated",inputs);
		}else{
			console.log("errors try again",validationErrors);
		}

	}

	const handleInputChange = (event) => {
    	event.persist();
    	setInputs(inputs => ({...inputs, [event.target.name]: event.target.value}));
  	}

	return {
    	handleSubmit,
   		handleInputChange,
    	inputs,
    	errors
  	};
}

export default ValidateForm
The ValidateForm contains the below code:
import {useState} from 'react';

const ValidateForm = (initialValues,validate) => {
	const [inputs,setInputs] = useState(initialValues);
	const [errors,setErrors] = useState({});

	const onSubmit = (event) => {
		event.preventDefault();
		const validationErrors = validate(inputs);
		const noErrors = Object.keys(validationErrors).length === 0;
		setErrors(validationErrors);
		if(noErrors){
			console.log("There is no error",inputs);
		}else{
			console.log("errors try again",validationErrors);
		}

	}

	const handleInputChange = (event) => {
    	event.persist();
    	setInputs(inputs => ({...inputs, [event.target.name]: event.target.value}));
  	}

	return {
    	onSubmit,
   		handleInputChange,
    	inputs,
    	errors
  	};
}

export default ValidateForm
Next, the validation.js component contains the below code:
const validate = (inputs) => {
    //Email errors
   const errors = {};
   if (!inputs.email) {
       errors.email = 'Check Email';
   } else if (
       !/^[A-Z0-9._%+-]+@[A-Z0-9.-]+\.[A-Z]{2,}$/i.test(inputs.email)
   ) {
       errors.email = 'Invalid email address';
   }

   //Password Errors
   if(!inputs.password  || inputs.password.length<8){
       errors.password = 'Check Password'
   }
   return errors;
}

export default validate;
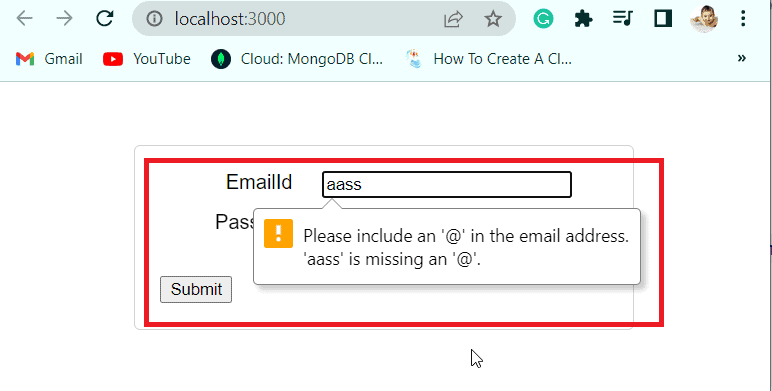
Now run the application, with the npm start command, and you can see the form render on the page. As you can see, if I will put the nothing and invalid email address we will get an error, while submitting the form.
And if I will insert the valid email address, and if I will click on submit button then you can see the error below the password field.
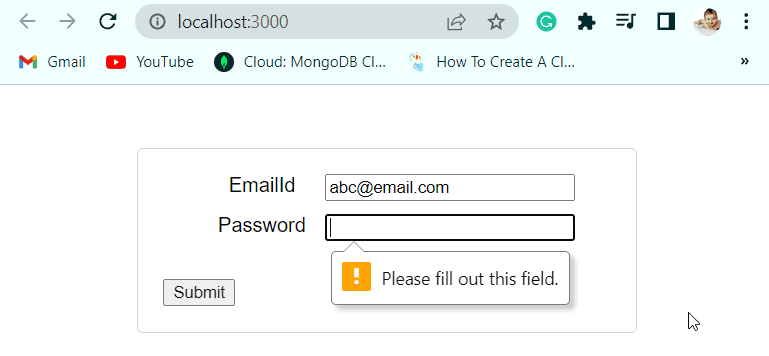
This is an example of form validation in react js using hooks.
Read Conditional rendering react js
React form validation on blur
Here we will see an example of React form validation on blur.
The onBlur event, which occurs frequently in HTML, causes an input element to lose focus as it is transferred to another one. When a user clicks the next input element or just hits tab, this frequently occurs. Other UI interactivity is made possible by capturing this event and using logic on it, such as validating user input once focus is relinquished.
In this manner, the user won’t have to wait until the input has been submitted before learning what went wrong. For example will show you how to integrate logic into a React.js component using the onBlur event.
Let’s say the index.html contains the below code:
<div id="root"></div>The Index.js file is the starting point of the React app, so it contains the below code:
import React from 'react';
import ReactDOM from 'react-dom/client';
import './index.css';
import App from './App';
import reportWebVitals from './reportWebVitals';

const root = ReactDOM.createRoot(document.getElementById('root'));
root.render(
    <App />

);
reportWebVitals();
The App.js file contains the below code:
import './App.css';
import Form from './Form';
function App() {
  return (
    <div className="App">
      <ValidateForm></ValidateForm>
    </div>
  );
}

export default App;
The ValidateForm.js contains the below code:
import React from 'react';

export default class ValidateForm extends React.Component {
  constructor(props) {
    super(props);

    this.state = {
      customerId: "",
      pwd: "",
      messagecustomerId: "",
      messagePwd: ""
    }
  }

  handleOnBlurcustomerId(event) {
    var customerId        = event.target.value;
    var messagecustomerId = "";

    if(!customerId) {
      messagecustomerId = "customerId required";
    }

    this.setState({
      customerId: customerId,
      messagecustomerId: messagecustomerId
    });
  }

  render() {
    return (
      <div>
        <label>
          customerId:
        </label>
        <input
          type="text"
          onBlur={this.handleOnBlurcustomerId.bind(this)}
        />
        {this.state.messagecustomerId}
        <br/>
        <label>
          Password:
        </label>
        <input
          type="password"
        />
        {this.state.messagePwd}
        <hr/>
        <button>
          Login
        </button>
      </div>
    );
  }
}
Now run the application with the npm start command and you can see the form render on the page. So here whenever we jump from customerId field to the password field, the onBlur will trigger. Here

This is an example of React form validation on blur.
React hook form validation date
Here we will see how to validate the date field in react js form.
For example, we will use the React-hook-form library to validate the date field in React js form.
Let’s say the index.html contains the below code:
<div id="root"></div>The Index.js file is the starting point of the React app, so it contains the below code:
import React from 'react';
import ReactDOM from 'react-dom/client';
import './index.css';
import App from './App';
import reportWebVitals from './reportWebVitals';

const root = ReactDOM.createRoot(document.getElementById('root'));
root.render(
    <App />

);
reportWebVitals();
The App.js file contains the below code:
import './App.css';
import Form from './Form';
function App() {
  return (
    <div className="App">
      <ValidateForm></ValidateForm>
    </div>
  );
}

export default App;
The ValidateForm.js contains the below code:
import React from 'react'
import { useForm } from "react-hook-form";

const ValidateForm = () => {
  // handle events
  const { register, handleSubmit, formState: { errors } } = useForm();

  // handle submit
  const Submit = data => alert(JSON.stringify(data));

  return (
    <React.Fragment>
      <section>
        <form onSubmit={handleSubmit(Submit)}>
          <div >
            {/* header section */}
            <div>
              <p >Validate date input</p>
            </div>

            {/* body section */}
            <div>
              <div>
                <input
                  type='date'
                  className={`w-96 text-3xl rounded-lg ${errors.date &&
                    " focus:border-red-500 focus:ring-red-500 border-red-500"}`}
                  {...register("date", { required: 'Date is required' })}

                />
              </div>
              <div>
                {errors.date && <span className="text-sm text-red-500">{errors.date.message}</span>}
              </div>
            </div>

            {/* submit btn section */}
            <div className='flex justify-center items-center mt-14'>
              <input
                type='submit'
                value='Submit'
                className='w-2/5 h-10 bg-green-700 text-white font-bold rounded-lg'
              />
            </div>
          </div>
        </form>
      </section>
    </React.Fragment>
  )
}

export default ValidateForm;
Now run the application with the npm start command and you can see the form with the date field rendered on the page. As the date field is required, if we will left empty then it will show the error message.
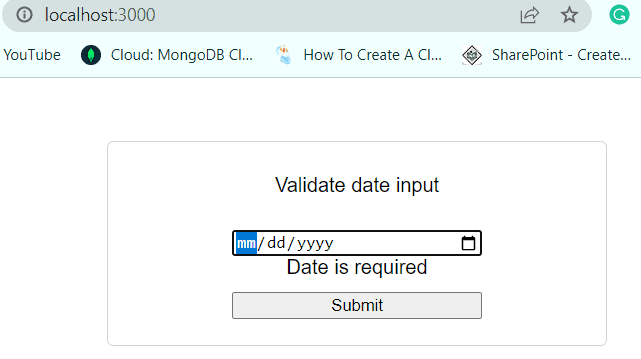
This is an example of React hook form validation date.
Read React js form examples for beginners
React form validation for phone number
Here we will see how to validate the phone number field in the Form in React js.
For example, we will create a form with the phone number or contact field, and also validate, if the number is 10 digits.
Let’s say the index.html contains the below code:
<div id="root"></div>The Index.js file is the starting point of the React app, so it contains the below code:
import React from 'react';
import ReactDOM from 'react-dom/client';
import './index.css';
import App from './App';
import reportWebVitals from './reportWebVitals';

const root = ReactDOM.createRoot(document.getElementById('root'));
root.render(
    <App />

);
reportWebVitals();
The App.js file contains the below code:
import './App.css';
import Form from './Form';
function App() {
  return (
    <div className="App">
      <ValidateForm></ValidateForm>
    </div>
  );
}

export default App;
The ValidateForm.js contains the below code:
mport React from 'react';
class ValidateForm extends React.Component {

  constructor() {

    super();

    this.state = {

      input: {},

      errors: {}

    };

    this.onChange = this.onChange.bind(this);

    this.handleSubmit = this.handleSubmit.bind(this);

  }
  onChange(event) {

    let input = this.state.input;

    input[event.target.name] = event.target.value;
    this.setState({

      input

    });

  }
  handleSubmit(event) {

    event.preventDefault();
    if (this.onvalidate()) {

      console.log(this.state);
      let input = {};


      input["contact"] = "";


      this.setState({ input: input });
      alert('Contact is submited');

    }
  }
  onvalidate() {
    let input = this.state.input;
    let errors = {};
    let isValid = true;


    if (!input["contact"]) {
      isValid = false;
      errors["contact"] = "Please enter your contact number.";

    }
    if (typeof input["contact"] !== "undefined") {
      var pattern = new RegExp(/^[0-9\b]+$/);
      if (!pattern.test(input["contact"])) {
        isValid = false;
        errors["contact"] = "Please enter only number.";
      } else if (input["contact"].length !== 10) {
        isValid = false;
        errors["contact"] = "Please enter valid contact number.";
      }
    }

    this.setState({

      errors: errors
    });
    return isValid;
  }
  render() {

    return (
      <div>

        <h1> Validation For contact Number </h1>

        <form onSubmit={this.handleSubmit}>


          <div class="form-group">
            <label for="contact">Contact📞:</label>
            <input
              type="text"
              name="contact"
              value={this.state.input.contact}
              onChange={this.onChange}
              class="form-control"
              placeholder="Enter contact"
              id="emailId" />
            <div className="text-danger">{this.state.errors.contact}</div>
          </div>


          <input type="submit" value="Submit" class="btn btn-success" />
        </form>
      </div>
    );
  }
}
export default ValidateForm;
Now run the application with the npm start command and you can see the form with the contact field rendered on the page. If the number you enter is less than 10, then it will show you the error message, like below.
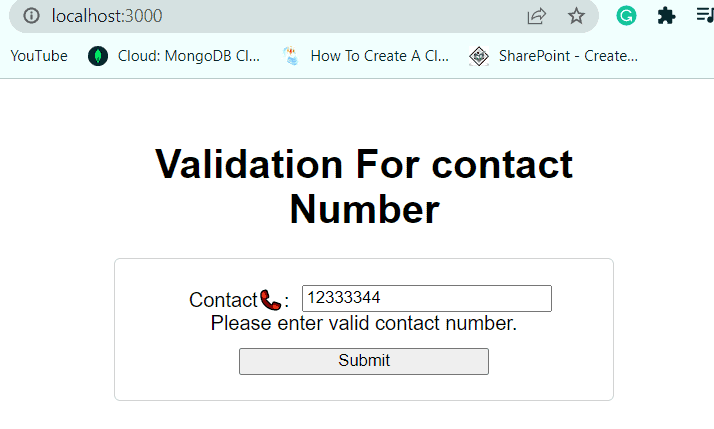
This is an example of React form validation for phone number.
Read How to reset form in react js
React form validation formik
Here we will see how to validate the form with the Formik library.
Formik is made to handle complicated form validation with ease. Formik provides field-level and form-level validation that is both synchronous and asynchronous.
To use Formik in our project we need to install it, by using the below command:
npm install Formik --saveFor example, we will create a Login form with the validation with the help of the Formik library in React js.
Let’s say the index.html contains the below code:
<div id="root"></div>The Index.js file is the starting point of the React app, so it contains the below code:
import React from 'react';
import ReactDOM from 'react-dom/client';
import './index.css';
import App from './App';
import reportWebVitals from './reportWebVitals';

const root = ReactDOM.createRoot(document.getElementById('root'));
root.render(
    <App />

);
reportWebVitals();
The App.js file contains the below code:
import './App.css';
import Form from './Form';
function App() {
  return (
    <div className="App">
      <ValidateForm></ValidateForm>
    </div>
  );
}

export default App;
The ValidateForm.js contains the below code:
import React from "react";
import { Formik } from "formik";


const initialValues = {
  emailId: "",
  pwd: ""
};

const onvalidate = (values) => {
  let errors = {};
  const regex = /^[^\s@]+@[^\s@]+\.[^\s@]{2,}$/i;

  if (!values.emailId) {
    errors.emailId = "EmailId is required";
  } else if (!regex.test(values.emailId)) {
    errors.emailId = "Invalid EmailId";
  }

  if (!values.pwd) {
    errors.pwd = "Pwd is required";
  } else if (values.pwd.length < 4) {
    errors.pwd = "Pwd too short";
  }

  return errors;
};

const onSubmit = (values) => {
  console.log(values);
};

const ValidateForm = () => {
  return (
    <Formik
      initialValues={initialValues}
      validate={onvalidate}
      onSubmit={onSubmit}
    >
      {(formik) => {
        const {
          values,
          handleChange,
          handleSubmit,
          errors,
          touched,
          handleBlur,
          isValid,
          dirty
        } = formik;
        return (
          <div className="container">
            <h1>Log in to continue</h1>
            <form onSubmit={handleSubmit}>
              <div className="form-row">
                <label htmlFor="emailId">EmailId📧</label>
                <input
                  type="email"
                  name="emailId"
                  id="emailId"
                  value={values.emailId}
                  onChange={handleChange}
                  onBlur={handleBlur}
                  className={
                    errors.emailId && touched.emailId ? "input-error" : null
                  }
                />
                {errors.emailId && touched.emailId && (
                  <span className="error">{errors.emailId}</span>
                )}
              </div>

              <div className="form-row">
                <label htmlFor="pwd">Password🗝</label>
                <input
                  type="password"
                  name="pwd"
                  id="pwd"
                  value={values.pwd}
                  onChange={handleChange}
                  onBlur={handleBlur}
                  className={
                    errors.pwd && touched.pwd ? "input-error" : null
                  }
                />
                {errors.pwd && touched.pwd && (
                  <span className="error">{errors.pwd}</span>
                )}
              </div>

              <button
                type="submit"
                className={!(dirty && isValid) ? "disabled-btn" : ""}
                disabled={!(dirty && isValid)}
              >
                Sign In
              </button>
            </form>
          </div>
        );
      }}
    </Formik>
  );
};

export default ValidateForm;
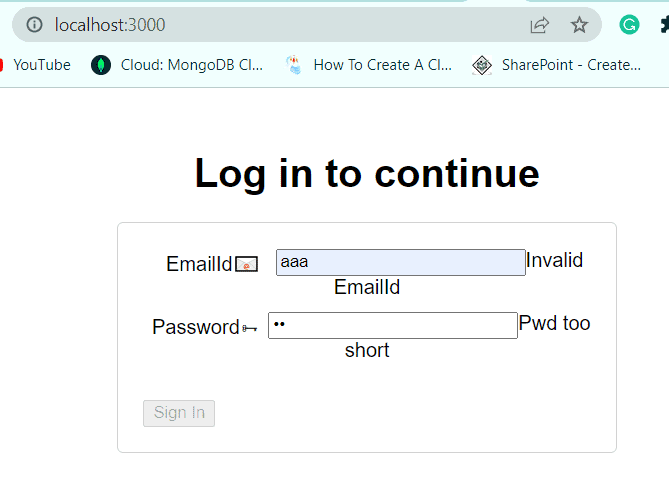
Now run the application with the start command and you can see the Form render on the page. Now we cannot log in until we will fill the form with the valid email id and password.
React hook form checkbox group validation
Here we will see react hook form checkbox group validation.
This example shows us how to create and validate checkbox components using Formik and Yup library.
Formik is a simple form library for React that is free and open-source. Formik is a form tool with a minimal API that enables developers to build form fields with less code. It was designed for scalability and high performance.
Yup is a tool for validating and parsing values in JavaScript. Create a schema, modify a value to match, check the shape of a value, or do both. Yup schema enables the design of intricate, interconnected validations or value transformations.
Let’s say the index.html contains the below code:
<div id="root"></div>The Index.js file is the starting point of the React app, so it contains the below code:
import React from 'react';
import ReactDOM from 'react-dom/client';
import './index.css';
import App from './App';
import reportWebVitals from './reportWebVitals';

const root = ReactDOM.createRoot(document.getElementById('root'));
root.render(
    <App />

);
reportWebVitals();
The App.js file contains the below code:
import './App.css';
import Form from './Form';
function App() {
  return (
    <div className="App">
      <Form></Form>
    </div>
  );
}

export default App;
The ValidateForm.js contains the below code:
import React from 'react'
import * as Yup from 'yup'
import { useForm } from 'react-hook-form'
import { yupResolver } from '@hookform/resolvers/yup'

export default function ValidateForm() {
  const validation = Yup.object().shape({
    chooseCbOption: Yup.bool().oneOf([true], 'Checkbox selection is required'),
  })
  const formOptions = { resolver: yupResolver(validation) }
  const { register, handleSubmit, reset, formState } = useForm(formOptions)
  const { errors } = formState
  function onFormSubmit(data) {
    console.log(JSON.stringify(data, null, 4))
    return false
  }
  return (
    <div>
      <h2>Required Make Checkbox in React Example</h2>
      <form onSubmit={handleSubmit(onFormSubmit)}>
        <div >
          <div >
            <input
              type="checkbox"
              name="selectCheckbox"
              id="selectCheckbox"
              {...register('chooseCbOption')}
              className={`form-check-input ${
                errors.chooseCbOption ? 'is-invalid' : ''
              }`}
            />
            <label htmlFor="chooseCbOption" className="form-check-label">
              Accept Term and Condition
            </label>
            <div className="invalid-feedback">{errors.chooseCbOption?.message}</div>
          </div>
        </div>
        <div>
          <button type="submit" className="btn btn-dark"> Submit</button>

        </div>
      </form>
    </div>
  )
}
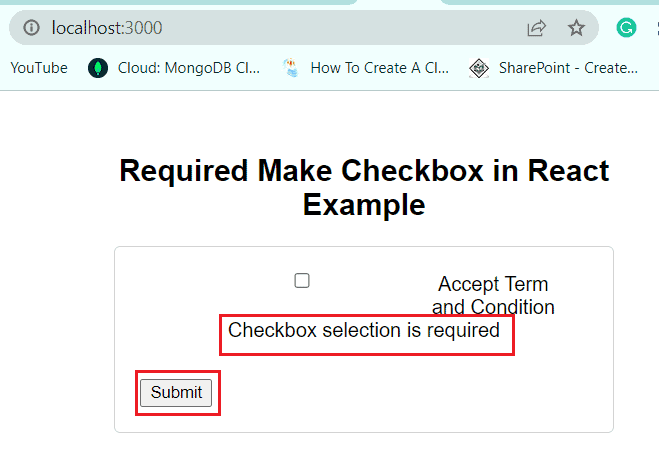
Now run the application with the npm start command and you can see from a render with a checkbox.
React hook validate an email
Here we will see how to validate the email in React js
For example, we will see how to validate the email field in the form of react js using the React-hook-form library.
Let’s say the index.html contains the below code:
<div id="root"></div>The Index.js file is the starting point of the React app, so it contains the below code:
import React from 'react';
import ReactDOM from 'react-dom/client';
import './index.css';
import App from './App';
import reportWebVitals from './reportWebVitals';

const root = ReactDOM.createRoot(document.getElementById('root'));
root.render(
    <App />

);
reportWebVitals();
The App.js file contains the below code:
import './App.css';
import Form from './Form';
function App() {
  return (
    <div className="App">
      <ValidateForm></ValidateForm>
    </div>
  );
}

export default App;
The ValidateForm.js contains the below code:
import React from 'react';
import { Form, Button } from 'semantic-ui-react';
import { useForm } from "react-hook-form";

export default function ValidateForm() {
    const { register, handleSubmit, formState: { errors } } = useForm();
    const Submit = (data) => {
        console.log(data);
    }
    return (
        <div>
            <Form onSubmit={handleSubmit(Submit)}>

                <Form.Field>
                    <label>Email</label>
                    <input
                        placeholder='Email'
                        type="email"
                        {...register("email",
                            {
                                required: true,
                                pattern: /^(([^<>()\[\]\\.,;:\s@"]+(\.[^<>()\[\]\\.,;:\s@"]+)*)|(".+"))@((\[[0-9]{1,3}\.[0-9]{1,3}\.[0-9]{1,3}\.[0-9]{1,3}\])|(([a-zA-Z\-0-9]+\.)+[a-zA-Z]{2,}))$/
                            })}
                    />
                </Form.Field>
                {errors.email && <p>Please check the Email</p>}

                <Button type='submit'>Submit</Button>
            </Form>
        </div>
    )
}
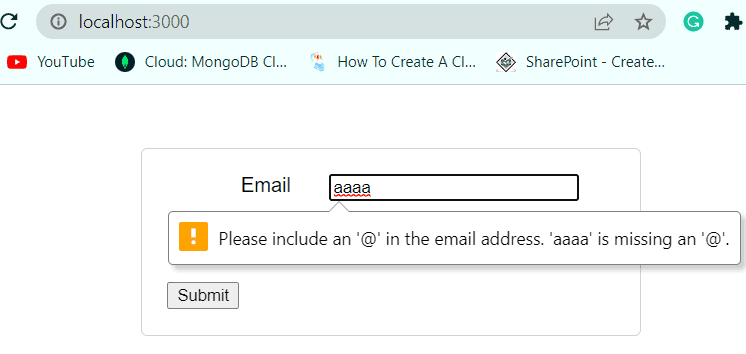
Now run the application with the npm start command and you can see the form render on the page with the email id field. If the email id field is empty, then it will show you the below error message.
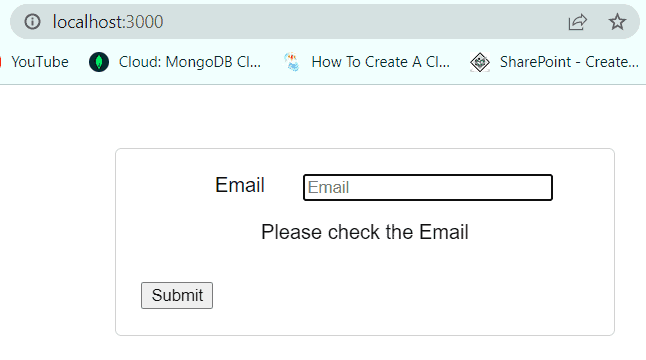
In case you fill the invalid email, then it will show you the below error message.
React form validation of multiple fields
Here we will see how to handle validation of multiple fields in React form.
Validating each field separately is frequently sufficient:
A @ symbol is required in emails, and passwords should have at least four characters.
However, there are times when you must combine the validation of multiple fields:
Let’s say the index.html contains the below code:
<div id="root"></div>The Index.js file is the starting point of the React app, so it contains the below code:
import React from 'react';
import ReactDOM from 'react-dom/client';
import './index.css';
import App from './App';
import reportWebVitals from './reportWebVitals';

const root = ReactDOM.createRoot(document.getElementById('root'));
root.render(
    <App />

);
reportWebVitals();
The App.js file contains the below code:
import './App.css';
import Form from './Form';
function App() {
  return (
    <div className="App">
      <ValidateForm></ValidateForm>
    </div>
  );
}

export default App;
The ValidateForm.js contains the below code:
import React from "react";


function validate(email, pwd, pwdConfirm) {
  // true means invalid, so our conditions got reversed
  return {
    email: email.length === 0,
    pwd: pwd.length === 0,
    pwdConfirm: pwdConfirm !== pwd
  };
}

export default class ValidateForm extends React.Component {
  constructor() {
    super();
    this.state = {
      email: "",
      pwd: "",
      pwdConfirm: "",

      touched: {
        email: false,
        pwd: false,
        pwdConfirm: false
      }
    };
  }

  handleEmailChange = evt => {
    this.setState({ email: evt.target.value });
  };

  handlePwdChange = evt => {
    this.setState({ pwd: evt.target.value });
  };

  handlePwdConfirmChange = evt => {
    this.setState({ pwdConfirm: evt.target.value });
  };

  handleBlur = field => evt => {
    this.setState({
      touched: { ...this.state.touched, [field]: true }
    });
  };

  handleSubmit = evt => {
    if (!this.canBeSubmitted()) {
      evt.preventDefault();
      return;
    }
    const { email, pwd } = this.state;
    alert(`Signed up with email: ${email} pwd: ${pwd}`);
  };

  canBeSubmitted() {
    const errors = validate(
      this.state.email,
      this.state.pwd,
      this.state.pwdConfirm
    );
    const isValid = Object.keys(errors).some(x => errors[x]);
    return !isValid;
  }

  render() {
    const errors = validate(
      this.state.email,
      this.state.pwd,
      this.state.pwdConfirm
    );
    const isValid = Object.keys(errors).some(x => errors[x]);

    const shouldMarkError = field => {
      const hasError = errors[field];
      const shouldShow = this.state.touched[field];

      return hasError ? shouldShow : false;
    };

    return (
      <form onSubmit={this.handleSubmit}>
        <label>Email Id 📧    :</label>
        <input
          className={shouldMarkError("email") ? "error" : ""}
          type="text"
          placeholder="Enter email"
          value={this.state.email}
          onChange={this.handleEmailChange}
          onBlur={this.handleBlur("email")}
        />
        <label>Password 🗝   :</label>
        <input
          className={shouldMarkError("pwd") ? "error" : ""}
          type="password"
          placeholder="Enter password"
          value={this.state.pwd}
          onChange={this.handlePwdChange}
          onBlur={this.handleBlur("pwd")}
        />
        <label>Confirm Password 🗝:</label>
        <input
          className={shouldMarkError("pwdConfirm") ? "error" : ""}
          type="password"
          placeholder="Confirm password"
          value={this.state.pwdConfirm}
          onChange={this.handlePwdConfirmChange}
          onBlur={this.handleBlur("pwdConfirm")}
        />
        <button disabled={isValid}>Sign up</button>
      </form>
    );
  }
}
Now run the application with the npm start command and you can see the form render on the page having three fields, i,e, email id, password, and confirm password. Enter the email, and password, and add a different confirm password, you can see the Sign in button is disabled.
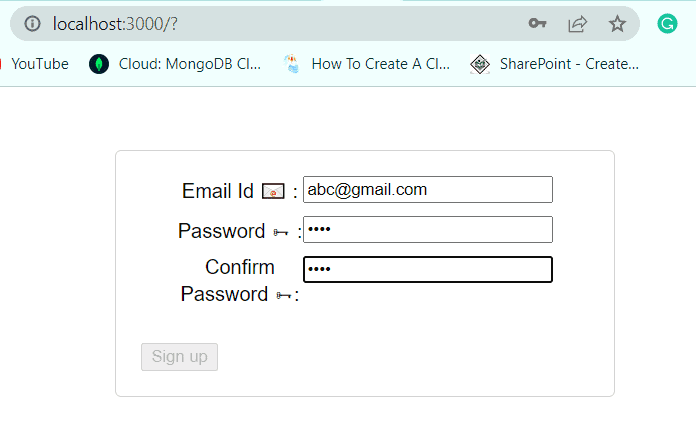
Now if I will enter both the password and confirm the password same, you can see the Sign in button is enabled.

React hook from image validation
Here we will see how to do image validation using the React-hook-form library.
For example, we will create a form on which we will upload the image file, and it will check if the file size is greater than 30kb.
Let’s say the index.html contains the below code:
<div id="root"></div>The Index.js file is the starting point of the React app, so it contains the below code:
import React from 'react';
import ReactDOM from 'react-dom/client';
import './index.css';
import App from './App';
import reportWebVitals from './reportWebVitals';

const root = ReactDOM.createRoot(document.getElementById('root'));
root.render(
    <App />

);
reportWebVitals();
The App.js file contains the below code:
import './App.css';
import Form from './Form';
function App() {
  return (
    <div className="App">
      <ValidateForm></ValidateForm>
    </div>
  );
}

export default App;
The ValidateForm.js contains the below code:
import React, { useState } from "react";
import { useForm } from "react-hook-form";

function ValidateForm() {
  const [uploadedImages, setUploadedImages] = useState([]);
  const [imagePreview, setimagePreview] = useState([]);
  const {
    register,
    handleSubmit,
    watch,
    formState: { errors }
  } = useForm();
  const submit = (data) => {
    console.log(data);
  };

  const onUpload = (event) => {
    console.log(typeof event.target.files);
    const files = event.target.files[0];
    setUploadedImages([...uploadedImages, files]);
    setimagePreview(
      uploadedImages.map((image) =>
        Object.assign(image, {
          preview: URL.createObjectURL(image)
        })
      )
    );
    console.log(files);
  };

  const thumbs = imagePreview.map((image) => (
    <div key={image.name}>
      <div>
        <img alt={image.name} src={image.preview} />
      </div>
    </div>
  ));

  return (
    <div>
      <form onSubmit={handleSubmit(submit)}>
        <input
          {...register("testimages", {
            validate: {
              lessThan10MB: (files) => files[0]?.size < 30000 || "Max 30kb",
                acceptedFormats: (files) =>
                  ["image/jpeg", "image/png", "image/gif"].includes(
                    files[0]?.type
                  ) || "Only PNG, JPEG event GIF"
            }
          })}
          type="file"
          onChange={onUpload}
          name="testimages"
          accept="image/png, image/jpeg"
          multiple
        />
        {errors.testimages && <span>{errors.testimages.message}</span>}
        <button type="submit">Submit</button>
        {uploadedImages.map((image, i) => (
          <p key={i}>{image.name}</p>
        ))}
        <p>{uploadedImages.length}</p>
        {thumbs}
      </form>
    </div>
  );
}

export default ValidateForm;
Now run the application, with the npm start command, and you can see the form with the image file.

React input length validation
Here we will see how to set the length that will validate when the user provides inputs to the field.
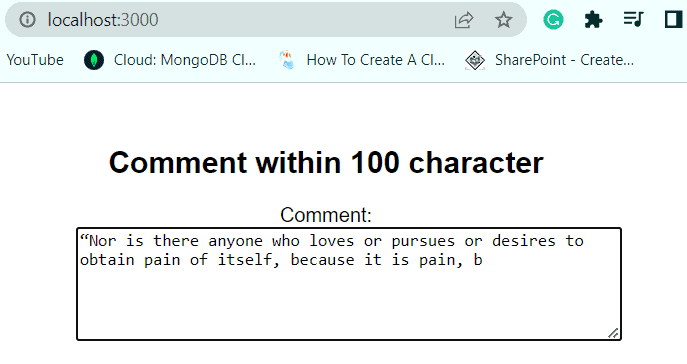
For example, we will set the text area (comment) field input length character as 100. So when the user will enter the comment, it will not accept the character more than 100.
Let’s say the index.html contains the below code:
<div id="root"></div>The Index.js file is the starting point of the React app, so it contains the below code:
import React from 'react';
import ReactDOM from 'react-dom/client';
import './index.css';
import App from './App';
import reportWebVitals from './reportWebVitals';

const root = ReactDOM.createRoot(document.getElementById('root'));
root.render(
    <App />

);
reportWebVitals();
The App.js file contains the below code:
import './App.css';
import Form from './Form';
function App() {
  return (
    <div className="App">
      <ValidateForm></ValidateForm>
    </div>
  );
}

export default App;
The ValidateForm.js contains the below code:
import { useState } from 'react';

const ValidateForm = () => {
  const [comment, setComment] = useState('');

  const handlecommentChange = event => {
    if ((event.target.value.length) <= 100) {
      setComment(event.target.value);
    } else {
      alert("It is greater than 100 character")
    }
  };

  return (
    <div>
      <h2>Comment within 100 character</h2>
      <label>Comment: </label>
      <textarea
        maxLength={100}
        id="comment"
        name="comment"
        value={comment}
        onChange={handlecommentChange}
      />
    </div>
  );
};

export default ValidateForm;
Now run the application with the npm start command and you can see the form render on the page.
React hook form validation length
Here we will see how to validate the length of the input field in the form.
For example, we will see how to validate the length of the input field with the react-hook-form.
Let’s say the index.html contains the below code:
<div id="root"></div>The Index.js file is the starting point of the React app, so it contains the below code:
import React from 'react';
import ReactDOM from 'react-dom/client';
import './index.css';
import App from './App';
import reportWebVitals from './reportWebVitals';

const root = ReactDOM.createRoot(document.getElementById('root'));
root.render(
    <App />

);
reportWebVitals();
The App.js file contains the below code:
import './App.css';
import Form from './Form';
function App() {
  return (
    <div className="App">
      <ValidateForm></ValidateForm>
    </div>
  );
}

export default App;
The ValidateForm.js contains the below code:
mport { useForm } from "react-hook-form";
function ValidateForm() {
  const {
    register,
    handleSubmit,
    formState: { errors },
  } = useForm();
  const submit = (data) => {
    alert(data);
  };
  return (
    <div className='App'>
      <form onSubmit={handleSubmit(submit)}>

       {/* UserId minmum length is 4 and maxlength is 20 */}
<section>
  <label> userId</label>
  <input
    type='text'
    placeholder='userId'
    {...register("userId", {
      required: true,
      minLength: 4,
      maxLength: 20,
    })}
  />
  {errors.userId?.type === "required" && (
    <span>UserId is required</span>
  )}
  {errors.userId?.type === "minLength" && (
    <span>UserId must be at least 4 letters long</span>
  )}
  {errors.userId?.type === "maxLength" && (
    <span>UserId must not be 20 letters long</span>
  )}
</section>
        {/* Age is grater than 18 and less than equal to 60 */}
        <section>
  <label>Age</label>
  <input
    type='number'
    placeholder='age'
    {...register("age", { required: true, min: 18, max: 60 })}
  />
  {errors.age?.type === "required" && <span>Age is required</span>}
  {errors.age?.type === "min" && <span>Age is too small and grater than 18</span>}
  {errors.age?.type === "max" && <span>Age is too high and less than 60</span>}
</section>
        {/* Submit button */}
        <section>
          <input type='submit' />
        </section>
      </form>
    </div>
  );
}
export default ValidateForm;
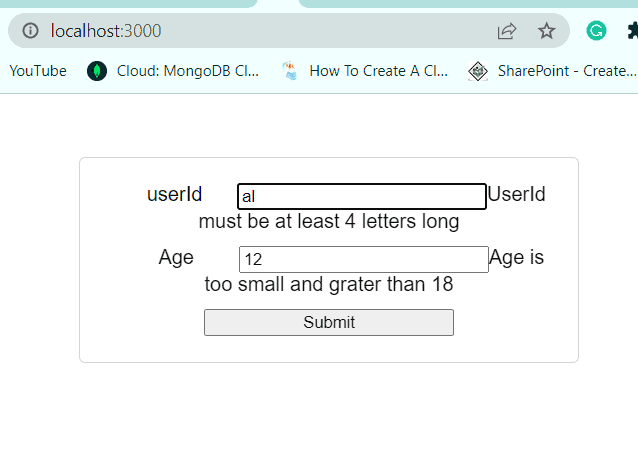
Now run the application with the npm start command and you can see the form render on the page. Here in the form if the user id field is less than 4 or greater than 20 then he or she will get an error message ‘UserId must be at least 4 letters long or UserId must not be 20 letters long.
Similarly, Age number is less than 18 or greater than 60, then the user will get an error message, Age is too small and greater than 18, or Age is too high and less than 60
Conclusion
In this React js form validation tutorial, we covered different examples of how to validate the react js form. And also we use different libraries like React-hook-form and Formik to create and validate the form. Here is the example we covered:
- What is Form validation in react js?
- How to do simple form validation in react js
- How to do react form validation on submit
- How to do react form validation after submit
- How to do react input validation without form
- How to do form validation in react js class component
- simple form validation in react js functional component
- How to do react form validation on change
- How to do react form validation disable button
- How to do custom form validation in react js
- How to do react form validation alert
- How to do form validation in react js using hooks
- How to do react form validation on blur
- How to react hook form validation date
- How to do react form validation for phone number
- How to do react form validation formik
- react hook form checkbox group validation
- react hook validate email
- react form validation multiple fields
- react hook form image validation
- react input length validation
- react hook form validation length
You may like the following react js tutorials:
- How to upload file in react js?
- React js cancel button
- What is react js and react native
I am Bijay a Microsoft MVP (10 times – My MVP Profile) in SharePoint and have more than 17 years of expertise in SharePoint Online Office 365, SharePoint subscription edition, and SharePoint 2019/2016/2013. Currently working in my own venture TSInfo Technologies a SharePoint development, consulting, and training company. I also run the popular SharePoint website EnjoySharePoint.com