In this React js tutorial, we will learn how to handle events in React js component. We will see everything about Handling events in React js with examples. Also, we will discuss the below points.
- What is handling events in react
- react event handler list
- Synthetic Event in React
- react event handler naming convention
- handling events in react functional component
- handling events in react class component
- What is event bubbling and event capturing
- react event handler in props
- react handle events with parameter
- handling keyboard events in react
- handling scroll event in react
- how to handle onchange event in react
- react event handler pass parameter
- react event handler callback
- react event handler stale state
- react event handler arguments
- react event handler bind
- react add event handler conditionally
- react event handler for checkbox
- react event handler double click
- react handle events in the parent and Child component
What is handling events in react js
In React handling events with elements is similar to handling Events with DOM elements. The only difference between them is syntax. As react events are written in camel case. The function is passed as an event handler to the elements.
The Event handlers in react js decide what action is to be taken every time an occasion is triggered. This may be a button click on or a change in textual content input. With the event, the handler user can make interact with the react application.
For example:
<button onClick?="handleClick()">Click me</button>React event handler list
Here we will see different types of Event handler and their event names and properties.
| Event | Attributes | Properties |
|---|---|---|
| Clipboard Events | onCopy, onCut, onPaste | DOMDataTransfer, ClipboardData |
| Composition Events | onCompositionEnd, onCompositionStart, onCompositionEnd | String data |
| Keyboard event | onKeyDown, onKeyPress, onKeyUp | boolean altKey, boolean ctrlKey, number charCode, boolean getModifierState(Key), string Key, number keyCode, string locale, number location, boolean metaKey, boolean repeat, boolean shiftKey, number which |
| Focus | onFocus, onBlur | DOMEventTarget, relatedTarget |
| Form Event | onChange, onInput, onInvalid, onReset, onSubmit | |
| Generic Events | onError, onLoad | |
| Mouse Event | onClick, onContextMenu, onDoubleClick, onDrag, onDragEnd, onDragEnter, onDragExist, onDragOver, onDragStart, onDragLeave, onDrop, onMouseDown, onMouseEnter, onMouseUp, onMouseOut, onMouseMove, onMouseLeave, onMouseOver | boolan alt key, number buttons, number button, number clientX, number clientY, boolean getModifierState(Key), booleanctrlKey, boolean metaKey, number pageX, number pageY, number ScreenY, number Screen X, DOMEventTarget relatedTarget, boolean shiftKey, boolean metaKey |
| Pointer Events | onPointerDown, onPointerMove, onPointerUp, onPointerCancel, onGotPointerCapture, onLostPointerCapture, onPointerEnter, onPointerLeave, onPointerOver, OnPointerOut | number pointerId, number width, number height, number pressure, number tangeltialPressure, number tiltX, number tiltY, number twist, string PointerType, boolean isPrimary |
| Selection Events | onSelect | |
| Touch Events | onTouchCancel,onTouchEnd, onTouchMove, onTouchStart | boolean altKey, DOMTouchList changeTouches, boolean ctrlKey, boolean goodModifierState(Key), boolean metakey, boolean shiftKey, DOMTouchList, targetTouches, DOMTouchList touches |
| UI event | onScroll | numberDetail, numberAbstractView view |
| Wheel Event | onWheel | numberDataMode, number deltaX, number deltaY, number deltaZ |
| Media Event | onAbort, onCanPlay, onPlayCanThrough, onDurationChange, onEmptied, onEncrypted, onEnded, onError, onLoadedMetadata, onLoadData, onLoadStart, onLoadPause, onPlay, onPlaying, onProgress, onRateChange, onSeeked, onSeeking, onStalled, onSuspend, onTimeUpdate, onVolumeChange, onWaiting. | |
| Image Event | onLoad, onError | |
| Animation Event | onAnimationStart, onAnimationEnd, onAnimationIteration | string animationName, string pseudoElement, float ElapsedTime |
| Transition Event | onTransitionEnd | string propertyName, string pseudoElement, float elapsedTime |
| Other Events | onToggle |
Read What is react js and react native
Synthetic Event in React
Here we will see about Synthetic Event in React.
In React js, when we define an event in JSX, we are not directly dealing with regular DOM events, so we are dealing with react event type known as a synthetic event.
In order to paint as a cross-browser application, React has created a wrapper identical to the native browser to avoid creating more than one implementation for multiple methods, for multiple browsers.
Another advantage is that it will improve the application’s overall execution as React reuses the event object.
List of attributes that every synthetic Event object carries on them.
- Boolean bubbles: Return boolean value i.e. true/false based on events is a bubbling event or not
- boolean cancelable: Return boolean value i.e. true/false based on the event can be canceled or not
- DOMEventTarget current target: This tells the element to which the handler is attached
- boolean defaultPrevented: Return boolean value i.e. true/false based on the event has been canceled by preventDefault().
- number eventPhase: This return number, indicates the phase.
- boolean isTrusted: This will return true when the event is generated by the user and return false when the event is generated by the browser
- string type: This will return the string, which indicates the type of the event.
- number timeStamp: This returns a number, which indicates the time when the event is created.
React event handler naming convention
Here we will see how to add naming covection for event handler function and props in react.
On the surface, the use of event handler functions seems very simple: an event occurs, a function handles it. But having a naming standard might help you keep your code organised and ensure uniformity among your React components.
Thankfully, we’ve already accomplished half of the job thanks to the HTML event attributes! HTML event attributes already come with a pretty straightforward naming scheme that uses the syntax of onEvent (readability-enhancing camel-case), where Event is the event.
This naming standard is used for examples such as onchange, onclick, and onsubmit. Why would this practise change while using React? Let’s simply follow to it to make our life simpler!
Naming convection of function
Your handler function should be named according to the same naming guidelines as your event handler attributes. Just keep in mind that the cause and effect in this situation follow a certain flow.
While an event attribute always uses the on prefix, we will change our handler naming convention so that it always uses the handle prefix before the event.
As a result, the naming scheme becomes handleSubjectEvent, where Subject denotes the object on which the handler is focused and Event denotes the event that is occurring.
Naming Convention: handleSubjectEvent, handleEvent
For examples: handleChange, handleFormReset,
Naming your props
Simply follow to the onEvent convention when constructing a React component that contains a prop that handles something (adding a Subject if applicable).
Convention: onEvent, onSubjectEvent
For example: onNameChange, onFormReset, onReset
Your code will be predictable and consistent if you follow to these straightforward naming rules. By putting these naming rules in place, there is no longer any guesswork involved in deciding what something should be called or how to come up with a good name.
Read Setup React js environment and Create your first react app with react js
Handling events in react functional component
Here we will see how to handle events in React functional component.
For example, we will see how we will see how to handle click events in the Functional component. That means when we click on the button on the page it will return a greeting message in the console.
Let’s say the index.html contains the below code
<div id="root"></div>The Index.js file is the starting point of the React app, so it contains the below code.
import React from 'react';
import ReactDOM from 'react-dom/client';
import './index.css';
import App from './App';
import reportWebVitals from './reportWebVitals';

const root = ReactDOM.createRoot(document.getElementById('root'));
root.render(
    <App />

);
reportWebVitals();
Then in App.js file contains the below set of code:
import './App.css';

function App() {

     function greet() {

        console.log(" Welcome!");

      }
return (
<div className="App">
<div onClick={greet()}>
    <p>Click this text to see the event bubbling</p>
      <button onClick={greet}>Click me</button>
    </div>
</div>
);
}
export default App;
So, now run the above code with the npm start command, and you can see the greeting message ‘Welcome’ in the console, this happened because of <div onClick={greet()}> calling the function inside the JSX code. Furthermore, if you click on the button, then you can see the message logged twice in the console. The reason behind this, is we are actually triggering two on-click events i.e. one on the div, and another on the button.

Handling events in react class component
Here we will see how to handle events in react class component.
In this, we will take the same greetings example and we will click on the button, which will show you the greeting message.
Let’s say the index.html contains the below code
<div id="root"></div>The Index.js file is the starting point of the React app, so it contains the below code.
import React from 'react';
import ReactDOM from 'react-dom/client';
import './index.css';
import App from './App';
import reportWebVitals from './reportWebVitals';

const root = ReactDOM.createRoot(document.getElementById('root'));
root.render(
    <App />

);
reportWebVitals();
Then in App.js file contains the below set of code:
import './App.css';
import React, { Component } from 'react';
class App extends Component {


  render() {
    return (
      <div className="App">
      <div onClick={() => console.log('Welcome')}>
        <p>Click this text to see the event bubbling</p>
        <button onClick= {this.handleClick}>Click me</button>
      </div>
      </div>
    );
  }
}

export default App;
Now run the above code using npm start command, and click any of the nested component i.e. paragraph or button, that will log the message in console.

Read Components in React js
What is event bubbling and event capturing in React js
Here we will see what event bubbling and event capturing are, with an example in React JS.
What is event bubbling in React js?
When the innermost component handles an event and events propagate outward, this is referred to in React as event bubbling. The innermost element in React will initially be able to handle the event, and then the surrounding elements will also be able to handle it.
Now we will understand how event bubbling works, with an example in React js.
Let’s say the index.html contains the below code
<div id="root"></div>The Index.js file is the starting point of the React app, so it contains the below code.
import React from 'react';
import ReactDOM from 'react-dom/client';
import './index.css';
import App from './App';
import reportWebVitals from './reportWebVitals';

const root = ReactDOM.createRoot(document.getElementById('root'));
root.render(
    <App />

);
reportWebVitals();
Now the App. js file contains the below code:
import './App.css';

function App() {
  function outerHandler(){
    console.log("Outer")
  }
  function innerHandler(){
    console.log("Inner")
  }
  return (
    <div className="App">
      <div onClick={outerHandler}> Click Outer
        <div onClick={innerHandler}> Click inner
          <h1>Hellow React</h1>
        </div>
      </div>

    </div>
  );
}

export default App;
Next, run the application, with the npm start command, you can see ‘Hellow React’ get rendered on the browser page. And when we click on ‘Hellow React’, the onClick event gets triggered and you can see the output in the console.
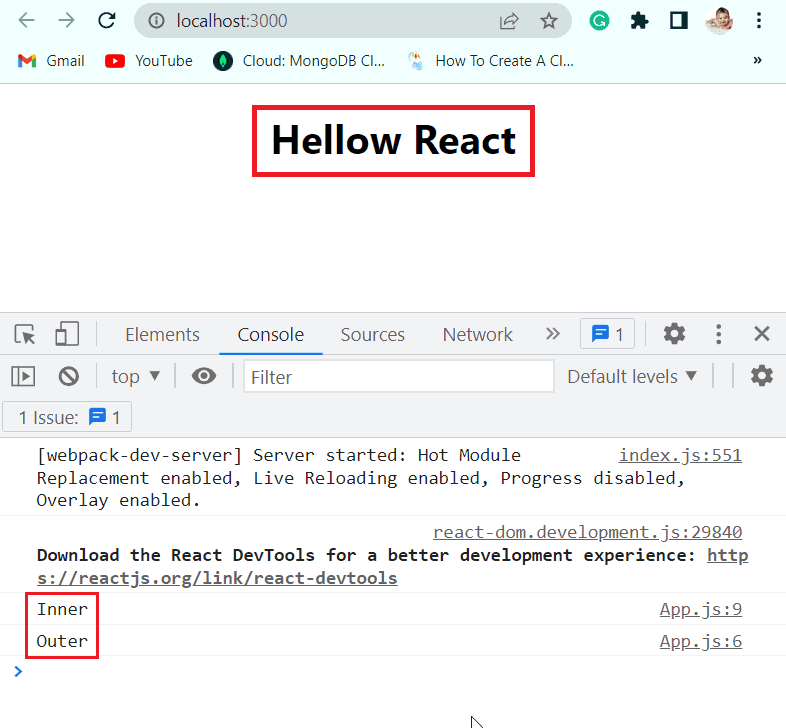
Due to event bubbling, as can be seen, the “inner” was printed before the “outer.” The inner <div> in this instance is the innermost component, therefore its event is processed first (printing “inner” to the console). Following that, the outer is permitted to handle the event and print “outer” to the console.
What is event capturing?
The event is captured when it begins at the top element and moves to the target element. In contrast, event bubbling starts at the target element and moves up to the top element.
Here is the same example as the one we went over earlier, but this event capturing is used to demonstrate the point.
Let’s say the index.html contains the below code
<div id="root"></div>The Index.js file is the starting point of the React app, so it contains the below code.
import React from 'react';
import ReactDOM from 'react-dom/client';
import './index.css';
import App from './App';
import reportWebVitals from './reportWebVitals';

const root = ReactDOM.createRoot(document.getElementById('root'));
root.render(
    <App />

);
reportWebVitals();
Now the App.js file contains the below code.
import './App.css';

function App() {
  function outerHandler(){
    console.log("Outer")
  }
  function innerHandler(){
    console.log("Inner")
  }
  return (
    <div className="App">
      <div onClickCapture={outerHandler}>
        <div onClickCapture={innerHandler}>
          <h1>Hellow React</h1>
        </div>
      </div>

    </div>
  );
}

export default App;
Now run the application with the npm start command and you can see the ‘Hellow’ world’ rendered on the page. React to use event capturing rather than event bubbling by using ‘onClickCapture’ instead of ‘onClick’. The outcomes are displayed in the console:
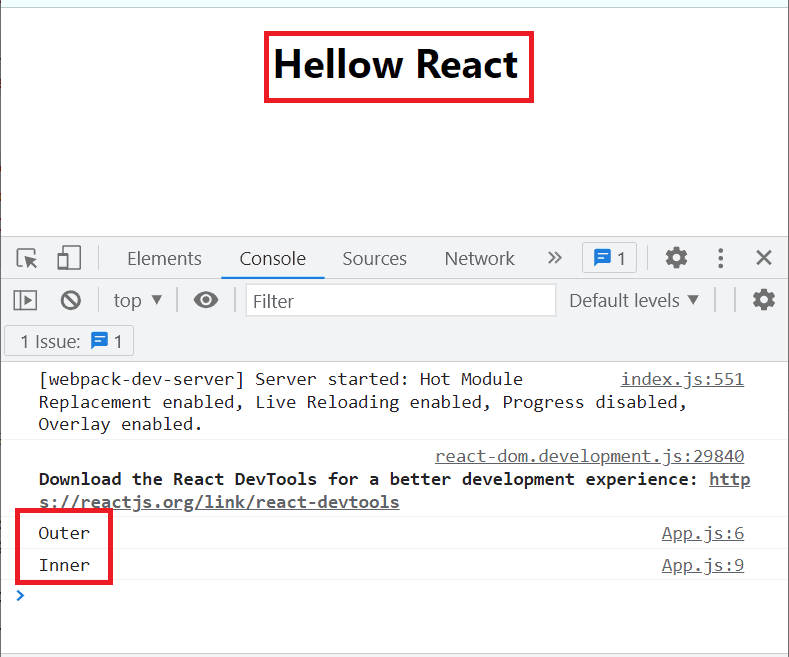
We can observe that, as we predicted, this time, “outer” was printed before “inner.”
Even though the methods for either are similarly called, it’s crucial to be able to tell the difference between event bubbling and event capturing approaches because the outcomes can differ significantly.
Read What is JSX in React js
React event handler in props
Here we will see how to use this with the onClick event handler.
It is best practice to declare the function included within a class component as a method. On the other hand, you must bind the event handling method inside the constructor, if you intend to give props or states to the displayed component in the future.
Understand how to use this with the onClick event handler with an example.
Let’s say the index.html contains the below code
<div id="root"></div>The Index.js file is the starting point of the React app, so it contains the below code.
import React from 'react';
import ReactDOM from 'react-dom/client';
import './index.css';
import App from './App';
import reportWebVitals from './reportWebVitals';

const root = ReactDOM.createRoot(document.getElementById('root'));
root.render(
    <App />

);
reportWebVitals();
Now the App.js file contains the below code.
class App extends Component {
  constructor(props) {
    super(props);
    this.greetUser = this.greetUser.bind(this);
  }
  greetUser() {
    console.log("Welcome React users!");
  }
  render() {
    return (
      <div className='App'>
      <h1>Click on the below button to greet the user</h1>
      <button onClick={this.greetUser}>
        Click here
      </button>
      </div>
    );
  }
}
export default App;
Since they are not tied by default if you put <button onClick={greetUser}>, nothing will happen. Therefore, it is important to bind these inside class components. A greetUser is undefined error should appear if you try it out.
Now run the app with the npm start command, you can see the button rendered on the browser page. By clicking on that you can see the output in the console.

Read Props in React js
React handle events with parameter
Here we will see how to handle events with parameters in React function component and react class component.
Handling a parameter to an onClick event handler in React functional component
Here we will use the above example to greet the user. Let’s imagine you wish to display the user’s real name rather than logging the message “Welcome React user!”.
We need a mechanism to provide the name as a parameter to the onClick event handler because you want this to vary depending on the user.
Let’s say the index.html contains the below code
<div id="root"></div>The Index.js file is the starting point of the React app, so it contains the below code.
import React from 'react';
import ReactDOM from 'react-dom/client';
import './index.css';
import App from './App';
import reportWebVitals from './reportWebVitals';

const root = ReactDOM.createRoot(document.getElementById('root'));
root.render(
    <App />

);
reportWebVitals();
Now the App.js file contains the below code.
import './App.css';

import React from "react";

 function App() {
  function greetUser(name) {
    console.log(`Welcome, ${name}`);
  }

  return (
    <div className='App'>
      <h1>Click the button to greet the user</h1>
      <button onClick={() => greetUser("Alex")}>Click me</button>
    </div>
  );
}
export default App;
Now run the app using npm start command, and you can see the H1 text and button get rendered on the browser page. By clicking on the button, onClick get triggered and you can see the output in the console.

Handling a parameter to an onClick event handler in React Class component
Here we will see how to handle a parameter to an onClick event handler in React class component.
We must bind the event handler to this in the case of class components, as previously demonstrated.
Let’s say the index.html contains the below code
<div id="root"></div>The Index.js file is the starting point of the React app, so it contains the below code.
import React from 'react';
import ReactDOM from 'react-dom/client';
import './index.css';
import App from './App';
import reportWebVitals from './reportWebVitals';

const root = ReactDOM.createRoot(document.getElementById('root'));
root.render(
    <App />

);
reportWebVitals();
Now the App.js file contains the below code.
import './App.css';
import {Component} from 'react'


class App extends Component {
  greetUser(user) {
    console.log(`Welcome, ${user}`);
  }
  render() {
    return (
      <div className='App'>
        <h1>Click the button to greet the user</h1>
      <button onClick={this.greetUser.bind(this, "Ron")}>
        Click Here
      </button>
      </div>
    );
  }
}
export default App;
Now run the app using npm start command, and you can see h1 text and button. By clicking on button, the onClick get triggered and you can see the output in the console.

Read State in React js
Handling keyboard events in react
Here we will see how to handle keyboard events in React.
When a user touches a key on the keyboard, ReactJS’s onKeyPress event fires, but not all keys, such as ALT, CTRL, SHIFT, and ESC, in all browsers.
We’ll use the onKeyPress method that is already provided in ReactJS to use the onKeyPress event.
Example 1: Here we will build an application that will show the key pressed in the input box.
Let’s say the index.html contains the below code
<div id="root"></div>The Index.js file is the starting point of the React app, so it contains the below code.
import React from 'react';
import ReactDOM from 'react-dom/client';
import './index.css';
import App from './App';
import reportWebVitals from './reportWebVitals';

const root = ReactDOM.createRoot(document.getElementById('root'));
root.render(
    <App />

);
reportWebVitals();
Now the App.js file contains the below code.
import './App.css';
import React, {useState} from 'react';

const App = () => {
  const [state, setState] = useState('');
    //  handle the changing state to the name of the key
  const handler = (event) => {

    // which is pressed
    setState(event.key);
  };

  return (
    <div className='App'>
      <h1>Write your name </h1>

<p>pressed key is:{state} </p>


      {/*  the key pressed, passed to the handler function */}
      <input type="text" onKeyPress={(e) => handler(e)} />

    </div>
  );
};
Now run the application using the npm start command, which will render the h1 text, p text, and input box. When we press the key, onKeyPress gets triggered every time you press the Key. With the help of the state method, we will see which key is pressed last on the keyboard.

Example 2: So here we will create a Yes/ No quiz app, by pressing y and n you will get the marks.
Let’s say the index.html contains the below code
<div id="root"></div>The Index.js file is the starting point of the React app, so it contains the below code.
import React from 'react';
import ReactDOM from 'react-dom/client';
import './index.css';
import App from './App';
import reportWebVitals from './reportWebVitals';

const root = ReactDOM.createRoot(document.getElementById('root'));
root.render(
    <App />

);
reportWebVitals();
Next, the App.js file contains the below code:
import React from 'react';
function App(){
	 function handleAnswerChange(event){
		if(event.key === 'y'){
			setTimeout(()=>{alert('The sky is your starting point!');},1000)
	}
		else if (event.key === 'n') {
			setTimeout(()=>{alert('The sky is your limit');},1000)
	}
}

	return (
		<div className='App'>
				<h1> Are You Smart?</h1>
					<input type="text" onKeyPress={(e)=>handleAnswerChange(e)}/>
				<small> Press Y for Yes or N for No</small>
	</div>
)
}

export default App;
Now run the application with the npm start command, and you can see the h1 text, and input box, so when you click on ‘y’ and ‘n’ the onKeyPress is triggered. Then it will show you the marks with the help of an alert box.

Read State in React js Hooks
Handling scroll event in react
Here we will see how to handle scroll events in react js.
What is a scroll event?
When you scroll a webpage or an element, the scroll event is triggered. The scrollX and scrollY properties for a page return the number of pixels that are currently being scrolled both horizontally and vertically in the document.
A DOM scroll event, which is by default built into every browser, is fired when a user scrolls. Any component can be called React’s own method, onScroll, when the scroll event occurs. We can call a function as a result of a user scrolling by using this onScroll method.
Let’s say the index.html contains the below code
<div id="root"></div>The Index.js file is the starting point of the React app, so it contains the below code.
import React from 'react';
import ReactDOM from 'react-dom/client';
import './index.css';
import App from './App';
import reportWebVitals from './reportWebVitals';

const root = ReactDOM.createRoot(document.getElementById('root'));
root.render(
    <App />

);
reportWebVitals();
Next in the App.js file contains the below code:
function App() {
function handleScroll(event) {
console.log('scrollTop: ', event.currentTarget.scrollTop);
console.log('offsetHeight: ', event.currentTarget.offsetHeight);
}
return (
<div
style={{
margin:'10px auto auto auto',
border: '8px solid black',
width: '600px',
height: '300px',
overflow: 'scroll',
}}
onScroll={handleScroll}
>
<p>Lorem ipsum dolor sit amet, consectetur adipiscing elit.
Phasellus bibendum aliquam dictum. Lorem ipsum dolor sit amet, consectetur adipiscing elit.
Proin et eros ligula. Morbi sit amet odio lectus. Nullam commodo enim blandit ligula pulvinar, vel cursus justo ullamcorper.
Fusce pellentesque urna nunc, vitae volutpat augue dapibus nec.</p>
<p>Lorem ipsum dolor sit amet, consectetur adipiscing elit.
Phasellus bibendum aliquam dictum. Lorem ipsum dolor sit amet, consectetur adipiscing elit.
Proin et eros ligula. Morbi sit amet odio lectus. .</p>
</div>
);
};
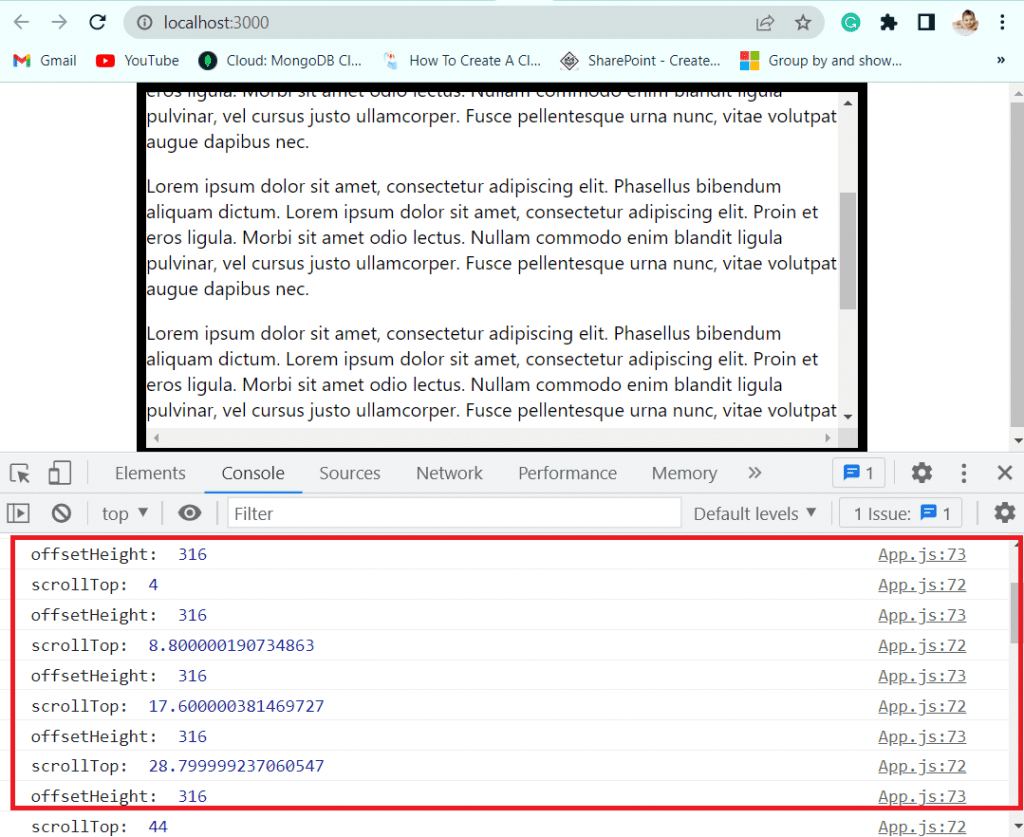
export default App;Now run the application using the npm start command and you can see the set of content. When scrolling the content, the onScroll method gets triggered, and you can see the output in the console.
How to handle onchange event in react
Here we will see how to handle onChange events in react.
What is the onChange event handler?
The onchange method provided by JavaScript enables us to keep track of when an input’s value changes. The onchange event handler in React is identical but camel-cased.
Example of onChange Event handler
Let’s say the index.html contains the below code
<div id="root"></div>The Index.js file is the starting point of the React app, so it contains the below code.
import React from 'react';
import ReactDOM from 'react-dom/client';
import './index.css';
import App from './App';
import reportWebVitals from './reportWebVitals';

const root = ReactDOM.createRoot(document.getElementById('root'));
root.render(
    <App />

);
reportWebVitals();
Next in the App.js file contains the below code:
import React, { useState } from "react";

function App() {
  const [name, setName] = useState("John Sen");

  function handleChange(event) {
    setName(event.target.value);
  }

  return (
    <div className='App'>
      <h2>Write Your Full name</h2>
    <input
      type="text"
      name="FullName"
      onChange={handleChange}
      value={name}
    />
    <p>Full name is : {name}</p>
    </div>
  );
}

export default App;
Now run the app with the npm start command and you can see h2 text, input box, and <p> text render on the browser. When we will write the name by removing the default name ‘John Sen’, the onChange event gets triggered.

React event handler pass parameter
Here we will see how to pass an event and parameter to an event handler side by side in React js.
For example: To handle the onClick event generated by one of the two buttons in this example, a method called onClickHandler is used (Button 1 and Button 2). To indicate which button was clicked, we will give the button’s name to the handler method.
Let’s say the index.html contains the below code
<div id="root"></div>The Index.js file is the starting point of the React app, so it contains the below code.
import React from 'react';
import ReactDOM from 'react-dom/client';
import './index.css';
import App from './App';
import reportWebVitals from './reportWebVitals';

const root = ReactDOM.createRoot(document.getElementById('root'));
root.render(
    <App />

);
reportWebVitals();
Next, the App.css file contains the below code, to format the button:
.App {
  text-align: center;
margin-top: 1%;
}

.App-header {
  background-color: #282c34;
  min-height: 100vh;
  display: flex;
  flex-direction: column;
  align-items: center;
  justify-content: center;
  font-size: calc(10px + 2vmin);
  color: white;
}

.App-link {
  color: #61dafb;
}

button {
  margin: 0px 20px;
  padding: 15px 30px;
  border: none;
  cursor: pointer;
  background: purple;
  color: white;
  font-weight: bold;
}

button:hover {
  background: red;
}

@keyframes App-logo-spin {
  from {
    transform: rotate(0deg);
  }
  to {
    transform: rotate(360deg);
  }
}
Next, the App.js file contains the below code:
import { useState } from "react";
import "./App.css";

const App = () => {
  const [text, setText] = useState("No button was clicked");

  const onClickHandler = (event, choose) => {
    // Do something with event
    console.log(event);

    // Use the passed parameter to render on browser
    setText(`${choose} has been clicked`);
  };

  return (
    <>
      <div className="App">
        <button onClick={(event) => onClickHandler(event, "Submit")}>
          Submit
        </button>

        <button onClick={(event) => onClickHandler(event, "Reset")}>
          Reset
        </button>

        <h2>{text}</h2>
      </div>
    </>
  );
};

export default App;
Now run the application, you can see the 2 button i.e Submit and reset, and you can see the default message rendered on the page. Then click on the Submit button and you can see the text changed to submit button clicked.

React event handler callback
Here we will see how to pass a parameter to an event handler or callback in React js.
For example, We will create a new function that calls the correct function call with the right parameter, we will utilize the arrow function. Passing React’s event object as the second argument.
Use the arrow function or bind the function if you want to give a parameter to the click event handler. If you sent the argument directly, the onClick method would be called automatically even before you pressed the button.
Let’s say the index.html contains the below code
<div id="root"></div>The Index.js file is the starting point of the React app, so it contains the below code.
import React from 'react';
import ReactDOM from 'react-dom/client';
import './index.css';
import App from './App';
import reportWebVitals from './reportWebVitals';

const root = ReactDOM.createRoot(document.getElementById('root'));
root.render(
    <App />

);
reportWebVitals();
The app. js file contains the below code:
import React from "react";
class App extends React.Component {
  call(message,event) {
    alert("We will see you soon");
  }
  render() {
    return (
       //Creating a arrow function
       <div className="App">
      <button onClick={(event)=> this.call("Your message",event)}>
         Click the button!
       </button>
       </div>
    );
  }
}

export default App;
Now run the application using npm start command, and button get render on the page. When you click on the button and you can see the message pop in alert box.

React event handler arguments
Here we will see how to handle arguments react event handler.
Most of the time, we might need to provide our event handler with arguments. In React, how can we accomplish this? Since the event handler function would therefore be called automatically before you had ever touched the button, we are unable to give the argument directly to it. In the example we’ll use below, we’ll observe that. The Arrow function and the Bind method are the two available ways to provide arguments.
Let’s say the index.html contains the below code:
<div id="root"></div>The Index.js file is the starting point of the React app, so it contains the below code.
import React from 'react';
import ReactDOM from 'react-dom/client';
import './index.css';
import App from './App';
import reportWebVitals from './reportWebVitals';

const root = ReactDOM.createRoot(document.getElementById('root'));
root.render(
    <App />

);
reportWebVitals();
The Student. js file contains the below code:
import React , {Component} from 'react' ;
class Student extends Component {
//state without a constructor
state = {
id: 104,
name : 'Alex',
}
//Event Handler Arrow Function
handleClick = (id) => {
console.log(id);
<div><h1>{id}</h1></div>
};
handleClickArg = () => {
this.handleClick(this.state.id);
}
render() {
return (
<div>
<h1>Hey, {this.state.name}</h1>
<button onClick = {this.handleClickArg} >Click Me</button>
</div>
)}}
export default Student
Next the app.js file contains the below code.
import Student from "./Student";
 function App() {
  return (
  <div className="App">
  <Student />
</div>
  );
  }
export default App;
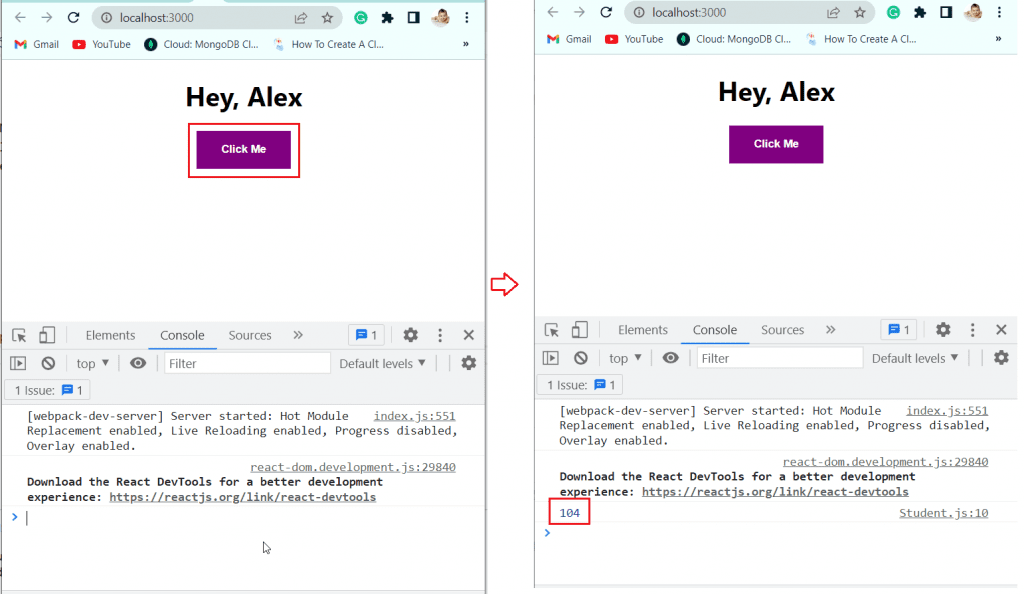
Now run the application with npm start command, and you can see the ‘Hey Alex’ and button render on the page, and by clicking on the button the onClick get fired. And you can see the output in the console.
React add event handler conditionally
Here we will see how we can conditionally add event handler in React js.
We will use the ternary operator to conditionally add event handler in React js. The ternary operator in react js returns true, if the condition left to the colon is satisfied.
Let’s say the index.html contains the below code:
<div id="root"></div>The Index.js file is the starting point of the React app, so it contains the below code.
import React from 'react';
import ReactDOM from 'react-dom/client';
import './index.css';
import App from './App';
import reportWebVitals from './reportWebVitals';

const root = ReactDOM.createRoot(document.getElementById('root'));
root.render(
    <App />

);
reportWebVitals();
Next, in the App.js file contains the below code:
 function App() {
  const addEventHandler = true;

  const handleClick = event => {
    console.log('Button clicked');
  };

  return (
    <div className="App">
      <h1> Click on the button</h1>
      <button onClick={addEventHandler ? handleClick : undefined}>
        Click
      </button>
    </div>
  );
}
export default App;
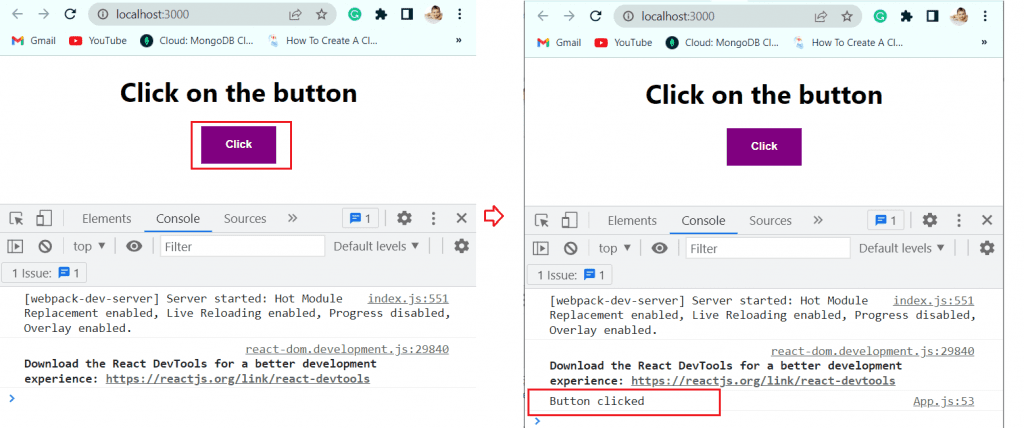
Now run the application with npm start command, and you can see the H1 text and button rendered on the page. By clicking on the button, onCLick event get triggered and if the condition is true it will show the output Button clicked else it will show undefined.
react event handler stale state
Here we will see how to handle react event handler stale state.
What is stale state in React js?
When we attempt to update state, frequently within a closure, stale state is a problem that arises. In JavaScript, a closure is a specific kind of function where a variable from another scope is used.
You might run into a situation where your useState hook doesn’t seem to be updating the value if you’re using React Hooks. This can happen if you call setState after changing the state value in place. Because React just makes a short comparison, it will abandon an update if the object instance is the same, leaving a stale value.
If something else later renders the component, you’ll find yourself perplexed when you suddenly see it in its new condition.
Let’s see an example, how to fix stale state in React event handler.
Consider the example that follows to help you understand the problem. It is a component that, each time the button is pressed, adds a number to the array. The button should display 1, 2, 3 after being clicked three times.
Let’s say the index.html contains the below code:
<div id="root"></div>The Index.js file is the starting point of the React app, so it contains the below code.
import React from 'react';
import ReactDOM from 'react-dom/client';
import './index.css';
import App from './App';
import reportWebVitals from './reportWebVitals';

const root = ReactDOM.createRoot(document.getElementById('root'));
root.render(
    <App />

);
reportWebVitals();
Next, in the App.js file contains the below code:
import React, { useState } from 'react'

function App() {
  const [numbers, setNumbers] = useState([])

  const addNumbersToList = () => {
    numbers.push(numbers.length)
    setNumbers(numbers)
  }

  return (
    <div className="App">
      <h2>Click on the button add number to array </h2>
      <div>{numbers.join(',')}</div>
      <button onClick={addNumbersToList}>Add number</button>
    </div>
  )
}

export default App;
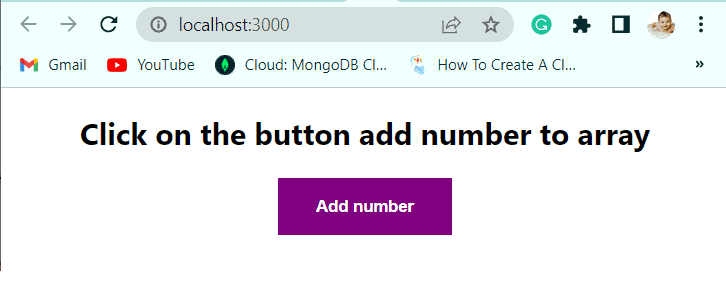
Now run the application with npm start command, and you can see by clicking button three times, there is no number update happening.
Fix the stale closure problem
addNumbersToList will not properly update the state because it directly modifies the state value. You will observe that rendering takes place as expected if you avoid mutation and instead clone the state array of numbers.
Now, in App.js file update the below code, to avoid mutation and get the desire result:
import React, { useState } from 'react'


function App() {
  const [numbers, setNumbers] = useState([])

  const addNumbersToList = () => {
    setNumbers([...numbers, numbers.length])
  }

  return (
    <div className="App">
      <h2>Click on the button to add numbers to array</h2>
      <div>{numbers.join(',')}</div>
      <button onClick={addNumbersToList}>Click me</button>
    </div>
  )
}

export default App;
Now run the application with npm start command and you can see the result by clicking on the button.

React event handler for checkbox
Here we will see how to handle React onChange event for checkbox.
The data is transferred to the server when a submit button is hit in conventional HTML forms. However, a more seamless experience is frequently advantageous for current websites.
An example of a component that is typically present as part of a form is a checkbox. Now, we’ll see how to use React Checkboxes’ onChange event handler to automatically invoke functions.
Let’s say the index.html contains the below code:
<div id="root"></div>The Index.js file is the starting point of the React app, so it contains the below code.
import React from 'react';
import ReactDOM from 'react-dom/client';
import './index.css';
import App from './App';
import reportWebVitals from './reportWebVitals';

const root = ReactDOM.createRoot(document.getElementById('root'));
root.render(
    <App />

);
reportWebVitals();
Next, the App.js File contains the below code.
import Checked from "./Checked";
function App() {

  return (

    <div className="App">

    <Checked></Checked>
    </div>

  );

};
The checked.js file contains the below code:
import React from "react";
import {useState} from "react";
function Checked() {
    const [toggoled, setToggoled] = useState(true);

    return (
        <>
        <h2> Check the box </h2>
      <label>
        <input type="checkbox"
          defaultChecked={toggoled}
          onChange={() => setToggoled(!toggoled)}
        />
        Check Me!
      </label>
      <p>{toggoled? "checked":"Not Checked"}</p>
      </>

    );
  }
Now run the application with the npm start command and you can see the box is checked by default, and when it is checked it returns checked else unchecked.

React event handler bind
Here we will see how to bind events in React js.
ReactJS requires event binding in order for this keyword to stop returning “undefined.” In this, we will see the various methods for binding event handlers in ReactJS.
Let’s discuss with an example why we need bind(), in the, react event handler.
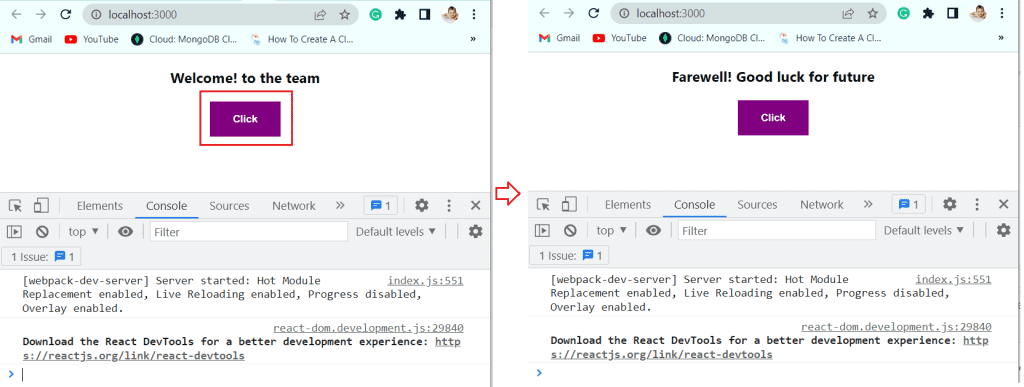
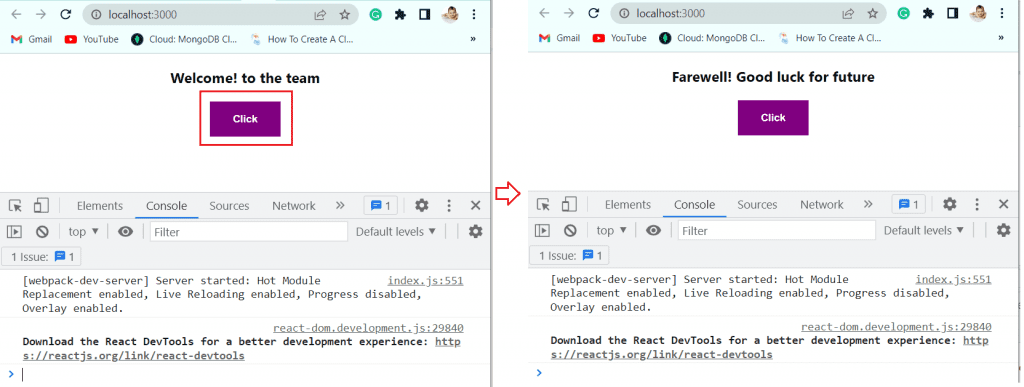
First, we will create a Message. js component that will render the Welcome message, and by clicking on the button, the message will change to a Farewell message.
Let’s say the index.html contains the below code:
<div id="root"></div>The Index.js file is the starting point of the React app, so it contains the below code.
import React from 'react';
import ReactDOM from 'react-dom/client';
import './index.css';
import App from './App';
import reportWebVitals from './reportWebVitals';

const root = ReactDOM.createRoot(document.getElementById('root'));
root.render(
    <App />

);
reportWebVitals();
Next, the App.js File contains the below code.
import Message from "./Message ";
function App() {

  return (

    <div className="App">

    <Message ></Message >
    </div>

  );

};
Now the Message.js component contains the below code:
import React, { Component } from 'react';

class Message extends Component {
    constructor(props) {
        super(props)

        this.state = {
            message: 'Welcome! to the team'
        }
    }
handleClick(){
    this.setState({
        message: 'Farewell! Good luck'
    })
}

    render() {
        return (
            <div>
                <h3>{this.state.message}</h3>
                <button onClick={this.handleClick}>Click</button>
            </div>
        )
    }
}

export default Message;
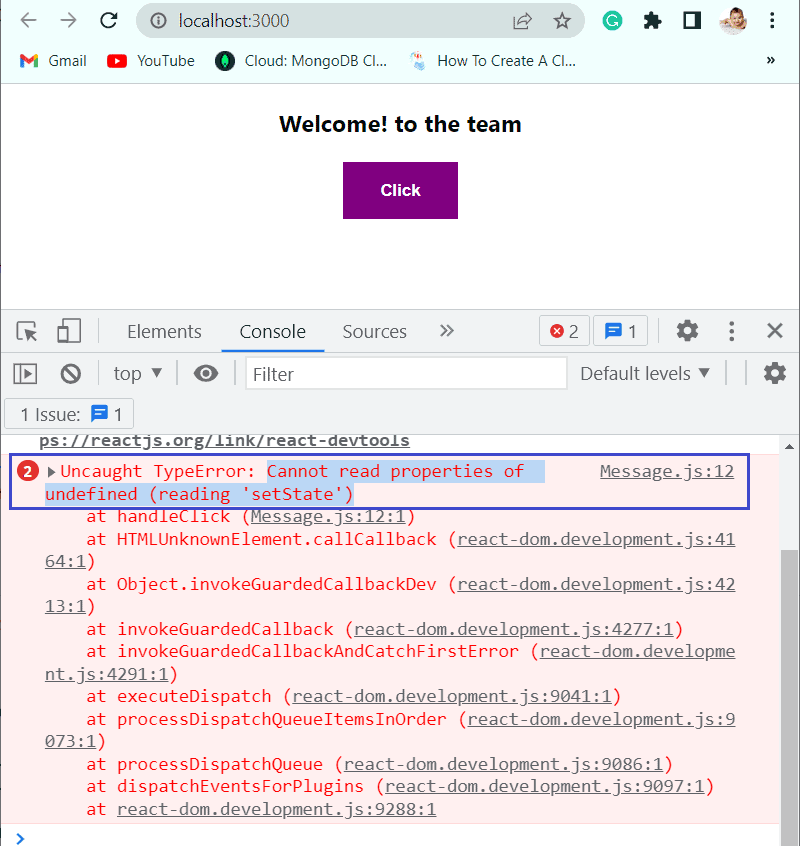
Now, run the application using npm start command, and you can see the error message ‘Cannot read properties of undefined (reading ‘setState’)’ in the Console. As, this returns ‘undefined’, that’s why we need bind().
Fix the above ‘undefined’ error by using bind()
Now let’s see how to use bind() in different ways to remove the ‘undefined’ error. The ways are:
- In Render method binding event handler
- Using Arrow function to bind event handler
- Binding event handler in the constructor
In Render method binding event handler
When the render method calls the handler, we can bind it using the bind() method. Now replace the Message .js component with the below code.
import React, { Component } from 'react';

class Message extends Component {
    constructor(props) {
        super(props)

        this.state = {
            message: 'Welcome! to the team'
        }
    }
handleClick(){
    this.setState({
        message: 'Farewell! Good luck for future'
    })
}

    render() {
        return (
            <div>
                <h3>{this.state.message}</h3>
                <button onClick={this.handleClick.bind(this)}>Click</button>
            </div>
        )
    }
}

export default Message;
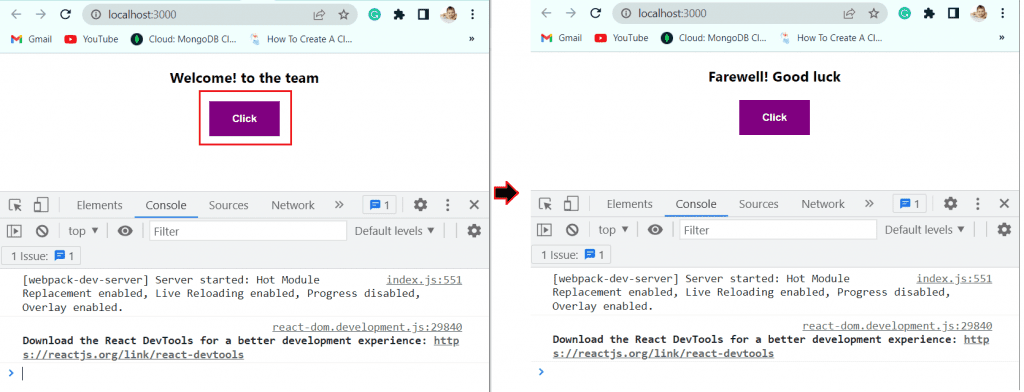
Now run the application using npm start command, and you can see the there is no undefined error, and went you click on the button it is rendering Farewell message.
React event handler arrow function
Although we are implicitly binding the event handler in this manner, it is essentially the same as the one described earlier. If you wish to give parameters to your event, this method is the best. Now replace the Message.js component with the below code:
import React, { Component } from 'react';

class Message extends Component {
    constructor(props) {
        super(props)

        this.state = {
            message: 'Welcome! to the team'
        }
    }
handleClick(){
    this.setState({
        message: 'Farewell! Good luck for future'
    })
}

    render() {
        return (
            <div>
                <h3>{this.state.message}</h3>
                <button onClick={() =>this.handleClick()}>Click</button>
            </div>
        )
    }
}

export default Message;
Now run the application with the npm start command, and you can see that there is no ‘undefined’ error. By clicking on the button we can render the Farewell message on the page.
Binding event handler in the constructor
With this method, the event handler will be bound inside the Constructor. Compared to the first two methods, this improves performance because the events aren’t bound every time the method is called.
import React, { Component } from 'react';

class Message extends Component {
    constructor(props) {
        super(props)

        this.state = {
            message: 'Welcome! to the team'
        }
        this.handleClick= this.handleClick.bind(this);
    }
handleClick(){
    this.setState({
        message: 'Farewell! Good luck for future'
    })
}

    render() {
        return (
            <div>
                <h3>{this.state.message}</h3>
                <button onClick={this.handleClick}>Click</button>
            </div>
        )
    }
}

export default Message;
Now run the application using the npm start command, and you can see the there is no ‘undefined’ error. By clicking on the button, the Farewell message render on the page.
React event handler double click
Here we will see how to handle double click in React event.
Let’s see an example of how to handle double click event in React js.
Let’s say the index.html contains the below code:
<div id="root"></div>The Index.js file is the starting point of the React app, so it contains the below code.
import React from 'react';
import ReactDOM from 'react-dom/client';
import './index.css';
import App from './App';
import reportWebVitals from './reportWebVitals';

const root = ReactDOM.createRoot(document.getElementById('root'));
root.render(
    <App />

);
reportWebVitals();
Next, the App.js File contains the below code:
function App() {
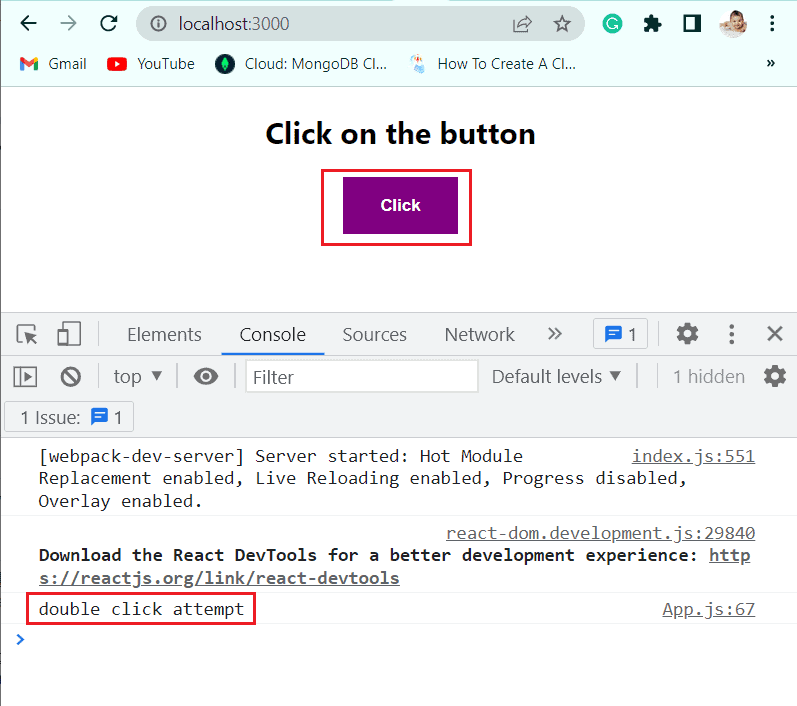
  const onClickHandler = event => {
    if (event.detail === 2) {
      console.log('double click attempt');
    }

  };

  return (
    <div>
      <div className="App">
        <h2>Click on the button</h2>
        <button onClick={onClickHandler}>Click</button>
      </div>
    </div>
  );
}


export default App;
In the above code, the event object’s detail property gives the current click count for click events. And, the onClickHandle function determines explicitly whether the current click count is two or less.
Now run the application with the npm start command, and you can see the h2 text and button render on the page. By double-clicking on the button, you can see the output in the console log.
Here we will see how to handle the arrow function in React event.
React handle event in the parent & child component
Here we will see how to handle React in the parent and child component.
For example, we will see how to pass the onchange event handler to a child component in React.
For this first, we will define the event handler function in the parent component, and pass it as a prop as the child component, and in the child component, the onChange prop is set on the input field.
Let’s say the index.html contains the below code:
<div id="root"></div>The Index.js file is the starting point of the React app, so it contains the below code.
import React from 'react';
import ReactDOM from 'react-dom/client';
import './index.css';
import App from './App';
import reportWebVitals from './reportWebVitals';

const root = ReactDOM.createRoot(document.getElementById('root'));
root.render(
    <App />

);
reportWebVitals();
Next, the App.js File contains the below code:
// import { useState } from "react";
import Parent from "./Parent";
import "./App.css";
function App(){
  return(
    <div className="App">
      <Parent></Parent>
    </div>
  )
}

export default App
And the Parent.js file contains the below code: here we are passing the onChangeHandler to the child component
import {useState} from 'react';
import Child from './Child';

function Parent() {
  const [message, setMessage] = useState('');

  function onChangeHandle(event) {
    setMessage(event.target.value);
  }

  return (
    <div>
        <h1>Write some message here:</h1>
      <Child onChangeHandle={onChangeHandle} />

      <h2>Message is: {message}</h2>
    </div>
  );
}

export default Parent;
Next, the Child.js file contains the below code:
import React from 'react';

function Child({onChangeHandle}) {
    return (
      <input
        id="message"
        name="message"
        onChange={onChangeHandle}
      />
    );
  }
  export default Child;
Now run the application using the npm start command, and the h1 text and input box and message will render on the page.

Conclusion
In this react js tutorial, we learned how to handle events in react js with different examples. With the below examples:
- What is handling events in react
- react event handler list
- Synthetic Event in React
- react event handler naming convention
- handling events in react functional component
- handling events in react class component
- What is event bubbling and event capturing
- react event handler in props
- react handle events with parameter
- handling keyboard events in react
- handling scroll event in react
- how to handle onchange event in react
- react event handler pass parameter
- react event handler callback
- react event handler arrow function
- react event handler best practice
- react event handler async
- react event handler stale state
- react event handler arguments
- react cancel event
- react cancel click event
- react event handler bind
- react event listener on body
- react event handler closure
- react add event handler conditionally
- react event handler for checkbox
- react event handler double click
- react event listener in use effect
- react handle event in the child component
- react handle event in the parent component
I am Bijay a Microsoft MVP (10 times – My MVP Profile) in SharePoint and have more than 17 years of expertise in SharePoint Online Office 365, SharePoint subscription edition, and SharePoint 2019/2016/2013. Currently working in my own venture TSInfo Technologies a SharePoint development, consulting, and training company. I also run the popular SharePoint website EnjoySharePoint.com