A Power Apps Dataverse table may be exported to an Excel sheet, did you know that? It is possible to use Power Automate to transform the dataverse table into an Excel spreadsheet.
However, this Microsoft Dataverse tutorial will teach you how to convert a Dataverse table to an Excel quickly and easily. In the excel sheet, we’ll also see how to highlight select particular dataverse fields.
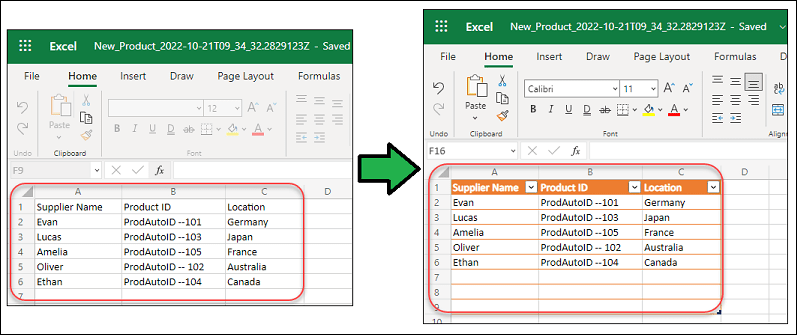
The left image in the screenshot below shows a Dataverse table (Suppliers) converted to an Excel Spreadsheet (right image) using Power Automate or Microsoft Flow.

Export Dataverse Table to Excel Using Power Automate
Let’s begin with exporting a dataverse table to an Excel file in Power Apps using flow. Refer to the steps below.
Step – 1:
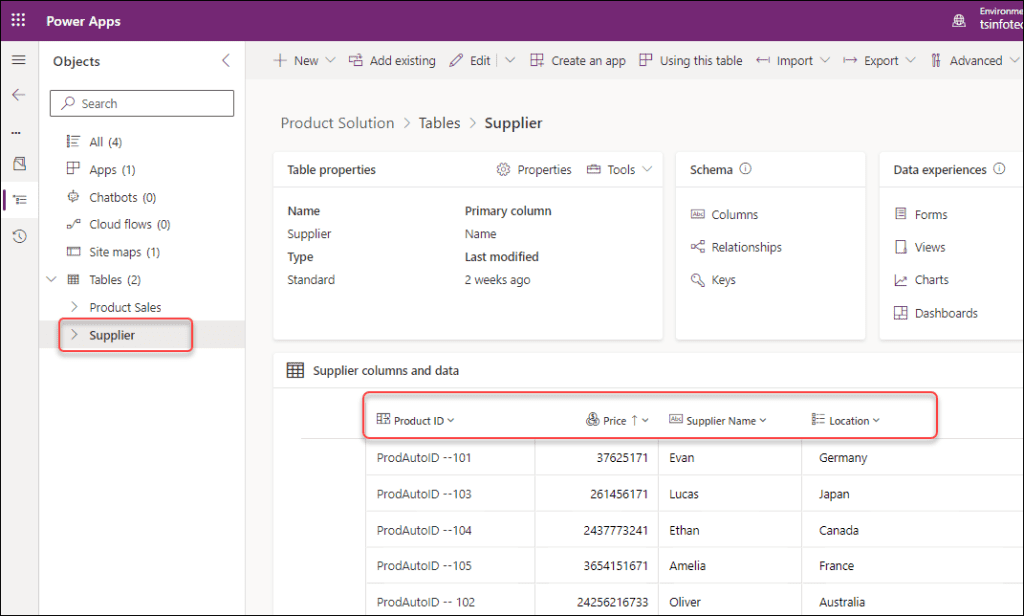
- As seen in the screenshot below, the Power Apps Dataverse Solution contains two Dataverse tables: Product Sales and Supplier. For this example, we will take the second table i.e. Supplier.
- In the Supplier table, there are four fields:
- Product ID = This column is a lookup that retrieves data from another table (Product Sales).
- Price = This is a currency field.
- Supplier Name = This is a single line of text data type column.
- Location = There are various names of countries in this Dataverse Choice field.
We are going to convert this Dataverse supplier table to an excel sheet.
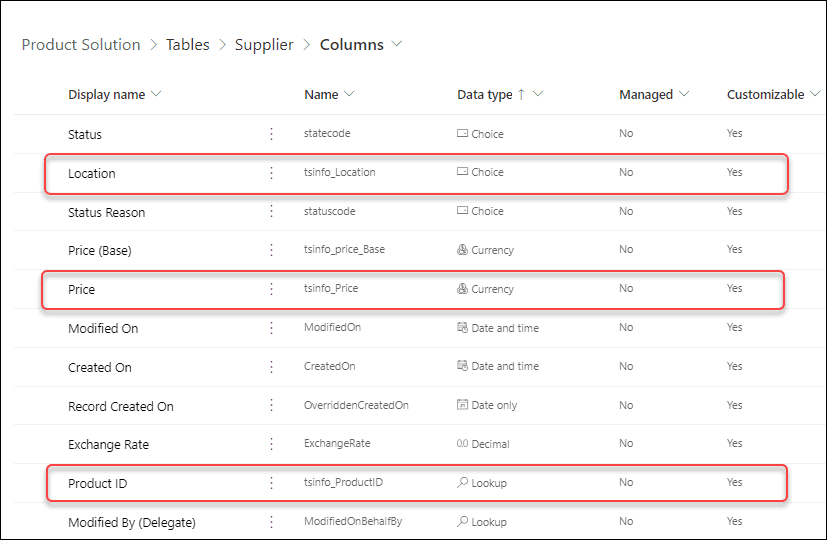
- You can see all the fields that are present in the Supplier table once you navigate to the Columns section. Consider the image below.
Step – 2:
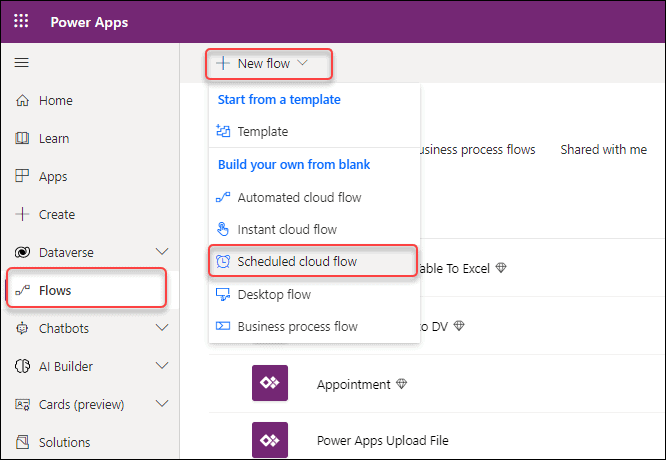
- Now we will create a new flow that will help to transfer the excel sheet. On the Power Apps Home page, go to Flows -> Expand + New flow -> Scheduled cloud flow.
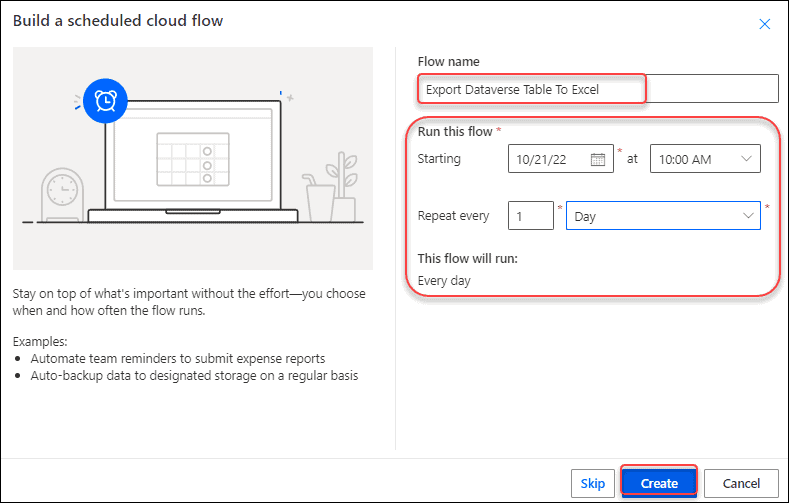
- Provide a unique flow name (Export Dataverse Table to Excel) and specify the date & time when the flow will run within a particular time period. Click on Create.
Step – 3:
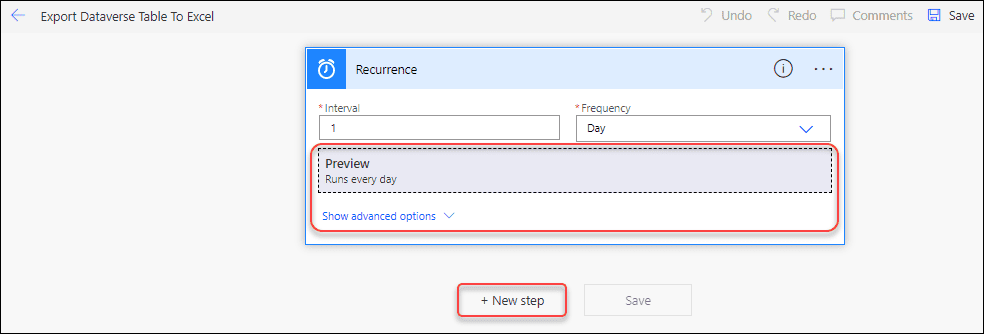
- The flow will appear as shown in the figure below once it has been created (Preview – Runs every day). Click on the + New step button to add the new action.
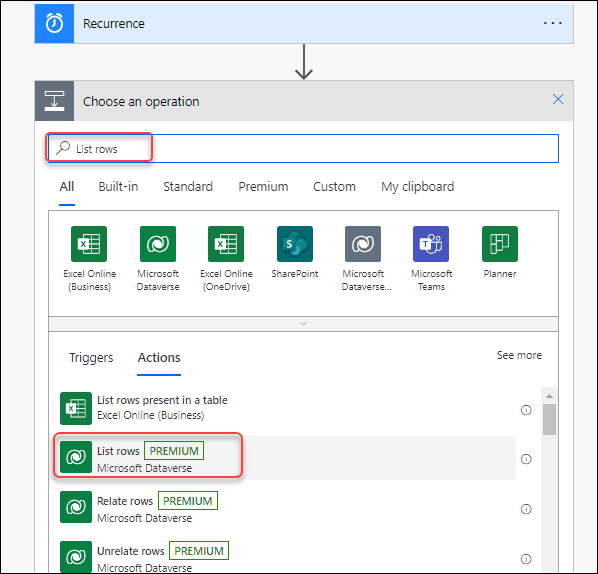
- Moving on to the next action, search List rows in Dataverse. The action name will appear when you type it into the search bar as List rows [PREMIUM]. Simply click it.
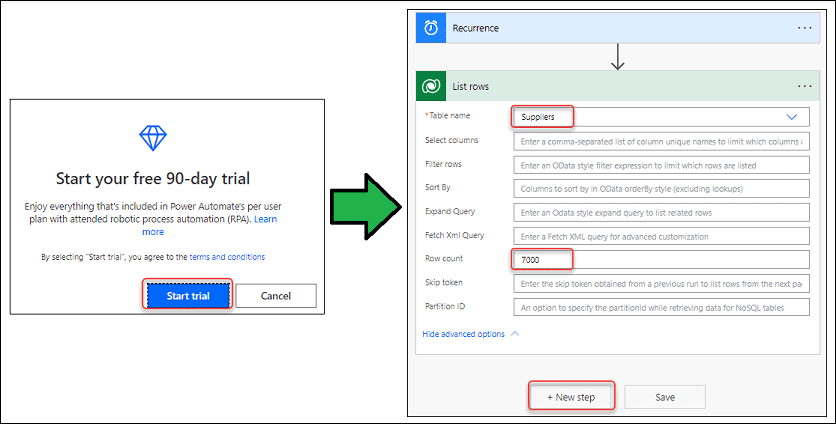
- A popup will ask you whether or not to begin your free 90-day trial because the List rows action has a premium version. Tap the Start trial button if you agree.
- Select and Provide the Table name (Supplier) and the Row count of 7000. By default, the row count will be 5000. If your dataverse table contains more than 5000 records, you will need to adjust the value of the Row count field. Click on the + New step button to add the new action.
Step – 4:
- Next, search Create csv in the search bar and insert the Create CSV table action under the Data Operation section.
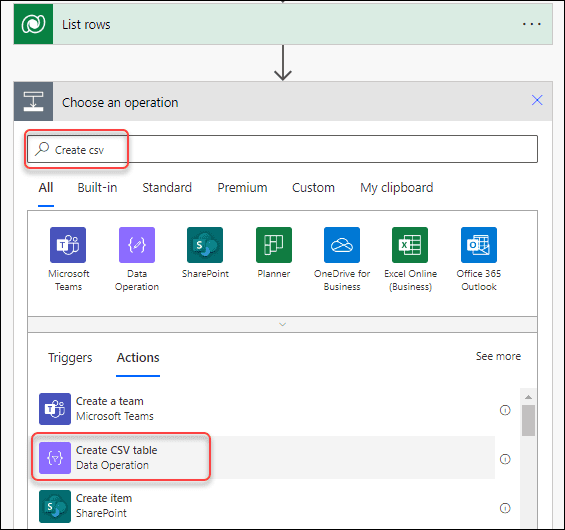
- This Create CSV table action has the fields below:
From = Select this field and provide the value under the List rows action.
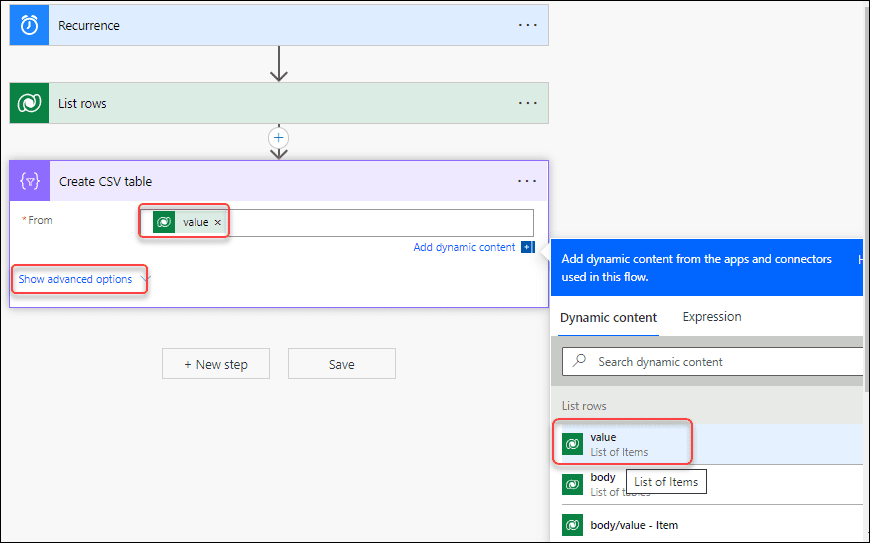
- As soon as you click Show advanced options, you will notice an additional field named Columns with the predetermined value of Automatic. Don’t make any changes to this field at this time. Again click on the + New step button.
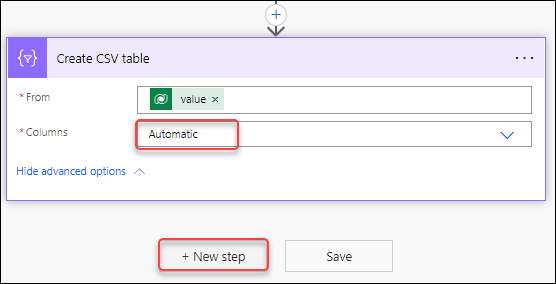
Step – 5:
- Again search Create file action and add the Create file under the OneDrive for Business section.
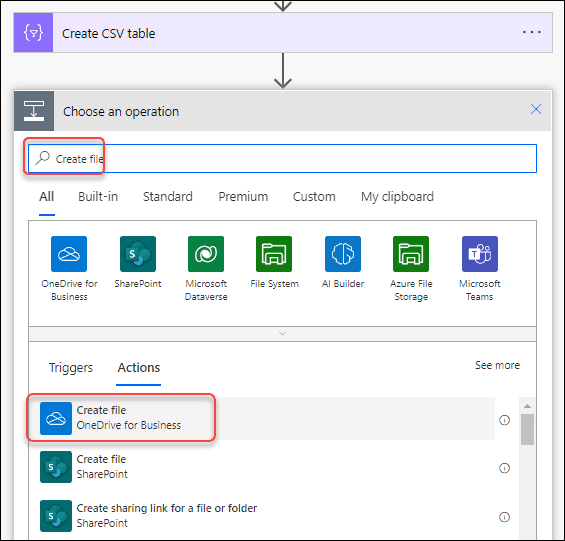
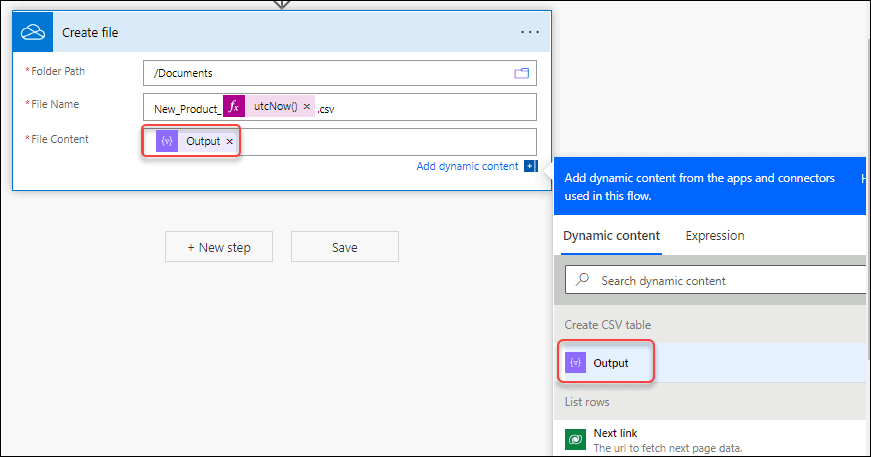
- The Create file action has the fields below. Such as:
- Folder Path = Specify the Document or folder path where you want to store the excel file (from the OneDrive).
- File Name = Provide a unique file name like “New_Product_utcNow()” and as well as the extension as .csv
IMPORTANT NOTES:
-> The “utcNow()” function helps to return the current date and time in UTC (Coordinated Universal Time). The new Excel file name will therefore be saved with the current date and time.
-> Additionally, be sure to include the file name and the “.csv” extension. If you don’t, you can run into problems and the file won’t open properly.
You may get the utcNow() function by selecting the Expression tab and adding it there.
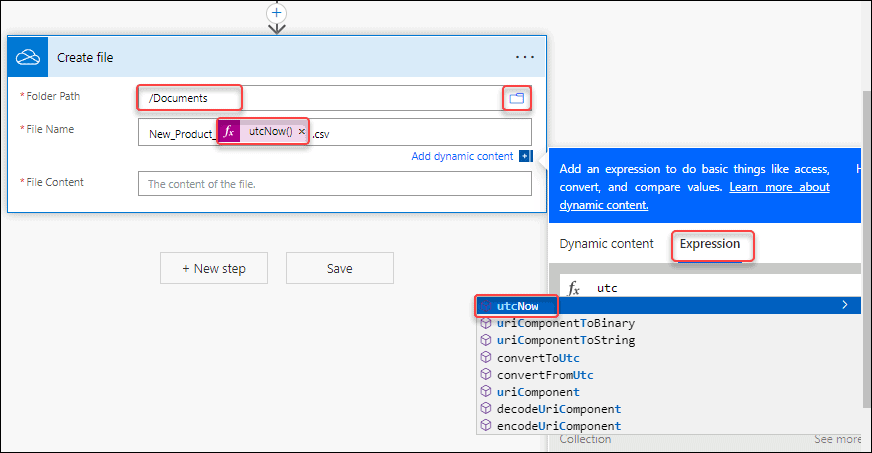
3. File Content = Here, we can use the Output field of the Create CSV table section.
Step – 6:
That’s all there is to do in the flow. The generated flow needs to be saved and tested right away. the procedures listed below:
- Save the flow and then click on the Test button.
- Select Manually and click on Test.
- Click on the Run flow button on the Run flow pane.
- When the flow run is completed, click on the Done button.

Step – 7:
We can tell that the generated flow worked as intended because a successful notification is displayed above the page. Go to OneDrive now, and when we open the specific document or folder path, we can see that a new excel file with the name New_Product_<CurrentDateandTime>.csv has been created, as seen below.

Step – 8:
- The excel file will show up with all the different fields as seen in the illustration below. You might assume that the field has been altered or has vanished from the sheet. But don’t be scared. Because only that sheet will have access to all the dataverse table fields.
- Select Editing from the Viewing panel by clicking on the excel file. Click Convert in the File conversion popup.

Step – 9:
- Next, select the excel table and go to Home -> Choose any table format under the Format As Table section. Check My table has headers and then tap on OK.

When everything is finished, the excel sheet will appear as the table in the image below.
Also Read: How to Upload images to Dataverse from Power Apps
Highlights from Dataverse Specific fields in an Excel table
Let’s say we want to draw attention to or highlight certain Dataverse fields in the excel table sheet. What should we do in that situation, or what are the procedures to follow?
For example, in the Excel sheet below, I wanted to draw attention to two different fields: Product ID (Dataverse Lookup field) and Location (Dataverse Choice field). To do this, follow to the directions below.

- Go to the existing flow and edit it. Expand the Create CSV table action and then Show advanced options.
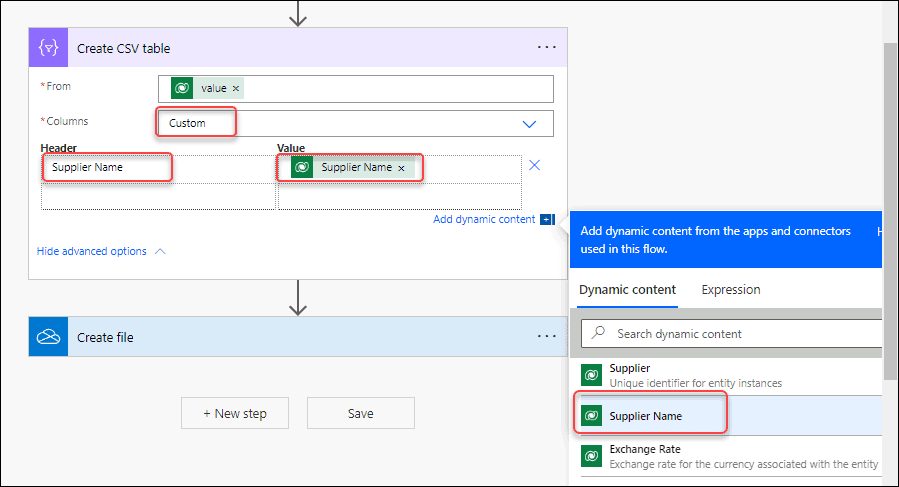
- In the Columns field, choose Custom from the dropdown menu. Two more fields—Header and Value—will show up once we select the Custom option.
- Here, we will add three fields i.e. Supplier Name (Single line of text), Product ID (LookUp), and Location (Choice).
- In the Header section, we can add the text “Supplier Name” and select the Value under the List rows action (under the Dynamic content tab).
2. Next, we will add the lookup field i.e. Product ID. As this one is a lookup, so we cannot add the value directly from the List rows action. Even if we will add also, the value will not appear in the excel table. To workaround with this, we need to follow 2 steps:
- Go to that excel sheet, select the Product ID field and copy the meta data that appears in the formula bar as shown below.
- Next, enter the text as Product ID under the Header section. For the Value, go to the Expression tab and apply the code below:
item()?['_tsinfo_productid_value@OData.Community.Display.V1.FormattedValue']Where,
‘_tsinfo_productid_value@OData.Community.Display.V1.FormattedValue’ = This is the metadata of the Product ID field that is retrieved from the excel sheet. You need to paste here including a single quote. This meta data should apply after the item() function only.
Once everything is completed, click on OK. The lookup field will display as like below.

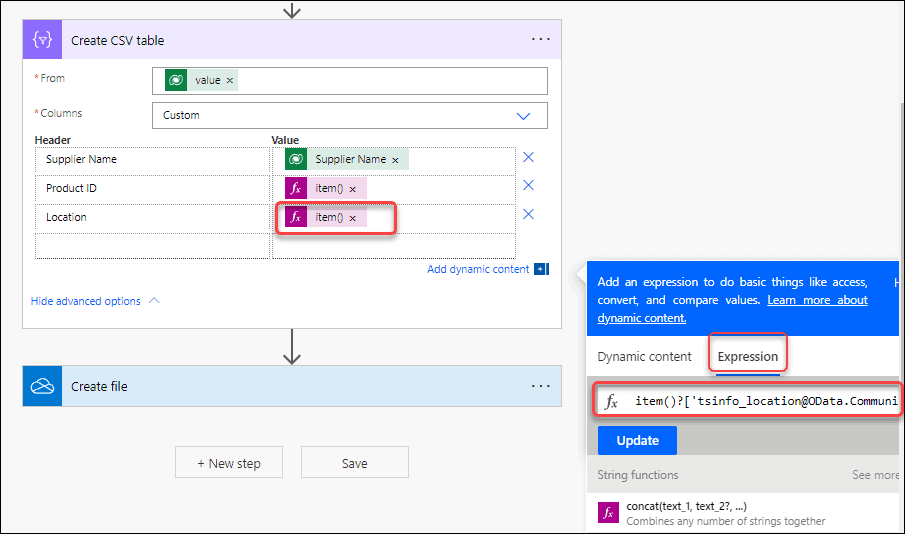
3. The same procedure as above must be followed in order to add the Location field (Choice). We are unable to directly add the value from the List rows action since this column is a choice column. The value won’t show up in the excel table even if we also add.
- Select the Location field from the excel sheet and copy the meta information that shows in the formula bar as shown below to work with this.
tsinfo_location@OData.Community.Display.V1.FormattedValuetsinfo_location@OData.Community.Display.V1.FormattedValue = Metadata of the Location field

- Then, in the Header area, type the text as Location. Apply the following code on the Expression tab for the Value:
item()?['tsinfo_location@OData.Community.Display.V1.FormattedValue']Where,
‘tsinfo_location@OData.Community.Display.V1.FormattedValue’ = This is the Location field’s obtained metadata from the excel sheet. You must paste the entire thing in, including the single quote. This meta information should only be used after the item() method.
Click OK once everything has been finished. The choice field will show up like the example below.
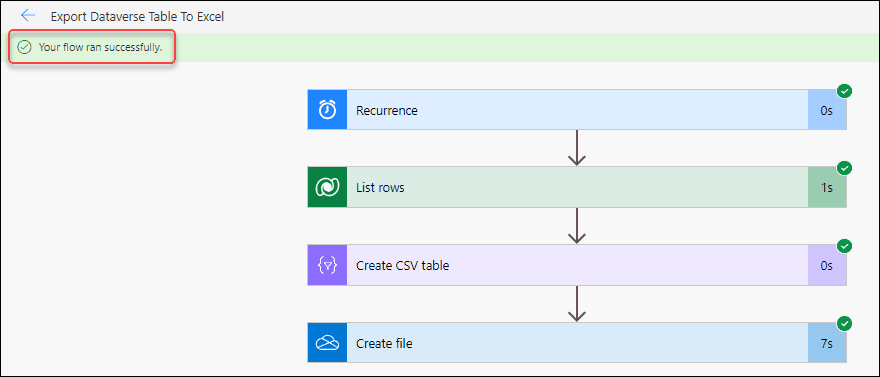
Finally, save, test, and run the flow manually. Because a successful message is presented above the page, we can tell that the produced flow functioned as expected.
Once again, a new excel file with the name New_Product_<CurrentDateandTime>.csv has been created, as can be seen below, when we open the appropriate document or folder path on OneDrive.

Open the excel sheet now, and format it into a table using the instructions above. The highlighted fields will then appear in the sheet, as seen below.
These are the steps to export Dataverse Table to Excel using Power Automate.
Additionally, you may like some more Dataverse tutorials:
- Power Apps Dataverse Yes/No Field
- How To Get Row by ID From Dataverse Table
- Power Apps Different Home Screen Based On Different User
- How To Get Dataverse List Rows Count Using Power Automate
- Power Apps Add Data to Dataverse Table
- How to create and use dataflow in Dataverse
- How to Create Dataverse File Field
- How to Create Dataverse View
- Dataverse Primary Name Column Autonumber
- Delete All Records From Dataverse Table [With Examples]
- How to get data from Dataverse in Power Apps
In this Dataverse tutorial, we will understand how to convert or export a dataverse table to excel sheet using Power Automate, what are the steps we need to follow to achieve it, how to highlight dataverse fields in excel, and many more.
I am Bijay a Microsoft MVP (10 times – My MVP Profile) in SharePoint and have more than 17 years of expertise in SharePoint Online Office 365, SharePoint subscription edition, and SharePoint 2019/2016/2013. Currently working in my own venture TSInfo Technologies a SharePoint development, consulting, and training company. I also run the popular SharePoint website EnjoySharePoint.com